There are two types of floor heating: electric and water. A water circuit is suitable for a country house, but this option cannot be installed in apartments. Installation is prohibited due to the fact that heating is carried out using central heating. Water moving through the pipes cools and is not able to sufficiently heat other apartments in the house.
Pipe laying.
1. Do you need heated floors in the kitchen?
The need for installation is determined by the type of material for finishing the floor:
- Ceramic tiles (the most common option). The surface of the tile is cold. To create comfortable conditions for staying in the room, it is better to organize additional floor heating.
- Laminate. Carpeting or underfloor heating is preferred.
- Natural wood covering or cork. A floor made of natural material is warm enough, so installation of the system is not necessary.
2. Electric heated floor
Installation of heating elements on top of a cement screed.

Covering the floor surface with ceramic tiles.

Pros:
- Does not dry out the air;
- Saving space in the kitchen space (compared to radiators);
- Eco-friendly;
- The heat level can be adjusted;
- Quite a simple way to control;
- Long service life.
Minuses:
- Additional charge for electricity.
Costs for an area of 12 square meters. m:
- Installation of heating mats: about 1600 rubles;
- Installation of a heated floor with a heating cable: from 3,000 rubles;
- Work on supplying power and the cost of installing a device that regulates heat: 250 and 500 rubles.
Determination of electricity consumption
Using simple calculations, we will calculate the maximum energy consumption in a kitchen with an area of 12 square meters. m:
- The heating area is usually about 70% of the total. For calculation we take the value 9 sq. m;
- We fix the power of the installed system: 150 W per square meter. We calculate the total power of the heated floor for the kitchen: 150 W * 9 sq. m = 1.35 kW;
- System operating time: about 6-8 hours a day (the system is always on). Maximum electricity consumption for one day: 8*1.35 kW = 10.8 kW*h.
- Maximum electricity consumption for one month: 10.8 kW*h*30 = 324 kW*h (real figures will be less).
3. Water
Pipes of the floor water heating circuit http://prostory-ukraine.com.ua/teplyiy-pol-vodyanoy/truby

Pros:
- Eco-friendly;
- More economical than electric (about 5-7 times);
- Comfortable heating (70% of heat is transferred due to radiation);
- Does not take up useful kitchen space (compared to radiators).
Minuses:
- Significant installation costs;
- Installation in apartments is prohibited. In some cases, it is possible to officially agree on installation.
Installation cost. The price directly depends on the materials used for the collector, thermal insulation, and system pipes.
An approximate cost guide for installing a water option, taking into account the necessary materials: from $300 or more (for a room of 12 sq. m.).
Photo: kirov-portal.ru, lenstav.sk, norstar.ru, profittings.ru
Tiles for the kitchen are the optimal choice in many respects. The coating is easy to clean, resistant to mechanical stress and has a wide choice of colors and textures. Moreover, it is easy to lay the tiles with your own hands, and the material is affordable. However, despite all the advantages, the floor has one drawback - it is a cold base that requires additional heating. A warm floor will help solve the problem.
The main determining factors for choosing a heated floor

Before choosing and installing a heated floor system, it is necessary to determine the following nuances:
- Typical heating in the house where the system will be installed;
- The presence of an additional heat source in the kitchen or the absence of one (warm floors in this case will be the only heating structure);
- Maximum permissible floor thickness;
- The need for a concrete screed.
Depending on the criteria and their parameters, it will become clear what kind of heated floor in the kitchen is needed: water, electric or infrared. All types of floors can be installed under tiles without the need for specialist services, but each system has its own price, features and characteristics.
Electric floor: characteristics and installation

The presence of good efficiency due to the high heat transfer of the tiled floor, ease of installation, clear functionality and affordable price have brought the electric heating system to the first place. However, there are some features:
- Expensive payment for use;
- It is necessary to raise the floor level, and this is not always possible;
- The elements are installed in a concrete screed whose thickness should be up to 5 cm, which does not add convenience.
The adhesive is applied on top and the tiles are laid. The result is a multilayer structure, including:
- Rough screed of the first floor (base);
- Thermal insulation layer;
- Heating elements;
- Thin screed;
- Adhesive composition;
- Tile.
The disadvantages are some complexity and duration of work, however, all manipulations are carried out by hand, and this pays off the costs. As a result, the user receives a warm coating with high efficiency. Installation process:
- Clean the base (remove the old coating);
- Level the subfloor, if necessary, correct or pour a new cement screed from ready-made materials;
- Lay a layer of thermal insulation with the shiny side up;
- Mount ready-made heating elements in the form of a snail or parallel strips;
- Pour a layer of screed;
- After drying, apply glue and lay the final coating.
Important! You need to be extremely careful when calculating the area and arrangement of furniture in the kitchen. There is no need to heat the floor under the cabinets, this will worsen the heat transfer and, subsequently, damage the furniture.
Water heated floor: characteristic features and installation
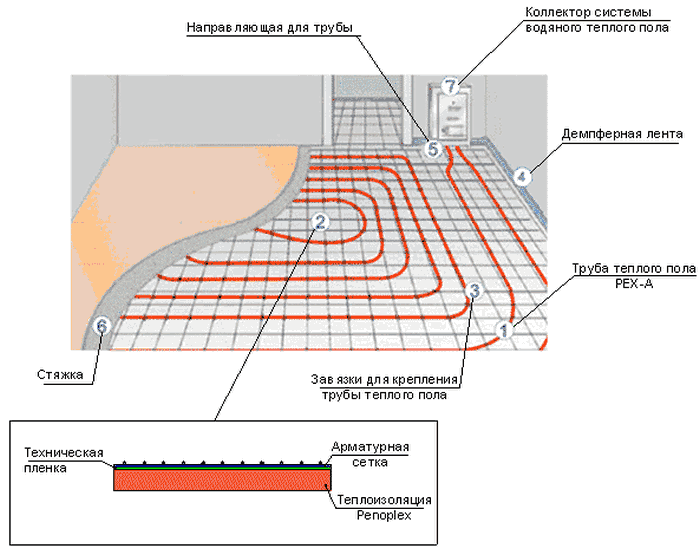
The simplest option that you can install yourself is a water heated floor. Operating through the supply of hot water, the system can be sourced from an autonomous heater or a centralized heating system. However, it is rarely recommended to install a water floor in multi-storey buildings, since the water supply is designed for a certain volume and installation of the system often leads to interruptions, which may not please your neighbors.
Ideal in terms of minimal costs and performance, the floor warms up very evenly, can be installed in an extension or in an extremely limited space, and such a system is inexpensive. But it is important to understand that the design significantly increases the thickness of the floor due to the cement screed. The stages of work are as follows:
- Dismantle the old coating and clean and level the base;
- After the leveling screed has dried, lay a layer of heat insulation with the shiny side up;
- Lay out the pipe system according to the desired pattern, avoiding furniture installation locations, connect to the collector/hot water supply source, as shown in the video;
- Test the system for leaks;
- Fill the structure with a concrete screed made from a ready-made mixture, level the base and let it dry;
- Apply glue and lay out tiles.
A ready-made heated floor in the kitchen under tiles can be equipped with a thermostat and set the ideal temperature, comfortable for living. Another advantage that a water floor has is that it warms up not only the floor itself, but also the air in the room. The minimum operating cost is also important, which makes a water floor most suitable for homes with autonomous heating.
Infrared heated floor under tiles in the kitchen: characteristic features and installation

- This is an almost eternal system that, if installed correctly, will work flawlessly;
- When laying, it does not require a screed, which means it does not raise the floors;
- The flexible film structure is easy to cut and lay in any desired format;
- Do-it-yourself installation does not require special skills;
- The floor is easy to transport;
- Not afraid of dampness, no need for waterproofing;
- If one element fails, the floors will not stop heating;
- Uniform heating will ensure not only a comfortable heated floor in the kitchen, but also good heat exchange of air masses.
There are a huge number of advantages, but there are also disadvantages:
- Do not use metal mesh, foil or other metal-based materials;
- A clear calculation of the area for laying the system is required (but this is in the interests of the buyer);
- Additional material is needed: drywall or glass magnesite;
- High price.
But to work with a film floor under tiles, 70% of the total kitchen area is enough. The stages of work are as follows:
- Dismantle the old covering, level and lay polyform;
- Lay out the film floor in sheets with overlapping edges (fix them with tape);
- Install a thermostat with nearby wiring;
- Install the temperature sensor, placing it directly above the tile and insulate the connection points to the wiring, as shown in the video;
- Check the system for functionality and cover the structure with thin plasterboard;
- Apply the adhesive, lay the tiles and the coating is ready.
There are no particular difficulties in installing the system yourself; the coating is sold ready-made and can be cut into light stripes. No screeds, wet work or long waits for drying - as soon as the glue has dried, you can arrange the furniture and use the coating for as long as you like.
Finally

The presence of good thermal conductivity in ceramic tiles allows you to install any type of underfloor heating system. It is only important to consider the following points:
- Do not install the structure under furniture;
- Apply the final screed or adhesive solution only after checking the system for functionality;
- Allow the mixture to dry completely before starting a new stage of work and after completing it. As a rule, heated floors for tiles are ready in about 1-2 weeks;
- It is better to grout the final coating with flexible mixtures suitable for heated floors.
Today, modern technologies make it possible to constantly improve living conditions for the better.
Warm floors in the kitchen have long been very popular. It creates the necessary coziness and comfort in the room. What else do you need for a place where all family members gather every day?
Advantages and disadvantages
Advantages
Heated flooring is a special room heating system. If necessary, can take on the responsibilities of heating the entire space, replacing the central heating.
It has the following advantages:
- Efficiency . Heating occurs over the entire floor area;
- Safety . Multilayer insulation for electrical option;
- Economical. When necessary, the temperature can be lowered or turned off altogether;
- Special microclimate, allows you to reduce the level of dust and humidity;
- Autonomy. The radiator heating system allows you not to depend on central heating.
Flaws
Like any system, material or product, heated floors in the kitchen have a number of disadvantages that you need to be aware of. For example, for the water heating method there is no possibility of independent temperature control. For the electrical system – additional electricity costs.
Choosing coverage
When choosing the material under which a heated floor will be installed in the kitchen, you need to take into account the features of the space where it will be used. The floor covering must have a number of properties. Strength, fire resistance, durability, moisture resistance, ease of maintenance and non-slip.
Usually they stop at the following materials:
- Tiled;
- Cork;
- Liquid.
Tile
Ceramics are rightfully in high demand among experienced craftsmen, as well as ordinary people. Its resistance to cleaning agents, ultraviolet radiation and mechanical stress is worthy of respect. The tiles are not afraid of moisture, moreover, it is an environmentally friendly material, and the choice of sizes and colors will pleasantly surprise you.
The main disadvantage of tile is its sliding surface, its hardness, which leaves no chance for falling dishes. Without underfloor heating, the tiles will always be cold.
Laying ceramic products will require a level base, meticulous work and professional advice. Tiles of the third level of strength with low porosity are best suited.


Self-leveling coating
Self-leveling flooring is the main competitor of ceramics. It is functional, environmentally friendly, not afraid of moisture, temperature changes, and is also elastic enough so that the dishes remain intact if dropped. Its smooth surface will last about 40 years. The choice of material is quite large.
The main disadvantage is the high cost of future coverage. Do-it-yourself installation is quite difficult.


Cork
This material is derived from the bark of the cork tree. It will give the space a feeling of comfort, retain heat and have a positive effect on health. Its coating does not have allergens, is very environmentally friendly, fireproof, moisture resistant, has soundproofing properties, and does not absorb odors.
The cost of the product may unpleasantly surprise you - this is the main drawback. It is better not to do the installation yourself; entrust it to professionals. If the tightness of the seams is broken, leaking moisture can damage the integrity of the coating.


Choosing a color
How to insulate a kitchen floor while choosing the right material? The choice of products depends on many factors. From the intended design, the intended interior, the size of the space, the presence of children, old people in the house.
Here are some tips:
- Ceramics are suitable for contrasting designs in black and white style;
- Tiles laid in a checkerboard pattern will look more luxurious;
- Cork is the best way to hide imperfections;
- The use of light colors will visually increase the space - dark shades will reduce it;
- For a large room, combined colors or patterns are suitable.
To heat a room, two types of devices are used: electric and water. They differ in the method of driving force, using water or electricity. The effectiveness of underfloor heating lies in the physical ability of warm air to rise from bottom to top. In addition, heated floors are pleasant to the touch.
Preparing the foundation

Regardless of the type of heating, we carry out the necessary work to level the surface. A screed made from a mixture of cement and sand will do this perfectly. Sometimes sand is replaced with screenings, giving the base additional strength.
The resulting solution is contracted by the rule. When pouring in a private home, you will need a pillow. Sprinkle crushed stone, expanded clay or gravel on the ground. We place beacons 100-150 mm less than the length of the rule.
After 3 weeks, after the screed has completely dried, we begin laying pipes and cables.

Installing electric heating
Every electric heating system needs a thermostat. Therefore, we make a place in the floor for it, install it flush with the plane, with thin elements down. The connection is made in parallel. Don't forget to calculate the wiring power.
We mount a metal strip for attaching the cable using a bracket with grooves every 2.5 cm. We fasten the tapes at an interval of 0.5 m.
We place the sensor under the film in a corrugated tube and install a plug. This will allow you to remove it if necessary or if it breaks. We isolate the terminals.
We mount the regulator between the cables and fix it. Only a mixture of sand and cement is suitable for pouring, since sharp pebbles from screenings can damage the insulation.
Penoplex will help as thermal insulation for the space located above the basement. A metal mesh with 2-3 cm cells is useful for installing the cable. It is simply mounted to the grid.
When heated, the glue layer cracks. To avoid this, make the minimum thickness of the screed 3-4 cm above the cable or pipe. The best option is 7-10 cm above the surface. This will allow the base to be heated evenly over the entire area.


After the screed has dried, we conduct a test run of the entire system. After a few days, the concrete base will stabilize and complete heat transfer will occur. Depending on the climate, the average temperature will be 30-40 C.
We install water heating
To install a water floor, similar to the electrical system, we use a screed. We take a metal-plastic pipe without seams with a diameter of 1.6 cm, it is cheaper and stronger than polyethylene.
We strengthen the screed with penoplex, and put a metal mesh on top to secure the pipe. Without reinforcement, we simply lay waterproofing in the form of a film, on which there is polyethylene foam with a 2 mm foil effect layer for heat transfer. Then we mark the path for laying the pipe, onto which we screw the brackets at a distance of 30-40 cm, shortening it at the bends.
We put a 20-30 cm steel spring with a diameter of 2-3 mm on the metal-plastic to avoid creases. If necessary, heating circuits are directed from the boiler to other rooms. The electrical package box is mounted in the wall near the floor. The temperature of the circuits is individually controlled manually.
A low temperature circuit with a condensing boiler is best suited for underfloor heating in the kitchen.
The screed is poured onto the finished pipe after laying the beacons. The required layer, thickness and distance are set by analogy with electric heating.
Video instructions - water heated floor
Do-it-yourself warm floors in the kitchen are a labor-intensive process. If you have a goal, then you will achieve it! The main thing is to choose the material for the flooring, the type of heating and be patient. As a result, any of the listed options will help you save your costs and give warmth to your home.
Part 1. Expanded clay subfloor
Part 2. Pipe installation
Part 3. How to make a screed
A warm floor is not an essential item and at the same time increases energy consumption, and the heating system itself and its installation require investment. The question arises, is a heated floor needed in the kitchen? In our opinion, in many cases it is really necessary and worth the money.
Warm floors in the kitchen are necessary if:
- You are planning and want to equalize the temperature in two parts of the room.
- You want to finish the floor with tiles or laminate while a child lives in the house.
- You and your household love to go barefoot.
- You live above the basement, on the first or second floor.
- If the apartment is not heated well enough.
- Or if you just want to make your kitchen more comfortable.
A warm floor in the kitchen may not be particularly necessary (except in the off-season) if:
- The apartment is well heated, and the floor is covered with cork, linoleum or some kind of wooden covering.
- The kitchen windows face south or southwest, which means that in summer most of the time the room is flooded with sunlight.
- You and your family prefer to walk around the house in slippers.
- There is no and is not planned to have a small child in the house.
So, the main advantage of such a heating system is comfort. Next, we will consider what types of heated floors there are, their pros and cons, and how to minimize the costs of their creation.
Types of electric heated floors
Having decided to install a heated floor, the first thing you need to do is choose a system that is suitable for your case. Electric underfloor heating can operate on the principle of convection (cable underfloor heating) and infrared radiation (film and rod system). Let's take a closer look at all types of electric heated floors.
Cable
In general, cable floor heating can be called outdated, but it is still in demand. Cable underfloor heating can be different: resistive and self-regulating, two- and single-core, shielded and unshielded, with an insulating Teflon or PVC coating, in the form of mats or a separate cable, high-power or low-power.
- Most often, resistive systems with a low-power two-core shielded cable in the form of mats are chosen to heat a kitchen in a city apartment.
To heat cold kitchens, for example, on the veranda of a house or a kitchen with an attached loggia, you should choose a powerful system.
As for the choice of coating, it’s up to you - Teflon coating is more reliable and thinner than PVC, but it increases the cost of the system by 15-20%.
Cable underfloor heating is part of a “pie” with insulation, rough screed and aluminum foil that directs heat into the room. The heating cable is poured with 3-4 cm of cement-sand screed, after which the finishing coating is laid.

Pros: Can be installed under any floor covering, including tiles.
- Since the cable system is laid directly into the concrete screed, it is available only to those who plan to carry out major repairs.
- Another drawback is that if one section of the cable breaks, the entire system will fail.
- Cable heated floors can only be installed where there will be no heavy furniture, for example, a kitchen set or a sofa. Otherwise, the cable will overheat at pressure points and eventually burn out.
- Several times greater heat loss compared to infrared heating systems. In this case, the heat rises to the ceiling and “accumulates” there. This means that most of the energy is wasted uselessly.
- Consumes more electricity than infrared film or rod heated floors.
Detailed instructions for laying a cable heating mat with your own hands are presented in the following video:
Film
Film floors themselves are classified according to the materials used for the film. It could be:
- Bimetallic connection based on aluminum or copper.
- Carbon film with copper and carbon elements.

- It is spread directly under the covering (linoleum, laminate, parquet) without screed. This means that there is no need to raise the floor level and carry out major repairs.
- Saves up to 20% of electricity consumption.
- Due to the parallel connection of the heating elements, failure of one section does not lead to failure of the entire system.
- Film heated floors are intended only for “dry” installation.
- Film flooring is not suitable for installation under tiles.
- It can only be installed where there will be no heavy furniture (due to the risk of overheating).

Rod (carbon)
This is another type of infrared heated floor, which consists of mats with carbon rods connected to each other by copper cables.

Rod infrared floors come in standard and high power. Powerful heated floors are designed for heating cold rooms, for example, attached loggias, verandas or those located above the basement or on the ground floor of the building. Standard power floors are suitable for all other rooms.

- This heating system is suitable for any surface, from tiles to linoleum.
- Distributes heat evenly, saving up to 60% of energy consumption.
- The rod heated floor is self-regulating, which also significantly saves energy (areas under furniture automatically heat up less, and areas near the window or exit to the balcony are more heated).
- Mats with carbon rods are durable (Unimat floors come with a 20-year warranty).
- Does not fail if one of the sections breaks down (due to parallel connection of heating elements).
- Heat loss is several times less compared to cable floors.
- The system heats up quickly - in about 2-3 minutes.
- Installing an infrared rod system does not add much thickness to the floor. When finished, its thickness can be only 3 cm.
- This is the only type of heated floors on which you can place heavy furniture without fear of overheating.
- Requires major repairs, as it is laid according to the “wet principle”.
- You can lay a carbon heated floor with your own hands, but it is better to entrust the installation to professionals, since the rods are very thin and fragile.
- You might end up with a fake.

How to install a carbon heated floor with your own hands, see the following video from the manufacturer Unimat.
Heated floors are not a luxury, but banal convenience and comfort. Agree, it’s nice when the house is warm and when it is not somewhere under the ceiling, but rising up, warms the legs and the whole body of a person. This is exactly the effect that heated floors have - the room warms up not only in its upper part, but throughout its entire volume.. We will understand its feasibility in this room, study its advantages and disadvantages, and also decide on the choice of the floor heating system itself.
How to make a heated floor in the kitchen photo
Warm floors in the kitchen: the benefits of using them
Most people believe that a heated floor is just a comfort, thanks to which you can walk barefoot at home and not worry about getting sick. In fact, this is a little different - there are situations that simply dictate the installation of underfloor heating instead of traditional radiators. There can be many such situations, but the most common of them are the following points.
- The so-called, whose tasks include the efficient use of kitchen space. By covering the battery under the window with a tabletop and forcing it into cabinets, you reduce the efficiency of its use to almost zero. Yes, you can make technological holes in the countertop and cabinets for air convection, but this is not aesthetically pleasing and ineffective. Usually in such situations the battery is moved to another wall, where it also interferes with something. This is where people remember this method of heating a room, such as a heated floor - here is your first answer to the question, do you need a heated floor in the kitchen?
- The second answer to this simple question is the situation with redevelopment, when the kitchen is either expanded at the expense of the adjacent kitchen, or it is completely moved there. Whatever one may say, after such a redevelopment the battery turns out to be out of place in its original location. Should I move it to another place? According to all legislation, changing engineering systems, and even more so moving the battery onto the balcony, is a gross violation. And where should it be moved, to the other side of the former window sill, where it would also be out of place? The solution is simple - the radiator is removed, the riser is hidden in the wall (no one forbids doing this), and instead of it, a warm floor is installed both on the balcony and in the old kitchen area.
- Another example of the advisability of using heated floors concerns private houses and apartments with individual heating. When making a heating system during the renovation process, it would be simply unreasonable to lose sight of this heating method. Essentially, you turn the floor of your home into one large heating device that warms the room from floor to ceiling - it’s hard to imagine a more efficient heating system.
You can see how to install heated floors in the kitchen in this video.
Well, now as for the shortcomings - by and large, there is only one, and even then, one might say, insignificant. This is the energy consumption of a heated floor, which will increase by thirty percent - it is for this reason that when making a verdict whether or not to have a heated floor in the kitchen, you need to carefully weigh everything. It should be understood that after its installation you will have to pay more for heat - you will need to pay bills for both standard heating and for this small innovation. Perhaps you need to think about giving up some of them. Well, in general, it’s up to you to decide - many people install heated floors in the kitchen under the tiles, simply out of a desire to follow fashion or because they just want it.
What to make a heated floor in the kitchen from: choosing the right system
It's no secret that today there are three main floor heating systems - a water heated floor powered by a heating system, cable electric and thin-film heated floors, which are presented on our market in two versions (with electric heating cables and infrared emitters ). Such a number of systems were developed for a reason - each of them is capable of solving the problems of floor heating in certain conditions, which we will deal with further, studying the question of what kind of heated floor to make in the kitchen. Let's start in order.
- Water heated floor. There is no need to talk much about the advisability of installing it in an apartment with central heating - no matter how much you want, you will not be able to do it. Not for technical reasons, but only because it is not allowed. That is why, if your apartment is not equipped with an individual heating system, you can forget about this type of floor heating - let’s say this is the priority of private houses that have their own heating. Such a floor heating system is installed at the stage of manufacturing the floor screed - first, foam plastic is laid on the existing base, which, in turn, is covered with a layer of reflective thermal insulation. Then the reinforcing mesh is laid, followed by pipes that are filled with a special composition of screed. During the process of pouring the screed, an expansion joint is made around the perimeter of the room, which is necessary to expand the floor during the process of heating it. This seam compensates for temperature deformations.

What to make a heated floor from in the kitchen photo
- Electric cable heated floor. This is a more versatile option that is suitable in almost all situations. Like a water heated floor in the kitchen with your own hands, it is mounted either into a screed (if it will later be covered with carpet or carpet) or directly on it, if tiles will be laid on top. The only limitation in the scope of application of such floor heating systems can be the lack of electricity in the house as such. Such floor heating systems consume a lot of energy, but there are still opportunities to reduce its consumption. Each, without exception, electric underfloor heating system is equipped with a thermostat - they are different, but among them there are programmable devices that allow you to turn on the heated floor only when a person really needs its services. Let's just say that with the help of a programmable thermostat, you can set hourly operation of the heated floor throughout the week - and this is at least fifty percent (if not more) savings in electrical energy.

Warm floor in the kitchen under tiles photo
- Film heated floor. Its whole feature lies in the thickness of the film, which allows it to be laid under floor coverings directly on the existing screed - it allows you to create a floor heating system without having to redo the base. Moreover, film heated floors can be easily laid on a wooden base. Essentially, you remove the old floor covering, lay down a heat reflective screen, then a heating film on top of it, which in turn lays the floor covering on top. The only exceptions are those that are glued to the base. If we are talking about linoleum, then the heated film floor must be covered with thin sheets of fiberboard.

Warm floor in the kitchen photo
As you can see, all three of these underfloor heating systems in some way complement each other - where it is impossible to use one of them, you can definitely use the other. As you understand, this is the very first and, one might say, main criterion for choosing a heated floor for the kitchen. Well, then see for yourself - if there are options, then, naturally, it is better to give preference to the more economical option. As for safety, each of the systems described above is completely safe for humans (if, in the process of deciding how to make a heated floor in the kitchen, the rules for installing the system were followed).
And to conclude the topic, a few words about installing heated floors in the kitchen yourself. They are not very difficult to install - in fact, this is a construction set for adults, especially when it comes to electrical systems. To assemble it, you just need to correctly connect together its three parts - heating elements, thermostat and temperature sensor. You can watch all this in the video attached above.


