Installing the plastic window is made by level - this is a mandatory requirement. The level alignment is carried out in three planes, as shown in the following figure:
Establish and fasten the window in the door perfectly exactly in terms of the level, it is necessary to confess, not so simple, even despite the correct geometry of PVC products and scarpurality in the work. It is not by chance that the permissible value of the deviation (error) of the mounted window from the level is determined in the GUTA: not more than 1.5 mm per 1 m length and not more than 3 mm on the entire height of the product. There is also a difference between the dimensions of the diagonals of the window frame (AB and CD in the figure above) - no more than 8 mm.
Before starting directly to install the frame in the opening, it is necessary:
- prepare a perforator with a bromide diameter of 10 mm and a 200 mm working length, a level, roulette, hammer and knife;
- prepare anchor and several wooden bars of centimeters long for ten, drilled, for example, from the nicknames of the dismantled window;
- stick psyl on the street side of the frame over the entire contour, except for the bottom edge (letter P). The cops are attached to the adhesive layer (hidden by a paper strip) along the edge of the frame without pulling. The tape before sticking should be cut into three pieces along the length of the side of the window box with a small allowance of 10 - 15 mm to ensure a dense bumping of these pieces through the corners. Installing the tape with one continuous piece with the inflection in the corners is not allowed. After sticking the case, it is advisable to immediately begin the installation of the frame in the opening, otherwise the tape will gradually expand to the maximum size and will interfere with the installation.
We begin with the fact that we put two bar in the corners of the turn closer to a quarter and put on them a window frame. At this point, it is important not to confuse the top and bottom of the frame, i.e. Do not put the window upside down (in fuss and this is possible!). It is possible to determine the top and bottom possible by loop on the frame (the upper loop is constructively different from the bottom, in particular, the presence of removing pin) or by drainage holes that should be at the bottom.
Frame before starting to mount on an anchor, follows:
- properly put in the opening in depth;
- lift to the desired height;
- align horizontally.
Exhibit the window in the depth of the day
The plastic window must be headed deep from the external (outdoor) edge of the wall at least than 1/3 of its thickness - in töplu zone. For example, a wall panel house It has a thickness of about 350 mm, therefore the position of the window in this case will be correct if the distance from the outer edge of the wall to the outer edge of the frame will be no less 100 mm. You should also take into account the gap between the window and the quarter, which, firstly, should not be zero (the frame should not concern or a quarter nor the walls of the goat, to avoid freezing) and, secondly, should not be more than 35 mm, otherwise After a complete expansion (40 mm), it will not be able to completely overlap it.
Thus, to eliminate the freezing and fogging, it is necessary to "tighten" the window to 1/3 of the wall. At the same time, it is necessary not to miss the gap between the window and the quarter: it should not be more than 35 mm so that it is able to overlap the psyl tape. In principle, in panel house With a wall thickness of 350 mm, if you make gaps between the window and the quarter in the range of 20-30 mm, the window automatically It turns out just in the desired (warm) zone of the work.
To find the desired position of the window in the depth of the day, we attach the level to one of the lateral sides of the frame (see in the figure above - "vertical leveling")) and, holding this edge of the window vertically, move it to a quarter so that it turns out between the frame and the quarter Average gap 20 mm, but not more than 35 mm. It is desirable that in the narrowest place this gap was at least 10 mm, because the psyms at expansion quite strongly "squeezes" the frame from a quarter and in narrow places can "knock down" it from the vertical level even after tightening anchors.
The found position of the window must be remembered, and it is better to fix in the numbers on paper, for which, holding the frame in a vertical position (so that the frame does not swing, you can substitute on the gap on the top of the suitable thickness bar), Make two measurements: at the top - between the frame and external edge wall ( AB in the figure), then below - between the frame and internal edge wall ( CD on the picture). The same procedure should be done with the second side of the window and compare the obtained values.

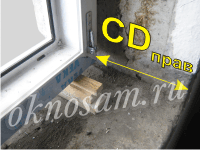
For the construction rules, all windows in the building should be aligned along the facade line, i.e. on the outer edge of the wall, so it is desirable to the distances AB Lev. and AB right It turned out the same. It is likely that at the same time the bottom distances CD Lev. and CD rights They do not coincide (we have such walls). And their equality would be desirable for proper Installation windowsill. The fact is that the edge of the windowsill should be parallel to the window plane, and if CD Lev. and CD rights They will not be equal, respectively, the windowsill will not be unequal from the wall on the left and right. If the difference is small (no more than a pair of centimeters), then in order of exception, you can lean a little from the rules and slightly, literally into several millimeters, deviate from the plane of the facade, aligning the window relative to the inner wall plane. If it is not enough, then for the sake of parallelism of the inner edge of the wall and the windowsill, it will be possible to install it (the windowsill) is not strictly parallel to the window, but a little "trapezoidal" (preferably with minimal overcast, not more than 10 mm, otherwise it will rush into the eyes, especially when the windowsill is narrow). Of course, in your particular situation, you yourself decide how it is better to orient the window, but once again remind you that the priority reference point for the competent installation of windows is the line of the facade.
Exhibit a window in height
Selecting the bars (support pads) of different thicknesses, it is necessary to raise the window to such a height so that the following conditions are followed:
- under the window from the street side, it would be possible to bring a tide with the possibility to tilt it for water drain (it was tiltand not to proceed through the bottom quarter);
- the lower gap between the window and the opening should be at least 35 mm so that from the side of the room it was possible to bring the windowsill window and the sufficient gap for gate remains;
- in the presence of external mounts of the mosquito net, the upper mounting corners should not hide under a quarter;
- the upper mounted gap between the window and the opening should be at least 20 mm.
Of course, the fulfillment of all these conditions is possible only in the case of proper measurement Windows (see "Window Measurement" section). If the measure was made incorrectly, then remake ready plastic window It will be impossible and will have to either expand the ability (very unwanted procedure), or if the window turned out to be small, spend a lot of foam on too big gaps and eventually be content with the window with a lumen less than it would be possible in this work.
Align the window horizontally
Raising the window to the desired height, simultaneously should align it horizontally using a level. This is done elementary substitution under the corners of the window of wooden bars of a suitable thickness. It is for this that a knife and hammer can be useful, with which it is convenient to split thick bars to pieces of suitable sizes. During these actions, it is necessary to ensure that the distances are not shot down CD In the corners of the window.
Level should be installed on both half of the window (see above to monitor the leveling of the bottom profile across the entire width of the window. The fact is that the middle of the frame in the absence of a support can sign from its own weight, or the bottom profile may be slightly (within allowable limits) bent Due to the incorrect length of the impost. Therefore, firstly, it is desirable to substitute another reference bar - under the middle of the window (opposite the imposput), secondly, in case the profile is bent due to the imposteral and the ideal leveling across the entire width to install It turns out, it is necessary to set the window so that its left and right halves have the same error in the horizontal (mirror, of course). In this case, the extreme points of the lower profile of the frame should be on the same horizontal line.
The most accurate result can be achieved using the hydroelectric system, but such supercount is not put before us. The main thing is that it is necessary to achieve when installing is not to distort the geometry of the window, i.e. Save it the correct rectangular shape, as well as position all four corners of the frame in one plane, without tightening the window with a screw. It is for the sake of this main goal and use an indispensable construction tool - level. After all, by installing the window strictly horizontally and vertically, we automatically task it the most rectangular shape, which is required. And small errors in alignment of the frame will not create serious problems And it is unlikely to be noticeable with the naked eye. But the skewers above the allowable can entail the wrong operation of the shut-off fittings, a loose fit of the sash, the incomprehension of the window contour with the inner circuit of the window frame and even cracking the glass due to the bending of the package.
By installing the window horizontally, it is necessary to check the lower and upper gaps again, and also make sure that the upper fasteners of the mosquito (if available) are below the edges of the quarter. After that, you can proceed to drilling holes and fastening the frame by anchors.
Fastening Rama
There is no strict sequence of drilling holes, but for convenience I suggest starting from the bottom side, let's say, on the left side, then go to the upper side (also left) and in a similar sequence (bottom-top) fasten the right side. After the window is fixed in the corners, you can install the remaining anchor in an arbitrary sequence.
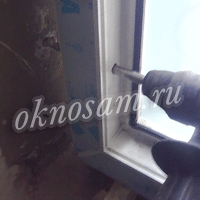
So, start from the bottom left corner. To start checking the distance CD Lev.. So that when drilling the window angle has not shifted from this position, I recommend to insert a suitable size into the gap between the quarter and the frame opposite the drilled hole and press this part of the window to a quarter during drilling. This technique is especially useful when you have to drill the wall with an uneven surface. Drilling is carried out directly through the frame through the holes done in advance (see to the right of the top photo). Insert a perforator into the hole on the frame should be carefully so as not to scratch the profile surface. The depth of the gunned hole in the amount with a thickness of the profile and the mounting gap should slightly exceed the length of the anchor. In other words, it is better for all the existing length of the bora, while trying not to damage the head of the perforator a sealing gum on the frame. The anchor is immediately inserted into the hole immediately (across the frame, of course), but immediately does not achieve to the end (the hat does not reach the profile of about 20-30 mm) and is not delayed.
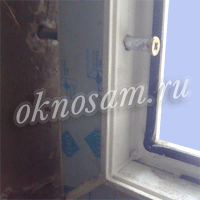
Now the left side of the window must be installed vertically by level (see above) and in this position you drown a hole for the upper side anchor. In order for the window during drilling, it is not hampered from the level, we substitute the bar, as they did in the bottom corner. By installing an anchor, you also do not finish it and not tighten it.
Go to the right side. We start from below, checking the distance first CD rights. Similar to the left side, we set the lower and upper anchor, without finishing them to the end, and then proceed to align the diagonals of the window.
This is done as follows:
Now you need to check whether the side sides of the frame are vertically (see). If there is a small (no more than 3 mm all height) deviation, and it is equally on both sides (i.e. the frame is not spinning with a screw), then you can leave as it is. Otherwise, you will have to adjust the level, bending one or two anchors to the desired side. Such an operation is dangerous in that with a significant bending anchor "twists" the profile of the frame, which leads to a delicate closure of the sash. With a small bend, this will not happen, but "disfigured" in this way anchor, if you suddenly need it, it will be difficult to unscrew or spinning. However, in some cases, this method is simpler and painless than reinstalling anchor anew.
Now that the window is fixed in the corners and is set up by level, set the remaining anchor, and immediately finish them to finish and drag it. When tightening the upper and lower anchors, be sure to control the horizontal level. By installing the average side anchor, we substitute next to them under the edge of the frame temporary wooden struts, as mentioned above, to align the side sides into a straight line. The accuracy of such an alignment can be checked by applying it to the profile above and below the side anchor and achieving the same testimony. In completion, it will be possible to measure the roulette width of the window in the middle, at the top and bottom: everything should be equally. Brokes on the sides can be removed after the gap will be stamped and the foam fully solids. The remaining cavity bars must be fill in foam.
If the installation of the seam from the side of the room is decided to close the vapor insulating tape, then it is necessary to take into account the following: the ribbon is glued to the frame before Switching seam, and to the wall - right after Fatings. In this case, the spacer bars on the sides will interfere with the installation of the tape. We'll have to tinker a little and install instead of bars inside the gap hidden struts (simply sticks with a pencil thickness) - beside with anchors. These struts should not be removed, they can be easily applied from all sides. They will not interfere with the installation of vapor barrier tape. The main thing is that they are compact and in no way be over the edge of the frame from the outside, otherwise there will be no foam before them (from the street), which will cause the appearance bridge cold in this place. In any case, in the area of \u200b\u200blateral anchors, it is better to establish exactly hidden The struts, because due to the bar, simply substituted under the edge of the frame, when tightening the anchor, the "twisting" of the middle part of the side profile will occur, which will lead to a loose closing of the sash.
The lower bars after installing anchors unambiguously need to be removed and replaced with compact supports (simply wooden legs with a cross section of no more than 20x20 mm, as in the following figure) like the struts from side anchors.
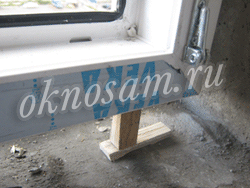
Such supports must be under the angles of the frame and under the impose, so they will need 3 pieces for a 2-fold window. By the way, if during drilling and installing anchors, the window has a little bit from a horizontal level, now it can be fixed, picking up the supports of the desired height. Pay attention to one important moment: Stands should be lackless and stand under the axial line of the profile, so that they do not interfere with the installation of vapor barrier and window sill, and outside the space fill in front of them remained in front of them. Note, the small lump of a small panel is placed in the figure under a wooden leg. It has a wedge form, which makes it easy to adjust the overall height of the stand in small limits.
The first stage of the window installation can be considered completed. Frame is exhibited and fixed. Now, while the window is not collected (the glass is not inserted and the sash is not inspired), it's time to do outdoor finish: Install the tide and decorative cornerswhat will come about


