Marina Rudich

The Day of Knowledge is approaching. A special day for everyone. Future schoolchildren will join the group on Monday. They will go to preschool education for another year, gain knowledge, and then take their places at school desks. " September There will be a festive lineup, competitions and dancing.
Every time to 1 September senior groups festively arrange group rooms. This time we are again decorated the windows in the dressing room bright vytynanka on a school theme.
Having prepared the templates and armed with sharp scissors, we cut out vytynanka. We cut them out of white and tinted paper so that they could be seen from the second floor.
For window decoration we cut out future schoolchildren


stack of books

Bell

Alarm clock and pencils

Several bright autumn leaves

Then they began decorate windows.

On one window Placed two schoolchildren and books, glued autumn leaves and bright pencils above them

On the second window we also have schoolchildren

surrounded by pencils.
While we were cooking vytynanka, the pupils looked at them with interest, saying that they were ready to go to school so that they could quickly buy a backpack and uniform.
The windows turned out bright, the pupils looked at them with interest and asked their parents to send them to school or buy a backpack.


Hello, dear readers! Today we have a school theme, namely, I will tell you about the design of the board for September 1st.
Knowledge Day is always a hassle: you need to figure out what flowers, or maybe a gift, to give to the teacher, get your child ready for school and, of course, decorate the classroom. After all, children will probably enjoy a festive classroom more than a standard office with desks, chairs and without a single hint of a holiday. Everything must be done to ensure that children are interested in learning, and a well-spent September 1 will be the basis for an excellent start to the school year.
Design of the school board for September 1
Let's take a closer look at the options for decorating a school board - perhaps the main detail of any educational institution, without which it is simply unthinkable to imagine the learning process.
Decor ideas for 1st grade
The youngest visitors to the school are first-graders. The design of a school board and classroom for them should be approached with special responsibility and a great desire to please the kids. In kindergarten they often had holidays, walks, toys, and they would simply be bored in a gray office.
If kids come to a festive, beautifully decorated classroom, this will certainly lift their spirits and awaken (stimulate) interest in the further educational process. There are a lot of ideas for decorating a board; you can search online or use your imagination and do it all yourself. I offer you several options for designing a board for Knowledge Day:
Decoration with bows, balls and maple leaves. Your little one will love this board decoration.
To apply you will need:
- balls;
- You can draw templates (bows, leaves, rowan berries) yourself.

Download ready-made templates
If one of the parents is good at drawing, you can ask him to decorate the school board beautifully. For example, you can depict your children’s favorite cartoon characters and add a school theme. First graders are still inspired by the atmosphere of a fairy tale, so this decor is a win-win option.
Decoration with balloons. All decorations for September 1 are based on flowers and balls. Today, many different shapes are made from balls. Starting from flowers and ending with cars. I suggest you take a look at an interesting option - balloon men with balloons in their hands. You can order them from a holiday agency, or you can try to make them yourself. Kids will really like these figures; they can be placed on both sides of the board, and the board itself can be decorated with beautiful themed stencils and holiday greetings.
The figures can symbolize a diligent student or student, or depict one of the popular fairy-tale characters, for example, Pinocchio.

Another idea for decorating with balloons that will not leave any child indifferent. A standard classroom immediately turns in the imagination of children into an exotic, distant land, where palm trees grow and funny monkeys have fun.

Simple ideas
You don’t always have money for expensive classroom decoration, so I offer you several basic options for decorating a school board, which will entail a minimum of costs, but the children will definitely like it.
The first is a simple and interesting option. You will need:
- White paper;
- scotch;
- balls;
- Printer;
- scissors.
We inflate several balloons and hang them on the board. We draw (can be downloaded on the Internet) a boy and a girl, flowers, the number 1 and letters. Cut everything out and glue it onto the board. We print out the congratulatory verse and add it there. The inscription may be different, for example, “hello school”, “happy knowledge day” and other phrases suitable for the topic.
This cute little train will definitely make children happy. We also download it from the Internet, print it out, cut it out and pin it on the board. We also glue a “Hello School” poster and a bell there. Then we cut out the clouds on which we write wishes for the young students.

You can make such flowers yourself and decorate the board. There are only a few of them in the photo, but if you make them in large quantities and cover almost the entire board, then the kids will love this decoration.

The beauty, made as in the photo, will definitely appeal to children in grades 2 and 3. After all, they also like cartoon characters and already know how to read. Each child will curiously look for where his name is hidden on the board.

You can draw a book with chalk on a blackboard and glue a lot of butterflies around it. They can be made from simple colored paper. It's very easy to do and looks incredibly beautiful.

Unusual design ideas

Making a sun out of balloons
We will need:
- yellow balls No. 16;
- modeling balls (SDM) No. 260 (2 pcs.);
- ball trim;
- 2 shades of yellow balls No. 5;
- pump;
- high float (for processing balls);
- sticker (eyes, mouth).

We make a knot from the scraps of the balloon, insert it into a 16-inch balloon and inflate our balloon to a round shape.
We tie two long balls for modeling and when tying our ball, we insert them into the knot.
We catch the knot that we previously dropped into the ball and twist it.
We take one of the oblong balls, stretch it, wrap it around a knot and tie a knot with a small remainder. After this, we do the same with the second modeling ball.
Let's start with the rays, take balls No. 5, treat them with high float, because... we will twist them. We take the pump, calibrate it to 1.5 strokes and pump up each ray. Now we take the ball, give it an oblong shape and twist it ¼ from the top. Now we twist this small circle in half. We do the same with the rest of the small balls.
Let's start adding rays to the sun. We take small balls and twist them using the modeling balls attached to the sun earlier. Alternates shades of yellow through one. When we are done with the rays, we glue on the eyes and mouth. Our beautiful sunshine is ready.
Balloon flower
We will need:
- several blue ShDM No. 160;
- small flower made of white balls No. 10;
- one ball No. 5 yellow.

We inflate the blue balloons with helium, and the white and yellow balloons using a regular pump. We tie five large blue balls together, connecting a combination of 2 and 3 balls to each other and placing them in the same plane.
We do the same with five small white balls (we connect a set of 2 and 3 balls, respectively, to each other). Place a bunch of white balls on top of the center of the blue balls. We securely tie the blue balls to the white ones with a ribbon several times, passing in a circle.
We twist the yellow five-ball in half and place the middle between the white and blue balls. This must be done so that the yellow ball, on one side, looks like the core of a flower, and on the other, it is securely fixed in the composition and allows you to attach a stem to it. We tie the inflated leg of the green ball to the back of the flower, securing it to the thickening of the yellow ball.
You can keep the process simple and make a flower using only large helium balloons and a stem ball.
We will need 5 large blue balls and one white (No. 10). You also need a green ball to act as a flower stem. An important detail - when pumping up the white ball, you need to pump it 3 times and tie it so that the tail is as large as possible. We twist the white ball in the middle and catch it between the balls. We return the tail back and twist it together, then lower it down. On the back side there is a place to attach the tail, and on the front there is a white center. We attach the stem according to the previous diagram. The flower is ready!
I hope these ideas will help you turn your classroom into a fabulous place where children will feel fun and comfortable. Don't forget to subscribe to the blog, share the material with friends and on social networks. And with this I say goodbye to you, see you soon!
Sincerely, Anastasia Skoracheva
This is not just the day when another school year begins, it is a small holiday for parents, students and teachers.
For any celebration, including this day, it is worth preparing in advance. And all participants in the educational process are preparing for it: parents, teachers, and students, especially first-graders. Parents choose briefcases, stationery and school clothes for their children, teachers draw up scripts for the ceremony and class hours. Pupils are sorting out their brand new school supplies - they don’t want to forget anything.
But the feeling of the holiday will not be complete without creating an appropriate festive atmosphere - the design of the school and classrooms. The design of the school and the decoration of the classroom for September 1 will be discussed further. We will consider the most budget options that do not require the invitation of specialist designers.
Window decoration
Decorating the school for September 1 should start with the windows. They will be the first to be noticed by everyone heading to the line. By decorating the window glass, you will give a small piece of the holiday even to those who will only pass by your educational institution on this day.
You can decorate the windows with applications from colored paper: cut out all kinds of suns, flowers, palms. Windows decorated with multi-colored letters, numbers, and figures will look interesting.
Painting windows with paints will not only create a festive mood, but will also immerse you in a kind of fairy-tale atmosphere. The main thing is to remember that the colors should be bright, rich, and compatible with each other.

School corridor decoration
School corridors require special attention, because they are the first to greet schoolchildren, and they are the ones who should set the right festive mood.
Decorating a school with balloons is the most winning option. You can make balloon arches and place them at the school entrance. “Air fountains” will look original if placed near office doors.
Making a garland with your own hands is not at all difficult. To do this you will need balls, a pump (or several people as “pumpers”) and fishing line. The balloons are inflated: the main thing is not to overinflate them, otherwise they will very quickly lose their shape. The balls are tied first into twos, then the twos into fours, and the fours are strung on a fishing line. The ends of the garland must be secured.
You can also decorate the walls with various thematic wall newspapers and paper garlands; you can make colored flags from fabric and combine them into a single composition, similar to a garland of balloons. Moreover, this option is ideal for the long term, because fabric products can be easily washed, ironed and restored, which means that you can not only use them in school decorations for September 1, but they will also serve as decoration for other holidays.

Decoration of the hall for September 1
How to decorate the assembly hall on September 1? Of course, with balls! This decoration has long become traditional for decorating large rooms for any celebration.
On September 1, you can use balloons to make a symbol of the first bell - a bell, funny people - children-students who came to the holiday. These are perhaps the most complex design elements of all those presented in this article. But if you already have some balloon modeling skills, then making these crafts will not be so difficult for you, especially if you use numerous master classes as a model, which can be found on the pages of thematic websites.
Yes, even simply framing the stage with balloons will create a festive mood, and such decoration does not require any special knowledge at all - just a little imagination and creative mood.

Class decoration for September 1
It will be more convenient to decorate the classroom by September 1 by highlighting several zones: the blackboard, desks and chairs, walls and a classroom corner. For each of these zones, you can choose your own highlights, but you must not forget about the overall composition.
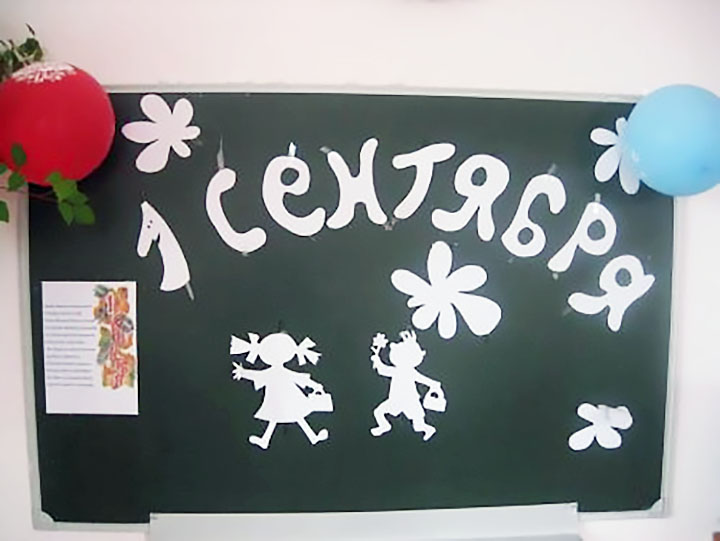
Design of the board for September 1
The board is the most important element in every classroom; it instantly attracts all attention, so when decorating, forgetting about it is not only impossible, but unacceptable. What is the best way to design a board for September 1?
The easiest option is to make all kinds of drawings with colored chalk. But this can only be used if there is a person nearby who knows how to draw beautifully. Most importantly, the drawings should be bright, cheerful and school themed.
Decorating the board with corrugated paper figures, balloons, paper garlands or letters looks more advantageous.


Desks and chairs
When decorating a classroom for September 1st with your own hands, it is worth remembering that this is being done, first of all, for children, so you must decorate every desk or chair. Small gifts for students will successfully cope with this task. This could be a flower knitted from balloons (you can make them yourself), or a small souvenir assembled from stationery. Well, if you don’t have the energy, time and imagination, then you can simply tie a balloon inflated with helium to each chair.

Walls and cool corner
What classroom decoration for September 1 is complete without wall decoration? This is where designers can show all their creative abilities.
One of the elementary ways to decorate walls is with the same paper garlands. You can do them yourself, it won’t take much work, it all depends on the availability of time.
For the simplest garland you need: sheets of colored paper or A4 sheets, with printed color drawings, scissors and fishing line. And then there are 2 ways to create:
- Large triangles are cut out of paper, the upper part of which is bent so that they can be hung on a fishing line stretched on walls or windows
- Diamonds or large rectangles are cut out of paper, which are then folded in half and hung on a fishing line. This option is more convenient because this way the garland turns out to be double-sided, and its elements are more securely fixed to the fishing line.
You can stick letters on the elements of the paper garland and create welcoming or congratulatory phrases, for example: “Hello, school!”, “Happy Knowledge Day!”

Don’t forget about decorating the classroom with balloons, because this is the fastest way to create a festive atmosphere. You don’t need to limit yourself to garlands of balloons; you can try to make unusual figures: a class number or a panel.
Walls decorated with balloon flowers look very beautiful. To create a flower you need only 5 balls, four of which are the petals, the fifth is the core.
A cool corner on September 1 should be decorated with a bright festive wall newspaper. This could be a congratulatory poster or information leaflet covering the history of the Knowledge Day holiday. A photo report about the past years of education of the children in the class being designed will definitely attract the attention of children and adults. You can also decorate a cool corner with themed folders.

Vinyl stickers for classroom decoration for September 1
Recently, vinyl stickers have become especially popular in wall decoration. They are easy to apply and just as easy to remove from almost any surface. But you can place them not only on walls. They will look great on window panes, on a chalkboard, and on a classroom door. This is a great option for those who have no desire to make any jewelry with their own hands.
The choice of such stickers is so large that if you start searching in advance, you can choose an image of an absolutely suitable theme and size. You can decorate your classroom for September 1st with vinyl stickers on the following topics: “Autumn Time,” “School,” “Letters and Numbers,” “Cartoon Characters,” “Flowers and Patterns.”
The issue of decorating a classroom for September 1 must be approached very responsibly, because if properly organized, this holiday will leave an indelible impression on the children and their parents.
Day of Knowledge. September 1.
This set of paper cutting templates contains almost everything you need to decorate your school interior for the holiday of September 1 in an interesting and attractive way:
- autumn foliage and clusters of ripe rowan,
- a familiar and cozy image of the school in festive decorations and charming schoolchildren enthusiastically greeting each other at the school walls,
- a variety of school equipment, a traditional bell and other school paraphernalia,
— as well as 4 options for holiday inscriptions (the inscription “September 1” is presented in two versions).
All this wealth of paper decorator will allow you to create thematic compositions on the windows (or in other parts of the interior) in the classrooms of both junior and senior classes. At the same time, the light, cheerful nature of the scenery will certainly find a response in the souls of first-graders and older children, as well as teachers and parents of students.
By the way, parents can use the elements of the set not only at school, but also at home, organizing a pleasant surprise on the occasion of the beginning of the school year (especially if we are talking about the very first academic year at school).
In addition, many elements of the set will certainly come in handy when preparing for the next big school holiday - Teacher's Day.
And together with a special addition, the templates from the “September 1” set are an excellent tool for creating festive compositions for the school’s birthday (Anniversary).
With the help of these templates you can solve not only large-scale decorating tasks, but also decorate compact objects. Especially for such purposes, a set of hand-cutting templates (in PDF format) includes reduced copies of elements, which fit on A4 sheets, and the set for the plotter contains solid templates of all elements that can be scaled arbitrarily.
For example, fragments of the composition are placed in three window openings width 60 cm and height 135 cm. However, you can easily vary the dimensions of the composition, adjusting them to the size of your window, for example:
- reduce the size of elements by setting the custom scale in the print/cut settings to less than 100%;
- reduce the area of the composition by reducing the number of elements used - the optimal solution for small windows;
- expand the composition by adding additional elements (from other sets or drawn yourself) - for especially large windows or showcases.
Dimensions of large elements of compositions:
- school: 62.8×57.1 cm;
- boy and girl: 36.4×54.1 And 35.5×54.4cm;
- rowan branch: 33.2×35.2cm;
- school equipment: 50.3×27.3,50.0×33.5,50.0×33.4 And 50.5×28.3 cm;
- inscription “Happy Knowledge Day!”: 52.5×26.2 cm;
- inscription “September 1”: 52.5×33.9 cm;
- inscription "Hello, school!": 52.4×36.9 cm.
Compound:
1. A set of templates in the format PDF- for cutting by hand:
- simple and composite templates (composite - glued together from several fragments on different sheets) for cutting out decorative elements on A4 sheets;
- reduced jewelry templates that fit on A4 sheets;
- templates for cutting out composition elements on seven sheets of A1 format (templates on A1 sheets are intended for large-format printing on whatman paper (this can be done at the nearest copy center), which will slightly reduce production time);
- instructions for making window (interior) decorations.
2. Set of templates in vector formats DXF, SVG and FCM (for ScanNCut Canvas), STUDIO3 (Silhouette Studio Document)- for cutting on a plotter:
- templates of large decorative elements, prepared for cutting on sheets of paper A4 and sheets 30×30 cm(large elements are divided into fragments of appropriate sizes);
- templates of all decorative elements (without breaking into fragments);
- instructions for making window decorations.
Add a set of templates in the desired format to your cart.
Decorating windows for September 1 can become a good tradition, like, for example, decorating windows on New Year's Eve. The children, not yet having time to enter their classroom, look out of habit into their native windows. At this point, they will be very happy to see that everything is ready for the new school year.
Children attending kindergarten will be even more delighted by the decorated windows. Due to their age, they perceive any changes more emotionally, carefully studying the environment around them.
Autumn decoration for a window made of paper
One of the most interesting and original ways to decorate windows for September 1 in a kindergarten or school is to make autumn leaves using a technique similar to stained glass. The leaves will not lose their relevance in the following days and even months of autumn, and thanks to them the group will always look elegant.
What you will need for work:
- thin transparent polyethylene film;
- office glue (it’s better to take transparent one, but you can also use PVA);
- thin transparent colored paper or colored polyethylene (yellow and red);
- scissors;
- album sheet;
- a simple pencil and a dark marker.
Let's get started.
We fold the transparent film in half to determine the approximate dimensions of one half.
Apply glue to half of the film.
Place a layer of yellow paper or film on top of it.


We glue red pieces of different shapes to the yellow film, distributing them randomly.


We also coat the second half of the transparent film with glue.
Cover the yellow-red layer with transparent film.


Let the film dry.

At this time, we draw the contours of autumn leaves on a landscape sheet - first with a simple pencil, and then with a bright marker.
Cut out leaf templates.

We attach the template to the film and cut it out. To make cutting more convenient, secure the leaf template with tape.


Thus, we use the entire film to create autumn leaf fall.

We fix the finished leaves on the window using transparent or double-sided tape.

This is just one of the options for how to decorate a classroom on September 1st. In the same way, you can decorate the hall, gym, school corridors, and, if desired, the windows of your apartment, thereby giving it a .
Autumn window decorations made from real leaves
Very interesting autumn compositions can be made from real autumn leaves. We lay out the leaves on adhesive tape, laying out the pattern. We “seal” the top with another layer of adhesive tape.


