- Basic materials for fire
- Manufacturing a log in the bowl
- Some recommendations how to cut a log house
- Positive and negative moments of a log in the bowl
Earring buildings from whole logs, experienced specialists use some ways to cut. Its selection is determined by the purpose of the constructed building. So, to build a building for permanent housing, carpenters enjoy logging into a bowl or in paw.
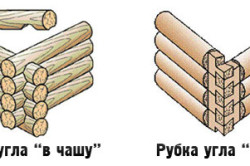
The log house is put on the "in the bowl" or "in the paw".
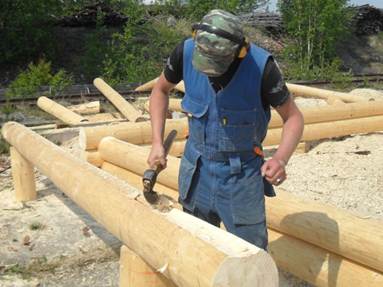
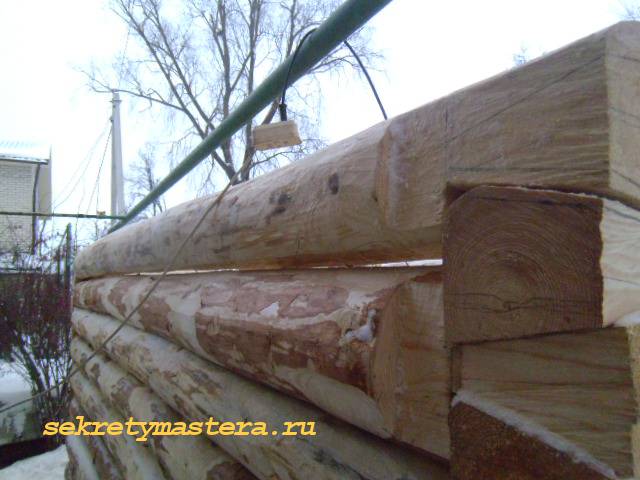
How to cut a log house in a bowl? The real craftsmen advise to make such a roll of rolls, in which a cup-shaped excavation will be superimposed on a round log, but not vice versa. The opposite way of laying a log is called in the edge. The log house in the bowl is an original Russian invention. After all, the distant ancestors were resorted precisely to such a method of building buildings. Chopped houses are built in our day. This construction method was checking time.
How to cut a log house in a bowl? This can be found from the article below. A person who is not dedicated to such things, to fulfill the log house will be difficult. Experienced masters will easily come to help and without the use of nails will be built a strong and warm building. Let's find out for what reason this technology cutting so loved by the population and gained widespread.
Basic materials for fire
The most successful foundation for the construction of the construction will be pine.
Options Wheel "in the bowl".
Its wood has a sleek trunk, it is strong and simultaneously mild, easily processed. Defects in the form of bitch are practically absent. Cracks do not appear on the pine after the drying process is completed. Wood pine does not rot for a long time. It is a practically impeccable material for the construction of buildings from rounding.
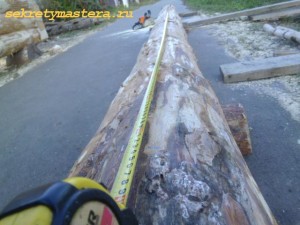
To carry out high-quality construction of the house from the bar, you need to be particularly scrupulously approach the choice of material. It is necessary to use the logs of the same dimensions. The most acceptable material will be the diameter of which is 22-24 cm. But other log sizes are not reborn. All cases are individual.
The best materials will be those that were bought in the winter. After all, in the wood at this time there is little juice. It will be almost dry, therefore, it will not be cracked.
Back to the category
Necessary work tools
Construction wooden sruba Based on the use of important tools. These include:
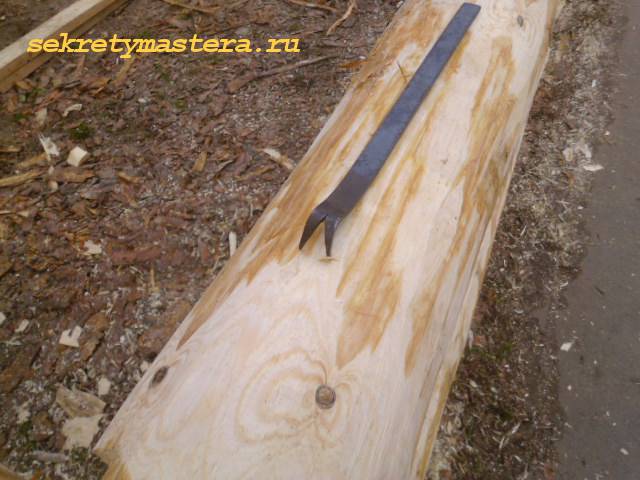
- ax;
- electric or gasoline saw;
- chisel;
- carpentry.
Back to the category
Manufacturing a log in the bowl
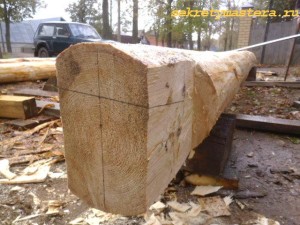
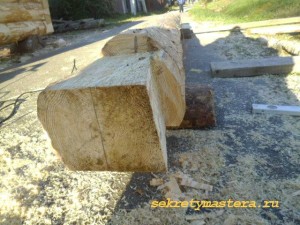
Cutting the corners "in the bowl" and "in the paw".
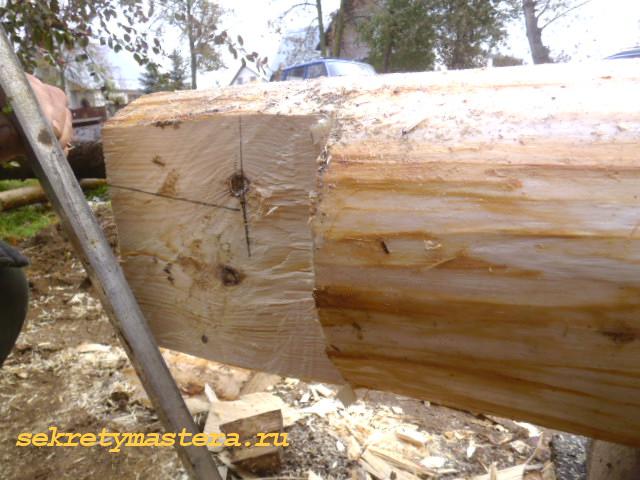
The name itself indicates that a seashest hole is made in the corner of the bar. It is a kind of castle between the crowns of the building. In this way, you can build a warm and comfortable home, and the combination of angles will be distinguished by reliability.
The technology of cutting involves starting the construction of the construction from a groin crown. On the ready Fundam The layer of waterproofing material is stacked, then 2 logs are fitted.
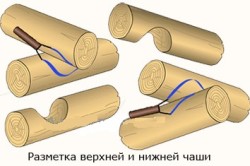
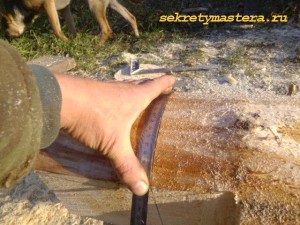
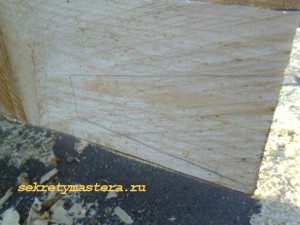
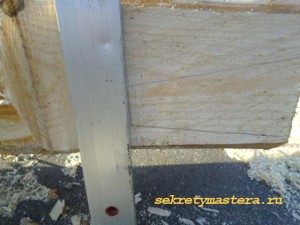
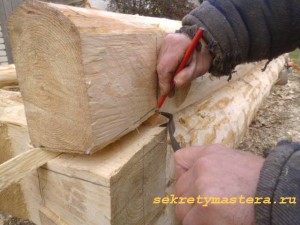
At the same time, the exhibition of the horizon occurs. Then there are also 2 logs perpendicular to the previous one, and markup is also placed on the laid timber. To make it right, you need to take advantage of a special carpenter tool - feature. It helps to make a profile markup flawlessly, simultaneously on two logs. This tool can be done by himself. Externally, it resembles a cirkul, but with a more solid foundation. From the accuracy of the carpenter will depend on the density of the logging (timber) to each other.
The markup is associated with finding points suitable for cutting. Before starting such work, it is necessary to focus on such provisions:
- put the logs in the original position, in which they were when assembling;
- put sharp ends to the connection site;
- line on two bars immediately.
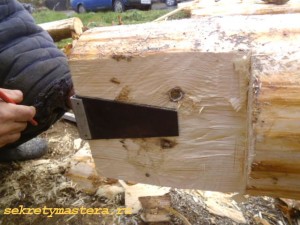
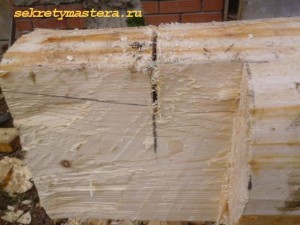
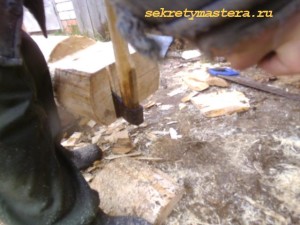
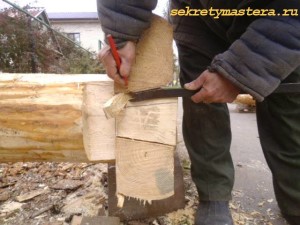
Further technology is associated with the sample of the bowl. Moreover, the depth must be calculated that the logs from the top are included at the lower base exactly half of the bar. To carry out such an operation, it is necessary to use the saw, an ax or specially intended for this by the nozzle "Coroder".
Back to the category
Marking for cutting "in the bowl".
For a more dense adjacent of the upper base in the lower, it is necessary to make a groove of the longitudinal form in the bar. The width will depend on the size of the logs and climate conditions in which it will be located. Most has dimensions of 180-200 mm. If the design is performed correctly, both logs should come into contact thoroughly. Otherwise, the building will be cold. Cutting a log house in a bowl is quite difficult, so it is worth attaching certain efforts to provide the entire design of stability and fortress.
Crowns tend to need additional insulation. For this, our ancestors used moss, which is considered to be a good material for seeling the gaps. Among the modern insulation, the jute material is especially popular. It provides the building with warmth for a long time.
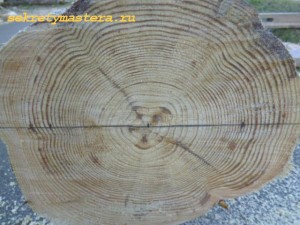
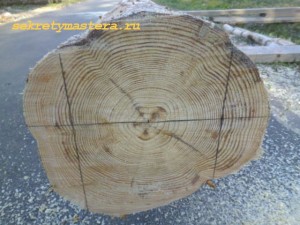
Any hatching of the whole log must be related to the laying of the bar in a certain way. To do this, it is necessary to distinguish between the northern and southern sides of the wood. The northern part of this material is stacked with the outside of the wall. The opposite part is inside the construction, because the southern side is more capricious and cannot be so confronted by weather conditions as North.
Russian and Canadian cutting "in the bowl".
So that the building has not been actively exposed for a long time ambientFor this, it is chopped by a log house called. Moisture will not fall into the base between the crowns, ensuring the construction of dryness and long period of operation.
Of course, cutting a log house in the bowl on its own very hard. Here must be helpers and just experienced masters. This design can be ordered in finished video in specialized points.
How to cut a log house in a bowl? Below we will try to answer this theme question?
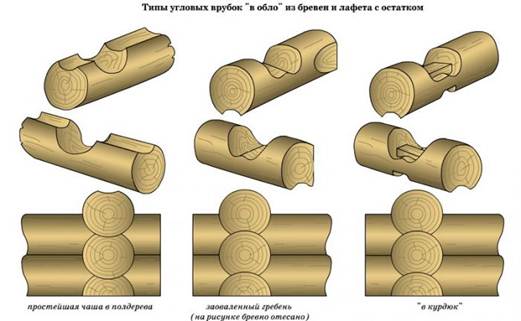
During the construction of solid logs, several ways of cutting are used. They depend on the designation of the erected construction. With the construction of houses for permanent residence and bath carpenters apply the cut into the bowl or in the paw. Experienced specialists are recommended when the capital construction is erected to use the cutting method, which is done in such a way that the bowl falls on the log, and not vice versa - log in the bowl. Such a logging is also called "in the chop" or "Siberian". Whereas, the recess is reverse - the cutting "in the Obla" or "Russian". The Siberian method of cutting is better protecting the moisture cut from the penetration. Its use, compared to Russian logging, less technological operations are performed. In the manufacture of log cabins in the Siberian technology, they make a log release to the outside of up to 60 cm, getting a warm angle.
Tools required for logging
The grub production process involves conducting work on the markup of the logs and directly the logging. Without special tools it is impossible to perform work qualitatively.
Therefore, consulting with professionals, purchase:
- carpentry ax;
- chainsaw (email);
- chisel;
damage to carpentine (it can be done by himself).
To prepare for cutting down, use a special tool - a carpentry line, which is similar to a circulation, only a rigid design.
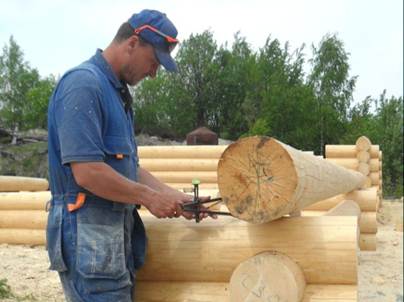
The scope between the extreme points features is set in accordance with the diameter of the used logs and is equal to half the lower or top log.
The markup process is in the designation of the contours of the future cutting. Performing markup, follow several rules:
- install the logs as they will be laid when building a log house (cross on the cross);
- install the pointed ends of the feature on the connected parts;
- spend lines for wood outline simultaneously on both logs.
The term "logging" has been preserved historically, although modern masters, in the construction of houses from a log, are more often used instead of the ax of chainsaw. Highly professional carpenters, lines for notches are performed as a saw. After the designation places, cut down or drink the bowl so that when assembling a log, the log layer, embedded in the adjacent lower row exactly half.
For dense adjacent to the crowns to each other, the selected bowl, by choosing a longitudinal oval with a groove. Select the size of the additional notch depending on the local weather. The colder winter, it should be wider. To ensure dense adjustment, align the depth and volume of wood cutting for oval.

The correctness and accuracy of the work performed, check the trial laying of the logs. The exactly treated surface of the upper log must be tightly to the bottom log in the entire plane. The laid part should not have gaps and cracks. In case of their formation, make marking and adjust the cutting down to the tight fit of the logs.
![]()
Photo: Many interesting on this topic can be emphasized from old books written with the participation of experienced Master of Carpentry.
For tightness of the connections, use an additional deforestation element - spike. If you are chopped by a warm building, take into account the location of the annual rings, since the southern parts of the rings should be inside the log house. To preserve the level of the rows in the horizontal direction, do not miss important moment. In the cutters alternate Kolly logs with a narrower part of it. To align the crowns, cut down alternately in a wide part of the log, then in a narrow.
Having mastered the craft of a carpenter, you will significantly save on construction. Start comprehending the basins from the manufacture of chopped gazebo for the garden. Then, chop on my site a small bathhouse. The acquired experience will allow you to master and build a house. Technologically accurately made log house will be warm and give construction durability and reliability and will provide an exceptional ecology, especially if you use cedar cladding for internal lining.
On other pages of our site you can watch a lot of interesting things about logs of log houses and log baths.
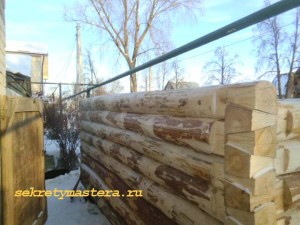
One of the practical ways to produce a log house is a cutting into a bowl, since such a log house is warm and, due to the locks of locks formed in the corners, stronger. That is why many are asked the question how to chop out the bowl into the bowl? It is certain knowledge of the technology of cutting, as well as skills in handling wood, which are quite accessible to any person, will help create a high-quality structure of wood.
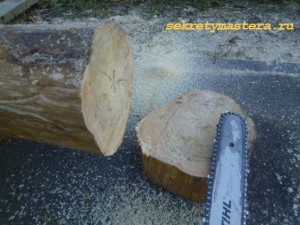
1. So, for this method of cutting, it is necessary to use only high-quality wood, which will not be infected with fungus or wood bugs, and the logs to harvest better than the same thickness. If it is problematic, then you should choose trees on the top cut, where the diameter should be with a permissible difference of up to 30 mm, since from such logs will be in the future it is easier to chop shed.
2. When the logs are harvested, it should be done with a terex. All compess sides of the logs must be embroidered from the inside to the thickness of the upper diameter, giving them the form of oval. It is better to perform such a tulet from the top with the transition to Komle to prevent the appearance of wood loans.
3. After that, you need to bookmark the first crown. The foundation should be covered with an insulating gasket, where it is necessary to put two logs in parallel, after which it is necessary to align them horizontally, which would be smooth in the future.
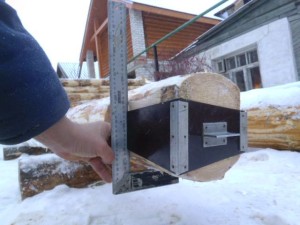
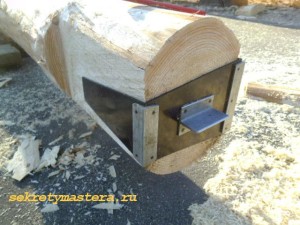
4. Next, you should put on the log data perpendicular to two more logs and make a markup or a carpenter with a circulation, for which the hammer should be taken and attached to its plane 2 of the metallic rod with a length of 150 mm and a diameter of 8 mm. Conducting such a markup from two sides of the upper log, the bowl in the sruba will be equally equal. After that, it is necessary to cut out excess wood in the log. Thus, cut down bowls in the logs, the depth of which should be such that the upper logs can be raised relative to the lower half of the diameter.
5. The field of this should be laid in the bowls and align them. You can use brazing spikes that allow you to drive around the logs. Holes under these spikes drill should be at a depth of one-time height of the bar and 3 cm greater than the length of the heel itself. You can score spikes with a sledgehammer. The logs in the log house should be placed on some sides, but at the same time withstand the horizontal of all rows. Before installing logs, it is recommended to lay a pass or moss on the entire length. The same installation of logs on each other is recommended to pursue a wooden chock with blows, while constantly checking the verticality of the wall plane.
____________________
The construction of a church has various technologies, one of which is "cutting a cut in the bowl." The main feature of this method of grazing is the construction of corner locks. But that you all fully understand, this technology will be disclosed in more detail.
How to cut a log house in a bowl
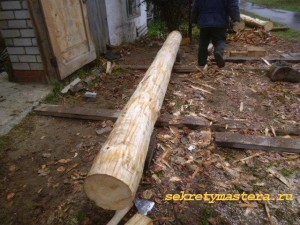
So, the first thing to build a log should choose the tree of the tree that will most suit your climatic conditions. The chosen of the selected tree of wood should be without blue, mold, moss and damage from beetles. Try to choose a brica of one thickness, which will simplify the cutting of a church. Next, go to the processing of the log, namely, to the clotting of extra and impart, the desired oval form. Typically, they are closed by a commute part of the log, in other words, thickened end.
Laying logs on the foundation
Now that things are completely prepared, you need to go to the bookmark of the crowns on the foundation. Before this, to launch a waterproofing material for the foundation, then a substrate plaque from larch, impregnated with an antiseptic and then the first two crowns, which are desirable to handle the antiseptic impregnation by immersion.
Laying logs on the foundation
After that, the following two crowns are stacked, perpendicular to the top of the previous ones. On two ends, marks are made and then need to chop bowls in half the thickness of the next top log (crown) for these marks. Therefore, follow the advice and select the one of the thickness initially one thickness to speed up the scraper assembly process. When the bowls are willing, they are stacked in them and then everything is repeated again. The log house resembles a designer assembly, only an adult. How could you notice the technology of "log cabin in the bowl" received its name from the process itself. The masters actually chop the shape of the bowl in the log and then laid a log in this bowl.
Interwetant insulation is important!
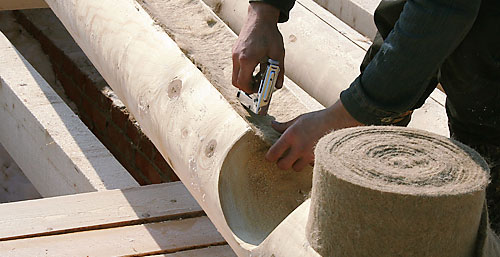
Be sure to decide the issue of choosing interventonian insulationSince it is laid when assembling. From a long time, the pass or moss use, but modern standards speak of jute and flax. Moss or packle is evenly laid by hand in the groove along the entire length of the crown. After assembling a log house, everything that hangs from the seams is causing. Remember that it is necessary to careen only around the perimeter, in other words, you must cross the seam on all sides of the building, only then go to the next seam located above. 6 months after the shrinkage, it is necessary to pass a re-panty. More modern insulation - jute and luna, simply roll from the head of the insulation along the length of the crown. Canopate such insulation is not done, but it is still necessary to secure the stapler.
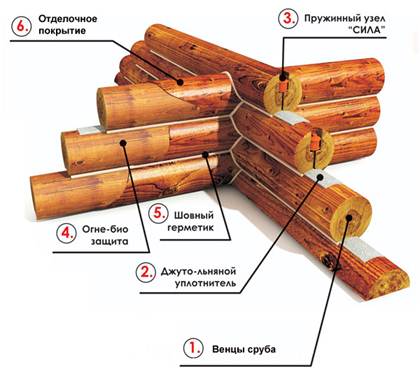
I want to give you useful advice About shortening the shrinkage and strengthening your cut. This is done with the help of a wooden braid either spring node "force". Thanks to such strengthening elements, the log house does not lead as usual. It is more stable, durable and enters the exclusion much earlier. Agel is more than a long-time product of wooden house-building to strengthen the cut, but the spring "force" spring assembly is a new generation of strengthening elements of greater efficiency. What to choose to solve you, but better of course the spring node "force".
________________________
Siruba markup
Marking and cutting bowls
Marking Bowl
Cutting into a bowl with a spike
How to saw a chainsaw bowl
_____________________________
Log house in the bowl has its own
Pros:
Non-Russian Sir View, looks very nice and color
More stable design due to the best connection between the logs
Good thermal insulation walls for the same reason
No need to produce additional finishing works
Minuses:
More complicated firing technology
The need for more logs and respectively money
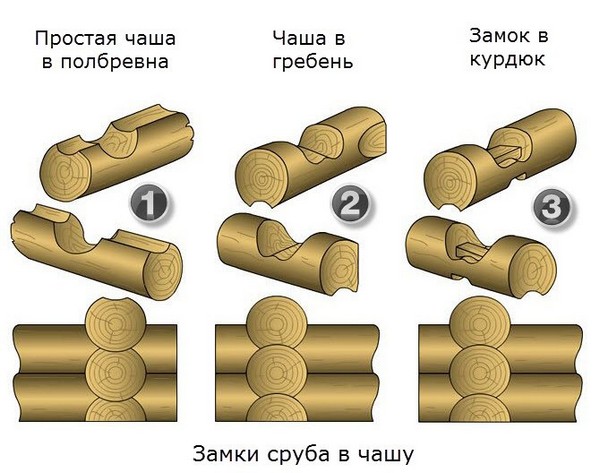
With this version of the log, part of the log remains issued from common design By 20-30 cm, and the connection between the logs is made by cutting down or drinking recesses- "cups". Due to the fact that the log end on each side protrudes, the overall loss of the inner area can be critical, but by increasing stability it is possible to build several floors to increase residential space.
Illustration:
http: //vobrog-srub.rf
Nowadays everything more people Interested in wooden buildings. Environmentally friendly, with good and very original external speciesThey allow owners to feel themselves in the atmosphere of the distant past, carrying them into the era of ancestors. Today, have a chopped wooden hut or a bath on the plot - it means to have a good taste and take care of your health. Our ancestors knew how to chop out a bowl into the bowl and this method was greatest. The technique of this method is quite simple, however, in order to master it, you need to know some techniques of carpenter skill.
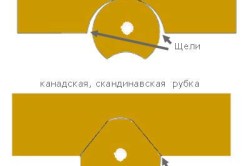
 This method of erection of wooden buildings is characteristic of the countryside of Russia, including those places where the climate is very severe - Siberia and the Russian North. The method received its name thanks to a semicircular excavation, which the master did in the lower log - the so-called "bowl". This seizure served to perpendicular to the top log in it. Such a connection method made it possible to avoid significant gaps and ensured a very dense fit of the logs to each other. Speaking about what a log house is in the bowl, it is impossible not to mention its varieties. If the bowl is done in the lower log, then this is a faithful sign of the so-called "Russian cutting" (or so-called "in the region"). In the case when the wizard cuts into a bowl in the log, which will be top, has a "Siberian cutting" (another name - "in the chop"). It is believed that in the second case, the building is more protected from unfavorable weather factors.
So, the advantages of a church in the bowl can be called:
- fairly strong design;
- non-blowing corners of the building;
- aesthetic appearance.
But the log house in the bowl has some drawbacks:
- challenge problems;
- due to the projections of the corners, a reduced useful area of \u200b\u200bthe room;
- high wood consumption.
What will take a carpenter
So, you are going to make a log house in the bowl with your own hands. This will require the following:
- saw (electrical or gasoline);
- ax;
- carpentry line (circula);
- chisels.
Also need material for sealing slots (pack, jute, etc.)
What tree to chop?
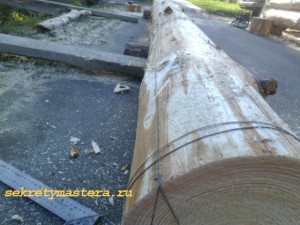
Specialists in a carpentry case prefer such a tree like pine. Despite the fact that it is not the most best Material In processing (Pine wood is characterized by hardness and a tendency in the process of working with it to form chips), it is pine logs that have better characteristics on the resistance to fungal diseases of wood and attacks of cores. In addition, the trunks of the tree are smooth and practically deprived of such a defect as the swirls. Buildings from pine have durability. For construction, you need to choose a log thickness from 20 to 25 cm. It is necessary to harvest the material in the winter, since during the process of drying wood trunks will be less prone strain and cracking.
Work technique
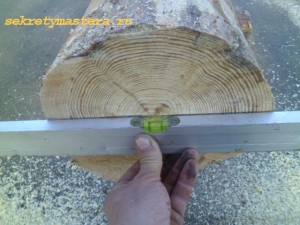
This process, like a log cabin in the bowl, should precede the preparation of the foundation with work on its waterproofing. The key to success here will be undoubtedly a strict horizontal surface.
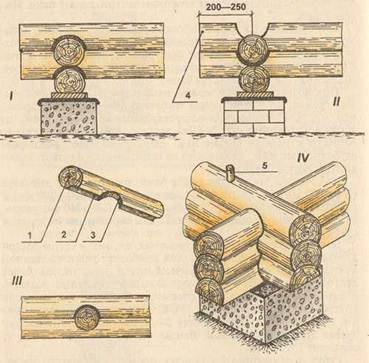
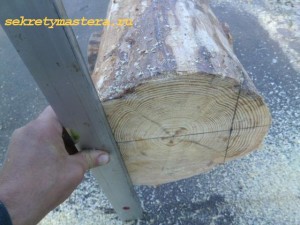
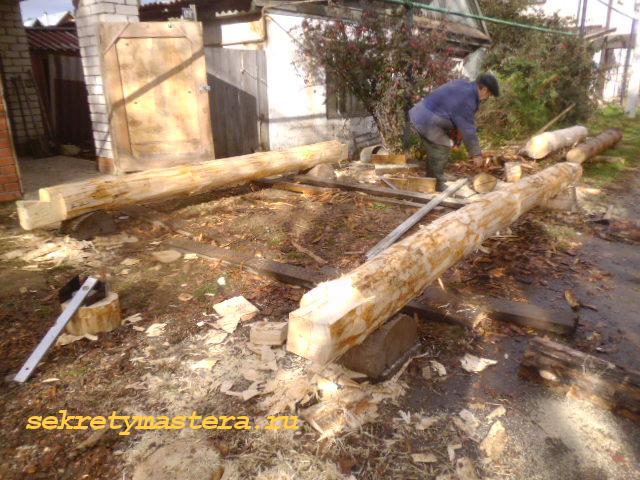
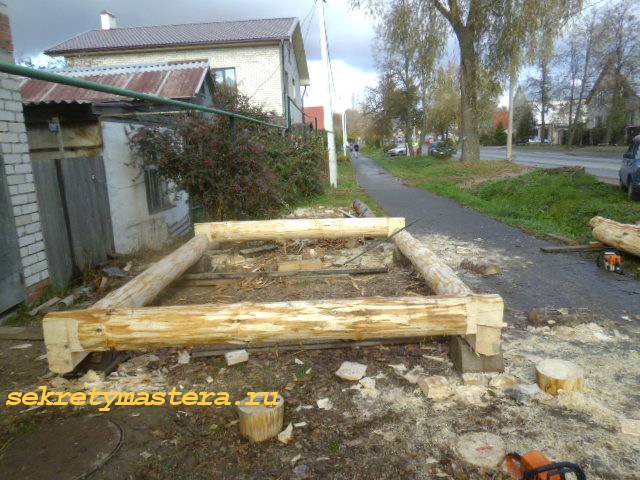
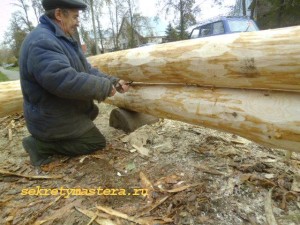
We proceed to the creation of the lower layer (bustling crown). To do this, we take two barrels that will go to the device of the long walls of the cut, put them in parallel, then two trunk is put on their ends perpendicularly. Next, with the help of a carpenter circulation, the marking of the outbreaks under the logs is made. By doing this, it is necessary to observe special care and accuracy, since only correctly fitted logs will ensure proper quality of work. Placing a bowl, it is necessary to achieve the immersion of the upper barrel to the lower exactly half.
Next, using the tools, we cut the cutting down of our bowls. After that, we pre-install the upper logs in them. In order for the logs well to fit the vertically to each other in the lower log, in the place where its upper edge is, it is necessary to cut into the groove. It is performed along the entire length and its thickness can be from 12 to 20 cm, depending on the sizes of the trunk. Before installing a log in the grooves lay insulation.
To ensure the levels of the whole design in the bowls, the holes in which the holes are drilled in which the brazers are inserted - special spikes. The grub assembly process is accompanied by tracing logs with a chumbana.
And further…
Collecting log house, you need thin annual rings to arrange outside, and thick - inside. Building can be assembled by parts, carrying out a bundle on Earth, and then installing each other. Pile Fundam - The optimal version for a log in the bowl. With a lack of experience, it is better to start building small designs - arbors or baths.
Rubym corners in the top bowl
2016-02-24, 22:12
Tool Removing Bark Log Lowing Initial Marking Cutting Paws Fit Flat Lape Slub Path
Cut the log house yourself - quite real. Now we find out all the details and see, well, and the ax in your hands.
You can't find such a material on the Internet anywhere else, as everywhere shows a log cabing from first-class logs, but it's not easy to get a first-class rounder, so we will challenge from what God sent, not to the detriment of quality.
At that time, God sent a forest to the hurricane, and the first grade of speech is not even close. Nevertheless, we cut out of it an excellent frame for a bath.
Get the first grade - excellent, facilitate her work.
Tool
For the manufacture of a log, the following tool will be required:
2. Hacksaw or chainsaw
3. Black Ballet or Electrolake
4. Level 40 - 60 cm.
5. Metal line 40 - 60 cm.
6. Construction cord-Malka.
7. Template.
About the template More, since it has to be done. Pattern under the lamp Canadian (swallow tail). There he is:

Sizes of template

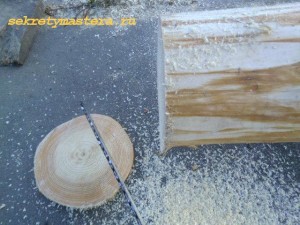
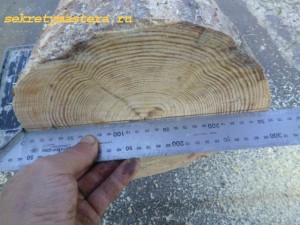
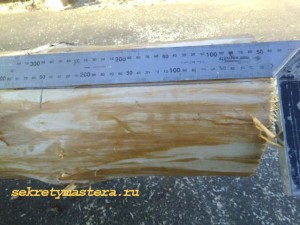
A - width, takes relatively paint (fine) parts of the finest log. The width of the template is taken by this part for 4 centimeters. For example, if the log thickness is 20 cm., Then the width of the template is 16 cm.
In - 3/4 from a
C and D - 2/4 from A
E - 1/4 from A
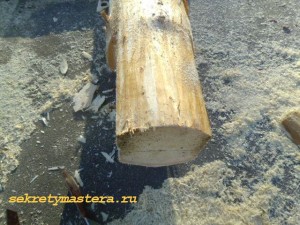
Removal of the crust
First of all, we remove the bark with a bric. From all. So that the log under the crust is not prohibited, and in warm time, the cored would not be activated under it.
This operation is done by a shovel, sharpened like this:
With a broken bark of a bark can be lying for a very long time, but if the estimated storage period exceeds half a year, it is necessary to ensure the injection, and cover the stop on top of the rubberoid, or something like that.
Laying log
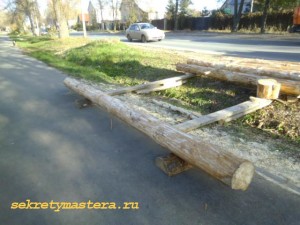
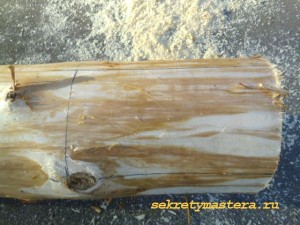
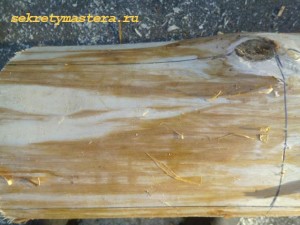
Work begins with the layout of the log. For this, two stands are made with recesses, on which the log is given to the markup.
If the material is the first grade, without noticeable bends, the log is laid out on the annual rings so that the part where the annual rings thinner turned out in the future from the outside of a church.
If the material is not the first grade, then the log is laid out in accordance with the existing bends that must be addressed or up or to the outside. Or in both these directions. Just not down and inside.
Be careful. At first glance, the log may seem very smooth, but the look along it will immediately determine the curvature.
![]()
When calculating, we determine and the direction of laying the log in the log house relative to the previous one. The consumer part is stacked on the painshore, and vice versa.
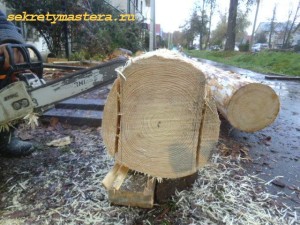
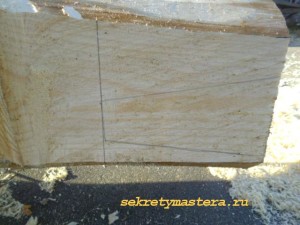
Primary markup
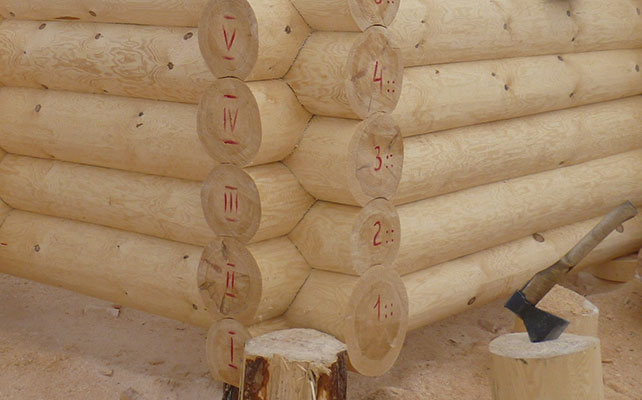
Brother is chosen as follows: the 1st crown is the thick of the most fat, then the most thin. From the 7th crown again, the last pressure crown is fat.
For marking logs in a logo. There are no special devices for this - it is done on the eye, but the smallery will be made, the less will then fit and the probabilities of the slots in the corners.
The ending is done exactly in size, the same for all log walls.
After trimming in terms of the level, we carry out a horizontal line along the widest part of the end of the log (the first grade is the middle), we celebrate its center, and from the center we take the template width.
By the width of the template, we spend two lines along the vertical level, thereby starting the outfit paw brush.
Then, according to these lines, we stretch the thread between the ends of the log, and it fieces the longitudinal part of the brush, 25 - 30 cm long. Only all the same.
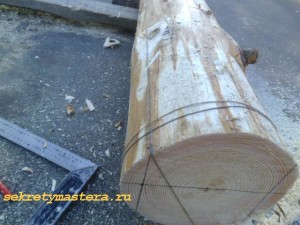
As a result, there will be such a markup at the ends of the log:
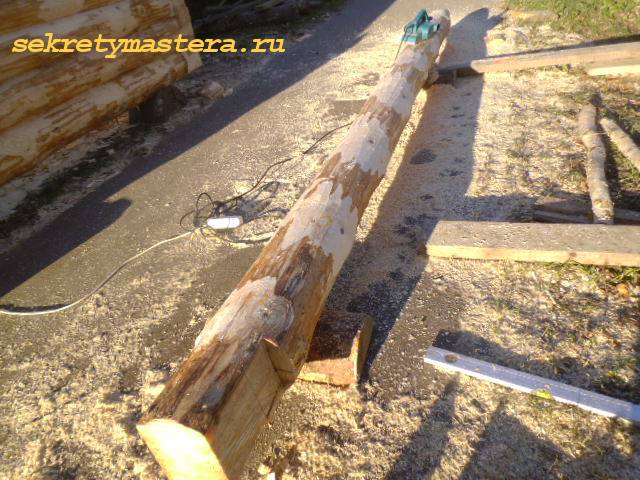
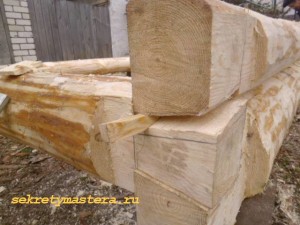
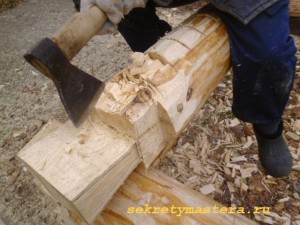
Cutting paw
By markup cut the paw brushes.

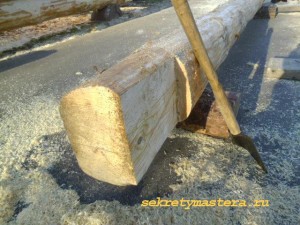
I caught a width of the pitching exactly in the width of the template so that it enters it tight, but without straining. While the hand is not naked to do them better with a small margin, and then pose with an ax to the desired size.

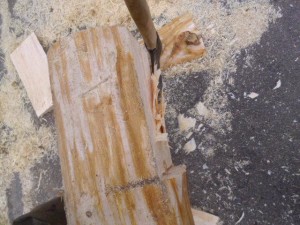
Chainsaw for the cutout of brothers is applied then, the years there are swirls on them. If there are no bitch, then the segment is completely cut into the ax.
Go to the manufacture of the board of the paw. The first two logs are one landing place - top.
We put on the paw in the middle of the template and fill in the upper border. The narrow part of the template is from the outside of the wall.
From the edge of the border outlined by the template, up the line on the vertical level from both sides. The distance from the border to the top of the log, with a wide (inner) side, should be at least 5 centimeters.
 .
.
Then ignore the landing area, cut the end, and cut the log segment. It is important when cutting out the end, not to do the cut below the template boundary.
Lap is also made at the opposite end of the log. Then the second log is made according to the same instructions, which will be in parallel in the first one.
Go to the transverse brothers of the first crown. Furoving, marking and brushes at the transverse log are made in the same way as the first. But the paw is a little different, since it is already complete, with two planting platforms, top and bottom.
First, the lower pad is made. Measure approximately 5 cm. From the bottom of the logs, install and outline the pattern.
Why approximately 5 cm? Since the brica does not differ in perfect evenness, and the trim initially will most likely be not perfect, then the template will most likely lead the plane, so it will need to be customized at the bottom paw, and this fit can eat 1 more - 2 cm.
As a result, we will get the normal depth of the paw. The depth of the paw should be about 0.5 from the width of the groove, so that if the average width of the groove 12 is 14 cm., The depth of the paw is normal 6 - 7 cm.
Do not forget that the narrow end of the template from the outside. Upper edge can not be accessed yet. I detected here for you to be clearer.
Now in terms of the level, negate the inner edge of the paws.
I turn around the log, and just like on the first log stile down the edge and make a rubber, and also cut down the paw, only if the first log was given the top of the paws, now, on the transverse we do the bottom.
Upper landing do not touch yet, as the lower still will have to customize.
After that, we take the electrolyak and process the knockers. If there is sharp bends on the log, protrusions, then hang them.
We left to fit the plane of the lapse of the longitudinal and transverse log, but how to do it, so that it is not repeated again, I will show on the second log on which the groove is already.
In the meantime, we will install the transverse and bring the entire design on the diagonals and the level. The level is taken at the bottom of the first bric.
Fitting planes LAP
We are ready for the top of the paws of the first log and the bottom of the paws of the first transverse. Now you need these planes to fit.
First of all, we take the vertical. This is done with the help of the level and the clina.

By putting a log, we look at the gap, we define and strict the place on the paw that you need to pick up, so that there is no crack and log legs strictly vertically.
After fitting, we measure the resulting depth of the lower plane of the paws, and on this size, fill in the template and cut the upper plane. Thus, the paw will be exactly in the middle of the log.
Now we prepare triple logs. It will be longitudinal, with a groove, and on the same instructions all subsequent logs will be made.
I exhibit the log as described above, cut the brush and cut down the bottom of the paws with a depth of approximately 5 cm., Processing the bitch and protrusions and set the previous one.
I exhibit the vertical with the help of a clina, and look at what a gap turned out between logs.
Nuance here is so. The evenly the gap between the logs is, the even the grooves will turn out, so if the gap will be very uneven due to the virtue of failure, then it is better to modify the birch.
The width of the gap should turn out no more than 2/3 of the latter. About the draw Read more.
The trait is the tool with which the groove is made. Damage is different species and structures, but in general in all one - the same distance along the entire length of the crown.
I have it like that.
Groove groans
Drawn, we note the size of which will lay a log, thereby configuring the plane of the paw and twist the border of the groove. The bottom line should lie on the previous log, and the top of making a scratch on the top.
Then make transverse shallow cuts between the borders of the groove. In the region of the bitch more often.
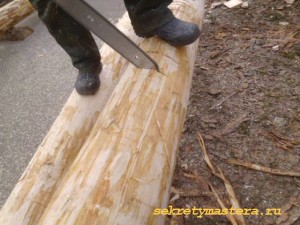
Excorrecting the ax, handle the paw, and cut the groove.

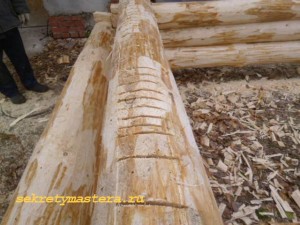
After cutting down, the grooves can be brought with a grinder with a petal nozzle.
After such a fingering, neither in the paws nor between logs practically does not remain slots, which will require a minimum of the plug-in material, and will save from additional cacopants.
As a result, it turned out such a srubik.
With a log of the first grade there would be no panite with fit. With a good trimming, and a clear execution of brothers, the paw can be cut down in the log center immediately and from above and below, after which it is to set a log to downe the groove.
I wish work success.


