No furniture is difficult to present comfortable accommodation in both residential and country buildings and arbors. Very often there is a need to manufacture designs of a certain size, buy which in finished video problematic. For example, make a children's table from plywood with your own hands by almost anyone, while you will get a unique product for very reasonable money, and its reliability will not give way to the structures of the factory production.
Basic rules of work with the material
In order to make the furniture from plywood, it was not only beautiful, but also durable, several important recommendations for carrying out the workflow should be remembered:
| Right sawing | To work, it is best to use, with its help you can make high-quality cuts, and they can be both smooth and curved (in this case special canvases are used). The smaller the tooth on the hacker canvas, the higher the quality of the cutting and the smaller the bully and other flaws are formed, it should not be forgotten |
| Reliable fastening | We recommend using when working only special wood screws, which provide high reliability of fixation. To avoid cracking of the material, it is necessary to pre-drill holes with a diameter by 2 mm less than the size of the screws, it will simplify the workflow and will exclude plywood damage when assembling |
| High-quality bonding | To ensure additional reliability, elements can be glued, for this, high-quality carpentry glue should be used. The work is made as follows: the connected elements are polished to obtain a perfectly smooth surface, after which you need to clean the surface from dust and apply glue on it. Details are tightly compressed with each other and left in this position until complete drying |
| Proper flexion | If you want to bend certain elements (for example, for the backs of the chairs), then it is necessary to initially mix the surface with water at first, then bend items and fix them in such a position at least 12 hours |
Tip!
If in some sections top part The veneer was peeled, then you need to lubricate the surface with joinery glue, after which it is tightly pressing the plot through the paper gasket.
Overview of some options
We will tell about some kinds of products, you can make the same tables, and you can take the ideas below as the basis and make the option that best suits your conditions.
Simple design
In order to make an original table for a gazebo or cottage plotYou will need an old tire and a piece of plywood thickness 10 and more mm so that the surface is tight and resistant to loads.
The workflow is as follows:
- If you have, then you can just glue 2-3 sheetsFor this, you can use either a special adhesive gun, or carbon black gloves, which are lubricated surfaces and elements are tightly compressed to the complete drying of the composition;
- Wheel need to wash well, the surface is best to paint or cover with varnishso that the rubber does not get dirty and looked more attractive subsequently, you can use a one-picture version, and you can make any pattern or ornament;
- Next, you need to cut the phaneer on the tire diameter, for marking, you can use a circulation, and you can apply people's method - Tail the cord, the length of which is equal to the seal, whose length is equal to the desired radius, and a pencil is tied to another end. The tip is put in the center, after which the perfectly smooth circle is stolen, cutting is performed using an electric jigsaw with a special narrow blade for figure sawing;
- Next drill holes over the circle diameterAfter that, you can fasten the improvised tabletop straight to the rubber, fasteners enters it very well. From the bottom you can fasten the legs - the main stage is completed;
- If desired, you can safely wind the design with a jute cordIt is impregnated with acrylic composition for fixing, as a result you will have a very original element of the interior, as in the photo below.
Table for work
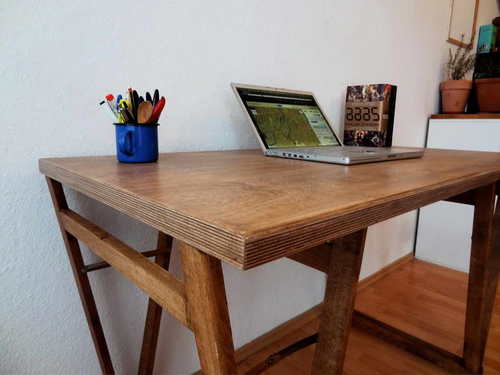
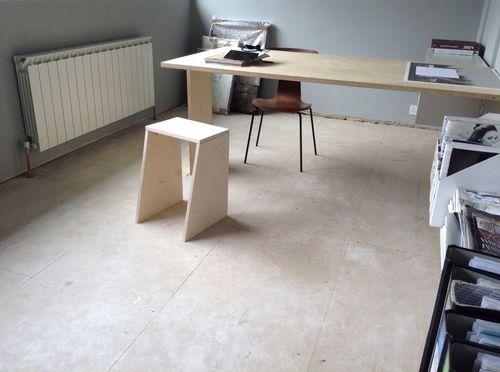
Now consider how to make the simplest writing desk with your own hands.
The work is made in the following order:
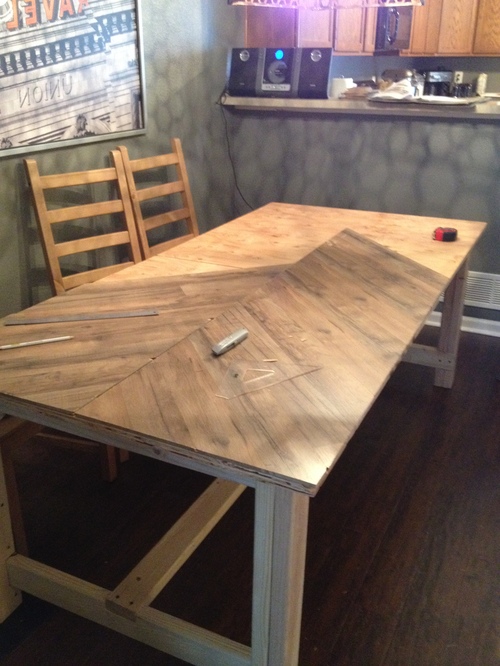
- First of all, you need to make drawings of the table from plywood with your own hands, the most accurate accuracy is not needed here, the most important thing is that all major sizes are presented on the sketch. This will significantly simplify the further process and will allow you to clearly represent the final result of the work, which is also very important if you do not have such experience. Below is the simplest option that can be done by even inexperienced specialists;
- For the beginning, all the elements required for work are cut, it is very important to immediately process the ends to be perfectly smooth. This improves appearance products and their adjacent to other details, if the surface will be shrinkable;
- Next, you need to drill two holes in each rack in order to attach the inner wall. The scheme shows the drilling places, there may be two or three, depending on the size of the design and the thickness of the plywood used. For fastening, special furniture screeds are applied - confirmates, they reliably fix the parts and hide into the surface, the main thing is to use a special drill;
- The instruction on the further assembly is very simple: it is necessary to accurately put the worktop and attach it with the help of furniture corners, they can be purchased at any accessories store. The length of the used screws should be at least 3 mm less plywood thickness so that they do not get out on top;
Important!
To spend the work much more convenient and faster, the easiest way to put the worktop to the front part on the floor, covered with cardboard, and at the top to put the support part.
- The last step is the attentive inspection of all the ends, their grinding and gluing a special tape to close the visible sections. It is self-adhesive and for reliable fixation it needs to be well to warm up either using a constructional hair dryer or with an iron.
If you need to make a computer table, then you need to enable additional items in the design to create a system unit, the shelves under the printer and a roll-out element under the keyboard, for which the roller guides are best. Connections are easiest to do with the help of all the same euro-shop and furniture corners, it is simple, and reliably.
Output
You can make a more skilled carved table from plywood, the process becomes more complicated by the fact that the cutting of all elements is much more complicated, but the result will be more original and attractive. Video in this article will tell some important moments works, and if you have any questions, then ask them in the comments under the review.
Natural reserves building materials on our planet are limited, and they are replenished much slower than they are spent - therefore the idea of \u200b\u200busing recyclable for the manufacture of beneficial things is far from Nova and is particularly popular in lately. Especially since some types of such raw materials are perfect to make a great dining table for the country or in a gazebo. And if you make quite a bit effort and fantasy, you can make a great table in the kitchen.
About a few interesting and original ideas For the manufacture of stylish and, most importantly, comfortable tables, we will tell you more. But make such tables, bringing their "highlight" into their design - your task.
Pallet table - solidity, thoroughness and reliability
To understand how to make the table from the pallets do it yourself most simple way, I must first decide which pallets will go to the manufacture of the table.
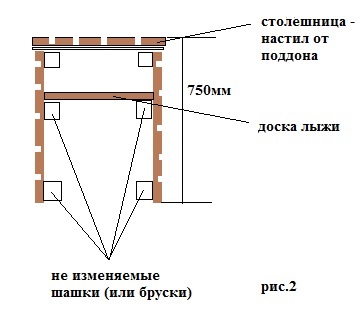
The structure of the pallet is shown in Fig.1.
Flooring from extreme and intermediate boards is most often used for tabletops and side planes of the table, and checkers (in some types of pallets, they can be replaced by bars running along the transverse boards) - as connection nodes of the parts of the table.
Loft Table - Or Design Table
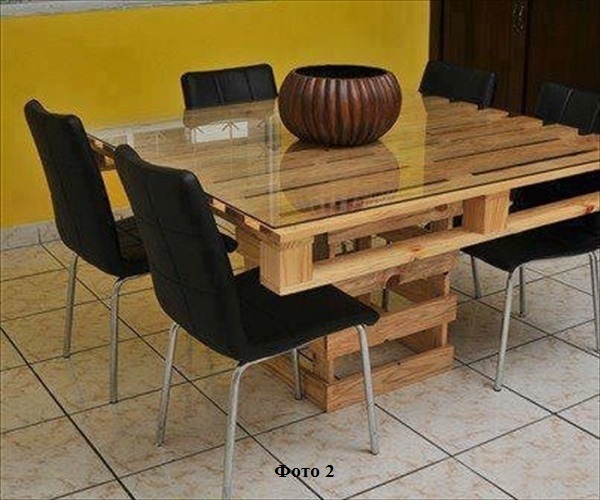
For the table, the size of 800x1200x750 mm, 3 pallet will be required. The table depicted in photo 1 will require them as many as 6 pcs., And may have a different configuration, since it consists of two identical modules. Having made such a couple, you can simulate the kitchen space in different ways.
In addition to pallets, we will need: nail-cutter, manual disk saw, configmatics (or nails) for screed parts of the structure, grinding, spatula, powder and wood paint, varnish.
Preparation for assembling design. Disassemble pallets as follows:
We collect the P-shaped design of the table, connecting the worktop with pallets supplied on the ribs and tightening them with confirmates.
For reliability, you can additionally install furniture corners on the back of the table top.
The central checkers of the side parts of the table connect the additional crossbar made from the transverse board, which remained after dismantling the first pallet.
Finish finish design. Thoroughly shaking the irregularities of the external surfaces of the table, paying special attention to the tabletop and the ends of the boards. Give putty dry and re-pollue outdoor design elements. Pain in the desired color and coat with two layers of varnish.
As you can see, the table from the pallets do it yourself very simple - for this you only need imagination and attention to detail. Try to make a table with photo 2 - you will see, you will succeed!
Post-table table top: Classic genre of the desired size
And again the old kind of classic, but created with his own hands.
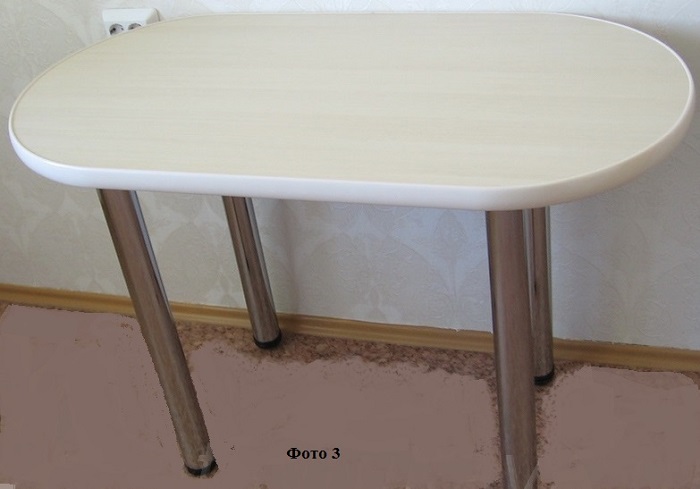
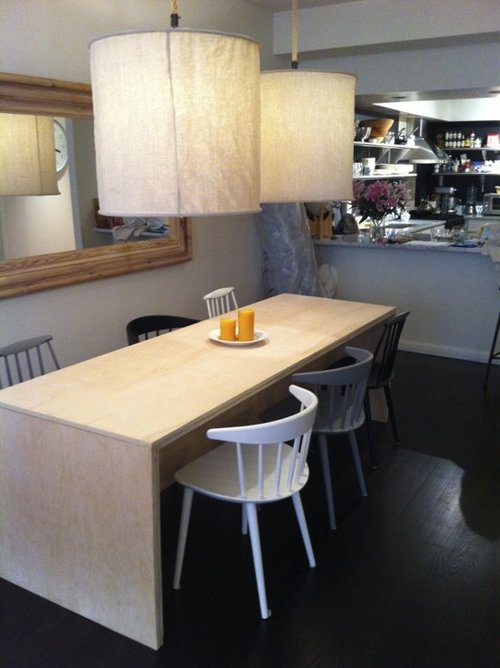
We need a very small segment of furniture countertops to significantly save on the purchase of a dining table for the kitchen. It will be about how to make a table from the table top with your own hands. The classic kitchen table (photo 3) is almost no different from the furniture purchased in the furniture cabin - except, the sizes of the table top, ideal for your kitchen.
We will need the following materials and tools:
- Marking. In accordance with the drawing, the details A and B are absolutely identical on the contour, the difference is only in the depths of assembly grooves. Therefore, it is better to make one template (from Watman), and on it already make marking on the plywood. Pay attention to the selection in red: the groovers must be on the same line, and their width (like the height of puzzle protrusions at the top of the parts) is equal to plywood thickness.
- Drinking and processing details. The attention is important here and accuracy: the strength and stability of the product depend on them. Grinding, toning and varnishing coating should be carried out on all parts of parts, including ends.
- Assembly. With a qualitative execution of previous steps, the assembly will not take much time: we connect the parts A and B (in the groove), the part b wept on top of puzzle protrusions. If the fastening elements of the Podstoley are somewhat performed above the table top plane - they must be counted (grinding). Cove the details of the finish layer of varnish - a table ready!
To the particularly outstanding furniture materials will not attract Phaneur. Its dignity in another - in the availability and ease of processing. Therefore, it is quite possible to manufacture such pieces of furniture such as coffee tables, tables for cottages, ping pong, etc. In addition, they can be decorate with original patterns from the same material. Make a table from plywood can almost everyone, and drawings of such products can be taken ready.
Plywood table do it yourself: opportunities and restrictions
Plywood - soft and malleable material for processing material. Not differing in special strength indicators and durability, multilayer plywood may well become the initial raw material for the manufacture of tables that do not experience heavy loads (both both folding and folding). In some cases, even children's tables are mastered: Plywood in this case can be used as a surface for various guys.
The undoubted advantage of the plywood table will be its originality, which is visible in the photo. And homemade, for example, you can decorate with carved shelves, also made with your own hands from plywood.
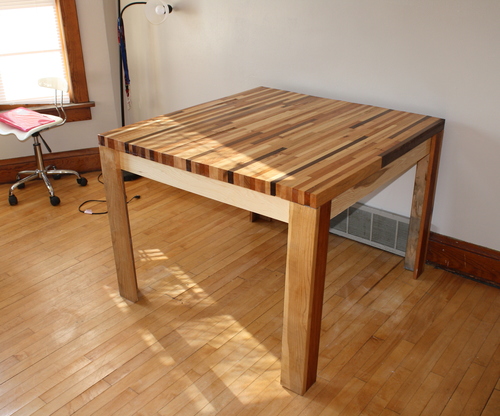
In order to ensure the satisfactory strength of the table top, it is better to use sheet material for its manufacture. The table from the sheet of plywood turns out to be stronger than the same, but made of cropping this materialAlbeit even thoroughly interconnected with the help of carbon black glue, resistant to water and moisture. In many cases, the finished product is subsequently covered with varnish or verses. The exception is the kitchenware, on which the cutting of food products is often produced.
Materials and tools required for manufacture
The first sodium plywood is considered the best for this kind of craft (stacked on both surfaces). In this case, surface defects are practically absent. Depending on the purpose, the water resistance class is also selected:
- Plywood FSF is suitable for products that are outside, and indoors, so you can make a folding table for cottage or to play table tennis.
- Plywood FC is suitable for use only inside - therefore it is possible to make a written or computer desk with your own hands.
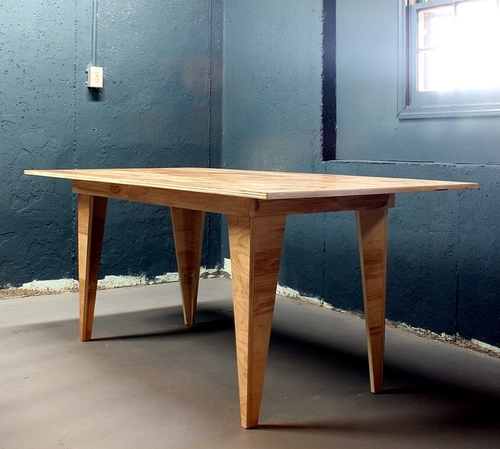
If we proceed from wood material, it is most advisable to choose for the manufacture of a table birch Faneruwhich is easily and well processed, and also has sufficient strength. The material thickness must be at least 20 mm.
Required:
- The pattern, with which the contours of the legs and the countertops are transferred from the drawing to the plywood sheet (for small tables, for example, journal, two wide and stable legs). A sheet of drawing paper or cardboard is often used as a template.
- Portable grinding machine for surface trim table tops.
- Electrolzik.
- Electrode for drilling technological and mounting holes.
- Hacksaw with thin teeth of the saw blade.
- Fastening products (screws, screws or anti-corrosion coating bolts).
Production sequence
The quality of the finished product largely depends on the correctness and accuracy of the performed template made according to the product drawing. In the case of the use of plywood trimming, connected in each other in the process of manufacturing the table, all subsequent operations are performed only after the complete preparedness of the semi-finished product. In this case, the excess glue should be removed immediately so that they do not spoil the appearance of the finished product. Since the electroll bison is used to cut the individual elements of the future table, then its capabilities should be correlated with the dimensions of the discharged parts.
Especially you will have to work on the table top: it must have an ideal symmetric view of the allowance for the subsequent grinding and removing sharp corners. In particular, after grinding on the surface of the table, there should be no burrs, scratches and other surface defects. If in the future the surface is supposed to decorate, it is better to use not paints, but colorless waterproof varnishes, under which a beautiful texture of the source material will be well noticeable.
If the table is in unfavorable external conditions (for example, it may be exposed to aggressive chemical media), T. best option There will be a table from laminated plywood - in this case, the surface layer of the source material will have a higher operational resistance. For example, the laminated plywood makes sense to make homemade kitchen tables, and in some cases even written and computer.
The folding table intended for the next installation on the balcony, loggia or in the country can also be obtained with your own hands. It is only necessary to more carefully make fastening holes for connecting parts, because at the slightest skews, the plywood product will quickly fail.
Drawings of tables from plywood in different types And performances can be seen in the photo. You can consider photos of tables from plywood, as well as the corresponding training video, which shows the sequence and procedure for manufacturing the plywood table.
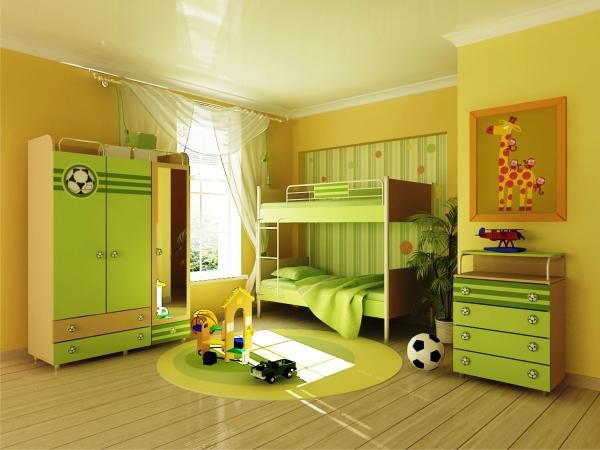
If you purchase furniture for children's premises, you need not only to choose an attractive appearance, but also to check it on environmental safety. The natural color of the tree perfectly harmonizes with bright colors of accessories or toys.
Today, you can find a lot of furniture options for children's premises:
- From plastic.
- Wicker.
- From MDF.
- From chipboard.
What product for children to choose? If the child's health is in the first place, it is better to buy an environmentally friendly material from a natural tree.
Wood products
Children's furniture from wood has a beautiful appearance, durability, environmental friendliness, so such a product is the best solution. This material has natural origins and distinguishes high wear resistance. Experts advise to buy deciduous wood. Coniferous for children are not suitable, as the child easily scratches such a product and traces will be very noticeable.
It is important to consider that the children are active and in negligence deform, the furniture scratchs. Hardwood wood has high performance.
The product for children's premises is made from different materials. Survived is a wood product with an antitoxic basis. If you acquire children's furniture from a tree, you need to carefully consider the finish. Ask the seller closer to show you, specify which paintworks were used? If water-based solutions were used - then take this product.
Children's product from chipboard and MDF
Finance does not always allow you to acquire what I want, and in this case, the material from a natural tree seems expensive pleasure. There is an alternative to wood - chipboard and MDF.
Chipboard is a budget material that allocates toxic components. Ask when buying, from what tree it was created. For children's rooms, products from chipboard are suitable, which have a group E. In high-quality versions, the slab must be processed from all sides: from the inner and outer side, they have a laminated base or veneer veneer.
Furniture from MDF is considered an more environmentally friendly option, since formaldehyde resins are not used when creating the slab. MDF holds better bolts than chipboard. You can once again disassemble and collect lockers and bedside tables. Such products have a long service life. But the price is at the level of the cost of the tree. But if you decide to purchase a product from chipboard, then choose a group E1.
Buying a product from plywood or natural organity, you need to know that it is environmentally friendly, reliable and durable. It used to be believed that plywood products are faded and simple. But improved technologies were able to change the vision of designers. Since this material is flexible, manufacturers began to create children's furniture from plywood different forms.

Children's furniture do it yourself
Distinctive features of furniture from this material:
- The basis of such a material consists in environmentally friendly material - natural wood.
- Plywood stability has high indicators. Even the most active child will not harm the product from plywood.
- Safety is detected by the high quality of the processing of the angles and the surface of the elements. Make the material completely safe for children is possible.
- Processing of elements does not have problems with your own hands. To independently produce a product, you need to have a simple tool kit: a knife, a file, a screwdriver, drill.
Disadvantages of furniture from plywood
Such material has only one minus - high cost. A sheet of good-quality organita in 18 mm will cost a round sum. But the usual plastic chair will be many on the pocket.
In the first place, as we have already said, environmental friendliness. Therefore, the FSF organite does not fit: when connecting the sides of the veneered product, phenol formaldehyde resins are used, which retain ease for a long time. Choose Phanera from the birch of FC, despite the fact that it is less resistant to moisture. Veneer from larch worse.

Chair and plywood table do it yourself
The perfect sheet thickness is 16-18 mm. In this situation, the product can go without a frame: instead of corners, the connection of the elements of the jack is applied. Aesthetic appearance of the wood base should be used: instead of paint, treat the phaneer with a transparent solution. The plywood of the first group has no bitch, holes, irregularities in the outer layers of the veneer. Therefore, it is best to buy it.
What materials still need for repair with their own hands?
- Bolts. Scrumbs are suitable for wood.
- Liquid Nails. Use glue preferably: it will make fasteners reliable and relieve the gaps.
- Varnish. A faithful solution is parquet polyurethane. It has high wear-resistance and is intended for use in residential rooms.
- If you use the electric jigsaw, it is better to have a wide cloth. If it is narrow, the smallest turns will be the radius. The more the teeth, the faster we will dial Faneru.
Production of elements do it yourself
If you are going to cut one side of the part, it is better to do the inside up. If the state of both the basics is important, then take the Pilka with small cloths. If you cut the lines curves, you still have to cut, follow the position of the web. If straight cutting is performed, then take the jigsaw and align it with a line on the platform. In this situation, cutting will be perfect.
To bend a plywood element of a small size, split it and dry. If the thickness is 15 mm and more, it is necessary to break off with cuts, from the back of the bend. Double reliability elements gives a dry detail glued on a dry detail.
An alternative to creating elements with a minimal bend radius and a large thickness is to sample several sheets of thin organic with further drying. The duration of sprinkling is from several hours to day, depending on the thickness of the product.
Children's furniture from green plywood
Decorative elements do it yourself
The children's room should look beautiful and aesthetic: it is often decorated with intricate patterns and drawings. How can you draw them?
The contour of the picture is transferred to elements using a simple copy. The resource of the picture is a children's book or magazine. You can enlarge the picture using a copy with a picture of an increase in the picture. To make the outline to be accurate, a device for burning wood is used. An alternative method is a sharp cutter. If it is not, then try the knife.
Most. simple method Shipping with their own hands is considered to use simulats of various colors. If there is a desire to apply a color picture to the base, its parts are disappeared by alkyd solution. If the varnish solution, then use the gouache or watercolor.
If the furniture is needed in the nursery, it is necessary to stick to round lines without bright angles so that the child is safely played in his kingdom. To handle the angles, take the rashpil, sandpaper and pass the surface.
If furniture is made from plywood low quality, I need to handle with the putty of faults with an acrylic solution by wood. Several times the spacure is performed. If there is no grinding machine, nothing terrible: take the bar, wrap in the sandpaper. Then cover the lacquer in several layers.
If you want to save money or in your family there is a master of all hands, then make children's furniture from plywood with their own hands simpler simple.
Original bright and comfortable children's furniture from plywood can be made according to their own drawings. A variety of material allows you to build all sorts of models of tables, chairs, beds in the shape of a ship or machine and much more. At the same time, the furniture will cost inexpensively, and last long. The main thing to adhere to some rules and councils of specialists.
Choosing sheet and other material
Since the furniture is assumed for children, then the first qualities that material must have - is environmental friendliness and safety. Therefore, you can safely follow the children's furniture with your own hands from Plywood FSF brand, since this type of production sheets is glued with a resin, which contains phenol formaldehyde, which is especially harmful to health.
The ideal choice will be the plywood of the brand FC from birch, although it is less resistant to moisture, but when it is created, only carbamide resins are used. In addition, the birch is smooth and does not threaten the toddles as the same larch. Although several layers of varnish can be saved in this case.
As for the thickness of the sheets, the optimal for furniture is considered from 15 to 18 mm, then the furniture can be created without a frame and connect the details of the jack, without corners and bars. Finishes in this case are also not particularly required, you can simply open with varnish, just a great natural wood structure will be visible. Although for children it is possible, it is still a bright color children's furniture from plywood with their own hands, in the photo below the example of such a model.
The variety of material is subject to choice, better than the 1st grade, although such a fane is harder to find proper quality. Grade 3 and 4 are permissible, but will additionally have to shit and paint, which will increase and labor costs and cost the final product.
You will also need fasteners, which will make screws or liquid nails. In the role of the first, it is recommended to choose the screws for the tree with a length of 5-7.5 cm, and with a diameter of 3-4 mm. The second can act as silicone sealant, they are optional, but desirable, since then the combination of furniture parts will be stronger, and they can also be seeded.
As already mentioned, the furniture can be lacquered, the polyurethane is suitable, as for parquet. This material has high wear resistance, besides, intended for use in residential buildings And not as expensive as the yacht.
Choosing a tool for cutting plywood sheets, it is worth noting that most often we use the electrolovka. The wide web will give the most straight line, with a smaller width of the web - the rotation radius decreases. It is easier to cut with large teeth, but when cut across the fibers of the veneer from above, it is better to take it smaller to avoid pushing chips.
Attention! The electrolovka is applicable to plywood with a thickness of 1.5 to 6 mm. All that overwhelmed with a disk saw.
When connecting furniture parts for kindergarten From plywood or for home use before mounting on nails or screws, you need to drill holes for them. And when working with plywood made of soft wood under the hts of fastening items you need to put the washers. If some kind of curved item is required, then it must be pre-mixed and dried by attaching at the desired position of the clock by 12.
Tip! When laying the layers of veneer, they can be glued with paper strips.
Practice of the manufacture of plywood children's furniture
First of all, you need to prepare drawings of children's furniture from plywood or find ready-made specialists. Below are instructions for assembling several ready-made solutions for children's furniture with the drawing app. For work, the following will be needed. instruments:
- Drill;
- Drill;
- Confirmation nozzle;
- Curly nozzle for screws;
- Lobzik;
- Grinding machine (manual);
- May be needed iron and hairdryer.
Stages of manufacturing a simple baby bed:
- Cut the bottom of the bed. For this, a sheet of plywood is plywood 18 mm thick and a size of 3000x1500 mm and cuts into two segments of 2x1.5 m and 1x1.5 m, the latter will become the headboard.
- Stripping the ends of plywood skirt.
- If the plywood is not laminated, then a piece under the headboard is processed by a verse or paint.
- Collection of the bed frame. This item needs to be made from BRUSEV. For the longitudinal part, 2 vehicles of 2 m long, for transverse - 1.5 m per minus double width of the bar himself. The finished bars are bonded among themselves with nails, wood or self-drawing waters. The fasteners are placed in a checker order.
- Installing the bottom on the finished frame. Fastening is carried out at this stage with long bolts.
- Fastening the legs of pieces of the same BRUSEV inner corners The collected frame.
- Decorating headboard. Detail decorate a cloth for furniture upholstery, attaching it with a construction stapler. For convenience and safety under the fabric you can insert a piece of foam rubber.
- Fastening with long bolts headboard bed to the whole design.
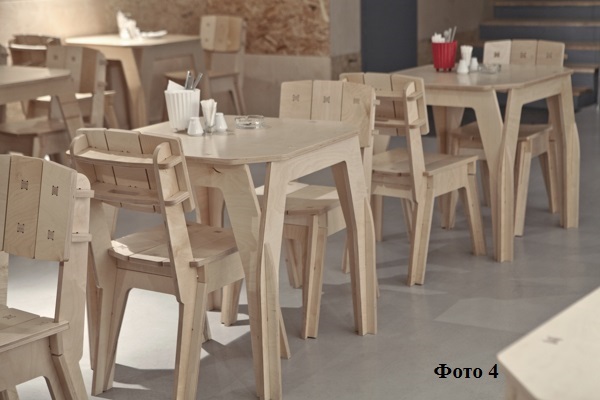
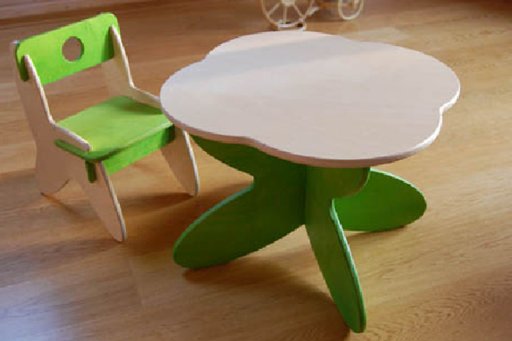
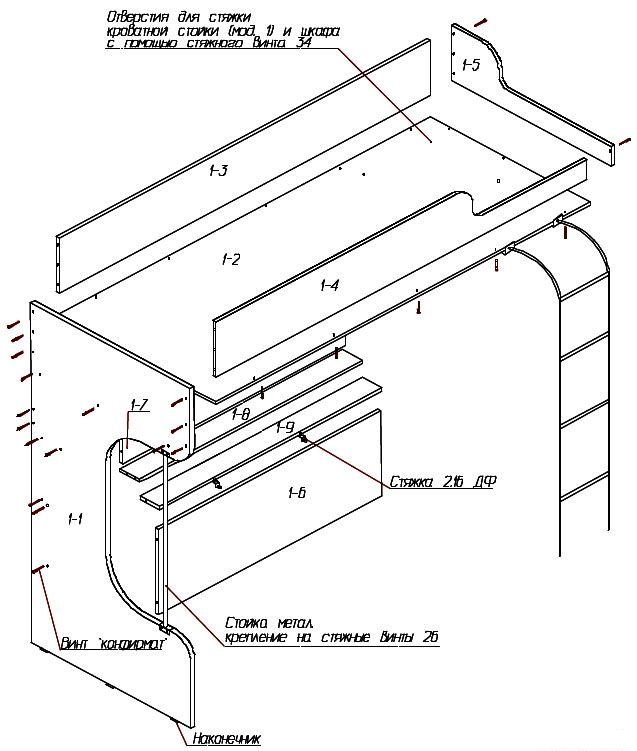
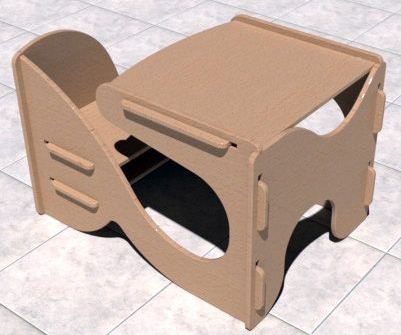
Now imagine the method of manufacturing a children's desk and chairs for a kindergarten of plywood and absolutely no fun. The model consists of 8 parts that the spike is connected in the groove. This model refers to quickly prefabricated designs. The width of the party will be in the finished form 60 cm, the countertop is at an altitude of 52 cm, the length of the structure is 83.5 cm.
Making parties and chairs from plywood:
- Cutting curvilinear figures from plywood with a thickness of 15 mm and the size of sheets 1520x1520 mm according to the drawing parameters with the help of an electrolovka.
- Grinding details.
- The final processing of details of the jigsaw, a knife or hacksaw, intended for metal products.
- Processing with sandpaper (grain 80) corners.
- Build construction.
You can also make a chairs from plywood parts too. To do this, you will need 16 flat pieces of plywood of large thicknesses, which are connected to each other. Corners for strength are strengthened with metal parts, which combine legs, back and seat. They can be made of steel or aluminum sheet, the thickness of which will be 1-1.5 cm.
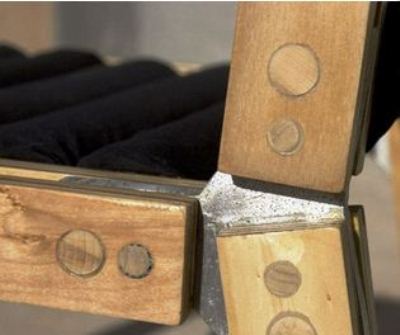
At the bottom of the chair, the legs are connected in front and behind the rods from the birch tree, the diameter of which is 2 cm. The same rods are placed in the back of the chair and the seat, simply on top they are separated by foam rubber and covered with high strength tissue. Thus, the seat is not just easily done, but also can serve as an excellent massage simulator.
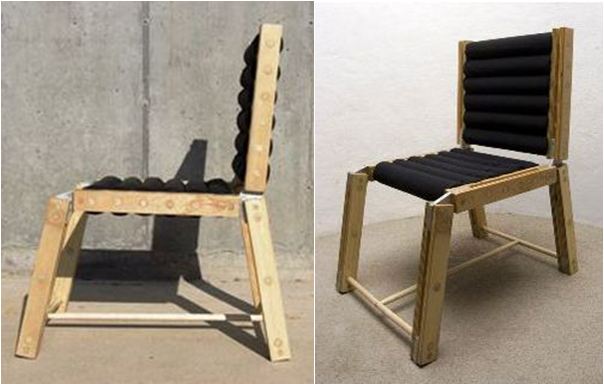
Make a rods from birch bars hard all. This can be done using a lathe and a circular dice with a diameter of 20 mm. The rest is already easy, the main thing is to correctly calculate the parameters of the chair "for yourself", and also do the holes for the rods in the back of the chair and seats.
The rods are inserted into the holes with the strengthening of the glue mixture. PVA or epoxy glue is suitable for this design. When the whole design is collected, glued and dried can be covered with colorless varnish in several layers. For kids, you can paint the elements of the stool into bright colors or climb the seating and back cloth.


