There is no smallest in construction. As it does not sound strange, but sometimes the absence of only one item can lead to the fact that the house very quickly fails and you have to start the overhaul of your home. Such an important detail belongs to the scene around the house.
Do not be surprised, it is its presence that increases the service life of the base several times, and as a result, and the whole house. Let's talk today how to make a break around the house with your own hands.
There are many options for installing the scene around the base of the house. But the most common is concrete fill on a prepared basis. The technological width of this base is 70 cm. This is enough to protect the base of the foundation from additional moisture.
We drive the pegs at a distance of 70 cm from the basement basement and stretch the thread on them. This is a kind of feature to which we will have to do a break. Then proceed to the excavation of the fertile layer of soil. It is very important to take it to the leveling of your site.
The most optimal way to do is choose the entire fertile layer of the soil to the sand layer. Do not be afraid if you have to "remove" 15-20 cm of the soil layer, in the future it will fall asleep with sand and will become an excellent pillow for the scene.
The scene is a type of construction that will significantly extend the service life of the construction of any type. It can well be done by himself.
What is the scene?
In essence, it is simply a trench of a depth of 0.5m, which rolls around the building tightly to the foundation. A gap is formed between the foundation and the breakfast, which is covered by a compound and several layers of rubberoid. An formed emptiness falls asleep sand-crugging mass.
To date, the most common is the cesspost on a multi-layer pillow, which means alternate rubble and sand along the layers. In general, the coatings for the breakfast can be divided:
1) Hard. This type of challenge is a monolith, consisting of asphalt or concrete.
2) Semi-rigid. This scene is created using a pillow of several layers over which the tile or cobblestone is stacked.
3) Soft. That in their essence is just a multi-layer embankment.
Why do you need a scene?
To do a break if not necessarily, it is very desirable. Among its basic functions are distinguished:
- decorative component;
- protection of the foundation from various weather phenomena (rain, melting snow, etc.);
- Protection against frost. This is especially true if you warm the breakfast.
How to make a blind area around the house?
- The most acceptable option is 60-cm scene. It is worth paying attention to the fact that the scene should not be wider than the protrusion of the roof.
- The scene must be along the whole house.
- When creating a breakfast, it is important to create a slope that will enable moisture to pass into the ground. The angle should be from 1.5 degrees and above.

The scene itself consists of two main layers:
. Litter. The task of this layer is to form a smooth compacted basis. As materials use: clay, crushed stone and sand. The thickness of this layer should be about 2 cm.
. Coating. This layer should be protected from water, so it is better to do it from asphalt,  "target \u003d" _ blank "\u003e concrete or stone. The layer thickness can reach 10 cm.
Stages of construction of the scene.

7. Put crushed stone. Layer about 7 cm.
8. To strengthen the scene, install the reinforced grid.
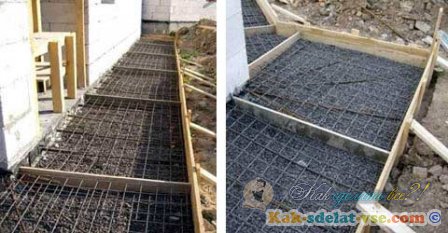
9. Where the scene is connected to the basement, make a compensatory seam. It will protect the soil from sending soil. His width is about 1.5 cm. Fill it with sand or stone.
10. Pour concrete.

11. When you already pour the breakfast concrete, take the seam every few meters.
12. Align the solution. Helps in this pressure of wooden plates.
13. Cover the surface so that it does not swam. If necessary, moisturize it.
14. After a week, remove the overlap - the Gotos is ready!
Video. How to make a break?
Having dedicated a large number of articles to the construction of various kinds of buildings, this time we want to tell about such an important completing stage of construction as a defense. What is a breakfast, for which it is needed and how to do it - all this you can learn from this article.
What is a breakfast
The scene is a coating that passes around the perimeter of the house, with a slope towards it, to protect the building from water. To be more clear, the scene is a "track" that passes on the house on its perimeter.
What is needed for something
We want to emphasize the attention on the fact that the scene is really needed is an integral part of the construction of any capital construction. What is needed for?
The scene is needed primarily for the barrier waters so that flowing water does not create a puddle near the foundation and did not destroy it. In addition, the scene takes water dragging from the roof, again so that it is not formed in the puddles and did not destroy the foundation.
Also, the scene is used as an element of decor, which gives the construction of the completion. The scene also protects the foundation from the freezing.
As you understand, the scene is an integral part of the construction and performs protective functions. If it is not, the foundation and the base will be collapsed.
What makes a break
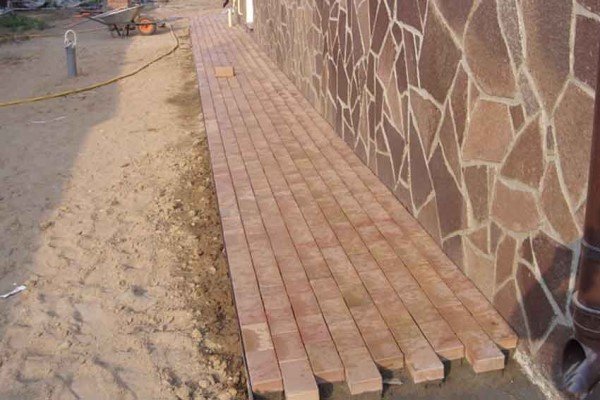
Previously, during the construction of houses, the scene was made from asphalt or concrete, now, as a rule, asphalt is not used. Most often, now the gentle is made from concrete, it is quite practical, in addition, the concrete breakdown can be postponed with paving tiles, which will look very beautifully on the overall background of the construction.

How to make a blind area around the house
To begin with, you must measure where you will have a breakfast. The optimal width of the scene is 1 meter. If the visor of your building performs for a greater distance, then the gentle is needed to do more so that flowing water falls on it.
When you were determined with the width of the scene - we produce its markup. To do this, arche with spikes or rods and a rope to outline the area where the scene will end. After that, we remove the layer of the Earth for 25 centimeters to the depth (that is, the fertile layer of the Earth), throughout the perimeter, where the scene will be made, from the base to the borders of the scene. Then I wonder the land.
The next stage of work is a formwork formwork for the fill of concrete. It also needs to be done throughout the perimeter, where the formwork will be held. We want to draw your attention to one quite essential nuance. Concrete for formwork is best done solid. Why? If you pour concrete parts, then the joints of these parts will be not as strong as the monolith, in the end, with great confidence it can be said that in this place there may be a crack in the future and you will have to repair the scene. Therefore, we advise in advance to take into account this moment and eliminate the possible onset of negative consequences and pour a monolithic break.
But before pouring the concrete formwork, you must pour a sand pillow. To do this, you will need sand and tamping material. On the perimeter of the breakfast, we embarked the sand layer with a height of 10 centimeters, after which I shed it with water, but at the same time not very pouring it, so that the sand does not grow and did not turn into a porridge, and so that it was loose and it could be easily tamped. You can catch up with any girlfriend with a smooth surface.
When the sand pillow is ready - we fall asleep rubble. The height of the rubble layer should be at least 5 centimeters. Watering it unnecessary, but you can slightly tumble.
When the flooring is ready - we put the road grid made from the rods from above. Such a grid can be bought in finished video In a construction store, or make it yourself. The width of the grid should be 1 meter.
After laying the grid, we turn to the most difficult stage - the fill of concrete.
How to make a slope
The scene as you understand, performs the role of drainage, so it should be under the slope so that water flows from it. The set of width in the meter is made at an angle of 5 degrees. In order to pour the cabin at an angle from the side of the house, a slightly larger concrete solution is poured, approximately 1 centimeter, after which it is aligned with the level and rule.
How to pour concrete breakdown
When the place for the scene is prepared and the formwork is prepared - you can proceed to the pouring of concrete. Cook concrete You can independently or order it. Of course, each of us is trying to save and makes the decision to make concrete on your own, but rationality is important here. Cook concrete solution You can independently if you have a small area, if your home is big, then cook, for example, 8 tons of concrete for 4 hours, until the flooded part began to dry - you need to try to very much. At the same time, it is very difficult to do it very much if it's really real. Therefore, if you need a sufficiently large number of concrete, it is better not to save and order a car that will fill a concrete and you will be unnecessary to carry it yourself and fill. The only thing you need to do is to align its surface and make slightly 5 degrees using the rule.
When concrete is covered - we give him a couple of hours to dry out and cover it with a film. Within two days, the film can be removed. This is done to moisture in concrete, not evaporated.
Decoration of sidewalk sidewalk
As already mentioned earlier, the decoration of the scene can be made by paving tiles. To do this, when the concrete gentleflow is completely dried, stool the waterproofing film, we smell on it sand, centimeters 10 and well tamper it. The edge of the scene is made border, which will hold the tile. Then lay out the pavement tiles and fall asleep its seams.
The village, the surrounding house, plays a very important role in ensuring long and comfortable use of the house. It provides protection for the design of the foundation and soil around it from water from entering water. Moisture accumulation near the house when melting snow or during precipitation can blur the upper layer of the soil and reach the foundation. If she succeeds in leaving the sole of the foundation and damage it, its carrying ability and strength will decline that as a result can cause the destruction of the house. It is especially important to be properly done in the case of using a finely breed basis, in which the sole is close to the surface, why moisture can easily reach the depth of its embedding.
The width of the scene must be the maximum possible, as it should protect the base.
As a result of the opening, the strength of the sole is reduced, and it begins unevenly, destroying the foundation. However, even in the case of the use of shredded grounds, it is also necessary. It should always be done, regardless of the design of the base, such as soil and other conditions.
Preparation for the creation of the cabin around the house
How to properly make a high-quality break around the house so that it serves as long as possible and has become a reliable protection for the foundation? To do this, it is necessary to choose the appropriate material of good quality and clearly follow technology.
First of all, you need to choose the width of the scene around the house. Since it should protect the base, its width should be the maximum possible.

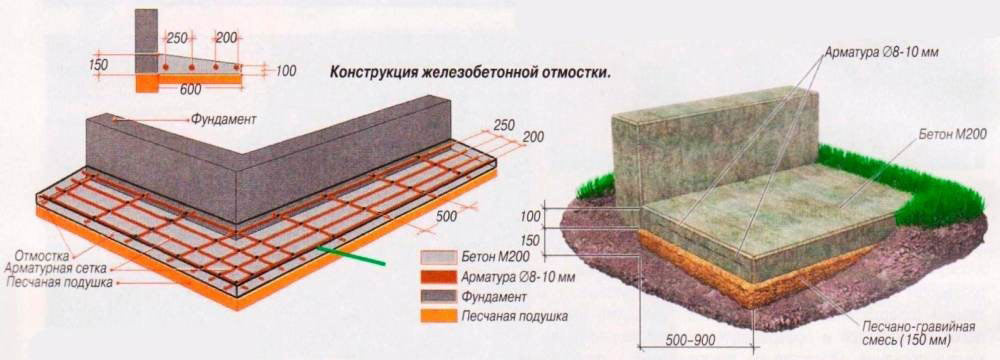
Scheme of the scene around the house.
In addition to the protective function, the breakpoint around the house is also elevated as a path around the perimeter of the structure. This also needs to be taken into account when choosing her width so that in the future I did not have to walk on her side. Based on the foregoing, it can be concluded that the most optimal width of the correctly made scene around the house corresponding to all standards and requirements is within about 1-2.5 m.
The scene around the house must be done with a specific slope, due to which water flows in the direction of the walls of the structure will be ensured. The construction norms define the magnitude of the slope equal to 50-100 mm per 1 M of the width. This means that the edge of the scene around the house, the width of which is 1 m, will have a height of 50-100 mm near the wall of the house, and the other the same region will be located in the ground. The resulting descent is good for removal of water from the structure: water on it will be quick enough, but it is difficult to walk on such a break. However, if you make an angle of inclination less, the water will flush much slower or linger at all on the surface, but it will be much more convenient to walk. A compromise between efficiency and comfort is a slope equal to 15 mm per 1 M width. When walking, such a slope is almost not noticeable, and the water is completely flowing down and does not delay on the surface.
Back to the category
Materials and coating for the scene around the house
To make the right thing to make a break around the house, it is necessary to prepare the appropriate materials. There are several popular options for its manufacturer when used various materialsBut the most common is a piece of concrete.
Manufacturing technology is quite simple. First of all, the platform is cleared, after which the reinforcement bar with a diameter of 6 mm is stacked in the form of a grid. Between themselves, the rods are connected with the help of knitting wire. Next is installed formwork made of wooden boards. At the end of the formwork is poured by concrete solution.
The durability of the foundation, as well as the amount of money and time spent on the design of the structure itself, depends on the ability to be done in accordance with all the norms and regulations. It is better to take care of creating a mess immediately after completing the construction of the house.
The scene around the house consists of 2 structural layers. The first one is the underlying layer. The main task of this layer is to create a compacted smooth base for the coating. Material used: sand, clay or fine crushed stone. Layer thickness - up to 20 mm. The choice of material for the underlying layer is completely dependent on the material of the second layer, i.e. Coatings. The main task of the coating is resistance to the devastating effects of moisture and waterproof. The material used: clay (it can be used both as the underlying layer and to create a coating), asphalt mixture, concrete, fine cobblestone. Layer thickness - up to 100 mm.

The scheme of the device of concrete scene.
This is true for any types of challenge around the house. Next will be given the instruction of the device device on the example of the most popular option - concrete.
For cooking concrete mix It is necessary to take cement M400, crushed stone and sand in proportions 1: 4: 2.
Make marking for future messy around the house. The minimum width of the design was told earlier. Remove and construct the land around the perimeter of the structure. Typically, the soil is still removed on the zero cycle of construction work. When building, the scene must prepare the Earth under the width of the future design in accordance with the markup made. It must be taken into account which material will be used during construction. For concrete breakfast, the land needs to be removed to a depth of about 25 cm ("on the bayonet shovel").
The next step is the manufacture of formwork from the board. For formwork, boards with a thickness of 20 mm are used. A small clay layer is stacked on a compacted land. Clay is aligned and compacted. The sand layer is stacked with a thickness of about 10 cm. The sand needs to be carefully sealing, for which it should be additionally shedding. Try not to overdo it. Remember that at the bottom of the clay. Especially carefully you need to seal the sand at the foundation. Now you need to lay a crushed stone with a layer of 60-70 mm.
2017-04-10 9:47
Today I will tell you how to make a break with your own hands.
During the construction of a private house, various nuances should be taken into account. Including - preventing the fitting of the foundation with rainwater. A constant flow of water under the foundation can lead to very undesirable consequences. The action of atmospheric moisture on the basement concrete leads to the occurrence of cracks and other damage. In these cracks begin to germinate the roots of plants and produce a destructive effect on the foundation.
Sometimes, in the construction of the structure, builders for some reason forget the existence of such a problem, and the owner of the house has to solve it. Some owners do not realize the need to ensure the protection of the foundation of the structure, and this significantly reduces the operational period of the housing.
In order for the water to do not flow under the foundation make the breakfast - special strengthening of the perimeter of the structure. In the presence of construction work experience, this element of the construction of the house can be made independently, thereby saving on the services of specialists.
So how to make a break yourself?
Why is it necessary?
The scene is designed to carry out the following important functions:
- prevention of the foundation of the structure from such destructive factors as moisture, plant roots, and so on;
- the diversion of rain or melt water from the walls of the house into the drainage system, for which the scene is equipped - such a design provides a decrease in the risk of regenerating the foundation;
- enhance aesthetics external view at home, giving it harmony and completeness;
- reducing thermal loss during the cold season.
How the scene is arranged

The base of the scene is the underlying layer, on top of which the covering layer is applied. Often, to create them are used different materials. To ensure drainage from the walls of the structure, the surface of the scene must have a small slope.
The covering layer is often made from concrete.
In this case, the surface of the base layer should be horizontal, the slope of the surface of the covering layer is created when concrete is poured. The standard slope value is five centimeters per meter.
The underlying layer is most often made of clay, rubble or gravel. The most practical material is mint clay due to the fact that it does not pass water well. Usually the underlying layer makes a thickness of 0.25 to 0.3 meters. When using clay sufficient thickness for the underlying layer will be from 0.15 to 0.2 meters.
If crushed stone or gravel is used when creating the underlying layer, then the sand layer from 0.07 to 0.1 meters should be passed between it and the covering layer.
The covering layer is made of durable and waterproof material - natural stone, asphalt, concrete. In some cases, it is used for this brick or a tile for sidewalks.
Preparation for work
The first step in preparation is to establish the main parameters of the future design. The standard minimum flap width is 0.6 meters. However, in its design, it is necessary to take into account the following factors, including those related to the characteristics of the architecture and design of the structure:
- The position of the roof cornice of the roof of the house: the edge of the scene must perform for this line at least 0.25-0.3 meters. This will prevent the water flow from the roof to the ground in the absence of drain or problems with it.
- Combinedness of the scene with the common structure of the structure and the surrounding landscape.
- Features of the soil around the building. So, if the house surrounds the step-down soil, the minimum recommended width of the scene is one meter. Such a size provides the convenience of applying a breakfast as a track.
- The facilities of the climate of the area in which the house is located.
- Materials that are supposed to be used to build a breakfast. So, if you make the covering layer of paving slabs, then the slope can be made less than in the case of the use of rubble.

After establishing an acceptable value of the breakfast width, it is necessary to determine the angle of inclination. To ensure effective drainage, the magnitude of this angle should lie within between two and five degrees.
The slope of the scene can be created both in the process of laying the underlying layer and during the installation of an external coating. The choice of one or another approach is determined by the materials used.
Materials and tools

The next step in the preparation of the construction of the breakfast is the calculation of the required volume of materials and the selection of the necessary tools. To bookmark the lower layer, you need crushed stone, sand or clay.
The most common material for the covering layer is concrete. If it is supposed to be used in the construction of it, it is its, then the following instruments and additional materials will be needed:
- concrete mixer or trough for stirring cement mortar;
- wire;
- reinforcement rods;
- bayonet shovels for soil coppes and scooping shovels to work with a solution;
- line or roulette;
- level.
Skostka do it yourself
- Marking

The first step in the construction of the scene is the markup of the territory in front of the structure. To do this, you need to drive around the perimeter of the building in the ground pegs at the required distance from the wall and combine them with the twine.
2. Prokotka trench for the slate
After this operation, you need to dig up between the stretched twenty and the wall of the house, the depth of which will be determined by the selected material. As a rule, the thickness of the cabin of concrete is 0.25 meters. At the same time, the surface finishing thickness is not taken into account.
After the trench is ready to prevent unwanted growth of plants in it, whose roots can have a destructive effect on the design in the future. For this, the soil is processed into the trench and near it with special herbicides. If the trees grow not far from the future breakfast, their roots should be poured.
You can also pave geotextile, but it is more expensive
Prokopka trench is not always the necessary procedure. If the soil around the house is sufficiently soft, it will be enough to the appropriate depth.
3. Installation of formwork

The next step is to assemble the formwork. For this, you can use non-cut boards with a thickness of at least 20 millimeters. Boards are installed along the outer border of the pit. As a backup, you can apply bars from wood.
4. Creating a litter layer
After mounting the formwork, it is necessary to catch the bottom of the trench and fall asleep its clay so that the thickness of the layer is 50 millimeters. Clay must be tightly tumped, and then pour a sand layer with a thickness of 100 millimeters on it, which should also be sealing. So that the seal of the sand layer was high-quality, sand should be moistened. The completion step of this stage of the work is the laying of rubble over the sand layer.
Tamping the soil at the bottom of the pit is the necessary step in carrying out work on the construction of the scene. If this is not done, then the scene in the future can be asked under its own weight. In order to completely eliminate the seeping of water through the cabin, the clay layer can be separated from the subsequent layers with waterproofing material, for example, polyvinyl chloride film or polyethylene.
5. Installation of reinforcing grid

After the preparation of the pillow is complete, the armature is placed on the surface of the crushed stone layer so that the reinforcing mesh is obtained. At the same time, the distance between the rods should be from 100 to 150 millimeters. Places of crossing the rods need to be tied with wire made of steel. The presence of a reinforcing grid ensures the strength of the scene and its ability to withstand various loads.
Instead of reinforcement rods, you can use the finished reinforcing grid.
IT'S IMPORTANT TO KNOW
An important nuance in reinforcement is to ensure complete enveloping of reinforcement with cement mortar. To do this, you can lay the grid on the bruises from the tree, which gradually remove in the process of concreting.
6. Creation of temperature seam

Where the scene comes with a wall of the building, the temperature should be created, the width of which should be approximately 15 millimeters. To fill the seam space, sand mixed with gravel or bitumen is used.
To create a heat insulating layer between the cabin and the wall of the house, you can also use plates from extrusion polystyrene foam or foam. It is important to ensure a dense adjacent to each other plates of the insulation.
7. Pouring concrete
![]()
The next stage of the work is the fill of the concrete solution. To do this, first should be laid across the trench rails from the tree so that the distance between them was 2.3-2.5 meters. The purpose of these regions is to create deformation seams that ensure the normal operational characteristics of the structure. The width of the REC should be such that their edges coincide with the surface level of the concrete layer. To prevent the destruction of the rails with bacteria and fungus, wood must be treated with an antiseptic solution and coat a layer of bitumen.
Standard concrete solution is prepared from cement (one part), sand (two parts) and shallow rubbing (three parts). It is advisable to use river or sea sand. If the usual sand from the career is used, then it is first necessary to wash it for removing various impurities.
Sand flushing is produced twice or three times. To do this, you can use the concrete mixer. When washing, the sand falls asleep in the concrete mixer, poured with water and stirred for several minutes. After that, the concrete mixer turns off and the water merges. If this procedure is neglected, then in the future, the erosion of the breakdown with water is not excluded.
Concrete pouring is made at once with one layer. Otherwise between the plots filled into different timeThere may be cracks in the future. Therefore, even if you pour all the concrete for one day for some reason it is impossible, then the next day the work should be fully completed.
To prevent the formation of cracks and defects in the future, it is important to ensure the high quality of the cement mortar. Therefore, it is best to cook it in the concrete mixer.
If hot weather was installed during the construction of formwork, then best time For work - Early morning or evening.
8. Alignment of concrete surface

After the concrete layer floods and has not yet hardened, it must be aligned and create the necessary slope. To perform this procedure, the rule applies. If this tool is not, you can use a conventional wooden slaughter with a smooth and smooth surface. To ensure evenness, smoothness and faithful surface inclination should be used special lighthouses as landmarks.
Upon completion of work on the creation of the covering layer, the surface of the concrete is necessary to cover with a saucer, moistened with water. This cloth must be regularly moistened, not allowing it to dry. This will ensure the prevention of cracks in the concrete when it is gradual hardening.
9. Finishing and decorative work
The process of rejection of concrete continues from two to three weeks. After this time period passed, and the concrete gained the necessary strength, you can remove the formwork and proceed to finishing and decorating its surface. To do this, you can use porcelain sheets, or something else.
Downtown houses do it yourself - video
Well, that's all, friends.
Thus, the creation of a scene is not very complex construction work. Following the instructions, you can perform this work yourself, and spend only on building materials.


