The bath is a construction that necessarily builds each owner of the site when arranging its territory. It is used to perform hygienic and paired procedures. When they are carried out, water is used in large quantities, which should be discharged from the structure. Many are installed in bath plumbing devices. Therefore, there is a need for drainage. To do this, sewage is needed.
When installing, the system must be arranged in such a way that it is convenient to use it. Therefore, it is thorough to the question of its creation. Each stage upcoming work is thought out most carefully.
Before you begin the creation of sewage in the bath, you must give answers to the following questions yourself:
- how wastewater will be discharged from the bath;
- what kind of sewage system will be used in the bath and how the septic tank or drainage system will be located;
- what depth in winter time Mix the earth on the site.
If the owner is suitable for the construction of sewage in the bath in the bath, then in this case it does not avoid errors. The consequence of their appearance will be that during the operation of the sewer system, you can encounter such phenomena as mold and rotting processes. During the use of the bath will be felt by an unpleasant smell. With the incorrect organization of the sewer system, the process of destruction of the design of this structure can begin. In addition, waste water will begin to stroke.
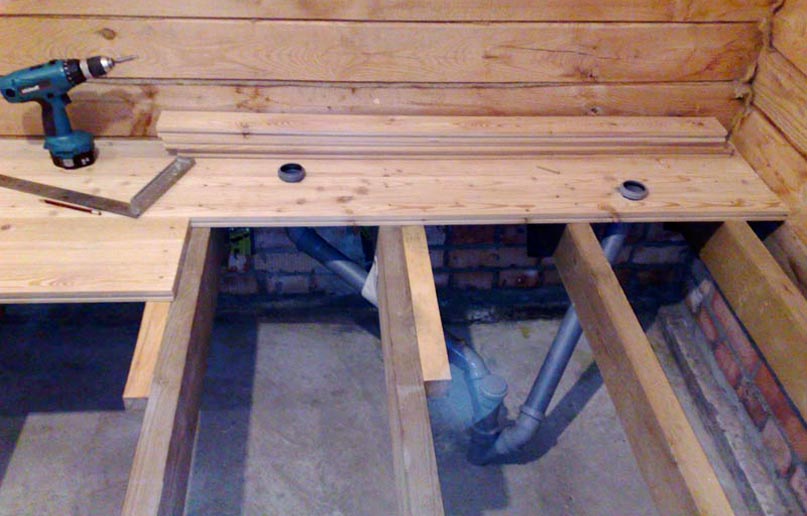
 First of all, I would like to pay attention to the fact that the installation of sewage in the bath should be made before work on laying the floor in the bath. At the same time, the greater value, from which material there will be the floor in the bath does not have. Regardless of your choice on a drain device before creating a sewage, you must perform certain preparatory work.
Many mistakenly hope that all the strokes from the bath will take the soil. However, this variant of wastewater removal leads to the fact that the soil is contaminated, the soil is blurred. If you refuse the idea of \u200b\u200bcreating a water removal system, then after a short time, from the start of the operation of the bath, you can encounter a shrinkage of the structure, its main designs will begin to deform.
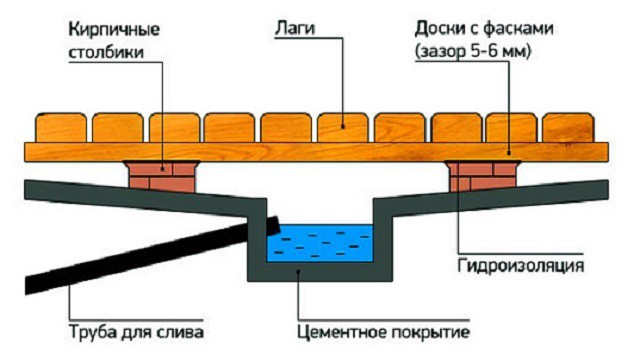
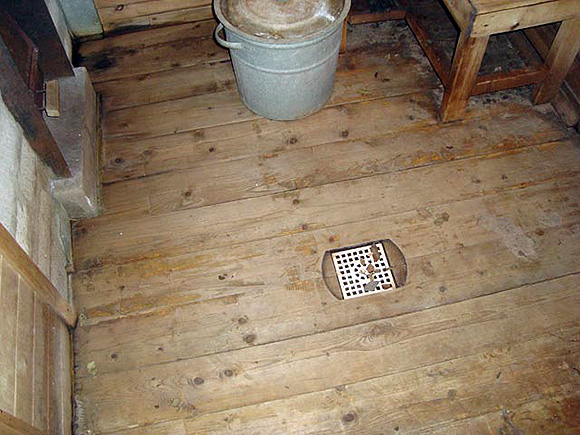
If the erected construction for paired procedures is intended for a family of three, and it is used only once a week, then in this case you can not worry about the device in the structure of the sewer system if the bath is erected on sandy and sampling soils. In this case, to remove the water, the creation of the flowing gender is performed. This work lies in the fact that the floorboards are fixed loosely. They fit free with a gap of 5 mm.
This allows you to raise the floor at any time and dry it. Streams that pass through such a floor abupid to the ground. If the amount of battery will be large enough, then in this case it is necessary to equip the non-pending floor in the structure and create a sewer.
Floor floor
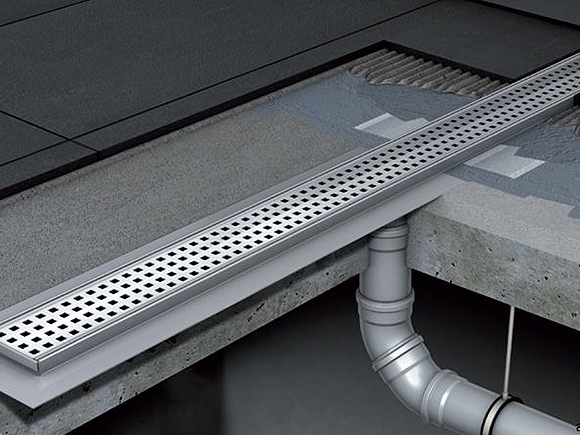
Quite often, when the floor is installed in the bath, it is done non-shy and at the same time provide a natural bias in one direction. This ensures rapid wastewater in the chute. It should approach the sewage pipes, which provides the transportation of wastewater into a drainage system well or a specially equipped septic tank. The chute holes are usually covered with grille, but often the owners of the bath arrange it in the wall separating the washing room and the pair. It is quite convenient because it does not have to create additional gutters.
Working on the sewage device in the bath, you must not forget about the device of the ventilation riser. It must be arranged on the plum. For its manufacture use asbestos or ordinary steel pipe 10 mm diameter. At its upper end, the deflector is dressed.
Pipes for sewage
 When the internal sewage device in the floor of this building uses non-free pipes from plastic, which the wall thickness does not exceed 3.5 mm. In addition, apply shaped elements. For the purpose of providing high tightness of the sealing system when connecting all elements that make it up, special high-quality seals are used.
When installing the external pipeline, PVC pipes are used. The selection of the diameter of products is carried out depending on:
- how many people will use the bath;
- how many plumbing devices will be installed in the premises of the structure.
50 mm - exactly so much should be the minimum pipe diameter for the bath sewage system. Laying pipes is performed with a specific slope necessarily below the level of primerization of the soil.
Water shutter device
Mapping the sewage in the bath, you need to perform work on a special ladder device. It can be built of stainless steel and concrete. At a height of 10-15 cm from the bottom, the nozzle is raised, while the steel plate is tilted at any angle, and then fix it everywhere except Niza. Thanks to this, a water shutter is created, which prevents the spread of unpleasant odors. In addition, it eliminates the penetration of cold air balls outside. The gearbox is covered with a grid that will be as a peculiar cover.
Sewage without water shutter
 The sewer in the bath can be arranged without using a water shutter. To do this, you need two or three bricks to raise the base in the bath, pave drain pipe Before the well to the drainage system.
Inside the bath to this pipe, you should attach a knee with a diameter of about 5 cm, and top The knee should be located below the level of floor covering in the bath by 3-4 cm.
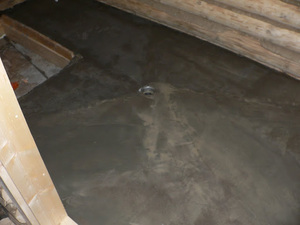
A mixture of slag and cement must be pouring the floor in the bath. From above should be executed concrete screedIn which special grooves should be arranged for draining water towards draining.
Rubber ball The required diameter should be put on the drain knee. After pouring the screed, he must unhindered to separate from the floor. The ball acts as a peculiar valve, thanks to which the water is leaked when the uplink is risked, and when lowering, the access of unpleasant odors and cold air from the street is overlapped into the cast saddle.
Sewer options
The device in the bath of a drain pit for the removal of dirty water inside its premises is a nonhygienic solution. Therefore, even if the bath is used only in the summer, it is worth equipping a drainage outside the structure.
Options for the drainage system in the bath
Currently, there are several options in the bathing of the sewage in the bath. On the most frequently used we will tell further.
Connect to a centralized sewage system
The decision to make drain similar way is preferable because this method is the most convenient, ensuring a solution to the problem with drainage in the bath. However, not all areas have such an opportunity. In the private sector, as well as outside the city, it is rare to meet centralized wastewater collection systems.
To make drain with this structure, it is necessary to provide it minimum volume at 3 cubic meters. M.. When performing work on its creation, you must perform the following stages of work:
Engaged in the arrangement of such a structure for the sewer system of the bath, it is necessary to ensure the possibility of unhindered accessory accessories. You can reduce your costs for the challenge of cleaning professionals, if used in summer bacteria for cesspools, and in winter, special chemicals.
Filtering well
This construction is an excellent option for small families. To make a similar plum variant, you need to perform the following stages of work:
- first of all, you need to dig a low-size pitual. It is stacked by a layer of a mulled solution in compliance with the slope of a small value toward the drain;
- after that, the fading of the wells of rubble is a bit above the soil freezing mark. The land is falling asleep the remaining space.
The filter well can be used to remove electric waste and detergent. If you connect to the system, then may appear unpleasant odorBut besides this, the spread of various infections will begin. It is worth saying that for heavy clay soils, such an embodiment of the sewage to the bath is not suitable.
Septic
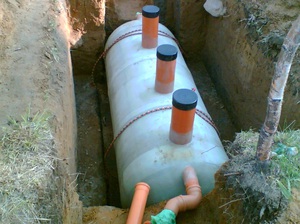 To make this variant of the drain, it is necessary to take into account: this structure is based on the fact that the drains overflow in three wells.
The first well is a fully sealed structure, in which wastewater purification occurs according to the method of aerobic fermentation.
The second tank is used to clean wastewater from the decomposition particles, which occurs when there is an air environment. The third well is a drainage structure, purified water from it enters the soil.
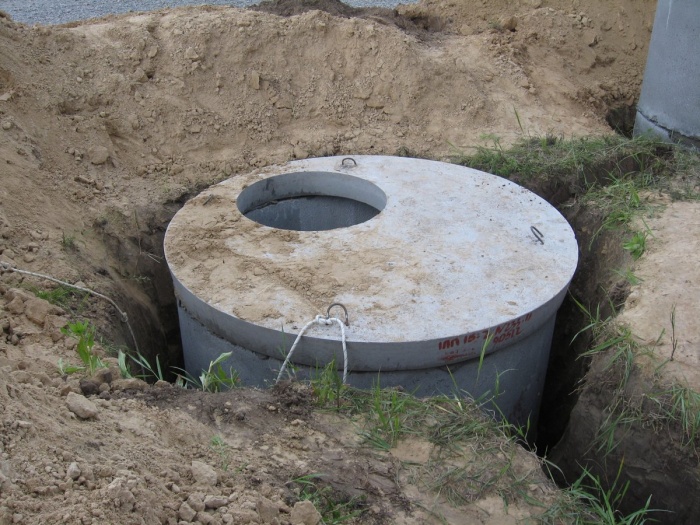
When creating septic tanks can be made of concrete rings or PVC. It should be taken into account that when installing tanks for the Septic, it is necessary to observe the slope of the pipe. For each meter he must be 2 cm.
Many different systems offer septic manufacturers. It is enough to establish them in accordance with the requirements of the manufacturer, and you can safely use such sewage. It is worth saying that the septic device is the most expensive version of the water removal system from the bath. In addition, its installation is associated with great labor costs.
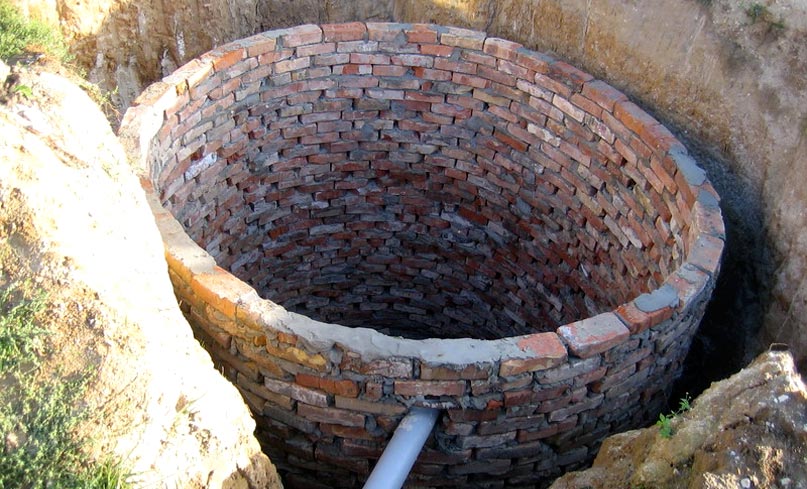
Looking well
Such a drain must be done on the removal of 3m from the bath. This construction may have a round or square form. The diameter of the well should be 1m. Its walls can be put out of materials such as concrete, brick or wood. Concrete tray should be arranged at the bottom of the construction. And in order to avoid freezing the well in winter inside it is necessary to install cover with thermal insulation material. Another protective cover must be laid on top of it. The whole design is covered with earth or sawdust.
Conclusion
Sewerage is needed not only for a private house, but also for a bath. Thanks to her will be provided effective wastewater removal From this facility. If you make a plums right, then this construction for paired procedures will be more functional, its service life will be longer, the owner will be ensured by comfort when receiving bath procedures.
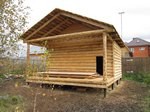
For those people who have at their disposal country plotTraditionally, a desire to build a private bathroom occurs. This is a rather complicated and troublesome, but quite complete. To perform all the large-scale work right, it will be necessary to pre-"shock" the mass of information on the construction of this building and carry out all the necessary communications in it.
One of the first specific questions arising when planning the building will be - how to make the floor in a bath with a drain? To install such a design, it is necessary to consider the bath flooring, the installation of a drain siphon, a water lead scheme, a choice of basic materials and some other nuances that will help facilitate work.
Upon erection of the bath, special attention should be paid to the design of the floor, since it is precisely the main "wet" load of this " narrow-profile " Buildings. The main task in the arrangement of bath floors, after their strength is a full and unimpeded outflow of water. From right mounting Systems of plum and drainage pipes directly depend long term operation of the whole structure. It is this factor that affects the wear of all layers of the floor and the possibility of destructive grinding processes in its wooden elements.
When installing floors in the bath, different schemes and technologies apply using modern waterproofing materials or with a support for old proven folk Methods. If it is decided to independently cope with this work, it is worth considering several options that will help determine the choice of complexity and installation and according to the specifications of a particular structure. In the absence of experience in construction art, it is recommended to choose the most reliable, simple, available in the execution and proven method of water disposal device.
But, in whatever option, the choice should be, the floors must meet the general criteria that determines the normal functioning of the bath and comfort of visitors:
- The floor must have a sufficient rigid and non-slip surface, both in dry and in a wet form.
- The surface of the floor should be warm, especially in cases where it is planned to use a bath year-round.
- The floors should be easy to clean and dry, as in any sanitary and hygienic room.
- The key condition is the mandatory presence of a system of rapid water removal, in order to avoid the development of undesirable microflora, the appearance of unpleasant odor in the rooms of the bath.
A variety of bath floors with drain
The floor design and the arrangement in it in it directly depend on what material it is planned to produce its construction, and how to use the bath.
The floors in the bathrooms are mounted from boards, concrete or combined from several materials.
Under any of the types of floors, the removal of the water is prepared in advance - it can be a sewage pipe, which is supplied to a certain area of \u200b\u200bthe room, or a drain pit, which is diverted right under the room, the drainage falls asleep. The floor is almost always arranged under the slope towards the drain, and only in one case it can be done smooth - when the light covering is envisaged summer bath..
The simplest option is the removal of water into the waste hole under the bath
If a sewage tank is installed for a drain, then it is located in one of the corners or in the center of the floor of the room. Another variant of the drain is the slope of the surface to one of the walls, along which a kind of chute is satisfied, which is also slope to the drain holewhom The sewage pipe is already connected.
It is rather difficult to mount under the slope of the boarding floor, but if it is planned that the coating from the boards is planned, you can refer to the combined version. It includes a draft floor in the form of a concrete screed, made under the slope, into which the tube of sewage is impeded. On top of the screed, a smooth flooring of the flowing floor is installed. Water, penetrating between the boards on the bias of the rough floor, will strive for them to the drain hole and freely go into the pipe.
The combined floor can be called the optimal option, as it fully complies with all the above criteria for reliability and comfort, especially since it is quite possible to put the insulating material under the tie, which, with due waterproofing, will not come into contact with moisture.
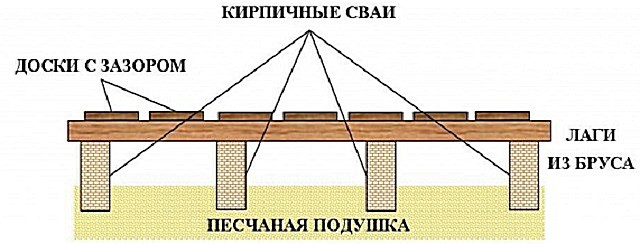
Legging floors
This type of bath floor is simple enough, and it can be attributed to inexpensive structures. For the installation of such a design, lumber of the first or second variety will be required. The flooring consists of smooth, without locks, well-groomed boards fixed on the beams of overlapping, at a distance of 5 ÷ 7 mm from each other. Thus, there are gaps between them, through which water goes.
In this case, it is quite possible to do without the installation of sewer pipes, and under the floor, which is raised from the soil by 500 ÷ 550 mm, is stacked by a good, caring depth of the soil about 500 mM drainage layer of rubble or clay and sand.
Usually sauna with such outdoor coating It is built in the country area for use only in the warm season, since through the course of the floor the premises will be quickly falling out and the good-quality effect of the steam room at a low temperature outside in this case will not be able to receive.
If you plan to use the bath round year, The flowing gender will also come true, only you need to use the above-mentioned combined option, when a concrete screed is satisfied with the floor boards. With this version, the wooden flooring is better to make removable, so that it can be taken in parts into the street, dry and ventilate.
Installation of leaking floors
To know which leaking floors can be and how to carry out their installation, the processes are stepdown.
First option
Installation of this type of floor can be called the easiest, but quite laborious. Drains begin to arrange at the construction stage of the foundation, which can be a ribbon or column. The basis for the walls raise a height of 500 ÷ 550 mm.
If a ribbon version of the foundation is erected, then in its walls it is necessary to arrange ventilation holes, at an altitude of 250-300 mm.
If a ribbon foundation is performed, then "Production" are left - ventilation holes
Fragments of ventilation pipes for these purposes are fitted during the fill of concrete into the formwork.
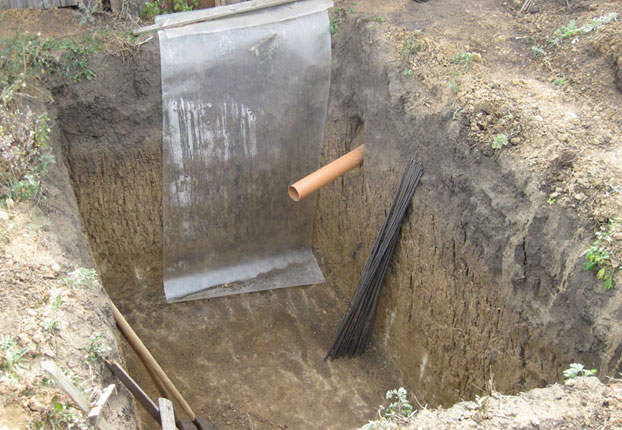
Drain when installing the flowing floor is satisfied in the underground. For this, its center rushes a small pit, a depth of 600 ÷ 700 mm in the event that a sewer pipe will be installed in it, and a depth one and a half meters, subject to water removal directly to the ground. The second option is possible only if the ground in the place of the construction of the bath is loosely, with a large content of sand.
On the surface of the soil, the underground form a bias towards the pit, where water should be gathered and go to the prepared drainage or in the waste pipe. Any foundation of PR and such a way to remove water should be the most thorough way. waterproofing - Usually for this process is used bituminous mastic and ruberoid.
If the ribbon foundation is satisfied, then the underground space, made under the slope, must be concrete or at least make a very dense embankment from rubble. When installing a bar foundation, usually cost drainage pillows around the supports.
Works occur in such a sequence:
- If a drain pipe will be laid, then after the pit is died under the foundation, the PM will be thrown in the middle of the underground space.
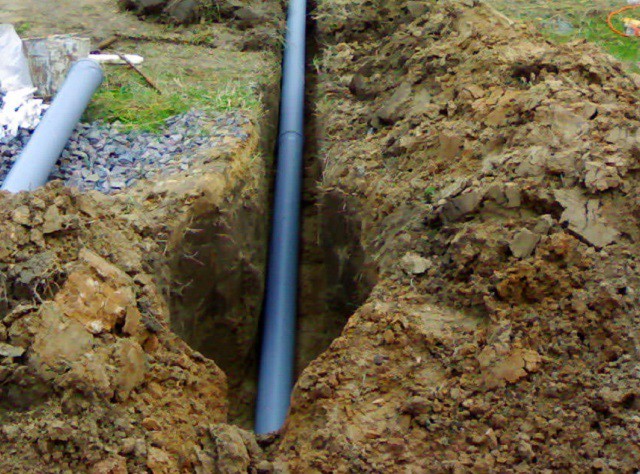
- Next, the trench is laid from its bottom, which takes place a pipe that takes water into the sewer or drain pit. The pipe is mounted under a slope of 3 ÷ 4 degrees - the height difference is obtained about 5 cm per messenger meter for zoi.
- If the drain pit will be directly under the floor, it should be deeper to it, and it is laid on it, and then the pillow from sand is 150 ÷ \u200b\u200b200 mm thick, and on top of it - a layer of rubble at 350 ÷ 400 mm.
- After the pipe will be held, or the drain pit is over, the foundation is erected, which must be necessary waterproof.
- Further, along the perimeter, the underground soil will be improved with a bias at an angle of 10 degrees from the walls or pillars of the foundation towards the pit.
- Then the skates of this slope can be covered with rubble, which should be well tumped, or the reinforced tie is satisfied with the entire plane. To do this, the reinforcement grid with cells of about 80 × 80 mm is stacked on top of the rubble. A sufficiently dense concrete solution is prepared, poured, aligned with the observance of the slopes, and then smoothes and reprove.
- If it is necessary to reduce the cost of the design device, then instead concrete solution To form slopes from above, a crushed stone for detention can be made of clay lock. It is moisturized and densely knead, and then lay out the thickness of 80 ÷ 100 mm and are well smoothed, and as they dry - they smoke, wetting water.
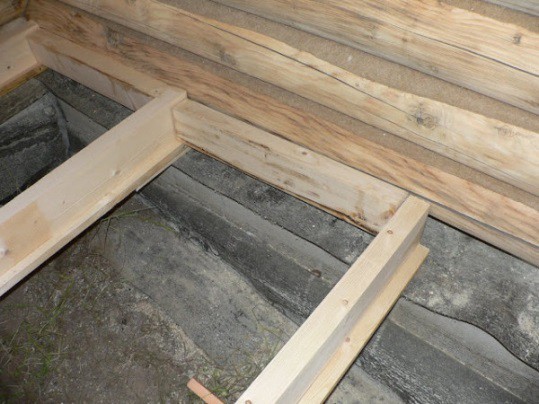
- After the drain and pit will be ready, on the walls of the foundation, covered with waterproofing material, the belt belt is installed and the overlap-processed antiseptic impregnation beams are installed. The lower cornese beams are fixed either to the metal belt of the strapping (if it is provided for by the design of the foundation), or with the help of mortgage elements - anchors, studs, etc. Connection of the crown and beams of overlap can be different - using metal corners, wrinkle, etc.
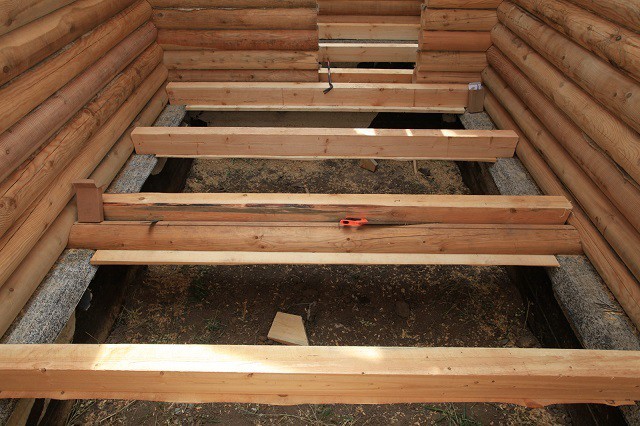
- On the floor beams, the floorboards are mounted at a distance of each other at 5 ÷ 7 mm, which must have a thickness of at least 20 mm. The thickness of the boards is selected depending on what distance the beams of overlapping will be laid.
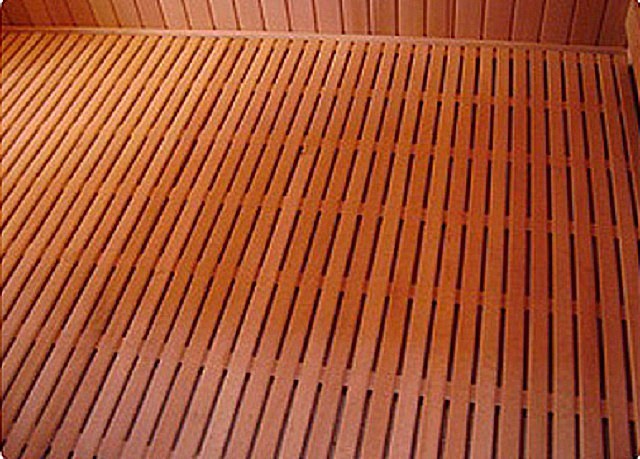
Table ratio of the size of the ceiling beams, the steps of their installation, the thickness of the floor board thickness:
| Board thickness, mm | Pitch beam overlap, mm | Board length, mm | Section of beams, mm | Pitch of support pillars, mm | Size section of beams |
|---|---|---|---|---|---|
| 20 | 300 | 2000 | 60 × 110. | 1000 | 50 × 80. |
| 24 | 400 | 2500 | 70 × 150. | 1200 | 50 × 90. |
| 30 | 500 | 3000 | 80 × 150. | 1500 | 50 × 100. |
| 36 | 600 | 3500 | 80 × 160. | 2000 | 60 × 110. |
| 40 | 700 | 4000 | 100 × 180. | - | - |
| - | - | 5000 | 150 × 200. | - | - |
| - | - | 6000 | 180 × 220. | - | - |
Sometimes the boards are not nailed to the beams of overlapping, and fasten with a bar and stacked on top. The boards are assembled into shields in such a way that the fastening bar is between the beams of overlapping. This is done in order to be able to periodically take the lattice flooring on the street for high-quality drying.
Second option
Another, even simpler, but which is only suitable for the summer bath, is a device in all underground space, between the pillars of the foundation, the seafood. It is completely filled with a drainage consisting of a sand pillow, on top of a closed layer of rubble or a mixture of these building materials.
In this case, water flows free on the entire surface of the underground. Crushed stone breaks her streams, and the sand plays the role of the filter, which will absorb and take it into the soil natural drainage layer. The depth of the pit should be about 450 ÷ 500 mm, and the belling is made with a thickness of at least 350 ÷ 400 mm.
Sometimes instead of a sandy-gravel pillow under the floor there is a waterproof pallet, which is mounted with a slope in the direction of the drain pit or ditches, located next to the bath, where water will be given. The pallet can be formed from several layers of rubberoid, which glove with a hot way with a bitumen mastic.
Third option
This version of VP can be applied in any bath used all year round, as it provides for insulation of the floor. Mounting it is more complicated and will require the use of a considerable amount of materials.
- Work on this floor option begins also when building a foundation. The drainage pipe is paved through the underground part of the foundation wall under a slope of 30 degrees into a cesspool or, if possible, is connected to the sewer central system. The pipe is plugged into the ground below the freezing layer by 100 ÷ 150 mm.
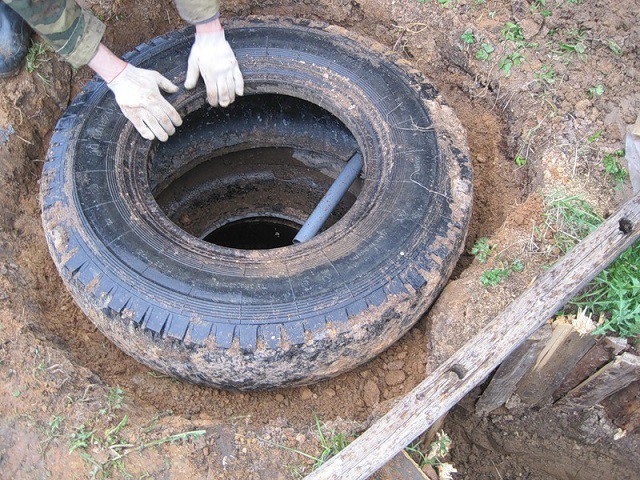
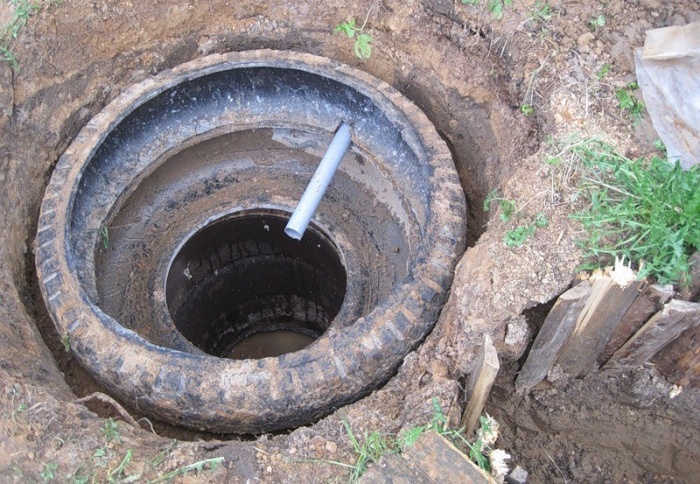
- The cesspool can be built of a brick, laid at a distance of each other in 50 mm, from concrete rings, in which the holes for removing water in the ground drill or make their way. And the easiest option is from old car tires.
The size of the pit needs to be counting depending on how intensively the bath will be used.
- Before you bang a ditch where the pipe is laid, it is recommended to fall asleep in it a clamzite, which will serve as a heatel and will not give water in the pipe to freeze in the winter.
Then the trench falls asleep soil, which needs to be carefully tumped.
Video: Example of laying a sewer tube from the erected bath
- Further work is carried out underground. On that plot where the drain will be, and where the drain pipe is supplied, the pit is drawn up. It, after it is covered with brick and plaster, should have a size, approximately 250 × 250 mm, and its bullet is carried out by 300 ÷ 400 mm. The veil walls should rise to the level of the rough concrete floor design.
- The pipe is inserted into one of the pit walls, then falls asleep with soil.
- Then around the perimeter of the floor in the underground space around the pit is made of a sanding of a sandy-gravel mixture, with which the slope is started to form chernov semi. This layer needs to be good to ravage - for this it is wetted with water.
- A insulating layer is applied to the gravel mixture, consisting of a concrete solution mixed with a crumb of foam, or the entire surface is laid out by polystyrene plates with a thickness of 30 ÷ 50 mm in compliance with the slope.
- Next, it is necessary to carry out waterproofing the joints of the wall and the formed floor of the room. Rolled material They are placed on the floor, the strip of about 200 mm and raise the walls of 500 mm. For waterproofing and in this case, the runner is best suited.
- On top of the foam and waterproofing, it is recommended to put the reinforcing grid, which will make the draft floor more durable and durable.
- The grid is poured by an aligning screed from a concrete solution - its thickness should be at least 50 mm. All work is carried out taking into account the maintenance of the angle of the slope from the walls of the bath to the pit. The screed must be perfectly smooth, as it will further decorate with tiles or other finishing materials.
- The finished tie can be treated with waterproofing impregnation of deep penetration, put the ceramic tiles or coat with liquid rubber or glass.
- After that, a hydraulic was installed in the pit.
- From above, the pit is closed with a metal grid for collecting large garbage.
- On the finished floor, a wooden removable flowing flooring is installed, convenient because it can be raised to take out for drying, and a concrete or tiled floor under it at this time to put in order.
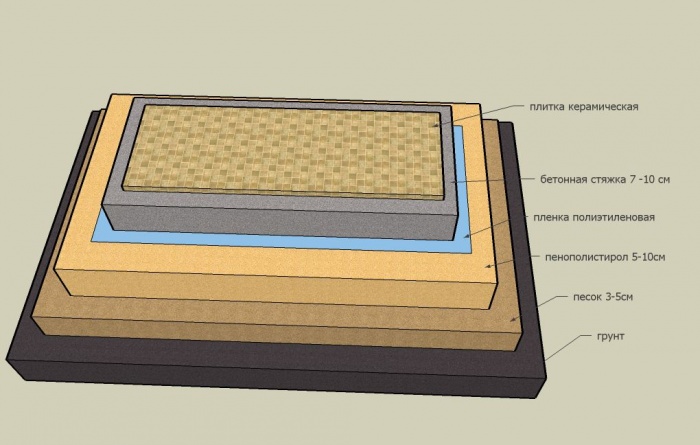
On this scheme, all the layers of the insulated heavy floors are clearly visible. The only moment that is not specified on it is reinforcing the screed.
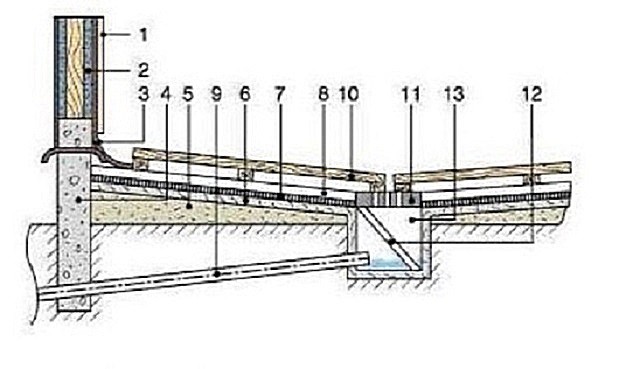
1 - Wall of a bath having internal trim.
2 - vapor insulation layer on the walls.
3 - Waterproofing layer at the joints of the wall and floor. This material is necessary precisely in these places, as the moisture that fell into them, makes much longer. Ruberoid used for waterproofing closes and curves the joint.
4 - Foundation from concrete.
5 - layer of snow-gravel snowflows or rubbed-sand Mixtures.
6 - insulating layer.
7 - Chatting of the draft floor.
8 - a layer of ceramic tile, topping impregnation, a coating of liquid rubber or glass - these materials make the surface smoother, and water is well out of it, and they will additionally hydroize all the floor layers.
9 - Drain pipe, reducing water from the pit in the sewer.
10 - flowing removable floor.
11 - The grill mounted on the veil hole for the delay of large garbage.
12 - Hydraulic that does not allow you to penetrate the cold air and an unpleasant smell from the sewer jam to the room.
13 - Pit for taking flowing water and guiding it into the drain pipe.
Bath foundation is a special approach.
The specifics of the operation of the bath imposes features and on the design of the base of this structure. A lot of useful information on this issue is posted in a special article on the construction.
Non-pending wooden floor
Non-pending wooden floor - more complicated in mounting. Its design consists of two dumping layers - "black" and "white" floors. The latter is arranged under the slope towards the drain. The insulation is mounted between these two layers, and through the thickness of the structure in the lowest place of the slope, a sewer tube and a drainband is installed.
To cover this type of gender, a good t-shuttered board of the first grade, having a "Schip-groove" locks, made of low hygroscopic wood, for example, from oak, but quality pine is also suitable. Oak has a high structural density, due to which the moisture minimally penetrates the wood of the boards, and pine has good resininess, which also holds back water into the material.
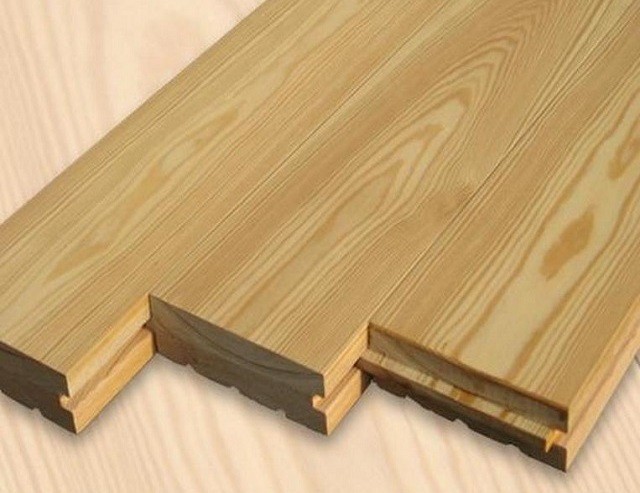
In this design, the boards are installed tightly to each other, and the coating should not even have minimal gaps. Water flows on the floor plane straight into the suture hole.
If such a floor is selected, then very good ventilation is needed in the bath, since wood should be able for a complete burden. After each use of the bath, the door doors need to be opened for ventilating.
Installation of the insulated non-flowing gender
- The drain pipe in this design is also mounted with the foundation device, and its nozzle rises to the desired height, which should be below the white non-peculiar coating by about 50 mm.
- Next, it produces complete waterproofing of the underground space using a rubberoid, which is laid on the ground base and walls and the upper plane of the belt foundation raised to a height of 450 ÷ 5000 mm.
- On top of the waterproofing material on the foundation ribbon are stacked and curved beams and beams Overlapping.
- On the beams of overlappings, the blackboard boards are fixed at a distance of each other at 50 ÷ 70 mm. In the area where the drain pipe is supplied, the round hole of the desired diameter is cut into the floor.
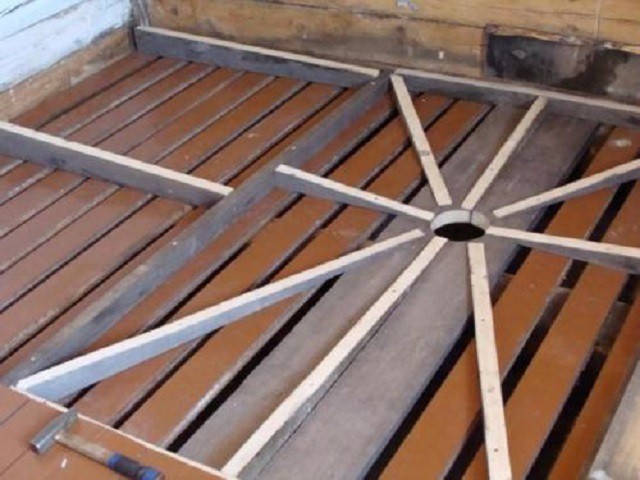
- Further, a plum is formed on the draft flooring. For this purpose, bars or boards are dried with compliance with the required slope. Usually, the bias make no more than 5 °, the height difference will be about 80 mm on the trafficphone meter. A coolest slope can be unsafe for washable in the bath.
In order to accurately achieve the slope, the bars will be fixed around the perimeter to the walls, which will become an element of the crate and denote it high point. Their height is usually varied from 50 to 100 mm.
- From above the mounted grade brackets, a vapor barrier film is fixed, it is nailed to the crate and blackboard boards.
- On vaporizolation, between the bars of the crate, the insulation is stacked - for this it is best to use extruded polystyrene foam. The material should be tight between the elements of the crate - if the gaps remain, they are filled with mounting foam, in order to avoid the formation of cold bridges.
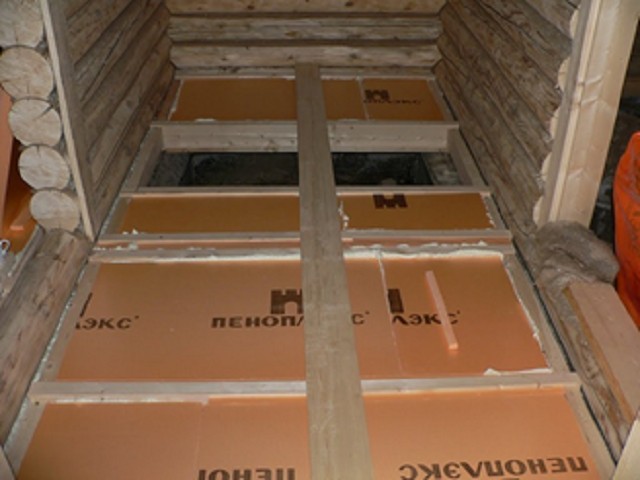
- Insulation, it is necessary to close the waterproofing material on top of the waterproofing material. Its role can perform the usual thick polyethylene film. If you have to install a few of her cloths, then this is done by 300 ÷ 400 mm, and the joint is glued with waterproof wide scotch.
- For drain pipe in the insulation and waterproofing, holes are made. Then the waterproofing film is fixed on it with waterproof tape, neutralizing the formed clearances.
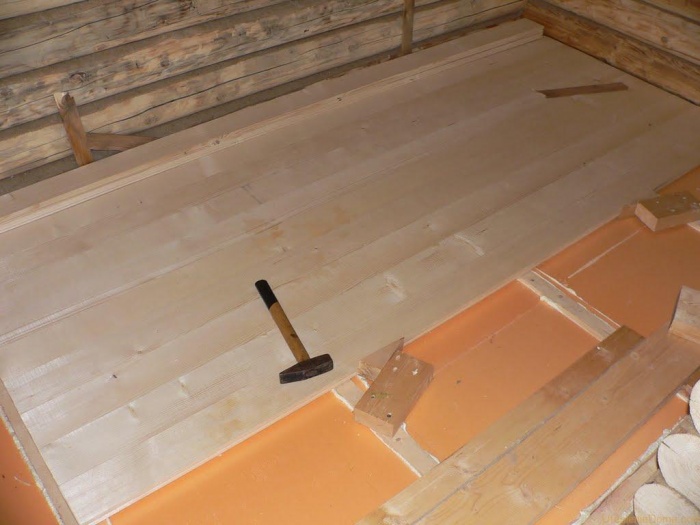
- After that, the clamping board is fixed on the crate, which are assembled into a single plane with the "Paz-Schip" locks. The material before installing must be processed antisepticwhich will protect wood from biological decomposition.
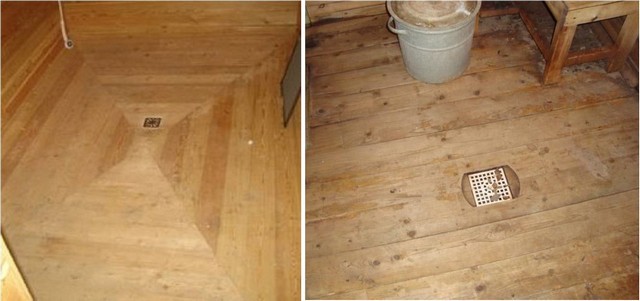
At the joints of the ends of the boards, if they have to do, the floorboards should be tightly adjacent to each other.
The optimal option is to install the boards in such a way that water flows along the fibers of wood, and not across. In this case, the material will be less absorbed by moisture, and the water is more intensive to drain into the ladder.
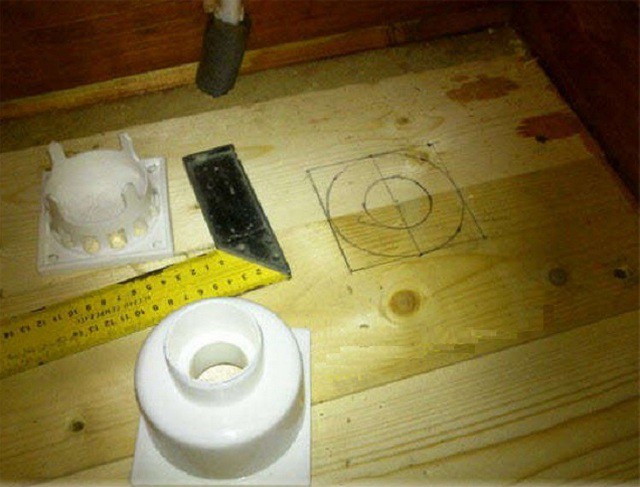
- To set the drain ladder in the boards of the first floor, it is necessary to extinct and cut the hole of the required diameter.
- In a wooden non-flowing floor, the flow can also pass along one of the walls. In this case, the slope is satisfied with one wall to another, and the plastic chute is installed on the bottom line of the slope, which is also mounted at an angle in the direction of the drain route, connected to sewage pipe.
If this option is selected, with a slope in one direction, then the doomle under it is somewhat different - the highest lumps are fixed along one wall, the lowest - along the drain groove.
- After the installation is completed, plinth is installed on the walls. The gaps around the sewer tube are sealed, and the drain hole of the ladder closes with a grid.
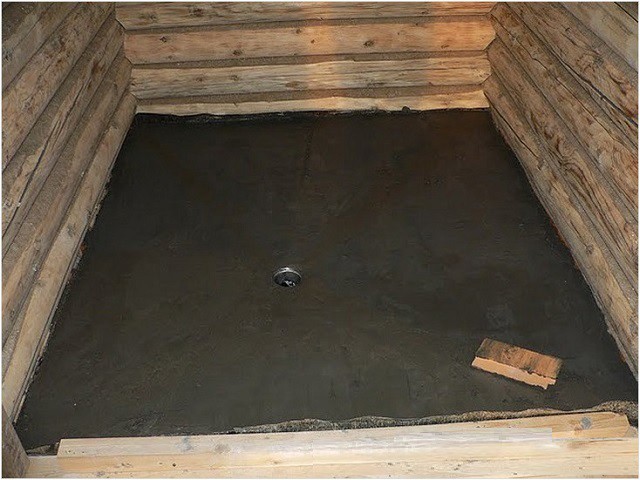
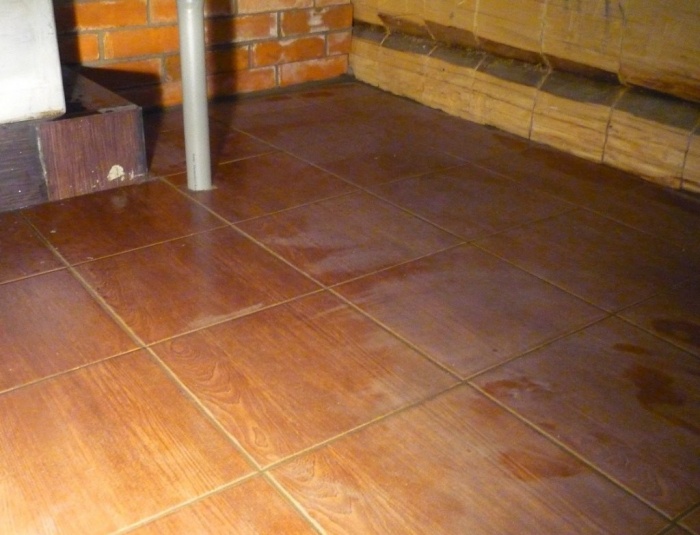
Concrete floor
This type of floor is suitable for a bath in all respects, except for one - it is cold, even if there is insulation inside the design, so very often under finishing materialThe top of the screed is laid infrared or cable electric floors.

When the device is appliance, the sewage laying is carried out in advance. The stock can be installed, both in the middle of the room and about one of the walls, as well as in the corner. The bias of the floor is made at an angle of about 5 degrees, which makes it possible to confortively to move on it to visitors and not linger on the surface of the water.
After the fill and the full ripening of the screed, it is decorated with a tile, the seams between which is closed with a stagnation with a wiping or sealant. Top of the tie often simply the removable wooden flooring, which have already been mentioned above.
Laying the concrete floor in the bath with the provision of slope is a topic for a separate consideration in a special publication of our site.
At the end of the article - the video material on the embodiment of the wooden flowing bath.
Video: A simple bath floor do it yourself
Before the construction of the foundation for the bath, you need to consider the development of the drain of water in the floor. If you decide to build a steam, do not resort to the services of a construction team, but do it yourself, you will need step by step guide. Phased instructions can be carried out by photo, but it is also preferably understood, why mount the drain system exactly so, and not otherwise, what is better, more profitable.
Characteristics for choosing a draining method
Solving how wastewater is separated, it is necessary to rely on such parameters:
- Frequency and intensity of bathroom exploitation. The depth of the concern for draining is depends on the indicator, as well as the ways to improve it.
- Proximity to fertile used soil. If the site is small and next to the bath is a vegetable garden, then only the drain yes is not to do. To remove it is necessary to equip for water purification.
- How deeply undergo soil waters. From this characteristic depends the depth of the trench for the output tube.
Deciding with the primary parameters, you can start the installation of the water removal system. It is divided into two stages: plums in nutria bath, which includes a certain design of the floor and installing the nozzle for the withdrawal of the liquid outside the steam.
Basic water removal mounting scheme
Pouring floor
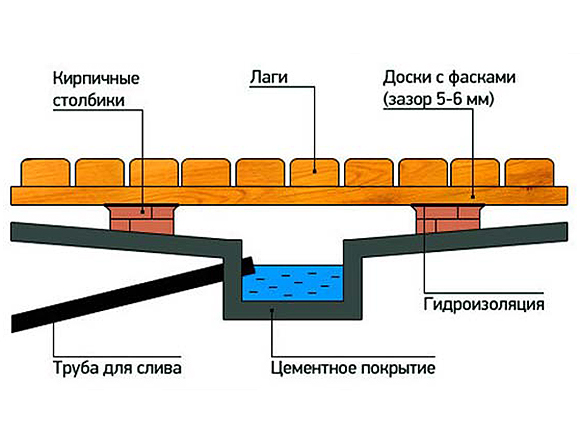
This method of the drain system is equipped with a bookmark. For the removal of the liquid, the hatch is not provided, which is usually mounted in the floor. Water seeps through the wooden flooring, falling into a small tank, after which the pipe flows into the reserved place. Carrying can be equipped without the tank and output nozzles. Option is suitable for summer designs without intensive use. Flooring in such a bath is made from wooden Lag. With a gap between bars at 0.5 cm. Under it, a small pit is digging, water from which is simply absorbed into the ground. Under the wooden coating, a gravel or another absorbent material can be placed, which will partially carry out water purification. Construction scheme and instructions for the flowing floor of the pile or billed foundation:
- Before the construction of the foundation, a sloping trench with an angle of 2-3˚ on the meter of the temporal. Its depth must be at least 50 cm, the length depends on the waste construction.
- The foundations of the foundation is equipped with a cement coating (plates) or wooden boards with chamfer. The fluid reservoir also can be isolated from the soil. PVC pipe is mounted in the container. The draft floor is usually done under a directional bias to the water tank.
- Wood flooring will necessarily hydroize, usually use bitumen materials as an insulator.
- The clean floor of the edged board or OSB plates is stacked.
- The gap between the wooden coating should be about 5 mm.
Attention! Waterproofing is mandatory, both for the draft floor from the tree and cement.
Pouring floor: a good option For baths, the use of which is planned only in summer period And not too intense
Unpolent
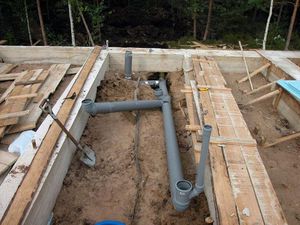
It is considered a more reliable way to arrange a drain system for a bath. Step-by-step execution construction work:
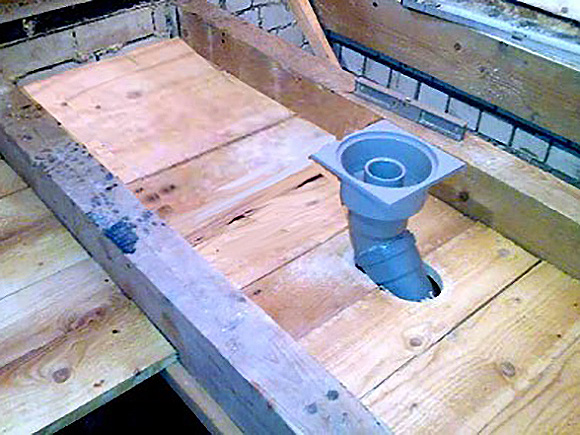
- Before the fill of the foundation is placed place for mounting nozzles.
- The nozzle should be closely attached to the drain pipe.
- Pour the foundation of the steam.
- Conduct complete waterproofing using bitumen materials and clay or crumbvoranulant.
- Make a rough floor with an inclination angle of 4-6˚ to the drain hatch.
- Perform work on thermal insulation and waterproofing.
- The final stage is stacked by the clean floor, the water removal hole is closed with a grid.
Drain into a cesspool
The most budget and lightweight method where you can remove the wastewater from the bath - it is to make a cesspool. It does not require special technological knowledge and skills. Such a plum is suitable only for baths on dumart sites, with an infrequent exploitation. To build, you need to dig a hole in a remote place and spend the pipe there. Water will be naturally evaporated and soaked into the ground.
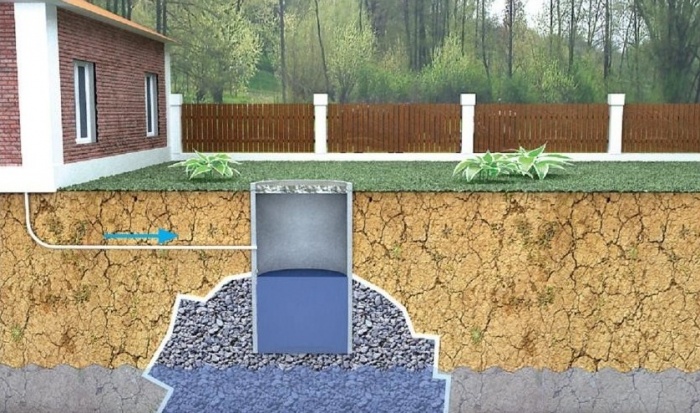
Sacky pit with septic
An excellent option that does not harm ecology and soil. Suitable for baths, which are often used for a household plot with a close-up garden. The disadvantage of such a design is the high cost of absorbent raw materials. Construction scheme:
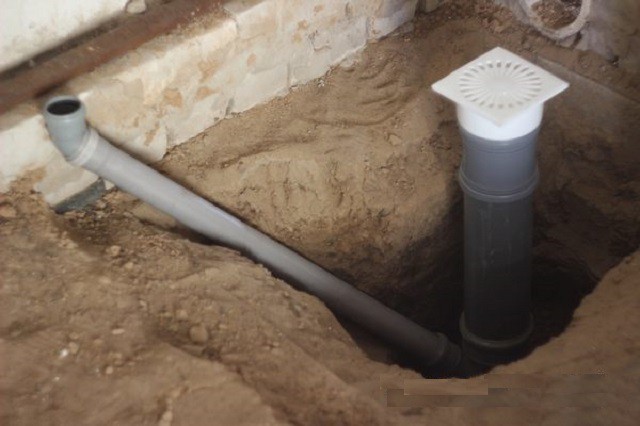
- A waste tube is laid under a slight inclination.
- Inside the room it is necessary to install the ventilation nozzle.
- In the course of the trench, two insulating containers with a septic are installed, in which the primary and secondary water purification will occur.
- It is installed again ventilation tubeTo avoid stiring fluid.
- Mounted collector.
- It is equipped with a filtration field using rubble, clay and sand.
Attention! To install a drain system with anaerobic septic, it is necessary to highlight a fairly large plot of land.

Installation of draining from a bath using septicism: a good and reliable option for year-round operation
Drainage well
Such a method for arranging water removal is suitable for the soil in which the underground water run deeply. Stages of the designer of the drainage well:
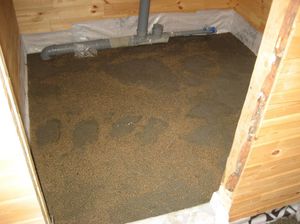
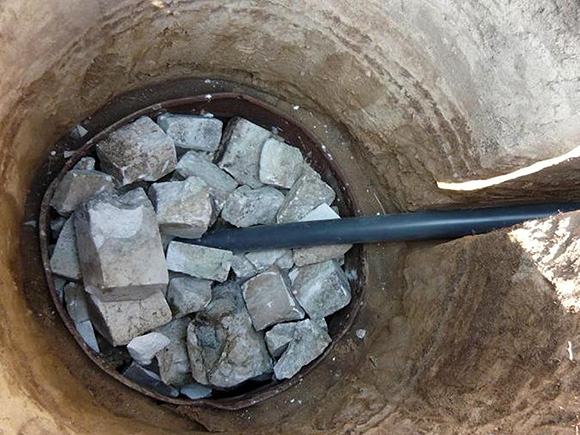
- At a distance of 1.5-2 m from the construction of the pitoking. Its depth should be half the meter below from the level of soil freezing. The width of the recess is 1 m in diameter.
- The bottom is resurrected by filtration raw materials: clamzit, crushed stone.
- The walls of the well are equipped with a metal tank without a bottom or old tires to avoid clogging of the tank.
- The washing bath with the tank is connected by the pipe, which is stacked in the trenches, dug under a small angle.
- Next, the well is covered with a lid and the earth is tight above.
Drain well
The drain well is a practical solution for removing the used water, without a threat to worsen the ecology of the soil. It is necessary to dig up the reservoir, which should be in the lowest part of the site so that water flows into it naturally. The same place should have an entrance for an assessing machine that will pump fluid. Phased guide:
- A rectangular pit is digging or square.
- A sandy pillow of 15 cm height is stacked on the bottom, tightly trambed. Then the surface is concreted.
Attention! Do not proceed to the next step until cement laying dry.
Drain Well: Another practical version of the organization of a drain in the bath
- Walls are laid with brick or reinforced concrete rings. The thickness of the material must be at least 25 centimeters. Do not forget to leave the hole for pipe supply.
- Sealing walls are carried out using bitumen mastic.
- Mounted cover from metal structures or a combination of layers: cement, metal doomba. The overlap on each side of the incoming hole for the drain should perform by 30 cm.
The correctly selected drain system for the bath will save the construction from the destructive impact of moisture, as well as will not affect chemical composition water.
Video: Drain of water from the bath
The bath has always considered a purely Russian view of the pastime. She served for swimming, helped to keep her body clean and played the role of the outstanding for the people. Nowadays it is hard to imagine a house in which it would not be. Many owners who do not have a bath think about building it. One of the questions that arises in connection with construction, it sounds like this: how to make a draining in the bath with your own hands? After all, the bath is a place where without the presence of water just can not do. And if there is a sufficient amount of fluid, it is logical that it is necessary to go somewhere. Someone can say that the easiest way when the water is merged into the pit, free space under the floor. But, we want to upset you - it is fraught with the fact that the mold will be formed in the floor, the smell of rotes will be present in the room, and most importantly, the bath can seek, as water will destroy the top layer of the soil. Yes, and not in all cases it will work out to arrange it, due to the fact that in the ground there can be a high content of clay, which does not absorb moisture.
That is why it is important to know how to properly organize a sink for the bath with your own hands and approach this work with a special responsibility. With this situation, your discharge will serve for many years. This article will consider several options, how to make drained in the bath with your own hands. This instruction will help you cope with the task.
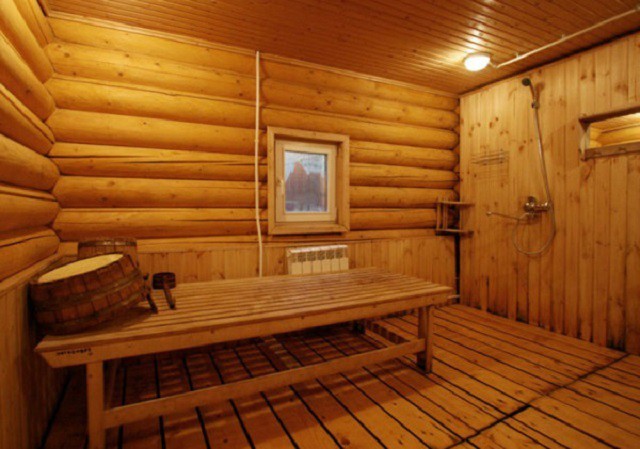
How the floors are arranged in the bath
If we talk about the properly made plum for the bath, then you can not affect the topic of flooring. It is necessary to approach this issue with no less responsibility. It is worth noting that, as if qualitatively, you have made a plums for a bath - this is a premises with superpring humidity. And it is the floor that takes on the lion's share of this moisture.
You need to know that the floor in the bath can be made either from a tree or from concrete. This choice directly depends on what kind of construction itself. If it is a capital building, where the shower room, a steam room, a pre-banker and a rest room will be used, then it is better to make a reliable concrete floor, with reinforced waterproofing. And if it is a bath from a tree, and you plan to use it only in the summer, then rationally make the floor of the tree. This will help significantly save your money and reduce the amount of necessary work.
Note! The wooden floor in the bath will serve you much less than concrete. Even if it is completely protected from moisture and high temperatures with a special composition, with time everything will have to be changed. You must be ready for this.
How is the concrete floor in the bath
If we talk about concrete coating, then it is more reliable and more durable. Such a floor consists of:
- compacted gravel;
- concrete layer;
- vaporizolation layer;
- the layer of polystyrene foam, as insulation;
- waterproofing layer (polyethylene film);
- one more layer of concrete;
- reinforced cement screed;
- facing layer ( ceramic tile etc.).
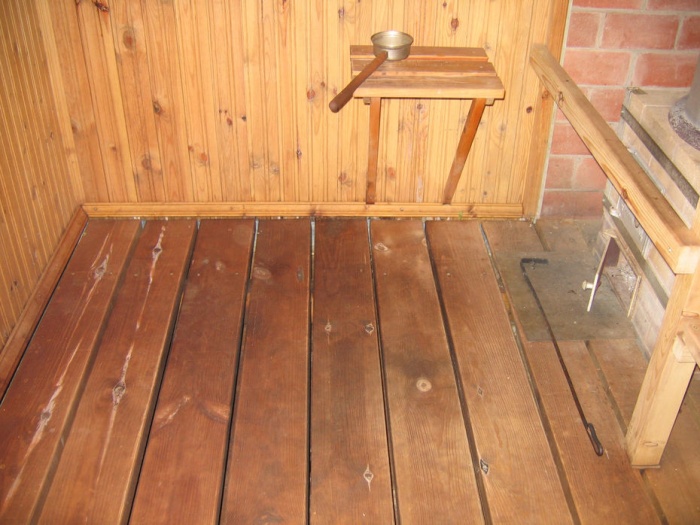
How the wooden floor is arranged in the bath
Concerning wooden floors, then they can be two types: solid (not flowing) and dense (flowing). The solid floor is filling from above on a concrete tie. At the same time, it is done so that the surface has a small bias towards the equipped plum. Boards are adjusted close to each other, so no lumens are. The minus of such a coating for the bath is that the water is stood on the floor, dries for a long time, and the boards quickly begin to undergo the process of rotting. It is much better to use a dense floor.
What is its advantage? It is easier to use and serves you longer. The thing is that the boards are not fixed close, but at a short distance from each other. This gap is 5 mm. It is enough to ensure that the water is not stood on the surface and easier leaving the plum. In addition, these gaps serve as a fan while drying the floor.
So that everything functioned correctly, you need to organize a hermetic cape under the room. From it on the pipe will occur the outflow of water into the cooked drain pit. In this pit it will be necessary to make a hydraulic machine, so that unpleasant odors do not fall inside the bath. Having understood with the sexes, you can figure out how to make a drain in the bathing baths and other rooms.
How to make a plums in the bath
To highlight the drain of water, you need to pay special attention to such indicators:
- Power of the drain system. It must be chosen given how many people will visit the steam room, and how often. In addition, this indicator affects the volume of the well or pit.
- The level of groundwater occurs in the place where the bath is built.
- The composition and quality of soil.
Taking into account these indicators, you need to decide how to equip the drain for the bath, which design is used, and what is its features. So you can immediately find out the capacity, depth, material and fastening. To begin with, you need to make the water collection system inside the bath under the unpaid floor. Let's find out how to do it.
Draining in the bath do it yourself step by step guide
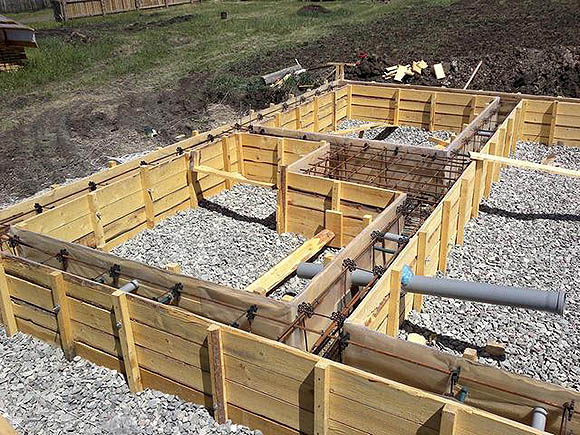
All work is done on the construction stage of the foundation. It may be a ribbon view or bar. The process is as follows:

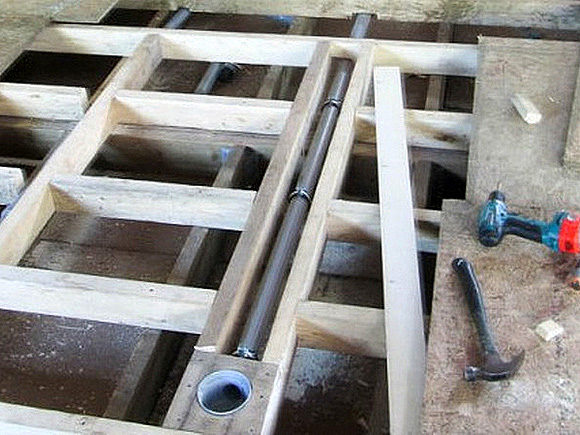
As a rule, boards may not be born to overlapping beams. For ease of operation, they are removable. They must be copped with a bar and put on top. Everything is selected in shields so that the connecting bar is between the beams of overlapping. The floor made in this way is better to exploit, as it can be removed and dried in air. We offer you to look for information how to make a drain in the bath:
Creating a drain reservoir
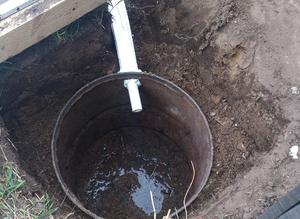
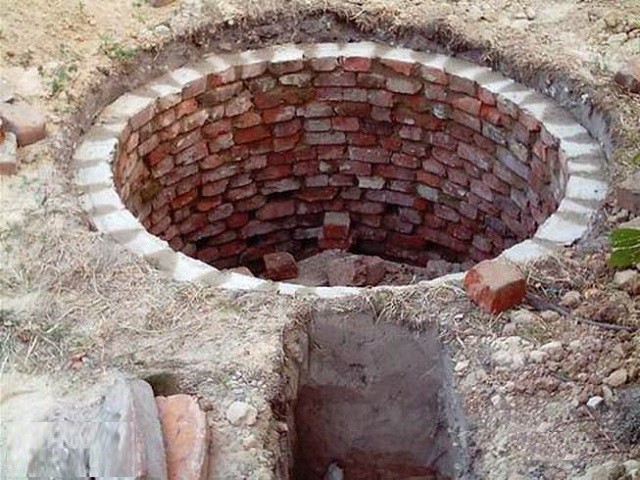
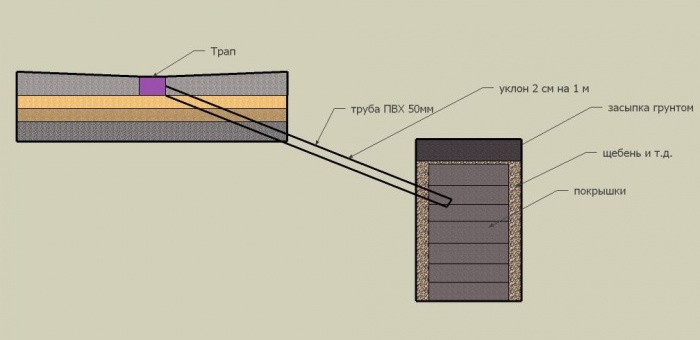
Now that you have created a liquid collection system, you need to figure out where to display the stock in the pipes. The first option is a drain tank that will have a filter bottom. Its purpose is to clean stock from pollution and delay the microorganisms. After that, water through the bottom goes into the ground, re-cleling. As a filter can be different materials. It's sand, and slices of bricks and even rubble. If the bath will use a family of 3-4 people, then the best size of the well - 2 m deep at a diameter of 1-1.5 m. The well shape can be round or square. Nevertheless, it is better to choose a cylindrical option, since the pressure on the walls will be uniform. Then it will not be necessary to repair.
It is important to consider that the well should be from 3 to 5 meters from the bath. If it is closer, there is a risk of unpleasant odors and the destruction of the foundation. And when to place the well is very far away, then there will be more pipes. Figure shows how to implement this scheme.
Most often the wall of the well is additionally strengthened. The most expensive option is concrete rings. But there is also easier, for example, automotive tires. As a compromise version - brickwork. In addition, you can use a metal or plastic barrel in which there is no bottom. It is important to close the well with a cap from concrete or metal and sprinkle its land.
Drain of water in the sewer
If there is central sewage in your site, then everything is much simpler. All you need, correctly arrange the floor in the bath, insulate it and organize a drain to the central sewer pipe. The plums will be installed pipes laid horizontally at an angle to the pipe. They will take water, which through the siphon and the plum body will be able to fall inside.

PVC pipes are paired in the floor at an angle to the riser. It is recommended to fall asleep sand in advance in the trench and tamper it. And already on the prepared pillow to install pipes. The drop must be 2 cm per 1 m. Pipes are displayed to a riser or outward baths. More specifically how to make drain in the bath, you will learn from the video:
Drain of water in a cesspool
Another option to remove water from the bath, make drain into a cesspool. This option has some drawbacks, but it is the easiest. We will not consider the phased course of work, since the principle is already understandable. It's just that water from the bath will go through the pipe system directly into the cesspool. All that will be required of you - as it is folted, pump out the contents.
Note! You can do it yourself or call a special service.
Let's summarize
Drain for the bath is a very responsible stage of construction work. It is important to pay enough attention and time to this process. After all, if you do something wrong, then all your works may be in vain. To avoid this, it is important to configure in advance to equip the drain in the bath. You need to think in advance what kind of water removal to choose. After all, if the sewage system is not provided in your area, you will have to make a plum in a cesspool or well. In addition, pay attention to the quality of consumables: pipes, siphon and drain hole. Then your plum will last long and reliably.
Bath, in which water procedures are not provided - not full. It is necessary to at least be able to wash off the lifting discharges that are inevitably formed in the process of active body warming, which actually causes a hike into it.
In this case, the presence of water supply is not at all necessary. You can set a periodically filled container for it, you can take with you in a bucket or a mustache. But the draining in the bath, with any method of using water, is required.
What are the plums and how to make drain in the bath do it yourself, so that there is no odor - the subject of consideration of our step by step leadership.
Determine the place of plum (pit or septic)
As a rule, there are not so much effluent out of the bath, and they do not contain fecal masses, large fatty sediments and everything else that can contain house sewage. Of course, if it is provided, then the baths are better to take it into it.
And if there is no one, then the plums of the bath can be performed in a primitive drain pit, consisting of a barrel without a bottom installed on a drainage pillow of sand and large rubble layers - 10-15 cm each, and a closed small concrete slab. Large paving slabs, a thick sheet of metal and so on can be used.
A drainage can also be made, similar to what is carried out from point.
For this abroad bath Wall, at a distance of at least 1.5 m from it, the one and a half is paved - the two-meter portion of the perforated pipe in the drainage pillow, as described in one of the sections of the article on the same link.
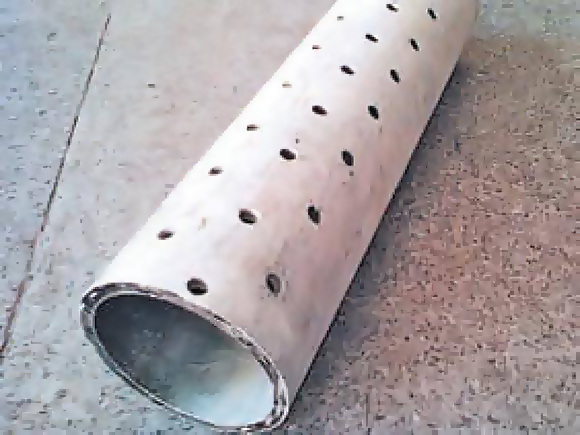
You can take a special pipe for drainage systems, and you can chop down holes in asbestos-cement. It is important that they are in diameter less than the gravel snowing fraction around it.
You can also arrange a point drainage well under the bundle of the bath. If, in your bath, apart from the two - three ears of water poured into the steamroom, the bathroom, shower, kitchen area, will need to be organized.
The slope of the outlet drain pipe from the bath should be done the same as for sewage systems: 2-3 °. And just, if its diameter is at least 110 mm, then it does not need to be insulated, and if less - necessarily.
Selection of floors: structural features of torrential floors in the bath
There is another way to remove water from a bath when there is no drain. Just under the bath built on foundation Foundation, A solid drainage pillow is satisfied, which takes the drains of it. But it is rather a purely summer version, due to the fact that the floor in such a bath cannot be insulated, and its wooden coating is made with gaps 3 - 5 mm, through which water is poured out.
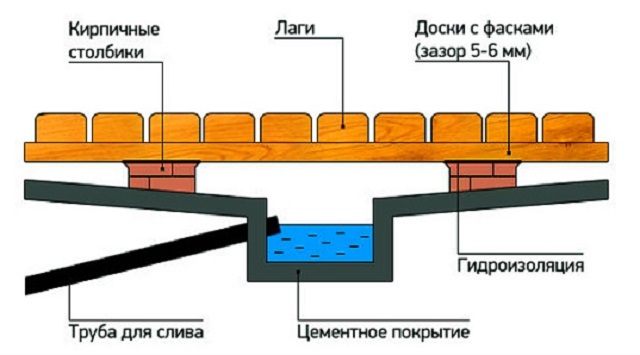
But such drainage is almost never found. More often, heavy floors in the bath are performed according to the scheme, with the water receiver located outside the design.
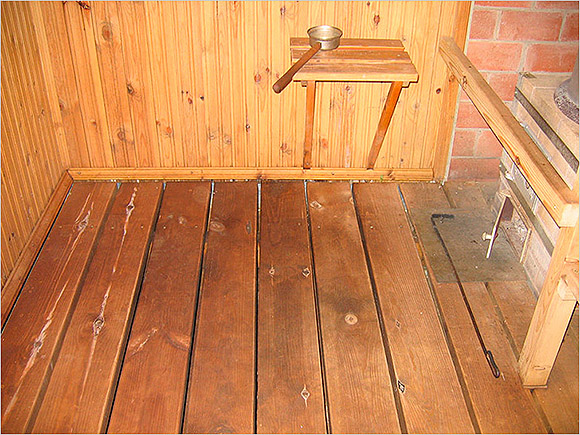
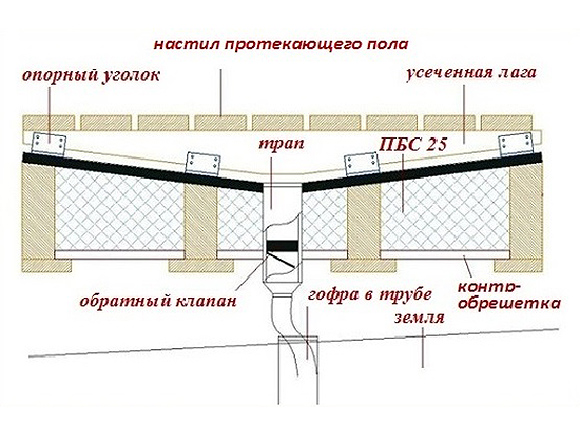
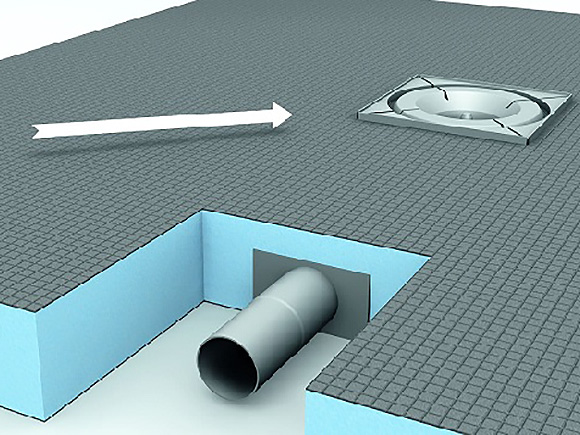
These floors are called flowing. In this case, such a technical solution is mainly applied:
And here are also several options. Your choice depends on what the floor in the bath is: warm or cold, wooden or concrete, on which foundation it is built by the TP. Along with the above scheme, others are applied.
![]()
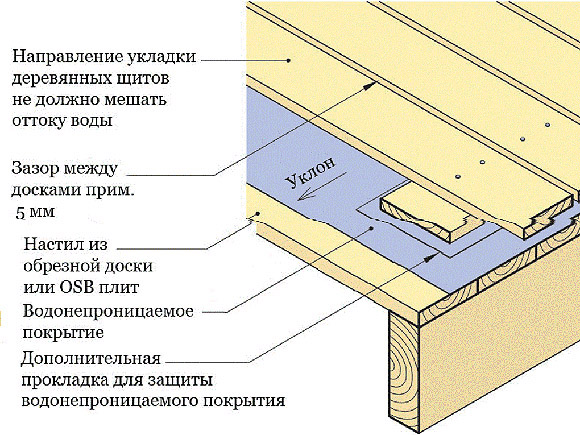
Similarly, it is often suited to drain in the bath, erected on the screw piles.
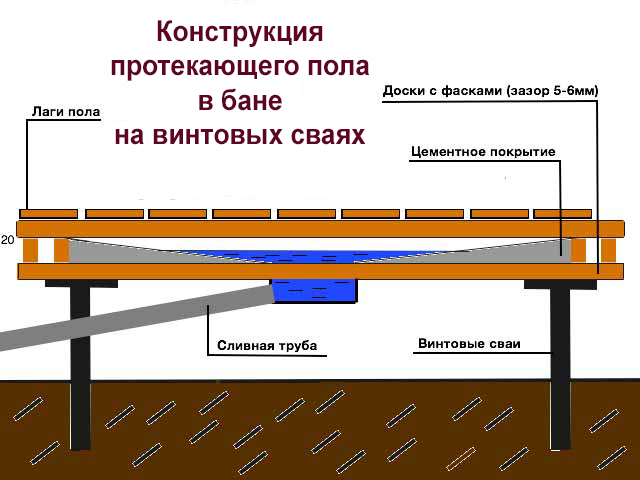
Of course, concrete slopes with such a drainage device are made after waterproofing the bottom board of the floor of the floor of the floor by the steamed geomembrane or tolstoy (at least 200 μm) polyethylene film. The last option is worse, because Alkaline cement medium leads to its gradual destruction.
How to make a draining in the bath with your own hands so that there is no smell?
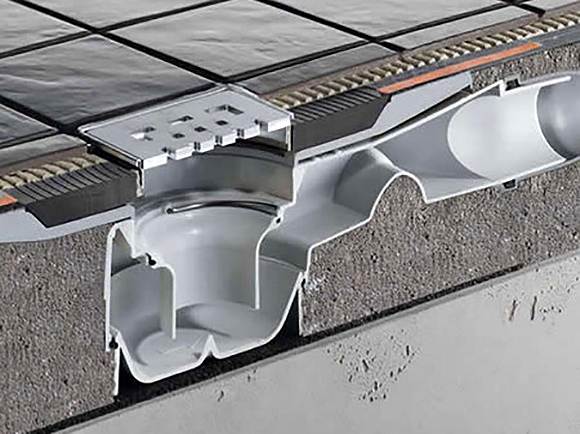
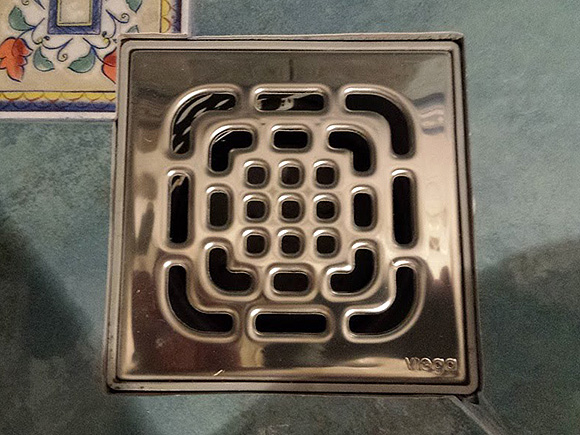
For this, special roads or siphons are used if there is a place in the floor design.
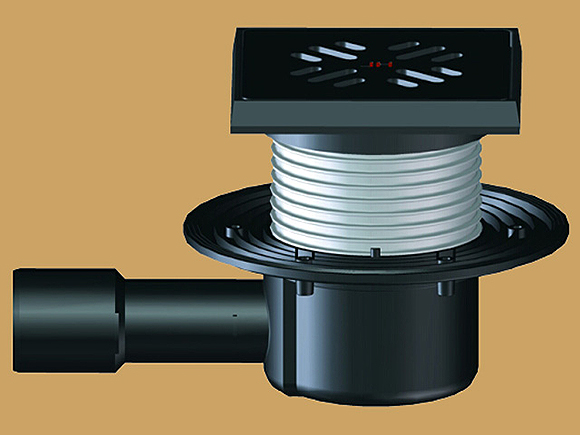
Water shutter provided for in them does not smell penetrate the room.
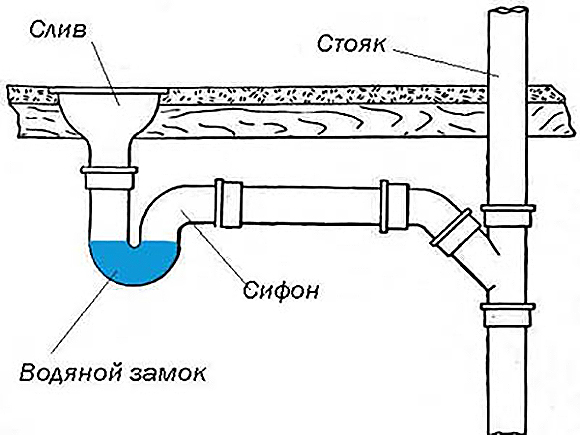
Also from the system can be removed ventilating riser, leaving on the roof or in an attic room.
Water in them is going through organized slopes. And the biases are performed regardless of which type of coating applies: a wooden, concrete or a ceramic tile is laid on it.
Wooden solid tipped floors in the baths are more often performed from oak, teak, larch, sometimes made of resamping pine in the crate.
More often these floors are made in a warmed version, especially for frame houses.
As a heater, in this case, we recommend using polystyrene foam, which, even completely immersed in water, per day absorbs its no more than 1%, which cannot be said about any of the types of cotton insulation. But in this case, the waterproofing should not be neglected. And it is better to apply a dense geomembrane for it, paved on the junctions laid with a launch of a wall at least 80 - 100 mm.
Laying drain pipe
The entrance to the drain highway laid in the ground is better to produce through a corrugated pipe, which compensate for the winter rise of the soil due to the forces of frosty powder, the integrity of the system will not break.
If you build a bath on ribbon foundationThe yield of the drain pipe and the place of its passage through the inner tapes should be foreseen at its fill, having calculated the slopes, and then having laid it into it immediately.
If the thickness of the floor platform allows you to comply with the necessary slopes, the drain pipe can be paved inside its design. Cold bridges in this case will not arise.
In floating foundations performed in the form of solid monolithic plate, Plum systems from the baths are mounted before their fill.
At the same time, if the finishing floor covering is performed from the tile, then the necessary slopes are observed when it is styling due to changes in the thickness of the adhesive composition, to which it stacked.
And on large areas before laying the tile is preliminarily cement strainer By lighthouses. If on concrete base The wooden pouring floor is stolen, it is also performed, and opposite the trapka it provides a removable board for maintaining the device.
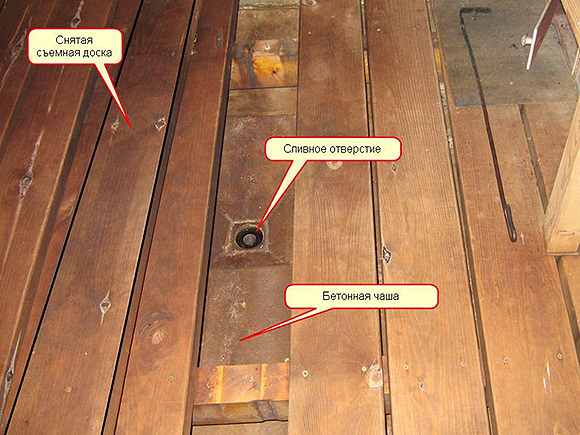
The same concrete bowl under such a floor is desirable to hydroize the bituminous primer or the composition similar to it.
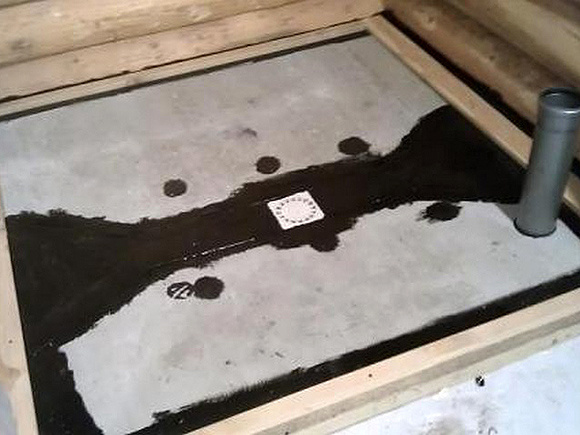
If in the bath, and sometimes in the steam room itself, they make a shower, it is desirable to install a wider center for taking water.
And the recommendations for its installation are no different from the previous ones. It remains to add that if the trap or siphon is mounted in the finished concrete base, it is better to be reduced by a special polymerized waterproof cement mixture, pre-trusted the connection place with the rest of the primer of deep penetration.
Dear readers, if you have any questions, ask them using the form below. We will be happy to communicate with you;)


