interest in weapons reaches the stage that the only right decision is to make them yourself, it is important to delve into all the nuances in order to get the perfect result. The quality of the bow depends on the condition of the wood from which it is made. And the state, in turn, depends on how the drying was carried out.
To make a wooden bow is within the power of anyone who shows such a desire. But you need to act gradually. If you want to do absolutely everything yourself, you need to be patient, because the process takes several months.
In general, the creation of a bow is carried out in several stages:
- choice of wood;
- timber harvesting;
- drying of the material;
- giving an arc;
- primary processing;
- the formation of the front part;
- string selection.
Consider everything related to the selection and drying of wood.
Selection and harvesting of wood for the manufacture of onions
For residents of Russia, and almost the entire post-Soviet space, the choice of wood is not difficult. Most of the trees and even bushes are suitable for making onions.
Depending on what grows in a particular region, you can take juniper, maple, hazel, ash, birch, elm, cedar or oak.
Then all the fun begins. It is advisable to attend to the preparation of material in the winter. Optimum temperature for sawing: -10 ... -15 degrees. A tree cut down in winter has increased flexibility and elasticity, which is of paramount importance for a traditional bow.
It is best to look for a branch to be cut in advance (before the onset of winter), fairly even, perhaps with a slight bend. The number of knots on it should be minimal. Optimum diameter: 8…10 cm. Optimum length: length of the future bow + 30 cm for additional processing (cracks may appear in the ends after drying).
The branch is sawn from both sides so that only the workpiece of the desired length remains. Its ends are covered with oil paint. After the latter has dried, the ends are wrapped with polyethylene.
Everything, the workpiece is prepared for drying.
Attention! Drying of wood is carried out in the bark, it does not need to be removed. The bark is a natural process speed regulator. If it is removed, the “bare” tree, when dried, literally cracks in a few days, often quite large. This makes the blank unsuitable for making a bow.
Proper drying of wood for making onions
Drying is the longest stage, and the maximum requirements are imposed on it. Compliance with all conditions is very important, since proper drying is a guarantee that the bow will have the necessary flexibility, it will not crack, and it will last a long time.
Natural drying
The optimal drying time is 2 to 5 months. At the same time, the moisture content of the wood should decrease from the initial 40-50% to the optimal 8-10%. To determine this indicator, a needle or non-contact moisture meter is used. If this equipment is not available, weighing techniques are used. In this case, it is necessary to know the initial moisture content of the wood used in the corresponding climatic zone.
The best place to dry the workpiece is a ventilated room with a normal difficulty of 40-65%. Dry air is undesirable, as the wood dries out and loses its elasticity. Cracks may appear in it and it becomes brittle.
The workpiece is placed vertically in a place where direct sunlight does not fall. There should be no fluctuations in humidity, as sudden drying damages the structure of the material, violating its integrity.
Moisture content is measured 2 months after the start of drying. If it is higher than 8-10%, the workpiece is dried to the desired condition.
Speed drying
Since we live in the age of technology, it is only natural that the process of natural drying can be accelerated. This allows you to proceed to the subsequent stages of making the bow much faster.
Accelerated drying can be carried out by several methods, each of which has its own subtleties.
Digestion / soaking

This technique, although it gives results faster than natural drying, still requires a lot of time, although many times less.
Preliminary, all the same, under natural conditions, the workpiece is dried up to 18-20%. At the same time, the tree still remains in the bark.
When the humidity level reaches the specified figure, soaking / boiling in water is carried out. This technique was used in the Middle Ages, preventing cracking and decay.
Then the workpiece is attracted to the bar with clamps until it dries completely. It occurs much faster than with natural drying.
The process takes several weeks.
infrared drying
If there is no way to wait that long, there is another option - infrared drying. To do this, just one thermomat / thermal cassette with an infrared heater is enough, which can be used as a household heater at home.
The workpiece is placed directly on the thermomat and left to dry. Depending on the type of wood, the process will take 3-7 days. In this case, the result will correspond to natural drying. The material will reach the required level of moisture, retaining its elasticity, avoiding cracks.

Making onions with your own hands is a complex and often unpredictable process, the behavior of a tree cannot always be guessed. Even experienced amateurs who have been doing this for more than one year say that mistakes always happen. There is no getting away from them, and wood is a capricious material. The result is rarely exactly what it seems.
A bow is a beautiful weapon, known to man since ancient times and still popular not only among romantic teenagers, but also among athletes, as well as hunters. strikes the imagination. You can buy this accessory in the store, or you can make it yourself, there would be a desire. And today we will tell you how to make a classic, compound and do-it-yourself bow for hunting with arrows at home.
This type of weapon works by transmitting a thrust force to the bowstring with straightening shoulders, which causes the arrow to fly out at a certain speed. This speed depends on the tension force. Popular models in this category are, and.
The video below will tell you how to make a classic bow for shooting with your own hands at home:
What you need
Need to cook:
- Plane.
- Hacksaw-saw.
- Insulating tape.
- Electric jigsaw (for compound bow).
- Drill (for compound bow)
- Glue.
- Sandpaper.
- Lacquer, paint for finishing.
- M6 bolts (for compound bow).
- Material for the bowstring (fishing line, synthetic rope or silk thread).
- The material for the bow is a PVC pipe or wood (yew is best, you can also take ash, juniper, cedar, willow, walnut, mountain ash, larch, elm).
Do-it-yourself classic bow
Technologies
Option one
The easiest way to make the bow whole is by taking a PVC pipe 4 centimeters thick. The length is measured based on the distance between the ends of the fingers in the extended state and the middle of the thigh. At the ends of the pipe, notches are made where the bowstring is attached.
The product is not very durable - it is only enough for a few times.
Option two
This is a composite model with which you will have to tinker longer. But the design will turn out to be more durable and reliable.
- Here, you first need to cut out the central part (base) from the wood, to which the shoulders will be attached. The width of the base in the center is 5 centimeters, and along the edges - one and a half centimeters. The bar for the workpiece has dimensions of 40 by 4 by 6 centimeters. Material - oak or birch. You can glue the workpiece from several layers of maple, beech or other wood.
- The shoulders are made from the same PVC pipe and reinforced with pieces of a smaller diameter tube inserted inside. We put notches on the edges, where we attach a bowstring woven from silk thread.
You can also make shoulders from ready-made springy slats taken from a sofa or bed. The length of these elements is usually from 70 to 120 centimeters. The optimal thickness is 12 centimeters. Cut out the details obliquely (preferably two at once). At the edges, notches are made for a bowstring with a depth of 7 to 8 millimeters. The shoulders are connected to the base with M6 bolts (for which holes must be drilled).
It's even easier to make shoulders out of skis - they fit perfectly. It is best to take narrow skis, but wide ones will have to be sharpened. Both plastic and wooden products are suitable. In this case, the total length of the bow should be from 120 to 140 centimeters.
compound bow
These models differ from the classical ones in that, due to the presence of eccentric blocks, less effort is required when firing. And the accuracy and accuracy, as well as the firing range, increase. Such block models as, and others are popular with athletes and hunters.
This video will tell you about making compound bows with your own hands at home:
What you need
A very simple option involves the presence of:
- Two powerful springs (you can buy at the car market).
- Two metal wheels (parts of a car lift, also bought at the car market) and two metal studs 4 centimeters each (they will be axles).
- Eight furniture corners and two corners of 4 centimeters.
- Two furniture hinges.
- Four brackets made of metal in the form of the letter "P" (fix the wheels).
- Self-tapping screws ordinary 30-35 pieces and elongated - 4 pieces.
- Synthetic ropes (strings).
- Wooden bars 46 centimeters long (2 pieces for the shoulders), 40 centimeters long, 4 centimeters wide and 2 centimeters thick (2 pieces for the base) 16 centimeters long and the same length and width with notches along the edges (2 pieces for attaching springs) .
- Hacksaws.
- Jigsaw.
- File.
- Screwdrivers.
- Sandpaper.
Do-it-yourself compound bow (drawings)

Technology
We make the base by attaching two small, sixteen-meter bars along the edges of a forty-centimeter bar. For fastening we use corners. We strengthen the structure with long self-tapping screws. We bring the surface to smoothness with sandpaper. We attach wheels to the shoulders with U-shaped brackets (for which we make slots at the ends of the shoulders). Studs will serve as axles.
We attach furniture hinges (curtains) along the edges of the base. We paint all the details (best of all, spray paint, it dries quickly). Then we attach the shoulders to the loops (behind the middle), we screw the corners to their front part from the end. We hook the springs for them, which, with the second end, hook on the recesses in the base bars. It remains only to pull the bowstring.
How to make a hunting bow with your own hands at home, we will tell below.
Hunter bow
Modern bows for hunting can be simple (solid) and composite, recurve and block, having different lengths and power. The cost of some ready-made branded models is quite high, so we will tell you how to make a hunting bow yourself. And in the "field" conditions.
Hiking simple option
What you need
- Durable wood (cedar, spruce, bird cherry, pear, apple, elm, pine, birch, larch).
- The knife is sharp and comfortable.
- Animal fat.
Technology
- We choose a suitable flexible bough in the forest.
- We try on in size, attaching one end to the thigh, the other to the end of the outstretched arm.
- We clean from the bark, cut out the desired shape.
- In the middle, we make a thickness of 5 centimeters, along the edges - 1.5 centimeters.
- For a bowstring, the grooves are 1.25 centimeters from the ends.
- We rub the finished product with animal fat.
Do-it-yourself hunting bow

Composite Model
What you need
- Wood for the base (otherwise, kibiti) is taken as a single-layer, dense, not flexible. It is best to take close to the root of the tree.
- For shoulders (otherwise, horns) we take bird cherry growing near water.
- For a bowstring - a cord, a leather strip three millimeters wide or twisted nettle stalks.
- For gluing parts - glue from crushed fish heads.
- Birch bark, a plate made of spruce "kremlin".
- Animal fat.
Technology
We clean the blanks from the bark and dry well in a dark place. After roughing, a second drying takes place. When all the details are cut out, they are already dried in the sun. If there is a desire to shoot from the knee, then one horn (shoulder) is made shorter. If this is not expected, we make them the same. The edges of the bow - up to 1.5 meters can be. The dimensions of the base are as in the composite model described above.
Details are glued together with fish glue, for strength they are fixed with animal tendons. The base is impregnated with fat (or cedar resin). Inside, we glue the onion with a plate of spruce "kremlin", on top - from warm birch bark, boiled and softened (we place the fibers along). It remains to attach the string.
As for arrows for a hunting bow, they are made with a diameter of 6 millimeters, from wood without cracks. At the back, fly bird feathers are inserted.
Light wood is good for small game, hard wood for big game.
If you want to hunt birds, just sharpen the tip of the arrow. If you look at something bigger, make a tip. Metal, bone, silicon.
This video will show you how to make a bow for hunting under water with your own hands:
Making onions is a process that requires precise adherence to technology. Only in this case, you can count on a good result. With a well-made bow, you can send arrows straight to the target, while it must be powerful enough to hit the game, which as a result will become the prey of the hunter.
Taking on its manufacture with their own hands is primarily for those who already have experience in hunting with such weapons, however, with the right approach to business, anyone can cope with the task. Consider how to make a bow for hunting with your own hands, using materials and tools that are available to everyone.
Varieties of bows
The main parts of such weapons are the bow and bowstring. By design, bows can be divided into two main groups:
- simple - for these models, the arc is made of one material - wood or PVC;
- composite, or composite - the arcs of such bows are made of several materials.
The form is distinguished:
- classic bows - the arc of such a hunting weapon has one bend, in a bent form it has a D-shaped appearance;
- recursive - their arc bends three times and has an M-shape.
Also, bows can be divided into simple and collapsible. The arcs of the former are made from a single piece of material, while the latter consist of several parts.
From natural materials for the manufacture of composite arches, wood can be used - for the middle part, horn - for the inside, as well as tendons that are attached to the outside. This three-piece design provides the weapon with good elasticity, flexibility and power.
Today, in the manufacture of industrial collapsible bows, high-strength modern materials are used that have optimal properties - fiberglass and carbon fiber, aluminum and magnesium alloys, and so on.
The device of such a weapon can be quite complicated, but making it yourself at home is a task that requires some experience, as well as a lot of time and effort.
With your own hands it is better to make a simple non-separable bow. With the right approach to business and the observance of technology, its accuracy and power will be enough for hunting.
Tools and materials
To make such a bow, you will need a minimum set of tools:
- hacksaw;
- plane;
 To give the arc the desired bend, it is better to use a special slipway. It can also be made independently from a board and several bars.
To make a simple non-separable bow with your own hands, you need:
- wood or PVC tube to make an arc;
- strong rope, rawhide ribbon, wire, thick fishing line for making a bowstring;
- thick rope or other suitable material for the handle.
While pulling the bow, his shoulders should bend, while the bowstring practically does not stretch.. The arrow is sent to the target precisely due to the force of the arc of the weapon, which straightens at the moment of the shot.
How to make a bow out of wood?
Consider how to make a hunting bow out of wood. The best material for this is yew - it was from it that the best examples of such weapons were made in the Middle Ages. However, it is difficult to get such a tree, so other species are usually used instead. It can be:
- hazel;
- juniper;
- Rowan;
- ash;
- larch;
- cedar.
A good bow rod should:
- not have cracks, it is also better to select rods without knots, but the presence of a small amount of them on the surface is not critical, the main thing is not to try to cut them when processing the rod;
- have a length of one meter to one and a half meters;
- be dry;
- be direct.
 For the manufacture of a bow, you can also use several thin rods of the same length, while they must be securely fastened by pulling in several places with electrical tape or other suitable material. This option is suitable if you need to quickly make a bow in field conditions from what you can find at hand.
Wood harvesting
Harvesting wood to make a hunting bow with your own hands is better in winter, at a temperature of -10 degrees or a little lower. If you look for a suitable rod in the fall, you won’t have to wander through the snowdrifts in search. It is necessary to cut it off, while the length of the rod should be several tens of centimeters longer than the estimated length of the bow. This is necessary, since the ends of the rod may crack during drying.
Before making a bow, the wood needs to be dried for a long time, on average three months is enough. For this, a room with room temperature is suitable in which the bar must be hung.
At the same time, it is not necessary to remove the bark, and it is better to paint or varnish the ends, which will not allow moisture to evaporate, then the future arc will dry out evenly along the entire length. A rod that has a slight curvature can be straightened over the steam.
In field conditions, drying can be done quickly with the help of a fire, the main thing is to do it carefully, do not lower the wood too close to the fire and do not dry it out. Such an onion will be more fragile and less durable than dried at room temperature.

Making a bow from a wooden rod
When the rod is dried, it must be processed with a planer, while the shoulders should not become cylindrical, but flat. The arc of a simple collapsible bow does not consist of a single piece of wood or PVC, but of two separate arms that are attached to the top and bottom of the handle. The handle in this case is easiest to make from a wooden block or cylinder of suitable thickness. At the same time, in the central part they can be turned, making a comfortable grip under the arm.
If it is intended to make a simple bow with an arc from a single piece of wood, and not with two separate limbs, the rod in the middle should be left round in section.
It is important that the shoulders have the same length, width and thickness, only in this case the force on them will be distributed evenly, and the bow will hit accurately.
Then the workpiece must be given the desired shape - in the form of a simple arc or M-shaped. To do this, the wood is heated over steam and fixed for a while in a special slipway, which will fix the desired shape. Such a device can be made from a board by attaching several bars to it. It takes about a week to keep the bow in the slipway.
When the arc is ready, notches must be made at its end and the bowstring must be fixed. You also need to braid the handle. To get a reliable installation, the fixation points of the bowstring and the handle must be glued.
Making a bow from skis
Skis are a great material for making a bow bow, which often does not even need to be processed. Therefore, if there is a suitable pair available that is unusable, there is no need to harvest rods or look for other material. You can use both wooden and plastic skis, the second option is preferable.
To make a bow, you need to saw off the two ends of the skis of a suitable length, which will be the shoulders, and fasten them to the handle. The handle itself can also be made from skis by fastening the cuts of the desired length in several layers and processing them so that a comfortable grip is obtained. After that, you only need to fasten the bowstring, and the bow is ready for use.
 The optimal length of the finished product is about 1.3 m. If a bow made from skis exceeds a length of 1.4-1.5 m, its power will be insufficient, since such a long arc cannot give the arrow sufficient momentum. Also, the shoulders should be narrow - so, in order to make an arc from wide skis, they must be turned from both edges.
Making a composite bow, each limb of which must be made from several different materials rather than one, is a more complex process. However, such a weapon is made according to the same principles as a simple homemade bow for hunting. If you approach the matter correctly, a bow made with your own hands will hit powerfully and accurately, and at the same time it will be able to serve for quite a long time.
Instructions for making a composite bow (with pictures)
A composite bow, by definition, is a bow made from two or more materials. In another way, such bows are called -. Typically, composite materials are used to make the bow stronger, although it can also be a purely decorative version of the bow. Exotic materials such as horn can be used by experienced DIYers, but for beginners, wood is probably the easiest option for making a composite bow. We will show you how to make a basic bow and refine it to the desired shape. Instructions for making a compound bow are given in a concise but easy-to-understand form for home craftsmen to understand.
Base for compound bow
Choose wood. You can go to the store and buy a couple of boards there. Cutting onions from raw wood is not recommended. It must be dried first.Choose the size of the board approximately: 1.8 m long and 25 mm thick. You can use thinner boards, but your composite bow will have more layers. Oak or birch are good woods for your first bow. The best bows are made from yew, but this material is difficult to work. Do not use pine, poplar or other soft wood.
Check the structure of the wood. Ideally, the fibers of the boards should run straight down the length of the board (not from the edge), so that the back of the board's plate would be a single layer of wood, without any growth rings or knots.
To study the direction of the fibers, you can use the following method. Run a sharp knife along the entire length of the board. The knife point should follow straight through the fibers. But it is unlikely that you will find such a perfect board in the warehouse of the store, so just look for wood that has the least amount of various defects.
Use a pencil to draw the outline of your bow on the tree:
- Follow the natural grain of the wood.
- If there are knots, knots on the tree, try to leave them aside.
If you will make a composite bow with two layers, then apply glue to the bottom board. This will make it easier to combine them. You can use any furniture (wood) glue, or epoxy.
Saw the onion with a hacksaw after the glue dries well. After that, with a rasp, bring the outline of the bow to the desired shape.
Now you need to cut and gouge the sides of the bow with a sharp tool, such as a chisel, to remove the taper towards the ends of the bow.
Don't cut too much wood at once, lest you inadvertently make the bow thinner than necessary. When working, check the bow as often as possible for symmetry and uniformity in the shape of the shoulders.
You can carve (cut) any configuration of the handle. Making such a bow is a creative business. The main thing is that it is convenient to hold the bow when shooting, and that there is a shelf for the arrow on the right side. Usually it is performed on both sides, so that it is convenient to shoot, both right-handed and left-handed. But, if you are not going to subsequently give the bow to a friend who has a different right (left) hand, then customize the bow for yourself.
Make 1/8" string notches at a downward angle on both sides of the top and bottom of the bow.
Pull the rope. From one end, look down the length of the bow and make sure the string runs through the center of the bow. If necessary, trim the ends of the bow with a rasp and only then pull the bowstring.
Sand the bow with sandpaper after making sure it is in perfect shape and no longer needs to be refinished.
Wrap the bow handle with lining material, putting it on the glue. It is better to treat the wooden parts of the composite bow with some kind of antiseptic or soak with tung oil.
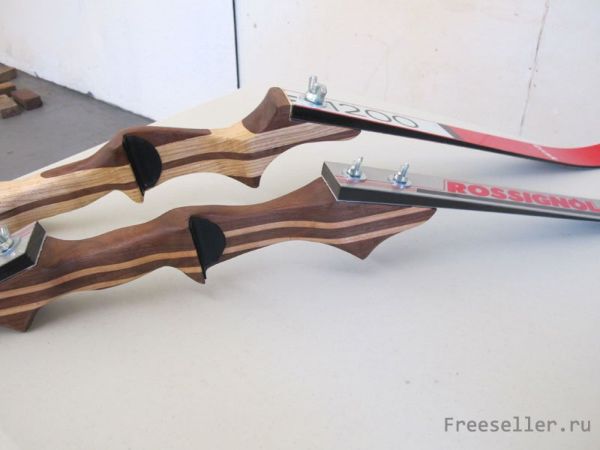
Using this step-by-step guide, you can make DIY bow from old skis. Skis are great for making bow limbs. First of all, they are the same. You don't have to worry about the material having different characteristics, you can expect the limbs to bend the same way. Also, you won't have to worry about bending the tree - the front ends of the skis are already bent.
![]()
Materials and tools needed to make a bow
Materials:Skis: pieces of skis for making bow arms;
Lumber - for the manufacture of the handle. You need either a large beam (at least 8x8x50), or small bars;
A pair of bolts, washers, wing nuts - to attach the bow arms to the handle;
Nylon thread (or any low-stretch string) - for the bowstring.


Tools:
clamps;
Hand drill with a set of drills;
Chisel, hammer;
Wood rasp or file;
Sandpaper of various grain sizes;
The tools listed below are not essential, but will make the process much easier if you're making a more complex bow handle.
table saw;
Drilling machine;
Band-saw;
Plane;
Belt / disc grinder.

Making a bow from skis
I used mountain skis. The ends are bent at an angle of 20 - 28 degrees. Bow limbs made from alpine skis will be more "strong" because alpine skiing is tougher.Bow handle design


The originals of the handle in real size:
http://www.instructables.com/id/Make-a-takedown-bow-from-skis/


