At present, it has become very popular to make concrete products with your own hands: window sills, steps for stairs, paving slabs, countertops and much more. Ultimately, the quality of building products directly depends on how ideal the components of the solution are. We suggest you make a device - a vibrating sieve with your own hands, with which you can quickly sift cement, sand, gravel and other bulk materials.
What is a vibrating sieve made of?
The proposed design is quite easy to repeat, and it does not require a lot of time and money. Components of a homemade vibrating sieve:
- base (frame), to which all other structural elements will be attached;
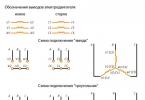
- engine (in our case, an electric saw or an electric drill);
- outer box (box) with rollers;
- internal folding box (box) with a metal mesh bottom;
- "rails" for the movement of boxes;
- guide chute for collecting sifted material;
- external block for adjusting the speed of the electric saw (if necessary).
For the manufacture you will need the following materials:
- wooden bars (60 x 60 or 60 x 70 mm);
- boards or plywood (thickness 18-22 mm);
- 4 furniture rollers;
- 6 rubber shock absorbers;
- piano loop;
- metal corners and plates (for connecting wooden parts and increasing strength);
- hardware: self-tapping screws, bolts, nuts and washers.
Manufacturing procedure
Drawings for the independent manufacture of a vibrating sieve are easy to do by yourself. For clarity, we present our schematic plan of the future product.

Our vibrating sieve has the following dimensions:
- overall dimensions of the base (frame): length - 1350 mm, width - 560 mm, height - 850 mm;
- dimensions of the outer box: length - 610 mm, width - 455 mm, depth - 120 mm;
- the dimensions of the folding box (internal) are chosen in such a way that it can be overturned and freed from screenings without much effort and friction against the walls of the outer box.
First, we make a frame of the required size from bars and boards. We fasten wooden parts with metal corners, plates and self-tapping screws. Then, on the inside of the base, we fasten the guide bars - “rails” (we use 6 metal squares), along which the boxes will move (to increase the anti-vibration qualities, we install rubber shock absorbers between the guides and corners). We fasten the guides together with transverse bars according to the principle of sleepers between railway rails. In the upper part of the frame we make a platform and attach an electric saw to it.

Then we make a structure that consists of two boxes inserted into each other and fastened together with a piano loop: one without a bottom (external), and the second with a fixed metal mesh instead of a bottom (internal). The size of the mesh cells is selected based on the size of the bulk material fraction that we want to get in the end. We attach four rollers to the “bottomless” box from below (they can be bought at a furniture accessories store). We attach the hacksaw blade to the outer box using a spring clip and bolts (10 mm). The translational movement from the blade is transmitted to the boxes, which move back and forth along two guides. In the process of movement, the mesh vibrates and the bulk material poured from above is sieved.

A gutter made of plywood, through which the sifted material enters the collection container, is rigidly attached to the base (it can also be made of sheet iron or roofing sheet).
The power consumption of a homemade vibrating sieve depends on the model of the electric saw used. The greater the power of the electric saw, the larger the dimensions of the homemade vibrating sieve can be. And this, in turn, will increase the productivity of the entire installation.
External speed control unit
Since the blade of the electric hacksaw moves too fast, we install a separate speed control unit (with a built-in switch and automatic fuse), which will help you choose the optimal mode of forward movement of the vibrating screen and adapt its operation to different bulk materials. In this case, the power saw switch is locked in the "on" position. You can refuse a separate adjustment unit if you use a fairly “low-speed” electric saw as an electric motor.
It is better to close the saw itself with a protective cover to prevent cement, sand or other dust from entering (it is easy to make from a plastic bottle of a suitable size). With fairly simple changes in the frame design, an electric drill (preferably with a built-in rotation regulator) can be used as the main engine, by installing a stud with a reciprocating eccentric attached to it instead of a drill.

The video shows another simple vibrating screen design using an electric jigsaw as a motor:
In custody
Using our recommendations, you can easily make a device for sifting building materials. A hand-made vibrating sieve will allow sorting into fractions such bulk materials as sand, cement, gravel, expanded clay, chalk, lime and much more.
Today, paving slabs, which have appeared on the domestic market relatively recently, are gaining more and more popularity. This can be explained by the fact that it is not only very attractive, but also absolutely clean in environmental terms. Moreover, the surface that was laid out with such tiles will be dry even after heavy rain. You can make such a good achievement of the industry right at home, using the simplest equipment for this, including a vibrating table.
What are vibrating tables for?
There are several main functions that these devices perform:
- A vibrator built into the equipment creates vibrations with a certain frequency, which are transmitted through the base of the tabletop directly to the molds with the mixture.
- The working surface is placed on the base of the table with the help of shock absorbers (this helps to absorb the vibrations produced) or simply on the floor.
The factory model is very expensive, it is much more economical to build yourself a vibrating table with your own hands. In this case, you will need to follow fairly simple instructions, but in this matter, as in many others, there are some nuances.
We start work.
Actually, what is a vibrating table? An ordinary metal frame, on the legs of which special vibration springs are installed, an engine and a bed of the correct mass. In this article you will find step-by-step instructions regarding the manufacturing process, but you will need the following tools:
- Electric motor.
- Four springs.
- Channels in the shape of the letter "P".
- A sheet of steel from which we will make a table.

So let's go.

Step one.
First, let's consider exactly what parts the vibrating table device consists of:

We take the channels and weld two squares out of them (this will be the frame of our design).
Step two.
We fasten the springs to the corners of the base, and weld a sheet of steel on top - this is our table surface. This surface is assembled at the same time as the foundation, and on the reverse side we install an electric motor.
Basically, that's all. It turns out that making a vibrating table with your own hands is very simple. But, despite the simplicity of construction and installation, the functionality of the device will be incomplete if certain rules are not followed.
- The most important of them is the correct weight of the countertop. Note that this indicator is different for each individual case, there are no universal tips on this issue. In this case, not only the material from which we will make the structure will be taken into account, but also the dimensions of the table itself.
- The material for the manufacture of countertops also plays an important role. But at the same time, you should rely not so much on the strength of the future structure, but on its imperturbability to various kinds of vibrations. Moreover, static-dynamic loads should also be taken into account, because they will also affect the countertop in the most direct way.
- It is necessary to carefully calculate the amplitude of the movement of the vibrating table in order to produce attractive and durable products. And if the amplitude is chosen incorrectly, then the quality of the work performed will significantly decrease, as well as the efficiency of the unit.
- And finally, the fourth point is the choice of the electric motor. This must be done according to preliminary calculations. In this case, the engine will be mounted according to the appropriate scheme. If this is done incorrectly, then the technological process will go wrong, and the tile will significantly lose quality.

About the imbalance mechanism.
If you plan to make it yourself, then we recommend that you contact a professional turner who can fit your electric motor to the needs of production, and also make the bearing assembly properly. Thanks to this, our device will be able to serve us for quite a long time.
Paving slabs are a great solution for decorating a personal plot. Its use gives the site a neat and well-groomed appearance, and the area laid out with paving slabs for recreation or for parking will always be clean and dry. The only negative arises when the estimate for the arrangement is knocked down. The price of paving slabs is not going to fall yet, and the design of paths and playgrounds can fly into a good penny.
What is a vibrating table
If, nevertheless, an irresistible desire arose to decorate the courtyard with tiles, then there is a way out of how to do it inexpensively and efficiently. Tiles are possible. In this case, its price will be several times less than the purchased one, and if you make an effort and do everything according to the technology, then in terms of quality such a tile will not differ from the branded one.
To do this, you will have to use a concrete mixer and make a vibrating table with your own hands, a drawing and brief explanations for the manufacturing process can be found on the page. This is the largest investment that will have to be made to begin work on the arrangement of the yard. A concrete mixer does not count, since almost every owner has it, but problems can arise with a vibrating table. The vibrating table is necessary to compact the concrete mixture from which the tiles are cast, and without the compaction process, the material will be loose and loose, which will undoubtedly affect the strength and service life of the finished tile.
The vibrating table is arranged very simply and for its manufacture, you can use different methods. The drawings and photographs that make up the page show that its design can be different, as well as power and performance. Depending on the tasks set, everyone selects the design according to their needs.
The main element of the vibrating table is an eccentric motor, which together form a vibrating unit. The vibration mechanism sets in motion a movable plate, on which a form with a solution will be located during the production process. Under the influence of vibration of the plate, the solution is compacted to a certain limit, after which new forms are installed on the plate.
The main characteristics of the vibrating table
To make a simple vibrating table, you need to prepare a set of materials and tools, and with good metalworking skills, the design is assembled in a day and another day is spent on fine-tuning. From the materials you will need:
- 4 rack-supports made of rolled metal (pipe, angle, I-beam);
- a sheet of metal with a thickness of at least 3 mm;
- electric motor of any power;
- durable hardened steel springs.
The tool, of course, will be necessary, but you can limit yourself to a minimum set of a welding machine, a drill and a grinder.
The main characteristic of the vibrating table is its dimensions. The larger the table, the more forms can be placed on it. But then there is a need to increase the engine power, since the mass of the countertop will also grow. Springs are selected empirically, and engine power can start from 250 watts. Recommended table dimensions - 1800x800 mm.
Vibrating table motor and drawings
Engine power should not be too high, so many use motors from washing machines. Its only drawback is a small resource. But if there are no plans to provide the entire area with tiles, then one engine can work properly for several years at medium loads. You can modify the motor, since the main weak point of it was the bushings or bearings. If you immediately change the bearings to reinforced ones and remove the bushings and replace them with bearings, then the table will last even longer.
You can use a ready-made vibrator. IV99, for example, will cost 5-7 thousand, but it is almost eternal, since it has a power reserve and is designed for such work. An excellent addition would be the speed controller. With this help, you can adjust the vibration frequency for each batch of tiles individually.
Important details in the manufacture of a vibrating table
Despite the simplicity of the design, the work on manufacturing and calculations requires compliance with some subtleties. The working surface of the table must have a mass that is dictated by the size and materials of manufacture. The mass of the table must correspond to the capabilities of the vibration motor, and the frame itself must be welded strong and rigid.
In this case, it is very important to adjust the frequency of vibrations. If this is not done, then the tile will either be unaesthetic if the amplitude is too large, or not sufficiently compacted. Thus, after spending a few days, the farm will acquire another useful tool that will come in handy more than once.
In the private sector, cost optimization in the process of repair or construction is also achieved due to the fact that the maximum of technological operations is performed by the owner independently. In some cases, you have to spend money and rent special / equipment, since the household tools available in the house somewhat limit the capabilities of the master. Let's figure out how to make a vibrating table with your own hands, what to consider and what to pay special attention to.
On sites devoted to the issue of designing such an installation, the emphasis is on the fact that it is used for the production of tiles (paving). In reality, the scope of the table is somewhat wider. For example, independent production of blocks (bricks) from cellular concrete, sand sifting.
Table layout
Its purpose is to create tabletop vibrations of a certain frequency and amplitude in the operating mode. The main thing is to understand the composition and principle of operation of the installation. Then it will be easy to make a home-made vibrating table - independently draw up its drawing, decide on the technology and select the necessary materials. And no special instructions are needed.
- Bed. It is a frame structure (frame), which is the supporting part of the table.
- Tabletop. Forms with a solution are installed on it, from which an artificial stone is obtained.
- Vibronode. It includes - depreciation system + electric / engine with appropriate equipment.
- Electrical equipment. The specific circuit design depends on the knowledge of the master in electrical engineering and the specifics of using the vibrating table.

If it is planned to manufacture only paving slabs, and for ourselves, in small quantities, then, taking into account the low weight of the samples, it is advisable to make a vibrating table with an engine from a washing machine. Such an installation will not take up much space, and you can save on materials.
Step-by-step instructions for making a vibrating table with an electric motor
A corner is enough for the frame - 25 or 40. It will be more convenient to attach all other parts of the circuit to it. But the legs can be made either from it, or from other profiled products - a steel channel, a pipe.
To make the table vibrate, metal cups are welded to its supports and (or) frame, in which shock-absorbing springs are placed. Their optimal number, as well as the layout scheme, is determined according to a specific drawing, based on the dimensions of the table top and engine power.

There are other options. The diagram of the device of the depreciation system is visible in the photo.

- When making a vibrating table for paving slabs or other purposes, it is better not to use wood for the bed, although some instructions state the opposite. The main reason is that the tree dries out over time. Consequently, the geometry, alignment will be violated, and it is unlikely that it will be possible to create a vibration of the required amplitude. According to whatever drawing and technology the table is made, the quality of the artificial stone will be low.
- To the lower parts of the legs should be welded "pyataki". This will give the vibrating table stability. If necessary, they can be concreted, and if holes are drilled in the plates in advance, then they can be fixed on the base with anchors.
- The height of the vibrating table determines the convenience of working with forms. Optimally - about 75 - 85 cm.
- Practice shows that for the manufacture of samples of artificial stone at home, with your own hands, it is quite enough to develop a drawing of a vibrating table, focusing on parameters 75x75 (cm).
tabletop
When choosing a material for this part of the table, it is necessary to be guided by several criteria - what solutions will be used, how many molds are supposed to be installed at the same time, and with what intensity the installation will be operated. Its scheme, the weight of the countertop and the amplitude of its oscillations depend on this.
If you plan to work with solutions for lightweight concrete, with one or two forms of small sizes, then in principle any material that can withstand various (static + dynamic) loads is suitable for the working surface of the vibrating table. This is the only instruction for this item.
When assembling a small do-it-yourself installation, to reduce financial costs, the countertop is often made of MDF, chipboard, and the like. Such materials are easy to cut yourself, with the help of improvised tools. But if we are talking about the production of concrete blocks on a vibrating table, and even in large batches, then definitely - a thick steel sheet (6 mm - minimum).

Engine
Its power for the vibrating table is selected based on the total load (countertop weight + molds + solution). As a rule, in the manufacture of equipment with their own hands, they are guided by the ratio of 100 kg - 1 kW. Although you need to take into account the installation scheme of the engine. In this case - from below and in the center of the vibrating table (typical drawings).
For self-production on a vibrating table, only paving slabs are enough for a product of 0.65 - 0.75 kW.
vibronode
 For such a table, you need not just an engine, but a mechanism that creates oscillations of the working platform. There are a lot of corresponding drawings and manufacturing instructions. If the vibrating table is planned to be used for a long time, for the production of various kinds of work, then it makes sense to make a universal installation.
A coupling with radially drilled holes is attached to the axis of the vibrating table motor. They have threaded bolts. By adjusting the depth of their landing, you can adjust both the frequency of the table top oscillations and their amplitude. It will not work to make such a device with your own hands - you will need a machine. Considering the benefits of a vibrating table made according to such a scheme, it is possible to pay for the services of a turner.
How to set up a vibrating table?
Only by experience. You will have to experiment yourself, changing the frequency, amplitude (with the help of adjusting bolts), the total mass of the load on the countertop. But in any case, you can achieve good product quality, since the vibrating table, in principle, is not a particularly complex design, no matter what drawing it is made of.
With self-production of small-sized samples, you can do without a frame. All that is needed for the vibrating table is a tabletop with a fixed motor. The role of the support is played by a large balloon (for example, from the rear wheels of the Belarus tractor). When the motor shaft rotates, the rubber absorbs well, and this design completely replaces a full-fledged vibrating table.
In order to mechanize this process and facilitate the work, it is possible to manufacture a mechanical device with an electric drive. Such a mechanism will be especially relevant if it is necessary to prepare a large amount of building mixtures from bulk materials.
Such a device is called a vibrating sieve or a vibrating screen. It has a fairly simple design, and therefore it is not difficult to make a vibrating sieve with your own hands.
General design device
Making a vibrating screen for sand or gravel does not require a lot of time. The design description of the vibrating sieve provides for the following elements:
- supporting frame, on which all other parts and assemblies are located and fixed;
- electric drive, which can be used as a power saw, jigsaw or drill;
- an outer box (frame) without a bottom, mounted on fixed furniture rollers;
- guide rails from a metal corner for moving rollers along them;
- nestable box with a metal mesh bottom;
- a chute for transporting the sieved material to the collection hopper;
- device for adjusting the speed of rotation of the electric motor.
The transport chute is easiest to make from plywood, but a metal construction will be much more reliable, especially when screening gravel or other coarse materials.
A device for adjusting the speed of rotation may already be provided in the design of an electric drill or jigsaw. In this case, a separate external controller is not needed.
The principle of operation of a vibrating sieve for bulk materials is to transfer translational movements from a power tool to a frame with a fixed sieve. After sieving the materials, the inner wooden frame with the sieve is raised and the unnecessary screenings are discarded.

Necessary materials
For the manufacture of a frame, two boxes and other elements of the mechanism, you will need:
- wooden bars 60x70 mm;
- plywood 20 mm thick;
- 6 rubber or spring shock absorbers;
- 4 or 6 furniture rollers with mounting frame;
- piano loop with a length of at least 500 mm;
- metal corners for guide rails;
- metal plates or strip to strengthen the wooden parts of the structure;
- screws, bolts and nuts.
Particular attention should be paid to the strength of the piano loop, since when screenings are discarded, significant mechanical loads will fall on it.
Dimensions of the main structural elements
Before assembling the sand shaker, it is recommended to draw an assembly diagram or a simple assembly drawing. This will simplify assembly work and help determine the order in which they are performed.

- length 1400 mm;
- width 600 mm;
- height 850 mm.
The length of the outer drawer without a bottom should be equal to half the length of the supporting frame. The width is 100 mm less than the width of the base, the depth is at least 120 mm.
The dimensions of the inner box with a bottom made of mesh should ensure that it can be easily removed from the inner frame for free tipping and release from accumulated screenings. The outer and inner drawer are connected on the short side with a piano hinge, as a result of which there is the possibility of lifting and overturning the inner structure.

Assembly order
The manufacture of the vibrating sieve begins with the assembly of the supporting frame from wooden blocks in accordance with the drawing. To increase the strength of the structure, the connection of wooden parts is recommended to be made with reinforcement with metal corners and plates.
After that, on the inside of the base frame, it is necessary to fix the guide rails as a support for the movement of the furniture castors. The guide corners are fastened together in a single structure with the help of transversely mounted wooden bars. To reduce the level of vibration during operation, 6 or 8 rubber shock absorbers must be installed between the corners and the guides.
To fix the drive for a vibrating screen from an electric drill, jigsaw or saw, on one side of the upper part of the support frame, it is necessary to provide for a platform corresponding to the size of the power tool.
After assembling the support frame, a plywood gutter is made and installed. The processed material will flow through it into a collection container. It is more difficult to make a metal gutter, but it will provide a longer service life.
 At the next stage, a screening structure is assembled from two boxes, one of which with a sieve is nested in the second.
 On one short side, the boxes are fastened together with a piano loop.
 From the bottom of the outer box without a bottom (frame), furniture rollers are fixed, which ensure the ease of movement of the boxes along the rails on the bearing support.
 The mesh size of the metal mesh is determined by the fraction of the bulk material to be screened. Fastening the mesh to the frame is best done with metal tape and self-tapping screws.
The working body of the power tool is connected to the external movable box using a spring connection, which will provide smoother vibrations during the operation of the mechanism. The translational movements from the electric drive are transmitted to the boxes, and as a result of their oscillations along the guides, the material poured into the inner box with the net is sieved.
The electrical power consumption of the mechanism depends on the power of the installed power tool. At the same time, it should be noted that the more powerful the saw, the larger the dimensions of the vibrating sieve can be made and, due to this, large volumes can be processed.
 If you use an eccentric, then you can use an electric drill as a power unit. In this case, the tool is installed sideways to the boxes and the drive mechanism will oscillate.
 Oscillation speed control unit
Power tool manufacturers produce models with or without adjustable motor speed. In the second case, the vibrations of the electric saw may be too frequent, and an additional external device for adjustment will be required.
A rheostat type regulator can be purchased from electrical supply stores. At the same time, it is recommended to buy a circuit breaker, which will provide additional protection for the tool and its long-term operation.
As a result, you will be able to provide any necessary vibration frequency of the working boxes of the vibrating screen, depending on their load and the weight of the material being processed, without overloading the electric drive.
Protecting the drive from dust
During operation, especially with materials such as cement and dry glue, dust is generated that enters the actuator. Therefore, it is recommended to cover the installed electric motor with a protective casing, the design of which should not block the ventilation openings of the tool. Such a casing can be made from a 2-liter plastic bottle.
The finished assembled vibrating screen and its operation can be seen in the video below.