Starting a 3-phase motor from 220 Volts
Often there is a need for a subsidiary farm connect a three-phase electric motor, but there is only single-phase network(220 V). Nothing, it's fixable. You just have to connect a capacitor to the engine, and it will work.
The capacitance of the capacitor used depends on the power of the electric motor and is calculated by the formula
C \u003d 66 P nom,
Where WITH- capacitor capacitance, uF, R nom - rated power of the electric motor, kW.
For example, a 600W motor needs a 42uF capacitor. A capacitor of this capacity can be assembled from several smaller capacitors connected in parallel:
C total \u003d C 1 + C 1 + ... + C n
So, the total capacitance of the capacitors for a 600 W motor must be at least 42 microfarads. It must be remembered that capacitors are suitable, the operating voltage of which is 1.5 times the voltage in a single-phase network.
Capacitors of the KBG, MBGCH, BGT types can be used as working capacitors. In the absence of such capacitors, electrolytic capacitors are also used. In this case, the cases of electrolytic capacitors are interconnected and well insulated.
Note that the rotational speed of a three-phase electric motor operating from a single-phase network almost does not change compared to the rotational speed of the engine in a three-phase mode.
Most three-phase electric motors are connected to a single-phase network according to the "triangle" scheme ( rice. 1). The power developed by a three-phase electric motor connected according to the "triangle" scheme is 70-75% of its rated power.

Fig 1. Principal (a) and mounting (b) diagrams for connecting a three-phase electric motor to a single-phase network according to the "triangle" scheme
A three-phase electric motor is also connected according to the "star" scheme (Fig. 2).

Rice. 2. Schematic (a) and mounting (b) diagrams for connecting a three-phase electric motor to a single-phase network according to the “star” scheme
To connect according to the “star” scheme, it is necessary to connect two phase windings of the electric motor directly to a single-phase network (220 V), and the third through a working capacitor ( WITH p) to any of the two wires of the network.
To start a three-phase electric motor of low power, usually only a working capacitor is enough, but with a power of more than 1.5 kW, the electric motor either does not start or picks up speed very slowly, so it is also necessary to use a starting capacitor ( WITH P). The capacity of the starting capacitor is 2.5-3 times the capacity of the working capacitor. As starting capacitors, electrolytic capacitors of the type EP or of the same type as the run capacitors.
Connection diagram of a three-phase electric motor with a starting capacitor WITH n shown on rice. 3.

Rice. 3. Scheme for connecting a three-phase electric motor to a single-phase network according to the "triangle" scheme with a starting capacitor C p
You need to remember: starting capacitors are turned on only for the time of starting a three-phase motor connected to a single-phase network for 2-3 seconds, and then the starting capacitor is turned off and discharged.
Usually, the conclusions of the stator windings of electric motors are marked with metal or cardboard tags indicating the beginnings and ends of the windings. If for some reason there are no tags, proceed as follows. First, the belonging of the wires to the individual phases of the stator winding is determined. To do this, take any of the 6 external terminals of the electric motor and connect it to any power source, and connect the second output of the source to a control light and, with the second wire from the lamp, alternately touch the remaining 5 terminals of the stator winding until the lamp lights up. When the light comes on, it means that the 2 outputs belong to the same phase. Let's conditionally mark the beginning of the first wire C1 with tags, and its end - C4. Similarly, we find the beginning and end of the second winding and denote them C2 and C5, and the beginning and end of the third - C3 and C6.
The next and main step will be determination of the beginning and end of stator windings. To do this, we use the selection method, which is used for electric motors with a power of up to 5 kW. We connect all the beginnings of the phase windings of the electric motor according to the previously attached tags to one point (using the “star” scheme) and turn on the engine in a single-phase network using capacitors.
If the engine immediately picks up the rated speed without a strong buzz, this means that all the beginnings or all ends of the winding have hit the common point. If, when turned on, the engine hums strongly and the rotor cannot reach the rated speed, then in the first winding, swap the terminals C1 and C4. If this does not help, return the ends of the first winding to their original position and now swap the conclusions C2 and C5. Do the same for the third pair if the engine continues to hum.
When determining the beginnings and ends of the phase windings of the stator of the electric motor, strictly adhere to the safety rules. In particular, when touching the terminals of the stator winding, hold the wires only by the insulated part. This must also be done because the electric motor has a common steel magnetic circuit and a large voltage may appear on the terminals of other windings.
For change of direction of rotation rotor of a three-phase electric motor connected to a single-phase network according to the “triangle” scheme (see. rice. 1), the third phase winding of the stator is sufficient ( W) connect through the capacitor to the terminal of the second phase stator winding ( V).
To change the direction of rotation of a three-phase electric motor connected to a single-phase network according to the "star" scheme (see. rice. 2b), you need a third phase stator winding ( W) connected through the capacitor to the terminal of the second winding ( V). The direction of rotation of a single-phase motor is changed by changing the connection of the ends of the starting winding P1 And P2 (Fig. 4).
When checking the technical condition electric motors, it is often distressing to notice that after prolonged operation, extraneous noise and vibration appear, and the rotor is difficult to turn manually. The reason for this may be the poor condition of the bearings: the treadmills are covered with rust, deep scratches and dents, individual balls and the cage are damaged. In all cases, it is necessary to inspect the electric motor in detail and eliminate the existing faults. In case of minor damage, it is enough to wash the bearings with gasoline, lubricate them, and clean the engine housing from dirt and dust.
To replace damaged bearings, remove them with a screw extractor from the shaft and wash the bearing seat with gasoline. Heat the new bearing in an oil bath to 80 ° C. Place a metal pipe, the inner diameter of which is slightly larger than the shaft diameter, into the inner ring of the bearing and, with light blows of a hammer on the pipe, put the bearing on the motor shaft. Then fill the bearing 2/3 full with grease. Reassemble in reverse order. In a properly assembled electric motor, the rotor should rotate without knocking and vibration.
And most of the asynchronous motors are designed for 380 V and three phases. And in the manufacture of home-made drilling machines, concrete mixers, emery and others, it becomes necessary to use a powerful drive. The motor from the grinder, for example, cannot be used - it has a lot of revolutions, and the power is small, you have to use mechanical gearboxes, which complicate the design.
Design features of asynchronous three-phase motors
AC asynchronous machines are just a godsend for any owner. It's just that connecting them to a household network turns out to be problematic. But you can still find a suitable option, using which the power loss will be minimal.
Before you need to deal with its design. It consists of the following elements:
- Rotor made according to the "squirrel cage" type.
- Stator with three identical windings.
- Terminal box.
Be sure to have a metal nameplate on the engine - all parameters are written on it, even the year of manufacture. The wires from the stator go into the terminal box. With the help of three jumpers, all wires are switched among themselves. And now let's look at what motor connection schemes exist.
Star connection
Each winding has a beginning and an end. Before you connect the 380 to 220 motor, you need to find out where the ends of the windings are. To connect according to the "star" scheme, it is enough to install jumpers in such a way that all ends are closed. Three phases must be connected to the beginning of the windings. When starting the engine from, it is desirable to use this particular scheme, since high currents are not induced during operation.

But it is unlikely that it will be possible to achieve high power, therefore, hybrid circuits are used in practice. The motor is started with the windings turned on according to the “star” scheme, and when it reaches the established mode, it switches to the “triangle”.
Connection diagram of the "triangle" windings
The disadvantage of using such a circuit in a three-phase network is that large currents are induced in the windings and wires. This will damage the electrical equipment. But when working in a 220 V household network, such problems are not observed. And if you are thinking about how to connect a 380 to 220 V asynchronous motor, then the answer is obvious - only by using the triangle circuit. In order to connect according to this scheme, you need to connect the beginning of each winding to the end of the previous one. Power must be connected to the vertices of the resulting triangle.
Connecting the motor with a frequency converter
This method is at the same time the most simple, progressive and expensive. Although, if you need functionality from an electric drive, you will not regret any money. The cost of the simplest frequency converter is about 6000 rubles. But with its help, it will not be difficult to connect a 380 engine to 220 V. But you need to choose the right model. First, you need to pay attention to which network the device is allowed to connect to. Second, pay attention to how many outlets it has.
For normal operation in a domestic environment, you need the frequency converter to be connected to a single-phase network. And the output should be three phases. It is recommended that you carefully study the operating instructions so as not to make a mistake with the connection, otherwise the powerful transistors that are installed in the device may burn out.
Using Capacitors
When using a motor with a power of up to 1500 W, you can install only one capacitor - a working one. To calculate its power, use the formula:
Srab=(2780*I)/U=66*P.
I - operating current, U - voltage, P - motor power.

To simplify the calculation, you can do otherwise - for every 100 W of power, 7 microfarads of capacitance are needed. So for a 750W motor you need 52-55uF (you need to experiment a bit to get the correct phase offset).
In the event that a capacitor of the required capacity is not available, it is necessary to connect in parallel those that are available, while using the following formula:
Ctot=C1+C2+C3+...+Cn.
A start capacitor is required when using motors with a power greater than 1.5 kW. The starting capacitor only works in the first seconds of switching on to give a "push" to the rotor. It turns on through the button parallel to the worker. In other words, with its help, the phase shifts more strongly. Only in this way can a 380 to 220 motor be connected through capacitors.

The essence of using a working capacitor is to obtain a third phase. The first two are zero and phase, which is already in the network. There should be no problems with connecting the engine, the most important thing is to hide the capacitors away, preferably in a sealed, sturdy case. If the element fails, it may explode and cause harm to others. The voltage of the capacitors must be at least 400 V.
Connection without capacitors
But you can connect a 380 to 220 motor without capacitors, for this you don’t even have to buy a frequency converter. It is enough to rummage through the garage and find a few main components:
- Two transistors of the KT315G type. The cost on the radio market is about 50 kopecks. a piece, sometimes even less.
- Two thyristors of the KU202N type.
- Semiconductor diodes D231 and KD105B.
You will also need capacitors, resistors (permanent and one variable), a zener diode. The whole structure is enclosed in a housing that can protect against electric shock. The elements used in the design must operate at voltages up to 300 V and currents up to 10 A.
It is possible to carry out both hinged installation, and printed. In the second case, you will need foil material and the ability to work with it. Please note that domestic thyristors of the KU202N type get very hot, especially if the drive power is over 0.75 kW. Therefore, install the elements on aluminum radiators, if necessary, use additional airflow.

Now you know how to independently connect a 380 engine to 220 (to a household network). There is nothing complicated about this, there are many options, so you can choose the most suitable for a specific purpose. But it is better to spend money once and purchase it, it increases the number of drive functions many times over.
In the household, sometimes it becomes necessary to start a 3-phase asynchronous electric motor (BP). In the presence of a 3-phase network, this is not difficult. In the absence of a 3-phase network, the engine can also be started from a single-phase network by adding capacitors to the circuit.
Structurally, IM consists of a fixed part - the stator, and a movable part - the rotor. Windings are laid on the stator in the grooves. The stator winding is a three-phase winding, the conductors of which are evenly distributed around the circumference of the stator and laid phase by phase in grooves with an angular distance of 120 el. degrees. The ends and beginnings of the windings are brought out to the junction box. The windings form pairs of poles. The rated speed of the motor rotor depends on the number of pole pairs. Most general industrial motors have 1-3 pairs of poles, less often 4. Induction motors with a large number of pairs of poles have low efficiency, larger dimensions, therefore they are rarely used. The more pairs of poles, the lower the frequency of rotation of the motor rotor. General industrial IMs are produced with a number of standard rotor speeds: 300, 1000, 1500, 3000 rpm.
The IM rotor is a shaft on which there is a short-circuited winding. In low and medium power induction motors, the winding is usually made by pouring molten aluminum alloy into the grooves of the rotor core. Together with the rods, short-circuited rings and end blades are cast, which ventilate the machine. In high power machines, the winding is made of copper rods, the ends of which are connected to short-circuited rings by welding.
When the HELL is turned on in a 3f network, the current begins to flow through the windings in turn at different times. In one period of time, the current passes along the pole of phase A, in the other along the pole of phase B, in the third along the pole of phase C. Passing through the poles of the windings, the current alternately creates a rotating magnetic field that interacts with the rotor winding and causes it to rotate, as if pushing it in different planes at different times.
If you turn on the AD in a 1f network, the torque will be created by only one winding. Such a moment will act on the rotor in one plane. This moment is not enough to move and rotate the rotor. To create a phase shift of the current of the pole, relative to the supply phase, phase-shifting capacitors are used Fig.1.
Capacitors can be used of any type, except for electrolytic ones. Well suited capacitors such as MBGO, MBG4, K75-12, K78-17. Some capacitor data are shown in table 1.
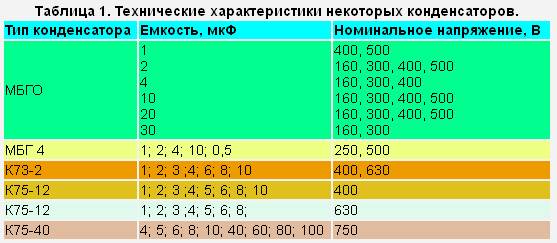
If it is necessary to gain a certain capacitance, then the capacitors should be connected in parallel.
The main electrical characteristics of IM are given in the passport Fig.2.

Fig.2
It can be seen from the passport that the motor is three-phase, with a power of 0.25 kW, 1370 rpm, it is possible to change the winding connection scheme. The connection diagram of the "triangle" windings at a voltage of 220V, "star", at a voltage of 380V, respectively, the current is 2.0 / 1.16A.
The star connection diagram is shown in Fig. 3. With this inclusion, a voltage is applied to the motor windings between the points AB (linear voltage U l) times the voltage between the points AO (phase voltage U f).

Fig.3 Connection scheme "star".
Thus, the line voltage is twice the phase voltage: . In this case, the phase current I f is equal to the linear current I l.
Consider the connection diagram "triangle" fig. 4:

Fig. 4 Connection diagram "delta"
With such a connection, the linear voltage U L is equal to the phase voltage U f., And the current in the line I l is twice the phase current I f:.
Thus, if the AD is designed for a voltage of 220/380 V, then to connect it to a phase voltage of 220 V, a “triangle” stator winding connection scheme is used. And for connection to a linear voltage of 380 V - a star connection.
To start this IM from a single-phase network with a voltage of 220V, we should turn on the windings according to the "triangle" scheme, Fig.5.

Fig. 5 Connection diagram of the EM windings according to the "triangle" scheme
The connection diagram of the windings in the outlet box is shown in fig. 6

Fig. 6 Connection in the output box of the ED according to the “triangle” scheme
To connect the electric motor according to the “star” scheme, it is necessary to connect two phase windings directly to a single-phase network, and the third - through a working capacitor Ср to any of the wires of the network Fig. 6.
The connection in the output box for the star circuit is shown in fig. 7.

Fig. 7 Connection diagram of the EM windings according to the "star" scheme
The connection diagram of the windings in the outlet box is shown in fig. 8

Fig. 8 Connection in the output box of the ED according to the "star" scheme
The capacity of the working capacitor C p for these circuits is calculated by the formula:
,
where I n - rated current, U n - rated operating voltage.
In our case, for switching on according to the "triangle" scheme, the capacitance of the working capacitor C p \u003d 25 μF.
The operating voltage of the capacitor must be 1.15 times the nominal supply voltage.
To start an IM of low power, a working capacitor is usually sufficient, but at a power of more than 1.5 kW, the engine either does not start or picks up speed very slowly, so it is also necessary to use a starting capacitor C p. The capacity of the starting capacitor should be 2.5-3 times greater than the capacity of the working capacitor.
The connection diagram of the motor windings connected according to the "triangle" scheme using starting capacitors C p is shown in fig. 9.

Fig. 9 Connection diagram of the EM windings according to the “triangle” scheme using starting condensates
The connection diagram of the star motor windings using starting capacitors is shown in fig. 10.
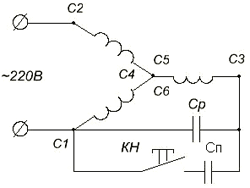
Fig. 10 Scheme of connecting the EM windings according to the "star" scheme using starting capacitors.
Starting capacitors C p are connected in parallel with the working capacitors using the KN button for a time of 2-3 s. In this case, the speed of rotation of the rotor of the electric motor should reach 0.7 ... 0.8 of the nominal speed of rotation.
To start the IM with the use of starting capacitors, it is convenient to use the button in Fig. 11.

Fig.11
Structurally, the button is a three-pole switch, one pair of contacts of which closes when the button is pressed. When released, the contacts open and the remaining pair of contacts remain on until the stop button is pressed. The middle pair of contacts performs the function of a KN button (Fig. 9, Fig. 10), through which starting capacitors are connected, the other two pairs work as a switch.
It may turn out that in the motor connection box the ends of the phase windings are made inside the motor. Then HELL can be connected only according to the schemes of Fig. 7, fig. 10, depending on power.
There is also a diagram for connecting the stator windings of a three-phase electric motor - an incomplete star fig. 12. Connection according to this scheme is possible if the beginnings and ends of the phase windings of the stator are brought to the junction box.

Fig.12
It is advisable to connect the ED according to this scheme when it is necessary to create a starting torque that exceeds the nominal one. Such a need arises in the drives of mechanisms with difficult starting conditions, when starting mechanisms under load. It should be noted that the resulting current in the supply wires exceeds the rated current by 70-75%. This must be taken into account when choosing the wire section for connecting the electric motor.
The capacity of the working capacitor C p for the circuit of fig. 12 is calculated by the formula:
.
Capacitances of starting capacitors should be 2.5-3 times greater than the capacitance C p. The operating voltage of the capacitors in both circuits must be 2.2 times the rated voltage.
Usually, the conclusions of the stator windings of electric motors are marked with metal or cardboard tags indicating the beginnings and ends of the windings. If for some reason there are no tags, proceed as follows. First, the belonging of the wires to the individual phases of the stator winding is determined. To do this, take any of the 6 external terminals of the electric motor and connect it to any power source, and connect the second output of the source to a control light and, with the second wire from the lamp, alternately touch the remaining 5 terminals of the stator winding until the lamp lights up. When the light comes on, it means that the 2 outputs belong to the same phase. Let's conditionally mark the beginning of the first wire C1 with tags, and its end - C4. Similarly, we find the beginning and end of the second winding and denote them C2 and C5, and the beginning and end of the third - C3 and C6.
The next and main step will be to determine the beginning and end of the stator windings. To do this, we use the selection method, which is used for electric motors with a power of up to 5 kW. We connect all the beginnings of the phase windings of the electric motors according to the previously attached tags to one point (using the “star” scheme) and turn on the electric motor in a single-phase network using capacitors.
If the engine immediately picks up the rated speed without a strong buzz, this means that all the beginnings or all ends of the winding have hit the common point. If, when turned on, the engine hums strongly and the rotor cannot reach the rated speed, then in the first winding, terminals C1 and C4 should be swapped. If this does not help, the ends of the first winding must be returned to their original position and now the conclusions C2 and C5 are reversed. Do the same; for the third pair if the engine continues to hum.
When determining the beginnings and ends of the windings, strictly adhere to the safety regulations. In particular, when touching the terminals of the stator winding, hold the wires only by the insulated part. This must also be done because the electric motor has a common steel magnetic circuit and a large voltage may appear on the terminals of other windings.
To change the direction of rotation of the IM rotor, included in a single-phase network according to the “triangle” scheme (see Fig. 5), it is enough to connect the third phase stator winding (W) through a capacitor to the terminal of the second phase stator winding (V).
To change the direction of rotation of the IM connected to a single-phase network according to the “star” scheme (see Fig. 7), it is necessary to connect the third phase stator winding (W) through a capacitor to the terminal of the second winding (V).
When checking the technical condition of electric motors, it is often possible to notice with chagrin that after a long operation, extraneous noise and vibration appear, and the rotor is difficult to turn manually. The reason for this may be the poor condition of the bearings: the treadmills are covered with rust, deep scratches and dents, individual balls and the cage are damaged. In all cases, it is necessary to inspect the electric motor and eliminate the existing faults. In case of minor damage, it is enough to wash the bearings with gasoline and lubricate them.
But the operating voltage of the household network is 220 V. And in order to connect an industrial three-phase motor to a conventional consumer network, phase-shifting elements are used:
- starting capacitor;
- working capacitor.
Connection diagrams for an operating voltage of 380 V
Industrially produced asynchronous three-phase motors can be connected in two main ways:
- star connection";
- delta connection".
Electric motors are structurally made of a movable rotor and a housing into which a fixed stator is inserted (it can be assembled directly in the housing or inserted there). The stator incorporates 3 equivalent windings, wound in a special way and located on it.
When connected with a "star", the ends of all three motor windings are connected together, and three phases are fed to their beginnings. When connecting the windings with a "triangle", the end of one is connected to the beginning of the next.

The principle of the engine
When an electric motor is connected to a three-phase 380 V network, voltage is applied to each of its windings in series and a current flows through each of them, creating an alternating magnetic field that acts on the rotor, which is movably mounted on bearings, which causes it to rotate. To start with this mode of operation, no additional elements are needed.
If one of the three-phase asynchronous electric motors is connected to a single-phase 220 V network, then no torque will occur and the engine will not start. To start three-phase devices from a single-phase network, many different options have been invented.
One of the simplest and most common among them is the use of a phase shift. For this, various phase-shifting capacitors for electric motors are used, through which the third phase contact is connected.

In addition, there must be one more element. This is the start capacitor. It is designed to start the engine itself and should only work at the time of starting about 2-3 seconds. If it is left on for a long time, the motor windings will quickly overheat and it will fail.
To implement this, you can use a special switch, which has two pairs of switched contacts. When the button is pressed, one pair is fixed until the next press of the Stop button, and the second will be closed only when the Start button is pressed. This prevents the motor from failing.
Connection diagrams for operating voltage 220 V
Due to the fact that there are two main options for connecting the windings of electric motors, there will also be two schemes for supplying a household network. Designations:
- "P" - the switch that performs the start;
- "P" - a special switch designed to reverse the engine;
- "Sp" and Cp "- starting and running capacitors, respectively.
When connected to a 220 V network, three-phase electric motors have the opportunity to change the direction of rotation to the opposite. This can be done using the "R" toggle switch.

Attention! It is possible to change the direction of rotation only when the supply voltage is turned off and the electric motor is completely stopped, so as not to break it.
"Sp" and "Cp" (working and starting capacitors) can be calculated using a special formula: Cp \u003d 2800 * I / U, where I is the current consumed, U is the rated voltage of the electric motor. After calculating Cp, you can choose Sp. The capacitance of the starting capacitors must be at least twice as large as that of Cf. For convenience and simplification of the choice, the following values can be taken as a basis:
- M \u003d 0.4 kW Cp \u003d 40 microfarads, Sp \u003d 80 microfarads;
- M \u003d 0.8 kW Cp \u003d 80 microfarads, Sp \u003d 160 microfarads;
- M \u003d 1.1 kW Cp \u003d 100 microfarads, Sp \u003d 200 microfarads;
- M \u003d 1.5 kW Cp \u003d 150 microfarads, Sp \u003d 250 microfarads;
- M \u003d 2.2 kW Cp \u003d 230 microfarads, Sp \u003d 300 microfarads.
Where M is the rated power of the electric motors used, Cp and Cp are the working and starting capacitors.
When using asynchronous electric motors rated for an operating voltage of 380 V in the household sector, by connecting them to a 220 V network, you lose about 50% of the rated power of the motors, but the rotor speed remains unchanged. Keep this in mind when choosing the power you need to work.
It is possible to reduce power losses by using a “triangle” connection of the windings, with which the efficiency of the electric motor will remain somewhere at the level of 70%, which will be significantly higher than when connecting the windings with a “star”.
Therefore, if it is technically feasible in the junction box of the electric motor itself to change the star connection to the delta connection, then do it. After all, the acquisition of an “additional” 20% of power will be a good step and help in work.
When choosing starting and operating capacitors, keep in mind that their rated voltage must be at least 1.5 times greater than the mains voltage. That is, for a network of 220 V, it is desirable to use capacities designed for a voltage of 400 - 500 V for start-up and stable operation.
Motors with an operating voltage of 220/127 V can only be connected in a star. When using another connection, you will simply burn it at startup, and all that remains is to hand it over to the scrap.

If you cannot pick up a capacitor used for starting and during operation, then you can take several of them and connect them in parallel. The total capacity in this case is calculated as follows: Ctot = C1 + C2 + .... + Sk, where k is the required number of them.
Sometimes, especially under heavy load, it overheats a lot. In this case, you can try to reduce the degree of heating by changing the capacitance Cp (working capacitor). It is gradually reduced, while checking the heating of the engine. Conversely, if the working capacitance is insufficient, then the output power given out by the device will be small. In this case, you can try to increase the capacitance of the capacitor.
For faster and easier start-up of the device, if possible, disconnect the load from it. This applies specifically to those engines that have been converted from a 380 V network to a 220 V network.
Conclusion on the topic
If you want to use an industrial three-phase electric motor for your needs, then you need to assemble an additional connection diagram for it, taking into account all the necessary conditions for this. And be sure to remember that this is electrical equipment and you must follow all safety rules and regulations when working with it.
To ensure reliable operation of the electric motor, starting capacitors are used.
The greatest load on the electric motor acts at the time of its start. It is in this situation that the starting capacitor starts to work. Also note that in many situations the start is carried out under load. In this case, the load on the windings and other components is very high. What kind of design allows you to reduce the load?
All capacitors, including starting ones, have the following features:
- As a dielectric special material is used. In the case under consideration, an oxide film is often used, which is applied to one of the electrodes.
- Large capacity with small overall dimensions - a feature of polar storage.
- non-polar have a large cost and size, but they can be used without regard to the polarity in the circuit.
A similar design is a combination of 2 conductors that are separated by a dielectric. The use of modern materials can significantly increase the capacity index and reduce its overall dimensions, as well as increase its reliability. Many with impressive performance have dimensions of no more than 50 millimeters.
Purpose and benefits
 Capacitors of the type in question are used in the connection system. In this case, it works only at the moment of start-up, until the operating speed is set.
The presence of such an element in the system determines the following:
- starting capacity allows you to bring the state of the electric field to the circular.
- Held a significant increase in the magnetic flux.
- rises starting torque, engine performance is significantly improved.
Without the presence of this element in the system, the life of the engine is significantly reduced. This is due to the fact that a complex start-up leads to certain difficulties.
The AC network can serve as a power source in the case of using the type of capacitor in question. Almost all used versions are non-polar, they have a relatively higher operating voltage for oxide capacitors.
The advantages of a network that has a similar element are as follows:
- Easier engine start.
- Life time much more engine.
The start capacitor works for several seconds at the time of starting the engine.
Wiring diagrams
 wiring diagram of an electric motor with a starting capacitor
 A circuit that has a starting capacitor in the network has become more widespread.
This scheme has certain nuances:
- Start winding and capacitor switched on when the engine is started.
- Additional winding works for a short time.
- Thermal relay included in the circuit to protect against overheating of the additional winding.
If it is necessary to provide a high torque during start-up, a starting capacitor is included in the circuit, which is connected together with the working one. It is worth noting that quite often its capacity is determined empirically in order to achieve the highest starting torque. In this case, according to the measurements, the value of its capacitance should be 2-3 times larger.
The main points of creating a power supply circuit for an electric motor include the following:
- From a current source, 1 branch goes to the working capacitor. It works all the time, which is why it got its name.
- There is a fork in front of it. that goes to the switch. In addition to the switch, another element can be used that starts the engine.
- After the switch start capacitor is installed. It works within a few seconds until the rotor picks up speed.
- Both Capacitors go to the engine.
You can connect in this way.
It is worth noting that the working capacitor is present in the circuit almost constantly. Therefore, it is worth remembering that they must be connected in parallel.
Choosing a Starting Capacitor for an Electric Motor

The modern approach to this issue involves the use of special calculators on the Internet, which carry out a quick and accurate calculation.
To carry out the calculation, you should know and enter the following indicators:
- Motor winding connection type: triangle or star. The capacity also depends on the type of connection.
- Engine power is one of the determining factors. This indicator is measured in Watts.
- Mains voltage taken into account in the calculations. As a rule, it can be 220 or 380 volts.
- Power factor- a constant value, which is often 0.9. However, it is possible to change this indicator when calculating.
- motor efficiency also affects the calculations. This information, as well as others, can be found by examining the applied information by the manufacturer. If it is not there, you should enter the engine model on the Internet to search for information about what efficiency. Also, you can enter an approximate value, which is typical for such models. It is worth remembering that the efficiency may vary depending on the condition of the electric motor.
Such information is entered in the appropriate fields and an automatic calculation is carried out. At the same time, we obtain the capacity of the working condensate, and the starting one should have an indicator 2.5 times greater.
You can carry out such a calculation yourself.
To do this, you can use the following formulas:
- For the type of connection of the windings "star", capacity determination is carried out using the following formula: Cр=2800*I/U. In the case of connecting the windings with a "triangle", the formula Cp \u003d 4800 * I / U is used. As you can see from the information above, the type of connection is the determining factor.
- The above formulas determine the need to calculate the amount of current that passes in the system. For this, the formula is used: I=P/1.73Uηcosφ. For the calculation, you will need engine performance indicators.
- After calculating the current you can find the capacitance index of the working capacitor.
- launcher, as previously noted, should be 2 or 3 times higher than the worker in terms of capacity.
 When choosing, you should also consider the following nuances:
- Interval operating temperature.
- Possible deviation from the estimated capacity.
- Insulation resistance.
- Loss tangent.
Usually, the above parameters are not paid much attention. However, they can be taken into account to create an ideal power supply system for an electric motor.
Overall dimensions can also be a determining factor. In this case, the following dependence can be distinguished:
- Capacity increase leads to an increase in diameter and exit distance.
- The most common maximum diameter 50 millimeters with a capacitance of 400 microfarads. In this case, the height is 100 millimeters.
In addition, it should be borne in mind that on the market you can find models from foreign and domestic manufacturers. As a rule, foreign ones are more expensive, but also more reliable. Russian versions are also often used when creating a motor connection network.
Model overview
 condenser CBB-60
 There are several popular models that can be found on sale.
It is worth noting that these models differ not in capacity, but in the type of design:
- Metallized polypropylene options performance brand SVV-60. The cost of such an embodiment is about 300 rubles.
- Film grades NTS are somewhat cheaper. With the same capacity, the cost is about 200 rubles.
- E92- products of domestic producers. Their cost is small - about 120-150 rubles with the same capacity.
There are other models, often they differ in the type of dielectric used and the type of insulating material.
- Often, the operation of the electric motor can occur without the inclusion of a starting capacitor in the circuit.
- Include this element in the chain only recommended when starting under load.
- Also, large engine power also requires the presence of similar elements in the circuit.
- Special attention it is worth paying attention to the connection procedure, since a violation of the integrity of the structure will lead to its malfunction.


