When it comes to installing windows in the house from cellular blocks, two different approaches to the fastening technology are facing.
Supporters of polyurethane foam argue that this material is so reliable and sealed that it does not require the use of fittings. Fans of dowels, on the contrary, make a bet on the mechanical contact of the metal and blocks.
Truth, as often happens, is in the middle of polar opinions.
Therefore, we decided to consider in detail the features of the high-quality installation of windows in aerated concrete and foam concrete walls.
When is it better to put plastic windows?
There is no consensus on this issue. Newbies developers are asked when you can install windows in a house of aerated concrete or foam block. They give advice one of another absurd. Some argue that cellular blocks have a very large shrinkage and mounted windows only a year after construction of the box.
Others are trying to undergo a "scientific" base approval and reason from three types of shrinkage of gas silicate and foam block. At the same time, all the advisers together ignore these manufacturers. They are clearly stated that the natural shrinkage of cellular blocks does not exceed 0.3 mm per 1 meter wall in height. Therefore, it is not necessary to talk about her critical exposure to the window frames. The confusion arises due to the substitution of the concepts of shrinkage of light concrete and the sediment of the building.
The deformation sediment of the structure (walls and foundation) does not occur due to evaporation of moisture from concrete and blocks. It causes uneven settlement and rise of the soil under the action of freezing and watering water. Here from such a shrinkage and need to protect bearing structures. For the foundation, frameworks from fittings are used, and for walls from aerated concrete and foam blocks - reinforced concrete belts, which are poured at the level of inter overhead floors. If these measures are not accepted, then cracks in the walls and foundation in construction on weak and water-saturated soils are guaranteed.
What practical conclusions can be made from our theoretical reasoning?
Very simple: to put windows in the house from gas or foam concrete blocks can be 2-3 months after the completion of the wall masonry. This period is enough to ensure that the foundation and masonry solution (adhesive) have typed strength.
Someone may argue, saying that the house should have to stand at least 1 year before the installation of windows and finishes, so that the processes of soil stabilization are completed. We will respond to that that the process of soil movement is continuous. Therefore, hope is not necessary for the complete completion of the sediment of the building, but on the quality of construction - a solid foundation and bearing walls.
Nuances of high-quality installation of windows in aerated concrete and foam blocks
Let's just say that insert the plastic window in the foam block is easy. It is much more difficult to ensure the irrepressibility and durability of the junctions between the wall and the plastic frame.
For this you need to perform three conditions:
- Seam tightness.
- Protection of contact zone from heat loss.
- Mechanical strength of contact "Window-wall".
The seamlessness of the seams can be partially secured by quarters - protrusions that are cut in blocks. In addition, it has to use sealing materials - frost-resistant sealants or self-seeping tape (psul). Frame contact zone with wall insulation traditional way - Polyurethane based foam. Dowels or mounting plates are responsible for the mechanical strength of the attachment.
Secure the window frame in the opening in two ways:
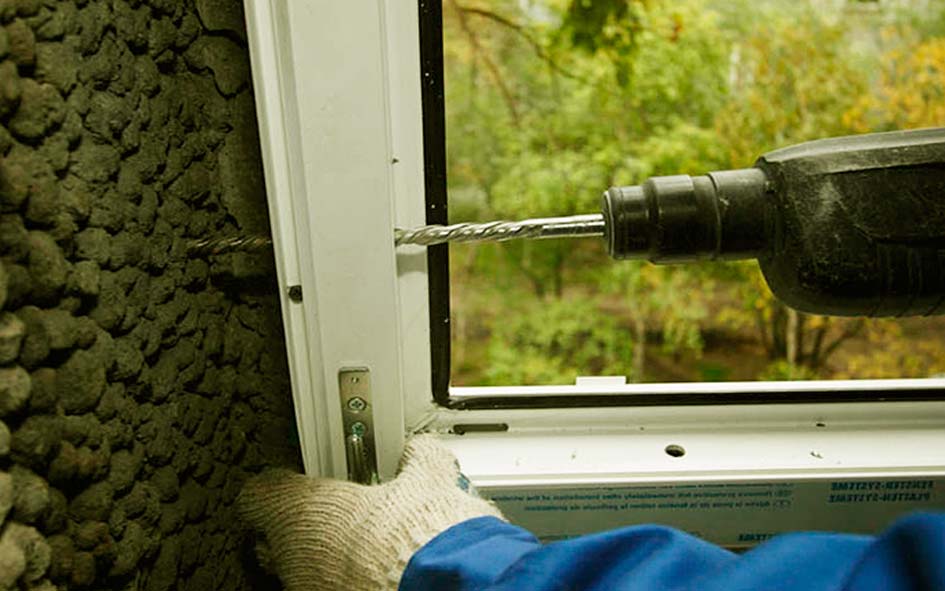
- Having removed the glazing, drill a hole in the plastic profile under a long dowel-nail, attach them to the frame to the wall and put the glass in place.
- Without removing glazing, lock the anchor plates throughout the perimeter of the frame around the perimeter. After that, you need to set the window to the mounting position and fasten to the wall of the dowel-nail through the holes in the plates.
The installation of plastic windows in a house of aerated concrete in the first way has its drawbacks: dismantling and installation of the glassworks of time consuming, and the position of the frame in the opening after its fixation cannot be changed. The second installation method is more convenient, because if necessary, the position position before joining the foam can be changed and only after that it is completed.
Example of anchor plates for fastening plastic window in the opening
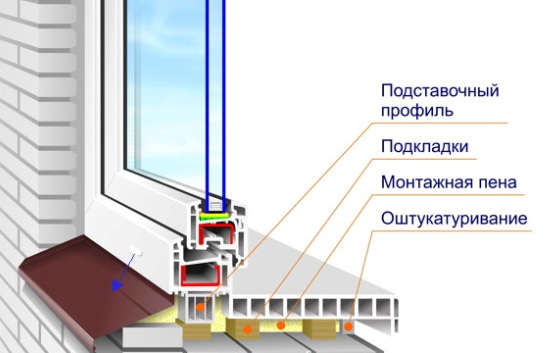
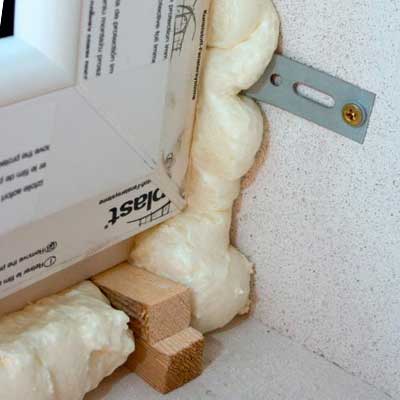
The standard installation of windows in aerated concrete begins with an installation under the frame of remote gaskets from plastic or wood. They are needed to create a gap in which insulation foam will be blown.
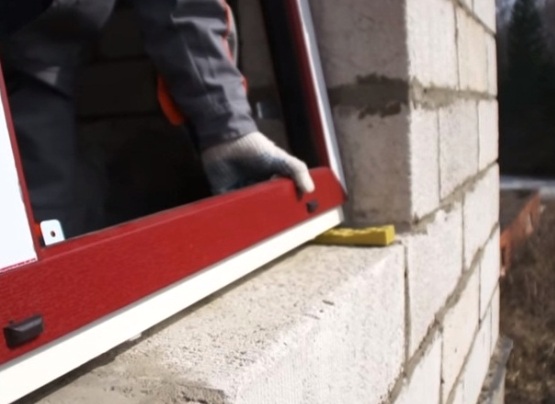
Before this operation, mounting plates must be fixed. For this, the screws are used with a length of 19 mm and a diameter of 4.8 mm.

The depth of the window installation can be from 8 to 12 cm (from the edge of the frame to the edge of the opening) and depends on the wall thickness (20 or 30 cm). If the external part of the masonry is insulated, the window can be put closer to the outer edge of the outlook on the thickness of the insulation.
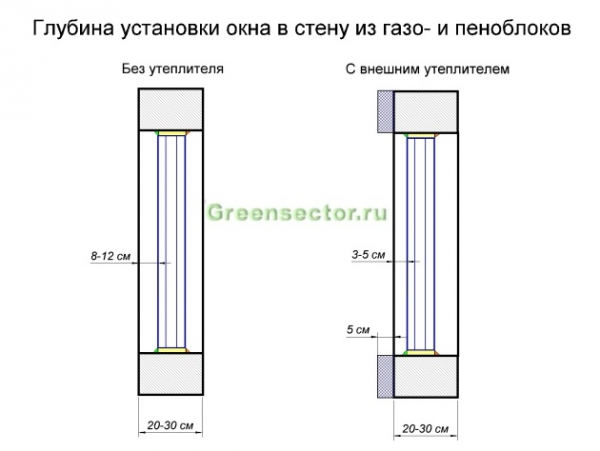
These indents choose not from the reasons of aesthetics of the appearance of windows, and due to the need to protect the bounds from the condensation of moisture and freezing (the dew point should be outside the frame).
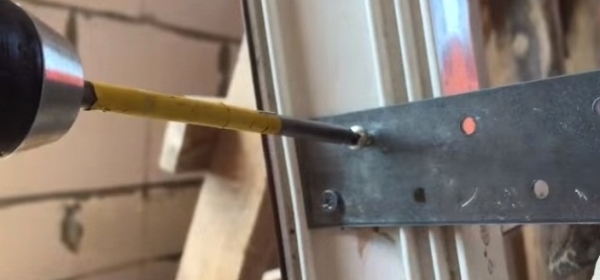
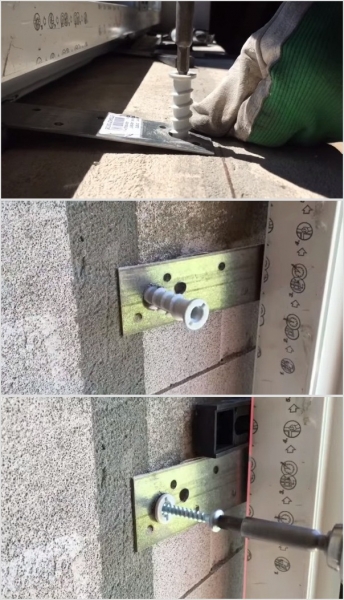
Adjusting the window position with the help level, the holes under the dowel (unstressed drill) are drilled in blocks. From the edge of the block, the extreme hole of the plate must retreat at least 5 cm so as not to split it. First, the plate is fixed with one dowel (diameter 6 mm length 80-100 mm). After final alignment, the second is screwed.
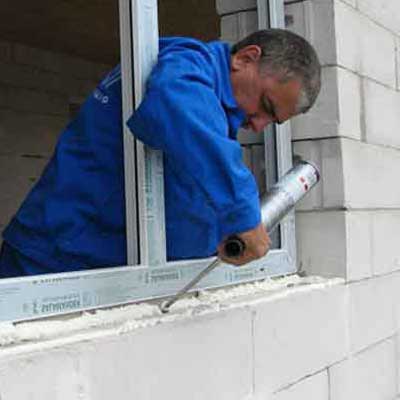
Making sure that the windows of the windows are easily open and closed, proceed to the stupid of the joint throughout the perimeter of the frame. For this work it is better to take a frost-resistant foam with a low expansion coefficient. This will increase the durability of insulation and reduce pressure on the frame. To improve the quality of the adhesion of the foam with the block and the window before it joining the entire seams need to be treated with water from the flavor.
After the foam freezes, her surplus, protruding, cut off. Adjustment wedges take out and the forms of voids are fought. Having finished these operations, the outer joint of the frame with the unit is sealed with an expanding ribbon (psuli) or protected by frost-resistant breathable putty. Another common option is to install around the perimeter of the waterproofing tape on glue-sealant.
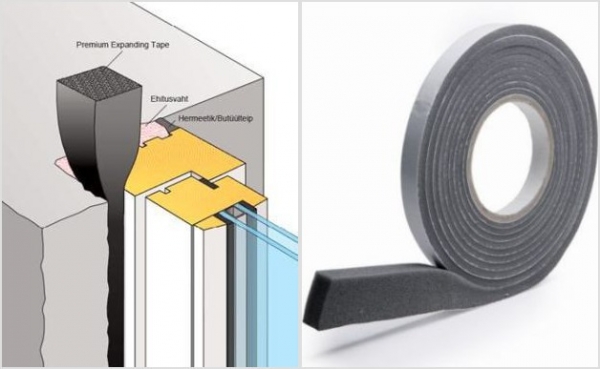
Sealing sealing ribbon
The inner joint is treated with a putty, carefully aligning it throughout the contact zone with insulation.
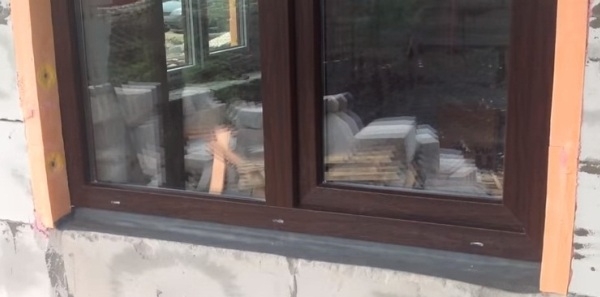
Completes installation installation of low tide and windowsill. An important nuance of this work is the correct placement of holes in the plastic profile, along which the condensate from the window goes out. They should be higher than the popular, so that the moisture does not fall into blocks.
Proper placement of the drainage hole on the plastic window
In conclusion, I want to say about the quarters that protect the joints of plastic windows from purging and freezing. Any cellular concrete is well cut, so in the process of masonry you can make a quarter of the desired quarter in advance.
Quarter of polystyrene foam
Another option is to install quarters from dense (extruded) foam. It is well insulates the slopes and frame, but quite complicated in the finish, because it needs to install the grid and high-quality putty. Polyfoam is fixed on glue and additionally fixed to blocks with plastic dowels with wide hats.
High-quality installation and installation of a window in a house of aerated concrete: all nuances and rules
Modern building process requires relevant decisions. Installation of the window to a house of aerated concrete is the task, the solution of which will take not so much time, forces and knowledge, as it would take to mount the old sample of windows and window frames. The entire process of installing the metal-plastic window consists of three stages:
- Preparatory work;
- Directly installing the window;
- Finishing stages of work.
Preparatory work
Before you begin to describe this stage, it is necessary to read at least superficially familiar with the material to work. Aerated concrete is an environmentally friendly material that is popular due to its strength and simplicity of its construction processing. Therefore, for cutting of aerated concrete blocks, the most ordinary hacksaw with small teeth are used. And in order to drill holes in this building material, it will be enough to use a well-sharpened drill for a tree or metal.
Tip! In order for the process of preparing for the installation of the window as fast as possible and comfortable, use the following tools and materials: Roulette, perforator, nail-cutter, steel sheet and polyethylene film.
To begin with the cleaning of the room in which installation works will be carried out. That is, it is necessary to fully free the space from furniture, carpets and other items. Since the installation window is very dusty. If there is an opportunity, cover the floor with a plastic film - this will make it possible to simplify the process of cleaning the room. If at the time of starting the installation of the new window in the opening there is an outdated design, then it can be dismantled with a hammer and a chisel. It will be much more complicated and longer than using a perforator with a fixed bit, which will take time not more than 10 minutes.
If the window installation is performed on the floor above the first, then it is worth adhere to certain security measures. After all, under the window there may be an external air conditioner unit or, which is worse, people pass. If these situations are not excluded, then on the edge of the future sloping will need to fasten the steel sheet across the entire width. It does not require an inventory for its installation, no locks. It will be enough to squeeze the sheet between the walls to the absolute immobility.
In parallel with the window it is necessary to dismantle the sampling. This can be done with the help of a conventional nail or passage. The most difficult and time-consuming stage can be called the dismantling of the old window sill. Of course, if it is made of wood, there should be no problems. But sometimes the windowsill can be concrete. To remove the windowsill, you need to use the perforator. First, we do the basic groove and begin to rock. Wooden design Swing and carefully pull out, but with concrete you need to show marginal attentiveness. After all, weighs such a windowsill quite a lot and during the finish jerk it is better to hold his opposite side, and keep your feet at a safe distance. After dismantling all dirt and dust from the window opening, it is necessary to enter a broom or brush.
Attention! In order to improve the hitch between the mounting foam and the base, it is necessary to project the surface from dust residues. Work after primer can continue after 4 hours.
 Installation of a window indoor window
Before abandoning to the very responsible stage, you must acquire the following materials and tools:
- Level;
- Perforator;
- Window frame;
- Wedges;
- Anchors;
- Roulette;
- Mounting foam;
- Windowsill;
- Low tide.
So, now, when you have the entire list of inventory at hand, you can safely begin to start the window installation in a house of aerated concrete. Taking the window frame, clean it completely from the factory film. Check the entire design and make sure that there are no cracks, scratches or other defects.
Installation of the window stages:
- A window frame is installed in the cutting groove of the aerated concrete. Do not try to stick all it at the same time. First one side, and then the second;
- If you decide to cut out the groove in advance, then we want to upset you - nothing will work. Therefore, it is necessary to pave special wedges. They can be both wooden and plastic. The advantage of the second is that they can not be removed from aerated concrete, which cannot be said about wooden. Next, the leveling process is accompanied by the use of the level;
- Next, align in width. At this stage, lay down aside and take the roulette. Error, it may not be more than a 3mm hub. On the sides fix with wedges than immobilizing the design;
- Align the vertical using the level;
- And so we gradually approached the four holes that are located in the inner part of the frame. They are located two holes for one side, through them it is necessary to drill the base, using special drills for aerated concrete. Drilling depth is 40 cm;
- Anchors are clogged into these holes. They should be scored until the top (hat) can in principle interfere with the closure of the window;
- Having done all the above stages, you should get perfectly fixed design. Next, it should be bleed by mounting foam with special small pores. The cost of its order is higher than the standard foam, but the quality is much better, respectively. If the wedges are used during installation, then they need to be removed. Plastic remain forever in aerated concrete;
- In the meantime, so far the mounting foam is frozen, a new window sill should be mounted. Before it is installed on the surface, a special silicone sealant is applied, which will perform in the role of glue. But for the installation itself you need to use the mounting foam, thanks to which all the holes and cracks are blown. After its fixation, it is best to put on top, which press;
- Mounting is made with the help of the same mounting foam, which is applied to the surface of the aerated concrete and is attached to the tide. The window is attached to aluminum screws.
Attention! If the window is installed uneven, even the most best aerated concrete Does not protect the room from drafts.
 Finishing stages of work
At the last stage, the secondary putty, gypsum plaster, knife and spatula will be needed. After hardening the foam, we proceed to the windows hanging. Here, checking the functionality and performance of the entire design. After 24 hours, cut off the excess foam. But if you start a slice a little earlier you can simply smear the knife foam, which is unlikely to happen. After cutting, the surface is ground.
Gypsum plaster is applied to sections. It must be done so that there would be no empty groove inside. This stage can be performed in two ways:
- Cut. A zone is made, which will be perpendicular to the frame;
- Continued. Performed by the way to continue the wall with a large way out of the frame.
In order to fully harde and dried up the top layer, you must up to eight hours of time. It all depends on the time of year and the manufacturer. The secondary layer is applied by no more than 4 mm and acts as the finish layer. It is applied with a spatula evenly, they also remove all the excess pieces after the putty of putty.
The whole window in the house of aerated concrete is installed. As you can see, in order to set the window does not require special knowledge and skills. Therefore, you should not be afraid that something can go wrong. The main thing is to adhere to the above instruction and then you will succeed!
There are two main directions in the attachment of PVC windows into foam concrete and aerated concrete walls 1) with the help of polyurethane foam without fittings; 2) Using dowels. And in the first, and in the second case there are devices. We will analyze what technology optimally gives quality and comfort.
When to put windows into a new home?
Experts note that shrinkage of the blocks themselves should not be higher than 0.3 mm per 1 m wall. Consequently, its impact on the quality of installation is not critical. The general shrinkage of the building will require no less than a year, during this time there is freezing and thawing the soil, the necessary strength of concrete and glue are gaining. However, with proper design of the building and the qualitative implementation of all construction work Installation of windows can be done in a couple of months after the construction is completed.
Installation (installation) of the plastic window is regulated by several documents:
- GOST 30674-99 "Window blocks from polyvinyl chloride profiles", Art. nine;
- GOST 30971-2012 "Seams mounting units of window blocks to wall openings. General specifications ";
- GOST R 52749-2007 "Sewage mounting window with vapor-throat self-sewing ribbons."
If the customer is required to install windows according to GOST, then in the contract you need to specify which GOST is meaning. Because many provisions in the GOST for voluntary use and special cases, for example, using vapor-rapid self-seeping sealing tapes (psuli) or without them.
Highlights
It should be noted that the indicator of high-quality installation of PVC windows in a private house These are: ensuring the tightness of the joints between the wall of the wall and from the blocks, the duration of the service life, the absence of heat loss, the ideal leveling of the frame, high-quality installation of sings and window sills.
For more sealed joints in blocks, special-quarters are cut out (in the process of masonry blocks it is possible to foresee and cut a quarter), special sealants and ps are used. The insulation serves a polyurethane foam, it fixes the zone of direct contact of the wall and frame. Mechanical strength is achieved by fastening the frame with dowels or by mounting plates.
The depth of installation (from the frame to the edge of the opening) can vary in the range of 8-12 cm depending on the thickness of the block wall. If the laying is additionally insulated, the window is mounted closer to the outer edge of the wall so that the dew point is outside the window frame. This will protect the glass unit from condensate and freezing.
Fixation of the frame in the opening
There are 2 ways to fix the frame in window noise. In the first case, you must first remove the glass. Plastic profile Drill in several places and secure the frame with long dowels. The disadvantage of this method is a complex disassembly, there is no possibility to change the position of the frame relative to the opening after final fixation even until the foam is planking. The disadvantage is essential, especially when independent installation windows in a private house. There is no chance of making chances from the first attempt. Everything is perfect, even if your hands grow from the right place, not much.
 Fasteners with anchors and dowels
 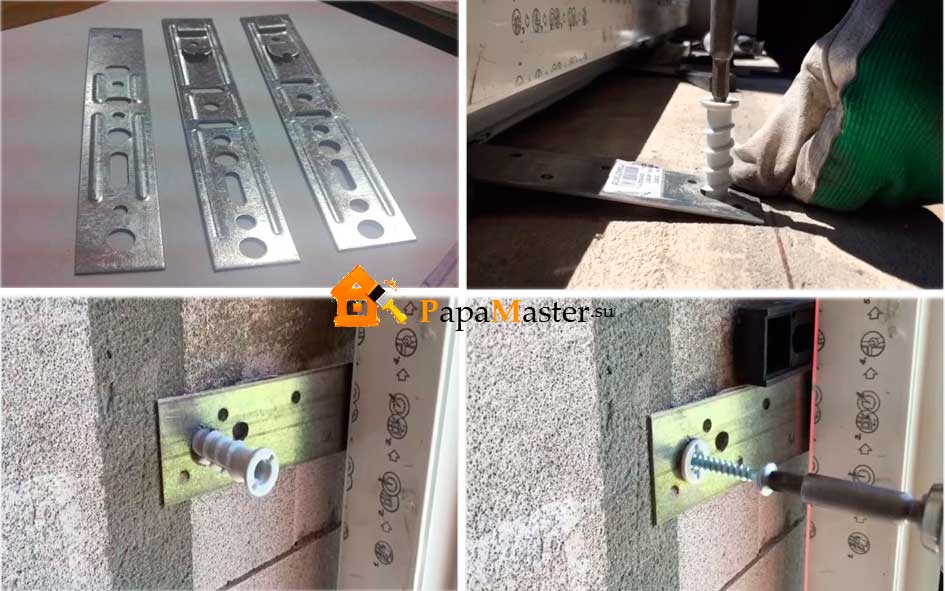 Fasteners with anchor plate
 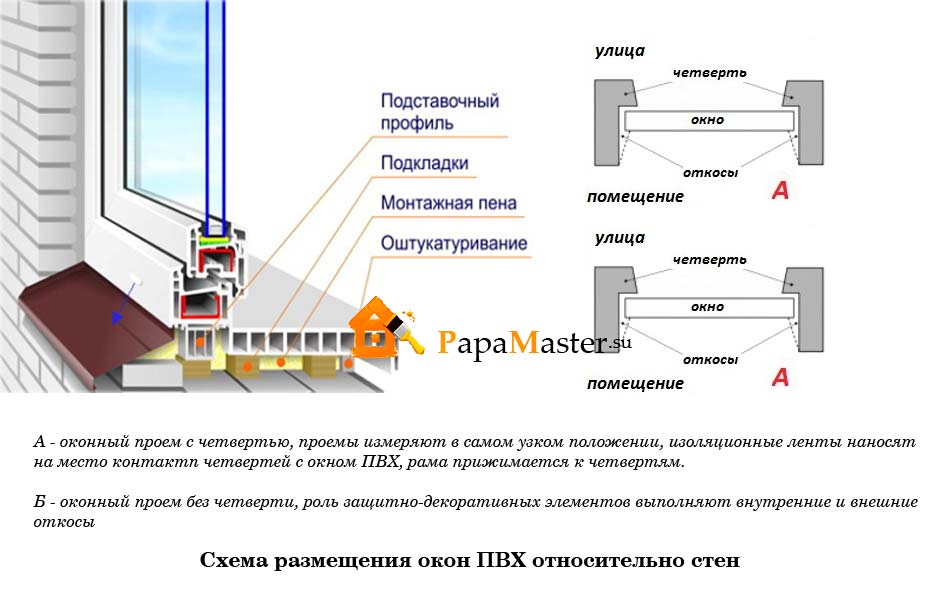 Glass placement scheme relative to walls
 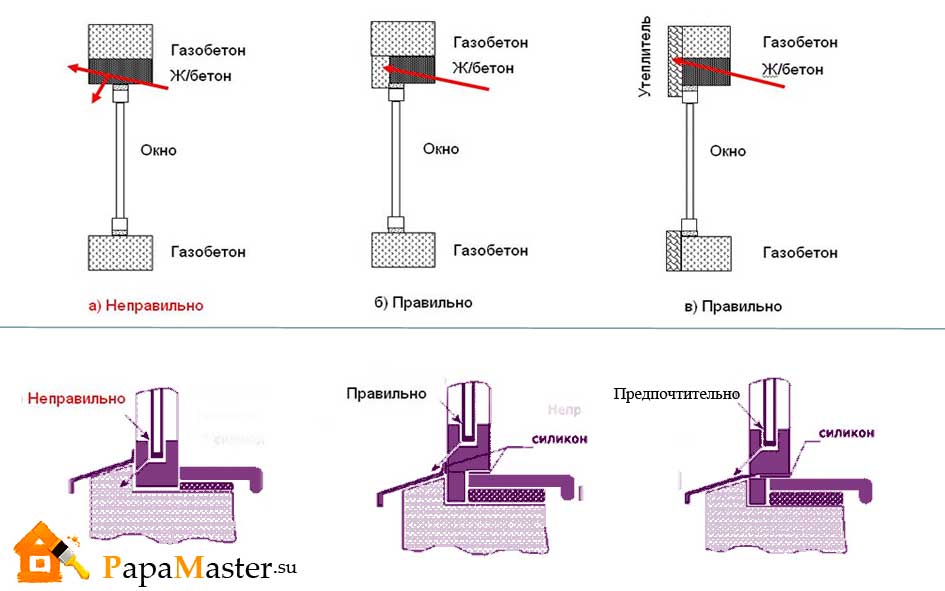 Errors in window installation
The second way does not require removing glazing. The frame is mounted using anchor plates, which are installed along the perimeter of the plastic frame using self-tapping screws. Next, fixation to the wall occurs with dowels-nails through the holes in the plates.
Installation of windows in a private house. Stages of work
1. Mounting plates on the window frame with self-draws of 4.8x12 mm are fixed.
2. Under the PVC frame, special adjustment wedges (wooden or plastic) are installed. They create a gap for subsequent applying insulation - foam.
3. The position of the glass package is regulated by the level. Blocks drill holes for dowels, given that to prevent the split hole blocks should not be closer than 5 cm from its edge. Initially, the plate is fixed with one dowel (6x100 mm), then align and screw the second.
4. Check the opening and closing of the window sash.
5. Stone around the perimeter of the frame all the joints of the frame with the wall. Foam pick up frost-resistant for Russia. Before giving the seam is sprayed with water from the spray. This simple procedure will improve the quality of the clutch of the foam with the wall and plastic.
6. After frozen the foam, the excess of foam is trimmed.
7. Wedges are removed, empties are fought.
9. The sump and windowsill are established. Holes are placed above the holes in pVC profile To remove condensate.


