Interesting technological solutions always cause a lot of controversy, and sometimes not entirely correct conclusions. So, for example, for many it seems a difficult task, and sometimes impossible. In practice, the question is how to make a warm floor on wooden floor, gets a simple answer in the form of simple recommendations.
For many, it seems a difficult and sometimes impossible task. In practice, the question of how to make a warm floor on a wooden floor gets a simple answer in the form of simple recommendations.
Underfloor heating system: features, advantages, installation "href \u003d" http://shkolapola.ru/teplyi/674-sistema-teplyj-pol "\u003e underfloor heating system in the presence of a wooden floor for many seems to be a difficult task, and sometimes impossible. In practice, the question of how to make a warm floor on a wooden floor gets a simple answer in the form of simple recommendations.
We insulate wooden flooring with new technologies It should be said right away that today the underfloor heating system involves three types of heating, three types of technology: Important! Only electric and infrared can be installed in apartments, With its own hot water heating system. In general, in private construction, electric and infrared floors have not been able to gain great popularity. Perhaps this is due to high energy consumption or a simple distrust, but it is the water option that remains the most in demand. In general, in private construction, electric and infrared floors have not been able to gain great popularity. Perhaps this is due to high energy consumption or a simple distrust, but it is the water option that remains the most in demand. Water underfloor heating: installation recommendations and advice on choosing ”href \u003d” http://shkolapola.ru/teplyi/500-vodyanoe-otoplenie-pola ”\u003e only a private house is suitable for water underfloor heating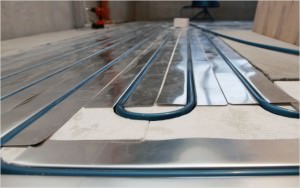 only suitable for water floor heating private house with its own hot water heating system.
In general, in private construction, electric and infrared floors have not been able to gain great popularity. Perhaps this is due to high energy consumption or a simple distrust, but it is the water option that remains the most in demand.
I-2 \u003d ""\u003e Work
All heating installation work comes down to four stages:
- Preparation of the base.
- Pipe laying.
- Connection.
- Finish coating.
Moreover, the preparation of the foundation can go in two ways:
- According to the already existing rough floor, option for installing heating during renovation.
- From scratch, here the question “pops up” is how to install a warm floor on a wooden floor.
In order not to delve into the process of flooring from the very beginning, you can simply determine the main point that is needed in both cases - the rough base. When repairing, for example, it is assessed and if it is in a satisfactory condition, then the installation is carried out directly on it.
Otherwise, as with creating floors from scratch, there are several nuances:
- Lags should be spaced 60 cm apart.
- There should be no serious gaps between the sub-floor boards.
- Of course, the complete absence of rot or mold.
After dismantling the old rough base, the installation of a new one begins, for this you can go through the following steps:
- New logs are installed, pre-treated with antiseptics and antipyrine.
- With their own hands, the bars are nailed to the lower base, if there is such an opportunity, or the bars are nailed to the sides of the log.
- A rough version of the floor is spreading. It can be uncut board or plywood, chipboard.
As a rule, an uncut board is used for a rough cut, which means that it will not be possible to achieve a snug fit. There will still be cracks in the surface. It's not scary, because the next step is insulation.
Warming
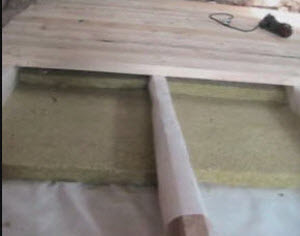
Before laying the warm floor on a wooden floor, it is necessary to lay out heat-insulating material on the rough base. The most common option is mineral wool.
Insulation is sold in the form of plates and rolls, and the choice depends on how correctly and accurately the logs are installed. The principle of laying the heat insulator is very simple and consists in the fact that the mineral wool is placed between the logs, and tightly, which excludes the formation of cold bridges.
Perfectly installed thermal insulator - mineral wool
Advice! Before installing mineral wool, a vapor barrier film is laid on the rough base. At the same time, the downtime of the plastic film should be excluded from the installation work. The use of polyethylene will cause permanent condensation.
Next, a pipe is installed. In the version with heat-insulating material, before laying the warm floor on the wooden floor, a groove is cut in the logs at the place of the pipe passage. The pipe itself is attached to the lateral surface of the log or to the subfloor using special brackets.

After the pipes are neatly laid and secured, you can proceed with the finishing coat.
The second option for how to make a warm wooden floor is slightly different, and involves the installation of pipes on wood, and not on heat-insulating material.
Here, the installation and installation process goes as follows.
- A rough floor is installed along the logs. Boards are stuffed, everything is as it should be with the device flooring.
- Further, the layout of the heating pipes is drawn.
- According to the scheme, the board, or plywood parts, begin to be installed.
- Installation takes place so that grooves for the pipe remain between the elements of the board.
- The edges of the boards are rounded to fit the pipe.
Such a system involves the use of boards or plywood, which will be slightly larger in cross section than the pipe itself. For example, if the pipe has a cross section of 16-18 mm, then the board or plywood is 20 mm.
The instructions for installing this option are quite simple, it will simply require more wood consumption, and the floor itself will turn out in the form of a kind of sandwich.
Important! Foil rolls are rolled out on the grooves, and only the pipe is laid along them. After that, the pipe is wrapped in foil, and the edges of the material are stapled to the wood.
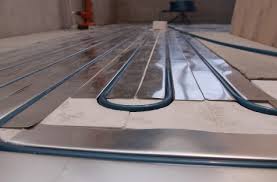
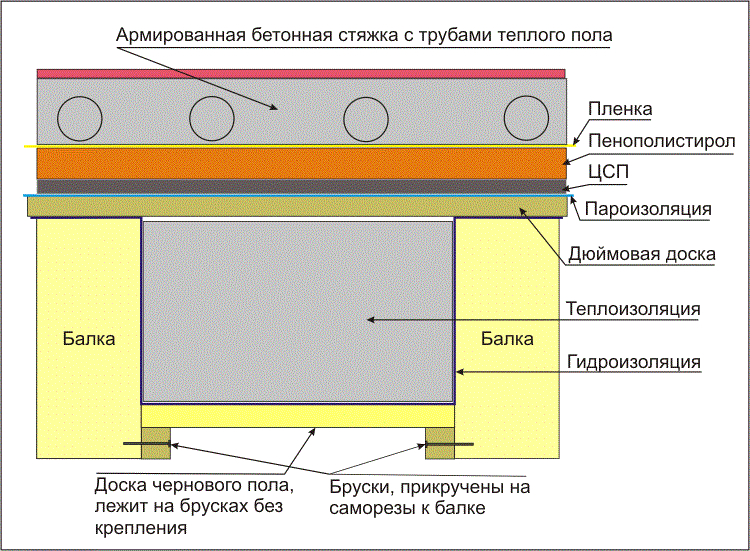
Diagram of the sub-floor device.
Plus, the cost will be influenced by the moment of connecting the entire system to heating, or rather, which switch cabinet will be chosen, which fittings, and which thermostat will be installed.
Output
The question of how to warm wooden floors only arises when there are problems with the sub-base, because wood and insulation already create ideal conditions for wood ”width \u003d” 640 ″ height \u003d ”360 ″ frameborder \u003d” 0 ″ allowfullscreen \u003d ”allowfullscreen ”\u003e
In the vast majority of cases, underfloor heating wooden base make it electric: this is faster and easier to solve a number of technological problems. But the installation of water heating is also quite possible - and here useful recommendations will help you, which are based on my own experience of laying such systems.
We will analyze the main difficulties that will have to be faced when assembling the structure, and we will understand the optimal sequence of work on the construction of such a floor.
Water floors in wooden houses
Features of heating a wooden floor
A water-heated floor under wooden floors, and even more so on a wooden base, is not installed so often. There are several reasons for this:
- Thermal conductivity of wood. On the one hand, this is a plus - the wooden base acts as a heat insulator. On the other hand, the floor will take a long time to warm up. In addition, there is a risk that a significant portion of the energy will be spent on heating the subfloor, and only part of the heat (relatively small) will enter the room.
- Thermal deformation... Laying pipes with hot water in the thickness of a wooden floor can lead to an uneven change in the linear dimensions of its individual sections. As a result, the stability of the structure is significantly reduced, primarily due to the appearance of gaps in both the rough flooring and the frame.
- Exposure to moisture. Of course, water-heated floor systems are made airtight, doing their best to avoid leaks. However, when laid under a wooden floor, even condensation caused by temperature differences can cause the wood to swell.
- Significant thickness of heating elements. If the pipes of a water-heated floor are laid in a screed, their thickness can be easily compensated by pouring the required layer of concrete. When installing on a wooden base, these problems have to be solved differently, since it will not be possible to simply lay a finishing coating over the pipes.
The option of pouring a concrete screed by wooden logs and rough plank or thick plywood flooring is usually not considered. The reason is quite obvious: with the required layer thickness, the load per square meter of overlap may well reach 300 kg. For timber frame this is a lot, because it either deforms immediately, or it will hold out for a while - and then it will begin to bend.
However, everything that I noted above does not mean at all that a wooden water floor system is unrealizable in principle. If we take into account all these shortcomings and use modern materials, devices and technologies in our work, then a warm floor on logs or boardwalk will work to the envy of neighbors.
How can a foundation be made?
When planning the installation of a warm floor in a house with a wooden floor or a log system, we need to solve the main question - where to hide the pipes?
The difficulty here is not only in protecting them from stress. This, just, is easy to do - just raise the level of the topcoat by a few centimeters. But in this case, we lose a lot in the efficiency of heat transfer: an air gap forms above the pipes, which acts as a heat insulator. That is, we heat anything, but not the floor itself.
That is why when assembling the underfloor heating system, they try to lay the coating exactly at the level of the upper edge of the pipe.
For this, the following devices are used:
| Illustration | Method of laying water heating system |
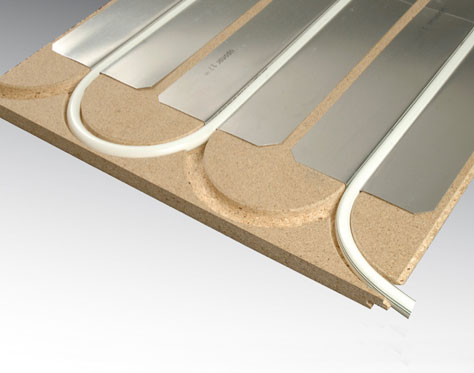 | Prefabricated milled bases. For laying pipes in the floor on the right level chipboards (chipboard) with grooves made on a milling machine are used. We adjust the depth and configuration of the grooves in such a way as to ensure the most rational distribution of pipes with a coolant. Cons of modular chipboard flooring:
|
 | Rack structures. This option is a cheaper alternative to the modular milled groove base. Rails are stuffed onto the rough floor, the gap between which corresponds to the diameter of the pipe to be laid. The thickness of the slats is selected in such a way that the gap between the upper edge of the pipe and the finished floor is minimal - this way heat losses are reduced. Minus - the gaps on the sides and in the places where the pipes turn out to be large, so some of the heat is still lost. |
 | Polymer mats. Grooved polymer mats can also be laid over the subfloor to address a significant portion of heat loss, warping and wetting problems. They function in the same way as milled chipboard panels, but the efficiency of these products is higher. Minus - high price, which is only partially offset by heating savings. |
Any of these options is suitable if we need to install underfloor heating on plywood or other wooden base. I am a supporter of polymer mats, but also milled chipboard models, and even simple designs from slats stuffed on the floor have a right to exist.
Material equipment
What do you need for flooring?
So, if we need to mount a heating system with our own hands, we should start with the purchase of materials. I will give the minimum list of what we need in the table:
| Illustration | Material |
 | Thermal insulation materials for underfloor space:
|
 | Subfloor materials:
|
 | Floor heating mats. |
 | Heat-reflecting metal plates. |
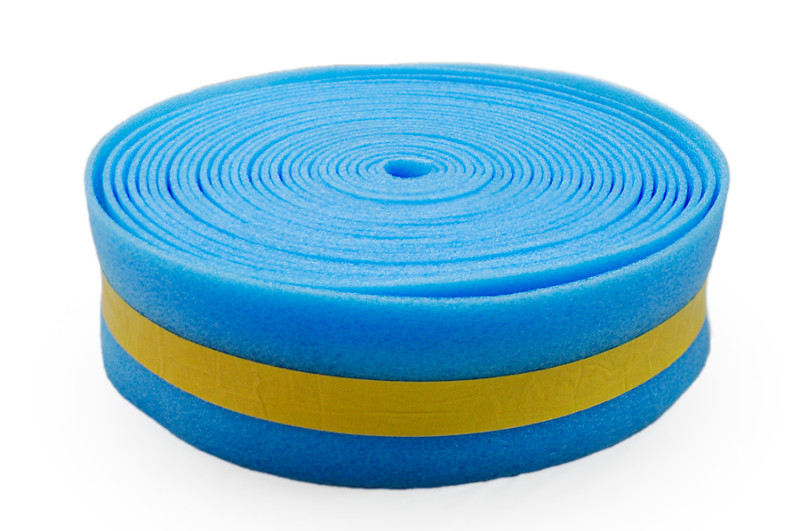 | Damper tape. |
 | Plastic pipes for underfloor heating:
|
 | Collector. |
 | Flooring. |
Keep in mind that underfloor heating under a wooden board, linoleum, laminate, tiles, etc. can be installed in different patterns. Accordingly, the set of materials may differ from that shown here. It all depends on what will be used as the finishing layer.
Tools for work
The preparation of the room for the installation of the heating system and the actual laying of the warm floor is carried out using the following tools:
- Saw on wood.
- Drill with a set of drills.
- Screwdriver.
- Knife for cutting heat and waterproofing.
- Brushes for applying waterproofing impregnations.
- Saw or special tool for cutting pipes.
- Tool for fitting fittings (crimping pliers for metal-plastic, soldering iron for polyethylene, etc.).
- Level.
- Roulette.
Installation technology
Stage 1. Preliminary work
The device of a water heated floor can be carried out both at the stage of building a house, and in an already operated room. Naturally, the scope of work in these cases will be radically different, so here I will describe the ideal situation, that is, I will list the basic requirements for the foundation:
- Underfloor waterproofing. To cut off moisture coming from the ground, we must waterproof the underground space between the logs. To do this, first we ram the soil under the room, then fill it with a layer of sand up to 15 cm thick and ram it again. For the most effective protection, a thin concrete or waterproof membrane (polyethylene, roofing material) can be installed on top of the bedding.
- Underfloor thermal insulation. We put insulation on top of the waterproofing layer - bulk or slab. When laying inelastic board materials (high density mineral wool, polystyrene) fill all gaps between them with self-expanding foam.
Expanded clay is effective only when the thickness of the heat-insulating layer is from 30-40 cm. It is advisable to fill it with very liquid cement mortar to reduce moisture permeability and obtain improvised expanded clay concrete.
- Vapor barrier of the insulated layer... On top of the insulation under the subfloor, be sure to lay a layer of vapor barrier material (glassine, polyethylene, membrane). We place the vapor barrier in such a way that between it almost completely covers the logs. At the edges of the logs, we leave free areas about 50 mm long to evaporate moisture from the wood.
- Laying the sub floor... The sub-floor for water heating is made either from plywood, or from boards, or from chipboard with milling. We fasten the flooring to the joists, and in such a way that there is a gap of 30–50 mm between it and the thermal insulation layer for ventilation and condensate drainage.
This sequence of actions is suitable for a new building. If we are installing floor heating in an already in use house, then it is enough to check and strengthen the subfloor.
As a last resort, the flooring is opened and, after laying additional thermal insulation / vapor barrier in the underfloor space, it is mounted back.
Stage 2. Preparation of the base for laying
A warm water floor on wooden floors is arranged on a specially prepared base. It must provide the required bearing capacity, hydro and thermal insulation, and also - protect all structural elements from excessive deformation.
The basis of heat-insulating polymer mats is made as follows:
| Illustration | Stage of work | ||||||||||||||||||
 | Bonding damper tape. On the walls around the perimeter of the room we glue a damper tape made of polyethylene foam. Such a tape is an indispensable element of the construction of any warm floor, since it compensates for temperature deformations. |
||||||||||||||||||
 | Laying mats with grooves. On top of the base, we lay mats with grooves for pipes and heat-insulating elements. In this case, two-layer mats are used. Their lower layer is made of porous foam, the upper one is made of sufficiently dense PVC, which ensures durability and reliability of fixation. We lay out the mats close to the walls. We connect individual elements with the help of side latches, laying them without gaps and joints. |
||||||||||||||||||
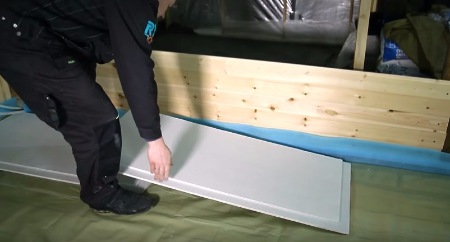
 | Adjustment of thermal insulation plates. We remove the metal insulating plates from the packaging and adjust them in length. As a rule, the products have special slots that allow them to be shortened without the use of tools. When adjusting, simply bend the plate along the desired slot and break off the fragment. |
||||||||||||||||||
 | Laying of heat-insulating plates. We distribute the heat-insulating plates over the surface of the base so that the configuration of the grooves corresponds to the planned layout of the pipes for the warm floor. Standard products are designed for a laying step of about 20 cm, therefore they need to be placed close to each other. With the correct layout, metal parts should cover 80 to 90% of the entire area. |
||||||||||||||||||
 | Fixation of metal plates. We fix each plate on the base, pressing it into the groove of the heat-insulating mat along its entire length. In this case, the recess in the middle part of the plate, intended for laying the pipe, must snap into place on the fastenings of the mat. When laying a warm floor on a wooden floor, be sure to use reflective thermal insulation - either prefabricated or rolled In principle, the instructions given are universal - they are suitable for milled chipboard, and even for slatted floors. If you want to save money, then steel plates can be replaced by roll insulation with a foil layer. We fasten the insulation to the rails packed on the base using a stapler, but do not stretch it, but form grooves for laying pipes. Stage 3. Installation and connection of heating pipesNow we need to lay pipes and connect them to the heating system:
ConclusionEquipping a warm wooden floor, and even on a wooden base, is not an easy task. But you can cope with it yourself - if, of course, carefully study the tips and videos in this article, and if necessary, you will seek advice from experts in the comments. |


Warm floor on a wooden basis is not an easy task, but possible. The advantages of such a floor are obvious, heat moves naturally from the bottom up, while the absence of batteries adds comfort and convenience. In the case when the finishing layer is made of wood, there are certain nuances and limitations, but they are not so significant as to refuse to use it.
With some knowledge and following the recommendations of experienced specialists, you can independently carry out all the necessary installation work without having professional construction skills. The arrangement process is also simplified by the fact that there is no need to use any special expensive equipment.
Installation features
The arrangement consists in laying heating pipes that act as. Such pipes will be located directly under the finished flooring, which has a certain effect on it.
The following finishing materials can be used as such a coating:
Due to the temperature characteristics of the wood finish, it is recommended to use separate heating sources. There are heating devices in which several circulation circuits are provided for such cases.
When used as overlap wooden beams the possibility of laying heating pipes inside the cement base (screed) is practically excluded. The pressure that the required layer of such a screed will exert will be excessive, and creating a structure that can withstand it is irrational.
Underfloor heating installation methods
There are not so many installation options and which one is preferable depends on the structural features of the building. Not last role plays the cost of materials, the use of which implies one way or another and the technological complexity of the proposed work.
The most common methods are described below:
- Modular.The pipes of the heating system are laid through special grooves that are provided for by the design of the module (often a chipboard plate with a thickness of about 22 mm). This method is relatively quick and simple, but due to the high cost of the modules and the required intermediate layer, it is more expensive than other installation options.
- Rack.The difference between this method is that the grooves through which the pipes of the heating system must pass are formed by laying out the rails. The relatively large labor costs of this method are offset by lower monetary costs.
- Mixed.This method involves milling pipe slots in a wooden floor. The milling process is not very laborious. Assumes the presence of a milling machine and some skills in handling such a machine.

With the modular method, pipes of the heating system are laid through special grooves that are provided for by the module design
Floor device
The whole process of installing a warm wooden floor can be conditionally divided into the following stages:
- Drafting a project.
- Preparatory work.
- Assembly and subsequent testing of the heating pipeline.
- Finishing works (laying of fine floor coverings).
Project
Before starting any work, you need to draw up a detailed project and perform all the necessary calculations. It is possible to do this yourself, having studied significant amounts of information, you can order individual project or choose a suitable one from those developed earlier.
The project includes:
- Detailed drawing (diagram).
- Calculation of heat losses for each room.
- Calculation of the amount of heat that should be supplied to each room.
- Resistance of the heating system pipeline.
- Calculation of the step of laying the pipeline, depending on the heat loss of each room.
- The number of consumables that may be needed in the course of work.
After the project is drawn up and all the necessary calculations have been completed, you can proceed to the next stage.
Preparatory work
Includes everything necessary work down to pipe-laying. You should start with the lag placement. The distance between them should not exceed 60 cm.
Before mounting, wooden logs must be treated with antifungal and antiseptic solutions. In order to exclude the possibility of the appearance of a tree bug, it is unacceptable to leave fragments of bark on any wooden products.
Between the lags, an insulating material (mineral wool, polystyrene, foam insulation, etc.) must be laid on the vapor barrier film. The thickness of the insulation depends on the height of the log, but generally does not exceed 100 mm.
The next step is the laying of the subfloor, the function of which, on the one hand, is to provide an even distribution of the load on the logs, to reduce their deformation (if they are used as overlapping). On the other hand, it will exclude possible deformation of the finished floor, providing the necessary rigidity.
The subfloor is usually made from some kind of sheet material or from planed boards. The thickness of this floor depends on the distance between the joists, the installation methods and the material used for subsequent layers.
Further actions completely depend on which type of warm floor is chosen.

Modular option
- Modules are mounted on the subfloor, this is usually done with screws or nails, sometimes glue is additionally used.
- Metal plates are inserted into the slots of the modules for heat reflection, if this is provided by the design of the module (instead of plates, special foil is sometimes used).
- When everything is ready to lay heat-conducting water circuit.
Warm water floor on a slatted base
- According to the project, slats of the required width and thickness are prepared. The thickness of the lath depends on the pipes to be used. The most suitable outer pipe thickness for residential premises is 16 mm. The slats should be several millimeters thicker than the pipe, so that there are no unnecessary difficulties during installation. The width of the board ranges from 100 to 200 mm and depends on the amount of heat required in each particular room or area.
- Appropriately prepared slats, screwed to the subfloor, guided by a pre-developed project.
- In the grooves obtained after mounting the rails, stack heat-reflecting plates or foil.
- Then you can do the wiring thermal circuits.
Most often, sheets of laminated chipboard are used for the manufacture of slats. It is cut into strips of the appropriate size, after which the corners on some strips are rounded off for the convenience of laying the pipeline.

Mixed styling option
If the room has a wooden floor made of boards and there is a need to make it warm, this can be done in a mixed way. To do this, you must first remove floorboard... Then, using a milling machine or machine, grooves are made in it, in the appropriate places.
After that, the board is fastened back, and the missing grooves are selected directly on the floor. Heat-reflecting plates are mounted in the grooves, into which the water circuit is then laid.
Connection and test run
After the pipes are laid and connected, as well as other necessary work has been carried out, you should make a test run of the heating system and let it run for some time at critical loads (within acceptable limits).

Laying the floor covering
The selection of material for the finishing coat depends on the method of laying the previous layers and should be carried out at the design stage.
Traditional types of flooring:
- Wooden plank. Can be attached directly to the surface where the pipes are laid. The thickness of the board should not exceed 22 mm. There is an opinion that a foam polyethylene backing can be placed under the board to compensate for possible unevenness of the base, but it should be remembered that the heat transfer of the floor will decrease.
- Tiled floor tiles.These materials must be settled on an intermediate layer of sheet metal panels (QSB, DSP). This is necessary to evenly distribute heat and pressure over these coatings. The advantages of these coatings are good heat dissipation.
- Linoleum, carpet.The installation process is similar to that of tiles, the difference in temperature conditions, which should not exceed 25˚.
- Laminate floors, parquet... The installation of these coverings is the same as for laying a wooden board. The difference is that these materials must not be heated more than 25.
- The most preferred material for water circuits is. However, whichever pipe is used, the presence of additional waterproofing will help protect the wood floor from possible leaks. As such insulation, a special corrugation for pipes is used. All wooden products also need to be treated with water-repellent impregnations.
- With a pipe thickness of 16 mm, its length should not exceed 70 m. Also, it is not recommended to make one large general outline for a large room, and then divide this room with a wall. It is advisable to make a separate contour for each room.
- It heats the room with the entire open floor area.
- Heat comes from the floor and, according to the laws of physics, rises up, which means the room warms up evenly; in order to neutralize the cold coming from windows or doors, this is taken into account in the project when the heating elements are located - they are laid in smaller steps.
- For certain rooms (hallway, bathroom, nursery, bedroom), a warm floor is a sign of coziness and increased comfort.
- Underfloor heating is an economical system, since it heats with a temperature not exceeding 50 ° C (the maximum floor heating should be 35 ° C), thus it saves money during operation; for wooden floors these numbers are decreasing.
- When it comes to water warm fieldwhere the coolant is heated with natural gas to a low temperature, its operation is as cheap as possible.
Warm floor and wood
The most common option for underfloor heating is the monolithing of laid heating elements (pipes through which warm water or electric cables will flow) cement-sand mortar, on which the decorative coating is then laid, usually, ceramic tile... Both of these materials - concrete and tile - give off and accumulate heat well, but by themselves they are cold and have increased hardness. Therefore, the desire not to change the wooden floor to one made of tiles is understandable, equipping it with a warm floor system.
This is especially important for owners. wooden houses, because I want the house not to lose its living wooden structure, consisting of ceilings, logs, walls and floors.
Wood itself is also a warm material, as it has a porous fibrous structure. It is not as strong a heat conductor as the materials described above. But, nevertheless, being heated from the inside, the wood will retain heat and transfer it outside.
On the other hand, wood is a natural material that cannot be overdried, otherwise it will become fragile and collapse. Therefore, taking into account the specifics of the tree, you need to know certain rules by which warm wooden floors are installed so that they will serve households for many years.
Conditions for laying a wooden floor heating
- The maximum thickness of the finishing wood coating should not exceed 22 mm for pine and larch density species and 24 mm for beech and oak density.
- The floor area should warm up evenly, so the heating elements are laid with this in mind (double spiral).
- The highest heater temperature at which wood retains its properties - 40 ° C - is controlled by an electronic thermostat with a temperature sensor.
- All elements of the system must be carefully protected from moisture penetration (especially for an electric underfloor heating).
- Before laying, the floor boards should lie in their places for several days with the heating system turned on and only after that can they be fixed.
- A warm wooden floor should not be covered with a carpet, carpet, or carpet.
Exist different ways underfloor heating devices for a wooden house.
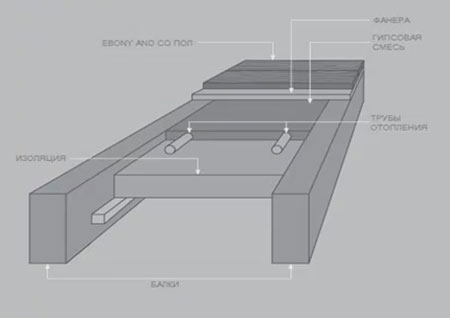
I. Water heated floor on a wooden backing
Installation of warm wooden floors differs from the generally accepted one in that the heating elements are not poured with concrete, but are placed inside a specially made structure for them and, then, wrapped in foil. After that, a finishing floor is laid on top of the heating system, preferably made of hardwood or laminate. As already mentioned, the denser the material, the more readily it transfers heat, therefore pine and linden are less suitable for a floor that is laid on a warm floor than oak and maple.
- A damper (otherwise, compensation) tape is laid along the perimeter of the underfloor heating structure and decorative floor, which will compensate for the expansion of materials.
- so that the heat from the coolant does not go into the structure to which it is attached, it must be insulated. To do this, a layer of insulation is laid between the logs laid on the rough floor. For example, extruded polystyrene foam or basalt wool.
- The latter must be covered, inside and out, with a vapor barrier film. This is necessary so that moisture from wooden structures does not get into the material and it does not block.
- For laying pipes or cables using pine boards or fiberboard or OSB, grooves are arranged for their laying.
- The pipes are flush with the grooves, wrapped in foil and fastened with metal plates.
- A finishing floor is laid on top of the structure.
II. Electric (cable) warm floor
In order not to increase weight significantly floor slabs, you can use the method of heating the wooden floor with an electric cable through an air cushion. The algorithm of actions is as follows.
- Supporting Burski with a thickness of 30-40 mm, a height of 50-60 mm with a step of 300-400 mm are attached to the subfloor.
- A heat insulator with a layer of 25-30 mm is placed between them, so that an air cushion with a thickness of about 30 mm is formed to the top of the bars, into which the cable will be laid.
- A galvanized mesh or laminated foil is placed on the thermal insulation, wrapping it on the support bars by 10-15 mm.
- The cable is mounted on the reflective surface using special clamps or mounting tape; the cable is laid parallel to the support bars; the distance between them should not be less than 10 mm. To "cross" the bars with the cable, cuts up to 30 mm are made in them. Foil is laid under the cable during installation.
- Finishing floor from parquet boards or multi-layer plywood, on which the laminate will be laid, is attached to the support bars; a damper tape is laid around the perimeter.

The specific power of the heating cable for wooden floors should not exceed 17W / m², and the specific installed power - 130W / m².
In order for the efficiency of the heating system to rise to 95%, interfloor thermal insulation should be applied.
Consider now the installation of a water-heated floor on wooden base, whether or by wooden floor ... With such an underfloor heating device, there is no need to work with concrete, and the system will be ready to start immediately after the installation is completed.
In addition, wooden floor heating is used where it is impossible to make concrete screed due to the design features of the building (room). For example, in the example below, a warm floor is installed in a wooden house.
Let's clarify right away: the connection to the collector, to the boiler and the layout of the underfloor heating loops are the same for a wooden underfloor heating and for a concrete one, so if you have not read articles on relevant topics, but immediately got to this page, then it is better to start from here.
Warm floor on wooden joists: the first installation option
There was a wooden floor. Logs from a board of 50x150 mm were placed on it with an interval of ~ 60 cm. Between the logs they put a heater - mineral wool - 100 mm thick. For insulation - floor heating pipes.
In the logs, cuts were made for the passage of the pipe. Possible gaps between the logs and the insulation were foamed (although with the correct distance between the logs, it is not necessary to foam; if the insulation is mineral wool, then the distance between the logs should be 1.5-2 cm less than the width of the mineral wool sheet). Plywood was laid on top of the logs, on which there was already some kind of finishing material.
The weakness of the device shown: there is an air gap between the pipe and the plywood, which does not need to be: it impairs the thermal conductivity of the floor.
Warm floor on wooden logs: the second installation option
More time consuming, but also more reliable. Lags are put. Between them - polystyrene, mineral wool, or the like. The base is spread on the logs - plywood, OSB, chipboard, etc. (but not gypsum board, which has the property of crumbling if you constantly walk on it).
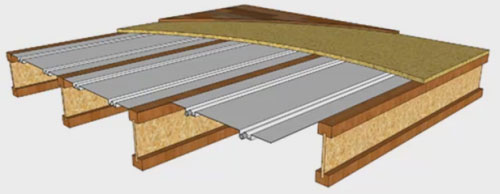
Further, plates with rounded corners are cut out of the chipboard - for the device of the grooves into which the pipe will be laid. The width of the plates depends on the required pipe pitch, and the thickness is 20 mm. These plates are screwed to the previously arranged base with an interval equal to the pipe diameter plus 3 ... 4 mm. Between the plates - foil strips 20 ... 25 cm wide - a reflective layer. And - pipe:
To enhance the reflective effect, metal sheets, either aluminum or galvanized steel, are laid over the pipes. Above - laminate, but not parquet!
The figure does not show a layer of sheet material on top of the log, but it is possible without it, although it is more reliable with it. Why? With a large distance between the lags, boards 20 ... 25 mm thick can bend under the weight of furniture and people. (Especially if these are not boards, but strips of chipboard.) With thicker boards, the distance from the pipes to the floor surface increases, which makes the floor more heated ...
Such a base is not suitable for parquet flooring, since it is very mobile and flexible. For parquet, you need a concrete base, and the underlay (plywood) must be firmly screwed to concrete base... And suitable for laminate.
The second option is more suitable for laying the pipe with a "snake", and photos illustrating this installation option are given below.
Warm floor on wooden joists: the third installation option
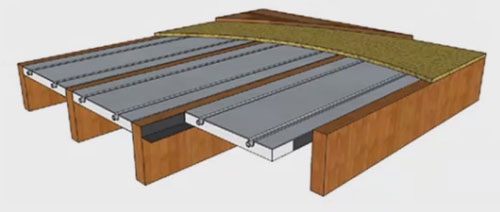
Most time consuming. As in the 2nd version, there is insulation between the lags. Next, a board with a thickness of 50 mm and a width equal to the step of the pipe is taken. The board is sanded from all sides. A groove is made in one corner of the board (yellow is the cut material; the blue circle is a pipe):
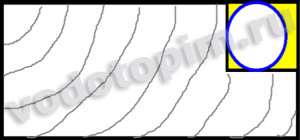
And in this groove we first put the foil (with an overlap on the top of the board), and then the pipe. We fasten the foil with a stapler to the boards, which before that are attached to the logs close to each other. Lay the floor covering on top of the boards.
Warm floor on wooden logs: the fourth option
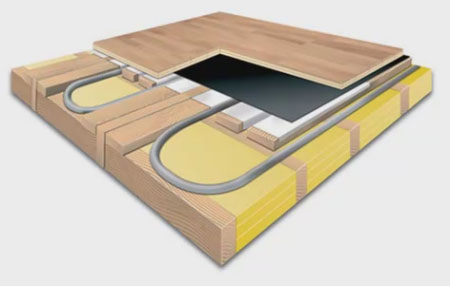
For the installation of a wooden underfloor heating, you can use various ready-made solutions produced by companies specializing in products for warm floors... For example, reflective plates with grooves for pipe laying:
The plates are mounted on top of the log, the distance between which must be determined in advance by the width of these plates.
Or insulation with a metallized layer applied to it:
There are pipe slots here too. We put the insulation on the corners, specially for this fixed along the upper edges of the log.
Warm floor on wooden logs: the fifth option
Another technology.
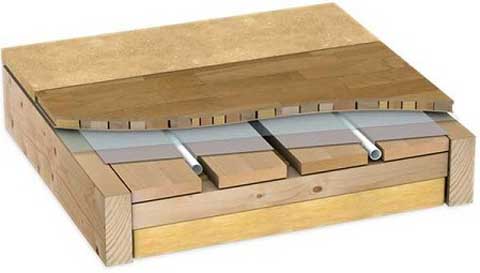
A raised floor is laid between the logs:
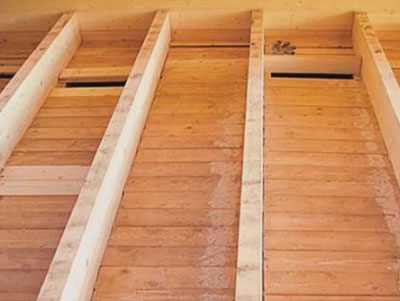
In the photo, a raised floor is made of boards, but this is not essential, both OSB and chipboard, etc. are suitable.
We put insulation between the beams, on it sheets with bosses flush with the upper edges of the lag:
Where the pipe crosses the logs, grooves are made, and the pipe in these places is enclosed in a corrugation, so that due to linear extensions, the pipe does not rub against the wood. On top of the pipe are reflective metal sheets. Well, the finishing coat.
Warm floor on wooden joists: the sixth option
Another option: you can lay the underfloor heating pipes directly on the insulation (only if the insulation is not cotton wool, but polystyrene) between the logs. So that the pipes are located below the top of the log. And fill the space between the lags with plaster mortar:
However, with a strong desire to do without wet processes instead of gypsum mix can be covered with dry clean sand. Gypsum or sand will smooth out one of the disadvantages of a wooden floor heating: the absence of a heat accumulator, which is a concrete screed in a concrete system.
(I gave six options for installing a wooden underfloor heating, but this does not mean that it is limited to them; perhaps you will come up with your own or make additions / improvements to the ones shown; the main thing is that the principles of operation of a warm water floor are not violated)
Installation of wooden floor heating in steps
Now we will consider the installation of a warm water floor on wooden logs in detail, clearly and step by step. (This is just one possible option.)
In the photo below we see logs for laying a wooden floor:

The logs are laid with a step of 0.6 m. For fastening the logs, galvanized supports can be used, the types of which are now produced in a lot:
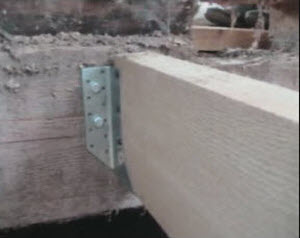

The convenience of using such supports is that they can first be fixed with self-tapping screws or / and nails, setting all the supports in level, and only then the logs themselves can be attached to the supports.
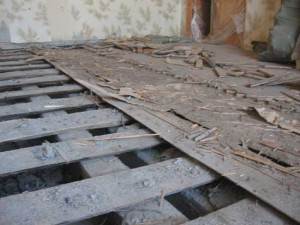
After fixing the log from the bottom, a rough floor is laid - in order to put a layer of thermal insulation on it:
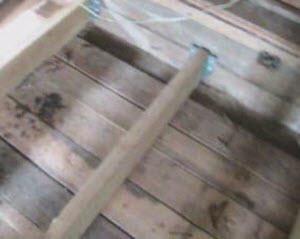
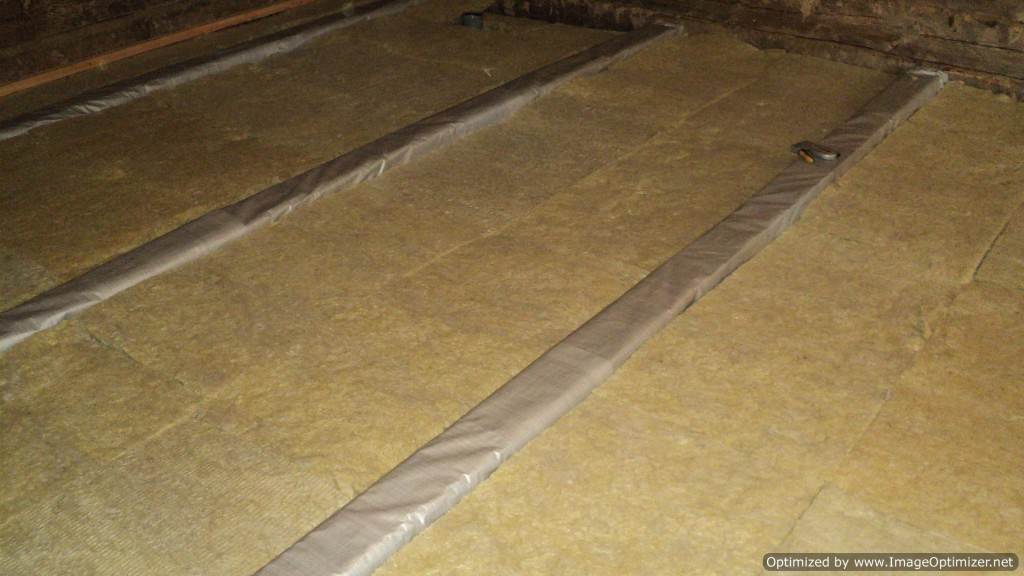
We put a waterproofing film on the rough floor (it can be clearly seen in the following photos); then - thermal insulation:

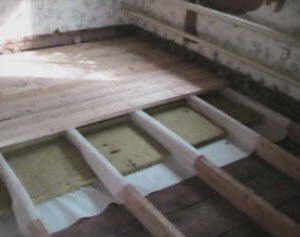

In the photo above, a basalt-based mineral slab in two layers (100 mm) is used as thermal insulation. A 40 mm board is laid on top of the thermal insulation (it is not necessary to lay this board, you can lay chipboard strips on the logs (chipboard thickness 20-22 mm), between which the underfloor heating pipe will be located).
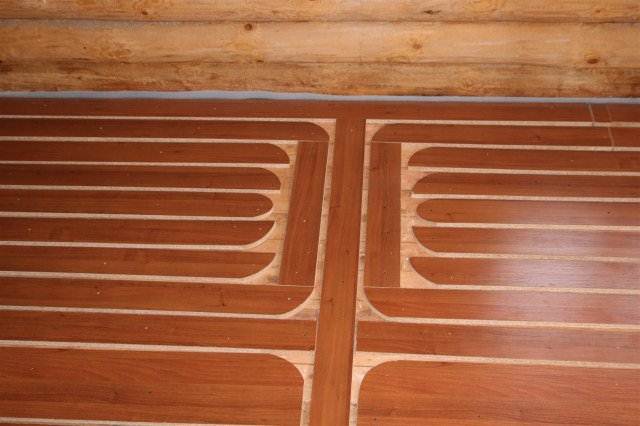
The next photo shows the laid strips of chipboard with a step of 20 cm (because during the calculations such a step was obtained between the pipes):
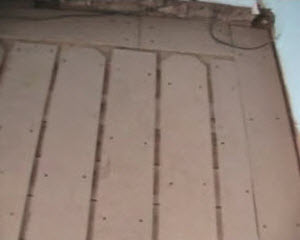
Chipboard strips are laid in the following sequence: first, stripes are laid along the walls, after which we are already laying strips throughout the entire area. The corners of the strips are cut - for laying pipe bends:

Between the chipboard strips, as seen in the photo, a gap is left in which the pipe will fit.
There are special aluminum sheets with extruded profiles for the pipe. Such sheets are needed as heat reflectors. They are not on sale everywhere, so you can get by with 0.5 mm thick galvanized iron sheets, which can be found in any building materials store.
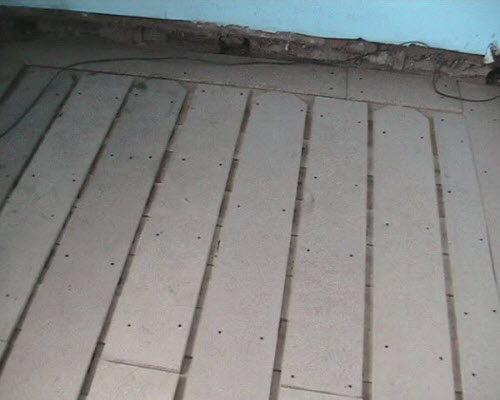
The photo below shows strips of galvanized steel, referred to in the paragraph above, already attached to the chipboard:

Galvanizing is attached to the chipboard with ordinary nails. The galvanized strips are bent in such a way that grooves are obtained, into which the metal-plastic pipe is then laid.
The figure below shows the profile along which the galvanized strip is bent:

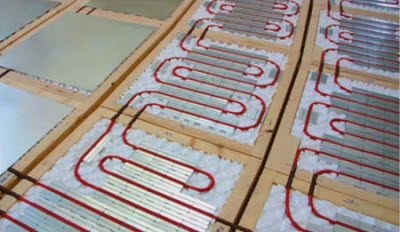
We see that a supply and return pipes are laid along the wall, and next to it there are "rolls" of the warmest floor:

When designing, it is important to take into account all the gaps that should be left between the laid pipes, and then fix the chipboard strips taking into account these gaps.
Other important point - lay the pipe so that it does not protrude above the floor level and then interfere with the laying of the finishing coating. As you understand, it is for this that the pipe fits into the grooves of the chipboard strips, and the thickness of the chipboard is taken more than the diameter of the pipe.
In the next photo, a finished wooden system of a water-heated floor:
The next step on this floor will be plywood and on top of the final floor covering (but first, the system should be pressurized: fill with water and hold under pressure).
Only two things can be said about plywood laying: plywood is chosen moisture resistant with a thickness of at least 10 mm, and we leave a gap of 5-10 mm between the plywood sheets (the gap can be filled with sealant, but it is possible not to fill it; a gap is needed due to the possible expansion of the plywood - wood, as you know, absorbs moisture - even moisture resistant, the same applies to OSB).
That's the whole installation wooden underfloor heating system - as you can see, there is nothing super complicated.
2013-2017. Copyright © Use of site materials is allowed with reference to


