Anyone today vacation home equipped with all kinds of powerful household electrical appliances. Naturally, it becomes necessary to ground a private house. You can make grounding yourself
What is grounding
Grounding is the intentional connection of any point in the equipment with an electrical connection to ground. By definition, grounding is intended to provide reliable protection against the hazardous effects of the possibility of electric shock. Therefore, the ground is used as a conductor of current, as one of the arms of an asymmetrical vibrator. Grounding consists of an earthing switch (ground loop) providing direct contact with the ground, as well as a grounding conductor. The most undesirable grounding option in terms of coefficient resistivity are stony and rocky soils. The best option the location of the ground loop is considered loamy and clayey soils
In order to make grounding in a private house, it will be necessary to build and install a ground loop. The grounding loop for a private house will consist of vertical conductors (grounding conductors) driven into the ground. The earthing switches are connected to each other by horizontal strips, creating a contour of a certain configuration. The circuit is connected to the electrical panel. This is how grounding works.
Grounding, like any other system, consists of certain elements, without the interconnection between which correct functioning is impossible.
What grounding elements does the system consist of?
Grounding elements are:
Vertical earthing
Grounding strips or conductors.
Grounding is a qualitative value and depends on the value of the resistance of the ground electrode. The amount of grounding can be reduced by increasing the area of \u200b\u200bthe grounding electrodes, thereby reducing the soil resistance.
Steel angle with dimensions 50x50x5 mm can serve as vertical ground electrodes. for horizontal - strip steel 40x4 mm. The choice of such materials and sizes of ground electrodes is regulated by the official document PUE-7, section 1.7. It is unacceptable to use fittings as grounding conductors, because the distribution of current over the red-hot outer layer of the fittings is disturbed.
Ground loop
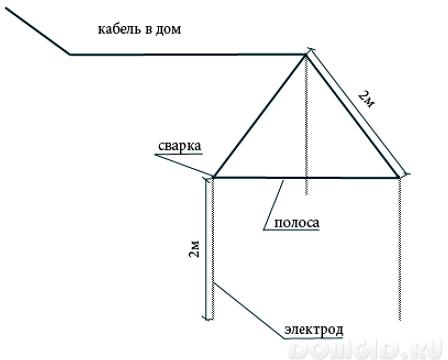
When a private house is grounded, a closed loop is created. A ground loop is a collection of metal conductors buried in the ground and connected to an electrical appliance. According to the rules, the ground loop is made geometrically in the form of an equilateral triangle. All elements (conductors and ground electrode) of the ground loop are connected by bolts and welding. Welding is preferred.
The owners of private houses are initially interested in the question of what materials can be used for the ground loop of a private house.
The most demanded materials are steel and steel in a copper sheath. True, the copper sheath used to create the outline is an expensive pleasure. The selection criterion for choosing an electrode is the cross-sectional area parameter. Normally, the use of pipes, rectangular or angular profiles and rods is allowed. In this case, the length of the electrode is significant and should reach 2 meters, and the minimum number of 3 electrodes.
What kind of grounding scheme for a private house to choose
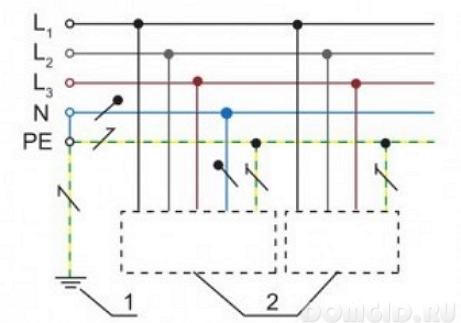
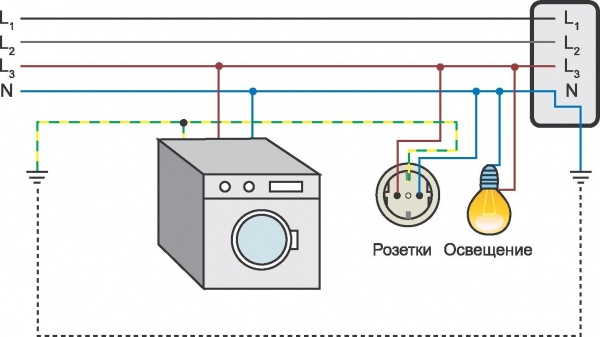
The grounding scheme is supposed to be produced using two systems: TN-C-S and TT.
Features of the TN-C-S system: it is a grounding system in which two functions, namely: zero protective and working conductors are combined in one conductor.
Features of the TT system: it is a system in which the neutral is permanently grounded due to the use of an earthing device.
For power supply of a private house according to the TN-C-S scheme, the PEN wire plays the role of a conductor. The TT system is most widespread among the owners of private houses. Why? The answer is quite simple: with a TT system, all conductive parts of electrical installations are directly connected to the ground by means of a ground electrode.
Stages of grounding a private house
Do-it-yourself grounding of a private house is done in several stages.
Preparatory
Earthworks
Driving electrodes into the ground
Connecting electrodes
Drilling technological holes in the wall
Ground wire routing
Checking the grounding functionality.
The preparatory stage involves the selection of a site where the ground loop will be located.
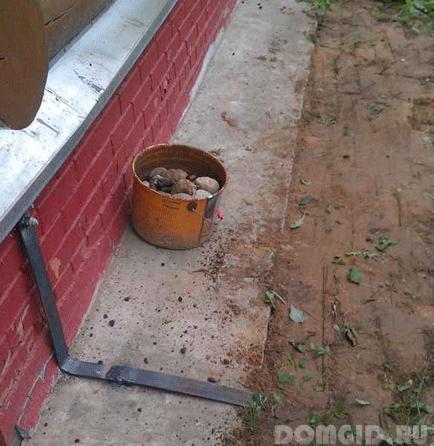
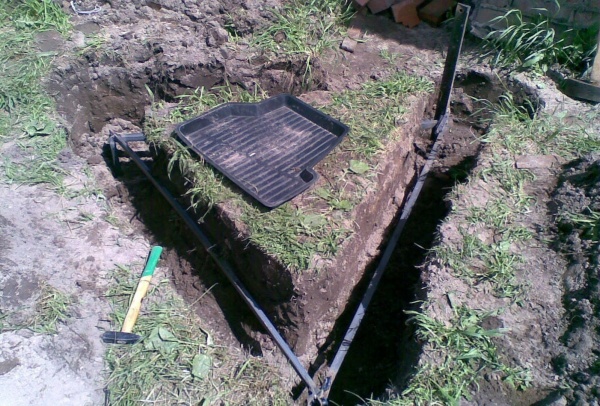
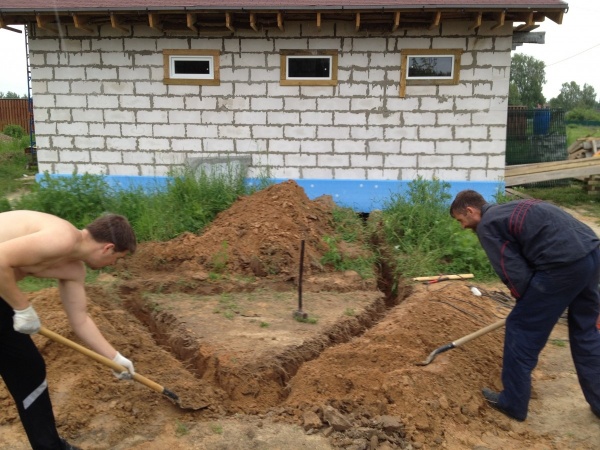
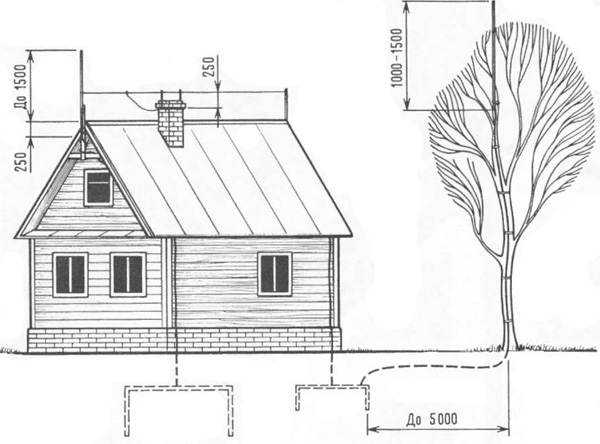
Excavation works are intended for the ground loop equilateral triangle created in the soil. For this, holes and connecting trenches are dug. The depth of trenches and pits should reach 1.5 m. It is recommended to lay a ground loop at a distance of 1 meter from the foundation of a private house. Trenches are dug along the marked triangle to a depth of 1 m. The width of the trench must be sufficient for subsequent welding of the electrodes.
![]()
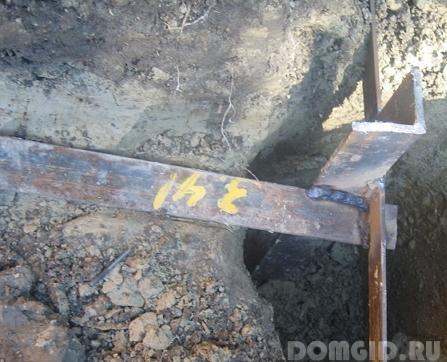
The electrodes are driven into the ground along the vertices of the triangle. Earthing switches are driven into the soil to a depth of 2-3 meters. For the convenience of work, the corners at the ends are sharpened. It is preferable to carry out work on driving conductors with a sledgehammer. Deformation or change in the shape of the electrodes is not permissible.
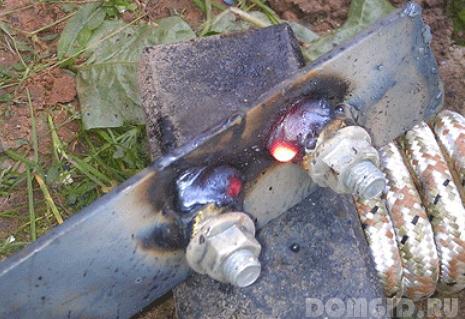
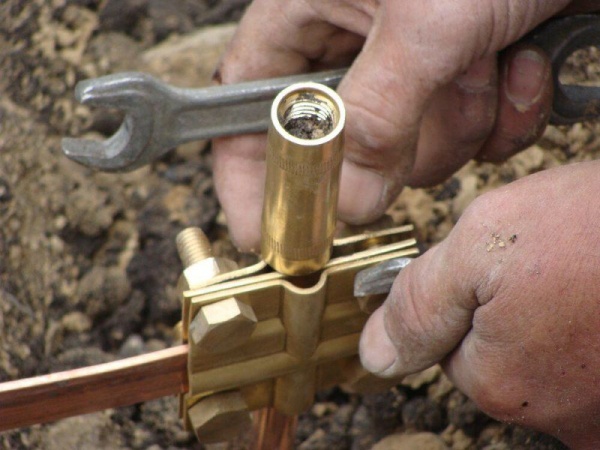
The connection of the electrodes is carried out using a threaded connection with a steel strip 40 mm wide and 4 mm thick and bolts M80 or M100. An M80 bolt is welded to the edge of the strip to secure the wire going to a private house. A copper stranded wire is connected to the edge of the bolt, leading directly to the distribution board of the house.
After the completion of grounding and installation work on grounding, a control measurement of the ground loop is made. "Test measurement" should show the value of the resistance of the grounding device. The measurement of the resistance value of the ground loop is carried out by specialized laboratories using M416 ohmmeters.
To thoroughly disassemble yourself about the purpose and functions of the circuit conductors when installing grounding, you just need to watch the proposed video
An increasing number of various electrical appliances serve us to facilitate our work and life. The load on the electrical grid is almost always at its maximum, even in the most seedy village. TV always on, a frequently used washing machine, dishwasher it works every day and does not turn off, not to mention various sources of lighting, irons, vacuum cleaners and computers. Safety in the operation of electrical devices almost always suffers, and RCD protection devices do not work on time due to the absence of a ground loop in a private house. How to make grounding in a private house, this article will tell.
Any homeowner can competently and practically free of charge make grounding in a private house. The work on its device is quite simple and does not require special knowledge. The energy supervisor can check the ground loop once every hundred years and pays little attention to the safety of homeowners. It is enough that you will have a guarantee to avoid electric shock to your own person.
So what do we need to know first? This is what it needs to be done according to clearly regulated instructions. She tells us how to make the grounding of a private house in accordance with the Electrical Installation Rules, Electrical Installation Safety Rules and Electrical Installation Operating Rules. According to these documents, you need to check the ground loop of a private house for resistance immediately after manufacture, and its value should not exceed 4 ohms. And no one can forbid you to make a ground loop in your private house on your own, and not overpay money to specialists from third-party companies.
All the advantages of the ground loop:
- no accidental voltage on the cases of household appliances;
- compliance with the norms of operation of electrical devices, which increases their service life;
- safe human contact with the metal case of devices;
- significant decrease harmful influence electromagnetic radiation on the human body;
- reducing the level of interference in the network of a private house arising from voltage surges;
- reducing the number of deaths from electric shock.
Making a ground loop
So how to make a ground loop? The simplest ground loop in a private house can be made from three or four metal rods of arbitrary diameter (10-45 mm). They are driven into the ground in the form of an equilateral triangle or square with a side length of at least 1.5 m and a depth of 2 m. The contour details are usually connected to each other by welding to a metal strip with a cross section of 4x25 mm or larger. The connected upper edges of the circuit and a metal bus brought into a private house are called metal bonds. Metal bond resistance should not be more than 0.1 ohm. It is measured from the mechanical connection at the grounding bus site to the last, farthest element of the grounding loop.
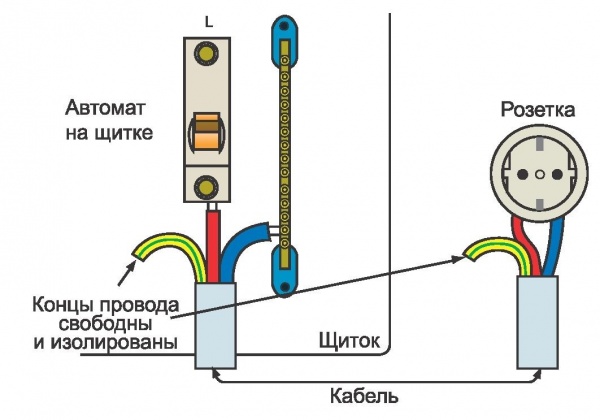
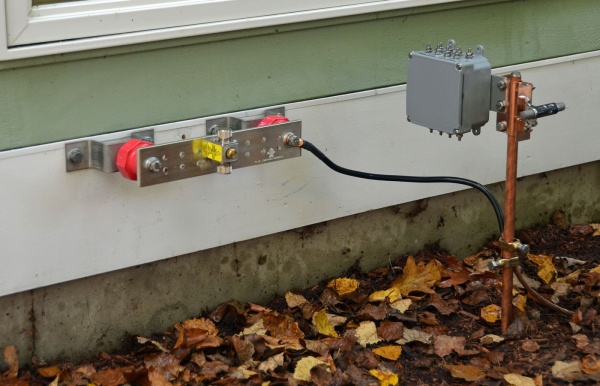
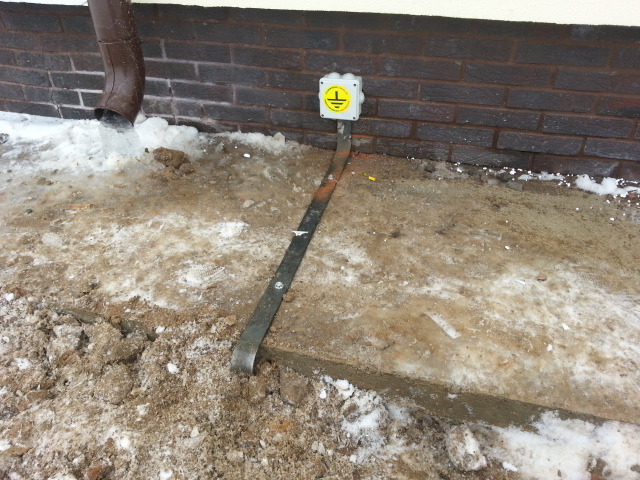
The place for the ground loop device is usually chosen based on the closest location to the metering board and most sources of increased danger - electrical appliances, that is, near the kitchen of a private house. Inside a private house, the ground loop is started with a metal strip that fits to the electricity metering board. With the metering board, the ground loop is connected with a copper wire with a diameter of 6-10 mm, having a yellow sheath with a green longitudinal strip and a nut screwed to a bolt welded to a metal bus with a diameter of more than 10 mm.
It is almost impossible to make a ground loop for your apartment while living in a multi-storey building. Many residents, very literate in all respects, are trying to replace grounding with a zero wire. This is very dangerous for two reasons:
- if, as a result of an emergency, zero disappears in the house, then all buildings will be under high voltage;
- with an uneven distribution of the load on the phases and when landing on a neutral wire instead of grounding, a potential arises on the metal cases of household appliances, that is, a life-threatening voltage difference.
Instead of a self-made grounding of a private house, you can purchase a ready-made ground loop made at the factory in a store. It costs a lot of money due to the high-quality manufacture of metal rods, with a thin layer of copper electroplated.
We warn everyone against the desire to make a ground loop by connecting a metal wire to the water supply or pipes of the heating system - this is prohibited by paragraph 1.7.110 of the Rules for Electrical Installations. Often, such experiments end in human casualties - electricity does not like to joke. When the insulation of the wires breaks down, instead of the ground, the current discharge hits the water pipe and, through the current stream of water, can shock people who are carelessly taking a shower in the neighboring house.
All elements of the ground loop in contact with each other, brought out to the outside of a private house and having a mechanical connection with each other, must be connected through prepared contact pads. Since metals have different electrochemical activities, galvanic vapor is created between them in humid weather, leading to corrosion.
Corrosion in this case can spread even under the sheath of the ground wire, which is carried in the house from the loop bus.
To prevent this phenomenon, all mechanical connections are connected to the contact pads, cleaned to a shine and lubricated with electrical grease of a special consistency.
It is strictly forbidden to connect several electrical appliances in series with the ground loop of the house. Each of them must be connected to a separate ground bus pad.
From all of the above, it follows that the independent manufacture and installation of a ground loop in a private house is quite capable of doing any person who wants to protect himself and his family from emergency situations and human casualties.
Private house - this is an opportunity every week to relax with friends or family in nature. Even a car is optional. Electric trains, minibuses and buses run from megacities to nearby towns and villages all the time.
But having a private house somewhere in the countryside is not all. It is necessary to take care of the safety of every person who is there. To eliminate the possibility of electric shock, it is worth making grounding.

Grounding ensures safe operation household appliances. Moreover, if you have an electric stove or washing machine installed, then you simply cannot do without it. In the latter case, the failure of a household appliance can lead to extremely dire consequences.
Important ! If you live in a private house without grounding, then this creates a dangerous situation inside the building for your loved ones and relatives.
It is not so difficult to make grounding in a private house with your own hands. The main thing is to follow the norms and use high-quality components and materials. Many are trying to save money and make zeroing, motivating such an act by the fact that grounding is not necessary in a 220 V network.
However, this is not entirely true. Indeed, doing grounding in a 220 V network is not a mandatory safety standard in a private house. But such a step allows you to largely protect each resident from electric shock.
Important ! If the power supply is carried out from a 380 V network, then grounding will have to be done. This will allow every person living in a private house to feel safe.
Why do you need a ground loop
Let's start with a school biology course. A person is 70% water. That is why an electric shock can cause us significant harm. Internal organs are receiving enormous damage. The body begins to writhe in convulsions. Therefore, it is imperative to quickly move the victim away from the power source. In the worst case scenario, the heart stops following an electrical shock.
Certainly, no one will crawl to bare wires to experience new sensations. But in case of failure, the cases of some devices become full-fledged electrical conductors. One touch is enough to grab a shock. To prevent this from happening, it is enough to make grounding. In this case, every person living in a private house will be under reliable protection.
Let's consider a real situation. The heating element inside the boiler has collapsed from long-term operation. As a result, electricity began to be transmitted through the nichrome spiral into the water. Now every touch of the boiler body is deadly.
To eliminate the risk of electric shock, all parts of the device capable of transmitting current are grounded. In this case, the stress arising from a breakdown will go exactly to the ground, without carrying any threat in itself.
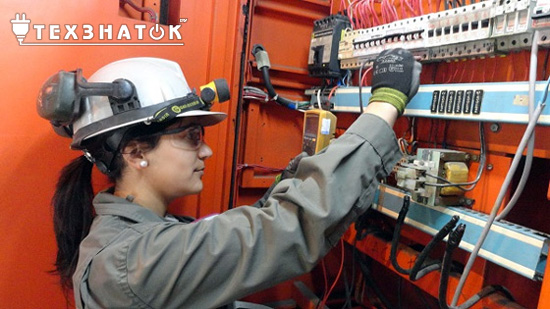
To better understand how to make grounding in a private house. Consider an example of such protection against electric shock in industrial facilities. The grounding conductor is connected to the body of each machine and control panels. This measure allows each worker to be insured against possible electric shock.
To make grounding for household appliances in a private house, you will additionally need to connect protective conductor... It connects to an outlet that accepts the plug of a specific device.
When the neutral conductor is broken, not only electricity disappears, the protection circuit is broken. If this happens, then the ground will be a neutral conductor. At the same time, the performance of each device will remain, as will the protection.
Attention ! The main role of grounding in a private house is to ensure safety when touching the housings of household appliances.
We do grounding in the country
What should be quality grounding
Before making high-quality and reliable grounding in a private house, you need to know the basic technical requirements to structures of this type. To begin with, consider the meaning of the concept itself. In fact it electrical circuit, providing a safe outlet of electricity in case of breakdowns of household equipment.

Structurally, grounding can be divided into three components:
- Earthing switch. This part is a collection of conductors. Each of them is in constant contact with the ground.
- Grounding conductor... This structural element connects the device to be grounded to the ground electrode.
- Grounding device or grounding- ground electrode + grounding conductors.
If you look in detail, then the ground electrode in a private house is a set of metal conductors that go into the ground. Any high-quality grounding must have an appropriate spreading resistance indicator. This parameter shows how easily the current enters the ground.
Important ! The resistance is like a valve. It blocks the current flow. The smaller it is, the better and more reliable the grounding in a private house.
The resistance force in the grounding of a private house is influenced by many parameters. Therefore, before you make this security system against electric shock in your home, you need to find out about them.
The first thing you need to pay attention to is at what depth does the ground electrode system lie?... Also, the resistance is affected by soil moisture and the number of conductors. It is best to make an outline around the entire perimeter of the house. If this is not possible, opt for the north side. It is there that the soil moisture is maximum.
There are special requirements for earthing switches. It is not enough that they are made of quality steel. The conductor thickness must be at least four millimeters. Moreover, the minimum pipe diameter is 32 mm; vertical rods 16 mm and more, horizontal 10.
Installation
To make a protection system against electrical shocks when household appliances are damaged, it is necessary to choose a place where the conductors will enter. This is where the vertical rods will need to be driven.
Important ! Before you do the installation of the device with your own hands in a private house, make sure that there are no communications in the place where you will lay the ground loop.
Ideally, you must first coordinate the work with the relevant services, such as heat and gas supply organizations. Please note that repairing damaged heat or gas network is extremely expensive.
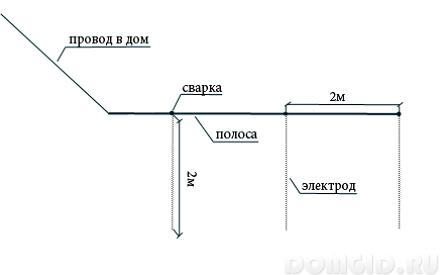
The easiest way is to make a linear contour, and place it parallel to the blind area. Some builders go to various tricks, making grounding in the form of a triangle or polyhedron. Ideally, you should encircle the house around the entire perimeter. True, this will require a lot of materials and time.
Advice! The main advantage of linear mounting is that, if necessary, the structure can always be increased.
You need to start the installation of a protective system in a private house by cutting off a corner or rod. Its length should be two meters. The end must be pointed. A hand drill can be used to drill holes. If there is no such accessory in the household, use an ordinary shovel.
After a hole is dug not far from a private house, you need to hammer in the ground electrode. If the first rod entered the ground easily. The second can be made half a meter longer. The main thing is not to overdo it. Three meters is the ultimate length.
Five earthing switches are enough to make reliable protection for a private house. Cutting the rods is done at least below ground level. Roughly, it is about 20-30 cm. You need to dig a groove between the ground electrodes that will connect them.
Grounding elements in a private house can be connected by welding. If a welding machine is not available, you can do the same, but using ordinary bolts. Welding is still preferable as it provides a higher level of reliability. The service life of the entire structure is also increased.
Important ! The bolted connection must be tightened periodically.
Making measurements
After you do the installation of the ground loop in a private house with your own hands, you will need to carry out the appropriate measurements. The first thing you need to test is resistance. The normative indicators are as follows:
- 220 V network - resistance within 30 ohms.
- 380 V network - resistance 5-10 ohms.
- Rare soil rocks, for example, rocky - 100 ohms.

The highest quality ground loop should be at the 380 V network. In addition, for three-phase wiring, the presence of grounding in a private house is mandatory. Luckily, you can make it yourself.
We are laying a ground electrode
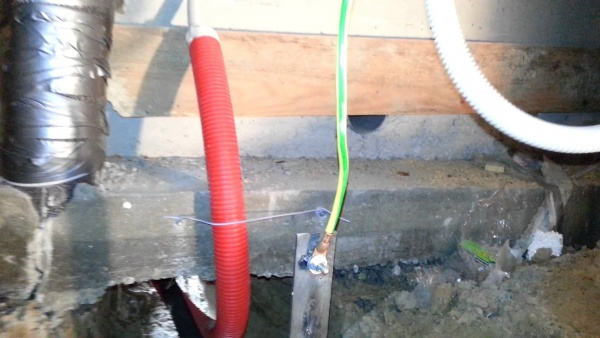
After the testing is completed and the indicators correspond to the norm, it is necessary to lay the grounding conductor from the circuit to the shield. The conductor diameter cannot be less than 8 mm.
The steel conductor is led inward through the wall of the house. You can choose the place yourself, the main thing is that it is convenient for you to work. Then the grounding in a private house will be done efficiently and reliably.
At the end of the steel conductor, which is part of the deceleration, a bolted connection must be formed. You can thread or weld a bolt. The tip must be pressed into the copper wire. The diameter of the latter is 4 mm. It is best to hide it in the baseboard.
Attention ! It is prohibited to break grounding conductors with switching devices.
Outcome
As you can see, it is not so difficult to make a ground loop with your own hands. Moreover, it is possible to cope with such work without using any special equipment. The effect of such a protection system will be more than useful and will be able to protect the residents of the house from household injury.
The main function of grounding is to protect a person from electric shock. In addition, due to the presence of a ground loop, the level of magnetic interference emanating from electrical equipment is reduced, and interference in the electrical network itself disappears. Also, no one has canceled the static voltage that appears on metal cases, but which can disappear if the case is reliably grounded.
Previously, grounding was mainly used in industrial electrical installations, but today even household electrical network should not do without grounding. In everyday life, the enclosures of electrical household appliances are grounded through an ordinary European plug with a special grounding contact. A protective PE conductor ("ground") must be connected to this contact.
In the event of an electrical breakdown of the insulation of the phase wire to a metal case and accidental touch of a person to this case, movement electric current will be directed to the ground, bypassing the human body. This is how the protection against direct contact works. In addition, when a phase is closed to a grounded housing, a current appears short circuit (short-circuit current), which sharply increases its value in a fraction of a second. Short-circuit current the circuit breaker reacts, which is triggered and completely disconnects the voltage supply to the place where the short-circuit occurred.
DIY ground loop - step by step instructions
At the moment, the construction of private houses is very popular. In addition to standard construction works, work is being done on the electrification of the house. As a result, it becomes necessary to complete the contour protective earth... The grounding contour can be performed not only for newly erected buildings, but also for houses that did not have a contour initially during construction. If in production the protective grounding loop is performed by an electrical installation organization according to finished project, then in everyday life you can do it yourself.
The following materials are required for the installation of the ground loop:
● metal electrodes;
● metal (steel) strip;
● several bolts.
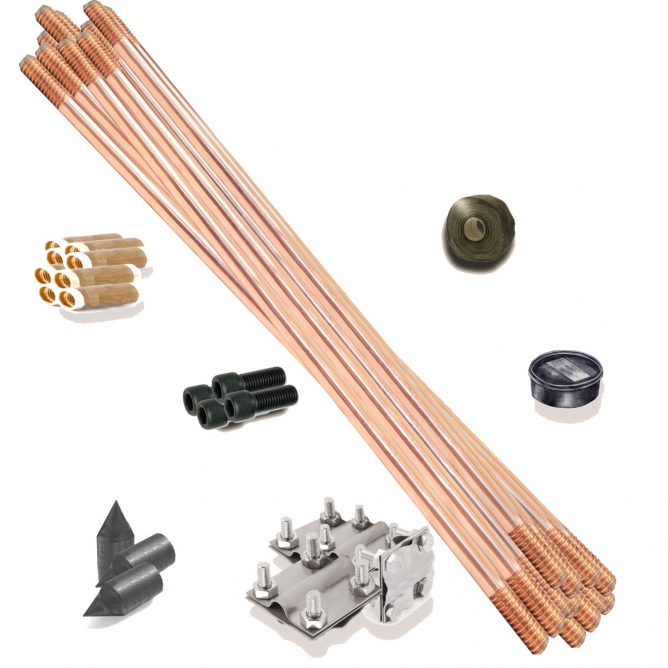
It is worth noting that there have long been special kits on sale for self-earthing of a private house.
To complete the installation work you will need:
● bayonet shovel;
● a large hammer or sledgehammer;
● household welding inverter;
● welding electrodes;
● grinder.
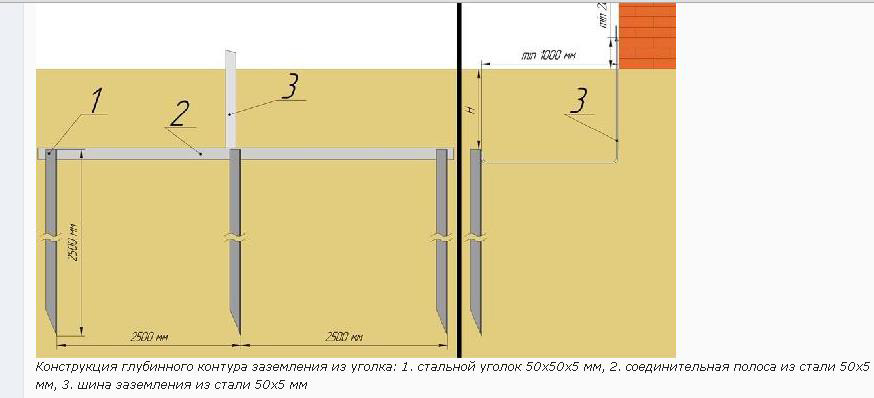
For a private house, the ground loop should consist of three grounding electrodes, dug in or driven into the ground and interconnected with a metal strip. A steel angle 50x50x5mm can be used as electrodes. The length of the corner should be within two to three meters. If the initial length of the corner is more than two to three meters, then pieces of the required length are cut off with a grinder. Steel 40x4mm is used as a strip.
In no case can you use metal fittingssince it has a hardened surface, therefore, the process of current spreading is disturbed. In addition, the reinforcement oxidizes and rusts faster, which is absolutely unacceptable. In short, the metal for the ground loop should not oxidize and rust after a certain time.
The branch from the contour is also performed with a metal strip.
Installation of a protective ground loop for a private house is carried out in several stages.
Choosing the location of the contour
To determine the location for the contour, it is necessary to take into account the properties of the soil. Chernozem is most suitable for the implementation of the ground loop, sand and clay are less suitable for these purposes. The ground loop should be located near the house at a distance of about a meter.
Markup
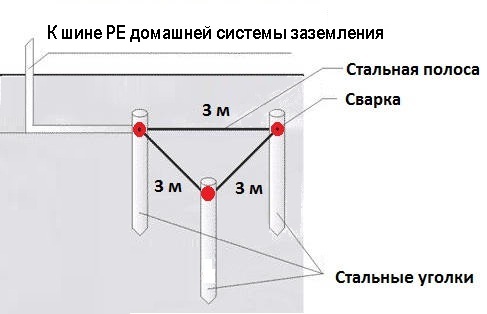
Since the contour for a private house is made in the form of an equilateral triangle, the marking on the ground must be appropriate. The distance between the sides of the marked triangle should be such that the electrodes can be driven into the ground at a distance from each other not less than the length of the electrode.
Contour trench
After the triangular markings have been completed, a trench is dug along the perimeter of the markings. The depth of the trench should take into account the depth of soil freezing in severe frost... The width should be sufficient so that it is convenient to weld the contour around the perimeter, for example 0.7 m.
Circuit installation
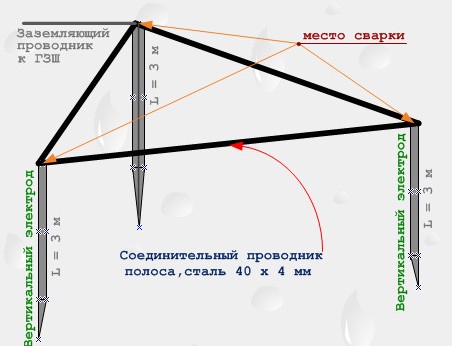
The installation of the circuit begins directly with plugging the electrodes. The electrodes are hammered with a hammer or sledgehammer at the corners of a triangular trench 2-3 meters deep. It is not necessary to score completely. On the surface of the trench, 0.2-0.3 m of the length of the electrode should remain.
Then the clogged electrodes are connected to each other by a horizontal metal strip by welding. This forms a triangular contour. Hence the name - ground loop.
It is impossible to use a bolted connection or any other instead of a welding connection. The reason is rapid oxidation and rusting.
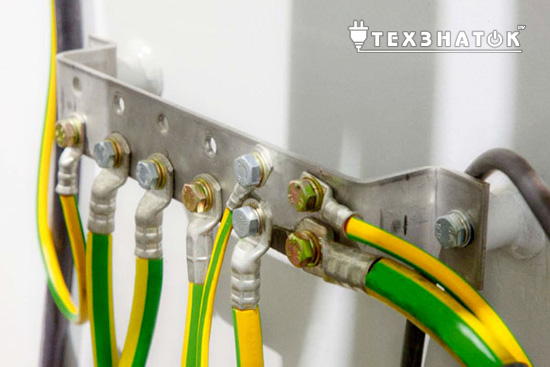
The next step is to make a metal outlet from the circuit. As mentioned, the bend is also performed with a metal strip. The strip on one side is welded to the contour itself, and the other side of the strip is led into the house through a hole in the wall. In the house, the strip is recommended to be inner wall at a low height from the floor. On this part of the grounding strip, the bolts are welded at a not too great distance from each other. A copper leash is screwed to one of these bolts, which grounded the house's lead-in shield.
After the installation work has been completely completed, it is necessary to measure the resistance to current spreading of the ground loop. Measurement is usually performed with a special device. The resistance value should be no more than 4 ohms.
After the measurement, the grounding contour is covered with soil, after which the grounding can already be operated.
A properly executed grounding loop with your own hand is a guarantee of safety and proper operation of household consumers.


