
Connect the outlet with your own hands
When performing construction or repair work, it is almost impossible to do without a socket. So let's look at how the installation and connection of the socket is correct.
The first thing is important to do is disable the supply of electricity to the room where it is planned to connect the socket. After turning off the power supply, it is recommended to additionally make sure that the electricity is disabled. Next, the preparation of the box (conversion), in which a new outlet will be installed. It is important that the wires in it are in free access.
Installing a new outlet
Sequential setting outlet
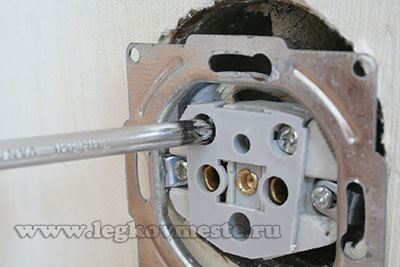
The first thing is taken into the hands of the socket and disassembled, the outer housing is disconnected from the inside. Next, we take pliers with which we cut the excess wire. As a rule, it is not larger and no less than 10 cm wires to connect sockets. It is just such a length that it is enough to make the connection to perform as much as possible and convenient. From each end of the wire, 1 cm of isolation is removed.
Stripping the ends of the wires to connect the socket

Wiring stripping with insulation puller
Placing outlets with consumers

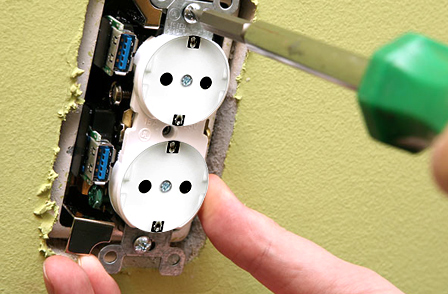
Before installing sockets, it is necessary to determine their numbers, as well as their location. The conditions for the placement of such elements are directly related to the location of consumers. electrical Energywhich are very fixed in the form of a refrigerator, television and a computer. In such places, as a rule, several outlets are mounted (block sockets from 2 to 5 pcs.) To ensure the possibility of connecting auxiliary electrical appliances. This, more optimal solution, rather than the use of tees and extension cords. After all, this leads to an additional outlet load, which significantly reduces its life.
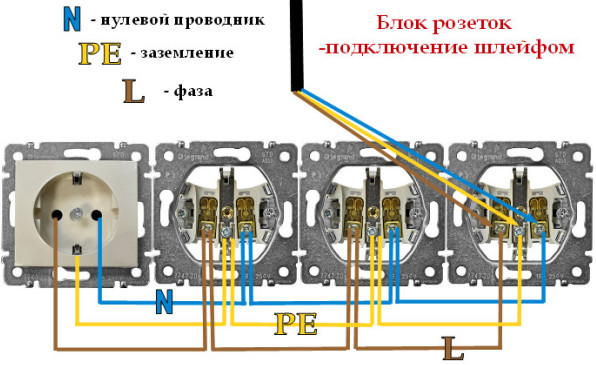
The socket unit is connected by a loop method (parallel)

Connecting Diagram Sockets - Pin
Horizontal block sockets
It is also necessary to take into account and sockets for temporary devices. This includes elements in the form of a vacuum cleaner, a laptop, a charger for a mobile device and an iron. Most experts do not recommend installing outlets in the bathrooms in order to prevent moisture from entering, which can lead to the failure of the outlet, and in some cases May lead to different injuries in humans. If you still do not do without a socket, for example for electric boilerThe socket must be installed a special, moisture-protected with a level of protection of at least IP-44.

Patch moisture protection socket for bathroom
In the rawrooms install sockets with no less IP44
Installation of sockets produce from 30 to 80 cm from clean floor in places that are available for connecting consumers and for high-quality maintenance. At the same time, the distance to the instruments should not be large so that the electric cord does not stretch, and freely resalted.
Various ways of fastening sockets
The method of fastening the socket is directly related to its design features, the material that is based on the wall, and how the cable is laid. If it is paired in plastic boxes, the sockets are often used to perform an outdoor installation. The fastening of such elements passes with the help of self-tapping screws on a plasterboard partition or dowel-nails on a brick or concrete wall. When the indoor cable is passed (hidden type), the sockets must have a completely different design and their mount occurs on a predetermined box.
Caliper sockets attached to the installation box with screws

Caliper is attached to the box with screws

The latest elements also have a different design, which is determined by the material, which is based on the erected walls. If the finish was carried out from the drywall, it is done in it, according to the size of the box, and the box itself is pressed to drywall using special screws. Then the wires are connected to the outlet, and only then it is attached to the box.
Installation of boxes for rosettes in drywall

Installation of outlets in a gypsumton wall
If you need to install a rosette on a wall with a concrete or brick base, you must initially use a special crown and make a ring groove in the wall in the wall, and only then with the help of a chisel or perforator, select the middle. A box is installed in the formed niche and enshrines. Installation and fastening of the socket is in the same way as in the plasterboard partition.
Installing the boxes on a solid base

Hidden installation of sockets
Places of location sockets
In the bathroom, it is enough to install several outlets to optimize the operation of the washing machine, an electric razor and a hair dryer. In standard room rooms, up to 4 sockets are installed, and at least one outlet will be required in the hallway. Lines must be provided with the protection of the UDO to protect a person from defeat electric current.
Risk get an electric crash if there is no uro

When connecting consumers groups, it should not be hurry, because the durability and efficiency of the sockets will depend on the correct performance of the work and except your safety.
Connect sockets according to the colors of the wires
For convenience, when performing work in the production of an electric wire, color shades are used, allowing you to unmistakably determine the purpose of the wire. So, the blue indicates that the wire must connect to "zero", the wires with white shades are connected to the phase, and the wires with a yellow-green tint are connected to the ground. This is the most common color palette of wires, there is another color range of wires.
Connect the outlets on the coloring of the wires
Connecting outlets in color
Having understood which wire to which terminal is to connect, you can proceed to work. The end of the wire is inserted into the slot and with the help of the existing screw is dragged to the maximum.
After the wires are connected to the outlet, it must be inserted into the box. The sockets are recorded using special clamps, which, as they screw down, diverge and pressed against the walls of the peavern.
When the socket is securely installed in the box, an outer cover is installed.
Setting the outer cover for outlet

Facing the rosette cover to pull the screw
All that is required, the cover is applied to the inside of the outlet and pull them with a screw. When screwing the screw, care must be taken, because if you drag the screw, the socket lid may break. All connection is completed, now we include and check the work done by us and if everything is in order you can start exploiting the outlet.
We are convinced in the presence of food in the outlet
Test a power outlet for power
Video. How to install and connect the outlet?
To know how to install a socket is not necessary to be an electrician by profession - enough those knowledge about electrical chainsWhat was obtained in school in the lessons of physics. From there, it is necessary to remember the first rule of such works - all of them are made when the voltage is disconnected and only after final verification of the results of the work is included.
Choosing a connection type - internal or outdoor
Before installing at home, a regular outlet is done quite a large amount of work. First, the wiring is calculated, on the basis of which the devices and wires themselves are selected, which will approach them. Then the wiring is paired throughout the apartment, and the sockets themselves are installed before or after the final decoration of the walls, depending on which method will be applied.
outdoor socket - left, internal - right
Different types of sockets are designed for use under certain conditions, but when choosing a way to install a socket in the apartment, most often guided by the issue of the convenience of mounting. There is no possibility and the need to lay the cable inside the wall, especially since a certain percentage of sockets will be connected by a temporary scheme - for example, if this happens on a removable apartment.
Internal and external sockets work in the same way, and their connection is different in small details. The main sequence of actions is always the same.
Preparation of the foundation

Internal and external sockets must be kept on something, and the mount should be high-quality, because the contacts of modern devices are made spring-loaded, for a dense contact with each other. It is necessary to reduce the resistance to electric current, but also a modern euro dress can jump out of the wall, while trying to remove the plug from it, if the base is not well kept well.
As a result - the foundation must be securely attached to the wall, for which additional accessories apply. In the hidden outlet, it is a peaver, which is immunted into the wall, and the open attached dowels or screws.
Installation of conversion
In essence, it is a plastic glass, stamped into the wall. If installing the outlets without it, then very soon its fasteners will reveal even the most durable concrete and it will fall out. Plastic is quite viscous, so that they clung to the fasteners and grungy to be held in the wall.

If the installation of the socket is performed, then the hole for the peavern is dried first. For this you need a drill with a crown or drill on concrete. The diameter of the hole should be slightly larger than the parameter installed. If you are replaced by a socket with your own hands, and the old subtle for some reason does not like a new outlet, then it is drilled out of the wall and it is necessary to put a new one in his place.

When the hole is ready, the socket wire is paved to it and now you can start installing the most opposite. To do this, a small amount of gypsum solution (alabastra or cement) is prepared and the hole in the wall is cooked by them on the sides - now you can insert a peaver (pre-sold the end of the wire).
Podrotimets are exhibited so that it is with the whole area, without distortion, was flush to the wall surface. When pressing it into the wall, the outward usually climbs a certain amount of solution.
Before removing the surplus of the solution and finally smeared the peavern to the wall, it is desirable to wait until the solution will begin to be captured.
Now it remains to wait until the master will not completely freeze - the peavern is ready and you can now install an inner socket.
Foundation for outdoor sockets
The outer socket consists of three parts - the base, the inner part and the lid. Between themselves are associated as follows - the base is attached to the wall, the inner part is screwed to it and the lid is put on to it, which is fixed by the bolt.

Often, all preparations for the fastener comes down to drilling holes under the dowel if the socket will be installed on the concrete wall. If you need to install an electrical outlet on a wooden surface, then everything comes down to twist the screws. True, if the screws are thick, it will not hurt to drill down the holes slightly smaller diameter so that the tree does not burst.
The nuance here is only one - the base of the socket is made of plastic, which burns and melts. PUE requirements, if necessary, put a rosette on a tree, prescribe an additional base from non-combustible material under it.
Preparation of wiring

The length of the wire that is left in the opposition periodically becomes the subject of hot disputes. On the one hand, it is desirable to leave it as long as possible, because when repairing the end of the wire, the end of the wire is likely to have to bite and need a stock. On the other hand, the socket will change or once in many years or in case of its overheating and melting, when part of the wire is most likely to be unusable. It is far from the fact that it will be a small piece of it, because in the opposite, everything is compressed together.
Otherwise, the preparation of the wire is completely identical for both external and when installing conventional internal sockets.
Color wires
Properly installed wiring for sockets is characterized by the use of wires of a certain color. This is not a prerequisite for its normal functioning, but provides invaluable assistance when installing and repairing.

The two most important colors that must be connected correctly - blue and yellow-green. The first denotes zero, and the second grounding is the same zero, but the supposed equipment is not for the operation, but to protect it and users from the phase to the case. The remaining colors can be different and the phase is "hanging".
If the installed wire is colorless, then it will have to be additionally copied to the probe or tester - which of the lived where it is connected.
Cleaning isolation

Professional electricians have special tools for this purpose, but if installing sockets are made with their own hands, it is unlikely that they will be at hand. At home for this purpose, a knife or pliers are used in which there are nippers.
Whatever the insulation of the wires, the main thing is why it is necessary to follow - so that the metal basis is not damaged - if it is even a minimum incision, it lives soon.
If you use a knife, then the blade must be kept under an acute angle in order not to hook the wire. When pliers are used, the insulation is slightly compressed with nipples and leaves. If a difficult case got caught, then the edges of the wire heats the lighters with fire and then leaves.
Working with for cutting wires and removal of insulation is well shown in this video:
Preparation of housings
Somewhat varies when using single-core and stranded wiring. The general principle is one - it is necessary to make the contact area between the wire and the terminal be the maximum. By logic, for this it is necessary to make it so that the terminal gave as a larger area of \u200b\u200bthe wire. Additionally, she lived crimped with pliers - it is slightly flattened and the contact area increases.
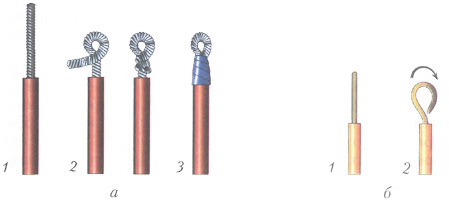
To increase the length of the part of the single-core wire, which concerns the contacts of the socket, it is spinning with a ring that its inner diameter approached the terminal bolt. When it is installed, you will have to completely unscrew the fastening bolt, insert the wire and spin the bolt back, but the contact will be the most reliable. The stranded wire is processed in the same way, but there is another way for him. For this, all veins are divided into two groups, each of which is twisted with each other - the tip of the wire is obtained in the form of the letter "V". Now wiring must be flattened with pliers and you can insert them into contacts the socket, not even unscrewing the bolt completely.
Lunetration or crimping

Frankly, this is not a mandatory stage for household devices, but if we consider how to install powerful sockets properly, or how to connect the wires as securely as possible, then without it can not do. The fact is that the effect of electric current causes vibrations in the contacts of the sockets and over time the wires are loosened, especially if they are stranded. It should also be borne in mind that over time the copper wire in contact with the air is gradually oxidized and the discharge veins will deteriorate.

To minimize this impact, before performing the wire connections, their tips are processed. The tinning is the coating of the veins by tin, and for crimping or crimp, special tips are purchased, which are put on the wire and pressed into it with pliers or crimping ties. Tips can be in the form of an ordinary tube or with a supplement in the form of washers at the end, which is pressed by a bolt to the contact.
Connecting wires
If it is known on what wire is the grounding and where the phase is with zero, then there should be no problems here. At each outlet, it is visually visible which terminal from which contact is to plant two wires on one current plate simply will simply fail (if you do not specify a specific purpose). The main thing is to properly connect the grounding (if there is) - usually this contact is in the middle and refers to the mustache, which sticks out on top and bottom of the socket. Phase with zero is connected to extreme contacts connected to the plates in which the plug turns on. Then the bolts are delayed - the connection is completed.

There are many diametrically opposite statements, when the perekllya is stated that the phase is necessarily connected to the right or left, but no one and never from the applicants can explain why it is necessary to do exactly as he says.
In PUE, there is not a single state of regulating this parameter and all such applications are scattered about one indisputable fact - the plug into the socket can be inserted as you please. Accordingly, there is no difference how to install a socket - with a phase on the left or right - any damable electrician before climbing the outlet, it necessarily uses its voltage indicator and check its location, even despite the color marking of the wires.
Fastening the socket in the submerged

If the wires are well fixed in the terminals, it is simply impossible to incorrectly insert the assembled mechanism of the socket into the opposite, especially since there is a limiter on its body, thanks to which the rosette fits the wall. It is necessary only to collect the wires together, to adjust them, carefully developed a back outlet and insert everything inside the opposition.

The rosette is fixed in two ways - spacer legs and fastening bolts, which are screwed into the rose - for them, slots are made in the restrictive bar. After the socket is pressed against the wall, the bolts of the sawing paws are tightened and they reliably fix it in the wall. So that the socket is not loosened from the insertion and extraction of the plug, already fastening bolts are applied. During the installation process using the level, check the horizontal frame of the sockets.

For an open outlet, this stage is passed, since its inner part is already fixed on the basis.
Setting the lid.
Here everything is completely simple - the lid is put in its place and is screwed by a bolt (sometimes two). The only thing to take into account is the possible presence of a decorative lining. It is not screwed to nothing and holds the lid. Its task is to hide the possible wall defects, due to the installation of the opposition. On some outlets, the size of the decorative lining is more standard, so they do not allow collecting outlets with a standard distance between the housings. If such a design is installed, then at this moment it is necessary to pay some attention.
Video selection
Brief video instruction from Leroy Merlin:
Installation of outdoor outlet Legrand:
Installation of three sockets with a loop connected:
Install a block of five sockets:
Installing outlets and switches in the slopes from plastic panels:
As a result, the installation of the socket can be broken down by several simple steps, with the execution of which even a person with the minimal skills of the tools can cope with the fulfillment.
Modern house is unthinkable without electrical appliances. The whole life of a modern person, one way or another, depends on electricity. The source of electricity can be located hundreds and thousands of kilometers from the place in which we live, but we get access to it every day, using switches and sockets.
Despite the utility and inconsistency, these electrical devices are not only an important component of a comfortable stay in the house, but also an element of the design, which can emphasize the individuality of the owner of the apartment.
The ease of use in everyday life depends on their location, to some extent - safety, especially for children.
Technical requirements for installing sockets and switches
Currently, there are no standards that rigidly regulate the height of the location of switches and outlets above the floor level. In most typical residential and office premises, the sockets are located at the level installed in the last century GOST R 50571.11-96 and PUE 7.1.48 - 1.50. These values \u200b\u200bare 900 mm. from floor level for outlets and 1400-1600 mm. - For switches.
The reasons for which such values \u200b\u200bwere selected are not known, but it can be assumed that it is with this location that these devices is most convenient. It basically meets the dimensions (height) of furniture - tables, bedside tables, chest of drawers (710-800 mm).
The socket turns out to be 100 mm above the surface level of the table top and it makes it easy to connect the electrical appliances placed on it.
Switches are traditionally located on the side of the door, from the door handle, and are at the level that provides them with good visibility.
It cannot be said that this location is always convenient. But it is familiar and most users do not cause complaints.
With the arrival in the source of foreign finishing materials And new trends in the design of residential and office premises This location is not always comfortable. This is especially true of sockets in which electrical appliances are connected in the kitchen - refrigerators dishwashers, electric stoves.
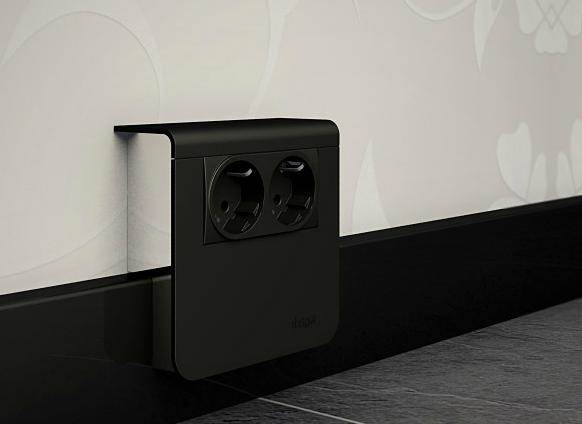
Their connection usually does not require frequent use of the outlet. Therefore, there is no need for outlets located in the reach area. In such cases, it is much more convenient when the socket is located at the floor level or 100-500 mm above it.

Many electrical appliances at the base have technological niches, which are just designed to fit the socket and the plug of the electric cord, and the electrical appliance itself could be tightly adjacent to the wall, saving the area of \u200b\u200bthe room and ensuring greater stability when working.
We are called "Euro" to the low installation of sockets and switches, although the tradition has a switches at an altitude of 900 mm from the floor level, and the sockets are 100-500 mm. came from North America.

In some cases it is justified and convenient. But it all depends on the consumer habits.
Safety measures when installing sockets and switches
All works associated with installing sockets (switches) or electrical machine gasket must be performed only in the absence of voltage in the network.
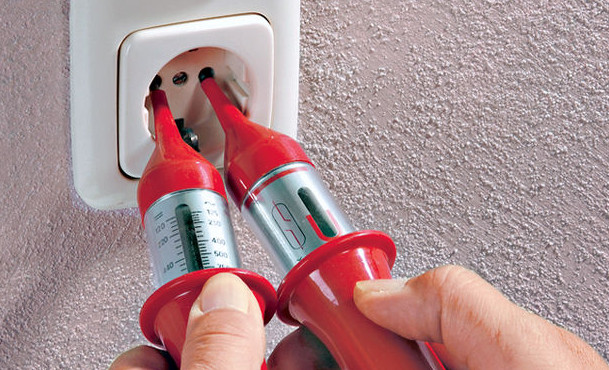
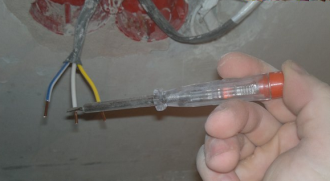
To do this, it turns off the input of electricity to the room on the shield. The outlet locations of the bare wires are nicknamed using a voltage indicator. It is advisable to use two different indicator on the device to ensure the lack of voltage at the failure of one of them. Indicators with power elements are subject to this.
Additionally, the absence of voltage is checked by a short touch of a fingertip. (You can never wrap the wire with two fingers!)
Such a preventive measure may afford to avoid electrical damage in case of violation of the electrical wiring, its breakdown to the carcass of the house or unauthorized connection to the neighbors network.
In these cases, the network may present a weak "wandering" voltage, not fixed by the indicator.
Only after you make sure there is no voltage. Start your work!
Preparation for installing sockets
There are two main electrocommunication gasket schemes - an open, made on the wall surface and hidden - when the entire wiring is located under the surface of the plaster or wall covering. In this particular, the stages of the setting of sockets differ from this.
In the first case, the installation does not require the laborious preparation of the niche in the wall in which the rose and socket itself will be located.
Outdoor Sockets (Switches)
On the wall, in the location of the socket, with the help of dowels (nails, screws), a wooden rectangular or round shoe (plywood thickness is 10 mm) is fixed in size by 20-30 mm. Excess the size of the socket (switch).
For outdoor installation, exclusively sockets and switches for outdoor installation are suitable.
A decorative plastic box is removed by the installation and on it, at the injection center of the electric cord, a plastic plug is taken out with a pliers or a round file.
The terminal with the help of self-screws or screws is screwed to a wooden (plywood) block. After that, the electrical wiring ends are joined.
The wires are pre-protected using an insulation puller or a retractable construction knife with replaceable blades - in the absence of a puller.

The wires are crimped around the terminal in such a way as to be easily passing through the hole in the lid on the site of the broken plug.
After that, the rosette cover is screwed over the clermet.
Installation of sockets (switches) of the hidden location
If the socket (switch) is installed in a standard socket, which is available in a brick (reinforced concrete) wall, then the installation does not represent complexity.

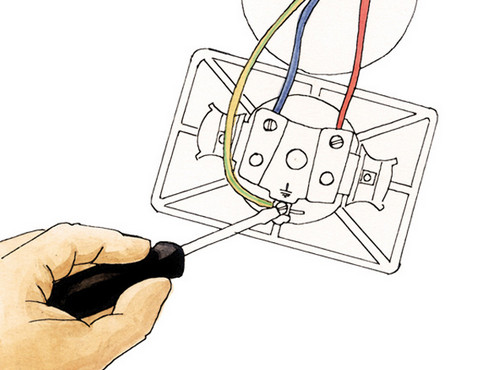
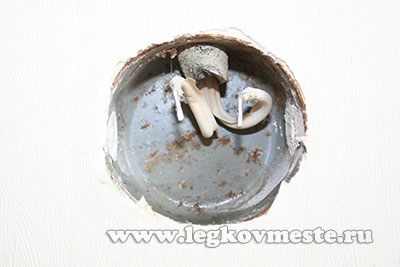
From the niche pull the ends of the wires and flex them up. Metallic or plastic peavering oriented in such a way that one of the wiring plugs is located opposite the wire output. With the help of a building knife or a flat screwdriver, one of the plugs is removed.
Through the hole skip the ends of the wires.
Podrottor is fixed in a niche with a rapid riding gypsum solution or construction mastic.

After reliable fixation, put a putty of the slots between the submerged and the hole of the niche. In order for the solution to do not get into the opposite of it, at the time of work, you can fill in a crumpled newspaper or stuck with scotch.
After drying the putty, the surface of the wall is polished by an abrasive mesh stretched on the grinding block.
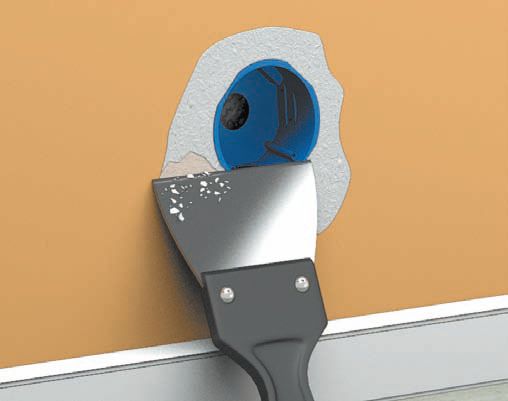
It is necessary to burst the peavercraft so that he does not speak over the wall plane. Otherwise, a slot is formed between the lid of the socket and the wall.
After executing this stage, the cable or switch key is attached to the wire. Excess wires are taken to the oral cavity. The clermin or key are fixed in submerged with sliding paws located on the sides of the clermin or with the help of the screws included in the kit.
Last queue is mounted the socket cover (switch). The level of the top edge of the lid is checked. If necessary, it is adjusted with a slight turn. After that, the fastening screw is dragged.
Arrangement of a niche for a socket (switch) of the hidden mounting
In the case of transferring outlets (switches) to another place or height, the need to arrange new niches. This marks the location of the new outlet.
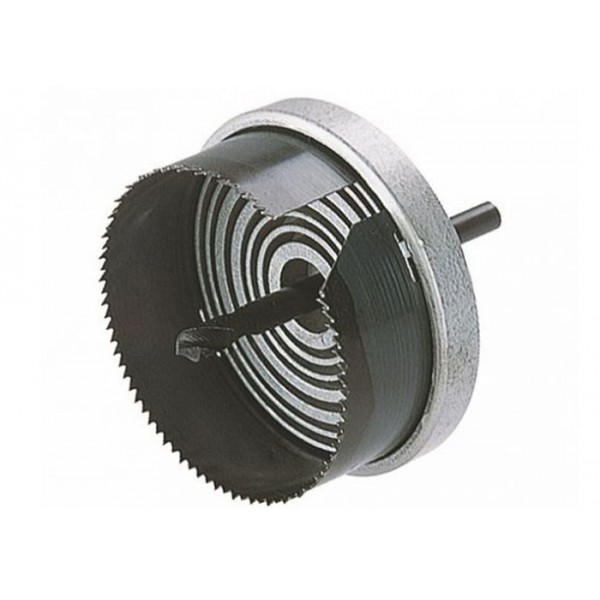
With the help of a "cup" drill on gypoku or concrete (depending on the material of the wall), the hole is drilled in the depth equal to the height of the peavern.

The central part is knocked out with the help of a bolt with a perforator or manually - bites and hammer.
The channel for lining the wiring is more profitable to direct down from the outlet, to the floor, if it is located at an altitude of 100-500 mm from the floor level. In this way, it will be possible to avoid unnecessary strokes, putting part of the electrocommunications in the technological niche of the plinth.

The channel of the channel is carried out with the help of strokeware. In the case of its absence - with the help of an angular grinding machine - "Bulgarians" equipped with a disk with diamond spraying.
Slip grooves is better under a small convergent angle to facilitate knocking out of the Channel of concrete or brick. The gap between two parallel processes is released from concrete or bricks by a perforator or manual chisel (chisel).
The wiring in the channel is fixed with a rapid solution of plaster. In complex places: surface bends, angles, it should be pre-strengthened in the channel metal or PVC brackets or clamps screwed to the wall.
The surface of the channel is plastered and protected by the abrasive mesh in the wall with the wall plane.

Installation of the socket (switch) in the newly arranged niche is performed in the same way and the sequence as discussed above.
Installation of outdoor (pumping) sockets
This method of installation of sockets allows you to completely avoid the walls of the walls for the niche and the channel for the electrical wiring.
By type of floor (pumping) sockets relate to external. That is, their body performs above the surface of the wall (plinth). Therefore, their installation will only in places where furniture is not planned to install the wall.
 The laying of electrical wiring in this case is carried out in the technological channels that most of the models of modern PVC plinths have.
Before installing the floor (pumping), the socket is carried out by laying electrical wiring inside the plinth. To do this, remove the central removable bar. The channel is released. It stacked the electric wire. The largest complexity is the laying of electrical wiring in places of dusting of the plinth: along the length, on the outer and in inner corners. In these places, it is necessary to stretch the wiring through the connecting elements.
The location of the electrical wiring from the plinth is arranged by drumming the hole D-10 mm. In the upper part of it.
Outdoor (pumping) socket can be installed both using wooden pads under the base, and without them. In the second case, the aesthetic type of socket increases, but for its fastening it will have to drill two holes in the wall and fasten with self-tapping screws in PVC dowels.

The first to learn about this, getting acquainted with the information received from the Internet - "work must be carried out in the daytime day, and ...
Even electric-novice will be able to install the socket and the connection. The event does not represent special difficulties, and besides, it will save from 500 to 700 rubles (the average price for the work of the wizard). To date, it is customary to use the fastening of sockets outdoor and hidden way. Next, we will look at how to install and connect both options.
Outdoor method used with (on top decorative finish walls). In this case, the housing is fixed to the wall with a dowel.
Installing the inner socket is used if the line is paved in special shifts (for example, during the installation of wiring in the apartment). In this case, you first need, after which go to connect the socket itself.

Now we will consider in detail each of the ways.
We draw your attention to the fact that the entry with a grounding circuit is currently used, so this article will consider the connection technology with a grounding socket!
Installation options
Inside the wall
Installing the socket inside the wall is carried out more often, because In this case, the plugged body is not striking and does not spoil the interior of the whole room.
Before starting work, we will need the following materials and tools:
- plastic converter - 1 pc.;
- internal socket - 1 pc.;
- alabaster;
- screwdrivers (figured, straight and indicator);
- sharp knife;
- pliers.
We draw your attention to the fact that the laying of the wires in this article is not considered. Connecting an electrical outlet is carried out in ready-made strokes with suburban veins! You can learn more about the wire laying in the article :!

So that information is perceived easier, we provide to your attention step-by-step instructions By installing a socket in a concrete wall:
Step 1 - Disable electricity
It is very important to turn off the electricity in the room before starting electrical installation. To do this, it is necessary to turn off the appropriate automatic in the camshaft in the distribution panel, after which it is necessary to check the availability of the current at the installation site using an indicator screwdriver. We were told in a separate article.
Step 2 - Installation of Outcome
To date, there are metal and plastic submersors. It is necessary to give preference to the latter. They have low cost and sizes corresponding to new standards. If you decide to install a rosette into a metal peauretler, fix the core with cutting paws is unlikely to succeed, as a result of which the housing will hang out and eventually fails.
To install plastic pickle in the bearing wall, it is recommended to use alabaster. The stroke must be slightly moiste with water, then impose 2-3 mm solution and quickly consolidate the product.
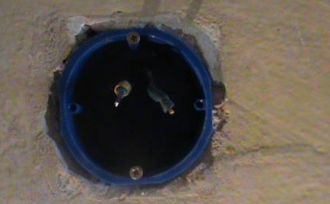
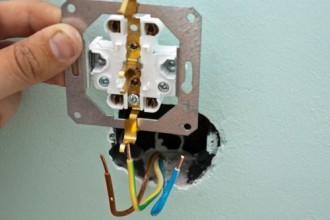
You can also make a mount using self-tapping screws, but in this case the reliability of the installation will not be so high. After that, wire conductors are inserted into special holes, as shown in the photo.

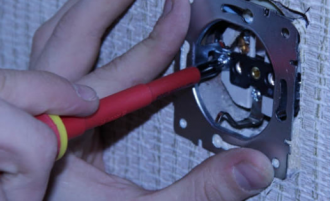
Step 3 - Case Fastening
Now you need to install the housing itself - the place where contacts will be connected. For starters, all 3 veins (land, zero and phase) must be cleared with a knife from isolation. Stripping length should be at least 7 mm (better than 10 mm). In order not to damage the current veins, we recommend reading that. Further all contacts must be fixed in the case. The design of the mechanism includes 5 screws: 2 side for retaining paws, 1 for grounding (centered) and 2 for phase / zero (right and left from the center). All you need is to loosen 3 central screws, insert bare cores and thoroughly tighten them with a screwdriver.

An important rule setting rule - a phase must be connected to the left hole (if you look at the housing recorded in the wall), and zero to the right. Such a custom is used by electricians for a long time and allows you to quickly find each of the conductors, if not.
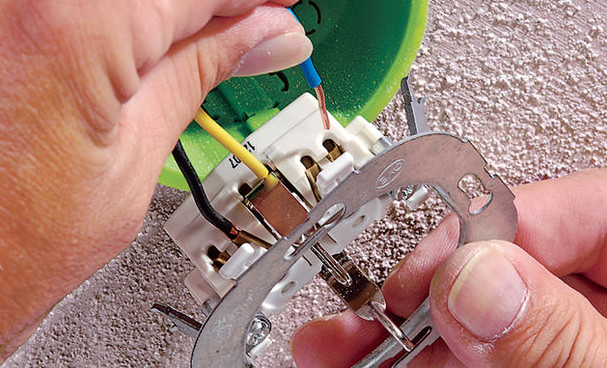
After that, it is necessary to fix the housing in the opposite. To do this, it should be further set it in the wall (so that after the installation is the socket, the socket has not been penetrated) and with the help of side screws spread the legs so that they are securely crashed into the walls.
Instead of paws, an overhead case can be used (provided in the photo below). In this case, the fastening is carried out by self-drawing on both sides of the rim.
Step 4 - Installation Installation
Now that all coins are securely tightened, you need to hide the case behind the decorative edging. It is also fixed with the central screw. There is nothing complicated, just pull up the screws until it stops.

That's all the installation technology and connecting the inner socket with your own hands. Be sure to make sure that all the veins are securely tightened. If the connection points will be weakened, after a while the housing will start melting due to heating, which will soon lead to the self-burning of the wiring and!
Open method
The outer version of the electrical outlet is used with and garage.
The advantage of this design is as follows:
- more simple replacement, repair and installation;
- you can quickly determine the problems of product appearance.
Disadvantages:
- increased cost of the product;
- open wiring can worsen the interior of the room.
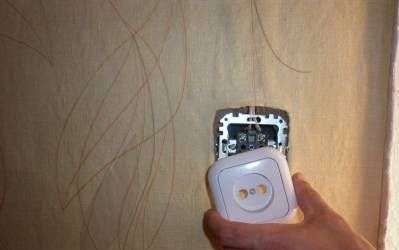
So, consider how to install the outer outlet yourself, as well as connect it to the 220 volt network. As in the previous case, you first need to de-energize the room and make sure that there is no electricity using an indicator screwdriver. Next, it is necessary to disassemble the case, which consists of a rear cover from the core and front cover.
First affect the back cover to the wall. To do this, we lean it, put it up in the level (so that there is no distortion) and mark the place of fastening holes with a simple pencil. After that, the marked places are driving a drill and drive a dowel in them. Now you can fix the lid with self-draws and proceed to connect the wires.
We draw your attention to the fact that between the back cover and the wall (which, as a rule, wooden), it is recommended to put a paronite. This material Prevents self-burning walls when the isolation is ignited.
When all three contacts are tightened by cogs, you can install the front cover, on which the process of connecting an overhead of the electropurting and ends. It remains only to provide for you several useful Sovietsthat will allow you to connect the power outlet with your own hands!
Experienced electricians advise to take into account the following recommendations when installing a socket in the house:
Video instruction
Visual video lesson
Like( 0 ) I do not like( 0 )
Today, dear readers, I want to highlight the topic how to make the setting. This procedure is very often in demand when replacing the old outlet to a new one in the event of a breakdown, when repairing repair in rooms and a complete replacement of electrical wiring.
The work itself is not of great difficulty, but, as in all there are its own characteristics and "highlights". So, proceed ...
As you know the outlet is the endpoints electrical networkTo which consumers (irons, refrigerators, televisions, etc.) are directly connected. They are both outdoor and internal. The principle of connecting to the electrical network and the other and others are the same, the difference is that the internal is installed in special boxes (submersors) recessed into the wall and practically do not drank, and the outer attached directly to the surface of the wall and completely in sight.
Consider everything in order:
ATTENTION: When conducting any work with electrical wiring, do not forget to turn off the electricity, and additionally check its absence on the network after disconnection.
1. Fastening outdoor outlets.
The principle of installing an external socket is very simple and requires minimal effort. This type of consumer connection is used mainly in rooms with outer wiring, indoors, the designs of which are made of flammable materials (for example, wooden buildings).
Of course, when using external wiring and external means of connecting consumers, the aesthetic look of the room deteriorates - all wires in plain form. But, on the other hand, when it is worth a choice between aesthetic look and safety of life - security is unambiguously selected. Due to the fact that all elements of the wiring can be seen - it is easily determined by the problem space. For example, with bad contact, you will immediately see the place of refueling the case, changing the color of the body and the appearance of smoke.
Installing the outdoor outlet is made as follows.
- disassemble the housing;
We unscrew the fastening bolts and remove the top cover.

- with the help of screws, screw the base to our surface (for example, to the wall);

If the design is attached to a flammable material (for example, a tree), it is desirable to pave non-combustible material (Paronite, plaster). This additional layer will create a barrier between flammable material and a socket and prevents fire.
- we connect the wires of the power grid (about it in more detail in clause 3 "Connecting sockets to an electrical network").
- we screw the cover to the housing and completely collect the outlet.
2. R.aznididity and installation of boxes for internal sockets.
A completely different principle of installation is used for internal sockets. When they are fastened, the box is necessarily used. This is a special cylindrical box in which the housing of the socket itself is placed.
Earlier used metal boxes. A recess in the wall was taken at the output place of electrical wiring, if the wall is lined with tiles - or the necessary diameter. It was mounted with alabaster the box and the contact wires were displayed. Already then, a means of connecting end users or a switch to connect the voltage to the box.
Currently, with the advent of plastic in a wide use, the boxes began to produce from it. In such a box, the socket holds well both with the help of spacer paws and screwed screws. Another advantage of such a box is its budget price.
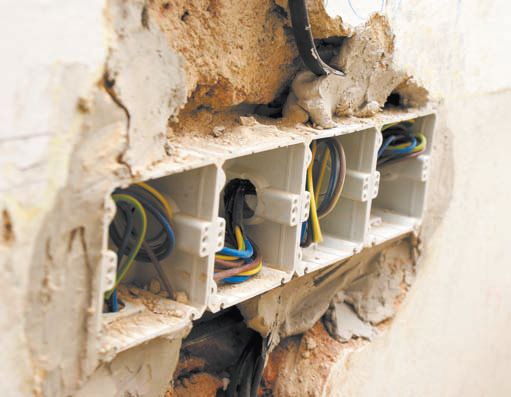
If there is a need to put a few sockets - the boxes are easily connected to the block.

Depending on the material of the walls in which the installation box is planned, the boxes of various modifications are available.
Conventional boxes are used for mounting, for example, in brick walls. For this, dried with a crown hole at the place of electrical wiring and future socket or switch. Already in this hole using alabaster, the box is fixed with the surface of the wall in which the wiring is displayed.
If you plan to mount the box in, then you need to use a special box "with ears" as the photo below.

Drill a hole with a diameter of 68 mm in the drywall. And insert the box into it. Spinning screws, ears on the reverse side of the drywall press the box and firmly fix it in place. The free space between the plasterboard and the wall should be at least 45 mm. So that the box is completely drowned and getting flush with the outer surface of the drywall.
Note: Modern outlets sold in the store are almost all calculated on plastic installation boxes with an inner diameter of 65 mm. And not always suitable for metal (old) boxes. The inner diameter of the metal box is 68 mm. The expansion of the legs of modern sockets is not enough to secure the case in the old box. Therefore, when buying a socket in the store, check if it is suitable for old boxes.
3. Connect the socket to the electrical network.
All preparatory operations are completed and you can install and connect our new outlet.
- Remove the top cover by unscrewing the bolts from the front side;
- We clean the ends of the power wires derived in the box. We guide the ends of the wires so that they get into the locations of the housing contacts and bend them in the form of a spring snake (as in the photo below). This type of bend makes it possible to remove the housing from the wall for tightening the wire fastening bolts on the body and eliminate the sharp drives of the wire when inserting it into the box;

- Tighten the wire fastening bolts in the housing sockets.
It is necessary to tighten very much, since when connecting a powerful consumer (for example, a 2kW heater) and a bad contact, the connection to the connection will begin to warm up. This will lead to melting of wires, plastic housing, and ultimately, failure of the entire design and wiring.
What to do if the ends of the wires bred in the box are short and do not allow you to connect the outlet?
In this case, there are several outputs from the situation that has created:
The best, but also the most difficult way to lengthen the wires, attacking them the required length of the wire and insulate the place of the soldering. This method is suitable if you have all the necessary accessories (soldering iron, solder, etc.) for soldering, if the wiring copper and the length of the supply wire makes it possible to do.
If the wire breakdown under the core of the box, you can neatly open the place of the sealing of the wiring in the wall and make the procedure of extension soldering where it is convenient. Of course, to break the aesthetic look of the wall and there will be a bit of this place, but still, the loss of the form will be minimal compared to the replacement of the entire wire from the junction box to the socket.
If the electrical wiring is aluminum, and it is most often breaking, the soldering method will be unacceptable.
In this case, if it allows the length of the debris end, you can use the terminal. On the one hand, we insert into it the cleaned chipped end of the wire into it, with another stripped piece of extension wire and strongly tighten the contacts of the contacts.

Of course, this method creates an additional contact point where heating is possible, which creates a certain risk. Otherwise, you will have to replace the entire supply wire from the junction box before the wiring output from the wall.
It was a small retreat, but we turn to the next installation. Wires we connected and now we need to install a socket in your place in the box.
4. Fastening internal sockets.
Depending on the type of box interior sockets It is attached to it in two ways:
- with fixing paws;

The principle of their action is simple. Fasteners have a curved configuration and resemble the Archimedes lever. When screwing the bolts passing through the paws, one side of the foot is pressed against the housing, and the second, passing through the emphasis, moves to the side. In turn, screwing the bolts from one and on the other side of the case, the paws rest on the box and jam the case in the required position.
This method of fastening is currently almost no applied. It is used only in cases where the socket is installed in the metal box, mainly in the buildings of Soviet times.
More convenient, easy and practical is the following method of fastening.
- fastening the housing with two screws;

Depending on the need orient the body in a vertical or horizontal direction. We direct screws into special holes in the box and twist.

The socket is connected to the network, fixed in the box and the last stage remains to put the top cover, supply voltage and try working, connecting the consumer.
Now and you know how to make a socket setting. Waiting for your comments and be sure to answer everyone.
To ambiguous meetings, and all easy repairs.


