Bath right in the house? For many, this is no longer nonsense, but quite familiar practice. Bath under the house? But here this risk will not everybody ... and in vain. Yes, the Russian steam room has long been built separately - but only because at that time there were no materials to protect the walls and the ceiling of the house from moisture and heat. But today - the choice is huge, and the technologies stepped well forward. You will be surprised, but the bathhouse under its own housing instead of detachedly tools most often just to use it ... personally. Those. Do not invite any companies and not tolerate the monthly Nawa of relatives from all sides who come to "specially shaken". But it is precisely what happens when the steam-walled and built separately, which can be done here. True, someone is delighted with such weekends and gladly collects companies for "from the heat - to the hole", but someone wants to get a maximum of pleasure from their own pair, but only in the family circle. Want this? Start!
How is the bath in the basement better than the prerequisite building?
So the sauna in the basement is even better built separately? You will be surprised, but just in ... heating costs. The fact is that the house and a separate bath are two foundation plates. And they need to turn them separately, naturally. But the bath in the basement of the house or in the basement is a minimum:
- Total slab overlap.
- In winter, underground warmer than above.
- The opportunity to get into the steam room straight from the living room.
- Much less costs during construction.
In addition, it is in the basement that is much easier to place the pool, highlight the place under the billiard room and combine communications at home and steam room. Those. When a whole zero floor is allocated under the bath or sauna, then it makes no sense to save each meter, as in the usual building, thinking whether to allocate a bit to the pre-banner, or let the recreation room come out.
It is also convenient to put the boiler room for the whole house, equip the workshop and storage room for the inventory. In general, a whole underground kingdom for men, where there are no smears of kitchen and noisy children.
A saved separate considerable part of the land that did not go under the bath, can be used to break down a young garden or creating an excellent pond with carp. Gazebo, barbecue or playground - yes anything!
Some technical details
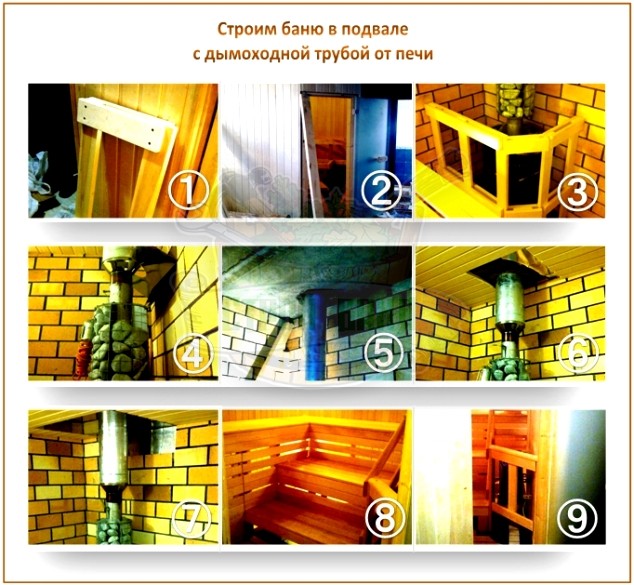
Of course, the easiest and most convenient option is to put an electric oven in such a bath. But, if for you the only steam room is a thick saturated "Russian" pairs, then get ready to seriously do chimney and extract questions. This is: smoke sensors, separate extract on the steam room, controlled influx and the yield of smoke. All this can be realized if desired, only be sure to invite the specialist to check everything carefully.
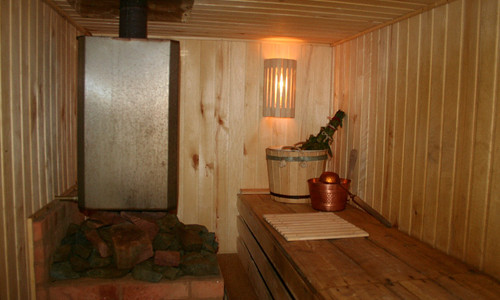
As for the installation of the furnace, the chimney can be removed directly through the base to the street or mow through the ceiling in the already existing one. As in this project:
And now pro hot water. If there is a boiler in the house, you can organize a closed loop with a circular pump with a pipe - it's simple enough.
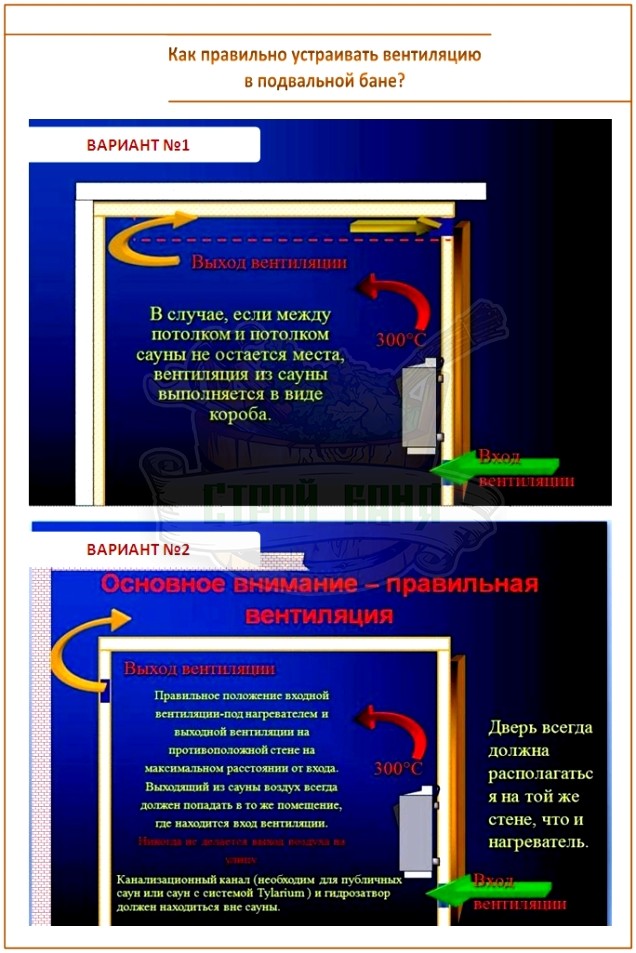
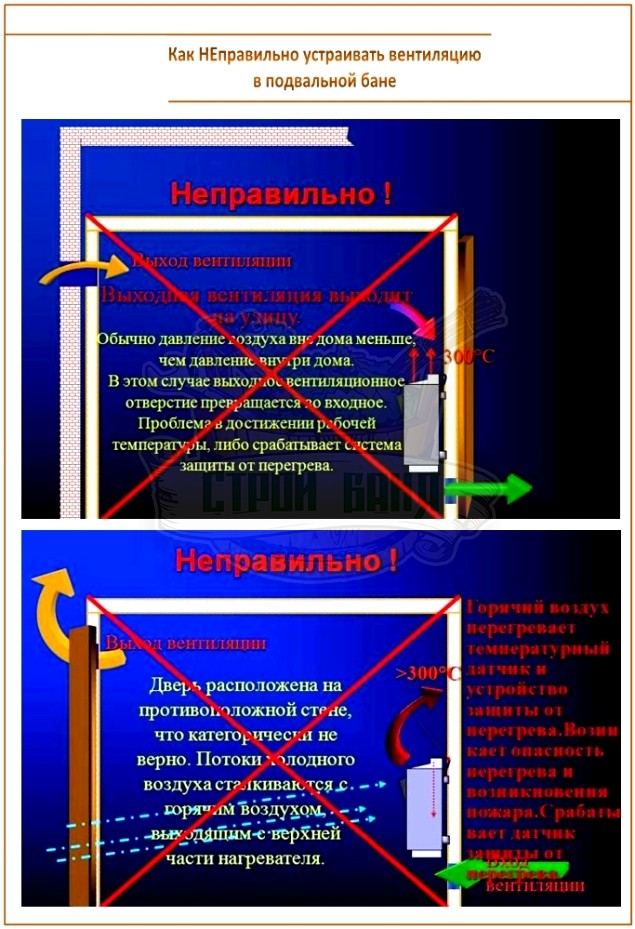
And how to organize ventilation in the basement bath, you can consider on such illustrations:
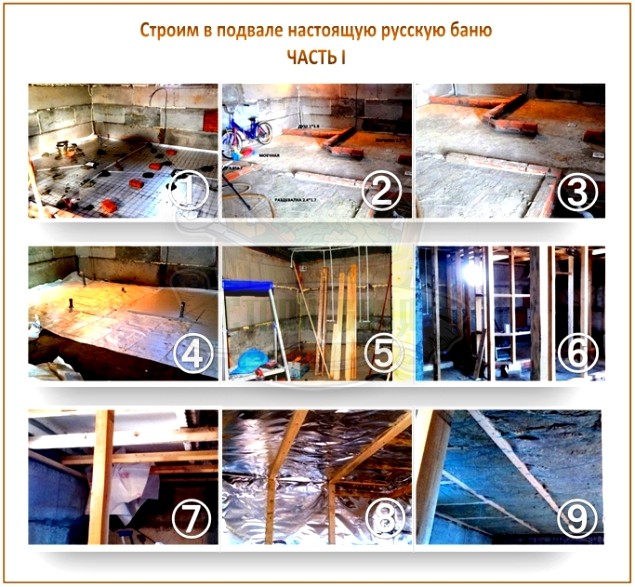
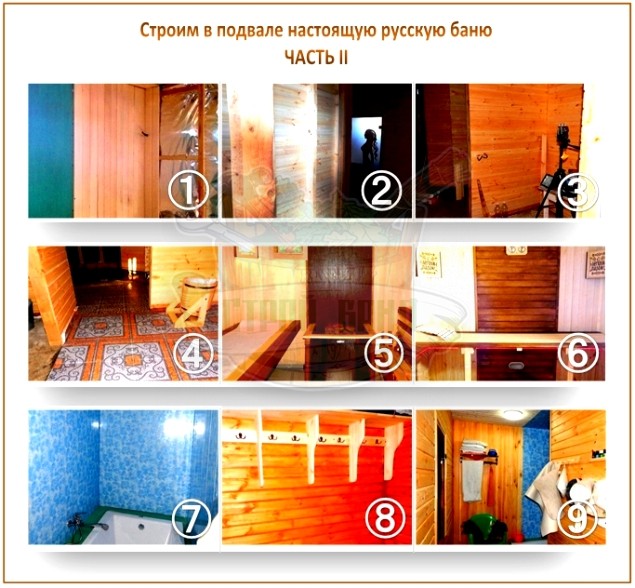
Project # 1 - Real Russian Bath under the house
So, everything is quite simple here:
- Step 1. On the perimeter of the future bath, we shoot a metal truck and insert 100 racks into it.
- Step 2. Between Racks Mount Firebroken Watts, 100 mm per wall and 200 mm on the ceiling. On the ceiling two layers of wool lay perpendicular to each other.
- Step 3. We are engaged in vaporizolation: nail with polyethylene steils, and the joints are sicking with special scotch.
- Step 4. Putting the rails for the ventilation gap to the ventilation and beams so that the polyethylene itself does not touch the finish coating.
- Step 5. We are wearing the chosen clapboard using a pneumatic finishing neuler.
- Step 6. Close all corner connections And decorative molding joints.
- Step 7. Place the shelves. For their installation, use special screws with an anti-corrosion coating, which will need to drown up to half the thickness of the board - so that no one has died.
- Step 8. We put the door, internal platforms and lamps.
- Step 9. We put the wooden grille on the floor and install an electric furnace with stones.
By the way, special advantages in foil before ethylene in the conditions of the parillers are not, and some bunchings are confident that foil only reflects infrared radiation, which can be unpleasant for the body. Foil material is just a good vapor polypoletor, resistant to high heating temperature.
Arriving inside the basement or basement of a real Russian bath, be sure to make a way out of the steam room for it - in the washing room, and from there - to the pre-banker. Or the finish of the entire basement should already be designed for high humidity of air - then it makes sense to set out all ceramic tiles.
The same applies to the device at the bathroom under the house of the pool. Water from it invisible for the eye evaporates manner and saturates the walls of the wall no worse than the open door to the Russian steam room. Therefore, the first rule of arrangement of this kind of premises is a complete vapor barrier ceiling and walls. And for greater confidence, purchase special air dryers - usually they cope with their task well.
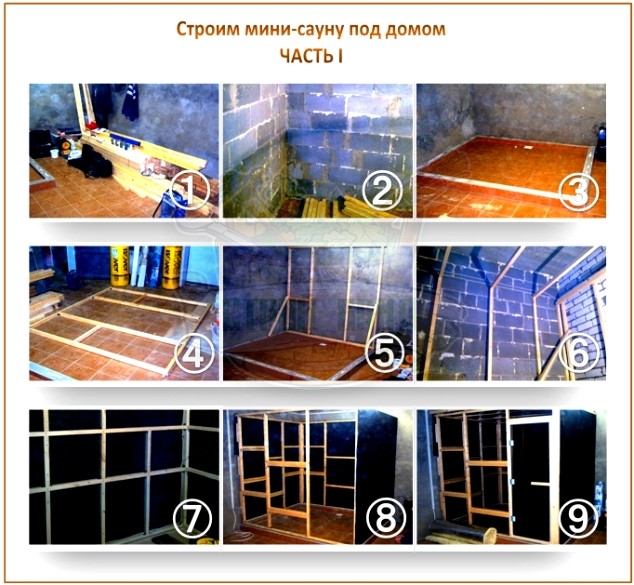
Project # 2 - a simple sauna for one weekend
The process itself:
- Step 1. Measure the existing basement and are determined with the future size of the bath.
- Step 2. Separate the walls and gender. Here - special attention: the floor really should be, and, desirable, in the form of tiles or porcelain stoneware.
- Step 3. We bring to the basement ready-made materials for the frame. We collect them on the floor or immediately on the wall - as you are comfortable.
- According to the bottom of the wall of the built-in steam or sauna, it is necessary to build at a distance of the room with a minimum of 50 mm. In principle, such an air gap is additional ventilation and heat protection, because the outer wall of the basement will always be cold in relation to the wall of the steam.
- Step 4. Now the frame of the walls must be protected from the so-called "wet" floor. To do this, you can lift and secure the frame itself on the wall, or immediately put on an aluminum profile, as in our photo instruction.
- Step 5. Go to the trim. In this case, the framework we collected a square, and therefore it is easy to separate it. The trim starting outside.
- Step 6. We attach every 50 mm of bars to the outer walls, and secure a vertical timing on it. After that we are wearing a roof membrane. The advantages of this technology: the insulation will not fall out into the ventilation gap, accidentally falling into it the moisture will be offended quickly, and outside the water will also not fall (in the case of a flood from above).
- Step 7. After that, we put the main frame of the sauna. Step Expand Based on the width of the insulation minus one centimeter. As such, take the "stone wool", i.e. Basalt, and what he tougher is the better. A foil escape is still well suited, only a foil direction to the outside.
- Step 8. We make wiring for future lamps and leave ventilation holes. Wire apply heat-resistant.
- Step 9. Heat the frame: walls of 50 mm, and the ceiling in 100. It is important that at least a small ventilated space remains under the ceiling.
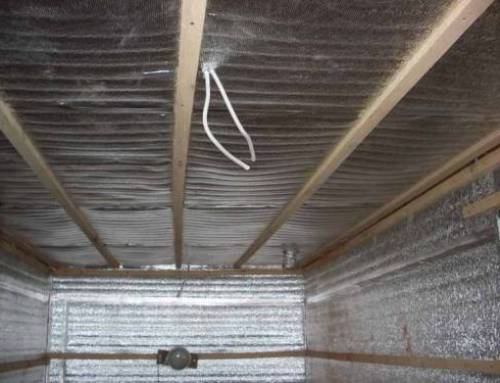
- Step 10. With the help of Stepler attach foil. Use for this purpose or a special reinforced foil on the thread - it is easier to work with it, or the usual but tight. All the joints and even the staples from Steppler are sicking with foil scotch.
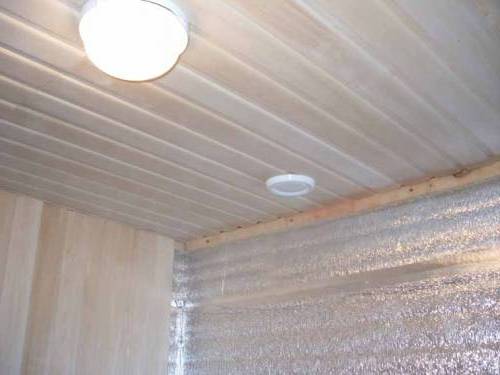
- Step 11. Now we create a ventilation gap between foil and clapboard. To do this, press on top of the foil rails with a thickness of 18-20 mm, and only on it already - fastened lining.
- Step 12. We put the shelves. In such a design, the mortgages are better.
- Step 13. We select the furnace. For such a sauna, calculate the power: 1 kV per 1 cubic meter. The control panel is out of steam room.
- Step 14. Fresh lamps, close by lamps.
That's all! It remains only to handle the lining and wooden elements with special oil.

As for the ventilation in this project, here the ventilation hole under the furnace takes the air from the pre-banner, and it returns it out of the steam. And all this is in the same room, and therefore there is no reverse thrust.
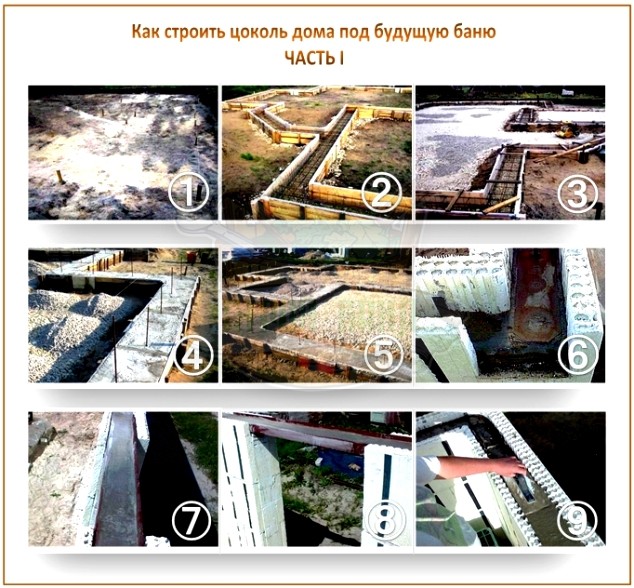
How to build a warm basement specifically for a bath?
So, if you plan to build a house and under it there will be a real bath, about the materials and technology of construction, you need to think about the design. After all, it is much easier then to integrate the steam room in the finished, warm and dry basement, than to adapt completely to this unsuitable. That is why for this purpose, use better polystyrene foam blocks that are not difficult to make at home. But in order not to put internal bearing walls, use reinforced concrete wetting plates of overlapping with reinforcement.
You can also just follow our instructions:
- Step 1. Tractor remove the fertile layer of the Earth. We put the pegs using a laser level.
- Step 2. Sychable and tamper 10 cm rubbish, pinch formwork shields and collect it by controlling the horizontal level. The maximum difference between the highest and lower point is 6 mm.
- Step 3. We fold the reinforcement in two levels, fall asleep with rubble and trambam the floor of the future basement.
- Step 4. Pour concrete into a formwork.
- Step 5. As soon as concrete freezes, cover it with two layers of rubber mastic.
- Step 6. At this stage, start laying the polystyrene foam blocks. Be sure to control the horizontal installation of their installation.
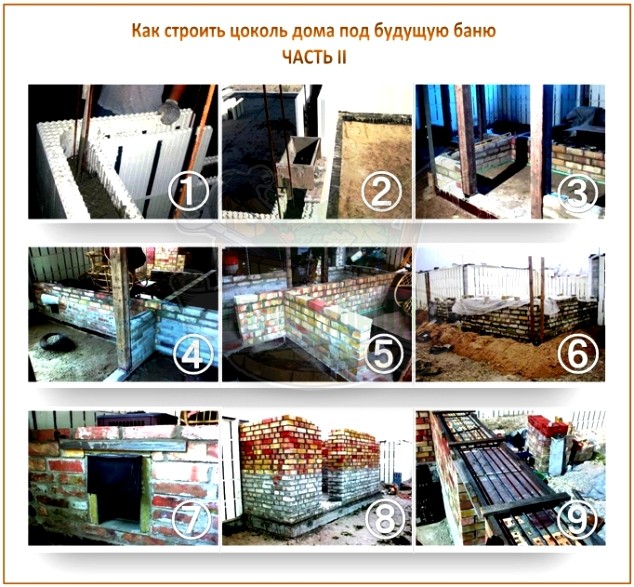
- Step 7. Now fill in the blocks of concrete, layers of 10-15 cm. The kneading is possible in the concrete mixer. Ideally, if for this purpose you hire concrete rates with a trunk, then the walls will turn out to be monolithic and durable, and it is so recommends to make a manufacturer of blocks.
- Step 8. As soon as all the walls of the base are filled, we begin to erect inner wall Bath. In this project, it is from brick, you can make from any material. For accuracy, do on the finished concrete base Additional small tape foundation. Put on it two layers of rubberoid and put a brick.
More advice - for a bunch of concrete and brick wall Drill in concrete holes and insert two pieces of fittings there, every five row of bricks.
Not always the dimensions of the site allow you to build separately standing bath. Place the steam room in the house can be in any convenient location. But what to do when places in the house under the bath is not provided, but I want to have your own steam room? There is an exit! You can make a bath in the basement with your own hands. The price of construction and improvement will be minimal, and the steam room will not be worse separately bathhouse. How to make a bath in the basement with my own hands, we will tell our readers in gradually.
In the basement you can landscaping quite a decent bath.
What you need to know before planning the construction of a bath in the basement do it yourself
Basement rooms in private houses are different. For a bath, a dry basement with high ceilings is suitable. And the use of modern hydro and vapor insulation materials will make a steam room even for wooden house. Moisture and mold will not harm the tree. For the construction of a bath in the basement, you do not need to have special skills. The main thing is to consider the ventilation system and collect an additional 1-2 walls.
 Before starting work, it is necessary to prepare a basement plan.
 Plan the steam room in the basement or basement optional at the construction stage of the house, you can perform work in the already built. To do this, you need to modify some elements and equip a steam room and a rest room.
Ventilation in a paired basement
For proper functioning it is necessary to consider the air exchange system in the pair. The fact is that the basement is the most unrecoverable part of the house. And to obtain a healthy procedure, air ventilation requires a constant inflow of oxygen inside.
 It is important to correctly perform in the pair of ventilation system.
 Make ventilation in the pair is easy with your own hands. Complete fresh air to the pair should from the street. The ventilation shaft is placed near the oven. You can purchase a special system with a fan, which when turned on will drive the air inside the room. On the opposite wall make an exhaust. Wet air will be pulled out and falling through the roof or wall of the house in general ventilation. The design of exhaust ventilation can be viewed in the pattern scheme in this article.
Wiring in the bathroom bathroom
An important moment to correctly perform electrical system in the bath. Since in the bath the temperature can rise to 950s, then all sockets and switches are trying to place below the floor. There is a temperature below.
 Luminescence in the bath is performed only in special ceiling.
 The wiring is drawn from the house in a special corrugation directly across the floor of the first floor. In the bath it is allowed on top of the finish. It is impossible to hide the wiring under the wooden lining or another finish. When fire or closure to perform repairs will be difficult. Since it is possible to work with electrical wiring, only having a special education, then trust the work of professionals. In the steam room, it is impossible to stir sockets and switches. Lamp hide in a special hermetic plander. Place on the opposite wall from the stove bath.
Waterproofing walls, floors and ceiling
Since the bath is connected with constant use of water, it is necessary to carefully perform waterproofing walls, floor and ceiling steam room and washing. Use for waterproofing different material, eg, bituminous mastic or liquid glass. The walls of the foundation and the ceiling are failed by mastic, on the floor it is possible to lay a rubberoid in 2-3 layers. Only after the foundation walls are protected from moisture, you can start steam and thermal insulation.
Warming and steam barrier
To insulate the bath in the basement, the insulation is chosen, which meets the characteristics:
- environmental friendliness;
- ease of installation;
- moisture resistance.
Choosing a heater, easy absorbing moisture, you create a favorable environment for the development of mold and fungus in the basement. And for the foundation it is fraught with rapid destruction. Optimum option: Minvat, Equata or Polyfoam. But the polyfoam has a minus - it is easy to ignite, so choosing it, it is necessary to consider the insulation of the furnace and chimney.
 The bath from the inside insulate and separate the protective foil.
 From above, the insulation is protected by a steam-overlapping foil, but it is necessary to leave the ventilated gap between the vapor polypoletor and exterior finish Minimum 5 cm.
Inside the pair do not finish plastic panelsSince at high temperatures they will begin to highlight toxic couples harmful to health. It will be optimal to use wooden lining, linden or larch.
The main stages of the work on the device and construction of the bath in the basement do it yourself
The construction of a steam room in the basement does not imply the construction of massive walls. Enough for a small bath to separate part of the room with a brick wall. Three walls will be from the foundation of the house. Works are performed by the following steps:
- Marking under the dividing wall and the trench is rotated.
- The bottom fall asleep with a sand pillow by 10-20 cm, thoroughly trambed and watered with water.
- Formwork is done and the ribbon foundation is poured.
- A wall is laid out, the binding to the main house is made using metal brackets.
It is important to correctly make a water flow system. For this, the trench from the washing bath under the slope towards the site. The depth of the trench must be lower than the soil freezing, and the width is at least 50 cm. In the trench, metal square pipes are placed under a slope and combine it with a common septic. Above the mine make a grid for pre-purification of the water used. The grid is fixed on metal double corners. From above over the mesh, metal canopy from iron sheets. It is necessary to prevent water from entering the mine. The floor in the bath must be placed under the tilt towards the mine.
The floors in the bath are covered with rubberoid sheets and pour cement screed. The tie is made in several layers:
- ruberoid + gravel + cement screed;
- after drying the first layer, again rubberoid + gravel + cement screed.
The second layer reinforced and give dry. After driving on the tie, you can mount the clean floor of the tile or wood.
At the stage of installation of the foundation, it is necessary to consider where the stove will be placed. The cement pillow is also poured under it and lay on top with red bricks in 1 row. The pillow must be the size of a 6-9 cm stove size throughout the perimeter. From above, the cushion is hydroizing and the base of the furnace is placed.
It is necessary to place the stove so that it is necessary to confuse and the furnaces are located in the pre-tribbon. So, it will not be necessary to remove additionally heating into the bath. Chimney Heat insulation and remove through the base to the street.
Bath landscaping in the basement
The canopy is made from the bar, you can use for the sink pine, but outside it is trimmed with a lime or oak. The fact is that pine will cry at high temperatures and when making procedures you can get a burn.
 Inside the bath is finished with lining and landscaping.
 Walls, ceiling are trimmed with lime clapboard. Be sure to leave the gap of 5 cm from the bottom from the floor and at the ceiling. The floors are driving under the tilt towards the plum. Then mount the plinth from the linden or larch.
In the pre-tribades install a small table, shops and hangers for clothes and towels. You can hang the mirror and set a small refrigerator for cooling beverages.
After decoration and improvement, lamps are carried out in special moisture and heat-resistant plaflubles. One of the similar saunas in the basement can be seen on the video:
Do not forget to fit the place in the steam room for fragrant herbs and blaming the brooms. Bars in a bath built with their own hands in the basement will be pleasant and useful for health. And the use of brooms and aromatic oils will make the procedure even more useful.
Wooden Russian bath is the cornerstone of the health system of the Eastern Slavs. Despite the presence in each room without exception, a comfortable modern bathroom and shower cabins, the pair still remains a favorite vacation spot for the overwhelming majority of citizens. Happy owners of country houses and cottages can afford to enjoy the parillery at least every day, however, to obtain such a buzz, it will have to be pretty sweat in the process of its construction and equipment. With great desire and hands growing from that place, almost everyone can cope with such a task. Do not believe? We propose to make sure that yourself.
Preparatory stage
Before the start of construction, finally decide what specifically the pair you delivers the greatest pleasure - Finnish, Russian or Turkish. Suppose you as a true patriot, elected the Russian bath.
First step preparatory work - Search or project development.
It is better to order planners or professional architect. We defined with the project, now it's time to choose a place for the future object. Remember, the perfect location of the bath is the territory on the shore of the reservoir or the outdoor pool (but not closer than 15 meters from the water).
Classic version of the Russian bath - wooden log, consisting of three reporting offices: steam, actually, baths and pre-bankers. The main task of the steam room is the warming of the room to a certain temperature and the maintenance of heat for the required time segment. In the pre-tribades, you can equip the rest room, the billiard room or the locker room.
Bookmark Fundament
Any capital structure needs a high-quality and strong foundation. Its design and type depends on the terrain, such as the soil structure. With a relatively smooth surface of the earth, experts recommend to stay on ribbon foundationwhich uses the "sand pillow" - a mound of large sand with a thickness of at least 15-20 cm.
After the bouting of the rubble foundation pour cement mortar, strengthen with a brushed stone and reinforcement, which use metal rods, reinforcement, profiles or pipes. In the process of filling the foundation with a solution, the vertical rods are inserted along the entire tape, which will subsequently be used for ligament walls with the foundation.
Walling
The ideal material for the construction of a real Russian bath, as we have already noted, is a natural wooden log house. Despite a huge range of cheaper and at first glance, practical synthetic materials, the environmental friendliness and practicality of the tree does not know equal.
Wooden timber or prepared logs are used in the construction of a profiled or rounded bath, cross-section of at least 150 x 150 mm.
For interior decoration The steam room and baths use wooden lining, which further provides a healthy microclimate and prevents rotting, appearance of mold and condensate accumulation.
Do not forget that wooden materials used for interior finishing works to prevent damage to wood insects, mushrooms and mold should be soaked with special antiseptic primer.
Between the logs are laid interwidden insulation. It will protect the construction of atmospheric exposure - rain, snow and moisture.
After the construction of the walls, we sew the floor and the ceiling, overlapping the roof, install windows and doors. The budget version of the construction of the bath involves the use of foam blocks or bricks as the material of the bearing walls.
Taking steam room
The main components of the steam room in the bath are furnace and shelves. Depending on the size of the steam room, the shelves can be height up to 60 cm for seating, and for layers - up to 1.9 m. To warm the bath, water pipes are used, electric heaters, or a stove-heater. The furnace is placed in the far corner of the steam room.
Choosing stove
The stove in the steam room is the main acting person. If you want to really follow the traditions of the ancestors and dismate the authenticity of the whole ancient ceremony, stop your choice on a wood-burning oven.
If this option is problematic, choose between brick and metallic electric furnace. Bunching with experience is recommended by metal models. They are not speculating in service, they quickly cope with the heating of sufficiently large premises, and to besides, not small and do not require the foundation for installation.
The power of the furnace is selected on the basis of a fairly simple calculation formula: for a 20-25 square steam room, crumpled with wooden clap, need a minimum furnace at least 12 kW. If your steam room is erected from a bare cut, power increases to a minimum to 18 kW.
And do not forget about the rules of fire safety. High-quality properly conducted wiring and ventilation system are a guarantor of the durability of your child.
Traditional bath accessories
The interior of the real Russian bath will complement such functional things like a wooden mug, for watering water (it will not burn hands), coniferous or deciduous brooms and a traditional bath hat "Bell".


