Concrete screed Paul - traditional way Strengthening and leveling a rough base under the laying of the finish coating. In the process of preparation and fill the cement screed, certain norms must be respected, regulated by SNiP. Only in this case, the formed coating will be durable and suitable for operation.
Basic requirements for screed
Fall cement strainer Floors with their own hands only in the case of compliance with all technological norms of the device of draft bases. It is this part of the base during operation will experience the greatest load. Therefore, according to certain standards specified in SNiP, the CPS must comply with the qualitative characteristics and the following requirements:
- High coating strength that would allow you to withstand large static and dynamic loads;
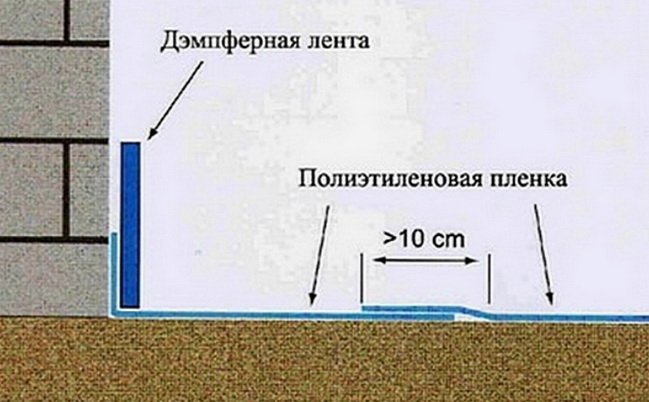
- Mandatory presence of a layer of waterproofing under cement layer;
- Waterproofing should be not only on the floor, but also on the walls at the thickness level of the screed;
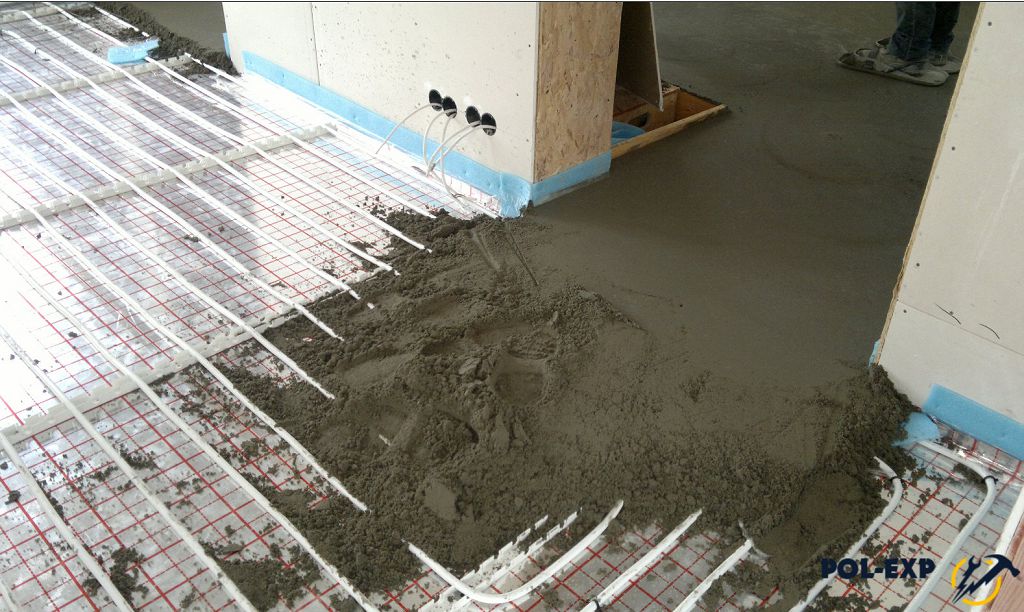
- In the case of laying the "warm floor", the thickness of the flooded solution should be at least 5-6 cm;
- If the solution is poured over the communications, its thickness above the pipe level should not be 2-3 mm.
In order for the laid screed to comply with all the above requirements, it is necessary to properly prepare a working solution. At the same time, special attention is paid to such nuances:
- composition composition;
- proportions;
- method of mixing components.
You can see how to properly knead the cement mixture on the video.
What is included in the CPS?
The cement sandbag consists of elementary components, which, however, provide a rough coating of high strength. The standard composition of the working solution includes purified river sand and cement. However, plasticizers and other synthetic components can be added to improve the mechanical indicators of the solution. Thanks to them, it is possible to improve the characteristics of the CPS and, accordingly, increase its period of operation.
What components can be part of the working mixture?
- Cement is a binder that is responsible for the fortress and the density of the screed;
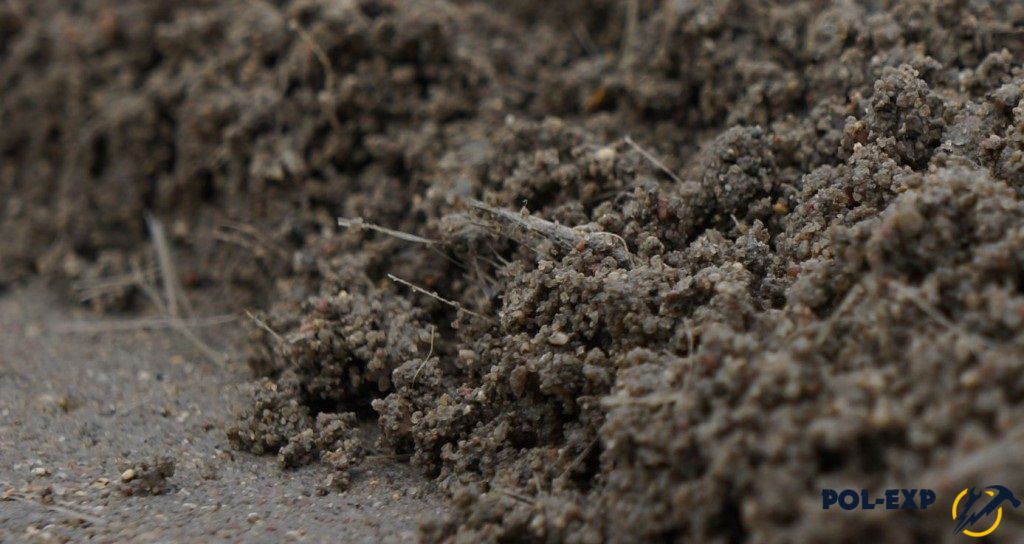
- Sand - plays the role of a small-caliber filler, thanks to which you can significantly reduce the cost of the solution;
- Plasticizers - increase the plasticity of the mixture, which makes it possible to significantly reduce the flow of water and, accordingly, the period of pouring the screed;
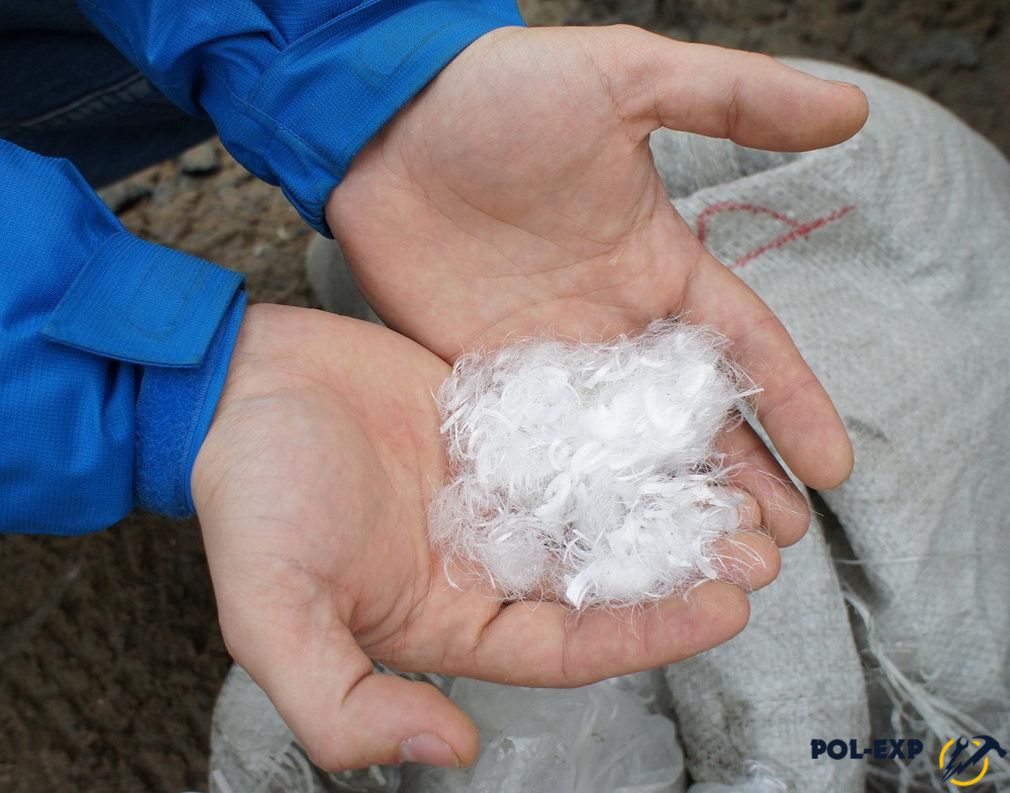
- Polypropylene fibrovolok - performs the function of the reinforcing grid, the hardening concrete coating; significantly reduces the plastic shrinkage rate, due to which the cement composition in the process of drying is practically not linked;
- The water is "reagent", which provides homogeneity of mixed components of the solution, as well as its fluidity.
It should be noted that plasticizer included in the CPS can affect many specifications concreted surface, namely:
- strength;
- water resistance;
- frost resistance;
- heat capacity.
Find out more detail how to make a cement tie of the floor, you can on video.
PSP proportions
Quality and strength characteristics of the solution are largely determined by the ratio of all necessary components. In other words, proportions play an important role as a mixture. Properly prepared composition has the necessary sound and waterproofing properties, which must be taken into account in the process of its preparation. What proportions need to be observed?
The ratio of the required amount of water and sand depends on the quality of cement - its brand. The higher the cement brand, the better its strength characteristics. For the preparation of a tiery mixture, as a rule, cement M300, M400 and M500 cement is used. The proportions of the required components for the specified cement stamps are shown in the table below:
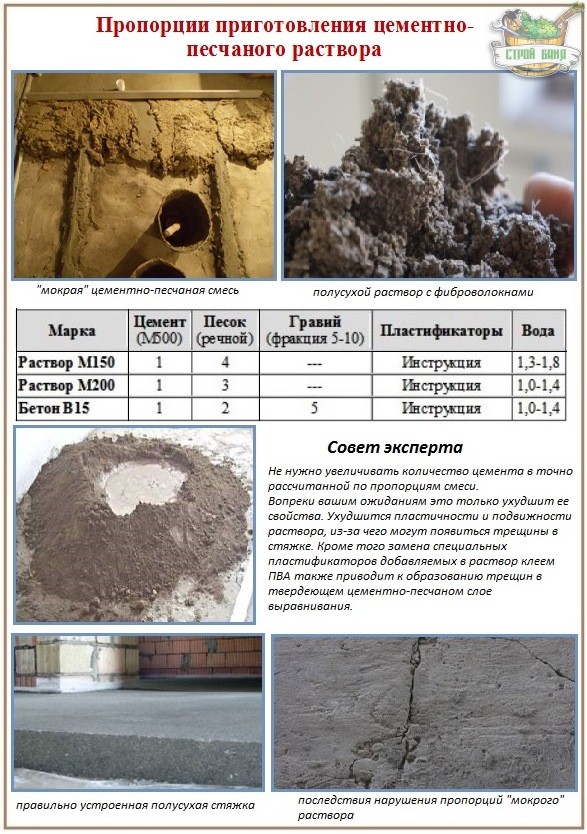
| Brand cement | Part of cement | Part of sand | Part of water |
| 300 | 1 | 2 (3) | 1.2-1.6 |
| 400 | 1 | 3 | 1.3-1.5 |
| 500 | 1 | 3 (4) | 1.6-1.9 |
According to the main positions of SNiP, the proportions that were shown in the table may vary depending on which load will be created on the base. See how correctly knead the solution, you can video.
Features of mixing components
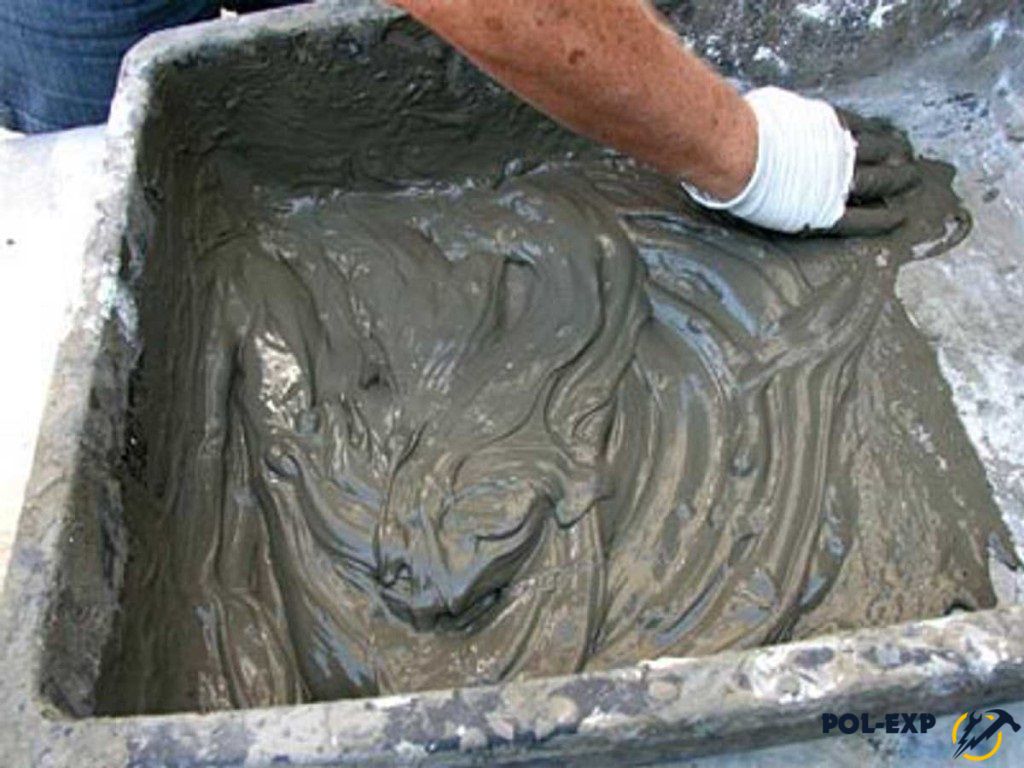
Prepare the working mixture is much more complicated than it may seem at first glance. After all, due to the degree of homogeneity of the solution, the indicators of wear resistance, density and abrasive stability of the created screed are dependent. How to confuse the tiery mixture?
- In the prepared capacity, you need to fall asleep the required amount of sand and cement;
- Components are thoroughly mixed in dry form;
- When it is added to a plasticizer solution, it is pre-diluted with water;
- In the dry cement-sand mixture make a deepening and water is gradually added;
- By density, the solution should be similar to the sour cream;
- It is not a shovel that is not a shovel, but a building mixer to obtain a high homogeneity solution.
Cement Filling Rules

The CPS should have high adhesion to a rough-based basis, so in the process of its fill it must be observed several important nuances, namely:
- Before the filling of the solution, the base is specially cooked so that the coating becomes grainy;
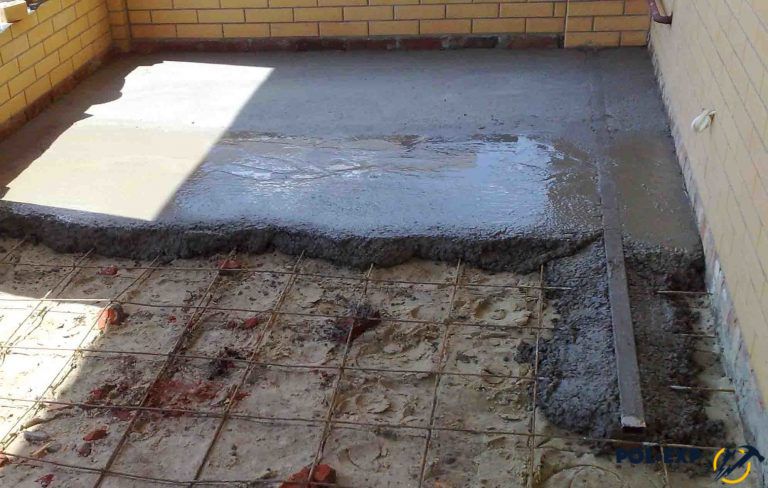
- On the floor set the lighthouses to control the thickness of the screed;
- Then the base is moistened with water to ensure normal adhesion with the screed;
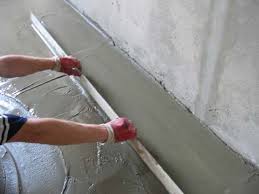
- A flooded mixture is smoothed and tamped to the required level, which was exposed on beacons;
- The final adjustment of the working mixture is carried out using the rule;
- After about 20-28 hours, lighthouses are cleaned;
- Holes from lighthouses are ground and fill with a solution.
Vite process of fill concrete mix Shown on video.
Strengthening tie
The concrete base is prone to dust formation and cracking. To prevent the screed damage, the "strengthening" composition is used - impregnation. It fills themselves all the pore coating, due to which the draft floor becomes more durable and resistant to mechanical exposure.
What impregnation is suitable for strengthening the CPS? Strengthening and dust the concrete surface will help impregnation based on such substances:
- epoxy resin;
- liquid glass;
- lithium polysilicate;
- acrylic;
- polyurethane.

High-quality and properly applied impregnation solves 4 tasks.
Strong base of the floor is the key to the fact that the finish coating will be laid beautiful and will live long years. This is especially true of materials such as tile. In order for the base to be perfectly smooth, it is necessary to hold a number of procedures. Cement-sand screed The floor is the possibility of creating not only smooth and even, but also a solid foundation. However, work on her fill is not so simple, as they seem at first glance. We will figure it out how to create such a screed yourself.
A screed made of a solution that is cooked from sand and cement is an almost perfectly level base that is suitable for laying absolutely any flooring, be it tile, laminate, linoleum or parquet. It is with the help of such a screed that most often align the draft bases - concrete floors in homes, the floors of the brick and even simply create the base lying on the usual soil. On average, the thickness of the cement-sand screed varies from 3 to 8 cm. It can be more, but because of the big weight construction solutionUsed to fill, when calculating the thickness of the screed, it is necessary to take into account the strength of overlaps.


The main tasks of the screed are not only in alignment of the surface, but also that it will redistribute the load tested by the floor, will create a solid base, will provide an opportunity to equip heat and waterproof layers and even in itself is an excellent option for heat and waterproofing. Inside this structure can be laid different kinds Communications, equip, etc.
On a note! Certain types of screed, which are called bulk floors, will help embody the most bold design solutions. Such floors can be different color or have a very interesting picture. Special compositions make it possible to create on the floor.

Benefits and features
The cement-sand screed has a lot of advantages. This refers to its physical and physico-chemical indicators.
![]()
The advantages of a sandy cement screed.
But, like any other way of alignment of the floor, the cement-sand tie has its drawbacks, which should be needed before the installation work is carried out on the basis of this type of base. Cons of cement-sand tie are below.
- Significant mass. Cement screed has a significant pressure on overlap, and therefore use it may be limited by this factor. For example, 1 m 2 cement-sand screed laid with a layer of 1 cm, weighs about 20 kg.
- Long dried period. Before the screed can be calmly move and produce further floor finish, it is necessary to dry it well. Duration of drying is large - about a month.
- Smooth surface to achieve manually difficult. Fortunately, if this could not be done, but evenness is necessary, the screed over can be pouring a self-leveling mixture.
- Complex mounting. Pouring screed is a very complex process that is carried out often with the help of foreign people. Work, of course, can be performed independently, but it is important to observe all the steps and key points during the fill of the screed. Otherwise, it cracks.

In any case, the correct scrolling is a great base option for any type of finish coating. In addition, it is easily cleaned after drying during operation, even not covered with trim, and not afraid of water.
Types of cement screeds
There are a large number of ways to make such a tie. However, it is possible to highlight the main - connected and unbound screed and floating.
![]()
Method tied ties It is used if the allowable layer of alignment may have a thickness of up to 4 cm. The base becomes like a single integer with the floor and walls. This version of the screed needed a thorough preliminary preparation of a draft base - all major holes, cracks, the cracks of the ceiling are close, all significant irregularities are removed as much as possible. If there are small tubercles or fumes on the surface of the overlap, they do not need it in the seal. Builders even recommend fresh laid overlaps artificially cutting, walking along them with a metal brush - thus, the clutch of the solution with the surface will be better.
A pouring solution of a screed must have a consistency of sour cream or cream for cakes. It turns out enough liquid and about 20 minutes after the fill will begin to gradually stick. Therefore, pour and make a screed need to have time for this time.
Attention! Large rooms are usually poured in gradually, as one person is unable to quickly dissolve such a number of mixture.
It can be carefully walking around the room the next day, but the duration of drying such a screed is great - up to 40 days. It is important to dry out such a reason correctly - it is impossible that water quickly evaporated from the layer, it must be released gradually, so the fresh screed is recommended to moisten with water and cover with the film.
there is screed unbound, on the contrary, mounted on the perfectly smooth surface. At the same time, the base should not have water-absorbing properties in order not to stretch moisture from the screed. The thickness of such a layer can reach 5 cm. The main difference from the previous species is that the primer is not used before filling such a screed. No methods that can increase the adhesion strength of the solution and rough base are also not applied.

Floor screed - mortar and grout
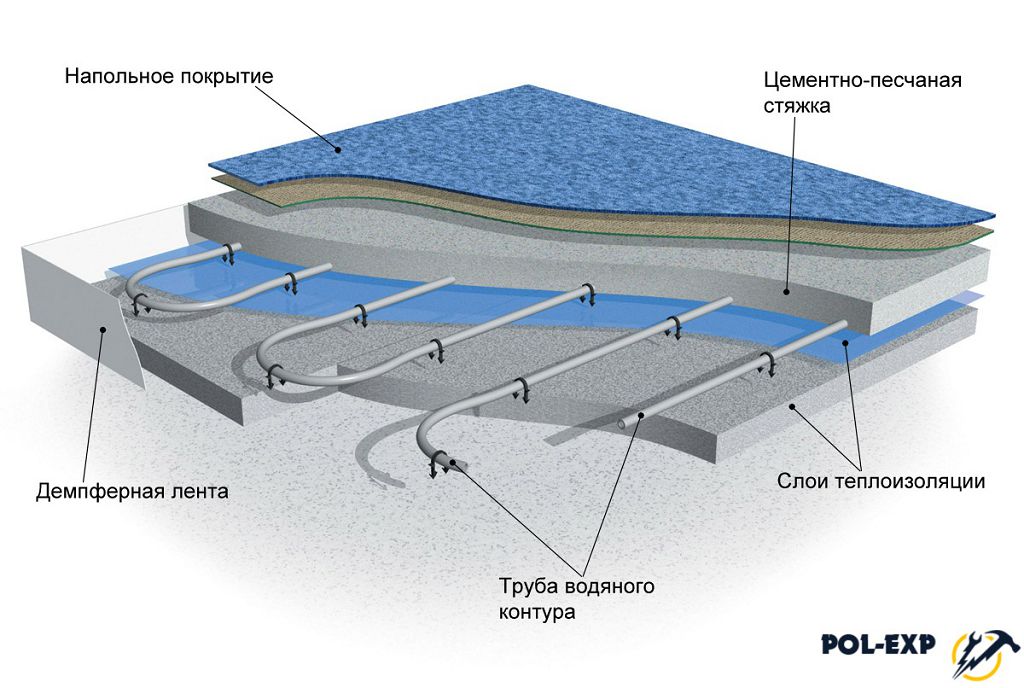
It is also often mounted so-called floating screed. It is usually used if its thickness should be 5-7 cm. The design of such a layer is distinguished by the fact that it is not even in contact with the draft base - on the contrary, the layers of hydraulic and thermal insulation are stacked between the solution and it, which simply do not give it The solution to fasten the overlap.
Attention! It is this type of screed strengthens most often with the help. Also in solution to increase its strength, reducing the risk of cracking and reducing the risk of shrinkage can be added.
Such a screed due to the high thickness could have the maximum weight, however, it is poured using the so-called semi-dry technology. That is, the solution is mixed using a small amount of water and reminds of the structure of wet sand.
Cement and sand proportions
Depending on which version of the screed is selected, the composition of the mixture for its manufacture is determined. The proportions of the two main components are selected depending on which brand cement will be used and what kind of sand. For the arrangement of the screed in the apartment is enough to use cement M200. Ready base It will be able to withstand a significant load - about 200 kg / cm 3. You can take 1 part of the M500 brand cement and mix it with 3 parts of the sand. And the water will need as much as it is necessary to achieve a solution of the required consistency. It is about 1 l per 1 kg of cement.
Attention! It is not necessary to add a lot of water, since the solution will become less qualitative.

It is very important to choose the right sand to create a solution. It should not contain (or at a minimum to contain) various inclusions - Il, clay, etc. These components negatively affect the strength characteristics of the finished tie. It is best to use river sand washed. Career sand is also suitable, but he is somewhat worse than the river due to the angular shape of the sand.
Table. Compositions of mixtures according to GOST when using cement M400, masses. h.
| Mark solution | Cement | Water | Sand |
|---|---|---|---|
| 150 | 1 | 0,55 | 3 |
| 200 | 1 | 0,48 | 2,8 |
| 300 | 1 | 0,4 | 2,4 |
Calculator calculating the number of ingredients of the floor screed
Cement screed is divided into three types - the screed tied with the base, the screed on the intermediate layer and floating. What the differences between them consider below.
It should be noted that the cement screed is a universal draft floor, suitable for any flooring. But the floor screed can only be laid on a non-vibrating basis, otherwise it cracks.
Cement screed in the house is also a stabilizer of temperature and humidity, due to its significant heat capacity and moisture intensity. Its presence increases comfort in the house. The heating elements are not rarely embedded in the screed, resulting in a system warm floors. It can not be the only heating system due to too large thermal inertia, but is a key element ensuring the comfort of living and a pleasant internal microclimate.
Now more, how the cement screed is made and what to pay attention to to prevent errors.
Types of cement ties
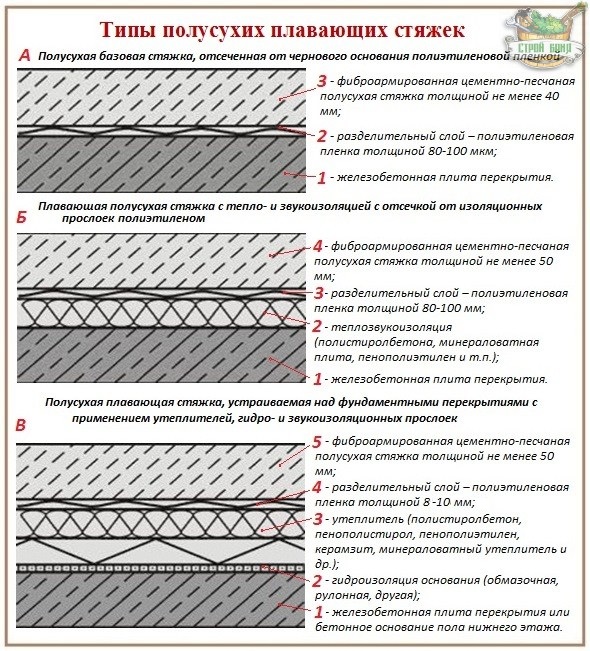
- The ties associated with the base are stacked directly on concrete base (R / B stove, concrete preparation). In essence, they are an upper equal and less durable layer of concrete design. The minimum thickness of such a screed is 25 mm. For its normal laying, a reason is needed to be discussed and be sure to progress (prevents the solution dehydration).
- On the separation layer, the thickness of the screed should not be less than 40 mm. As a layer, a waterproofing membrane, laid on concrete training or the rammed sandy submet. The main purpose of the separator is to prevent the rapid drying of the cement screed. This is the key point of laying a solution, the separator is always applied when there is a risk of fast drying.
- Floating screed - separated from the base and from the walls by a significant layer of insulating materials. With the reinforcement of the grid, the thickness of the screed may be 5 cm, without reinforcement - at least 7 cm. Floating - the main type of cement screed used in homes. Since usually layer of insulation for floors is laid under the base (it remains cold), but under the tie of the floor. In addition, thus mainly the soundproofing of floors on store houses.
How to stack
The solution needs to be consumed within 2 hours. In one room (within the boundaries of compensation seams), the screed is placed in one reception from one portion of the solution.
Task level
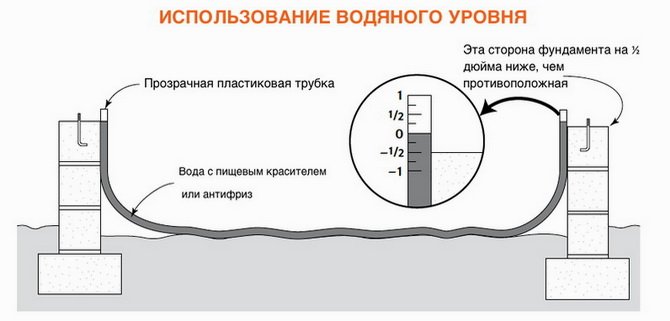
It is important to determine the correct level of the cement screed, which is as defined in the whole house, or according to the floors in other rooms. The thickness of the floor cover is also taken into account so that the step is not formed on the borders. The reduced level of 10 mm is recommended to do in the bathroom and in the bathroom - it is possible to spill water.The level is set with a laser level or water level. There is a single plane on the walls at a convenient height. Then the required level of screed in each room is selected, taking into account its thickness, markers are made on the walls, on which lighthouses are stacked.
The screed thickness was indicated above. But also needs to be taken into account and possible features - the basement of the base, a special load, thermal expansion, the presence of pipelines ... For example, for a warm floor, a layer of cement screed above the heating element should be at least 30 mm for effective heat dissipation.
Measures to strengthen the screed, prevent cracking
A too large screed is cracking at temperature and mechanical stresses, including during drying. It should be divided into small fragments. Usually the linear size of the fragment is not more than 4 meters, but better than 3 meters. In long and narrow rooms - seams every 2 meters. In addition, it is necessary to form seams before filling the screed on its borders, to prevent the transmission of voltages and shock sound onto the walls.And also the seams are shchedted on the borders of the joint of various flooring (area of \u200b\u200bthe passages and doors). If there is a reinforcement of the screed, then the seam must coincide with the borders of the reinforcement. In the tile - on the seam between the tiles.
Compensation seams are more often formed during the construction period, by cutting the slots in a non-frozen solution. Under tough outdoor coating (Boards, laminate ...) seam can remain empty or filled with insulation. Under tile, seam is better filled with a sealant, to prevent water accumulation.
In addition, in order to prevent destruction, for a screed, which will experience temperature expansions (warm floor), it is necessary to apply the reinforcing fiber reinforcing, and plasticizers.
You can read more
Reinforcement
The reinforcement of rods, more often with steel, is designed to prevent breaks of the screed under operational loads. It is necessary to reinforce the screed - the answer can only give a complex calculation.On the household level, you can recommend the following:- Reinforced the screed in the garage or at the bottom territory laid on the soil, if its thickness is less than 10 cm.
- Always reinforced the tie of the warm floor.
- Ruined floating screed inside the house with a thickness of less than 5 cm.
Preparation of solution
The usual composition of the cement screed is one piece of cement - 3 parts of the sand.But it is worth considering that concrete solution Cheaper than cement-sandy. And with large volumes, this affects significantly.
Concrete filler - crushed stone, gravel, - should not be larger than 1/3 of the thickness of the screed. Concrete brand for screed - B15, B20. 
On the household level - composition composition for tie:
- cement M400 - 1 part;
- Sand - 2.5 parts;
- Crushed stone - 4 parts.
But this is not a dogma, for example, a sufficient amount of sand is determined to fully fill the space between the filler, which depends on its fraction. It is also important to adjust the amount of cement depending on its brand and activity. Cement activity decreases over time. If 2 months have passed after cement production, the amount of cement is increased by 20%. If 6 months have passed, then by 40 - 50%. No one is not used, ejected.
To create a screed, the fluidity, plasticity, mobility of the solution is important. It is desirable to add industrial additives - SDB, M1 ... But, in the manufacture of a solution with your own hands, you can graze and a little soap into water, which is often done.
Purchased ready mixes For cooking a screed is much more expensive than the homemade cement solution. But they will provide better quality if you follow the instructions on the package.
The amount of water should not be greater. Increase the mobility with the amount of water is not correct. Water that does not bind to cement remains in solution, forming cavities in it, after evaporation - emptiness. The strength of the cement screed (concrete) is significantly reduced. You can also find out
The creation of a monolithic leveling plate by filling the aqueous solution of sand and cement is the most common, truth, and the most time-consuming method for preparing the base under the laying of coatings. Country bath owners The cement-sand tie attracts the ability to ensure a bias to organize the flow of waste water into the sewer system. Using a cement mixture, you can create a perfexiously smooth surface that does not require further lining. Shaped stone floor or flat roofing They will be perfectly resist alkalis, fat, acids, will not harm them excess moisture. Cement stone perfectly conducts heat, therefore, it is used most often with the device "underground" heating system.
Types of Cement and Sand Solutions
The leveling layer of a mixture of water, sand and cement has a considerable weight, depending on the percentage of water, from the cement brand and from the tie power. According to the range of 1 m² of the draft base, approximately 90 kg of plates made of artificial stone with a thickness of 4 cm. Therefore, this method of preparation is used if the bearing ability of the base is used, that is, they align basically concrete black floors.
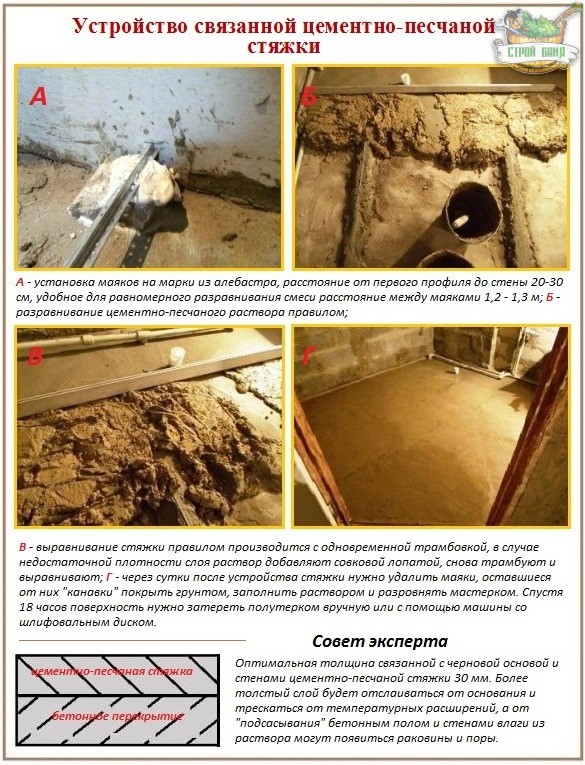
According to technical regulations, the minimum alignment height of 3 cm, otherwise the monolithium during drying will crack, "break" from the voltage when frozen and peel from the concrete overlap located under it. The maximum limit is 7 cm. When the specified limit is exceeded, the center's cement screed becomes unnecessarily dear pleasure. It will be necessary to strengthen the foundation, and the material on the pouring of the leveling layer will take a lot.
Depending on the thickness of the alignment layer, they determine what scheme the screed of a cement-sand solution will be arranged, which may be:
- associated with rough base and conjugate walls;
- not related, that is, not connected with construction structures;
- pose a floating slab cut off from the floor and walls insulating layers.
Related Cement Shrewing
It is suitable if the alignment layer does not exceed 4 cm. Since the cement-sand fill must result in a single whole with a rough base and surrounding walls, a thorough preparation is required for the associated screed device. At first, it is carefully examined by the centered area of \u200b\u200bthe floor, the repair of deep cracks is carried out, the mounting ears are tightened with a sledgehammer. However, minor irregularities of the floor are not eliminated, but are left to optimize the clutch with a solution.
Recently laid concrete floors are specifically coated, clean the surface to coarse-grained inclusions with a metal brush, then:
- lay beacons;
- carefully moisturize the surface of the draft base;
- mix the solution until the confectionery cream is obtained;
- the cement-sandy mixture is poured so that its level of its surface exceeds the beacons by approximately 1 cm with the calculation of the shrinkage characteristic of this scheme;
- the flooded layer will be trambed to the level of beacons, using boards and own weight, but it is better to take a flat vibration device for this operation for this operation, intended for sealing cement mixtures and uniform output of air bubbles from them. We need to rub the vibration tie in two receptions on small revolutions, not too diligent, so as not to bundle;
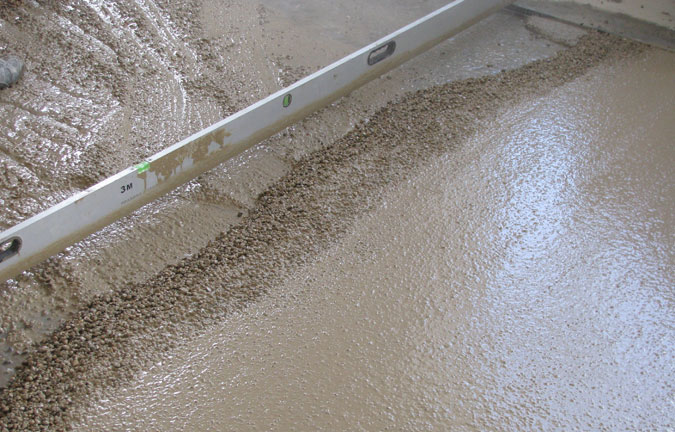
- the final adjustment of the level of screed with a rack-rule, moving it along the beacons, as if, on rails with a slight swinging to the right and left;
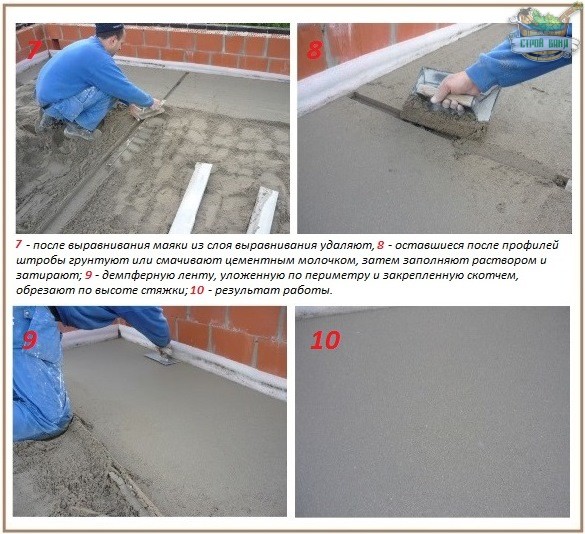
- after a day, lighthouses are dismantled;
- the shortcomings that remaining after removal of lighthouses are ground, fill with the solution and rub.
Attention. After 20 minutes after the manufacture, the liquid cement solution begins to gradually lose the binding properties. It is necessary to try to make the cement screed with their own hands flooding it before the expiration date. It is pointless to prepare too much volume. If the mixture is locked and fed by means of small mechanization, the amount of solution can be increased, focusing on their own strength and the skills of the concrete machine.
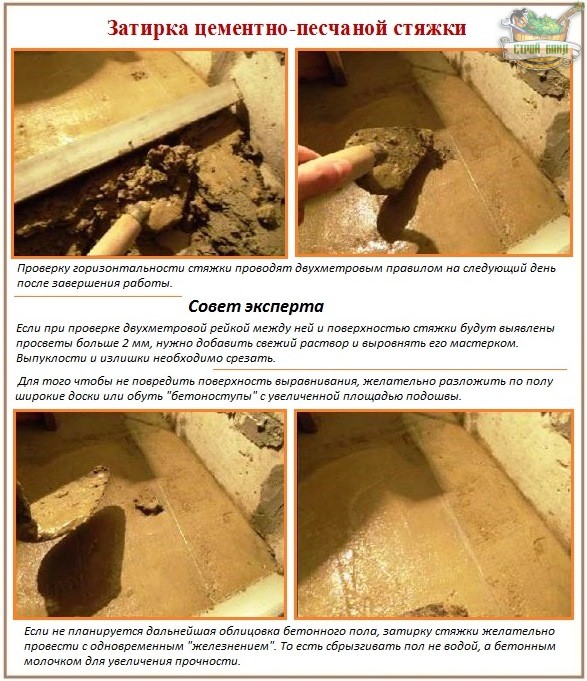
Checking the density of the arranged cement-sand tie is carried out by pressing the segment of the board to an arbitrarily selected section. If the result is a deep recess, the solution of a shovel is necessary to add to this place and sweep the recoverable segment. When forming a puddle in the excavation, the solution to eliminate the defect must be kneading more thickly.
In addition to checking the density, it is necessary to check the horizontality. Do it by setting 2 meter rule directly to the surface in different areas. The detected bugs and bulges must be cut off, places with lumens under rule more than 2 mm fill with a solution and sweep.
Note. You can safely move around the laid cement layer every other day, putting on the feet of special concrete with an enlarged area of \u200b\u200bthe sole. You can decompose wide boards, and we care about it.
A week later, they usually go to the screed without much concerns, since the rejection of the upper layer has already happened. However, it is possible to proceed to laying the coating only a month later, better than 35-40 days, although they consider the readiness of the cement-sand layer 28 days.
Upon completion of the process, the screed need to provide the ability to solve correctly, systematically losing the water contained. The next day, after the device, the surface of it is richly irrigated with water supplied with a sprinkler hose, and is covered with polyethylene. Irrigation is made evenly without puddle. Surface wetting, but already in the version of splashing, the next 10 days are held regularly. Polyethylene, excluding the premature loss of moisture, to streamline the alignment layer should be 4 days.
Attention. The room with the arranged cement screed must be protected from sunlight and be sure to turn off the heating and forced ventilation instruments. Due to the influence of batteries, fans, the sun rays will solve unevenly.
Unbound type cement-sand alignment
In an unrelated "case" adhesion and its optimization is absolutely not needed. On the contrary, a smooth concrete basis is required with excellent waterproof properties that prevent moisture sustaining from a hard screed. It is necessary to try to keep the top layer of concrete, especially if it is processed by water-repellent impregnation. The smooth upper barrier will prevent the adhesion and formation of shells in the formable screed. The optimal power of an unbound screed is 5 cm. Styling technology is similar to the method described above.
Attention. The use of primers and other means that increase adhesion at this technological scheme Absolutely forbidden.
Floating Screwing Principle
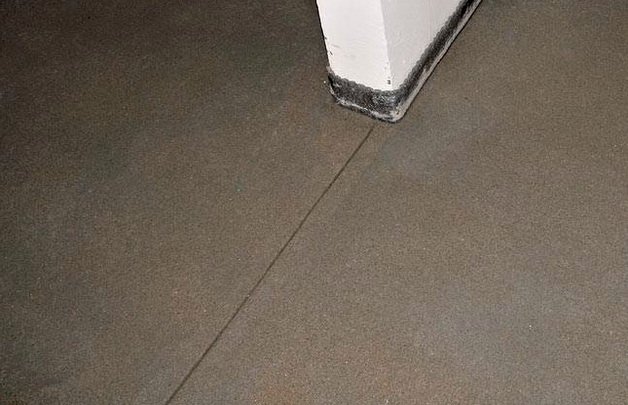
The method of creating a floating basis is used if the power of the alignment layer is 5-7 cm. From the rough base, the screed is cut through the styling of waterproofing, from the walls by a damper tape from foamed polystyrene. Due to the rather high power of the alignment layer, the device of a floating type of cement-sand tie is reinforced either by a metal mesh, or by introducing a fiber solution that excludes the appearance of cracks during the shrinkage period and subsequent operation.
Since the screed is obtained thick and, therefore, severe, semi-dry technology was invented to reduce its weight. It consists in the kneading solution with a reduced amount of water, due to which the hydration of the mixture is at the same time faster than 7 times. In appearance, the finished solution resembles wet sand or sand. The readiness of the semi-drying solution is checked by rolling. Must be formed not scattering, but not a dense ball.
Polypropylene fibrovolocks correspond to the strength properties in the semi-drying version, metallic counterparts are less commonly. They are injected into the solution during the preparation period at the rate of 0.7 kg per cubic meter of the mixture. Due to the chaoticness of the location of polymer "threads" in a floating plate, strengthening ties are created in all directions.
Reinforced with durable fibrovolocks The cement-sand screed does not give a shrinkage and does not lose the height of technical indicators in subsequent years. Cracks and shells in it appear extremely rarely due to a slight volume of evaporating moisture screed. To increase plastics and to reduce the timing of the solution, polymer substances are added to it. Ready finish ceramic tiles On a semi-dry option can be done four days later.
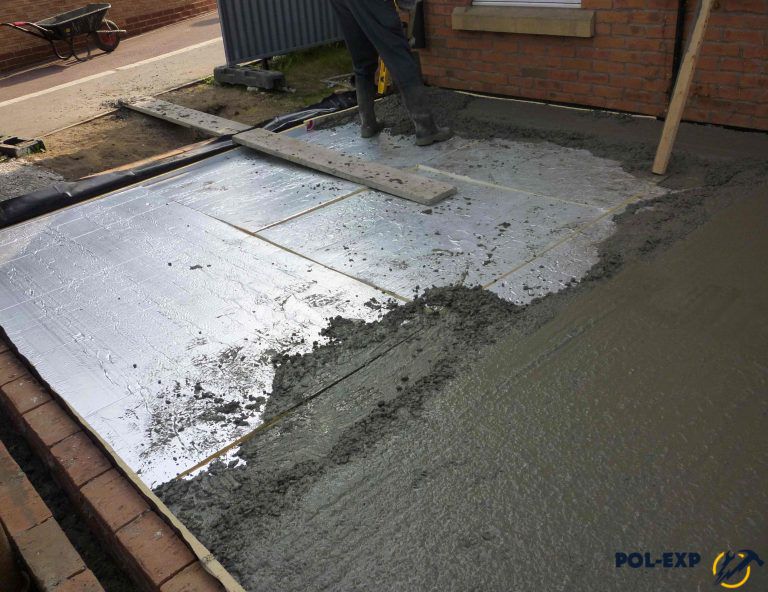
Most often, a thick floating plate is made in two receptions:
- First, the 2x centimeter layer is poured on top of insulating mats or over the overlaps and leave spontaneously seal and sit down for 24 hours.
- A day later, the mixture is made to the level of beacons and are leveling up in the usual way.
Two-stage production will save from the formation of rounded edges around the perimeter and on the joints of the cards, that is, on the lines of the compound of partial plots of fill. This happens due to the considerable tie power and due to the consistency. The card is a strip between opposite walls, it is necessary to arrange it in one intake without daily breaks. Stripes align the floor if there is no possibility to perform the entire amount of work in one day.
The attractiveness of the semi-dry method somewhat overshadows the need to use the means of small mechanization, kneading and supplying the solution to the place of direct laying. True intended for concrete work Mobile aggregate "Mixocret" can be rented. The mixture machine moves along the hose, due to which the traditional mud for concrete works is practically no.
It is still necessary to "helicopter" with discs for grouting and blades, if the owner plans to sweep the floor to the "mirror" surface without further finishing. The processing of the concrete-share machine is carried out as soon as the surface will begin to darken. This means that the solution began to grab. The signal to the beginning of the grout appears after 2 - 7h, depending on the humidity of the air and on the temperature background.
Otherwise, the sequence of work on the device from a semi-dry cement mortar is practically no different from the usual technological standards.

Rules for cutting damper seams
Approximately 48-72 hours after the device of the cement screed, regardless of the degree of humidity of the initial mixture, you need to cut damper seams. Peculous grooves B. monolith Plate Prevent the appearance of cracks in linear expansion.
Note. Damper seams are cut if the screed area is equal to or exceeds 30 m². It is recommended to form seams between the premises if the alignment was performed in several rooms.
To create a damper grid, it will be necessary to "divide" the plate on peculiar rectangles with a minimum area of \u200b\u200b10 m². According to the rules of the seams, it is necessary to coincide with the connecting lines between the ceiling plates, to the border of the reinforcement grid, if it was used. Approximate width of the damper "furrow" 3 mm, 1/3 depth from the thickness of the alignment layer. After cutting into the furrows, the cord is stacked, and then the remaining cavity is filled with sealant. The location of the seams necessarily take into account the further laying of the coating.
Video about device screed over "Warm floor"
The device screed from the cement with sand - the work is not too simple. It will require it besides a diligence of considerable time and physical effort. Even thoroughly finding out technological aspects, few will take the case for all items. However, knowledge of how to competently make a solid cement screed, not only independent masters, but also to owners who have charged the alignment of the builders brigade are needed. For control, technical information is required at no less than for stacking with their own hands.
turnAlignment and creation of a solid base of sex with their own hands is one of the main stages, which involves both repair and construction. Without a screed - it is thrown on the wind, and not spent on repairs cash. After all, if you do not build the necessary layer of the screed, the result of laying cladding will be much less high-quality. Cement-sand screed, probably the most optimal technologyallowing you to equalize or create sex with your own hands. But it is worth considering that it has a lot of weight.
Because of this, it is possible to make it only on sufficiently strong overlaps, while dry and semi-dry ties are lighter and there are much less pressure per 1 m2. The composition of such a screed, as follows from the name, includes cement and ordinary sand. Previously, this solution was done only by themselves, that is, they bought the necessary ingredients individually, mixed in the correct proportions and with the addition of water obtained the weight and density of the solution. Now you can also do so, but much better to buy in construction stores the finished mixture combined in optimal proportions.
Purchased mixture allows you to create an optimal concentration and density. After the acquisition of the solution, there is no need to add neither cement to it or sand. The manufacturer does everything exclusively according to standards, and their violation will only lead to a decrease in the quality of the solution.
As practice has shown, the cement-sand screed floor is a very universal method. The laying of such a screed can be done on any type of base, from concrete to stone. As well as a semi-dry screed, it can be erected on wooden based. For this, certainly need to be pre-training.
Preparatory work
Any screed, wet, dry or semi-dry, erected with your own hands, always starts from the preparation phase. In this case, it is necessary to prepare a basis, revealing and eliminating defects with the help of a mixture, which also consists of sand with cement. This is necessary in order to fill all cracks with a solution under definite pressure. The wet screed will not do this, due to the fact that its weight will not have the necessary pressure on the place of defects. Because of this, as a result, it may be a fragile floor. That is why the technology requires bringing the base to the normal state.
Usually, such a process is a small amount of both the time and materials. The main thing is to dry by naturally the solution after applying. The more thickness will be, the more time it is necessary to dry. So that the cement-sand screed did not give negative influence On the framework of the building, the next point in the arrangement is the distribution of the load on the base of the room. If counting in the room where the construction or repair of the floor is produced, the share of the screed is too big, it is better to make an additional reinforcing layer. That is, reinforce the screed. It can be done from the reinforcement or use finished products.
Do not forget that the thickness of the screed directly affects the rendered load on the base. And that's important moment, especially when work is held in the apartment of a high-rise building. At the preparation stage, it is worth understanding that in addition to laying a screed, there are also other elements, insulating overlaps. These include:
- insulation;
- waterproofing;
- heating systems or warm floor.
Due to this, not only the weight of the whole design increases, but also its height. Wet, like a semi-dry screed, have the final preparation step, including the primer of its base.
Marking
The cement-sand tie is not worth making an eye. Therefore, it is recommended to apply beacons. Usually used as such metal profiles. Directly to the floor they are attached with the help of the same solution. As the instruction says, the process of installing beacons must begin, first of all, with the correct determination of the zero level. But it already depends on the thickness of the laid tie. We should not forget that weight with 1 cm thickness of 1 m2 will be about 20 kg. When it is a standard option, its thickness is usually located in the region of 3 cm. And if it is planned to install a warm floor or reinforcing a screed, in which case the thickness indicator will be at least 5 cm. This indicator Depends simultaneously from such moments:
- the presence of waterproofing and insulation;
- from the presence of irregularities at the basis of the basis;
- applied type of floor facing.
As accurately as possible, it will help to expose lighthouses on the screed with your own hands - a laser level, although some prefer water.
On the outline that it will display, it is necessary to create a solid construction from lighthouses. The distance between their placement should be the same along the entire length of the design.
Preparation of solution
Next, you need to make a solution with your own hands or use ready-made mixes. The technology of creating a solution states that it makes no sense to make a large volume immediately, as it begins to harden after an hour and a half. Therefore, that the repair passed correctly, you need to calculate the consumption of each material, mixing the required components by the recipe. It is better to use ready-made purchased mixes for a screed, where weight required material For 1 m2, painted on the package, depending on which the thickness will be. It is worth noting that it is better not to apply the Dedovsky method of cooking with your hands the solution for a screed. The reason is that this solution will be inhomogeneous and have inappropriate density and consistency.
Pouring tie.
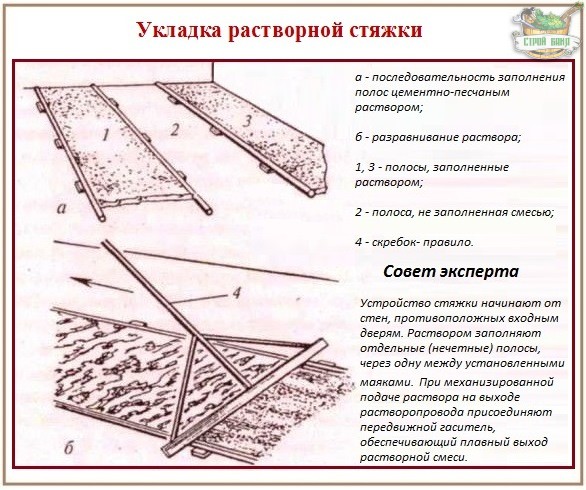
 Now the repair or construction of the floor is suitable for its final phase. Pouring should be made as quickly as possible, without great breaks and in one day. Semi-dry and dry screeds of such a need have no need. Starting to fill the screed, it is from the far wall to the door. The surface between beacons must be filled with a solution, after which it is pulled out its layer over the entire surface, pulling on itself. In this case, the thickness at one level in different areas can be different. All excess needs to be distributed further along the laying, and the depressions are filled with a solution and re-walk the rule. A very simple technology is obtained.
After 48 hours, when you can walk on the screed, you need to remove beacons. The resulting gaps are close to the same solution that the cement screed is made. After that, we wait until the screed is dry.
How to determine the quality of work
After the repair of the floor is finished with their own hands and the entire layer of hassiness of drying, there are several criteria for which the quality of the work done is determined.
In case of detection of defects, when the screed is already dry, that is, after its solidification, repair small deviations for curvature and the horizon is not hard. To do this, pour a small layer of self-leveling solution. But when the screed has a layer of air inside, then regardless of which its thickness in this area, it is necessary to completely dismantle the solution. After that, re-maintain the base and pour the solution again. By the way, the semi-dry screed cannot have such a defect, due to the technology of its laying.


