Plastic windows in city apartments or private houses are not uncommon for a long time, so it is difficult to surprise someone with them. They provide good sealing and thermal protection, but many are not interested in this issue. People are interested in what types of plastic windows are and how to install them correctly without the help of specialists. We will try to disclose these questions in our article, taking into account all the nuances of the installation.
If you decide to install such windows yourself at home, then you need to choose a suitable model for installation, and for this, you need to know everything about plastic structures.
Depending on the number of casements, the windows can be:
- single-leaf, with side or vertical opening;
- bivalve, with one or two opening leaves;
- tricuspid, with one, two or three opening leaves.
By the type of opening, windows are:
By the number of chambers in a double-glazed window, there are:
- single-chamber, have two glasses with an air gap;
- two-chambered, have three glasses with two air gaps;
- three-chambered, have four glasses, with three air gaps.
Based on the shape of the window, they can be:
- rectangular shape;
- trapezoidal;
- arched and round;
- triangular.
 There is another category of windows that combine several types of material. In other words, they are called combined windows. They usually consist of wood, PVC and metal.
Advantages and disadvantages of plastic windows
If you cannot decide whether to install plastic windows for you or not, familiarize yourself with their advantages and disadvantages, then making a decision will not cause difficulties.
Plastic windows have the following advantages:
- tightness;
- soundproofing;
- perfectly retain heat indoors;
- absolutely harmless to humans;
- a large selection of forms and opening mechanisms;
- long service life;
- resistance to atmospheric influences;
- simple care;
- a large selection of colors;
- harmonious combination with all types of curtains.
The disadvantages of plastic structures include:
- tightness, in addition to an advantage, it can also act as a disadvantage, since it prevents the free flow of air into the room.
As you can see, the advantages of such windows are much more disadvantages, especially since it can also be solved by regularly ventilating the room.
Installation of windows, stages of work
You have decided on the type of window block, now is the time to get down to work, which consists of several steps.
Stages of work:
- opening measurement;
- dismantling the previous window;
- preparing the window for the installation process;
- window installation.
If you have the financial resources, you can order the installation of a window in a special office, then you will not have to do anything. But if the family's budget is very limited, then the window installation can be done by hand, following our recommendations and sequence.
Measurements of the window opening
Measurements are performed in several stages, but first, consider the figure, which indicates all the indicators of interest.
The opening is measured in this way:
When measuring a rectangular window, you need to know the width of the opening, from one extreme point of the inner slope to another, and the height, which is equal to the distance between top windows and windowsill. These values \u200b\u200bare summed up with the thickness of the sill. To find out the size of the installed window, it is recommended to use the formula:
Width \u003d Width of the opening - 2 * (gap size);
Height \u003d Opening height - 2 * (gap size) - height of the support profile.
Measurements should be taken at several points of the opening, and when calculating, be guided by the smallest indicator.
The curvature of the opening is determined using a plumb line and a level. Verticality is checked with a plumb line, and horizontality with a level. If you find serious violations, then it is better to fix them on the drawing. These notes will be useful to you later.
Ideally, the opening should look like an even rectangle in the drawing, then window block will fit perfectly into it.
If you plan to install several window blocks at once, then measurements are carried out for each window separately. You will not find two identical openings, at least the width of all will differ, but the height indicator should be approximately the same.
When positioning the window frame, one rule must be observed so that it is 2/3 of the wall width from the inner border. If the outer walls are lined with insulation, or it is only supposed to be done, then the window block is allowed to be mounted even further, from the inner border of the window.
To measure the external ebb, you need to measure its length or take the opening width indicator you have and add 50 mm to it for the bend. The indicator width for an external ebb is calculated as the gap between the plane being installed and the outer edge of the wall, and the interval for the protrusion and bend is added to this data. If the outer walls are sheathed with insulation, then the width of this layer is also added.
To measure the window sill, it is necessary to determine its width, which is equal to the gap from the adjacent plane to the inside of the wall, but without taking into account the width of the window block. How much the window sill should protrude is determined in each particular case, but according to the rules, it should not go beyond the radiator by more than 1/3. If it is located very close to the wall or is generally installed in a niche, then special ventilation holes can be provided on the windowsill.
Measurement of the slopes is performed after the installation of the window. Before that, it is definitely not possible to measure their length. The length indicator is calculated as the height of the opening, taking into account the cutting.
Measurements of the opening with a quarter
Such openings are typical of brick houses, and they measure them with some peculiarities. The opening is measured along the outer part and is calculated using the following formula:
Width \u003d width between quarters + 2 * approach of a quarter to the frame (25–40 mm);
Height \u003d height of the opening from low tide point to top quarter point plus an allowance for the top quarter (25–40 mm).
When measuring such an opening, take into account cement screed, which is located under the ebb and the windowsill.
Measurement of window blocks in a private house
 To measure the opening in a private house, it should be noted that its size may be larger than it looks upon visual inspection. Slopes are often closed cement mortar or insulation. Therefore, before taking measurements, it is necessary to remove all unnecessary things.
This is also necessary in order to installed window well installed in the window opening and did not accidentally fall out. Fastening the window in a layer of insulation firmly will not work.
Moreover, such an expansion of the opening will allow you to install a wider window in the room.
Window selection by installation method
If you have removed all sizes, then you can go to the store and order the necessary windows. There you can examine in detail the opening mechanisms and find the best option for your room. But not only this must be taken into account when selecting a window. The fastening method also plays an important role.
There are two types of installation:
- through the frame, then you have to remove the sashes and double-glazed windows, even from blind windows;
- on the supporting reinforcement, which is attached to the frame during its manufacture. This method is suitable for people who decide to install windows on their own, then you will not damage the glass unit. But it is very difficult to do this alone, since the fully equipped window is very heavy.
The preparatory stage involves the following work:
- free space near the window;
- interfering furniture is removed;
- the floor and the radiator are protected from construction debris;
- window structures are being prepared.
The last stage is also divided into several steps:
- preparation of the window frame;
- filling with foam;
- dismantling the old frame;
- installation of a window frame.

Window block preparation
Installation of a window structure begins with its preparation. Depending on which installation method was chosen, they begin to remove the double-glazed windows and hinged sashes from the window block, or do not remove them, leaving the window assembled. To remove the glass unit, you need to pry off the glazing bead with a screwdriver and push it out of the groove. Thus, you need to remove all four glazing beads, starting with the vertical ones.
After removing the glazing beads, mark them so that you do not have gaps during assembly.
After removing the glazing beads, tilt the frame forward, then the glass unit will freely come out of the grooves. Until you need it, so set it aside.
The next thing to remove is swing doors. To do this, you will need to disassemble the canopy. To do this, remove the special plugs and loosen the hold-down bolts. If this is a fanlight system, then to release the upper part of the window, turn the handle so that it is located in a central position, while the sash itself must be open for ventilation mode. It remains to pull the hook from the lower canopy and the sash can be removed.
Holes for fasteners should be prepared along the entire inner perimeter of the frame. Their number depends on the size of the window, but on average, there should be three holes on the side parts, and two at the bottom and top. To drill them, you must use a metal drill. An 8–10 mm anchor is taken as fasteners, consider this fact when choosing a drill.
If the installation of the window will be carried out on the provided ears, then the window does not need to be disassembled. All you need is to attach the fastening elements to the frame and fix them with screws.
Foam filling
The foaming stage is not spelled out in GOST, and even experienced window installation specialists do not always do this. However, filling the support profile with one-component polyurethane foam is recommended to eliminate warm air leakage in the lower part of the opening.
To prevent this, inner space the substitute profile should be covered with polyurethane foam. It is better to postpone further installation of the window for one day, this will allow the foam to completely harden and fill all the voids.
Dismantling the old frame
Disassembly of the previous window must be started on the day of installing a new one; you should not do this in advance. Decide right away if you need an old frame. If you plan to use it further, in the country or somewhere else, then its dismantling should be careful. This process will be quite laborious, so it is better to go for the second dismantling option. To make this task easier for yourself, the frame can be cut and then it will be easy to dismantle it. First you need to remove the hinged doors and remove the glass so that you cannot get hurt. Next, the frame needs to be cut around the entire perimeter in several places. With a crowbar or nail puller, you need to pry each part of the sawn frame and remove all parts from the window.
The insulation under the box must also be removed. With a puncher, you need to process the slopes or completely remove them if the installation of windows is carried out in a private house.
The sill is also removed with a crowbar. The lower part of the opening is processed with a perforator, removing  thus, the cementitious substrate.
The dirtiest stage is over, now you need to start cleaning up construction waste.
The ends of the opening should be leveled, cleaned of construction dust and primed on the surface. This point is not always done by installers, so do-it-yourself installation has a great advantage.
If the installation of windows is supposed to be in private houses, then, in addition to the above measures, it is necessary to lay a waterproofing layer around the entire perimeter of the opening, then you will protect your house and fasteners from moisture. To strengthen the opening, a wooden box is sometimes installed.
Window installation and methods of its fastening
Before installation work, the lower end of the opening is covered with a special substrate. It is laid along the edge of the frame and the location of the impost, the central post or in the middle of the opening.
On this backing, you need to install the edge of the frame or the entire window based on which method of installing the window you have chosen. The supports are not removed, the installed window will stand on them in order to facilitate the task of the anchors.
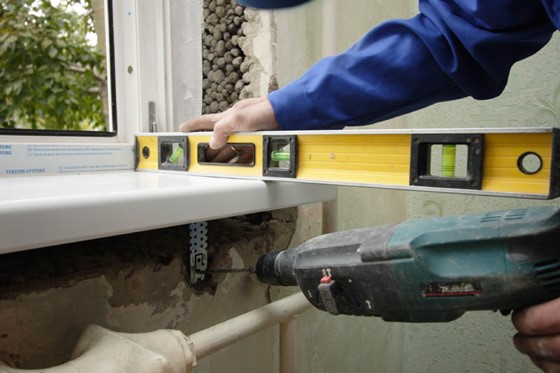
The window is fixed on the sides with small blocks, they are hammered between the wall and the window frame closer to the upper part of the window so as not to bend the structure. After installing and fixing the window, check it with a water level for horizontalness.
Bubble levels when measuring horizontality have a small error, therefore, window installation experts advise using a water level.
If horizontal is violated, these errors are corrected by placing substrates under the frame. After being horizontal, it is necessary to check the vertical window. For these purposes, it is recommended to use a plumb line.
 After the window has been checked for horizontal and vertical position, it can be anchored.
Fastening the window through the frame
If you are interested in such a mount, then for work you will need a punch, which needs to drill holes in the wall. To install the frame without errors, it must first be installed, aligned horizontally and vertically, and anchored the lower part of the window block with anchors. Next, you need to prepare holes on the sides of the frame and at the top, and in the same way, bait everything with anchors. When the frame with baited anchors is ready for final fastening, check it again in all respects, and only then proceed to tightening all the fasteners. Here, the main thing is not to overdo it, otherwise you can deform the frame.
Fastening the window on plates
If the window is being mounted on special plates, then you need to first attach them to the frame. In appearance, these are metal plates with holes for anchor bolts. If you bend the plate in the form of a step and attach it tightly to the wall, you can start drilling a hole for fasteners.
The installation of the window begins from its bottom, and after each fixed plate it is checked for horizontal and verticality.
Drainage installation
 Along the outer edge of the window there is a groove into which you need to insert a drain. For a more durable fastening, screws are used with which it is screwed to the frame. In addition, the place where the drainage is installed is thoroughly foamed, according to all the rules.
How to assemble a window
After installing the anchor bolts, you can start assembling the window unit. If you disassembled the window yourself, then assembling it will not cause you any difficulties, since all the work must be repeated exactly the opposite.
What should be done:
- install a double-glazed window into the frame and secure it with upper and lower glazing beads;
- fix the glass unit with side glazing beads, and snap them all the way in order to hear a characteristic click. If you can't do this with your hands, you can use a rubber mallet, and slightly tapping, snap the glazing beads;
- install the sash;
- after installing the swing blocks, it is necessary to check them for opening and closing;
- check the installed window with a level, for compliance with all parameters;
- open the window alternately 45 and 90 degrees. In these positions, the swing leaf must remain stationary and must not close or open itself.
When the window has passed all the checks, you can safely proceed to sealing the side gaps with polyurethane foam. Remember that over time, the foam can break down, ultraviolet rays are especially harmful to it, so it needs to be protected.
To do this, it is necessary to stick a hydro-vapor barrier adhesive tape on the inside and a moisture-resistant self-adhesive membrane tape on the outside of the window. In addition to the listed properties, the membrane tape also has vapor permeability, which allows you to protect the foam from moisture and remove moisture from the inside.
The lower edge of the block also needs to be protected; for this, a waterproofing strip with a foil surface is used. When attaching it, it will be completely closed by the window sill.
To ensure the best adhesion of foam to plastic surfaces, they need to be slightly moistened with water.
Window sill installation
The final stage of the installation is the installation of the window sill. To attach it, you need to trim its edges so that it can easily enter under the frame and fit snugly against the substitute profile. On the sides, it should go out onto the walls, by 5-10 cm. With the help of pegs, its horizontal position is adjusted, and it is recommended to foam the hollow space with polyurethane foam.
 For fastening the window sill, self-tapping screws 4x75 mm are used, which fix the window sill to the frame in three places, on the sides and in the middle.
After the work done, the installation of the window is completed, but you should wait about a day for the foam to completely harden, then the sash can be safely opened and closed. By the same principle, you can install plastic balcony frames, taking into account that the main emphasis will be on the parapet, which will need to be strengthened.
The installation of wooden windows is slightly different from plastic ones, so it would be wrong to use this technology.
With constantly rising energy prices, the problem of energy saving in a private house is becoming more and more urgent. According to energy-saving experts, plastic windows with high-quality double-glazed windows can save up to 20% of heat, and, therefore, reduce the payment for its source. Installation plastic window in wooden house - the matter is quite simple and anyone who is familiar with the level, drill and screwdriver can handle it. And the point here is not only to amuse your vanity. Such an operation can save you up to 30% of the cost of a plastic window, which will have to be paid for dismantling the old window and installing a new one. How to install a window in a wooden house - below.
So, if you need to install a plastic window in a wooden house, start with measurements. The fact is that standard sizes window designs are often not suitable for most homes. According to the technology of installing such a window in a wooden house, the gap should be minimal, however, sufficient to compensate for the change in the geometry of a wooden house when it is recruited by moisture elements. As we know, this expands the tree, which can cause the window to be skewed.
It is necessary to take measurements taking into account the window frame if you are going to leave it. This can be done only after a complete examination of it. If it is not affected by fungus and there are no traces of rot on it, it can be left as a base to which the window will be attached. Otherwise, this cannot be done.
After making measurements, we go to the company that manufactures windows. When choosing a complete set of windows for a wooden house, you need to pay attention to 4 elements:
- Double-glazed window. Glass is one of the most vulnerable spots through which the greatest amount of heat loss occurs. Modern double-glazed windows, as a rule, consist of 3 glasses, between which a special inert gas is pumped with a lower thermal conductivity. The thickness of the glass in the glass unit is at least 4 mm. Currently, manufacturers of plastic windows apply a special film on their outer surface, which is used for car tinting. It reduces the thermal conductivity of the glass unit, reducing heat loss. This film can be either transparent or darkened. The latter is best ordered for windows on the south side. Then the room will not be too hot in the summer. Please note that triple glazing is heavy and therefore the frame of the window frame to which the window will be attached must be strong to support it.
- Profile. The metal-plastic profile is the material from which the frame and window sashes are made. In the construction of a window, the profile is of great importance. Its thickness is determined by the number of air chambers. If you make a cross section of it, you can see the presence of air channels. They serve to reduce heat loss, because the air that is in them has a lower thermal conductivity. The more cameras in a profile, the more energy efficient it is. In addition to this indicator, a five-chamber profile with a triple glass unit will provide excellent sound insulation, which is very important if a wooden house is located in a noisy place, for example, by the road. Be sure to have holes in the profile to drain moisture, especially for a wooden house, for which its concentration can be destructive.
- Fittings. You cannot save on it. The swing-out window mechanism, especially if the sash is heavy, experiences considerable stress. If it is made poorly, then the window may not open well, sit down quickly, warp. Over time, poor fittings will cause the sash to not fit snugly against the window, leaving a gap.
- Seals. Check what material they are made of. Ordinary rubber in the cold can simply crack, making the window leaky. Therefore, the seals must be made of a special material that can withstand large temperature drops.

Having specified all the necessary nuances, place an order and wait for its execution.
Window acceptance
When your finished window is delivered, check its dimensions and completeness. The contract for the manufacture of the product must indicate the maximum deviations from the declared parameters. If they are larger, do not sign the acceptance certificate and send it back. Yes, in this case you will lose in latency, but you will gain in installation time.
What needs to be checked?
- Check the plane of the product. If it looks like a helicopter blade, return.
- The window is usually delivered with the sash installed. Check how it opens for airing and when cornering.
- Examine the glass unit. It must be free of cracks and scratches. If everything is in order, take the product and get ready to install windows in a wooden house.
Preparatory work and dismantling of the old window

Remember, you are doing for yourself, so be guided by the principle: better slower, but better. The teams of installers, although they know better how to install windows in a wooden house, do not care too much about the condition of the walls, old window sashes and glass, as well as the window block. Most of the recycled materials can be useful to you, so it's best to dismantle them as carefully as possible.
Dismantling procedure:
- The first step is to remove the sash. They may well come in handy, for example, for equipping a greenhouse in a local area.
- Pay attention to the glass, if they are not firmly attached to the frame with glazing beads, it is better to remove them. For this operation, take a crowbar or a small crowbar, hold the fold with one hand, and use the other hand to lift it up with the tool until it comes out of the curtains. Then just take it out. Do the same with the others.
- When the sashes are dismantled, unscrew the second part of the curtain from the window block.
- If the new window will be attached to the old block, leave its frame, if not, dismantle it. To do this, take a hacksaw for wood and file the frame posts at the bottom of it. Then use a crowbar to feed it inward.
- By loosening the stand slightly, you can remove it from the groove in the top bar. After that, it will be possible to remove the crossbar, the next post and, finally, the lower part with the window sill.
DIY window installation in a wooden house

Installation work procedure:
- First of all, free the surface of the window box from debris and clean it from burrs and chips. Debris can be shaken off with a dry cloth or soft brush.
- Next, the window sill is mounted. If a window sill is installed in a wooden house, a PFH window sill will serve as the basis for installing a window, therefore, its installation must be taken very carefully.
- When installing windows in a wooden house, the first step is to align the window sill on all planes. This can be done using adjusting plates, or thin pieces of fiberboard, and a level.
- When using fiberboard, it must be treated with an antiseptic. For reliable fastening of the window sill, you can make small recesses in the side posts of the box so that its ends go into them. In this case, the window sill will not "ride" when attached.
- The window sill is fixed in the lower strip of the window box. This is done using stainless steel screws. Step back from the end of the window sill 20 mm and use a screwdriver to screw the self-tapping screw into it. Remember: a PVC window sill has a hollow interior. Therefore, so that the screw cap does not break its surface and does not "go inside", it is necessary to use washers. Do not be afraid to screw the fasteners in small steps, it will still be hidden under the installed window.
- Next, prepare the window for installation. Insert the handle into the side flap and move it to the closed position. Then mark the holes in the window frame through which it will be attached to the box. The distance between them should not exceed 200-250 mm. The diameter of a self-tapping screw for wood is from 6 to 8 mm, steel is necessarily stainless. The hole diameter is 1 mm less than the dimensions of the self-tapping screw. An electric drill is used to drill it.
- On the inside of the window frame, we drill the holes so that the head of the self-tapping screw freely goes inside and firmly rests on the outer part of the profile.
- When the holes are ready, we install the window block in the seat. Since you have already set the level of the window sill, there is no need to adjust the horizontal position of the window. So that it stands evenly relative to the wall, you can attach any stops to the walls.
- Measure equal distances to the edge of the slope and align the window along them. Use a spirit level to level the slope. The window must be installed in the center of the box, leaving the technological gaps that we talked about above. To prevent the installed unit from moving after alignment, immobilize it with wedges or blocks. After checking that the installation is correct, start tightening the screws.
- After the window is fixed, it is necessary to install double-glazed windows. This must be done carefully. To begin with, adjusting plates are mounted on which the glass unit will stand. Thanks to them, the condensate drainage holes will not be blocked. The glass unit should not fit into the frame with interference. Otherwise, if the latter is skewed, it will simply burst.
- Then fix the glazing beads. When the glass unit is installed, it remains to fill up the gaps between the window frame and the window frame, as well as at the bottom of the window sill. The foam needs a day to finally harden, after which its remains can be cut off with a wallpaper knife. It is more convenient to do this with a knife, because it is quite flexible and can be reached anywhere.
Important! Before installing a metal-plastic window in a wooden house, it is not necessary to remove the protective film and cork stops from the profile until the end of the work. After the foam has hardened, it must be cut off and must be covered with mortar, plastic or other material. The fact is that the polyurethane foam "does not like" ultraviolet radiation, therefore it quickly crumbles, leaving behind cracks.
Installing plastic windows in a wooden house is not as difficult as it seems at first glance. This process has its own technological subtleties, since wood is still a living material that changes over time, and the house shrinks. When the wood starts to dry, it becomes a heavy press for the window block. As a result of this influence, the frame begins to tilt, and it becomes impossible to open the sash.
To avoid such problems, it is necessary to adhere to and observe the special technique in the installation.
We prepare the window opening
In order for a plastic window in a wooden house to serve for many years, it is necessary that everything is done correctly. First of all, you need to prepare an opening in the wall. Usually the opening is cut after the frame has been assembled, but sometimes the opening is left at the construction stage.
If the holes for the openings in the wall were cut out after the construction of the house, then it will be possible to prepare them for the installation of windows no earlier than in a year. This is the main shrinkage time of the house.
It is better to mark the contours of the future opening even during the construction of the house, so that subsequently there are no inconsistencies. Everything is calculated so that the logs above and below are cut in half, thanks to this, it will be easy to install the casing structure. The width of the hole in the wall is procured a little larger, taking into account the installation of the casing.
When the future opening is left at the time of building the house, then its width is made less than planned, since when the bars dry, the required value will be obtained. If its size is left larger, then when the house gives a landing, it will become larger than the prepared window.
Before inserting plastic windows in a wooden house, all the side parts of the beams are well processed and covered with a special solution that will protect them from decay. The wood is carefully sanded to a level surface. Then the hole is aligned using a level and a plumb line, since wooden houses always shrink well.
What do you need to know to install plastic windows?
The technique of installing plastic windows in a wooden house actually does not differ from other types of installation.

When it's time to insert windows, you need to prepare all the necessary tools and material. First of all, these are:
- Drill,
- Level,
- Chisels,
- Measuring device,
- Hammer,
- The device required to adjust the glass unit,
- Anchor bolts and plates,
- Polyurethane foam,
- Work clothes.
It will be very difficult to mount a plastic window in a wooden house alone. In this case, it is better to resort to help, since these structures are heavy and considerable in size.
A prerequisite for the technology of installing a plastic window is the optimal temperature regime. Weather with strong gusts of wind or frost is not suitable.
Very often, in an old wooden house, old out-of-order structures are replaced with plastic ones. Thanks to their installation, the cost of paying for heating is reduced. And also, thanks to their tightness, you can finally get rid of annoying noises outside the house.
When plastic windows appear in an old wooden house, it immediately transforms appearance building. In addition, there are other benefits:
- they are afraid of temperature changes and high humidity,
- there is no need to paint them every year,
- no effort is needed to open or close the sash,
- they will not rot or deform.
But for all this, you need correct installation plastic window in a wooden house.
The benefits of installing such structures are obvious, because their cost is affordable for everyone, and the absence of their annual restoration, and a long service life, make them even cheaper than wooden counterparts.
But first of all, it is necessary to adhere to the correct technology in order to deliver the structure, this will avoid unpleasant situations during operation, and will become the guarantor of a reliable and warm home.
Basic techniques for installing plastic windows.
If home repairs are done by hand, then often, specialists are not involved in equipping window frames. So how do you insert windows so that you don't have problems with them in the future?

Due to the fact that wooden buildings, over the entire period of their operation, are subject to shrinkage, for the installation of plastic structures, it will be necessary to make a casing. It is necessary so that the load from the bearing walls is redirected to it. And PVC, at the same time, will not give in to deformation when planting a house made of wood.
A siege can be simple or complex.
For a simple one, you need to cut grooves in the openings, and then hammer them in with bars. And for a complex casing, you need to do in window opening comb, and a carriage will be attached to it from above. The most durable, of course, will be the option of complex casing, since when the house shrinks, the ridge will be able to move in the groove, while not having pressure on the window frame.
To build a casing, it is necessary to cut a special protrusion in the opening (it is called a ridge). The vertical sides of the casing with grooves (they are called - carriage) will be inserted into it. The protrusions are made with a chainsaw.
The complete assembly of the casing structure is carried out directly in the opening itself. The finished box does not have a fastening with an opening, it must be able to slide. After all, if the installed casing material is attached, it will deform along with the frame during shrinkage.
Always, first, the vertical parts are installed, and there are already two missing parts to them. Above the board at the top, it is necessary to leave a space of about 8 cm, when the building shrinks, it will become smaller, and soon it will disappear completely. To begin with, it is filled with insulation.

The gutter structure must also be treated with a special antiseptic solution, and after it dries, it is already necessary to proceed with the installation of the glass unit.
Choosing a plastic block
Today there is a wide variety of plastic insulating glass units.
Their main characteristics:
- Multi-chamber... Profiles can be either two or five chambered. A medium version with three or four cameras is fine, and can provide good protection against low temperatures outside.
- Type of plastic block... If there are more air spaces in it, it will more reliably be able to keep heat inside the room, and not let the cold out from the street. Of course, the cost of such blocks will be much higher.
- The quality of the fittings. If you save on additional devices, you may soon run into a problem that the doors do not open well, or the handles stop turning. Therefore, it is better not to economize on such details initially.
Glass unit installation
How to install PVC blocks? This will require special mounts. They are attached to a special slide on the side of the frame. With the help of a level, the frame is installed in the opening and leveled, it is easier to do this if you insert wood chips from all sides into the gaps. And after that, it is mounted to the casing by drilling holes for screws, which are selected of a suitable length and screwed into the tree.

When the window unit is delivered, it is necessary to seal the frame from below with polyurethane foam. After that, all the sashes are put on, and the entire frame around the perimeter is also treated with polyurethane foam. After it has completely solidified, you can start installing the window sill.
In order to install a window sill, you must:
- on the sides of the casing, at the level where the window sill will be, it is necessary to make grooves up to 2 cm,
- then the window sill itself is inserted into them,
- it must be fixed with screws that are screwed into the window itself.
The end of the installation is plastic construction there will be an arrangement of slopes with which the window will have a more attractive appearance.
Self-installation of plastic window blocks in a house from wooden frame, of course, will have certain difficulties. But if all technological instructions are followed, everything will work out, and the end result will delight its owners for a very long time.
Video: installation of a plastic window in a wooden house


