When the base of the floor is uneven - it threatens the deformation of the coating, its creaking, a decrease in service life and the destruction of integrity. However, before aligning the floor of the plywood, it is necessary to prepare the basis. So if the wooden floor you need to simply screw the sheets with the help of screws to the old ground, previously convinced that the boarded old floor is quite durable. Plywood should be a thickness of at least 10 mm in this case.
There is a more laborious, but also a more solid method of laying plywood to lags. Unlike the previous method, this allows you to perfectly align the base and prepare it under any coating: parquet, laminate, carpet, linoleum, tile.
Requirements for the base
First of all, it should be checked dry enough concrete base. For this, for three days, put a piece of polyethylene tape for three days and press it at the edges of anything heavy. After three days, pay attention to the inner side of polyethylene: if condensate was formed on its surface, the concrete base is too wet.
To protect plywood sheets from exposure low temperatures And moisture in the future, cover them with an antiseptic before laying. So you will protect the floor from fungus and mold. If you have not yet decided what to put on, pay attention to the phaneur of the IV category. It is available at a price and perfectly suitable for black alignment of floors.
Phased instruction
The advantage of fulfilling the laying of plywood to lags is that it can make it one person. For work you need:
- Long roulette;
- A hammer;
- Perforator;
- Liquid or laser level;
- Screwdriver;
- Electrolzik.
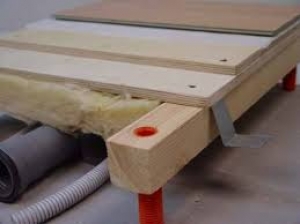
To begin with, clean the concrete base from dust and dirt, as well as dry it. Using the level, mark the border of the new floor throughout the perimeter of the room. Prepare lags - bars from a natural tree. You can buy ready-made lags on any construction market, but make sure that they are well sucked. It is recommended to take lags of softwood wood with an optimal size in a section of 40x100 mm.
Take care of the wooden layers for lags whose width will be from 10 to 15 cm, the thickness is 2.5 cm, the length is 20 cm. The laying should be made perpendicular to the light falling out of the window. The distance between the lags should be on average 40-50 cm.
The free space between lags should be filled with soundproofing, mineral wool or basalt insulation, then your semi will be silent, and warm.
Do not lay the lags close to the walls, should remain 2-3 cm of free space, which will not give the floor to deform from seasonal changes. During the installation process, make sure that the system of Lag corresponds to the level of the future floor marked earlier. In uneven places you can adjust the height of the lag with the help of wooden clins. Do not forget between lags, gaskets and wooden wedges to make a layer of linoleum or foamed polyethylene as soundproofing soft linings.
When the perimeter of the lags will be laid, install the transverse bars. When the entire doom is ready, you can begin to fasten the Phane to the floor. Pre-plywood sheets should be dried if they were brought from the street, after which it was 75 cm to cut into squares into squares from a side of 75 cm. Squares must be screwed to lags so that the gap in 2-4 mm remains between them. If the sheets are closely screwed to each other, in the future the floor can start trying.
The tree easily changes in volume, so the floor can "walk", depending on the time of year, humidity and air temperature. That is why the gaps between the boards are needed, between plywood sheets, walls and lags. You can scout the phaneer by self-drawing in a step of 50-100 mm.
When installing plywood on lags in the corridor or hallway, the lags should be fixed so that they are across the movement of people. Then the floor will be stronger and thorough.
How to align the floor to lagas?
If on the uneven base of the height of no more than 10 mm, then at these minor irregularities is allowed to attach plywood directly to concrete floor, without installing wooden plates. In this case, the plywood should be a thickness of at least 18 mm. The base with insignificant irregularities can be covered with thick plywood, consolidating it on a special adhesive mastic or on a dowel.
This method suggests the same preparation of the foundation as before installing the lag. The glue is applied to the concrete base with a toothed spatula.
The alignment of the floor on the lags is the most optimal option when the height differences are more than 50 mm. This floor will become a truly reliable basis for any decorative coating, while natural birch puner It is safe and greater clean material, unlike DVP, chipboard, OSP.
Additional Information:
Alignment of the floor plywood on lagas is a very popular way to prepare a smooth base under parquet, laminate or linoleum. This option requires much less strength and time than, for example, a floor screed. Another plus method is a good floor ventilability, and this is especially important if your choice fell on a laminate or parquet.
Floor alignment with lag
The use of lag for alignment of the base is an old method. Reliability is verified by centuries. However, not all so simple! To achieve good results, it is necessary to comply with technology. Go to the matter after completed all work with walls and ceiling.
Observe the security technique! All wiring must be de-energized, it will help to avoid short circuits and accidents. All actions are best done in protective glasses and gloves.
It is worth noting that dampness negatively affects wooden politsThat is why make sure that the wooden elements used are no more than 19% humidity, in addition, they need to be treated with antiseptics. Air humidity should not exceed 60%. Wooden elements carefully examine: if they are damaged.
About the preparatory stage
Clean the floor from dirt, dust and garbage. Single Ruberoid or waterproofing polyethylene film for the entire floor area. Fall - 15-20 cm. Scotch and fix the joints.
If the material is thin, it is better to lay it in several layers. For good sound insulation, all sorts of layers are used. Size - the thickness of the lag by 1.5 cm.

Wood bars are used as the lag as themselves (length - 2 m, width - 0.8 m, thickness - 0.4 m). Near the doorway, install a wide lag (wider than standard for a couple of millimeters).
Lugi put up 4-5 cm from each other. There should be a 30 mm gap between the wall and lags.
Before proceeding with the installation of Lag, the surface of the floor is measured and the level of the zero mark, focusing on it, set lighthouses in the form of screws. They are placed every 0.2 m. Selflessness must be opposite each other, thereby forming squares.
About laying Lag.
On the prepared foundation laid lags, focusing on lighthouses. In places with large drops of heights, they are installed on the columns (bolsters) of different heights, not forgetting to use lining. The height of the lag is regulated by self-drawing and screwdriver: the sound insulation layer is tightly tight, the lags are lowered or rising.
If the lags need to be founded on the basis of the soil, then they do it in such a sequence: the pillars on the foundations from the brick - Ruberoid - Soundproofing Gasket - Lags. Then the lags are carefully measured (in different areas: perpendicular, longitudinally, relative to each other) rail and level, the plane will be performed perfectly smooth.
The next stage of work concerns the crate. At a distance of at least 0.5 m between lags on wooden columns Set the crossbars - riglels, fix them with self-draws. The space between lags is filled with a layer of heat-insulating material.
You can safely use Minvatu, Ceramzit, Eco. Clauses between insulation and lags eliminate. From above lags, cover the layer of bitumen paper or pergamine.
Final Stage: Flooring Plywood for Lagat and Grinding
On the basis of Lag Freedy Faneru. At first, decompose it, after tagging the size of the plates, make gaps (1-2 cm from the wall, between the plates - less than 1 cm). Plywood sheets secure on the crate, the screws are attached to every 5-10 cm. Make sure that the sheets of sheets fall on the lag, to put the plywood with the displacement.
To increase the strength of the floor, laying another layer of plywood, while secure it with the previous glue. Upper layer Seek.
The prepared foundation will be well ventilated, warm, soundproofed, it will become a reliable starting coating for subsequent flooring of parquet, linoleum or laminate.
Alternative options
Option number 1: "Adjustable plywood"

A novelty in the building materials market is an adjustable plywood that allows you to do without the use of glue. The holes here are drilled according to the finished scheme in the sheet, the sheet is then put on the floor, and the similar holes are drilled already at the base.
Exhibit level. Then stacked the phaneer, it is fixed on top of nuts with washers.
Excess pieces of rods are cut. Put the second layer of plywood. This method helps to correct the oblique floor without lag.
Option number 2: "On the glue"
This method must be applied on the finished screed (with its complete drying), if the height differences are small. First, check the level of humidity: a meter piece of polyethylene press to the floor with something heavy, if there is no spain after three days, then proceed to work with plywood sheets.
Before laying Phaneur, cut and put it on the floor. This manipulation will allow you to fit the size, cut the pieces with the desired parameters for corners, arches, pillars, doorways.
There should be no cracks on the plywood or bundle. As this material prone deformation (it reacts to the slightest increase in air humidity), there is a small gap between the sheets (about 5 mm).
The gaps help the air to circulate. Fanuer put with offset. Number all the details and sketch the laying scheme. Remove the Phaneur. This was only the "fitting" stage.
If you decide to put Faneur without using lag, then your gender is perfectly smooth. Carefully dust and load the base (a primer is suitable for this, it is prepared from glue for plywood and solvent or bitumen mastic with gasoline). This composition (it will ensure the strength of the cement gender, will improve the adhesiveness of plywood and bases) cover concrete coating. Apply the primer need a roller.
The scheme for laying sheets is already ready, it remains to be copped. As already mentioned, it can be made with glue or bituminous mastic. But that's not all! In addition to glue, you will need an anchor bolts or screws. The distance between them is 20 cm.
After putting the plywood, drill holes in the screed. Next, plywood sheets are grouped by sandpaper or a special typewriter.
In the case of typical housing attals, there is very often the need for alignment of sex, since in the future the installation of an even and durable coating is not possible without this initial condition. The most high-quality materials will be deformed during operation (literally in 2-3 months), if the basis for them is an uneven black floor. One of the most acceptable methods (by labor costs and cost) is a way to prepare the foundation for outdoor coating Lagam alignment. This species is the most popular.
Pluses of floor alignment lagas
Of course, the leveling of the ground is much easier and more affordable than to create a concrete tie. The alignment of the floor on the lags is a faster process, in comparison with the manufacture of concrete screed.
The advantages also include:
- Ease of installation. Such a base for future coverage can be made with your own hands. To do this, you only need to clarify some technical features;
- In comparison with the result similar in effect concrete screed, this method is more economical (much less materials required, and according to the funds spent);
- The heat and sound insulation of such a floor is significantly better;
- In the space between lags, various communications can be hidden that are not desirable for the review;
- The pressure on the ceiling plates is significantly reduced, so this method is well suited for homes old buildingswhere extremely valid values \u200b\u200bare much lower than in modern buildings.
Required tools
To implement the idea, you will need a small list of items that can be purchased almost in any construction related construction.
It is necessary for the prevention of a perforator, a special subject to determine the level (1.5-2 meters), a measuring tape measure, an electric drill, an electrolovka, a screwdriver, screws (specially for wood) and a hammer.
Preliminary preparation of the foundation

Phased description of the main points:
- Pay attention to the humidity of the air in the room where the installation will occur. Its value should be in the limit of 60% and in no case, not exceed it.
- Check the moisture of the screed (which is already available). You can put a small piece of polyethylene for the base and tightly press any cargo, leaving about 2 days. The determinant of a dry screed, which is allowed to carry out further work, is the absence of condensate.
- We clean the surface from dust, wet areas and fatty contaminants (if available).
- Pre-dried lags we clean from dirt and soak the antiseptic in order to prevent the appearance of microorganisms during the operation of the floor.
- Additional materials: insulation, substrate, plywood (moisture resistant), foamed polyethylene.
- Recommended section of the section Lag - 50x100 cm, or 100x100 cm.
- After preparing the foundation, we apply a special primer - primer. This composition makes the surface stronger and removes dusty pollution.
- After complete drying of the primer, you can start the installation of the floor lag.
Secrets of Montaja
It is necessary to mark the mark of the new floor, pre-determining the thickness of the coating. To do this, we need to summarize the thickness of plywood, the lag themselves and the final coating, and then the obtained number must be subtracted from the distance to the concrete screed.
The distance that remains is and is the desired value for the substrates. It is better to foresee from wood and fix on a concrete basis.
If you put under a wooden substrate small pieces of linoleum (or polyethylene), noise readings will be significantly reduced.
Floor lags are stacked throughout the perimeter with a frequency of 50cm, leaving the gap to the walls of 30 mm and more. The mount is carried out by screws directly to the substrates. The space between the mounted lags must be filled with sound and thermal insulation.
In the latter, we carry out the laying of plywood, starting its device from the far corner of the room. The docking sheets of plywood should be done in such a way that the edges of the sheets bordered with the middle of the lag. Avoid tight laying of sheets with each other. It is better to leave a gap of several millimeters for the possibility of deformation changes. In the absence of gaps, the floor will turn to creak. The space from the wall to the base of the design of the lag is recommended to fill the construction foam or sheets of mineral wool.
The black base of the floor from the lag design can be supplemented with any final layer. Laminate, ceramic tile (or out of porcelain stoneware), linoleum, board. For proper montage Lag, you are guaranteed to get a smooth floor that will serve for a long time.
Live in your own house is a big luck. At the same time, this is considerable responsibility.
Your home needs to be constantly maintained in order. This is especially true of buildings from natural materials.
Tree is excellent in all respects construction materialBut for him you must follow and care.
And from time to time comes a turn of restoration works.
Preparation for floor alignment
Any sex, whatever excellent quality it is originally, tends to dispel, refuse or change the angle of inclination. Full is a rather time consuming and expensive event. But also to walk on creaking, uneven flooring dubious pleasure.
To extend the timing of the wooden floor operation, high-quality materials are selected for it, and treated, and competently stimulated. Started floors can be corrected and aligned. There are several different ways for this.
Preliminary inspection of the base
First of all, we need to evaluate the scale of the upcoming work.
To do this, we must see in what condition is the wooden floor. We tear one of the boards and carefully consider it from the inside for the presence of cracks, defects, rot, peeled marks of insects or even rodents. If all this is present, the flooring is better replaced.

If the fragment shot was intact and dry enough, then it is quite suitable for restoration works.
Also, the floor is inspected visually: how smooth it is. Determine the degree of its deviation from the horizontal will help.
If its surface is quite smooth, has a small number of low-challenging defects, it is easy to align it with a sphalese or cycle.
If the flaws are more than enough, it is better to use a self-confined mixture or plywood sheets.
Wooden floor alignment
Wooden floor squabs in a private house
The method can be called one of the simplest. Especially it is suitable for fans of natural wood, preferring natural surfaces, not covered with other decorative materials.
This procedure can be performed by manually or mechanical. The use of the first method usually takes a lot of strength and takes enough time. Professionals strongly recommend using special cycular devices.
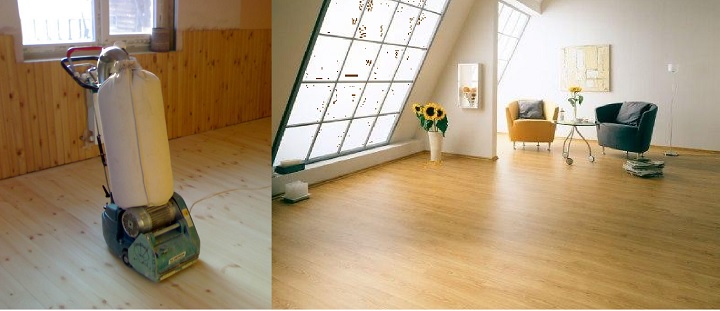 It's not just a significant reduction in time spent, but also in a better final result.
Order of work
Consider the course of work:
Upon completion of the work, the surface is cleaned from pinch, garbage and shallow dust. For this purpose, it is very convenient to apply the construction vacuum cleaner.
If the tree is assumed to be lacquered, the surface must be reliably degreased.
How to align the putty floor in a wooden house
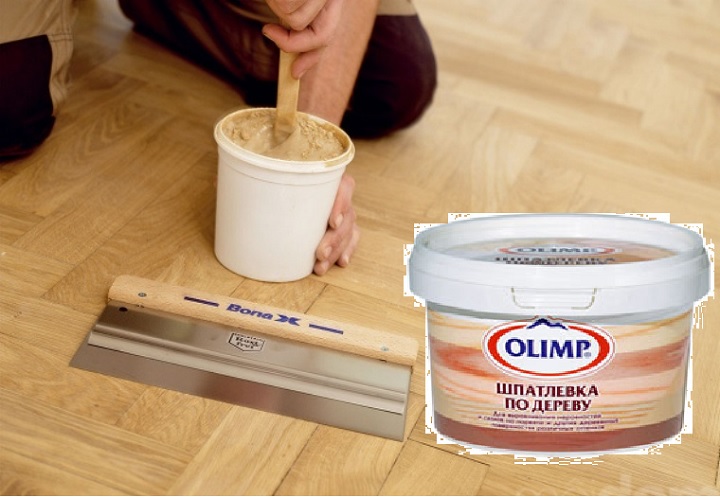
The widespread and actively used method of alignment of the floor in the old house is the use of putty containing in the composition of PVA glue. To take advantage of this method, you will have to attach a lot of strength and effort, but it is recognized as one of the most economical. The composition is prepared from small sawdust and putty, which are bred to a sour cream-like consistency.

Pre-sawing is poured with water, then press: after this simple procedure, they will absorb less moisture from the adhesive composition itself. When glue freezes, it becomes unusually durable. The advantages of this method is also the fact that the solution penetrates almost in all the slots, at the same time warming up the floor.
Order of work
For alignment of the floor, the following is done:
- with the help of the construction level, lighthouses are put, instead of special products, conventional wooden planks can be used;
- the base surface is flooded with a cooked mixture and is carefully smoothed. The layer usually has a thickness of one or two centimeters. If there are large-scale defects, it will be required not one layer, but two or more, each of which is applied only after the complete drying of the previous one;
- using the level, determine the degree of smoothness of the foundation obtained. If noticeable irregularities still remained, they are close in the same working solution.
When the alignment of the foundation is completed, you can move to the installation of decorative coating:
- plywood
- etc.
How to align the floor plywood
Wooden floor B. frame house Also lure chipboard or plywood sheets.
And the other material is quite accessible in its cost, but the latter has better strength indicators. Therefore, it is used for these purposes much more often.
The thickness of such a material should be at least one centimeter.
How to lift the floor with your own hands?
Order of work
The next job is as follows:
Next, the selected finish coating is stacked on the phaneer. It can be different - linoleum, carpet, laminate. Often, a special substrate is placed under Phaneur, which contributes to the additional noise and thermal insulation of the wooden floor.
Align the floor in the old house by self-leveling mixture
The perfectly smooth is one of the most original. A lot of effort to perform such a task will not be required, special skills too. But this method is preferably used in rooms with small height differences. In new buildings, specialists do not advise it: a shrinkage of freshly prepared wooden coating may occur.
When choosing a mixture, be careful, pay attention to its purpose: for a wooden base!
Order of work

Such a coating can dry up to two days. It is advisable to eliminate the occurrence of drafts, as well as cover the applied film from polyethylene. It is permissible to start not earlier than a couple of weeks to the final finish.
Wooden house: how to align lags
 Lag adjustment is well suited to eliminate maximum height drops. What is this method?
With the lag base completely removed the wooden coating.
Directly in the lags insert the screws of a special device: they can be twisted and screwed less or more.
Such manipulations are adjusted by the lags themselves, respectively, the position of the boards is also changing.
The use of this method leaves the possibility of high-quality insulation. Between the lags there is a warming material, after which the shot boards are returned to the place. It turns out an absolutely smooth floor, which is further adjusted in the future. If suddenly, as a result of some unfavorable factors, he will change its tilt, which are in lags, regulators will easily and quickly get rid of such a defect.
The disadvantage of this method is that the screws have a rather high cost, and the time will need to be installed. If there are low walls in the house, do not forget that when using this method, the floor will rise somewhere by 10 cm, that is, the ceilings will seem even lower. But there are also undoubted advantages.
If there are screws
 Wooden buildings are often exposed negative influence Drops of moisture and temperature, which can affect the angle of the slope of the boards.
If screws are installed in the lags, then with their help you can quickly and easily adjust the basis.
Above the preliminary installation of screws will have to be worn, but screwing is not such a complex process.
All listed methods are quite suitable for floor alignment in a private house. In each separate case The individual features of a particular structure and its foundation are taken into account. Based on these data and the preferences of the owners, as well as from the planned finish coating, the optimal suitable method is selected.


