The frame house won the love of not only residents of America, Canada and Finland, but also among our people. Why? The answer is simple: such houses are quickly erected, economical in use, retain heat well, can be built on any soils and at any time of the year. In addition, in the construction of structures frame houses There is nothing complicated, and you can put them with your own hands.
Types of materials used, their pros and cons
Traditionally, a tree is used in the framework of frame houses. It has the following advantages:
- inexpensive material
- light material
- can be processed with their own hands septic and flame retardant
- it is easily included with nails, bolts, other fixing elements
- the ease of wood allows you to apply in some cases the mounting glue
- rushet
- fully environmental
- it has a pleasant smell of wood, especially coniferous breeds
Do not forget to check all elements on geometry. Vertical racks must stand strictly vertically, and the angle between the lower strapping and the timber should be exactly 90 degrees. The strapping should lie on the same level, its quality depends largely on the level of foundation. There are several millimeters overwhelming, but not more than 10 mm. Horizontal beams must lie strictly horizontally, the distance between the beginning of the beam and the lower strapping should correspond to the distance between the end of the beam and the strapping.
Wall Pie: Best Options
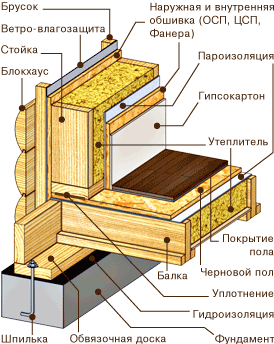
It is believed that the cake of the frame wall has the best thermal characteristics, if compared with blocks or brick walls. This opinion has the right to life, since the skeleton wall is much lower thermal conductivity. What does it mean? When the air is heated inside such a house, the walls are practically not heated, so the energy is spent on heating much less. In this case, the multilayer design allows for a long time to maintain the air of a comfortable temperature, as the walls do not absorb heat as brick and blocks. In cement houses, the air will not become warm and comfortable until the walls are heated, and it is also required for it, and electricity.
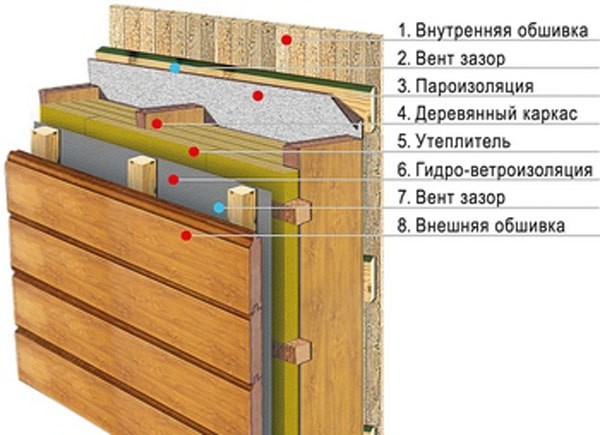
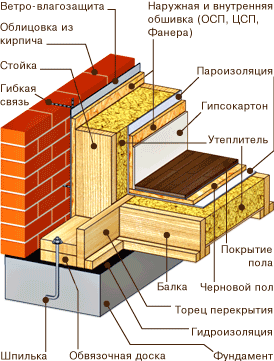
A simple wall pie consists of the following layers :, OSB sheets, vapor barrier membrane, waterproofing, OSB sheets, external or. This is the simplest pie and the most common, however, to improve the quality of the house there are some ways to improve it.
If your home is standing in a place where the wind is often raped, you will need an extra layer of windscreens. For this purpose, the outer walls of the house additionally insulate the sheets of foam. It is this material that is recommended by experts for additional external windproofs primarily due to the fact that it is not terrible moisture, which can get outside.
Sometimes external warming is made by stone cotton, as it is more heat-resistant. But because of its ability to absorb moisture, the external insulation of the wall is irrational to this material.
About how to insulate the house of mineral wool, read.
Since the frame houses at their essence resemble a thermos that keeps warm, the question of ventilation is sharply. Condensate in the form of water droplets can accumulate without changing the air and its movement on the walls, and the oxygen level is reduced in the air. Ventilation solves this problem frame houseinstalled during construction. And the additional drying of the walls from condensate can be ensured by changing waterproofing in the wall to vapor barrier. The membrane should be put so that the moisture does not come from outside to the wall, but it could come out of the wall and inside the house, and outward.
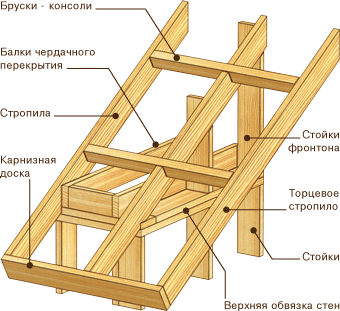
Elements of the future building
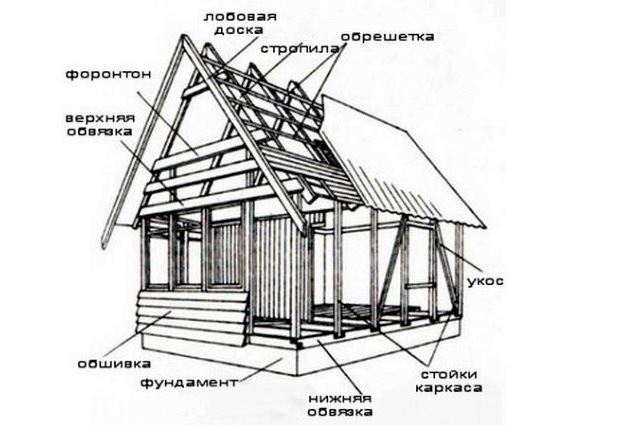
Since the construction of a frame house occurs gradually, and the new stage of construction begins after the completion of the previous stage, it is important to know which elements of the house design at all exist. So, the house consists of:
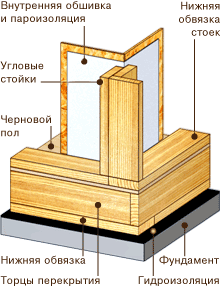
- Foundation. The construction of the foundation is the most important stage of construction. This is the basis of the house, which largely depends the long-term operation of the building.
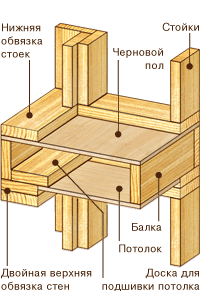
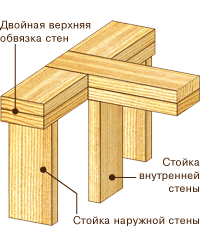
- Straps and walls. The lower strapping fixes the walls on the foundation, and the upper connects all 4 walls in one design. The walls consist of certain layers that we considered above.
- Floor. It can be performed in the form cement tie. On concrete or be wooden, the basis of which is lagows.
- Roof. It depends on the appearance of the building, and its quality, especially if a residential attic or heated attic will be located under the roe. The roof also consists of several layers, including insulation, vaporizolation, waterproofing, a doom and roofing material. If used flexible tileThe roof necessarily includes sheets of OSB, on which the material is stacked.
- External I. interior decoration It is not an element of the house design, but is the final stage in the formation of the building.
Each element of the building is built alternately in accordance with technology frame construction. About how to make the floor in frame houseRead.
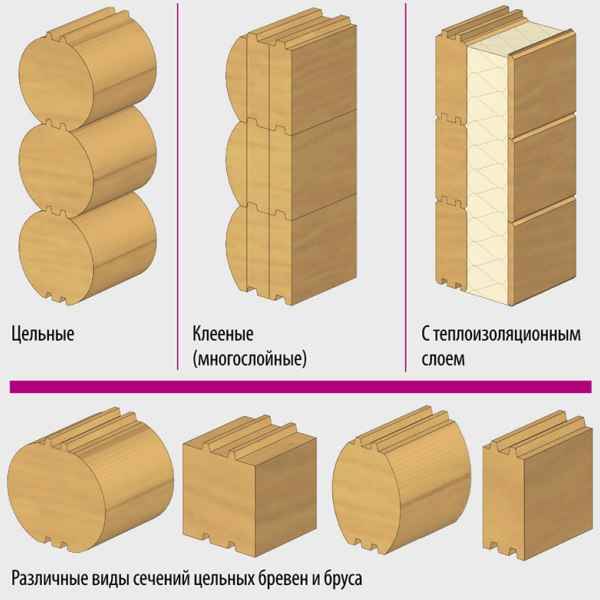
The simplest structures are broken walls. The bars are made of logs, lying them into four Cant at the factory or on the construction site manually, applying saws for this longitudinal sawing. When the BRUSEV billet remains with each log of four pumps, which are used for various purposes, for example, for the device warm floors or attic overlaps.
But the bars can also be purchased at the finished form, since the cutting logs at home will lead to increased consumption of wood and high labor costs. It is easiest to do this on the sawmaker, which significantly accelerates and facilitates work, or acquire a ready-made bar made in the factory. In any case, preference should be given to bars made on special equipment. Such bars have smooth plastic, they are easily customized to each other. The bars of the square section are made of the corresponding diameter logs.
The ability to maintain the heat of the bar 16-14 cm wide is comparable with an axle log with an average diameter of 19 cm. The cross section of bars for outer walls is taken depending on the calculated temperature of the outer air: at a temperature of -30 ° - 150x150 mm, at a temperature of -40 ° - 180x180 mm . For inland walls Use bars with a cross section, respectively, 100x150 mm or 100x180 mm.
In the corners, the bars connect "with the residue" and "no residue", i.e. "In the edge" and "in the paw", etc. For strength, indigenous spikes are used that reduce the imaging of the walls of the house. In addition, plugging spikes use them vertically to reduce the injection.
When executing a cut, the bars have one above the other with a gasket between them heat-insulating material. Felt often apply. If it is thick, the ends of it are joined in bulk and placed in one layer, if thin, then in two layers; But the ends also join the oppressive, and the second layer is placed on the first, well overlapping the underlying seams. Cut felt strips or tapes of such a width so that it is equal to the width of Bruusyev and did not flow from the walls from the walls. For a better removal of water from the horizontal seam between the bars from the top rib of the front of the bar of each crown, the chamfer is 30 mm width, pre-breaking through the rib from two sides at a distance of 20 mm risks. The resulting chamfer is best styling. The strips of felt should be chopped by 20 mm already widths of BRUSEV.
Consider the technique of angular and other conjugations while cutting walls from BRUSEV (Fig. 1).
Fig. 1 Hitch of walls from Bruusyev:
a - cutting angle into a lumping with a native spike; b - cabbage angle in Poledev on the impudent and plug-in swords; B - the connection of the walls of the bars on the impudent; M is the same of the t-shut-off bars with stamped rails; d - pairing angles on the knaps; e - the interface of the inner wall with the outer on the knaps; f - pairing the inner wall with outdoor dressing; z - the same frying pan; And - the same half-fertility; To -oping the ends of the beams on the inner walls with docking in the middle of the wall thickness; l - the same with the copy of the ends; 1 - 20x20 mm chamfer; 2 - indigenous spike; 3 - Begroes, 4 - Swipers
Cutting the corner into the ligation with a native spike (Fig. 1 A) is as follows. In the corners, the holes are drilled in advance, so that it is possible to connect several rows of BRUSE. For bonding bars (crowns) in height take round wooden braided with a diameter of 30 mm.
The cutting angle in Poledev on the impudent and plug-in keys is shown in Figure 1 b. When connecting to Polterev, you need to outline the risks for the cutting of wood both along and across, or for the cut across and rocking with the satellite along. The inserted bellows also connects several rows of BRUSEV.
The compound of walls on the impudent is shown in Figure 1 B, where three vessels are collected by one carrier, but they can be grabbed and more, for which it is necessary to have enhanced lines. To reduce the injection between the bars along their length, the grooves or tongs are sometimes arranged, or the triangular shape rails are stuffed (Fig. 1 g). Triangular bars are made of square logs with cutting them diagonally. For a more dense fit during nails nails, the bottom side of the bars is better to wear. If the bars are not very smooth, they are also sharp. In the bars covering the rails, the grooves of the triangular shape are chosen, but this size so that it can cover the bars after laying on them the heat-insulating material. The triangular groove is easier to choose compared to direct, with quarters, etc. Before breaking the rice, the center of the bar or the axis is first finding and from it from two sides. Predit or cut wood along the axis, and then shut off from extreme wrapping to the middle.
When pairing the corners of the cutting on the knaps (Fig. 1 d) in the bars, the grooves are chosen and the keys are inserted, which should fill in the groove. The interface of the inner wall with the outer on the knaps is shown in Figure 1 E. A more complex and durable interface of the inner walls with the outer is shown in Figure 1 g, s.
Outwilling the ends of the beams on the outer walls is performed by semi-festive (Fig. 1 and), and on the inner walls - with the support of the ends of the beams with the connection in the middle of the thickness of the wall or with the repayment of the ends (Fig. 1 K, L).
The bars along the length are combined with round begins with a diameter of 30 mm, a length of 60-80 mm (may be longer) at a distance of 1-1.5 m one from the other. When the ends of the mating bars are on the same level, they connect them in the angles of the adjoining and in the intersection with a key with a size of 35x50x150 mm (see Fig. 1 b, d, e).
Thus, the stability of the paving walls gives the connection in the angles and intersections with the inner walls, which are placed along the length at the same distance from each other, as in the logs. With the walls of a larger length, vertical bars fastened by bolts are installed to avoid sweepers.
The log cabin cabins and collect when setting in place in the same way as a log house made of logs.
Features of frame houses
Framework wall design
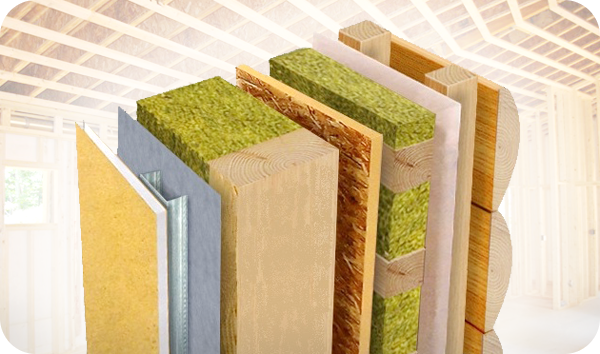
The design of any light frame house consists of several key elements - carrier carcass, insulation laid inside, as well as an outer and inner lining with additional layers.
Frame technology has an impressive list of benefits. Frame houses have a minimal thickness of the walls compared to any other technology and, accordingly, the best ratio of building area to the useful area of \u200b\u200bpremises.
Houses built by frame technology We have low weight and make minimal requirements for the foundation, which allows you to significantly save at its cost.
Despite the small thickness, subject to construction technology, the thermal insulation capacity of the frame walls is very high.

The angle of the inter-storey overlap
in a frame design
Adjunction of the inside wall
Depending on the type and thickness of the insulation used, the frame walls have the following approximate parameters of the heat resistance
- Minvata thick 150mm, - R \u003d 3.2
- Minvata 200mm thick, - R \u003d 4.3
- Polystyrene foam - 150mm thick, - R \u003d 3.7
- Polystyrene foam - 200mm thick, - R \u003d 5
Construction of frame houses should be made of dry lumber. The use of raw wood will inevitably lead to its subsequent drying, deformation, appearance of slots and weakened fasteners. The degree of these negative phenomena may be different, but in one way or another they will manifest themselves. The most common board of the board used for the frame of 150x50mm, 200x50mm. The width depends on the necessary soaplitel thickness.
An oriented chipboard (OSB, OSP), moisture resistant plywood, or cement-chip (CSP) can be used as an outdoor skeleton. The outer and internal covering, in addition to protecting the frame and the insulation from the external environment, gives the frame to additional spatial strength.
For insulation of frame houses, a dense mineral wool insulation or expanded polystyrene can be used. Mineral wool insulation should be designed for use in vertical structures and keep a good shape, otherwise it will slide and form a laptile cavity at the top of the wall frame.
If a foam is used for the house insulation, then after installation in the frame, the slots around the perimeter are mounted sealed with a mounting foam. In this regard, it is necessary to take into account the fact that despite the smaller cost of polystyrene foam, compared with the Minvata, the required amount of foam can be reduced to no difference in their price.
The most important element in the frame of the frame of the frame house is vaporizolation. It is installed on the inside of the room and protects the insulation from wetting. Special attention should be paid to the quality of vapor barrier, its tightness. All seams should be defined with a double-sided tape. When used as insulation polystyrene, the need for vapor barrier disappears.
The presence of vapor barrier in the framework of frame structures creates inside the house closed air media. For this reason, to maintain a comfortable microclimate in the premises, you should organize an effective ventilation system.
Framework technology involves two different approaches to the construction process. In the first embodiment, construction takes place from piece materials. Preparation, sawing materials and assembly of the house of them take place directly on the site.
In the second version, the house is mounted from ready-made large-sized panels (shields) manufactured in the factory conditions in accordance with the project. They are delivered to the construction site in the desired configuration, sizes, with window and doorways. On the construction site only their installation and assembly takes place. This approach allows you to build a box of a skeleton house with a very high speed. At the same time, the weight of some shields can be very high, and therefore a crane may need to install frame walls, or a brigade of several people.
Shield technology has options. In one case, shields can only have one-sided trim. Laying the insulation and trim from the opposite side occurs only after mounting the entire box. Another version of frame-panel houses is the construction of the so-called SIP panels. The SIP panel consists of a thick layer of dense polystyrene foam on which sheets (OSB, OSP) are pasted on both sides of high pressure. In this case, the polystyrene foaming performs not only the heat insulating function, but also increases the strength of the structure. Houses built from SIP panels have greater durability, compared to the usual framework frame.
Design of frame house
 ;
;
The design of the frame consists of the following elements - lower and upper strapping, vertical racks, cuts, base and inter-storey floors, window and door openings. The sequence of assembling the frame house depends on the engineering solutions used.
Facing blockhaus
Capital overlapping platform
Plaster facade
Castle overlap on the strapping of walls
Social overlap with independent
Remaining. Facing brick
The most common is the so-called platform frame. The name is due to the fact that before the construction of walls, on the foundation first, the base overlap with the styling of the draft floor is constructed. Fragments of walls are collected in the frame already on the finished platform, after which they are installed and fastening to the overlap right over the rough floor. Then the operations are repeated, the inter-storey overlap is mounted on which the walls of the second floor are installed.
The plus of the platform frame is the mining technology and the convenience of work. The presence of an even base facilitates the layout, fitting and installing elements, allows you to assemble the frame of the walls with maximum accuracy and quality.
The disadvantage of the platform structure is that after laying the sheets of draft floor (OSP, Plywood, CSP), it is not recommended to allow its wets. In this regard, in the context of rainy weather, it is necessary to provide measures to protect the overlapping from rain.
Another minus is that the repair of overlaps is extremely difficult in the framework of the platform type. Bearing walls are straight on the beams of overlapping, which makes it impossible to replace the beams, without serious interference in the remaining elements of the design.
This problem is not particularly relevant if the elements of the overlap design are appropriately processed and operated under normal humidity. However, in difficult conditions - a poorly ventilated underground, constant overvolving, poor biosecurity, the service life of the constructions of the basement may be significantly less than the walls, and the solution to this problem will be very complex. In this regard, it is desirable to provide access in the underground for a periodic inspection of structures.
Alternatively, there are other options for the design of the basement. In one of them, the overlap is constructed after installation of the frame of the walls. The beams fall on over the horizontal board of the wall frame. This option allows the replacement of overlapping beams if necessary. The disadvantage of this scheme is that in the absence of an even foundation, the assembly of the wall frame occurs in more complex conditions. In addition, it is complicated under the trimming of the black floor plates and the insulation in the area of \u200b\u200bthe overlap joint with the walls.
In another embodiment, the base overlap is constructed as a separate box inside the perimeter of the walls. Thanks to which the framework of walls and overlap are completely independent of each other. This design is possible only if the foundation of the house is wide enough, which allows you to move the walls to its outer edge, and to put overlap beams.
This method is good in that, with the best maintainability, it retains the advantages of the platform. On the foundation you can first build the block of overlapping, and the walls are already collecting on it. The difference is only that after assembly, the walls are assigned on the side, and not put on the overlap. The disadvantage is that this design Requires a wider Foundation tape compared to previous options. This leads to increased consumption of materials on the foundation and increasing its value.
Frame houses can be erected by almost any type of foundation. The simplest solution involves the use of a columnar or pile Fundament Without monolithic frame. In this case, the vertices of the columns are combined with a thick strapping bar on which the framework is constructed. Before erection of the framework for the foundation, layer of rolled waterproofing layer.
Outdoor decoration of frame houses
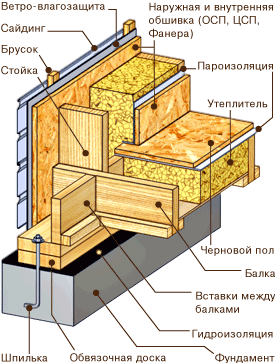
The decoration of the frame house can be made by various materials. The most simple types of finish is a covering siding, block mobile, and similar materials. For all these materials, vertical guides are installed - wooden bars or metal profile.
Guides are installed on top of the outer draft, which in turn is pre-covered by the wind-moisture protection membrane. Thanks to the guide between the trim and draft trim, the ventilated space remains that contributes to the removal of steam through the membrane. After installing the guides, on them, the elements of the finishing are fixed using self-tapping screws. Installation is lowered up.
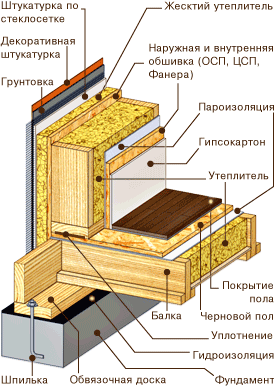
A more complex option is the plastering facing of the skener. On the one hand, the outdoor clamping from OSP, CSP or plywood is a fairly flat plane that can be used and painted. On the other hand, all sheet materials under moisture are deformed. This leads to wave formation and cracking of the facial coating at the joints of the plates.
For these reasons, plastering is performed using the "wet facade" technology, which avoids cracking. For this, a thin layer of a hard insulation is fixed on the outer cover, which is applied by a layer of plaster on a glass tower grid. Then follows a layer of primer and decorative plaster. The additional plus of this finish is that the addition layer of the insulation is solid, increases the overall tightness of thermal insulation, eliminating cold bridges in the area of \u200b\u200bjoints of the frame of the framework.
Another option of facing a frame house is a lining of wall bricks. To perform brick facing, it is necessary that the foundation comes for the outer plane of the walls allowing you to get a brick wall on it with a gap from the outer sheaving at least 50mm. Brick attaching K. frame wall With flexible connections for which the metal perforated tape is suitable.
A easier alternative to massive brick facing is the facade finish with clinker tiles. It is produced in the widest assortment of colors and textures, and at the same time does not require an additional foundation width. The technology of its installation is similar to the plaster cladding of the facade, only instead of decorative plaster produced glue tile mounting.
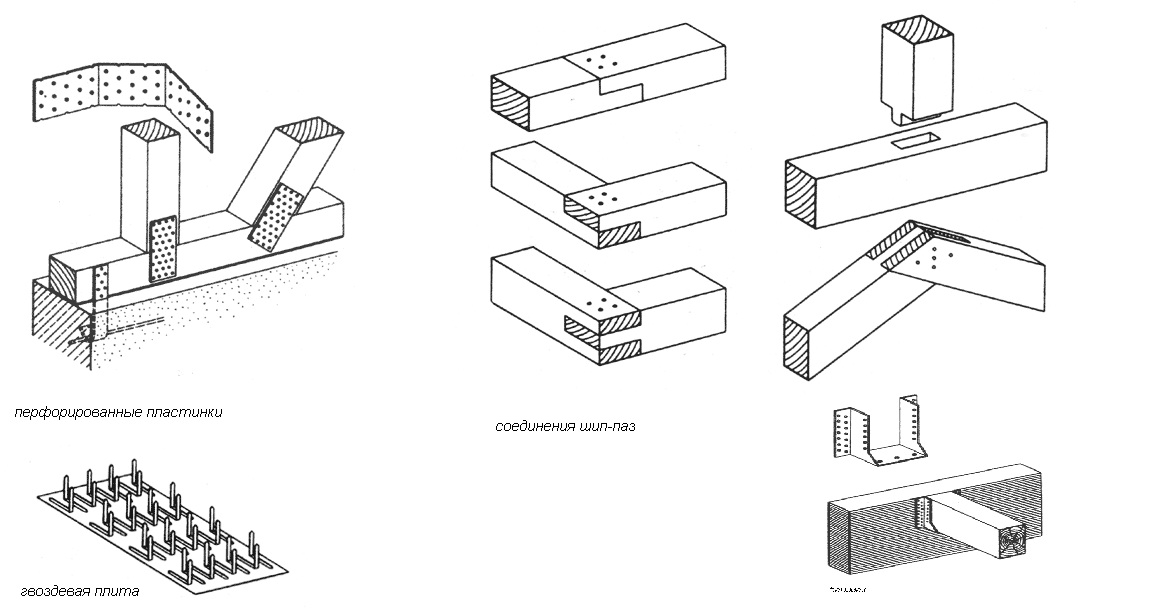
Metal fasteners of wooden structures
Slim-beam fastener
Bracket hidden
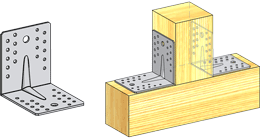
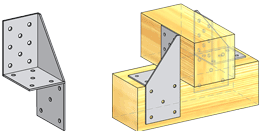
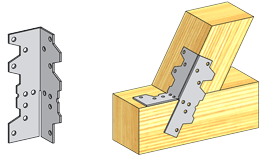
Currently, metal fasteners are actively used for installation of wooden, including frame structures, in addition to simple nail connections, metallic fasteners are actively used. Their use allows you to reduce the number of complex carpentry work, which speeds up the construction process. When using a metal fastener, there is no weakening of transverse sections, as in the case of a device.
Manufacturers offer a wide range of fasteners for wood. Each specific type of fasteners is manufactured in various sizes, allowing you to choose it under the design parameters. Perforated fasteners are made of sheet steel with a thickness of 1.5 - 2mm. To protect against corrosion, the metal is galvanized.
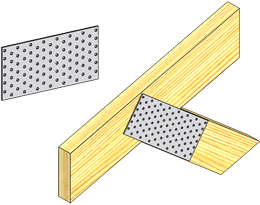
Perforated mounting plates
Connect a plurality of nails / self-tapping screws or bolts, allow you to carry out a reliable nail connection of two or more elements in one plane at any angle. They are superimposed on the node on both sides. Actively used to connect elements in rafting farms. Allow you to install right on the construction site. If necessary, the plate can trim the form of a node.
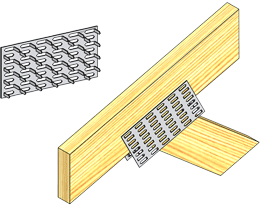
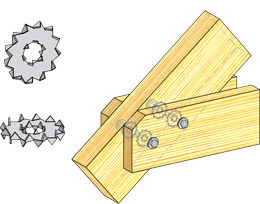
Nail plates
- (Metal gear plates of MZP) are made by the span of steel sheet, resulting in several rows of teeth-nails having a common base. They have the same purpose as perforated plates, but unlike them require installation in industrial environments.
The mounting of nail plates is carried out using the press by the method of indulgence. The clogging of the nail plates is unacceptable, since it does not provide a reliable connection. For these reasons, the use of nail plates is expediently in terms of production, since it provides high levels of assembly of structures, and inefficiently on the construction site.
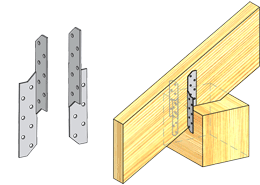
It serves to connect perpendicular structural elements relying on each other - beams and rafters. It can also be used to binder transverse elements from the bottom side of the beams. For more efficient fasteners, a pair of fasteners is not better installed strictly symmetrically, but to flip one of them to the shelf in the other side. In some cases, the lifting-beam mount can be replaced by a regular corner.
It is used in the construction of houses from a log or a beam of natural humidity, if the device has a sling. In this case, as a result of the shrink shrink, the distance from the skate run to Mauerlat may vary. Therefore, the rigid fastening of rafters to Mauerlat is unacceptable. Sliding fasteners allows the lower edge of the rafted freely shifted relative to the wall to which they rest. The installation of the sliding mount should be carried out with the maximum valve of the sling.
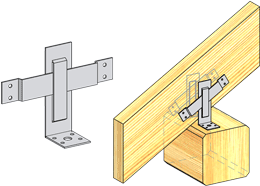
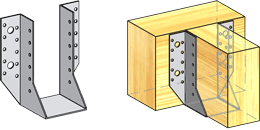
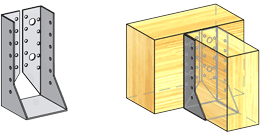
Babok supports
Allow the horizontal bearing elements at the right angle - (beams, runs) to different parts of the design. Fastening to the main support can be carried out both on nails or self-tapping screw and bolts. Balker supports are available in a wide range of sizes designed for various widths and height of beams.
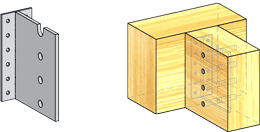
In some cases, if the designs are part of the interior, increased aesthetic requirements are imposed. In this situation, fasteners are either trying to mount imperceptibly, or use the writing technology of elements. Some fasteners are specifically designed for hidden editing.
Such elements include a hidden beam bracket. Unlike conventional beam supports, after installation, it turns out to be completely hidden in the body of the beam. To use the bracket from the end, the beam is made vertical propyl, and the holes for metal pins are drilled. The bracket is attached to the carrier part of the structure, in which the site is pre-selected under the bracket, the thickness of its metal, after which the beam dresses onto it and pins are inserted.
Corners
Different sizes serve to connect structures at right angles. May have holes for nails / self-tapping screw and under the bolts. Often used to connect racks (vertical design elements) with horizontal elements.
In addition to the corners with round holes, there are so-called adjustable corners with oblong holes under the bolts. This allows subsequent adjustment of the position of the connected elements relative to each other.
Also there are corners with an angle of mounting 135 degrees and angle with a flexible part, which allows you to keep the structural elements under any desired angle.
Used to enhance the strength of the bolt connections, beams and rafters. Discs can be both double-sided, for installation between connected elements and one-sided for installation under bolt hats. The fastening efficiency is achieved when the diameter of the opening in the disk corresponds to the diameter of the bolt.
T-shaped mount
It serves to connect two perpendicular elements among themselves. In a certain situation, the mount can be replaced with the help of the corners.
Knots wooden wall Frame house
All frames of the frame house consist of next details and elements - lower and upper strapping, vertical rack, dos, base and inter-storey overlap, window and doorways. The sequence of assembly and the installation of a wooden frame house will depend on the engineering solutions used. The most popular are the so-called platform frames. The name is explained by the fact that before the construction and installation of walls, the basement is primarily built on the foundation, followed by the basement with the subsequent styling of the draft floor. Fragments and elements of the frame house are collected in the frame on the finished platform, then they are installed and installed to the overlap over the installed black floor.
After that, the operation is repeated, the inter-storey overlaps are attached to which the walls of the next floor are installed. The advantages of this design of the frame house are honed special technology and the convenience of performing and installing work. The presence of an even and smooth base significantly facilitates the layout and the subsequent installation of all elements, also allows the assembly of all frame walls with maximum accuracy and reliable quality. The disadvantages of the platform structure in the fact that after laying and installing the sheets of black floor, they do not recommend allowing its wet. And in cloudy and rainy weather conditions, it is necessary to provide protective measures for overlapping from rain. Another disadvantage is the repair of platform type frames.
The walls of such a frame are right on the beams of overlapping, and it makes it difficult to replace the main beams, without serious and thoughtful interference in the remaining details and elements of the whole design. Floor treatment with antspetic impregnations Such a problem will not be relevant if all parts and elements of the design will be well and qualitatively treated with impregnations, and they will use them in normal humidity conditions. The service life of the basement and its structures can significantly be reduced due to poorly ventilated underground, constant convergence and poor biosecurity. In connection with such conditions, construction should provide access in underground and basement for periodic technical inspection of structures. Options for the designs of the base overlap there are many other types and design options for a wooden frame house and its basement. One of these is the installation of overlapping after mounting the frame of the walls. The beams are put on top of the horizontal wall of the frame.
This option will allow you to replace the overlap beams at any need. The disadvantage of this scheme is that in the absence of a smooth and even base, the assembly of the walls of the entire frame occurs in complicated conditions. In addition, it will be difficult to carry out trimming of plates and the insulation of the draft floor in the area of \u200b\u200bthe shocks of overlapping and walls. The second version of the basement is that the installation is in the form of a separate collected box within the entire perimeter of the walls. Due to this, the design of the wall of the frame house and its overlap will be absolutely independent of each other. This design will be possible if the foundation of the frame house is large enough. It is this option that will allow the walls of the house to the outer edge, and install beams for overlapping on the inside. Installing the walls on the side of the foundation platform is an intention that, with better maintainability, it perfectly retains all the advantages of the platform. The ceiling box is initially built on the foundation, and after all the walls are harvested on it.
The main difference is that after final assembly, the walls are approved on the side to each other, and not put directly to the overlap. The disadvantage of this design will be the use of a broader fundamental tape compared to the options that we have considered earlier. This will lead to an increase in the cost of all materials on the foundation and increase its value. It is possible to build frame houses in almost any form of foundation. The most common solution involves the use of a columnar or pile foundation. In this case, the vertices of all pillars are combined with a special thick strapping bar on which the frame is fixed. Before installing the framework of the foundation, the layer of rolled waterproofing is fixed. Types of connecting elements and knots of a frame house
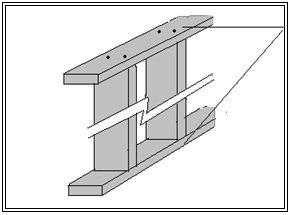
During construction and repair, it is often necessary to connect elements and parts into nodes and special designs. Connections of wooden elements and parts of structures is called landings. Connections in wooden structures can be defined by five types of landings: tense, dense, sliding, free and very free landings. Connection units of the frame house nodes are parts wooden structures In places connect elements and details. Connections of wood structures can be divided into the following types: end and side, corner and T-shaped, cross-shaped and L-shaped, as well as boxes corner connections. Joinery compounds may have more than 200 options. We will consider only those connections that are used in the work of the joiners and carpenters. The end connection of parts is the connection of elements and parts in length, when one of the elements is a continuation of the other. These connections can be smooth, gear and spiked.
Additionally, they can be fastened with glue, screws or special linings. Facial connections horizontal type Hold up huge load on compression, bend and stretching. All lumber is accepted in length, thus forming vertical and horizontal gear connections at their ends. These connections do not have pressure during the entire gluing workflow. Lumber connection. Types of joint spikes for wooden structures are performed carefully and securely, in accordance with the three main accuracy classes. The first class is intended for a special measuring instrument of increased quality, the second class is for products and parts of furniture production, and the third - comes for construction parts, inventory for agriculture and so on.
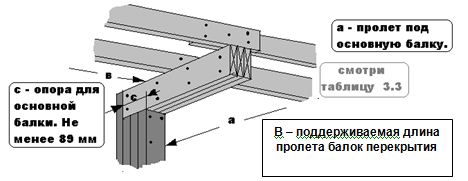
Side compounds with edge, several boards or racks are called solid. These compounds are used in the structures of floors, doors, the gate, etc. when wearing walls and ceilings of a frame house, the upper boards will block the lower on 1/4 of their widths. Outdoor walls usually cubs with horizontal laid boards. The top board must block the lower on 1/4 of its width, it will provide removal of atmospheric precipitation. Connecting the ends of the part with the middle part of another part forms a T-shaped connection. This compound has a huge number of fastening options. Such compounds (usually called mating) are used when conjugating the lag of all overlaps and interior partitions with the strapping of the frame house. The connection of the elements and parts at a direct or oblique angle is a cross-shaped connection. This connection has one or more grooves. Cross-shaped connections are used in the structures of farm roofs.
All walls must have a frame design.
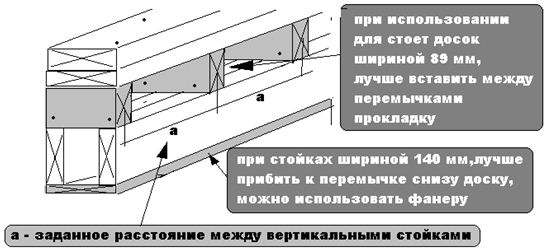
The dimensions of vertical racks and distances between them should be coordinated with the data .
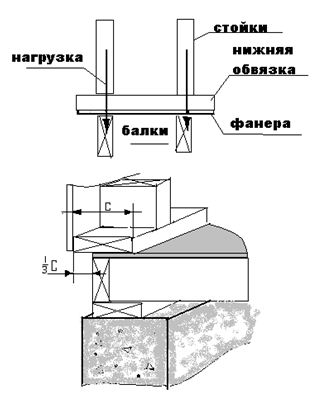
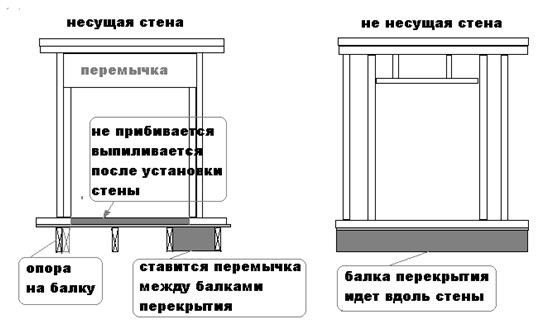
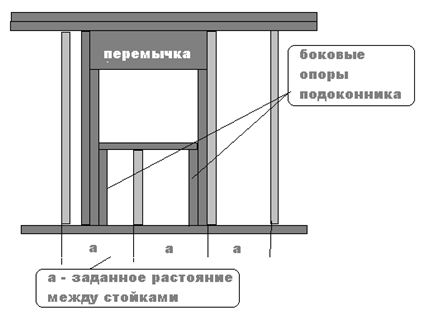
Bearing racks must be further reinforced with coating (plywood, chipboard, drywall, etc.) or oblique spacers. Racks should be located at right angles to the wall plane The racks are allowed to position parallel to the wall on the front of the roof, which closes the not exploited room or in non-carrying internal partitions, taking into account the restrictions defined in. Racks that support the cargo consisting only of the attic of the attic can be located parallel to the wall if: on racks with the front side, the coating is strengthened. A part of the roof supported by the wall with this layout of the racks should not exceed 2.1 m wide. Racks must go to the entire height of the floor, with the exception of places where windows are located, doors, etc. are located. Racks should not be connected from several parts. The angles and points of intersection of walls should be designed and are designed in such a way as to ensure sufficient support to the edges of the external and internal coating. In the framework of the walls in the outer corners there should be at least two racks. Where the vertical edges of the inner coating are supported on jumpers serving to fasten the inner wall to the outer, then re-mocks are placed at a distance with a reliable internal coating support. (See chapter). The thickness of the walls for the strapping of the walls should be at least 38 mm. The width should be equal to the width of the carrier racks of the frame (with the exception of non-bearing walls). In the bearing walls, where vertical racks coincide with the beams of overlapping vertical and direction, the lower strapping board can be 19 mm thick. Lower strapping should be in all cases. The lower strapping board in the outer walls should not perform, more than 1/3 of the width of the strapping, above the support. The upper strapping should always consist of two boards, except: In the wall, there is an opening for a window or door, and a jumper forming one node with a lining of the wall is installed above it; The upper strapping board can be used single in the bearing wall section, where the load from the overlap or rafters (farms), the roof is transmitted at no further than 50 mm. from vertical wall strings on the one hand. In all internal non-carrier walls. The upper strapping can be completely absent over the openings with re-sizes, if the connection between the wall and the jumper is made by steel plates (non-rust or treated with anticorrosive) size of at least 75x150x0.91mm or wooden plates 19x89x300mm. Wooden linings must be nailed to each wall section of not less than three nails of 63 mm and more. 16 The joints of the boards in the upper strapping should be above the centers of vertical racks and to go among themselves in a checkerboard order at a distance of no less steps of vertical racks. Between themselves, the upper strapping boards should be made through: at the ends of the boards - two nails; Over each rack one nail in a checker order. In places connecting the walls of the junction of the upper strapping should be a mustache with the bottom board of the top strapping of another wall. Bundles are equivalent to dressing corners and joints in walls with one top strapping board. On the sides of all openings, double racks are installed. Internal racks are installed from the bottom strapping to the jumper over the opening, the external goes from the top to the lower strapping. Single racks on the sides of the openings are allowed in non-carrying interior walls (only in homes where it is not necessary to achieve a high degree of fire resistance) In the openings of the windows, the windowsill or the support board of the window opening is installed. Vertical racks go from the bottom strapping to the windowsill board. They are installed on the wall markup. On the sides of the opening are additionally installed racks for the windowsill. Jumpers over door openings in non-carrier walls should be made of material not thinner than 38 mm and the width is equal to the width of vertical racks. This rule is mandatory for non-bearing walls provided for as fireborne partitions. I believe that it is better to do such openings as in the bearing walls. Operactions in the bearing walls must be collected with jumpers (at least two) in order to transmit the load. The jumpers should be fastened together with nails in two rows (length of nails at least 82 mm), and the distance between pairs of nails of at least 450 mm. If the jumpers do not reach the upper strapping, the racks are installed between them (strictly on the wall markup). Both jumper boards are connected by gaskets (plywood, board, etc.). On the walls of the collected from the board 140 mm, it is better to bind them from the bottom of the suitable board of the same width. The dimensions of the cross sections of the jumpers in the walls depend on the value of the span of this opening. It is important when designing and manufacturing construction remembers that double jumpers are used in the walls, where the cross section of 38x89 and more. You can use jumpers with a thickness of 89 mm consisting of one piece of wood. In the walls collected from the board with a cross section of 38x64 mm, the jumpers can also be made from a single piece of wood with a thickness of 64 mm or two boards 38 and 19 mm connected by nails 63 mm in 450 mm. In this case, the jumpers should be wider by 50 mm than in and not exceed 2.4 m.
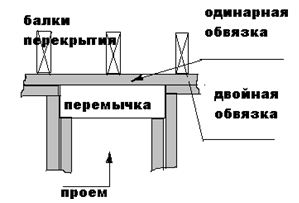
In the openings of walls exceeding values, it is necessary to collect beams consisting of three and more boards with a thickness of 38 mm mounted on the edge.
The outer walls on the outside should be shifted. If, the strengthening cover is not produced, the walls must be strengthened with diagonal disclosures. It can be boards, steel or aluminum profiles.
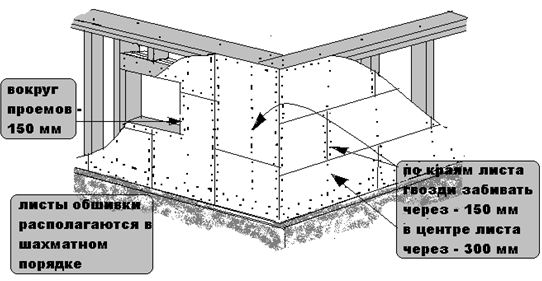
For outdoor wall sheathing, you can apply various materials (Look). While we are best used to Phaneur. You can use boards, but it is already expensive. The thickness of the plating depends on the selected distance between the racks.
Fastening of the sheath sheets can be vertical and horizontal. Plaques for plating are attached horizontally or at an angle of 45 degrees.
Between the sheets of the plating is the gap 2 - 3 mm.
For fastening the skin is better to use non-corrosion, or processed accordingly, nails.
Sheets of plates are attached to a frame of nails:
- by the edges sheet no more than 150 mm;
-On racks in the middle of the sheet - 300 mm;
- by the edges of the walls of the walls - 150 mm;
- From the edges of the sheathing nails are clogged at a distance - 10 mm
Nails for assembling wall frame and their application.
Consider the most important knots of the wall frame:
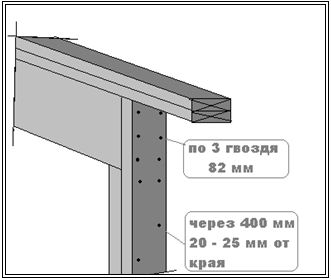
To the upper and lower strapping boards, the racks are nailed at least 2 nails on each side. The minimum size of nails is 82 mm. For us, the most suitable nails are 90 mm. This is the minimum size. You can take more size.
 -
-
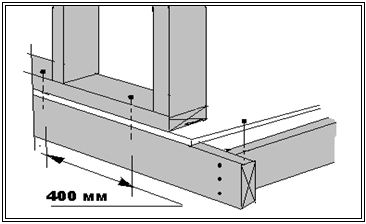
For installing walls in place, the lower strapping is attached to the floor platform at least 400 mm. The nail of 90 mm, through the Floor Phane, should enter the fire frame.
- The second board of the upper strapping is nailed at the ends of 2 nails, not less than 82 mm.
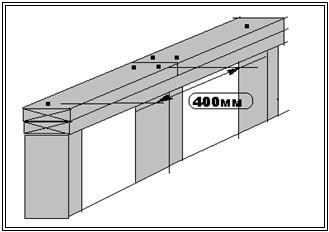
Over the entire length, the second strapping board is nailed with nails at least 76 mm, after 600 mm not more in a checker order. Practically, the second board of the upper strapping is nailed over each rack.
IN doorwayAfter drinking the lower strapping board, two nails are clogged with 82 mm so that they pass through the lower strapping, Phaneur and entered the fire frame.
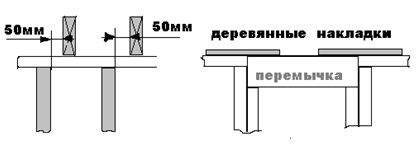
Jumpers over the openings in the walls are nailed to the frame frame racks at least three nails (each jumper board). 82 mm and more nails are used.
Double racks used to create a frame of the frame, make their way through 400 mm (at least). 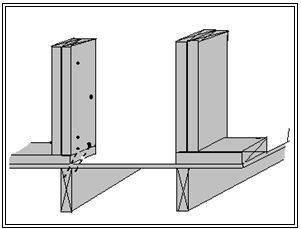
From the edge of the board, nails should be clogged by at least 20 - 25 mm.
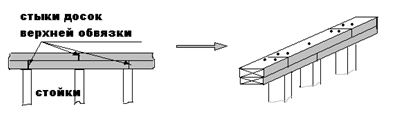
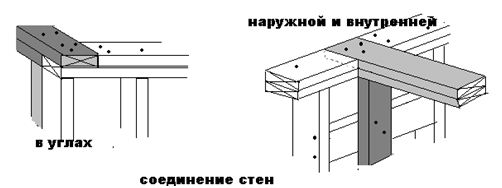
The second board of the upper strapping, when overcoating on another wall, is nailed at least 3 nails.
If the wall design does not provide for the second upper strapping board, the metal plate 19x89x300 mm is used to connect the upper veins of the walls. It is attached - three nails in each wallsy
Practical advice in the design of walls.
1. Usually, with low-rise construction, the thickness of the outer walls is selected from the thermal resistance conditions of the enclosing surface. In our construction, it is easier and cheaper to proceed from the strength of the walls of the walls of the walls. Why:
market building materials Rapidly developing. While the house is designed, a framework is built, insulation can appear with better qualities.
2. It must be remembered that the maximum number of floors, when using this technology - three, or two floors plus attic.
3. For the inner walls, the board with a cross section of 38x89 mm is sufficient. In the area of \u200b\u200bsanitary premises, in many cases, where communication communications will be used for the sewage, it is more convenient to use boards 38x140 mm.


