Hello everyone, in this article, consider how to make the wooden floor on the balcony.
Wooden floor on the balcony has many of its advantages among their competitors. I'll start with the most important, in my opinion it is an ecological clean material, a wonderful smell, any sizes, simplicity in laying, the ability to cover in any color, reliable!
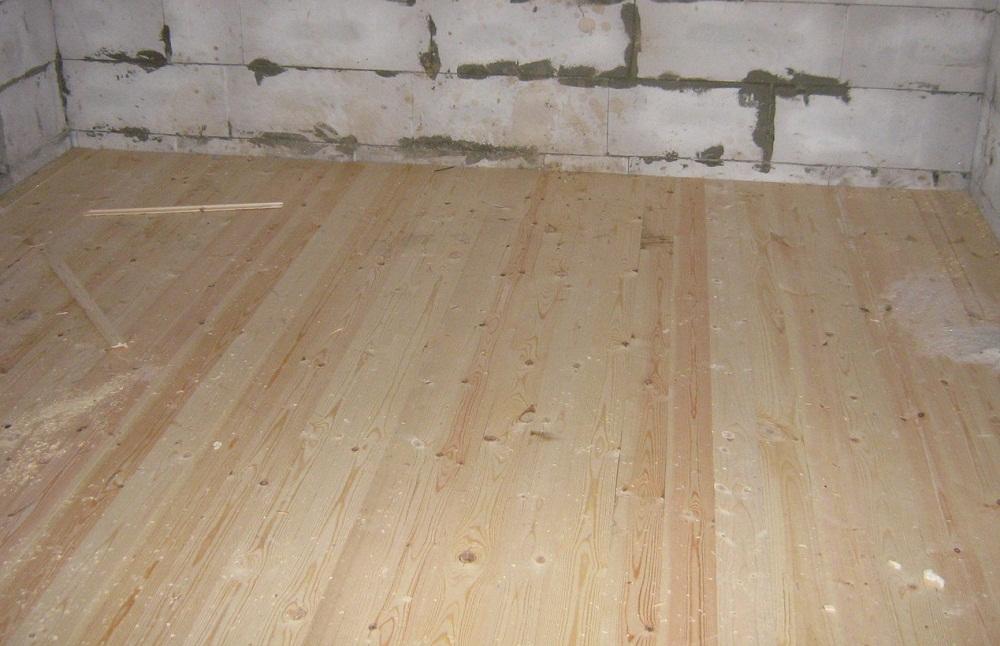
And so you need to prepare a place where the future floor will be located, set and fix the lags for the floorboard. Lags are recommended to be installed after 50 cm, we made in 45 cm. Depending on the room, the technology of laying the floorboard can be different. Since we make yourself the floor to the balcony, we decided to insulate the space between the concrete base of the balcony and the finish floor of the t-shirt. The insulation was used foam and mounting foam, according to the price and quality ratio, a very good option.
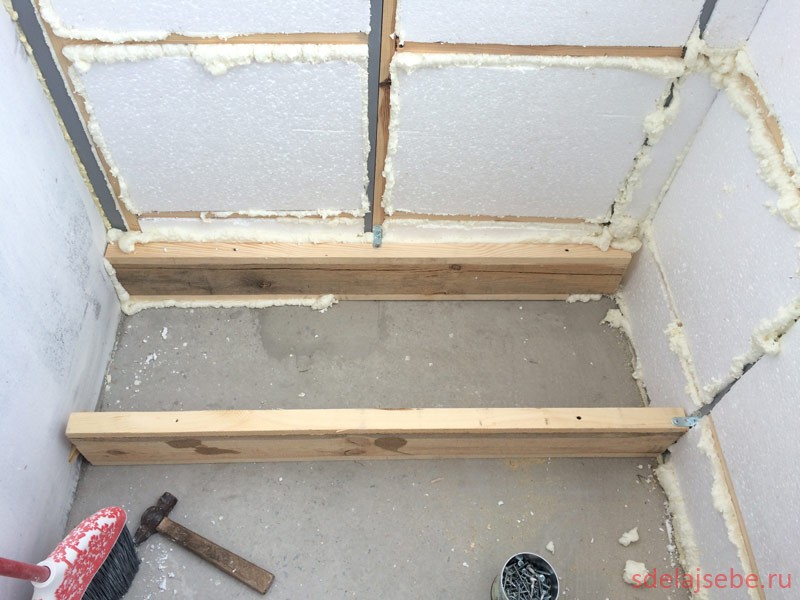
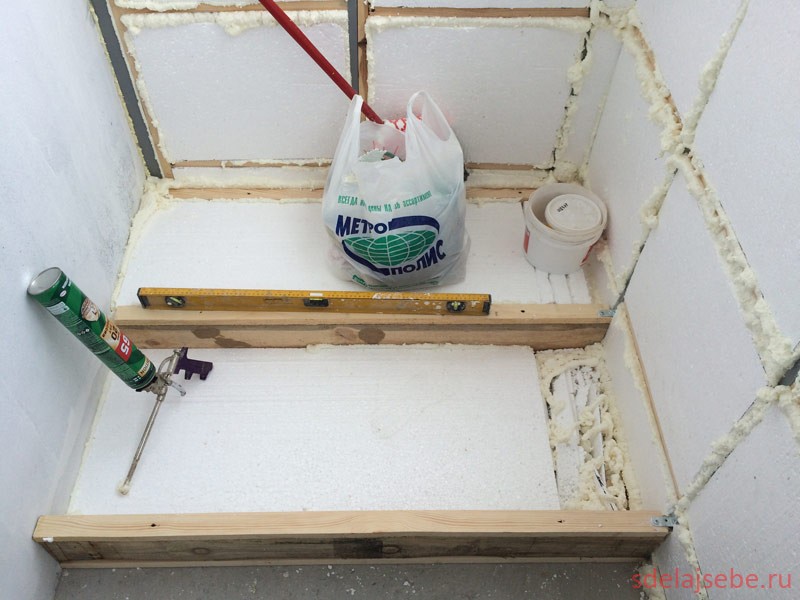
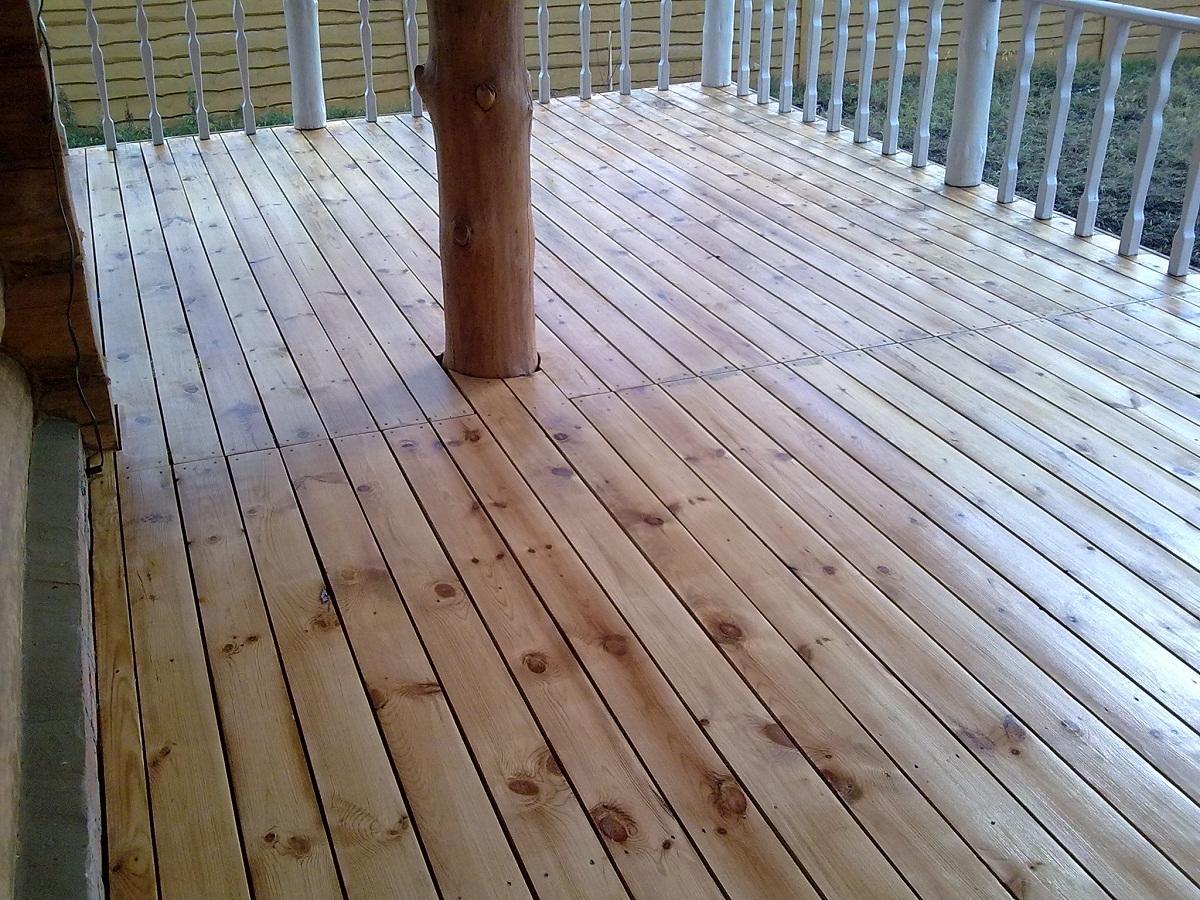
The laying of the floor will be from the tipped board, as it goes into the groove to each other, the absence of a cold bridge, it will not blow a draft from the floor. On the balcony will always be nice to stand on such a floor. In a word, this is an excellent solution for the balcony.
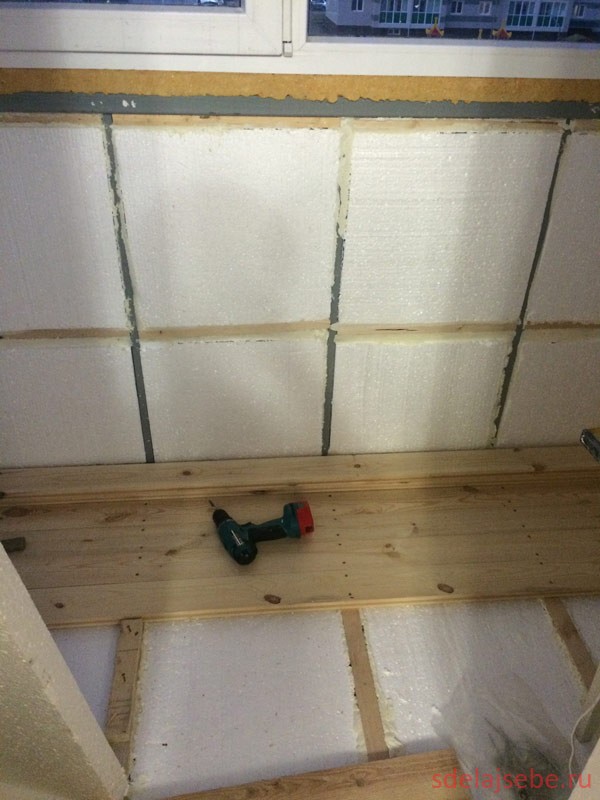
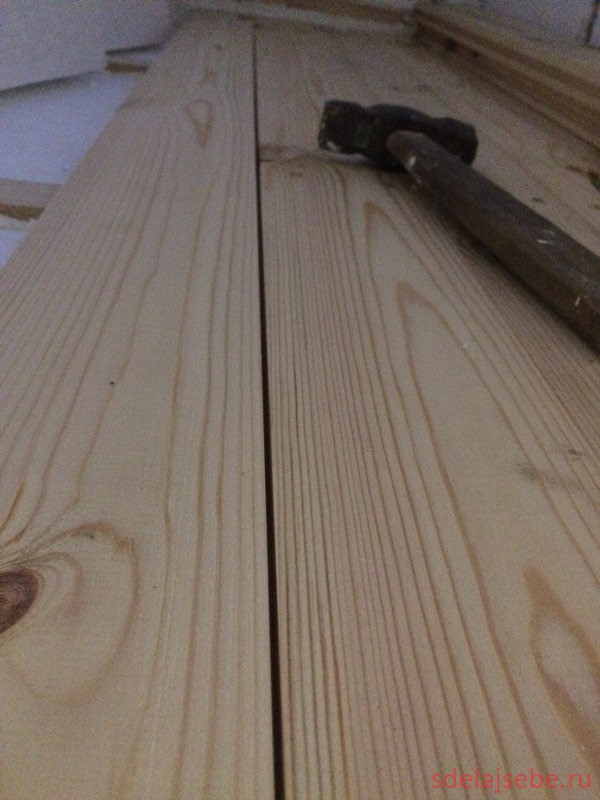
Put the first board to lags, and not to fasten any work, but since the second board, some difficulties may arise.
Namely:
—
It will not enter the grooves of the board, which already lies - for this you need to tap the board with a hammer through a wooden bar or cut from the board so as not to damage the appearance of the board.
—
If the board rested and it does not include strength, you need to weaken the previous board and swaying horizontally top-down insert into the groove.
—
Have you collected the boards with each other, but between them gap? How to eliminate slits in wooden floor See our video below. You can eliminate the gap in the floor with a wooden clina, driven it between the stop and the board, then all the boards will fit tightly to each other.
Good day. First of all, I want to apologize to the constant readers of the blog, which is so rarely writing. But simply, there was no time in life for life)), not that, on blogging. But in the future, I will try to correct ...
Today, the topic of the story: Flooring. Namely, the floorboard with their own hands. In the article below, I will describe one of the options, how the floorboard is made under the spool or groove / comb. But I will immediately want to make a reservation that most likely the floor board is most likely, it is unlikely to meet and easier to buy the factory. Personally, I was absolutely not going to do it, as the production of the boards "on the knee" is pretty not simple, as it requires perfect treatment and economically favorable. But everything relative. And depends on the value of the material and time spent on the robot.
And so, a brief background:
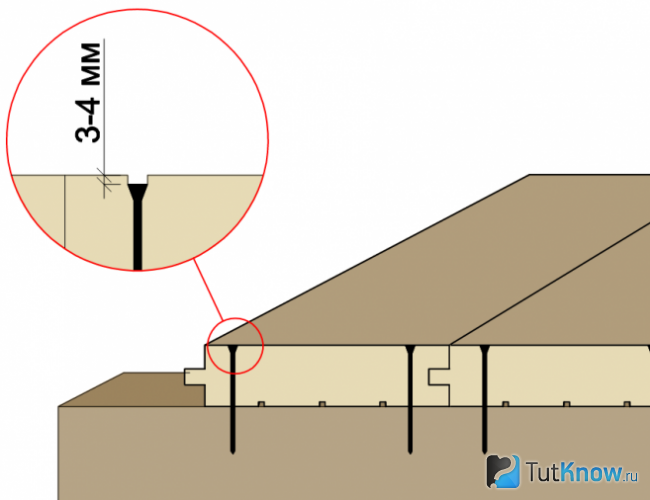
The floors were purchased for floors and dried around six months. Further, I also searched from half a year, already in the house on the floor. Initially in two rooms, I made a boards under a quarter. But the result remained completely not pleased. So, as the board, first fucked. What is in principle fixing. And secondly, it began to raise on connections. In some places, it is pretty much, up to 3-4 mm and will have to end it with a branch and to be installed to Fane or Chipboard. To smooth out irregularities ...
Therefore, on the rest of the premises, I decided to do hand board under the spool. The process in principle is not much different from.
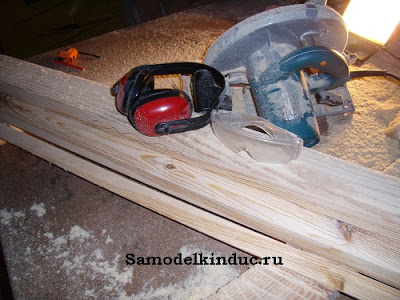
At the beginning with the help of a disk saw, a blank was cut 10 cm wide. You can do a larger size, based on the size, so far to reduce the residue.
Next, with the help of the rule, checking the smooth part, cut the pieces of the length I need. A smooth board was approximately 65-70%, the remaining 30% I re-cut into a smaller size of 9 cm. And used separately.
Immediately after the render labeling to the smooth side, so that I would subsequently check the evenness.
Further, leveled with the help of a flight all the details in one size. It is advisable to work out the system. That is, immediately think about how to fold the items to continue to save time. That is, I took it, put it. It is also worth choosing the finite side of the part and march the reverse.
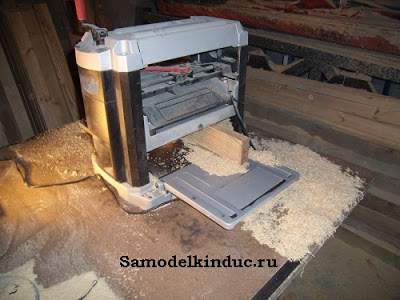
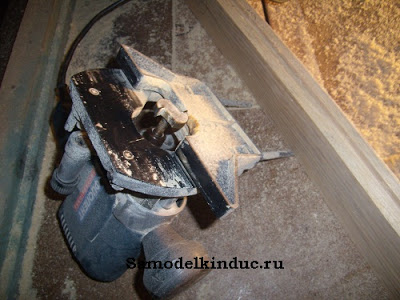
Next, using a milling mill "Parquet" folder chose a comb. And with the help of the saw cut off the unchecked balance. I also tried to remove the residue with a cutter "Barrel", but the result was worse. Since the item still had small deviations in thickness, which were expressed in dozens of MM, but have already given difficulty when docking the tongue.
![]()
The draft side cut off under zero, left not a large protrusion of two millimeters. Here is a photo of a trial detail.
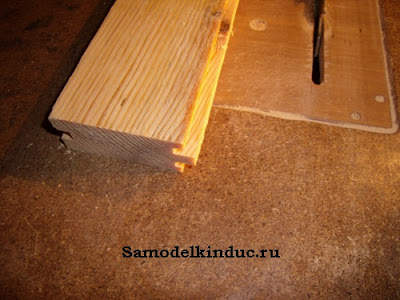
What gives this protrusion. First, if there is no evenness when connected, then with the help of emery paper on the bar, it is easy to attach to the desired size. Also, when assembling, there are no problems with small garbage, it simply falls into the groove without interfering with the connection.
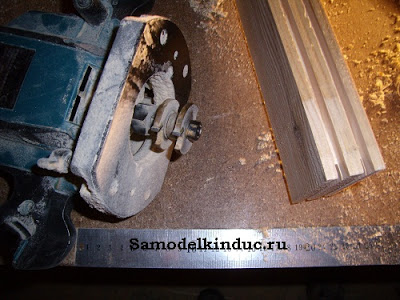
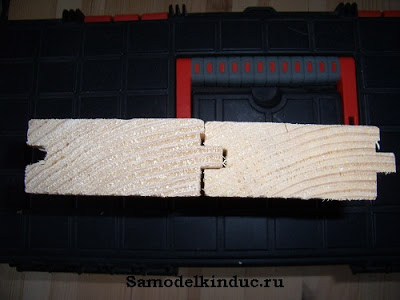
Next cutting the cutter of the groove.
As a result, having received such a connection as in the photo from the bottom. Where top part It goes tightly, and the lower has two millimeter clearance. Which simplifies the installation of the floorboard. For again, chips gets there. And also compensates for small generosities of the floor.
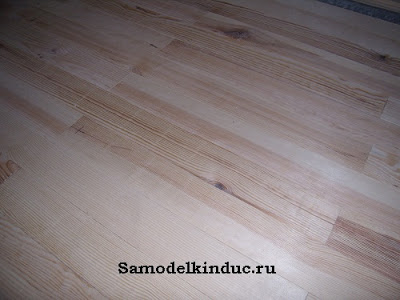
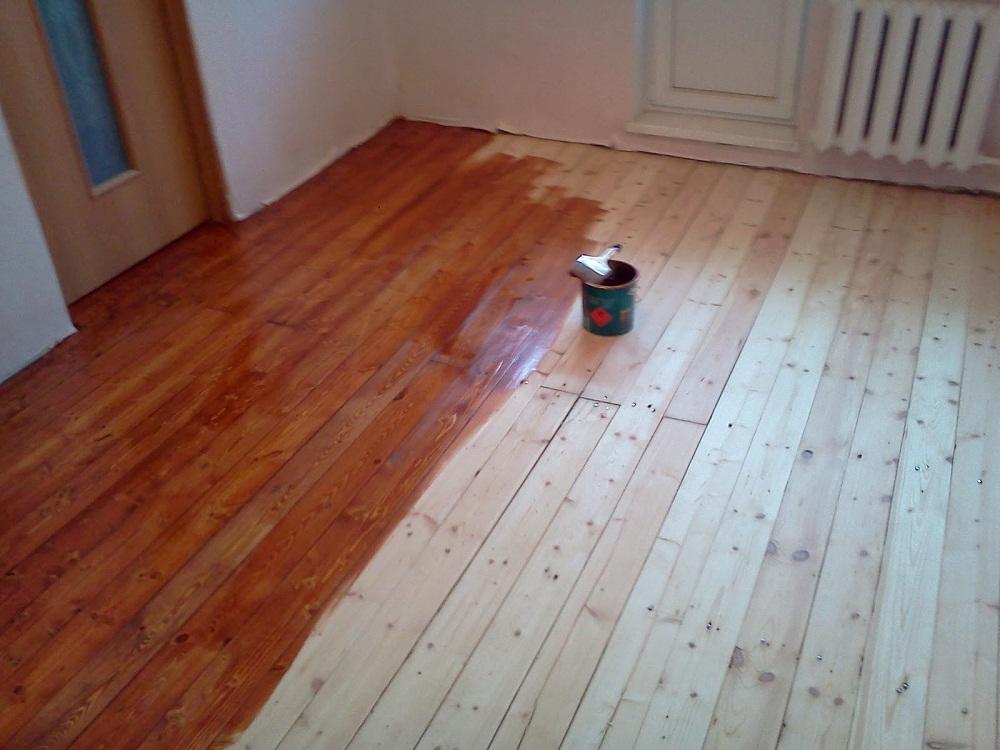
As a result, it turned out, here is the floor of the germ. There are of course small gaps. But since, the floor is used as a draft, it suits me completely. Yes, and in my opinion, pine can be used only on the draft. For it is very prone to piss-toleration and has a low density. On cleanye, it is desirable to use solid wood of oak wood, beech, larch.
Well, good luck to you and let you all work. Also, do not forget the safety technique when working with power tools.
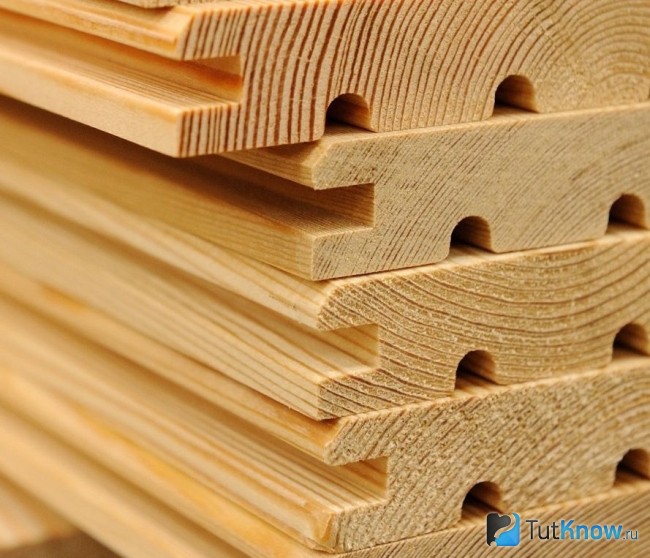
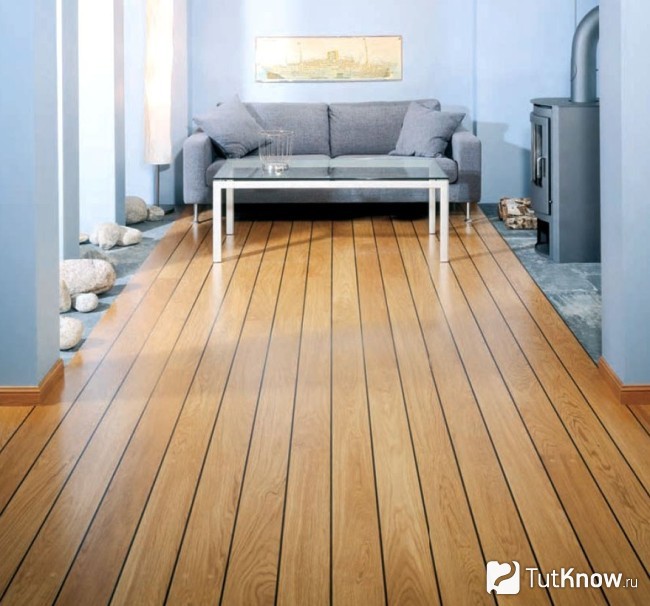
The tank board is used, as a rule, for finishing floor finish. It is made from an array of pine or ate. On one edge of the tipped board there is a spool, and on the other - the groove under it. This greatly simplifies the installation of the material. Mounted by connecting the groove and sheets of the board form a single solid surface. After laying the surface of the floor is processed (polished and opened with varnish) to acquire an attractive appearance and extension of service life.
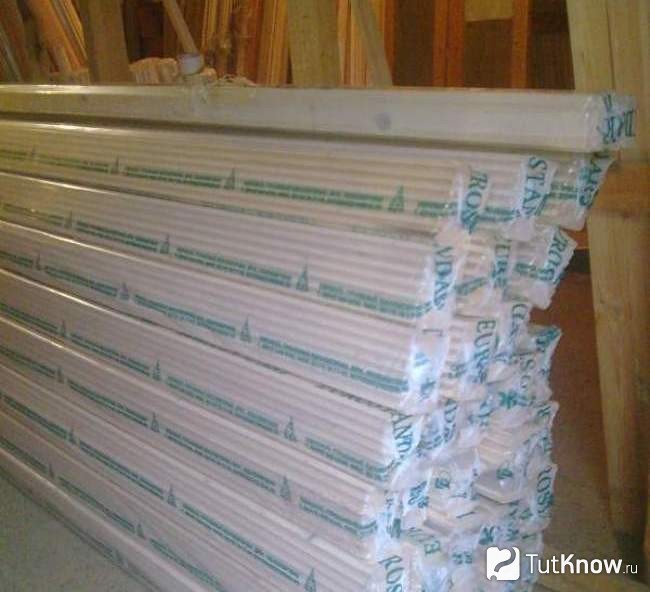
There are various sizes of the headboards for the convenience of laying. You can find mounting units from 2 to 6 meters in length, from 9.6 to 15 cm wide and thickness in the range of 2.5-4 cm. After the production of the board, it is dried to 10-15% humidity and tightly packaged. Thanks to this, you can immediately begin to install it without prior preparation.
Mounting order
The laying of the material is performed in a specific order. It is necessary to hold it indoors from 3 to 14 days after delivery so that the moisture in the room and the humidity of the wood equal. The duration of the exposure time depends on the season of repair work. A few days later, you can remove the packaging film and, if necessary, cut the material in length.
After cutting the board, it is necessary to put on the lags covered with insulation or film. In this position, the material is left for a few days for acclimatization. Only after that the material laying can be performed.
It is not recommended to use glue or any other synthetic substances during installation. To secure the board, the screws are used that the floor covering is screwed to each lag. The distance between the lags should not exceed 59 cm.
The first mounting unit is located on the tipped side to the wall.
There is a small gap between them, 1-2 cm. Floor ventilation will be carried out through this gap. In addition, if over time, the humidity of the floor will increase and the board will expand, then this gap will prevent the deformation of the floor surface. Boards should not be concave. This is worth seeing before the start of work.
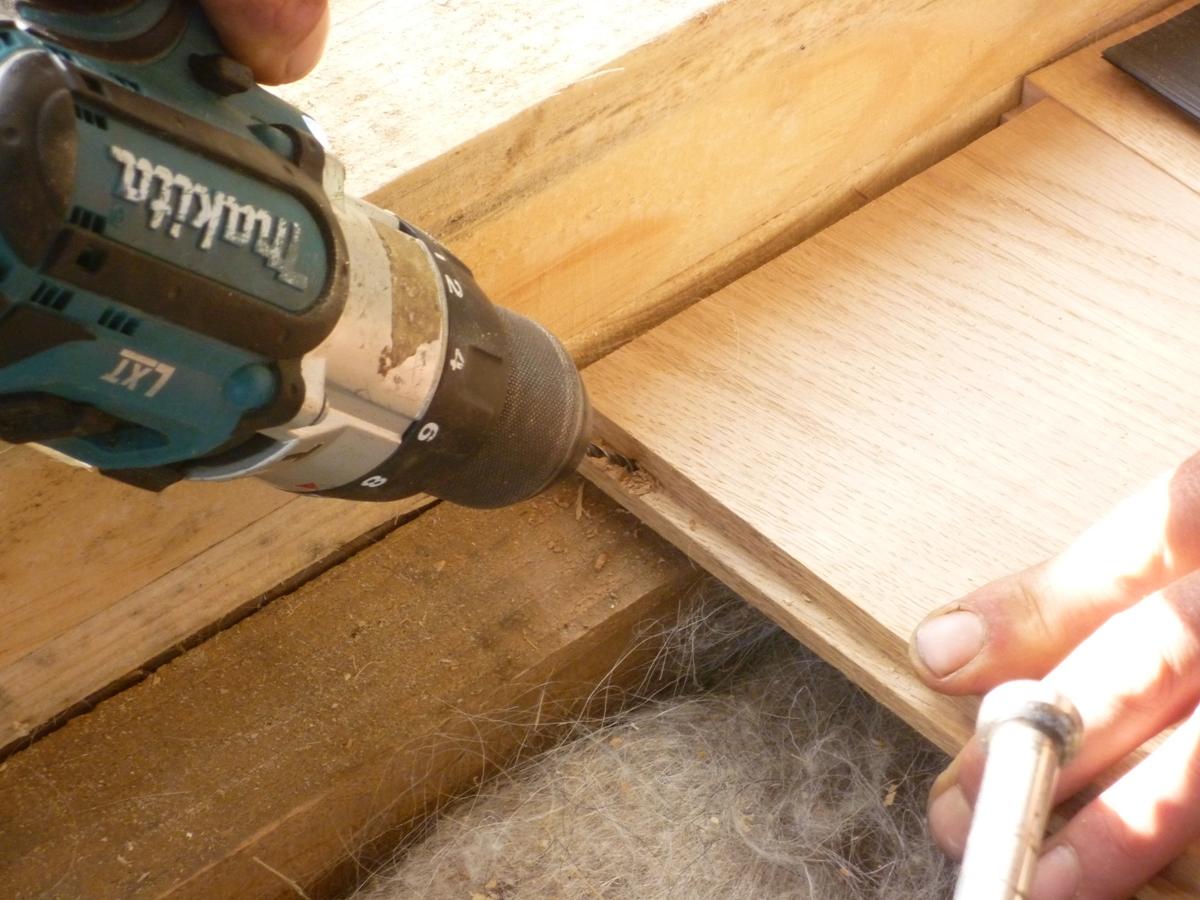
To secure on the lags, it is best to use a 5.5-6 veil tree with a long. They need to be screwed into the groove at an angle. Previously need to drill holes with a diameter of 2.5 or 3 mm. Thanks to the hole when screwing into the groove does not crack. Drills for this work due to its small thickness break rather quickly, so it is recommended to stock by them.
The second board is fixed to the first. Ideally fit them in each other with the help of the image, it is unlikely that it will be possible, so it should not be too much to zealous. For a better result, you can use a wooden wedge that you need to drive across the entire board, while screwing up the self-tapping screw.
The fastest and most convenient way is the use of a car jack. But in this case it is necessary to provide protection for material from damage. For this purpose, small planks are used that need to be supervised in the following mounting elements. When using the jack, the use of the image will not be required.
Thus, the flooring device from the tipped board is quite simple. You can do the installation of flooring items yourself. In this case, it is necessary to take into account the features of the material.
Wooden floors do not get out of fashion. After all, such a finish looks natural and noble. In addition, the tree is an eco-friendly and natural product that does not allocate harmful connections. There are several options for wood design. You can choose a parquet, or parquet board, but. Perhaps the most unusual type of finish is a t-shirt. What is this material, and for which it is used - read further.
What is a tie board
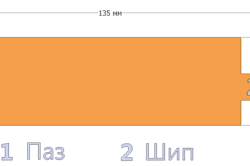
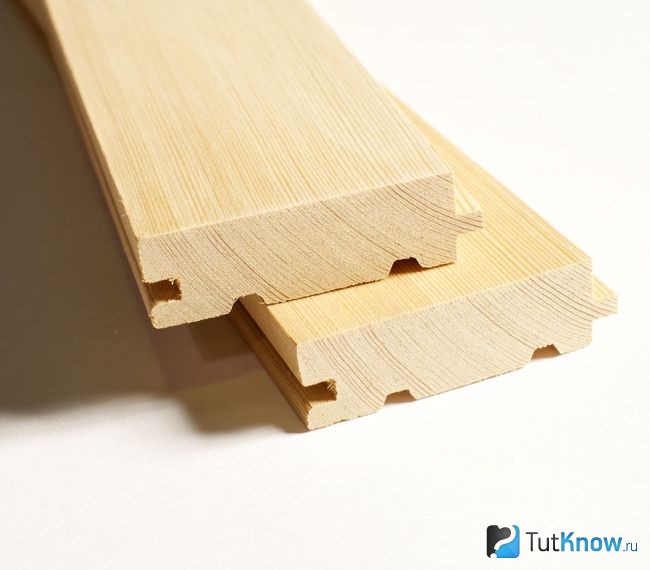
The tipped board is made of wood. In such an element, on the one hand, there is a centimeter groove, and on the other spike is the same length. They received their name, just due to the presence of such a key system, because the grooves are differently called the spool.
Bowed styling is a monolithic seamless design. The floors decorated in such material will eventually begin to creak and fall apart.
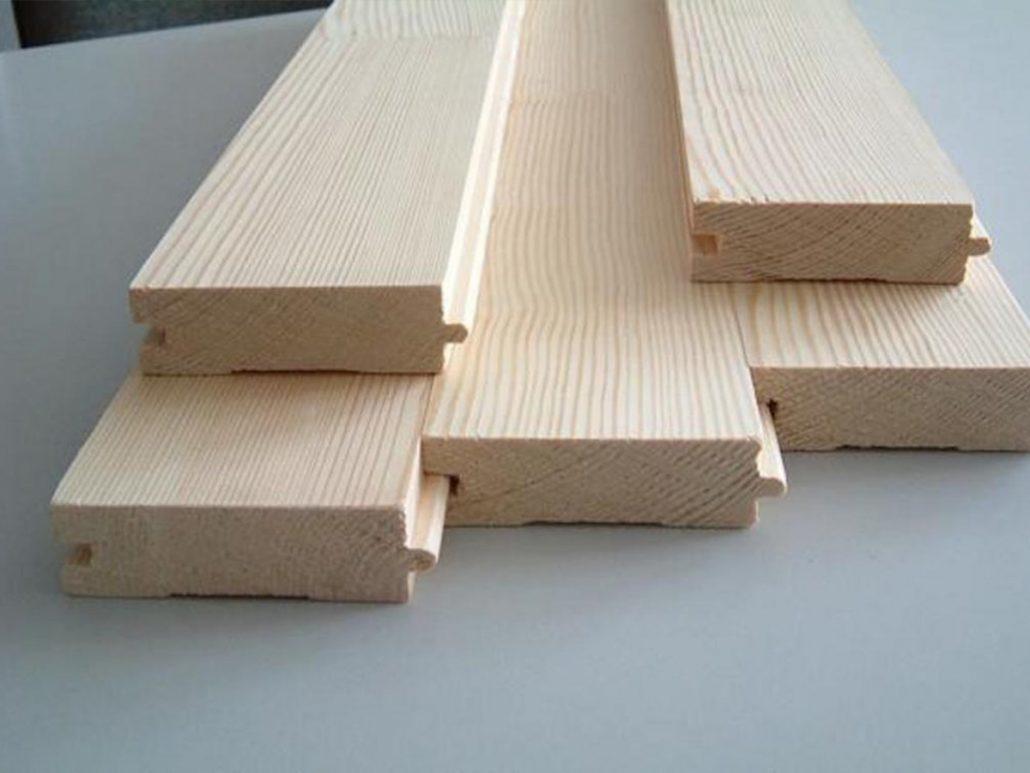
Fixtures for scribs of boards (spike and spool) are made on the milling machine. Only under the condition that these two elements will have accurate dimensions, the boards are firmly connected to each other.
The punching board can be made of different tree species. The material of such a product is selected depending on what it will be used.
Types of headboards:
- The cheapest option is pine tongs. They are not very durable and fear moisture, so they must be opened with several layers of varnish.
- The tongue from larch is not afraid of moisture, but it is twice as expensive than pine boards. This material is longer and unattractive for insects.
- Oak and ash board is the most expensive and beautiful material. Floors from trees such breeds look noble and aristocratic. High cost pays for strength and long service life.
In the construction markets you can purchase tight boards of all existing species. First of all, when choosing a material, pay attention to its humidity. Wood floor board must be saturated with liquid, no more than 10%.
There are standard sizes for circulated boards. Their length can vary in the range of 100 - 500 cm, the thickness is 2.5-3.5 cm, and the width is 8.5-10 cm.
Advantages and disadvantages of the floorboard for the floor
Wooden tipped boards have a lot of advantages. Of course, their features may vary depending on the variety and wood breed from which they are made.
Advantages of headboards:
- Spike-groove fasteners ensures uniform load distribution throughout the floor. Such a monolithic connection increases the service life of the floor covering.
- This type of boards is made in such a way that the air can freely penetrate through the boards. Thus, the mold and mold will not begin on the floor.
- Bloodboards are an environmentally friendly material that meets all European quality standards.
- Increased thermal insulation and noise insulation - additional advantages of such boards.
- Installation of tipped boards, thanks to the mounting system, so simple that any newcomer can cope with it.
- A seamless design of tankboards is perfectly in many interior styles. Especially successfully looks like such a coating in the premises made in the style of Loft.
- In the case of surface damage from wooden massive boardsIt is easy for him to return an attractive appearance, rebuilding it alone and opening a new layer of varnish.
All these advantages make a tipped board with excellent material for installation in a private house or apartment sucyss. However, such a coating has some drawbacks that can affect your choice.
Disadfined boards:
- Tree is an expensive natural material, so the headboard will cost more than most other outdoor coatings. The price of such material will pay off due to its strength and long service life.
- The whipped board is afraid of moisture, so it will be possible to cover the new layer of varnish or oil-wax mixture.
- The quality and duration of the service life of your floor covering depends on the selection of wood.
As you can see the shortcomings, such a coating is not so much. If you are satisfied with the high price of a tongue board, then you can safely acquire.
Options for using a genderboard board
Bounded boards due to their high prices are not used very often. However, apartments decorated with this noble material look very bright and original.
The first version of the use of a headboard is a black floor finish. In this case, on top on the boards, it is necessary to lower the decorative coating. For laying on the draft floor, you can use boards from the pine mass, they are not raw and cheaper than all other woods.
Best of all pinned boards look in spacious premises with environmental or concise styles of interiors who prefer simple forms. Especially successfully such a finish will fit into the Loft styles, modern and eco.
Another way to use tie boards is the facial floor finish. Such a designer stroke looks great in most interiors. For trimming facial surfaces, boards from larch, oak or ash. Such trees breed are stronger, moreover, they look much noble for pine materials.
Pine boards harmoniously look in combination with wallpaper of muted colors. Also, if you want to make a gender coating more original, you can handle it with a verse of any color. Such a reception will provide sex covering additional protection.
What reason can you retard sex sheets
The headboard can be laid almost on any base. So that such a coating light up as long as possible, the floor surface should be prepared. Make extra thermal insulation and waterproofing.
What grounds can be laid tipped boards with your own hands:
- Bounded boards can be laid on concrete base. If there are pronounced irregularities on such a surface, it must be pouring it a new layer of screed.
- You can also mount this design to lags. Lags are attached to the base with self-draws, dowels or glue.
- If you decide to use tipped boards, like a facial finish, you can sash the Fan. Plywood is attached to the base with glue or self-drawing.
- Old wooden floor can also be bored with a circulating board. The main thing is that all his elements were whole and firmly held on the basis.
Whatever reason you have used, you need to take care of additional floor insulation. First, the waterproofing film is stacked on the draft floor, then the insulation, for example, glass gamble, the film is recently laid again. Only after all layers are in their place, you can use the spanled board itself.
Laying of the floor from a t-shirt on a concrete base
First of all, to put the boards on concrete, you need to spend some preparatory work. You can align the base in two ways: using a self-leveling screed or using a metal spatula and cement-sand.
Under the tipped board, the insulation is not necessary. However, using such an upgrade, you will get a warm floor.
Next, you must select the insulation and waterproofing film. What materials are better, to say difficult. One thing is clear that the ideal option is the natural insulation and durable polyethylene film. You can also use waterproofing soil.
Build a warm floor on a concrete base with your own hands:
- A plywood or chipboard is attached to the concrete base. The distance at which the edge edge should be, is 1.5 cm. Honey plywood sheets also leave a gap. It must be 2 mm. To attach this layer, you will need self-tapping screws that are taken into the tree.
- The floor sizes are recognized. Boards are cut off on them, for this, a special device is used, for example, an electrolovka or hacksaw.
- Scuffed boards are attached to the plywood. The first element must be put in spike to the wall, and a round groove from it. To pull the boards use self-tapping screws or nails. Such tightening should be reproduced at an angle of 45-50 degrees, with a step of 30 cm.
- After all the boards are laid, the gaps between the walls and the floor are put on and decorated with a plinth.
This is the easiest option of laying a spanned board. With this installation, it is quite possible to cope. Mounting boards to plywood easily and quickly, but more often use the rallying of elements with lags.
More complex styling of the headboard with their own hands on lags
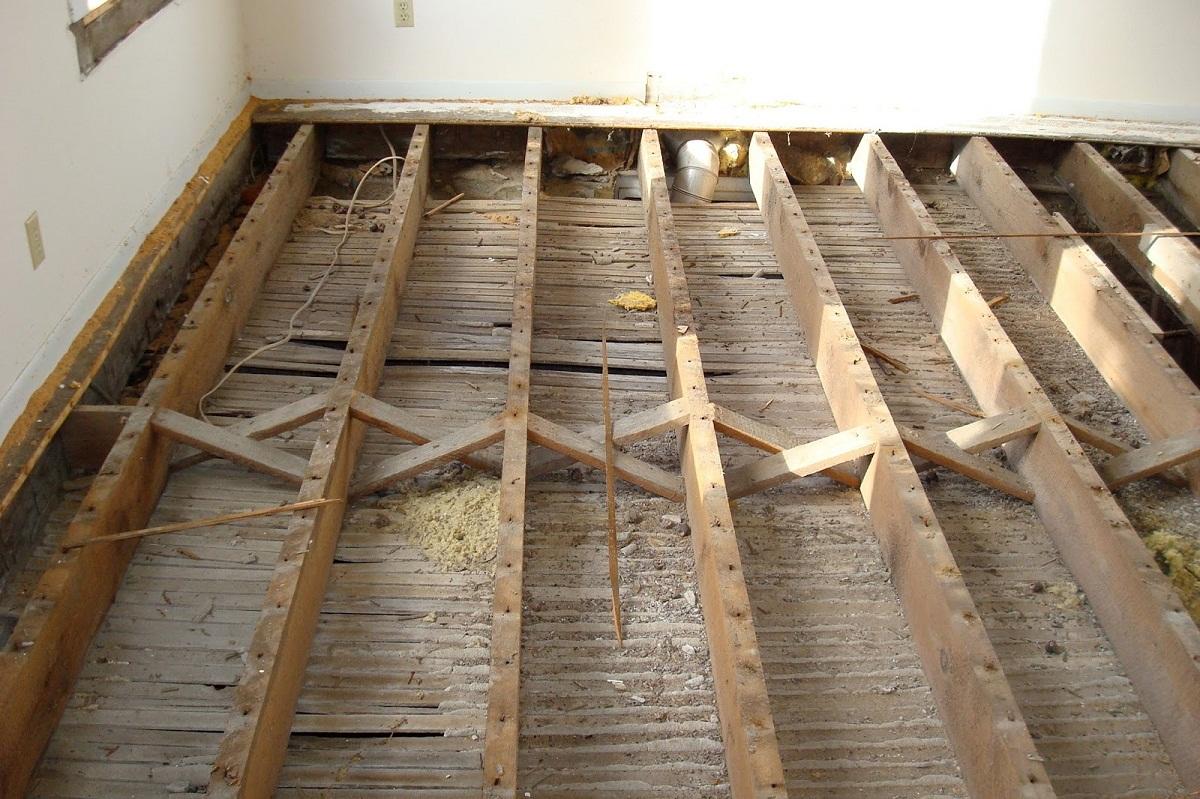
Lags are thick wooden bars, which are installed on the aligned concrete floor. They are stacked with a step of 30-60 cm. They need to lay a sound insulation substrate.
On top of the ridge, lag needs to put moisture-resistant faeer. The requirements for its thickness are quite rigid, the material thinner is 1.8 mm not suitable.
Attaching boards to lags:
- The first board is put on the crest to the wall at a distance of 1 cm. Its fasteners are made using self-tapping screws or nails, while the first board is correctly fixed across the entire width.
- Next, install three boards. In this case, the comb of each next board is needed at an angle to insert the previous element in the groove. For a better connection, the boards are closed with a rubber hammer.
- You can pull the boards using a jack. Come to the last lag of Bruks, the screw jack will be dried in them. Install the second beam on the rib board. Install the jack so that it rests on and in the bar on the lag, and in the bar on the board. So you can firmly connect the boards.
How to make a tipped board with your own hands
To separate your house with tipped boards, it is not necessary to buy a ready-made material. Folded board may well be done with your own hands. To do this, you will need a manual fuganok and a milling machine, as well as, any edged tool, as well as dry boards.
If you failed to pick up high-quality, well dried material, it means you have to dry it yourself. However, this stage will take quite a lot of time.
Laying the headboards with their own hands (video)
Screwed boards are made as follows: the material is fixed with clamps, the markup is applied to it, and the spike and the comb from different sides of the board are cut onto the markup.
The punch board is an excellent alternative to a piece parquet. It also looks luxurious, but it is easier to install it with your own hands.
Competent selection of tie boards, laying of material for different bases, advantages of coatings with a side compound "Spool-groove".
The content of the article:
Plotted boards are products from a single array of wood with milled grooves and ridges on opposite ends of the material, which, when articulated, form a brushless connection. Used to create high-quality seamless flooring for floors and other surfaces. We will talk about the methods of laying tie boards in this article.
Advantages and disadvantages of floorboards for floors
Bounded boards Thanks to design peculiarities, have significant advantages over other lumber:
- The "groove-spike" connection provides a uniform distribution of the load on the boards and increases their service life.
- On the rear side of the board, special grooves were made for supplying air to the involving side of the material, which eliminates the appearance of the fungus.
- The coating of tipped boards has good sound and insulating properties.
- Thanks to the spike and groove, the installation of the material is carried out very quickly.
- Bounded boards are produced standard sizesthat also speeds up the installation work.
- The board is manufactured from a single array of wood, without the use of chemical components.
- The coating has a beautiful appearance.
- The boards connected by the groove and the ridge are not deformed and will not be blown.
- Bounded boards form a durable seamless coating.
- To restore attractiveness, it is enough to protrude or run the front side and cover it with oil or special varnishes.
- Boards comply with European standards. The front part is smooth, does not require additional improvement, paint or varnish or varnish is perfectly put on it.
- In rooms with a floor of a natural tree is always there is a healthy mind.
- The floorboard floor looks good in any room interior.
- Docking elements (groove and spike) are manufactured on a high-precision milling machine, so the quality of the connection is very high.
How to choose headboards for floor
When buying a floorboard board, pay attention to the main characteristics of the lumber, from which the durability and the external appeal of the sexual coating depends.
Screen Board Wood Breed
Extra class boards from hardwood trees (larch, oak or ash) are used to create a clean floor. This is the most expensive product, without bitch, cracks and other defects, having a homogeneous structure and color shade. Extra class boards are characterized by increased water resistance, but are expensive.
The draft floor is mounted from soft rocks (pine, spruce), as well as any class S. class S. Timber of this class are distinguished by the presence of bitch, cracks, single holes. In addition, pine and firboards are soft, quickly damaged by thin heels, have a weak resistance to moisture. The low cost of the material can be attributed to the positive parties.
Screen Boil Dimensions
Measure the length of the wall walls. Determine, in parallel, what wall boards will be laid. Calculate the approximately the total length of the boards for the whole room and decide whether you should buy a blank.
In making a solution will help you with the following information:
- The length of the boards should be equal to the length of the room.
- You can buy short samples, but with the condition that they will not hang in the air.
- The market for sale from 1 to 6 m. For the floor, it is most often buying lumber from 3 to 6 m long, which allows you to choose the optimal length of the workpiece and reduce the length of the cropping.
- When buying the calculated material length, increase by 10%, which may be in trimming.
- Recommended sizes of tie boards: width - 70-145 mm. Thickness - from 28 mm.
Humidity of circulated boards

For work, floor-headed boards with a humidity of 12-16% are suitable. If you are able to choose, buy products that were dried in autoclaves - they do not exceed 10%. If the humidity is large, when drying, the floor will be deformed, cracks and warping will appear.
Humidity is determined in several ways:
- The most reliable is to obtain this parameter using a moisture meter.
- Highly wet boards are easy to distinguish - it is enough to make palm to the surface.
- When taping the knuckles of fingers, a wet material sounds deaf, dry - ringing and loud.
- The color of the wet boards is darker than that dry.
- A qualitatively dried board has a noticeable brilliance, wet - matte tint.
- If the boards were in cellophane packaging, inspect it for condensate. The presence of moisture drops about the high humidity of the boards.
Checking the quality of the manufacturing boards
Check the accuracy of the manufacture of grooves and spikes and the quality of the facial processing:
- The spike must enter the groove with a small load application, with a slight click after the compound with the groove.
- The front side should be carefully polished.
- The wrong side is usually processed roughly, but necessarily the presence of filling grooves.
- Buy lumber only in factory packaging, which guarantees the safety of the goods for a long time.
Requirements for the base for laying tie boards
The method of laying of tie boards depends on the type of floor carrier design. Lags or carriers are considered to be a classic option that lift the floor with 70 mm above the base. In low rooms, the boards are laid on the Faneru.
Lugi for a t-shirt
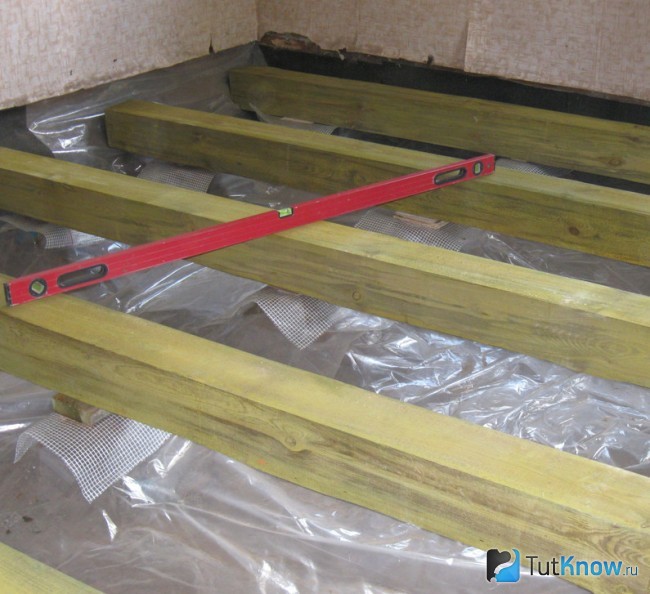
Lags are beams with a thickness of 50 to 70 mm, which are installed on a solid smooth solid surface, for example, on cement screed. If the base is uneven, instead of lag, the beams are mounted, which are installed on point supports. Each bearing construction bar is individually aligned. For carrier supports use beams with a thickness of 100 mm.
When installing lag, adhere to such recommendations:
- The distance between the lags depends on the method of fastening the material and the thickness of the headboards. If the boards are stacked perpendicular to lagas, the step of support structures should be 60 cm. If the boards are steel under a different angle, the step is reduced. At the corner of laying 45 degrees, the distance between the supporting bars is left 30 cm.
- The space between lags and the ground cannot be filling. Ventilation of the floor occurs through it.
- So that walking is not accompanied by deaf sounds, the beams are placed in sound insulation - pergamine, a laminative substrate, a synthetic procession.
- The beam's room is fixed in such a way that the boards should be harvested in parallel to the light stream running from the window.
- In the corridor, the boards should be located along the main direction of movement.
Plywood Substrate for Bookboard
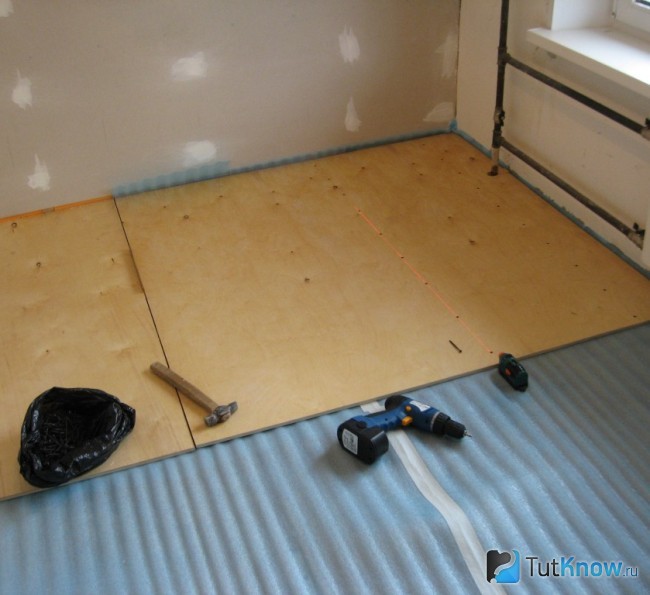
Phaneur is used to not raise the floor level. For the substrate, moisture-proof plywood is a thickness of at least 18 mm. Do not use thin plywood, it reduces the rigidity of the base and can lead to the deformation of the boards.
Installation of plywood follow this way:
- Check out the non-alone and the horizontal of the base to which the plywood will be laid, if necessary, perform its refinement. Most often, Phaneur steles over a concrete screed.
- Cut the sheet of material into several equal parts. For example, a sheet of 1.5x1.5 m is cut into 4 parts to remove the internal voltage.
- Place the blanks on the floor diagonally to the floorboards and secure the dowels at the rate of 15 pcs. on m 2. Between the parts, leave the gaps of 2-3 mm, and between the walls and plywood - 15 mm on temperature extensions.
- Drink fastener heads in wood.
- Treat the surface with a grinding machine or a drill with an abrasive head. For grinding, use sandpaper with a large abrasive, P24 or P36. After grinding, remove the dust with a vacuum cleaner.
- Make sure that there are no fatty and other unscrewed spots on the surface. If necessary, clean it with solvent.
Concrete floor board

Boards directly on concrete screed Do not put, only on lags or plywood. But the properties of concrete to absorb liquid lead to high humidity under the sex coating and rapid decay of the floor. Therefore, before installing the headboard, make sure that the concrete base complies with the following requirements:
- The maximum moisture content of concrete is 3%. The value is determined by the moisture meter. In the absence of an appliance, you can use people's way. Put the polyethylene film on the concrete floor, stick with scotch. If, after a day, water droplets will appear on the film or on the floor wet spot, it means that concrete is not dry enough.
- It is also necessary to check the condition of the surface of the screed, which should be smooth and flat. A long ruler will need to check. Put the tool on the floor in arbitrary places and check the absence of gaps between it and concrete. The deviations of the surface are no longer allowed on 2 m of the ruler. Orthodox becomes the cause of the screenshot and seeding of the floor.
- Using the hydrostatic level, measure the horizontal of the floor. The bias is not allowed more than 0.2% of maximum length Rooms.
- To equalize the floor, high areas should be passed, low - pour the self-leveling mixture.
- After alignment, the concrete screed is impregnate with a polyurethane primer mixture into several layers.
- To create a moisture-proof barrier between concrete and a wooden floor, a film of foamed material and soil mastic are used. The mastic is applied to the floor with a roller, and the film is glued on it.
Technology Styling Tublished Boards on Laggers
There are several ways to lay the headboard. The choice of option depends on the variety carrier structures Floor. The installation of the coating on the lags consists of several stages: pre-installation, final fastening, finishing.
Preliminary installation of tie boards
Prerequisites are performed as follows:
- Write lumber into the room in which it is planned to lay it, and leave for 1 week. During this time, the humidity of the air and material is leveled.
- Choose a flat board, wall length to the wall.
- Put the board on the laboratory crest to the wall, retreating from it by 10-15 mm. The gap allows the board to expand at high temperature and change of humidity. At the end of the work, he closes the plinth. The value of the compensation clearance depends on the length of the boards, more accurately its magnitude can be found in reference books.
- Secure the first board very reliable. Self-tapping screws to each lag for the whole thickness. Instead of self-screws, you can score nails.
- Put the second board next to the first and align the comb with a groove. For a dense compound, hit the hammer at the end of the second product through the bar. Similarly, attach three more boards.
- At a distance of 10-15 cm from the last board in lags hammer. Instead of a bracket to lags, you can navigate the boards or bars, which can also be used for product screed.
- In the lags, install a bit of 50-70 mm long and slide until it stops into the board.
- Between the bracket and the bar, install two wedges, acute ends to each other.
- Shunken boards with a hammer on the wedges, while the spikes will enter the grooves tightly, choosing gaps between the boards.
- In the bottom plank, the groove of the last boards screw the screws at an angle of 45 degrees and secure the board to the lags. So that the plank does not burst, run the hole in the board and lags for self-tapping screws.
- Instead of wedges for screeding boards, you can apply a screw jack. On the lags, bring the bars or boards in which the jack will rest. Install the tool on the beam. Between it and the board, put a wooden bar (gasket) and slide until you stop into the board. Through the bar jack will affect the boards.
- Close the entire floor by boards, fixing every fourth to lags by self-drawing.
- The middle rows are allowed to collect from short boards, the main thing is that the edges are located on the lags. Shorts short place in chess. Installation of boards in disintegration is hampered by a large amount of cuts that should be strictly perpendicular to the ends of the boards. For reliability, cut off the boards by templates.
- The latest boards are tightened by wedges that are clogged into the gap between the wall and the board.
- If the extreme board is not included in the slot, cut the extra pieces with a circular saw.
- The mounted floor is left temporary for half a year. Boards get out and take their final form.
Final attachment of tie boards

At this stage, the identified sex defects are eliminated and its reserves are performed:
- Inspect the surface for the presence of slots that may be formed due to the destruction of sawn timber.
- To eliminate gaps, the floor is assigned and fasten every board finally.
- Cuts are fixed with screws of 3x35-40 mm (for boards with a thickness of 40 mm), which are screwed at 50 degrees from the spike side. Hardware is installed after 30-40 cm. Recommended before screwing the screws to drill holes.
- During the attachment of the board, one of the ways described above should be pulled.
The finish processing of the headboards
The front side of the headboards is usually treated very high quality at the stage of manufacture and does not need additional grinding. But products made of soft woods sometimes require refinement.
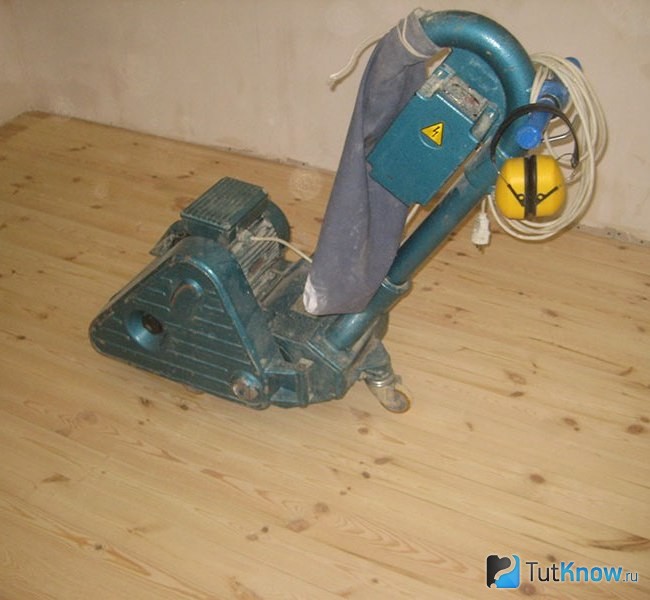
The grinding of the surface is performed by grinding machines - plane oarsal and corner. The first apparatus is used to process the entire floor. The angular is necessary for grinding of hard-to-reach places. In the absence of mechanisms, it is possible to use a grinding block or manual cit.
Processing occurs in three stages - along, across and diagonally diagonally. After grinding the boards of their coniferous rocks rose a pile. To eliminate it, they use triple primer and grinding each layer.
Pine and spruce boards after grinding must be lacquered to increase strength, which compensates for their softness. Varnish is applied in several layers. Larch boards can not cover the protective layer.
Fixing a t-shirt board on glue
Boards are glued to the base of low ceilings. To work, it will take glue, in which there are synthetic resins - polyurethane or epoxy-polyurethane. Such solutions are distinguished by durability and plasticity, which ensures the movement of the flooring at temperature extensions.
Fixing the boards in this way does not allow to adjust their position, therefore, before laying a t-shirt on the glue, perform a maquet assembly of the floor dry. Only after receiving satisfactory results, the boards can be glued.
Laying boards on glue is performed as follows:
- Measure the length of the wall and cut off the blank the board by 30 mm shorter than the result.
- First product Put the wall with a gap of 15 mm between the web and three walls. The spike boards must be turned toward the wall.
- Circuit the contour of the board, which will allow the plywood plot only for one board with glue.
- On the other hand, put the second board and move the groove to align the groove.
- Similarly, dial the entire floor of the room. Do not forget to circle the contours of the boards. Periodically, hack them with a hammer through a wooden slack.
- After mounting, pick up the position of the boards relative to each other and disassemble the floor.
- Apply a thin layer of adhesive on the fane with two spatulas. The first must be smooth, with its help the solution is flashed to the floor. The second is toothed, it evenly distributes glue over the surface. Apply it on the site highlighted by a pencil.
- Put the board on the solution and press the floor well. For reliable gluing, lock it with cloves that are clogged in a spike at an angle of 50 degrees.
- Similarly, the rest of the boards are glued, they laid them according to the labels of the mutual location.
- After mounting all the boards, it should not be shifted to completely dry the glue.
Screen boards allow you to get a practical and high-quality coverage with the application of minimal effort. The main condition for obtaining a good result is compliance with the installation technology and serious attitude to work.


