Good day, respectable audience. This time we learn how to make a niche from plasterboard with their own hands. Actually, Niche is pure improvisation, therefore the method proposed by me is not the only one. But he will give general concept how it should look at all.
Marking
The box is placed in the same way as in the appropriate lesson. We will take it a size of 50 × 18 cm, beat up vertical on the wall, lines on the floor and ceiling. At the same time, we take into account the thickness of the sheets of plasterboard - 12.5 mm, we still have a framework, not the whole design. So our sizes will be as long as 47.5 × 16.75 cm. The box markup (laser level) is shown in the picture:
Now you need to post a niche. Suppose it will begin at an altitude of 100 cm from the floor, and will have its own dimensions of 50 × 25 cm. It is extremely important to take into account the size of your screwdriver with a bat before marking - it should put in a niche for fastening the side surfaces. So 25 cm is already close to the minimum possible width. Here is the lines of its markup: ![]()
We are considering now the easiest case when "bottom" is already there - the surface of the wall. Again, do not forget to take into account the thickness of GLK! The inner rectangle is wider and longer than we need 2.5 cm.
Montage Karcasa
Mount the box for the box for us - the task is not new, there is nothing cunning here. Breeping strictly along the lines through the sealing tape guide profiles, it is most convenient to do with a dowel-nail. Profiles on the floor and ceiling, those that go parallel to the wall, cut to the full width, as shown in the picture: 
Because then we will insert the headwall guide profiles in them. The guides for niche are also mounted through the ribbon along the lines, like this: 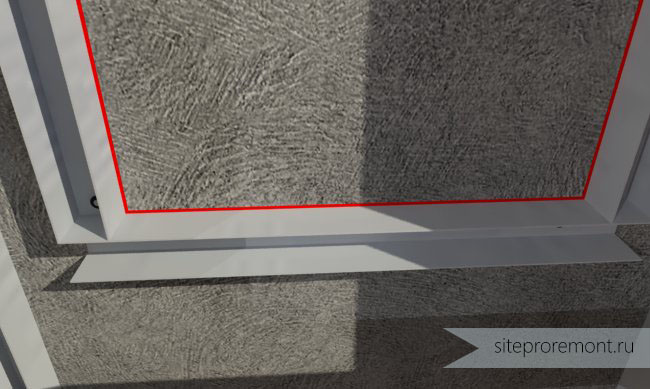
The lower and top profiles must also be cut off on the entire width. Later we learn why this is exactly, and not otherwise. How we are already known from the lesson about the box, the side faces are common to our frame already with finished video, That is, we must cut GCC and put the vertical guide profiles in advance. We raise one "side", we apply it to the frame on the one hand, insert it to the guide to those that are fixed on the floor and the ceiling, control the vertical and krepim, the whole thing is self-stoves on plasterboard to the wall guide. And then to short segments on the floor and ceiling. 
If everything was marked before that, the "sidewalks" will automatically be in the level. And now the most responsible stage. In the lateral guides, we must insert two ceiling profiles exactly at the height of the upper and lower guide niches. It will be better for time to fix them with self-presss with pressshaba. 
If not very clear, I will explain - the upper edge of the profile in the figure is in one horizontal plane with a red line of marking of the lower guide wall. Before fixing the profile, make sure that the side walls of the box are with a plane of the wall straight angle. Did we do not need a break, is it true?
The next step is to cut four pieces of Mon, slightly shorter than the thickness of the box. We insert pairs into vertical wall guides and firm on the horizontal PP, as shown in the figure below: 
All hard fix with self-drawing. The final step - in these segments of the guides insert vertical PP and set them into a single frontal plane of the box: 
Closeup it looks like this: 
Next, it will not be superfluous to insert additional front ceiling profiles. It will be enough for one between the floor and the beginning of the niche, and the two between the end of the niche and the ceiling. They will give all the design necessary strength. All, now you can sneak. 
Plasterboard design
Sheets begin to mount with a niche. First, two side faces, then lower and upper. Nothing extraordinary. 
Everything, roughly speaking, we have just already collected a niche of drywall do it yourself. It remains only to sheathe the front line of the box.
Remember the rule that does not allow sheets of sheets near corners and openings. It is impossible to interrupt the sheet at the beginning and end of the niche. The ends of the sheets must necessarily go to the niche.
I will explain on the example. The width of GLCs we have 120 cm, we use the entire value, cut the sheet of 120 × 50 cm, sew it on the front of the frame of the frame of the whole, and then we simply drink a blank. It turns out like this: 
Here, as it will look after complete sheaving, our design from the box and a niche from GLK: 
As you can see, a niche assembly is an easy. Especially when there is a specific example before your eyes. Use it on health, and good luck in repair!
How to assemble a plasterboard niche in the wall for curtains and under the TV. A detailed description of the stages of work on setting the design in the wall.
Niche in the wall serves as a multifunctional department in the interior of the residential premises. How to make a niche of drywall do it yourself? It is very simple. Need to make a little effort, have patience, and designer modern approach It will serve for a long time with its functionality.
So looks like a niche backlit
Functions and types of plasterboard niches
Niches come in various sizes and non-standard forms. It has a small depth for the picture or photo, or deeper of the drywall under the TV. Niche in the apartment can be:
- To divide the room on the zone;
- Establishing a TV or music center;
- Shelf for books or collection;
- In order to put furniture;
- For individual design.
You can make a plasterboard niche in any room of the residential premises. It will be a hall or bathroom. In each room, this niche will perform very important functions.
In residential premises, you can see decorative niches from drywall. They are located in the living room, in the bedroom and above the window. Their direct function is the originality of the designer approach, as well as the division of the room to the zone. On the shelves from GCL put vases, hang pictures. Basically, such niches are highlighted with point lamps.
Plasterboard niche, performs direct functions, mainly located in the bathroom for hygienic tools, in the bedroom from such a niche make a wardrobe.
 This looks built in a niche cabinet coupe
 A niche of plasterboard can increase space, visually, of course. If niche is made in horizontal design, the wall becomes wide. In the case of a vertical project, the wall increases up.
The room looks in an interesting interior if top part Curtains hidden and highlighting installed. Most people are interested in the question: how to make a niche for curtains from plasterboard? This is also done simply, in the plasterboard ceiling, a lighting box is created.
 Appearance Niche for curtains
 How to make a niche under the cornice? This design has different sizes and shapes. The easiest way to make a box on the ceiling is backlit near the window. Its walls will serve a niche for curtains.
Interesting is the fact that niches under the eaves of plasterboard can be performed with their own hands.
If there is no opportunity or time, then how to make a niche in the wall of plasterboard? Call the brigade of the masters and describe your desires and preferences. The masters will initially create sketches and drawings that are adjusted, and clarify the parts of the frame mounting.
Rule! Before working on the work of a niche, you need to decide - for which it is needed.
Preparatory work
In order to start preparatory work, I must establish yourself with a niche design. It will be very good if you make a sketch of this component.

- TV or other electrical engineering should not be "filled" from a niche. The facade of technology is on the same level with the edges of the niche.
- In the drawing, you should write the weight of the object installed on the shelf of the niche. If this is not a wardrobe.
- And also should immediately decide on the wiring. This is especially true if there is a backlight.
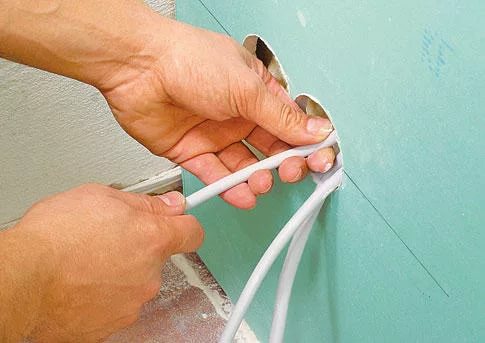 Conducting wires in niche
 Rule! All measurements and numeric data should be recorded. This will give an opportunity to easily calculate the amount of material required.
Required Material and Tools
For designated work, such materials and tools are needed:
- UD profile and cd.
- Small sized screws.
- Screwdrivers - flat and curly.
- Drill.
- Dowel.
- Level and simple pencil.
- Roulette.
- Plumb.
- Hacksaw.
- Build a knife with a set of blades.
- Passatizes.
- A hammer.
- Scissors for cutting metal.
- Spacure "Start", "Finish".
- Plasterboard.
- Glue.
- Paint.
- Needle roller.
- Spatula.
- Everything you need for wiring (wires, clips, lamps, switches and sockets).
Rule! Do not ignore the level and plumb, making everything "on the eye." This is fraught with the irregularities that the designer fiction will not name.
The main stages of work with step-by-step instructions
Initially, it should not only be a drawing and collect everything you need, but also to choose the material from which niche will be manufactured. It can be a tree or metallic profile. The wood has some minuses: when the temperature regime drops, it may be quiet or wake, which in the end will lead to the deformation of the structure.
Profile for drywall can be from different materials manufacturing. It is best suited by aluminum. It is light in work and price cheap.
 Aluminum profile for frame niche
 Plasterboard
In the construction markets there are 3 options for plasterboard: ceiling, wall-mounted, moisture resistant (green). You should decide what exactly needed? It depends on the location of the niche. If it is planned from drywall in the bathroom, then you should choose "green" GKL. Well, if for the separation of the room on the zone, then you need to look at the sheet thickness.
Marking
Here you will need the previously created drawing. Transfer each digit to the wall. Only if the drawing was performed on the usual sheet, then on the wall it is necessary to measure the real data and draw the line on them.
 The process of applying marking for plasterboard Nishi.
 Base
In order for the profile tightly to the wall, the base surface should be made. It is not necessary to do carefully and under Linebank. The main thing is that when attaching the profile there were no distillaces or large gaps.
Electric wires
If a niche of a backlit is scheduled to be scheduled, then it takes to think in advance how the wiring will be: under the plinth or in the wall.
 Installation of wiring for highlighting niche
 Mounting frame of metal profile
The principle of installation will consist of which niche should be. If the design of small sizes is assumed, then it will be better if first the frame is going, and after it is already attached.
If a big size niche, then she is going to step by step. On the wall, the carrier profile is mounted. These mounts play a big role in the design ( appearance and desiccation under equipment or books).
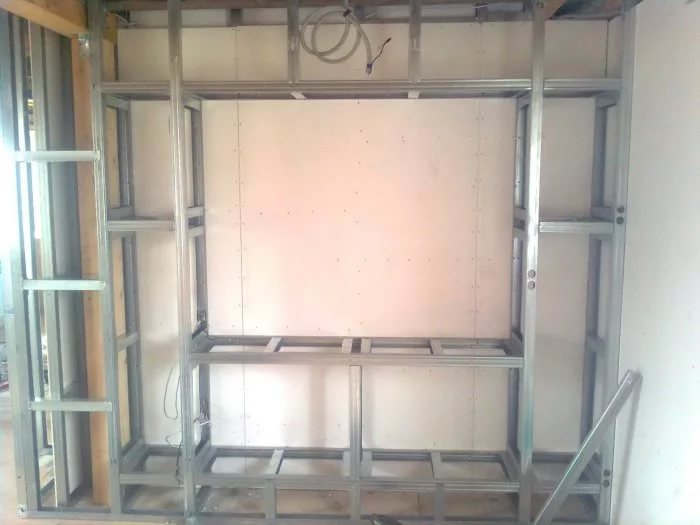 Metal frame for niche under TV
 Rule! If the design reaches the floor, then there are few wall profiles, you should consolidate the profile and on the floor. It will give stability.
For more accurate concept, how is the montage of the frame, you can watch the video.
Installation of shelves and rigidity
For the manufacture of a large niche requires strong and wide profile.
When creating a frame for the shelves, you need to make a frame from the profile of the desired size and attach it to the base. In order to bandage profile, you follow the side part.
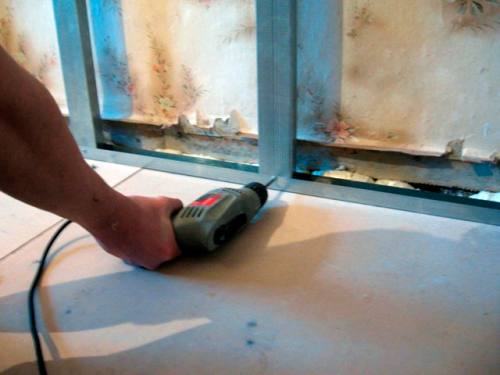
 Attaching the profile to the base
 If the frame is long in size, then it must be fixed using jumpers. They are installed in the intervals of 400 mm. In the case of use 2 such a framework, it is possible to make a suspension locker.
Attachping the frame to the floor with profiles, the base is obtained for the production of a niche in the wall.
 Attaching the frame to the floor for the base of the niche
 In order to make the original curvilinear design, you need to use a flexible profile and usual. Some profiles have some "locks", which is very convenient when creating structures.
The natural desire of a person is to make their dwelling as much as possible. But filling it with various expensive things (namely, the issue of interior transformation is solved), it is unlikely to add home to the house. But there is a more rational option - to independently change the geometry of any part of the room, and without affecting the bearing structures. One way of a variety of design of any room is the arrangement of niches from drywall. Such an interior element simultaneously performs several functions.
First, Niche serves a very original scenery of the room.
Secondly, it will completely replace furnishings, which will be much more expensive. And if you consider that it is not always possible to choose their optimal sizes, then the design of GCC, assembled with your own hands and on its own project, is able to replace any product manufactured in production. For example, a niche for a TV from drywall is no worse than purchased table or bedside table. In this case, you can arrange as much as possible (with different dimensions, configurations) of the shelves, cells. For example, for the bedroom niche is more than relevant, if we consider how much jars, bottles and the like, cute hearts of every mistress have "very necessary" cans.
Thirdly, the assembly of GLCs is painlessly restored by replacing only 1 damaged sheet.
Fourth, with a plasterboard niche, several complex problems can be solved, and with minimal costs. For example, disguise any surface defects, pipes, heating radiators in the living room (or another room where guests are often), which are rushing into the eyes and do not add attractiveness to the interior. If you consider that GLK standard sizes (average thickness) costs about 180-195 rubles, and its installation is quite simple, then the advantage of self-construct is obvious.
Varieties of niche from GLK
1. Horizontal. Installation of this design will allow visually expanding space. They are advisable to place along the walls characterized by a small width.
2. Vertical. As a rule, they are installed in close proximity to the window openings or next to massive cabinets in the living room, library, bedroom.
3. Decorative. Their appointment is to transform the interior. In essence, they are analogues of the feeds and are intended to accommodate various statuettes, small VAZ and so on.
4. Functional. More strong structures used, in particular, in order to organically build household appliances or furniture. Regardless of the project and dimensions, they allow you to achieve substantial savings of free space in any room.
Work specifics
Plasterboard is produced in several versions - ordinary, refractory, moisture resistant. But when installing inside the house (in the living room, in the kitchen, in the bedroom) is not the main thing. The peculiarity of the work is determined by the structure of the material, and first of all, its "core", plaster. There are a number of rules that need to be observed in the independent fastening of sheets.
1. Considering the brittleness of HCL, their cutting is carried out only on an absolutely even rigid basis. The workbench, the table - anything, but not on the weight or in bulk to the wall. Even laying on the floor is not a guarantee of a neat cut, especially if it is boarded.
2. To achieve high quality cutting without the destruction of the gypsum, it is better to work better sharpened blade and a metal ruler, which determines the line. If necessary, trim the sheet along the radius of plasterboard is pre-lightly wetted along the intended curve.
3. You can not install fasteners (self-screws or screws) when installing a niche try to screw in GLC. We need to graduate preparatory activities. At first, the holes are drilled in the places of their installation. And then, so that the heads were recessed and did not interfere with further finishing, the chamfer (larger diameter drill) is additionally removed.
4. Plasterboard is fixed based on several ways. If it is even (bribe), and the niche should be close to the wall, then you can fix a leaf board on glue. Sometimes GLCs are "fastened" by self-draws (screws). But this is only in cases where the niche will not be subject to essential mechanical effects.
In all other cases mounted basic structureFor the frame of which uses a profile from aluminum.
What to take into account?
Recommendations are found that GLC can be fixed directly on the plaster solution. But, first, it contains moisture, and it must be absorbed into the plasterboard (the wall will swell). Secondly, the plaster layer in the process of graze will give shrinkage, therefore, partial deformation of the GLC cannot be avoided (it will "behave").
If the base is made of wood, then no other methods for fastening niches or shelves from drywall, except for profiles, does not apply. Whatever they claim "experts", a tree even after many years is at least insignificant, but deformation. If only because during operation, it constantly absorbs moisture, then gives it back, to the room. This process is systematically, and about any deadlines of the full shrinkage of the material from these positions it is meaningless. Consequently, niche mounted directly to wooden wall, I will not last long.
What do you need?
With regard to the installation of the niche on the carrier frame.
1. Materials:
- GLC And first of all it concerns such a parameter as the thickness. It is necessary to focus on the design of the structure. For example, if with your own hands it is supposed to mount a niche of drywall in the living room, then what function will it be performed? If something heavy (household appliances, a massive vase or similar) is placed on it, then regardless of the project and general design, there are several options for choosing drywall for shelves. The first is to take thicker GLK. The second is a fond, but do double shelves (which is not entirely convenient). The third is to acquire plasterboard with reinforcement. This is a more promising and rational solution. There is a GLK on sale, the core of which is reinforced by the smallest fiberglass. For example, plasterboard under the brand "Knauf". Its value above (although quite acceptable), but the strength will be provided.
- Profiles. There are guides (PN), wall (PS) and ceiling (PP).
- Saws.
2. Tools:
- A sharp knife.
- Perforator (e / drill with a bump).
- Roulette.
- Plumb.
- Level.
- A ruler or rack (preferably metallic).
Step-by-step instruction
The recommendations below will be useful for self-making niche, regardless of its project and installation site (in the living room, hallway, bedroom, and so on). Consider the method of installation with a fastening on the wall gradually.
1. Marking.
The outline outlines on the wall. With uneven partitions with a plumb, the most convex place is determined, and the horizontal is planned on the floor, which is projected onto the ceiling.
2. Montage of the frame of the niche.
Mon (PP) profiles are "fastened" by self-draws to surfaces in line with the project. They are the basis for fixing the racks of a niche. PS products are attached to the wall. The assembly is made depending on which design is required to make with your own hands. If a niche of a decorative nature, then "liquid nails" can be used to fix the plates. In this case, the need for drilling disappears. Straight angles, parallelism of frame elements is checked with a plumbing and level.
3. Preparation of plasterboard.
Cutting GLCs and drill holes for the self-tapping screw. If any wall of the niche will be collected from drywall pieces, then a small chamfer is removed along the line of their joint (for further spacing of the gap). It is necessary in order for the line of touch of sheets to be carefully sealed. Even if the opening of the GLC was taken carefully, the partial crumbling of the "core" on the edge cannot be avoided. That is why putpuckle will have to literally press in the seam.
4. Fixing GLC.
On the self-tapping screw, but without excessive tension.
5. Grinding joints.
All of them are processed with putty, after which the reinforcing tape is pasted on top. Additionally, it is possible to strengthen the angular parts.
6. "Finish" finish.
Plasterboard is also convenient because the HCL coating is carried out with almost any material. Depending on the interior, it may be wallpaper (including "liquid"), decorative plaster, panels that imitate natural stone or wood, paints and varnishes - the choice is huge. Therefore, further finishing is carried out if necessary, taking into account the specifics of the installation of facing.
Article assessment:
| Articles |


