Plasterboard has always been a favorite material of designers, because with its help you can literally work wonders. What kind? - you ask. Yes, very different. Take at least the design of the niche plasterboard.
This is the so-called garbage in the wall, which can easily transform the interior of the room. Similar design today is not uncommon, since plasterboard has such positive qualities as a visual expansion of the space and giving the placement of additional volume, the originality of the decor and concealing small defects of the room, such as the irregularities of the walls, "extra" window-doorways and "unsuccessful" initial layout Apartments. 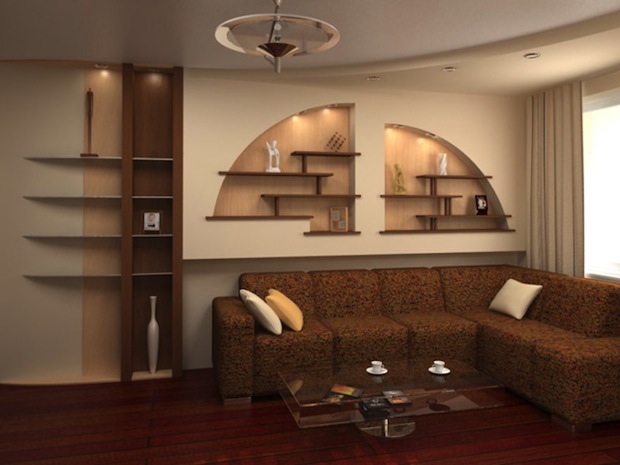
And also, as an option, the niches can be just a decorative part of the interior: with compositions from paintings with stained-in inserts, mirror tiles, plastic baguettes and other decorative materials.
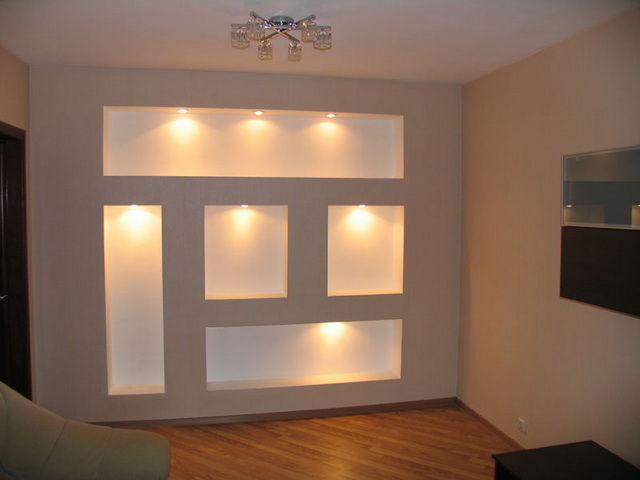
As a rule, niches in the walls of drywall can be performed both horizontal and vertical, and "on the whole wall" (outdoor). And their execution depends on the destination - either as a rack or decorative element (open execution), or as a wardrobe (closed version).
IN some cases Niche can even be used as a deepening for heating radiators - however, the heat-resistant plasterboard will have to apply.
As for the design, it may be the most different - but best option It will be the design of niches in rooms with complex geometry. These include multi-level floors and ceilings, unusual (atypical) room layout.
Niche in the wall of the shelf
If the layout of your apartment is such that niche in the wall is already provided in the wall of one of the rooms, the easiest way to use it is to arrange a shelf (or shelf) for books, vases and small souvenirs. True, not all walls have a perfectly smooth surface, but this problem is easily solved using the leveling surface of the plasterboard sheet. In addition, from simple bookshelves, you can create a whole home library.
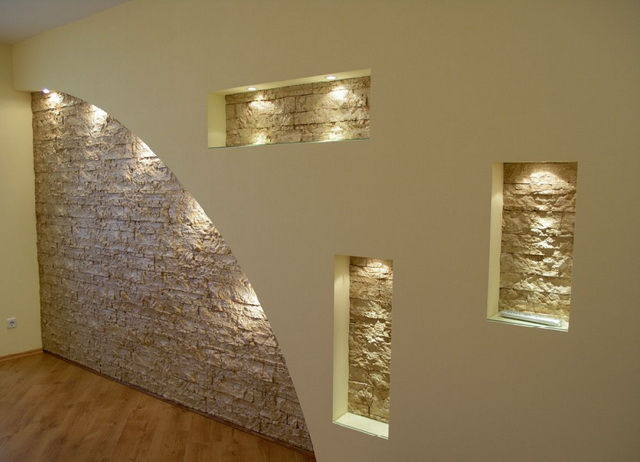
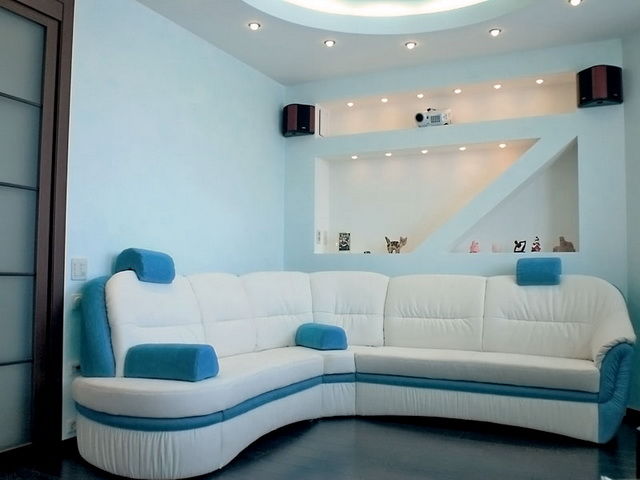
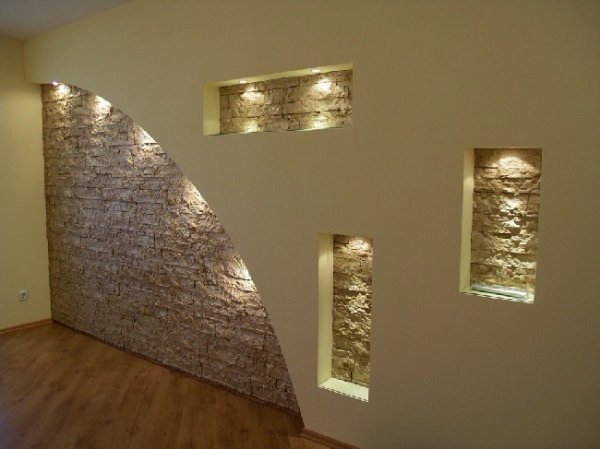
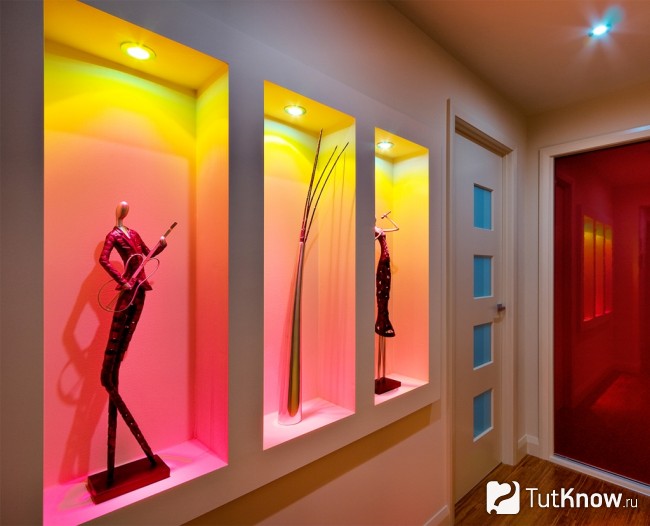
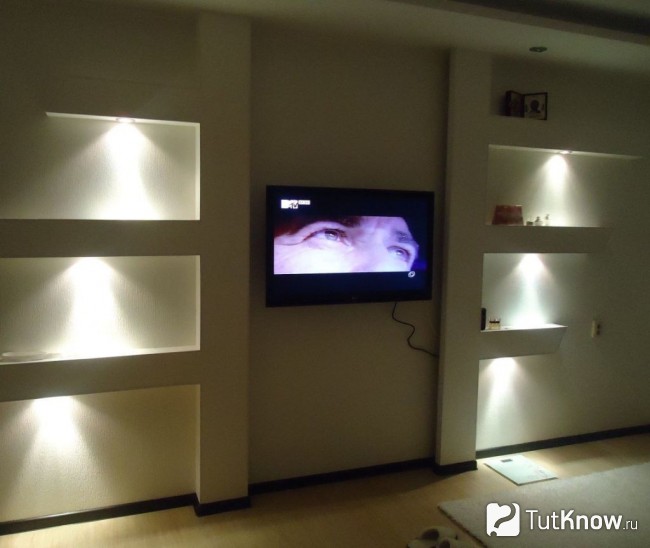
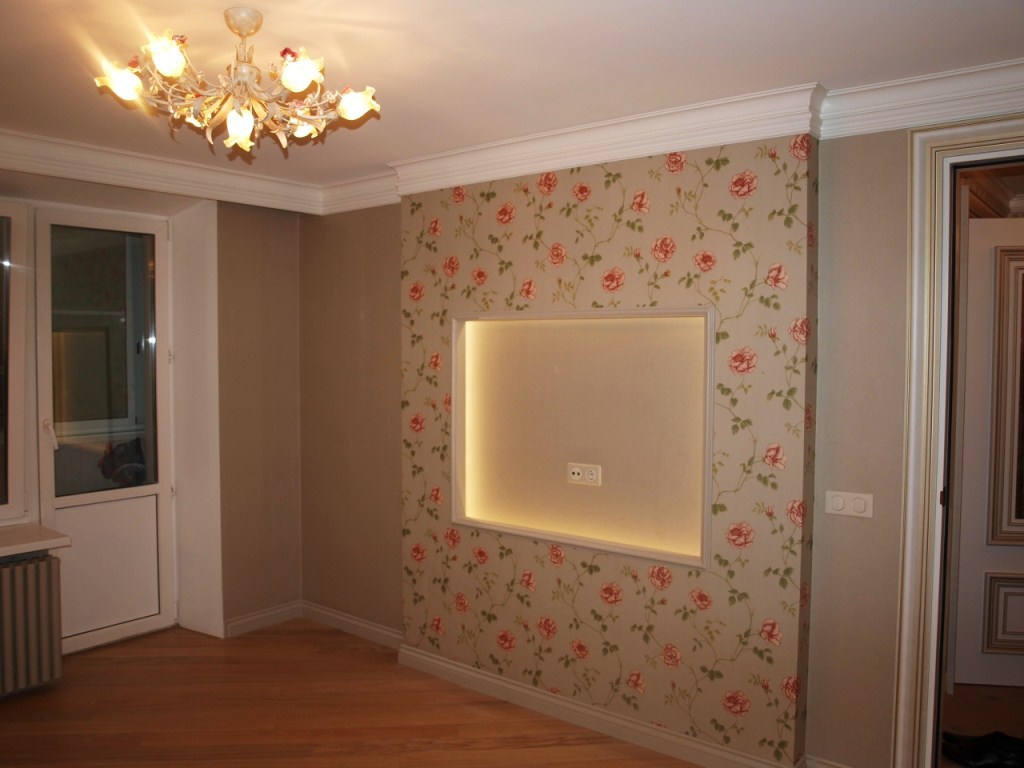
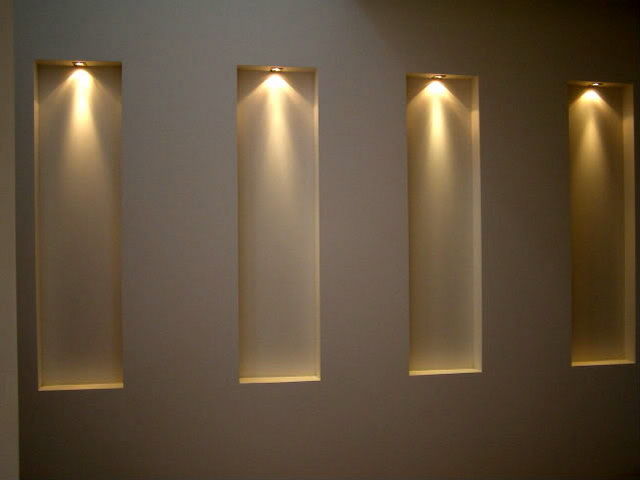
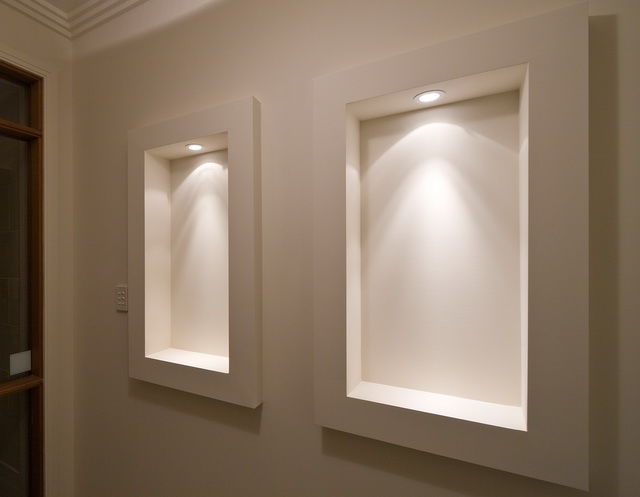
Lovers of beautiful will certainly appreciate a beautifully decorated niche in a wall of plasterboard with some backlit. In addition, point lights for the backlight can be positioned in any order and place, and the electrical wiring itself is to hide behind a plasterboard sheet, put an antique vase in a niche or fasten the shelves for books and souvenirs.
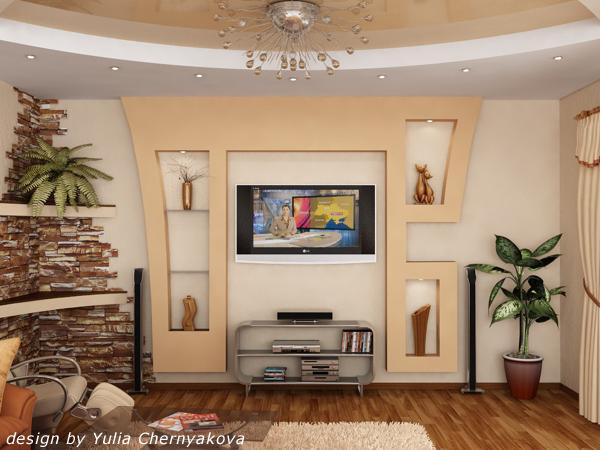
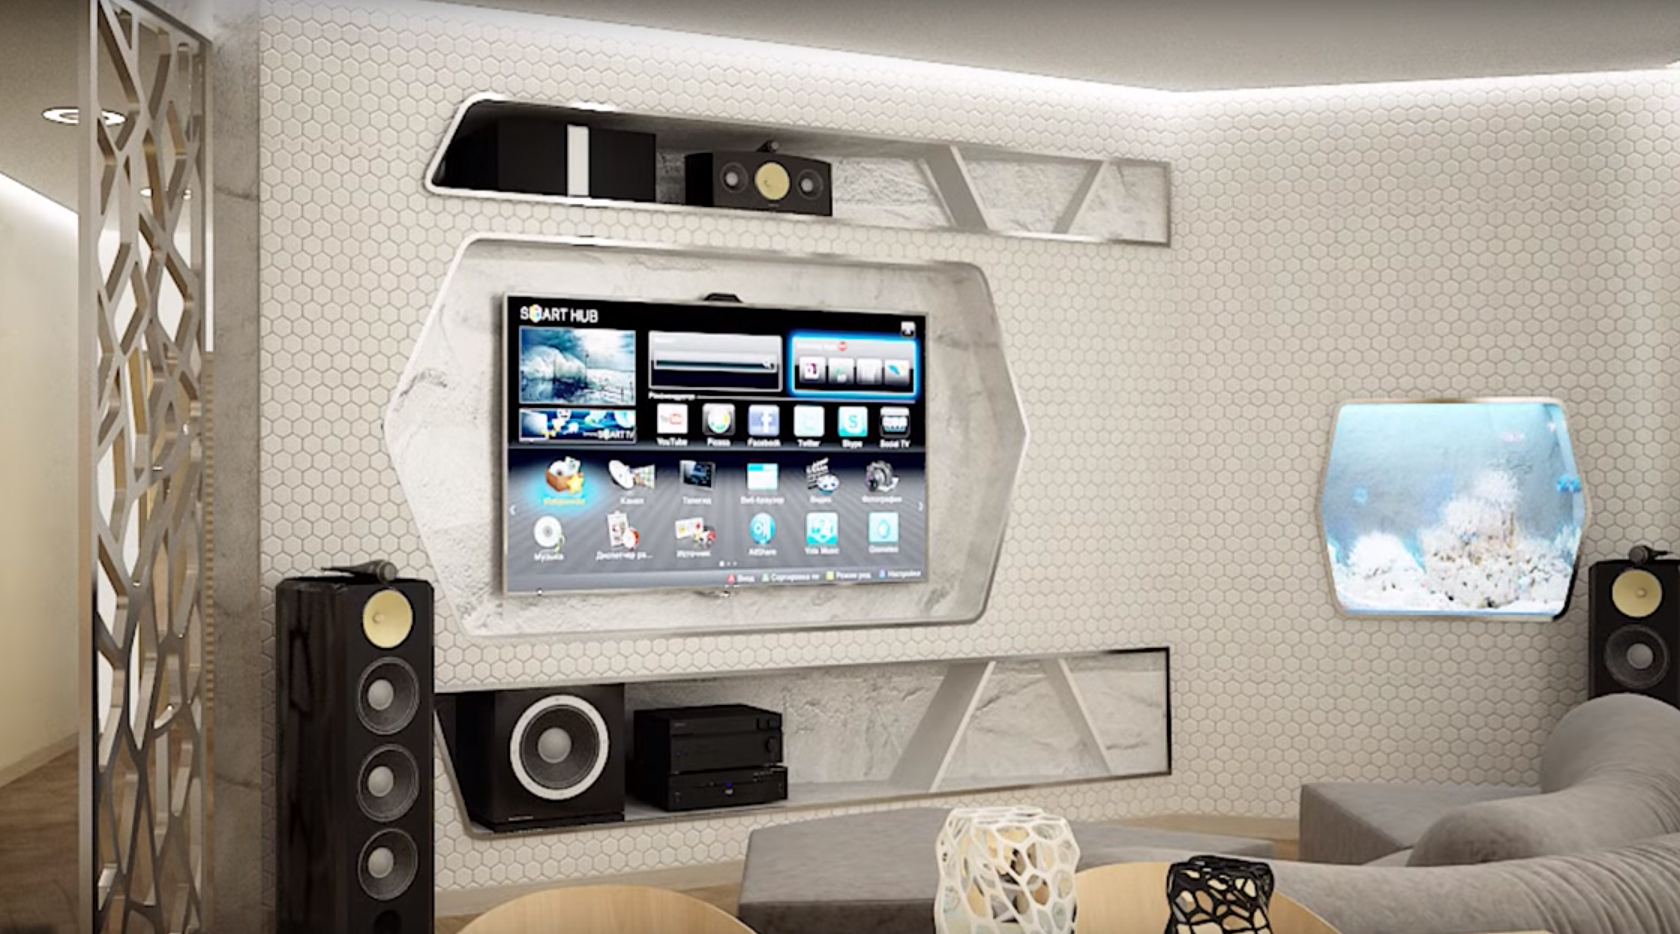
Niche in the wall under the TV
As you know, most modern young people prefer the maximum space in the room - this contributes to the choice of flat wall televisions. However, it is often even the most flat TV hanging on the wall, can cause a sense of discomfort - if only because there is a certain risk to hurt it. In addition, wires hanging around the wall can spoil the total such "impeccable" form of the situation. And here are even small niche in plasterboard wallIn which you can "cover" the LCD monitor, it may well come up, because:
- it is easy to arrange;
- all wiring can be hidden behind the sheet of plasterboard;
- the TV will be more security than "just on the wall";
- it looks very nice.
In addition, the geometry of almost any apartment can be corrected by arranging niche.
Well, for those who have aquarium, it can also be installed in a niche (of course, if volumes are allowed) decorated with plasterboard - and the useful area in the room does not "eat", and an additional "accessory" for interior design.
In other words, a niche in the wall of plasterboard is created not only "for beauty", but still from purely practical motives.
Niche in plasterboard walls: how they are created
The methods of the device of niches from plasterboard sheets There are two:
- on glue
- on metallic frame
In the first case, plasterboard sheets are attached to the wall on the adhesive solution (such special glue adhesives are sold in the construction departments), in the second - mounted on the installation frame from metal profiles. Consider the stages of the installation process.
Stage 1.. The layout of the future niche in the wall is carried out, the sizes of which will depend on the size of the frame profiles. So, if the niche in the plasterboard wall is intended for installing bookshelves or audio / video equipment, the depth of the niche must be the corresponding plus a small volume for ventilation and wiring. After that, on a sheet of paper, you will need to make a niche arrangement scheme.
Stage 2.. According to the final results, the required amount of material is calculated: sheets of plasterboard, fasteners, profiles, corners reinforcing ribbon. In addition, you will have to be rude by a perforator, a screwdriver and a grinder, level and plumbing.
Stage 3.. According to the drawing diagram, all sizes are transferred to the wall. By the way, it will also be necessary to take into account the profile width - at least 15 mm, from which the line will go to install the guide profile. Next, using a plumb, the markup must be transferred to the ceiling (if the estimated niche will occupy all height - from the floor to the ceiling).
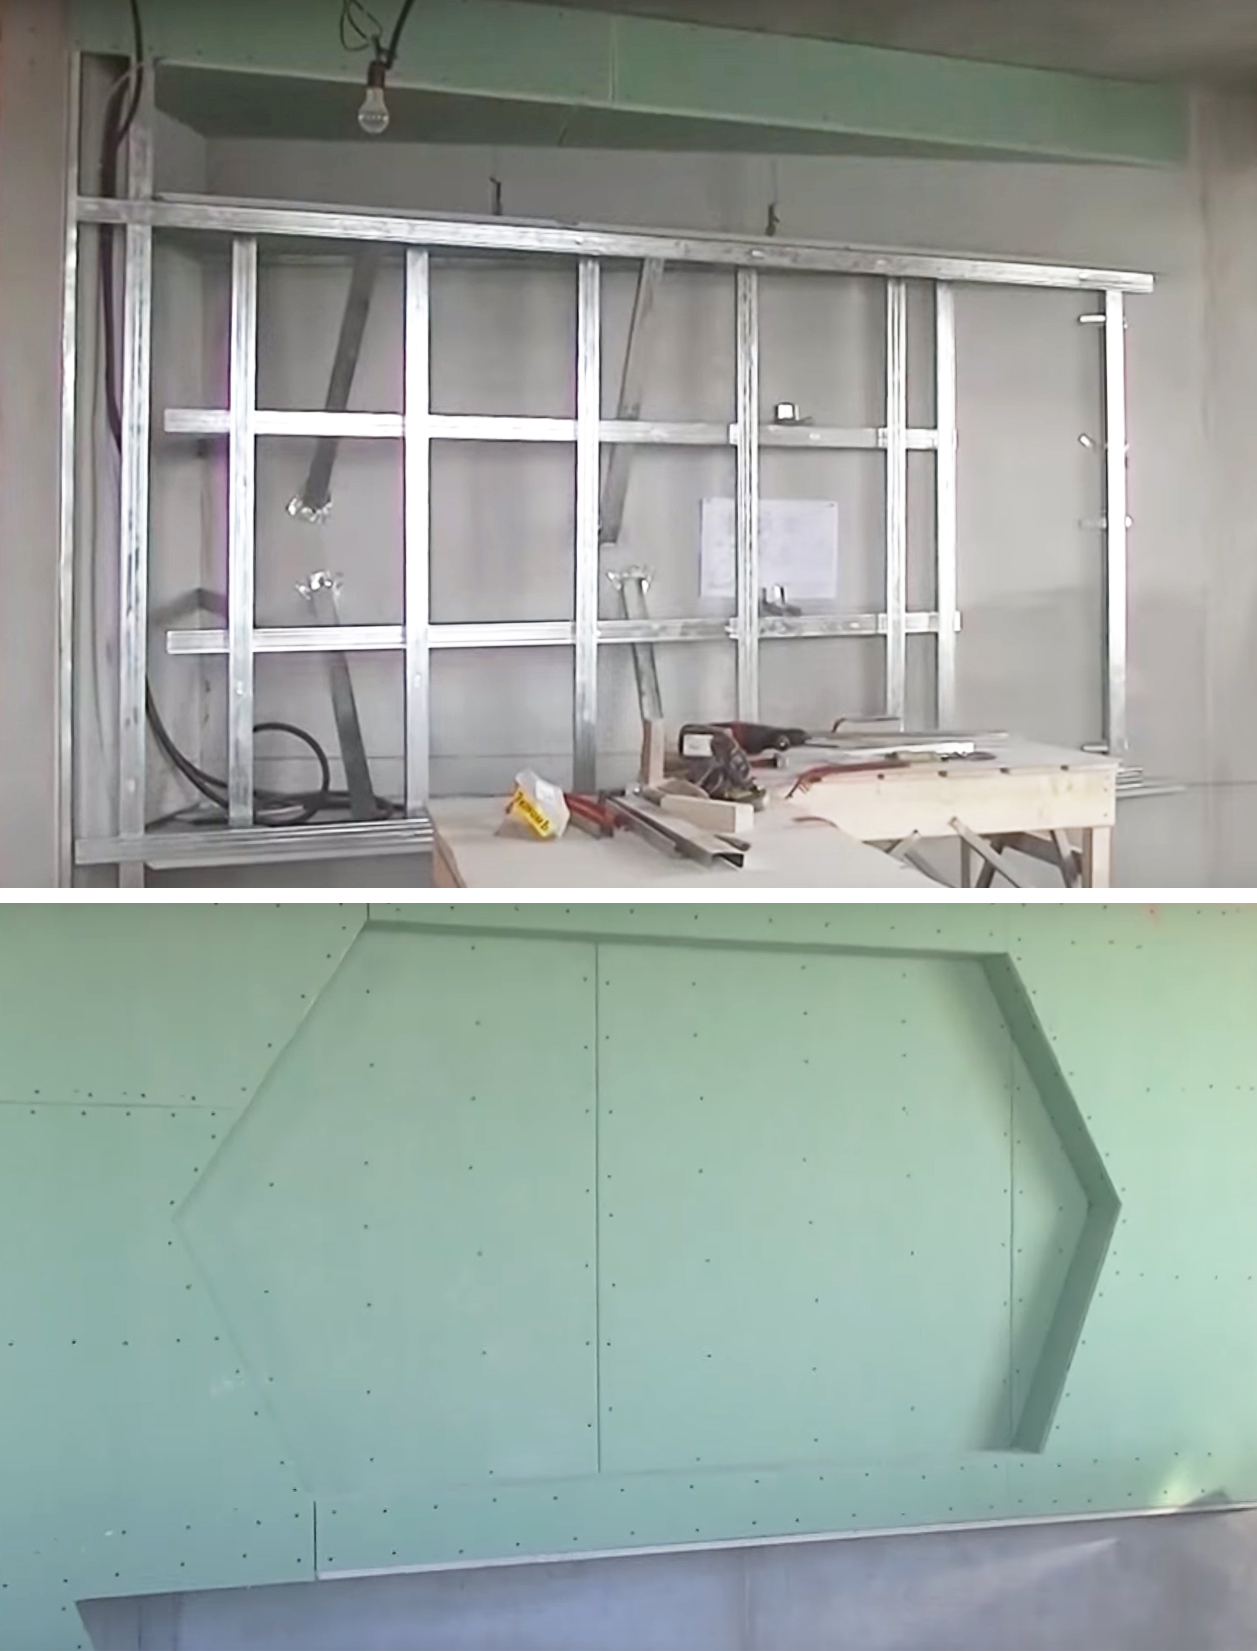
Stage 4.. Next, the installation of a metal frame: the segments of the required length are measured, are measured with fasteners (in this case, these are our self-tapping screws) and are attached to vertical racks installed in the corners of the niche corners in the cross position. This so-called frame profile contour connected by jumpers should be absolutely smooth - "evenness" of the crossbar should be pulled out by the construction level.
Stage 5.. After mounting, the frame is trimmed with plasterboard sheets, which are attached on self-drawing to the profile racks. The joints should align the reinforcing ribbon, and the angles to secure the corners. Further, the cavity of the niche is putting down, polished - and now Niche is almost ready! It remains to decorate it.
Stage 6.. As one of the options, it is possible to consider painting - but it is important to remember that the color decorations, as a rule, should be seamless to the tone of the color of the walls or contrast. In the first version, the niche will be merged with a common interior, and it will have to somehow allocate it in any case, and in the second - the contrast of dark and light tones should be particularly spectacular (of course, if the niche device implies the "highlight" of the room interior).
Niche in the walls and options for their design
Regulations can be a bunch - from simple backlight to the bagent composition.
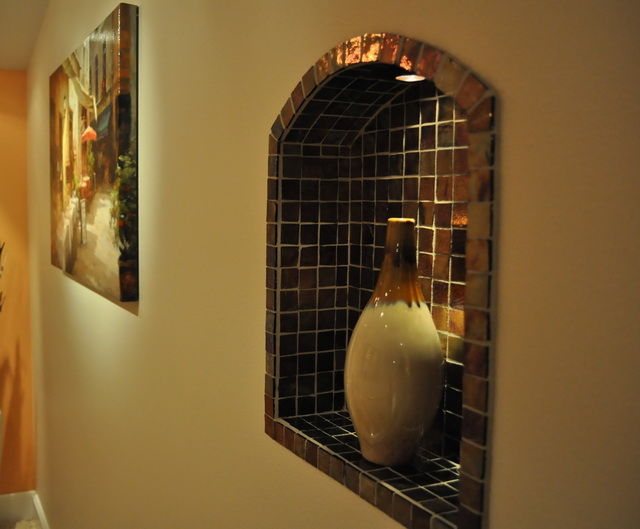
It is not necessarily everywhere "stuck" lamps - you can do with one soft light bulb, but lay the surface of the niches with a mirror tile. This reception achieves the illusion of space.
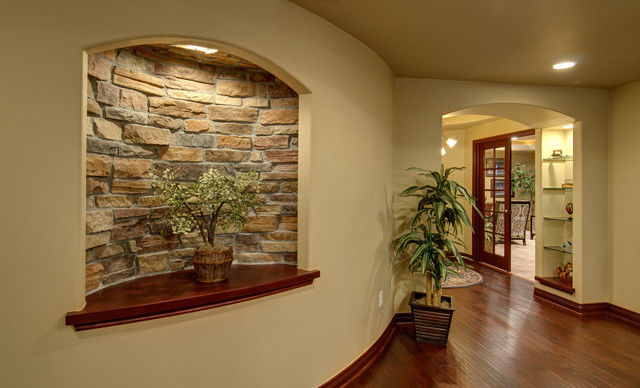
Instead of lamps, you can use a false fireplace - a little fantasy, and the usual niche can turn into a real fireplace portal. By the way, the "portal" will more effectary if it decorates the stone - artificial or natural.
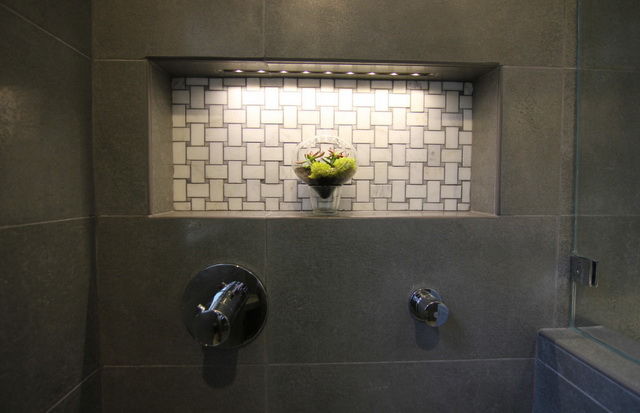
Modern room decoration with drywall is a convenient, simple and cheap option. I understood the technology of installation of plasterboard sheets, you can create with your own hands by changing the interior of any room, even bathroom or toilet, if you use moisture-proof material. One of the elements of the design of GLC is a niche in the wall. She fits perfectly into any room at home or apartments regardless of its destination.
Any construction and mounted process is divided into several stages. The construction of a niche from plasterboard in the wall did not exception. Therefore, starting to work, try to split it into steps.
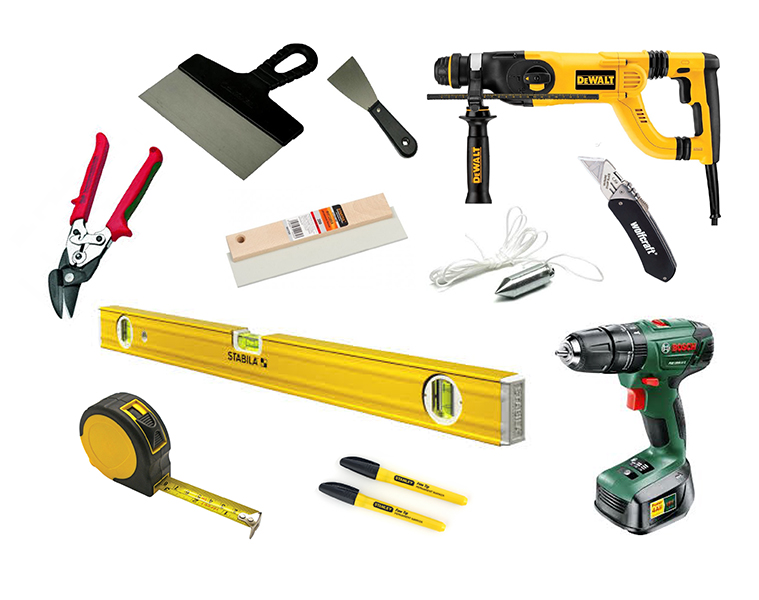
Preparation of working instruments
It is necessary to prepare tools and materials, as well as sketch the sketch of the future design.
You need from the tools:
- perforator;
- scissors for metal;
- construction knife;
- roulette with a marker;
- plumbing with the level;
- spatulas;
- screwdriver.
From materials:
- plasterboard sheets;
- metal profiles (guides or rack);
- putty;
- tape for sealing seams.
Now we need to make a sketch of a niche in the wall, which is like a bulk design that is repeated from the wall. Therefore, first of all it is necessary to determine its thickness. There are no special restrictions in this, but you have to consider the size of the room. And what less room, the less her thickness. Designers identified the minimum indicator of this size, which is equal to 15 cm.
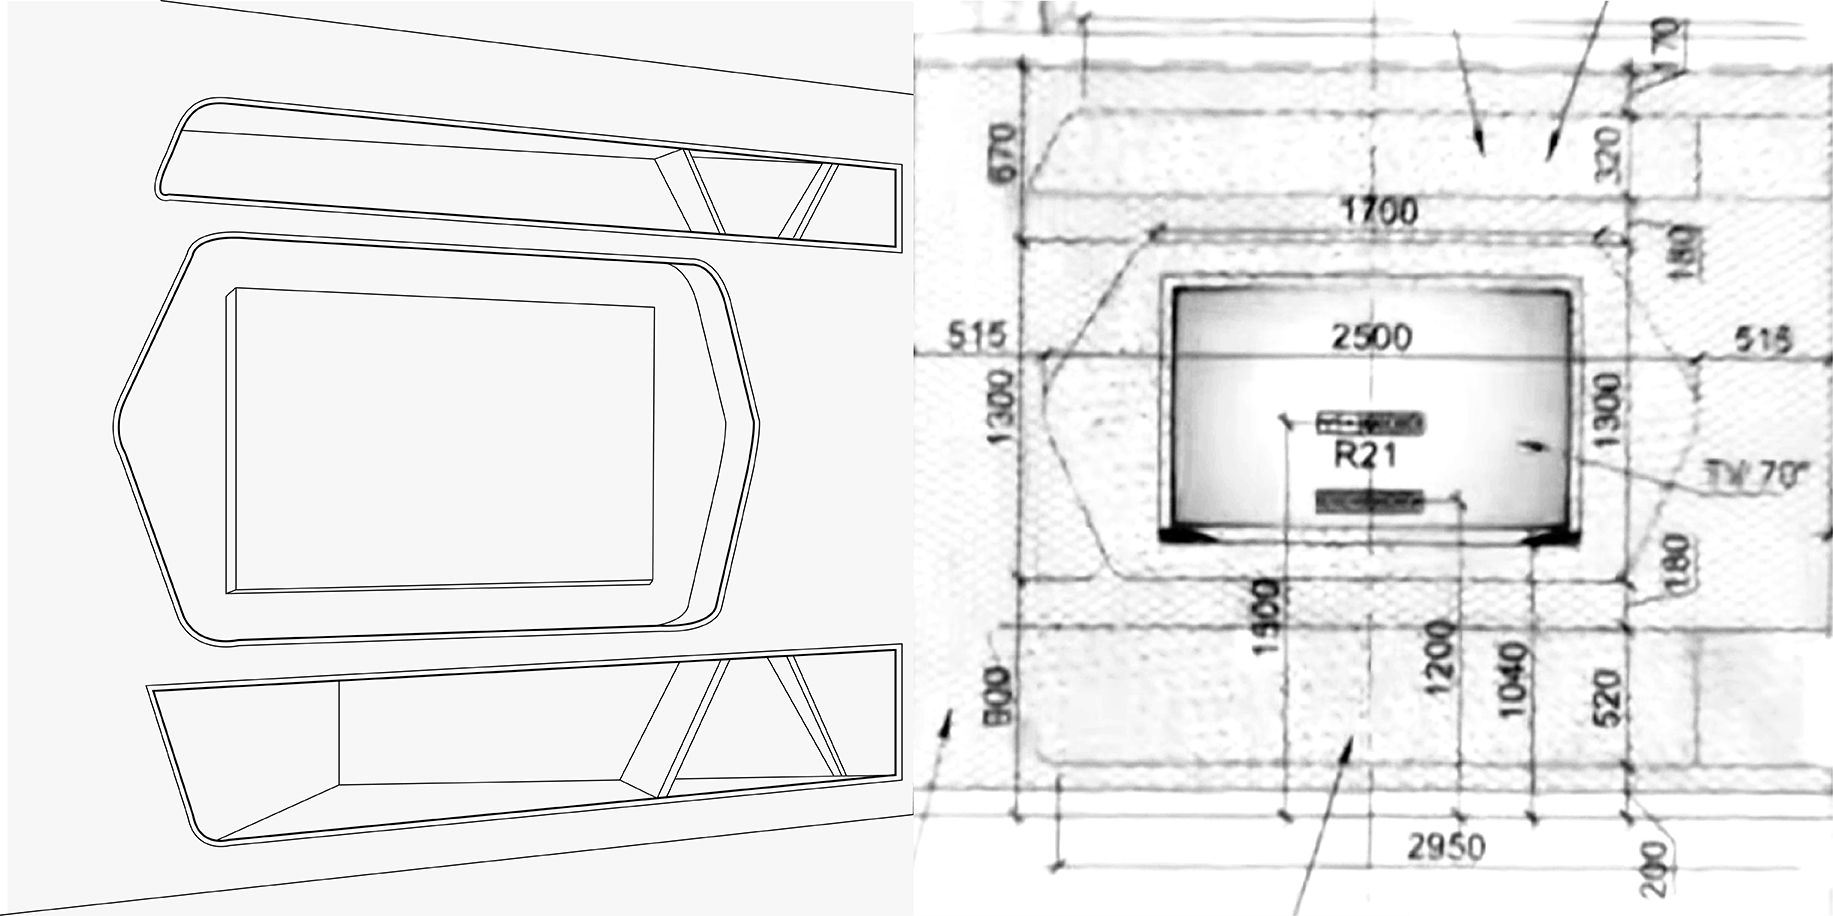
The form, height and width of the design is determined on the basis of the taste preferences of the host and size of the room. If the niche of the drywall in the wall of the room is done with their own hands, then choose a simple shape without frills: without rounded corners, without multi-level shelves and partitions.
Do not forget about lighting. It is on the sketch that you need to consider where lamps and sockets will be installed.
Calculation of the necessary materials for a niche in the wall
This stage includes cutting profiles in size, which are defined by a sketch. For drawing sizes, you need a roulette and a marker for cutting scissors. Experienced masters at this stage are cut back and plasterboard sheets. The newcomer is not recommended to do this, there is a possibility to get confused and incorrectly cut the sheet under the required dimensions. Therefore, working with plasterboard is better to transfer to the main stage, where the arrangement of a niche in the wall will be made.
Council for beginners. The length of the profile is 3 m, so it is possible when cutting up the corners of the niches not cut it into parts. You can simply bend a profile at right angles. To do this, in the place of folding on the side shelves it is necessary to make a triangular cutout so that the upper angle is 90º. After that, the profile is easily bent at right angles.
Construction Installation Tips
In order to facilitate her work, you need to sketch on the scale of the wall. That is, to draw a niche outline on the wall. To do this, use a plumb and level. It is very important here that the ribs are strictly in horizontal and vertical planes.
Now exactly the lines are set to install profiles.
- First, the profile is applied to the wall. Through it in the wall, the punch holes are made, where plastic dowels are driven. And already screwdriver screwdriver in them. The distance between the fasteners is 40-50 cm. Thus, the contour of the niche on the wall is assembled.
- Now we need to make a niche volumetric. For this, over the entire contour of the design perpendicularly, the wall is established crossing, the length of which will determine the width of the structure. The distance between them is 40-50 cm. Fastening to the contour is made by self-drawing. The upper coasts are additionally attached to the ceiling, if the niche of the drywall in the wall will be constructed to the ceiling. Bottom to the floor.
- At the edges of the established crossing, an outer contour is collected. And again, the profiles applied to the ceiling are attached to it, the bottom to the floor.
So, the metal frame of the niche in the wall of the room is ready, you can start the electrical wiring. Try to ensure that the wires do not touch profiles. They are better to mount to the frame of plastic clips.
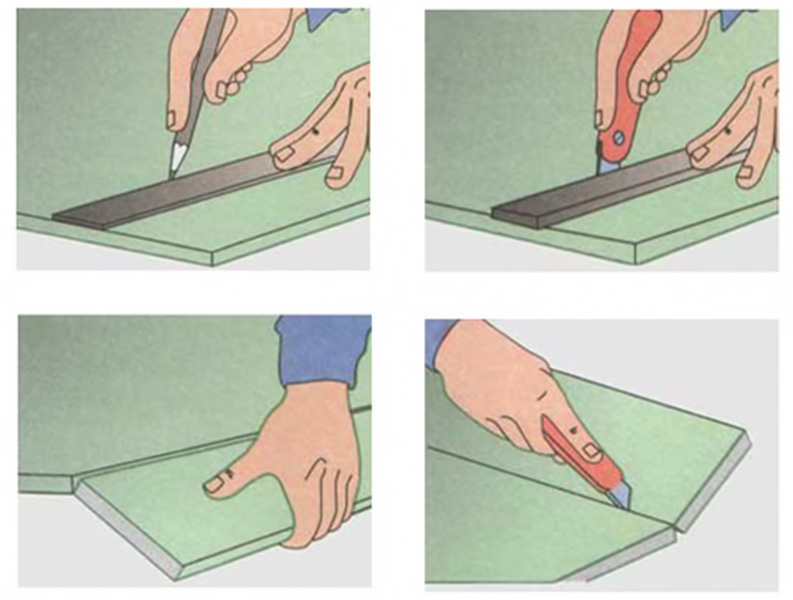
Then you can move to the facing of plasterboard. To do this, measure the dimensions of each site, transfer them to a plasterboard sheet and cut out with a sharp knife.
This is done like this:
- The sheet is placed on a flat surface at low height. It can be a table.
- A knife with a metal line or profile along the cut line is made incision of a cardboard layer.
- The sheet is exhibited by the edge of the table along the end line.
- Slightly pressed on the edge. The sheet should crack right along the line.
- The bottom cardboard layer is cut.
Next, everything is simple. The carved area is installed at the destination and is mounted with self-drawing to the profile frame. The distance between the fasteners is 10-12 cm, from the edge of 1.5 cm. Self-tapping screws are screwed into the body of the drywall at a depth of 0.5 cm.
Under the lamps and sockets are cut off holes with a perforator with a special cutting tool - crown. Its diameter is selected under the diameters of electrical appliances.
Finishing and design niche in the room
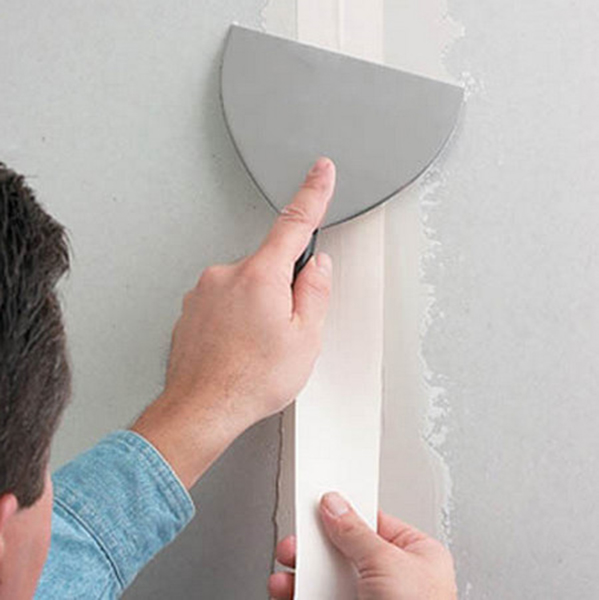
Go to another no less important issue, how to issue a niche in the wall? First of all, it is necessary to close the joints of plasterboard sites. To do this, you need to fill them with putty, apply a special paper strip on the joints. It is possible to dry and then walk along the joints with a spacion solution.
Now you can solve the problem of designing a niche in the wall. Options Weight: from simple painting and wallpaper stickers to cladding with stone or tiles.
If ordinary painting is selected, then primarily a niche of drywall in the wall should be treated with primer. After drying, a thin layer of putty is applied to align the plane. After another drying, grinding is performed using fine emery paper. But now it can be painted.
Registration of a niche in the wall with the help of facing materials is a more complex process. It is carried out according to the same technologies as the wall decoration. By the way, the parts of the walls are free from the design can be reeling with the same plasterboard. It is simply glued to the wall with liquid nails or adhesive compositions for GKL.
The original design of the niche in the wall is the facing of free wall areas with mirrors.
So, in this article, the question was considered how to make a niche in the wall of plasterboard. If someone has any questions about technology or there are proposals for design, we are ready to listen to your comments.
The advantages of a niche of plasterboard, varieties, project and calculation of materials, installation of the design and covering of GLC, the features of finishing and decorative work.
The content of the article:
Niche in the wall of plasterboard is a multifunctional design, which is very popular when finishing and decoring apartments. Modern designers who strive for minimalism, furnishing the rooms, replace these niches with many interior items. You can create it with your own hands, and this is a practical object that can be used at your discretion.
Functions and types of niches in the wall of plasterboard
Modern designers practice the use of niches in the wall of various shapes, sizes and depths. The use of these designs in the premises allows you to solve a number of such questions:
- Zoning space space;
- Convenient accommodation of household appliances, books, toys, collections and other things;
- Organization of additional useful area for installing furniture;
- The ability to give the room a unique individual design.
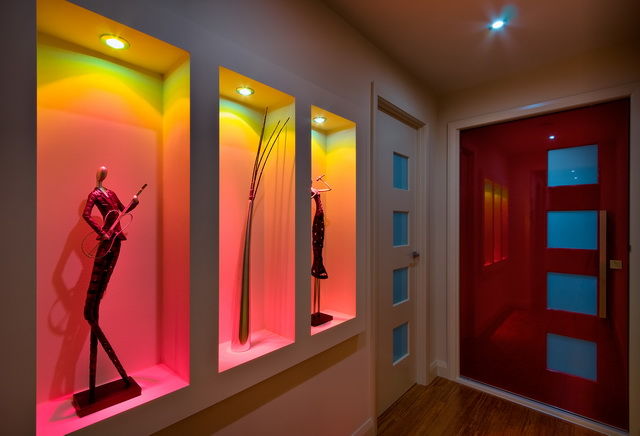
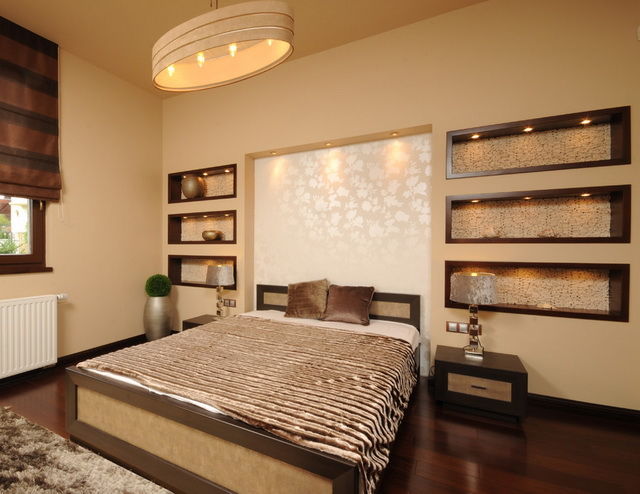
In modern apartments you can find several types of niches and partitions that can be done using drywall. Their design is completely dependent on what they do. Decorative are placed in the hall, living room, bedroom, above the windows. Their function - creating original design In the room, zoning of the room. They can place pictures, figurines, vases, books, point lamps (sometimes color).
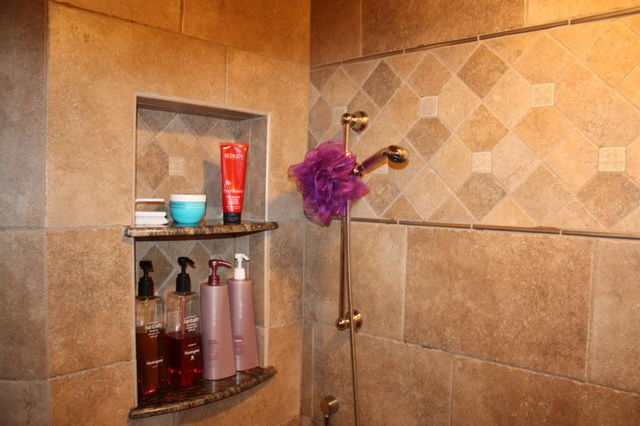
Functional niches can be found in any room apartment, including toilet and balcony. In the bedroom, such niches are used to accommodate a wardrobe or dressing room. In the toilet, they are used to store objects of hygiene, cleaning and detergents.
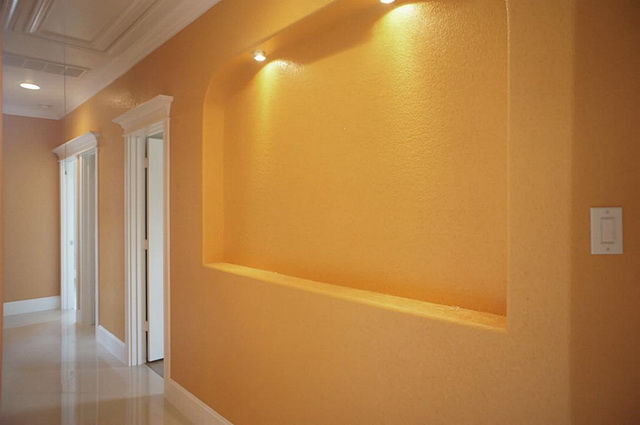
With the help of the proper design of the niche in the wall of the plasterboard, you can visually adjust the space. So, if it is horizontal, then with its help you can make the wall wider. Vertical niche will emphasize the height of the ceilings.
Two-level wall decoration and ceiling can make the interior exclusive and unique. Thus, the geometry of the room breaks and is created unique design.
It is worth noting that it is possible to fulfill this type of work independently, without the involvement of workers from the side and with small financial investments. After all, among the big range building materials It is the plasterboard that is considered an optimal option for finishing work. But if you do not know how to make a niche of drywall, consult professional designers to help make up interesting project.
Please note that before starting a niche installation process, it is necessary to determine its purpose. This will make it possible to make the right calculation of the materials for the frame and the trim.
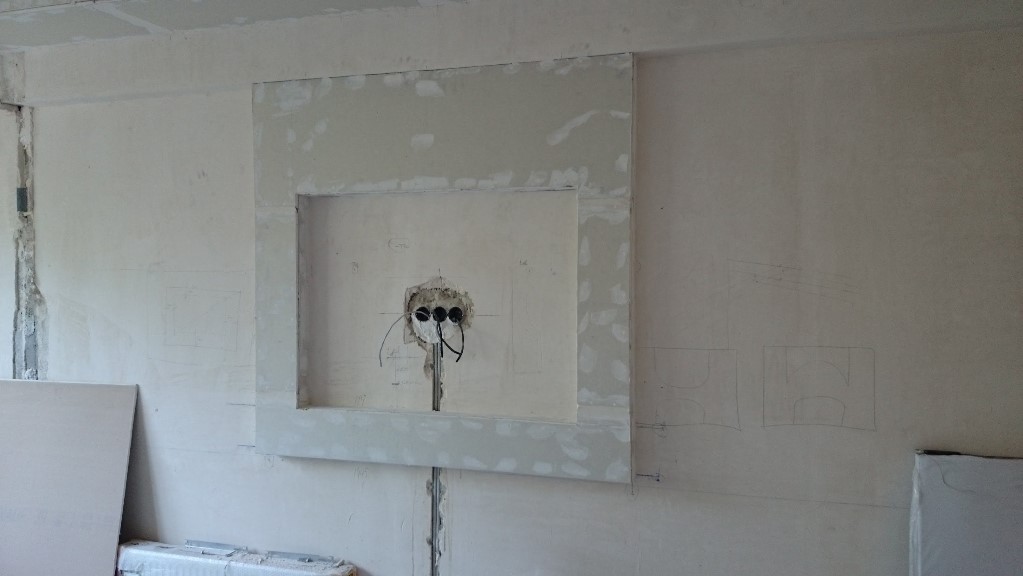
Preparatory work before mounting a rice of drywall
Before starting work, you need to spend careful measurements of your future design and make it drawing. If the niche is planned for household appliances, then it is necessary to take into account the gap for the natural ventilation of the air and prevent the heating of the plasterboard. If you plan to let the wiring in the design, then mark this moment on your plan.
In addition, it is necessary to decide in advance with the type of drywall and the framework of the frame. When building a drawing, they also need to be considered. In the finishing of the premises, as a rule, a wall drywall (12.5 mm thick), ceiling (9.5 mm), arched (6.5 mm) are used. It is also recommended to use or universal GLCs, if we are talking about bedrooms, living rooms, or moisture-proof, if you plan to create a niche in the bathroom, the kitchen.
The next step is the calculation of the required amount of consumables. To build a niche you need: guide profiles, profiles for drywall, screws, tools for working with metal, corners, levels, drill, drills, screwdrivers, hacksaw.
For guides, you can choose wooden or metal profiles, judging by the photo of the niches in the plasterboard wall. The first option has a number of disadvantages, among which are specific wood processing, exposure to temperature differences, which can negatively affect the shape of the niche itself. The optimal option is metal aluminum guides. The material is easy to process, has a slight weight, easily changes its shape.
Before starting work, the plan of your future design is applied to the wall, with the designation of the location of the shelves, sockets, lamps, arches, curly elements. Thus, the installation process is significantly facilitated.
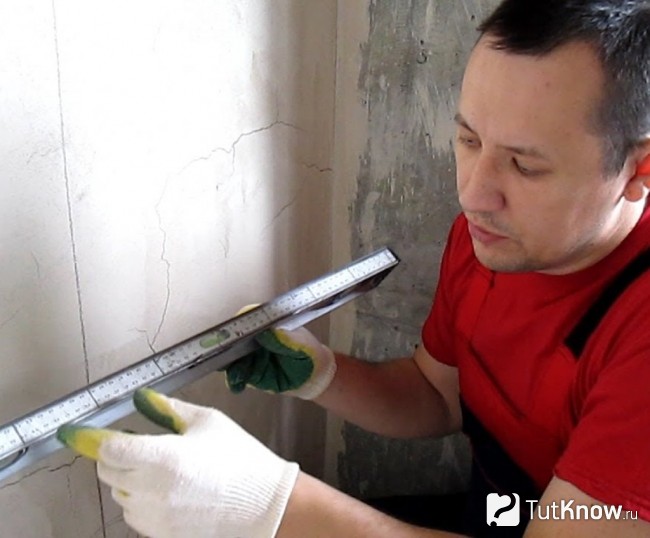
Before applying a plan for a future design to the wall surface, it is necessary to clean it from pollution and evaluate its evenness. It's easy enough to do it - attach a rack against the wall and see how that comes. Small bulbs are easily cleaned with chisel. If necessary, the wall can be laid down.
Mounting frame for niche on plasterboard wall
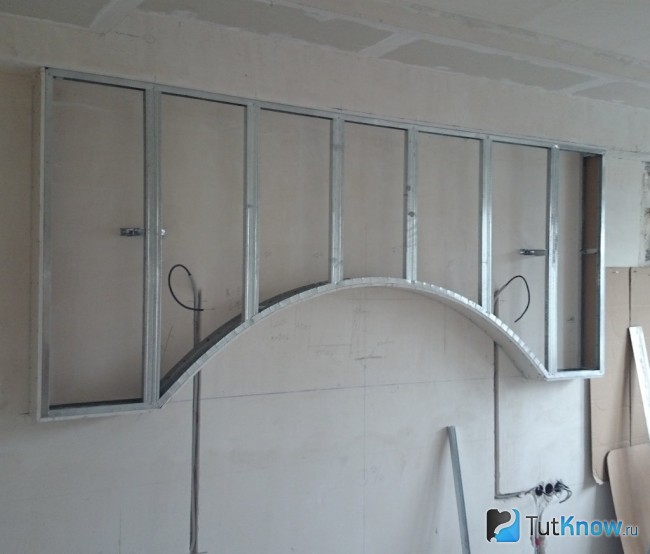
Collect the metal frame of the future niche should be clearly via drawn contours. We carry out work in this order:
- We have guides and fix their dowels strictly over the markup lines with a step no more than 40 cm. If your design has straight lines, then this operation will not be difficult. The harder process will go if the niche provides curved lines. Then you have to put a profile in the bend and give it the desired angle. In modern stores, you can meet the designs of the guide of different shapes. It will greatly facilitate work.
- When the guides are fixed, we make the future volumetric design. To do this, to the ceiling and to semi secure profiles. At the same time, their ends must be made strictly vertical. Therefore, when carrying out this stage of work, it is necessary to use a level.
- To create the front side of our design, bending profiles at an angle of 90 degrees. After fixing on vertical guides with self-tapping screws.
If you envisage the creation of a niche in a backlit plaster wall, then before starting the installation of the box it is worth planning its placement. The future of the backlight location must be applied on the wall when the design markup. Thanks to the presence of plastic secret boxes, you do not have to lay the stroke in the wall. And the wiring itself from the junction box can be launched under the plinth.
If the design of the niche in the walls of plasterboard is in small sizes and simple lines, and the installation surface is smooth and even, then you can make a metal frame assembly from profiles separately on the floor, and then the finished design is fixed on the wall.
Important! This operation requires constant use of the level. This will allow you to get a flat surface with rectangular corners. Also, do not forget about the coag.
Installation of shelves and ribs rigidity for drywall niches
The presence of shelves inside the niche makes it more rigid and stable. Mounting them in several stages:
- The first step is to determine the place of their future location and make a mark.
- Then put the plane using the level and the square.
- After that, fix the shelf using the screws. To give it hardness and stability, it is necessary to increase from the inside the design, using carrier profiles.
If you plan to install the shelves in niche are not decorative, but functional, then it is not necessary to do them from GLC, but from plywood or chipboard. In this case, it is prepared initially only profiles for them, and the installation of them is carried out at the finishing work phase.
If the shelves in your design are not provided, then it is necessary to take into account the presence of rigidity ribs. They can be made of wood or from metal profile. Especially this moment is relevant if you have a niche from the ceiling to the floor. When the design is trimmed, it will produce additional fastening of plasterboard sheets.
Nish Sheaving Technology Sheet Carts

When conducting the trim, it is important to remember some important points:
- We begin fixing the GLC on the box with geometrically incorrect elements or small fragments. They are reproduced and immediately try on the future place of installation. If necessary, be adjusted in size. After that, you can drill a hole in the drywall. At the same time, the size of the drill must be a little more self-press. This is due to the need to completely "drown" the head of the fastening element in the drywall.
- When finishing the inside of the niches, it is best to use one solid leaf. Thus, the design will receive greater rigidity.
- Lastly we are wearing a plasterboard sheet front part of the box.
The process of the skin will be easier and faster if there are few curved, small elements and junctions in the frame. This is especially important if you are a newcomer in business.
So that your niche has sound insulation properties, laid a layer of mineral wool or foam inside it. With small structures in the hall it is not particularly relevant. However, in the case of installing a niche in the toilet, a bedroom or a gasket of noise insulation is an important point. Otherwise, any sound will be echoed.
For simplicity of further finishing and ease of docking sheets of plasterboard, before starting the installation, it is recommended to shoot chamders for them.
Rules for finishing niche from drywall
After you have crossed the niche of plasterboard, it will be necessary to conduct finishing work. It should be started with the putty of seams and deepening from the screws.
We carry out work in this order:
- We are expanding the corners of the grater, and the joints with a knife.
- Check the horizontal of lines and secure a perforated corner using a stapler.
- We apply on the seams the starting line of putty and, until it is dry, fix the sickle.
- We apply the next layer of putty and thoroughly align it with a spatula.
- A narrow spatula is applied to a putty to the deepening seats in Glk.
- We are waiting for complete drying of the putty and proceed to the grout procedure using sandpaper.
- The finished niche, as a rule, paint acrylic or water-dispersion paint or is covered with wallpaper.
If you are planning the installation of lamps or backlighting in a niche from GLC, then it must be carried out at the stage when the design is fully assembled and covert.
Quite often, the inner surfaces of the niches are separated by mirrors, glass or decorative elements. Such decoration needs to be planned in advance, when drawing up a plan of a future design. The installation of these elements is made immediately after the trimming of the box with plasterboard prior to spacure-painting works. Extra fasteners (corners, brackets, liquid nails, etc.) are used to secure them.
There is a couple of the most popular ways. decorative finish Niche in the wall of plasterboard. This design is in the same colors as the whole room, or the color focus on it by means of darker paint. However, it is not recommended to paint a niche in too dark colors, otherwise they will create the effect of "holes". It is very striking, especially if the walls of a light shade.
If your niche is small, then it can be painted from inside the paint on a couple of tones lighter than the rest of the walls. In this case, a trifle on the shelves will look more attractive. A variant of the design of a small niche in the wall is possible using an unusual frame for the picture.
How to make a niche in the wall of plasterboard with your own hands - look at the video:
To create an original and functional niche, it is not necessary to be a professional builder. It is sufficient to stock right materials and tools, as well as a fantasy and desire to significantly update the old fit design of the room without major financial costs.
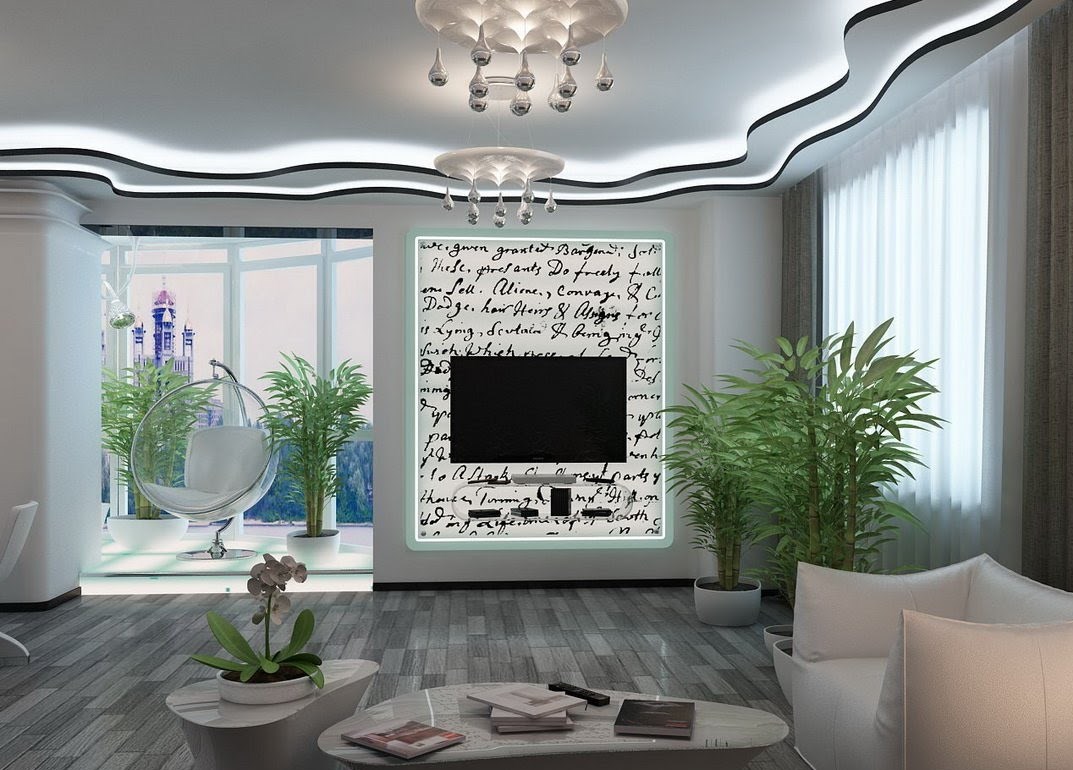
- A winning designer solution that allows you to enjoy the room, make it stylish and modern, add a coziness to the room and at the same time saving on the bulky furniture. The advantages of the drywall niches are a huge number of design options, any ideas and fantasies can be executed, and with your own hands, having minimal repair skills. This design allows you to disguise all cables and television wires, making the interior with elegant and aesthetic, as well as to serve protection for the technique, eliminating the danger to hurt and drop the TV.
We choose the design of the drywall niches for the TV: photo
First you need to consider a certain interior style, the basic idea, in accordance with which this designer solution will be fulfilled, is able to reflect the nature, needs and preferences of the owner.
It can be:
- Functional and technological high-tech;
- Simple and spacious minimalism;
- Spectacular and luxurious art deco.
Or it is possible to choose a combination of styles by creating your unique. However, it is important to pay the relevance and harmony of the selected style with the surrounding space. Then you need to decide on the shape and size of the structure, given the parameters of the TV and the volume of the wall itself.
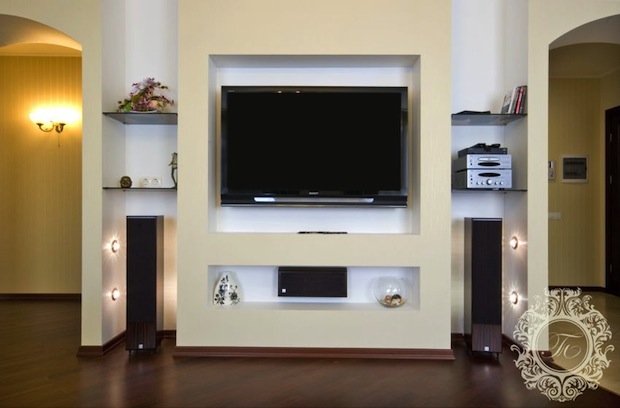
Niche can be in the form of a column, deepening in the wall, stands for souvenirs, English grotto, look like a shelf for books or, while performing all its functions.
Next, you need to pick up the color palette, or a close one by the tone of the remaining walls, or some other, contrasting color or drawing. But it is not necessary to highlight the design too dark, so that the impression is not created in the hole of the hole. It is important not to overdo the backlit, it should not be more intense the main source of light in the room.
After you need to pick up various decorated elements and coatings:
- Natural and artificial stone;
- Mirrors;
- Bas-reliefs;
- Frame from stucco;
- Mosaic.
Artificial stone is the most popular and in demand finishing material to date. It bribes the simplicity of its creation and use, it is easier than natural stone and withstands the temperature differences longer. Bas-reliefs are exquisitely and originally, while performing such tasks, how to hide the irregularities of the wall, distort the space and create transitions between functional zones.
How to create a niche for a tv from plasterboard
To start work, universal tools are needed: drill, screwdriver, ordinary or stationery, sandpaper, level, handbreaker, or Bulgarian.
For the manufacture of the design itself, materials will be required:
- Plasterboard sheets;
- Aluminum profile;
- Perforated corners;
- Reinforcing mesh and spacure mixture;
- Dowel with self-drawing.
The first thing is to sketch a project: with printed sizes, general design and design. Exactly on the sketch, with the help of the level and marker, markup is applied to the wall, taking into account the placement of wires and sockets. All lines must be parallel to each other, vertical perpendicular to the floor.
According to the applied markup, the frame from the profile is mounted, which, with the help of a perforator and a screwdriver, is attached to the wall by self-draws.
Niche acquires volume - vertical guides are attached, suspensions and jumpers are connected. All necessary communications (wires, cables, electrical wiring) are deposited (wires, cables, electrical wiring) is supplied to the light sources, if any projects are provided. Next, we carry out. With the help of a knife or jigsaw, all parts are cut into size, the corners and edges are gently shy. Slices of material, first from the sides, then with the front side attached to the frame, a box of plasterboard is created. Hats of selflessness should not be written, they should be tightened carefully, without damaging the sheets of plasterboard. Next are processed by putty places of fastenings of screws, joints and angles with a sticker of a special tape. The layer is aligned and after drying, the putty is polished by sandpaper.
Shelf under the TV from drywall: photo and installation of lighting
The backlight also plays an important role, it can also be an element of decor, an additional source of illumination and the ability to visually increase the space. Applying the backlight must be taken into account all the nuances: its brightness, shade of the luminescence, color solution, direction and intensity of the light flux, as well as the reflective ability of the walls. If the design provides highlighting, proceed to the installation of lighting devices.
Sources of light can serve:
- Spotlights;
- Luminescent and neon lamps;
- LED ribbons.
Installation of LED tapes will not be much difficult, no special knowledge is required for this. Tape gluits either by inner wall Niche, or if the light should be directed inside the design, a special sideboard is built, the starting profile is fastened to the edge of the protrusion, and the lane is low. To mount the point lamps, it will be necessary to do holes in the drywall.
For point lamps and fluorescent and neon lamps, electricity will be required. And you need to take care even before all the works. Wires must be hidden under niche.
If you do not have special education and skills, it is better to trust this work by a professional electrician. It is impossible to joke with electricity!
We apply the last touches: a niche of plasterboard under the TV
So, proceed to the finish finish. The simplest and economical finish is a sizing wallpaper, those that are saved the wall. You can choose the same wallpapers as in the rest of the room, then the design is as much as possible with the interior or choose another, contrasting color. A little harder will be painting the walls, in this case, the surface must be carefully aligned, as any roughness and ribbon will rush into the eyes.
Finishing with artificial stone The most time-consuming and energy-consuming. Tile must be customized and trimmed with a grinder, you need experience in handling it and compliance with safety.
Artificial stone is attached using mounting glue or liquid nails. Several versions of the stone laid out originally look at your fantasy. Bas-relief can create not only a professional artist or sculptor, but everyone who has determines, patience and prereparation. Any bas-relief itself is unique and unique.
Before you begin:
- Prepare everything;
- See the master class;
- Counseling with a specialist.
It is worth thinking in advance and create a sketch of a natural amount so that the sketch is combined with the rest of the design. The newcomer should not be taken for large-scale paintings, the composition of flowers, fruits or contours of animals and birds will look quite original. The final stage is the installation of the TV. In accordance with the parameters of the TV, in the center in the center there is a markup for the bracket, which, as a rule, is included in the kit. Then, with the help of self-tapping screws, the bracket is attached and the TV is hanging on it.
Stylish niche of plasterboard under the TV in the interior (video)
The cabinet to the TV was sunk in the summer, and similar, on the contrary, in lately It is becoming increasingly popular due to the ease of manufacture and installation, inexpensive and affordable materials. Such original idea Registration will not require a lot of time and money, but it will delight you for many years.
A small niche in the wall or an extended recess can be used to store things or as a stylized room object. There are two versions of niche: from drywall or by removing part of the wall. The first method takes a minimum of time, does not require special efforts or skills. Easily equipped with backlight, suitable for mounting in any rooms.
Stages of manufacture
It should be started with the preparation of a wall that will be supplemented by a niche. It is necessary to note the sections where the recesses will be located. Next is the fastening of profiles on the marketeries. For the manufacture of corners it is recommended to use special perforated corners: They have increased strength and help protect the design from mechanical damage.
Next, the niche in the plasterboard wall is trimmed by sheets. It is covered with the structure of the primer, putty. The prepared surface can be accumulated by film, wallpaper, decorative planks. True, the most stylish and refined staining with water-emulsion paint. But before you choose the shade of the composition, you need to learn how to arrange a niche in the wall without errors. This artist will help such recommendations:
- The recess cannot be covered with black or dark blue, purple paint. Such stylization will visually limit the depth, will worsen the perception of the addition.
- The tone of paint can completely coincide with the tone of the rest of the walls or be related (for example, beige - peach, blue - turquoise).
- In small rooms, it is necessary to paint a niche of light tones (ideally white).
Large decoration depends on the surrounding elements. Since the partial coincidence of the color gamma allows you to achieve optimal introduction to the overall interior.
The design of the niche backlight
Stylishly supplement and improve the design of the niche in the wall will help the neat backlight. Good lamps are suitable for such a goal. They can be placed in the arc, and on the shelves, and at the top of a small niche. If the recess was intended for the accurate placement of the chest or the cabinet, the ideal illumination option will be a table lamp.
If the prepared built-in niches are a deepening in the wall itself, the supply of wires for connecting the lamps is not always possible. In such a situation, the optimal solution will be the installation around the perimeter of the LED ribbon niches, wires. The choice of option depends solely on the requirements for the lighting and the possibility of a neat installation without disrupting the initial stylistics.
Examples of using
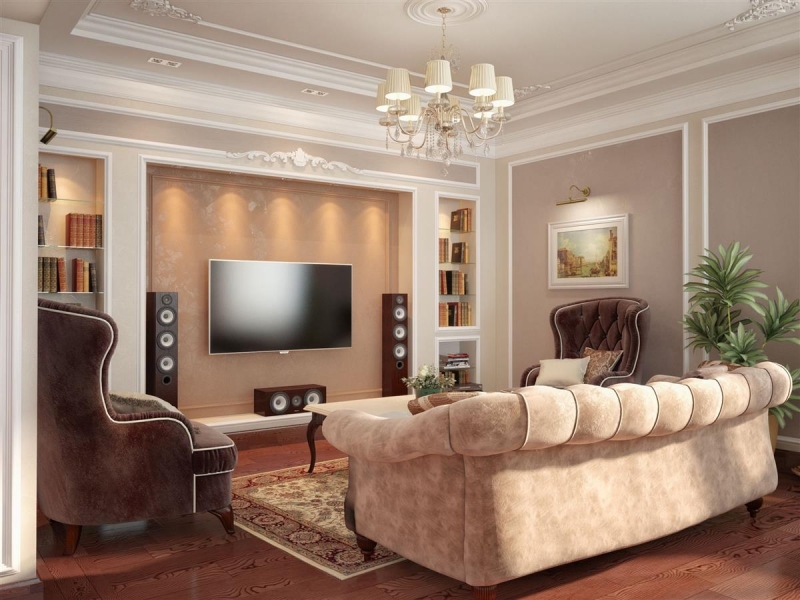
In addition to receiving tips on how to make a niche in the wall, you need to remember its purpose. You can make a deepening in the bedroom, a living room for storing books and magazines, souvenirs, figurines. This design is well suited for installation of a flat TV. In the kitchen, it applies to the stylish placement of sets of dishes or drinking glass. And in the bathroom, it can be designed to accommodate the mirror, creating small shelves for the storage of hygienic and cosmetics, towels.
The accompanying photos and video reviews of modern niches in the interior will help to learn new ideas and choose the appropriate option to styling the interior. But when creating a design it is worth remembering about some features and requirements for the size and type of deepening. For example, when there is an arrangement inside the equipment, it is necessary to leave enough space for accessing the air to the block and exceptions overheating the instruments. But when installing such a design in the kitchen or bathroom you need to use moisture-resistant plasterboard. These wishes will help create not just a beautiful, but also practical durable niche.
Stock Foto Niche in the wall