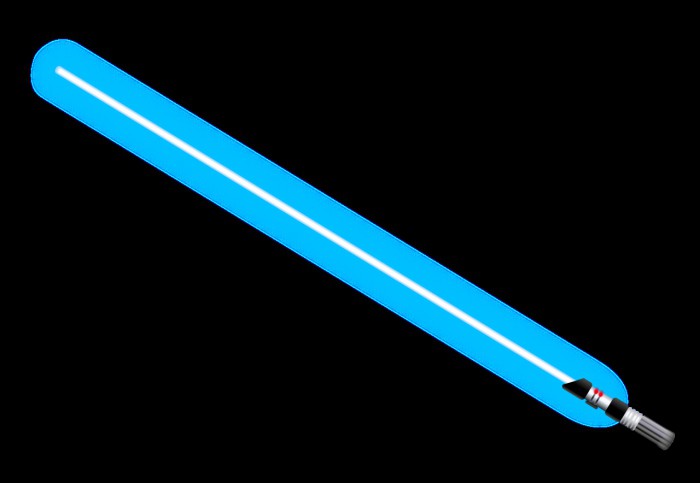
In already distant 1976, the first creation of George Lucas appeared on the screens - the beginning of the saga about Star Wars. The author's fantastic idea captured the hearts of people who became ardent fans of the film. Each girl dreamed of being like Princess Leia, and the boys imitated heroic warriors. We suggest you make a Jedi sword with your own hands. It will be the perfect toy for a little fan or complement the role-playing image of an adult Star Wars fan.
Flashlight sword
In order to create Jedi swords for children, you need to choose safe materials. The most suitable option is to make a toy weapon from a simple flashlight. It should fit comfortably in the baby's hand. It is better to choose a lighting fixture with diodes inside. They are durable and consume a minimum of energy, so you don't need to change batteries often. Make sure the flashlight is emitting colored light. If you don't find this, don't be discouraged: you can remove the glass and paint the diode in the desired shade with ordinary nail polish.
The second component of the toy sword is a polycarbonate tube and a small plastic plug. Adjust the length of the blade yourself by trying it on with your child. 60-80 cm will be enough. The section of the pipe should be slightly smaller than that of the flashlight. You will also need hot glue or transparent Moment and electrical tape.
Assembling the toy
Assembling the fearsome laser sword is pretty simple. First, prepare the blade. Polycarbonate is transparent, but you need a material that will diffuse the rays. To make the tube matte, rub it thoroughly with sandpaper. Use hot glue to secure the cap on the top of the blade. Remove the glass from the flashlight and try on the tube to the handle. If it does not fit tightly inside, make a few turns with electrical tape. Secure the blade with glue at the top of the flashlight. It remains only to test the toy at work. Your child will jump with happiness! Create Jedi swords for his friends, and they can play against the forces of evil.

Such hand-made weapons will cost you inexpensively (unlike offers in toy stores, where the price bites very much), and you will spend a minimum of time making it.
Diode Ribbon Sword
To craft a lightsaber you will need:
- LED strip, or It has many advantages, including safety, durability and low energy consumption. The price depends on the width of the tape and the number of diodes. On average, it ranges from 350 to 500 rubles per square meter. A wide range of glow shades will make it easy to determine the color of radiation that will emit your Jedi swords.
- Metal lantern. You do not need this device as an illuminator, it will serve as a reliable handle for a formidable weapon. When choosing, rely on color, design, size. It is important that the handle fits comfortably in the palm of your hand, and the inverter easily fits into the inner tube.
- A tube. As in the previous version, use a polycarbonate cut with sandpaper. Take care of the presence of a plug at its end.
- Inverter. It is a special battery for flexible neon. Button batteries are inserted inside a small box.
You can also use hot or instant glue and duct tape.
Preparatory part
Now let's take a closer look at how to make a Jedi sword. First you have to gut the flashlight. Carefully remove the insides from it. See if the inverter fits inside the tube. If yes, then everything is fine!
Remember that the tube should be slightly smaller than the head of the lantern. Choose the size of the blade yourself. Sand the ends of the plastic, as they are very easy to cut.

Assembly
The size should be slightly larger than the tube. Fix one end with hot glue to the plug, which will cover the top of the weapon. The tape should be inside the polycarbonate tube. Jedi swords glow evenly along their entire length, this effect will provide you with cold neon.
To connect the tape to the inverter, you just need to insert the connectors into each other. No soldering or additional manipulations are required, which is very convenient. Check the lighting is working.
For the sword to serve you for a long time, carefully fix the inverter inside the tube with hot glue. So it will not dangle and beat against the walls of the case.
All that remains is to carefully insert the tube into the base of the handle and secure it with glue. The lightsaber is ready! This option is suitable for both role players and children.

To those on the dark side
Lovers of cunning images also need Jedi swords. After all, the Sith simply switched to and created their own order. Darth Maul was a dual wielder that provided an element of surprise in battle. His red lightsaber terrified anyone who came across the dark lord on the way.

As you may have guessed, it will not be difficult to make it. You just need to collect two swords with a red neon ribbon. Note that their blades should be slightly shorter. Connect the handles-flashlights together with black electrical tape. Make the winding strong so that the parts do not dangle. You can first fix their bases with "second glue", and then walk through with black insulating tape.
Conclusion
Now you know how to make a Jedi sword with your own hands. Real fans grind metal hilt parts on lathes.

They use special compounds for processing steel to achieve a realistic effect. Thanks to the assembly process described in the article, you will be able to continue your journey of making a formidable weapon to protect the universe.
The ritual of creating your own lightsaber was an integral part of Jedi training, and included not only technological skill, but harmony with the Force. Ideally, it will take a Jedi many months to create a perfect weapon that he will keep and use until the end of his days. Once crafted by you, the lightsaber will become your constant companion, your tool, and your ready-to-use defense.
Luke Skywalker
In this article, a DIY master will tell us how to make a Jidai lightsaber with light and sound effects. Created on the Arduino platform, the sword responds to every movement. Let's watch the video.
Below are the characteristics of the sword.
Shine:
-Smooth on / off with lightsaber effect
- Pulsing color with the ability to turn off
Sounds:
-Mode 1: generated noise. The frequency depends on the angular velocity of the blade
- Mode 2: hum sound from SD card
-Slow swing - long hum sound (randomly from 4 sounds)
-Fast swing - short hum sound (randomly from 5 sounds)
-Bright white flash when the sword hits the surface
-Play one of 16 sounds on impact
- Weak hit - short sound
- Hard hit - long sound
-After power on, the blade displays the current battery level from 0 to 100%
Battery:
- Battery low - Lightsaber won't turn on - Power button flashes 2 times
-When the battery is discharged while working, the sword will automatically shut off
Control button:
-Hold-on / off sword
- Triple press - color change
-Five clicks-change sound mode
-Selected color and sound mode stored in memory

Tools and materials:
-
-
-
-
-
-
-
-
-
-
-
-
-
-
-
-Polycarbonate pipe Ø 32 mm with diffusion (dispersion) you can buy;
-Sewer pipe Ø 32 mm and Ø 40 mm;
-Plastic caps;
-All for soldering;
-Plume;
-Steel wire;
-Double-sided tape;
-Glue gun;
-Fasteners;
-Hacksaw;
-File;
-Rule;
-Marker;
-Knife;
-Scotch;
-Paper;
-Burner;
-Drill;
-Calipers;
-Cone drill;
-A spray paint;
-Porolon;
-Thermal shrinkage;
-Insulating tape;
-Screwdriver;

Step one: connect
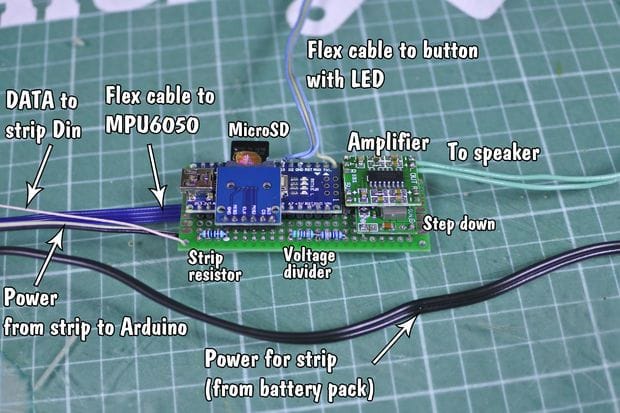
Assembles electronics according to the circuit on the breadboard. Solders the contacts with a mounting wire. The downconverter pre-adjusts to 4.5 V. The accelerometer is connected separately using a loop.


Step two: flashing
Instructions, firmware, sounds can be taken
or download from the link on this page.
You can configure:
-Number of chips on the tape (if the length of the sword blade changes)
- On / off flicker
-Measure and indicate in ohms the resistance of the resistors
And some other settings.
For the project, the master took a MicroSD 4 GB, FAT.
When flashing an assembled sword, you must turn on the power.

Step three: batteries
For his project, the master used three lithium 18650 batteries with built-in protection.
Solders them in series into one battery. The diameter of the 32 pipe is larger than the battery pack. The author wraps the battery with paper so that it fits snugly into the pipe. Then he heats the surface of the pipe with a burner and quickly cools. The tube narrows and takes the shape of a battery. Pulls out the battery. Peels off paper. Now the battery fits tightly into the pipe and does not hang out.


Step four: LED strip
Blade length (polycarbonate tube) 75 cm. Master cuts two pieces of LED strip 75 cm each. Sticks double-sided tape on the tape. A hole is made at the top of the tape (without damaging the tracks). Draws one end of the insulated wire into the hole. Adheres the wire to the tape along the entire length of the tape. Glues the second strip of tape on top. The result is a rigid LED construction.


Having previously brought the cable out, it fixes the accelerometer in the second (lower) plug. Solders the wires to the LED strip and brings them out. Secures the wire with a self-tapping screw on the plug. To prevent the tape from dangling in the middle of the tape, from a toothpick, makes a transverse stop. Puts a polypropylene tube over the bottom plug. Puts on the top cap. Stretches the wire and secures it with a self-tapping screw at the top.


Step five: hilt
For the handle, the master used two pieces of pipe, Ø 32 mm and Ø 40 mm, inserted into each other.


Drills holes in the handle for the connector, the power button, the mode selection button and a row of holes in the lower handle of the part for the speaker. Covers the handle with paint.
Many amateurs " Star Wars"in their dreams they imagined themselves in the place of brave Jedi who fight evil using their fantastic lightsabers. Probably every boy thought about the sword in the film and how can such a weapon be repeated in reality? In the film, young fighters of good had to go through many challenges to create your own weapon. real lifeof course, everything is a little simpler.
What do you need to purchase to create?
- To make a laser sword with your own hands, you will need to purchase an ordinary flashlight at any store that runs on 2-3 "A" batteries. The lantern will serve two purposes at the same time. First, it will be the hilt of your future sword. Secondly, it will highlight the structure. It is best to choose metal flashlights. The color can be any, the main thing is that you like it and match the color of the future "blade" of the sword. The size depends on your hand, you should be comfortable.
- In a specialized online store, you will need to order the so-called "cold" or "flexible" neon. This type of product is widely used for decorative lighting of premises, and you will make a real Jedi laser sword out of it. Neon is an electroluminescent cord. Its average price is about 300 rubles per square meter. The main advantage of "flexible" neon is the fact that it gives a uniform and pleasant glow along the entire length at the expense of rather low powers.
- should be chosen according to your taste. Today there are various models of this product. Remember that it is best to choose one that is thick enough. The length of the cord will correspond to the length of the future sword.
- If you're wondering how many Star Wars fans made the laser sword, buy a power supply or inverter. For the cord to glow, a high-frequency current must pass through it. Remember that the ideal output frequency of the unit should be at least 2000 Hz and the voltage equal to 110 V. Typically, these inverters operate on batteries.
The last step to create

First you need to attach a flashlight to the power supply (which, as you remember, is needed for the handle). Check if the glow works. If the neon lights up, the Jedi's weapon is ready. For the structure to be more durable, it is necessary to fasten each part in the most careful way and isolate the joints.
The second way to create a sword: what do you need to get?
So, we have already considered above how some craftsmen made a laser sword, but there is another way. For it, you need to purchase Luxeon 5W or 3W LEDs (the latter is better not to buy in white or blue), a holder for "little finger" speakers with a diameter of 25 mm, a button to turn off, a plug, a steel tube with a diameter of 32 mm, a translucent polycarbonate tube, screws, black electrical tape, simple wires, tin, pins, Remember that this method is only suitable for those who know how to solder.
Instructions: step by step
- Sketch the hilt of your future sword. Remember that the more "filling", the longer it will be.
- Assemble the inner frame. To do this, connect the diode and the speaker with a soldering iron. Attach the lens to the diode, and the battery holders to the speaker.
- After that, all electronics will need to be secured to the frame. Be sure to check if the structure works and start creating a body from a steel tube.
- Create a blade. To do this, you need to saw off from a part of a suitable length, plug one end of it, and attach the other to the handle.
- Let's start decorating the handle of your choice. Here you can show all your imagination.
You have learned two ways how numerous fans of the famous series made a Jedi laser sword, and you can safely create your own weapon.
Perhaps even casual Star Wars viewers would agree that the lightsaber is the most spectacular weapon ever to appear on screen. Fights involving this piece of equipment are so elegant that they have an almost hypnotic power. Well, the point is clear: Lightsabers are the deadliest weapons in the universe. And, despite the fact that not everyone has a sufficiently persistent stream of Power in their veins, each of us in the depths of our souls dreams of seeing ourselves with this instrument in our right hand.
Science fantasy
The idea of \u200b\u200bsuch a weapon as a lightsaber is simply ingenious: a light and very powerful weapon that requires only a small dose of energy, it can defeat the representatives of the dark side in one blow and become an effective shield against laser flares.
So why shouldn't humanity develop a similar piece of equipment in real life? Of course, physicists don't need to be incredibly smart to start making these fantastic weapons. Yes, they simply have to adore Star Wars.
The obvious way to create such a weapon would involve using a laser, which will appear as particularly bright flashes of light. But, even in spite of the fact that this technology is becoming more and more improved and finds application in mechanical engineering, the glowing sword still remains only a fantasy. Let's see why. 
Elusive light
The first difficulty arises from the fact that the sword will need to find an acceptable size. Let's say you stop at a length of about a meter. But in order to form a sword from a laser beam, it is necessary to make it "stop" in a certain way. This will not be an easy task, since light has a natural tendency to move if there are no obstacles in front of it.
The best solution to this problem is to place a mirror on the tip of the blade. But just imagine how much inconvenience this design will bring. After all, to install a tiny mirror, you will have to use additional parts. It also makes the sword too fragile for a weapon. 
Design problems
The second problem is manifested in the fact that the developed weapon will consume a lot of energy. But we need exactly the opposite. The blade will take a lot of strength to be able to cut through certain materials. This is done by welding lasers used in industry. But it is worth considering that they are equipped with a huge power supply unit and incur costs of several kilowatts of energy. In fact, even if magically If you manage to cope with this problem, then one more "but" will stand in the way. The laser device will need a powerful cooling mechanism, otherwise the heated sword handle will simply burn the user's hand. 
Where is it without effects?
In addition to everything, difficulties will arise in the practical use of light weapons. First, two laser swords can never collide with each other. They just pass through each other without leaving that amazing effect that appears in films.
Moreover, laser light focuses on a specific direction so quickly that the human eye simply does not have time to catch it. It is for this reason that fog is used in nightclubs. Smoke particles scattering around the room act as tiny diffusers. They break the laser light into many pieces and thus make the beams visible. 
Plasma as an alternative
But don't despair. No one claims that a lightsaber must necessarily be laser-based. An alternative weapon already exists - it is made of plasma. This substance is a hot, literally incandescent, gas. Due to strong heating, its atoms disintegrate into separate components, which are electrons and nuclei. 
The most interesting thing is that plasma is capable of emitting different colors. The shade of a substance depends on the gas it consists of. For example, neon light is the effect of plasma converted neon. Jedi Knights' green swords can be crafted from chlorine. But the red light weapon of Sith villains is easy to create from helium.
What is a plasma sword? A small but rather powerful power supply is hidden in the handle of the weapon. From it stretches a thin thread surrounded by an inert gas, the function of which is to transfer an electric charge. When you turn on the sword, the effect of an incandescent lamp is created. Electric charge heats up the gas particles, causing them to turn into plasma. The lamp becomes so hot that it can instantly melt any object.


