In a series of lessons, I want to statenly show you how you can make a doll from polymer clay Without special knowledge in anatomy.
Materials and tools for making polymer clay dolls
- polymer clay for FIMO Puppen dolls
- silicone forms
- working surface (glass or ceramic tile With a flat smooth surface)
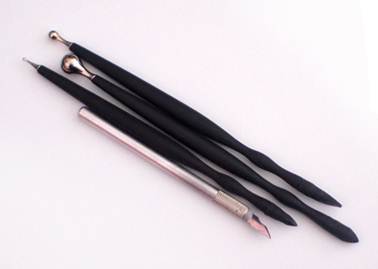
- polymer clay knives
- stacks

Lepim Polymer Clay Doll
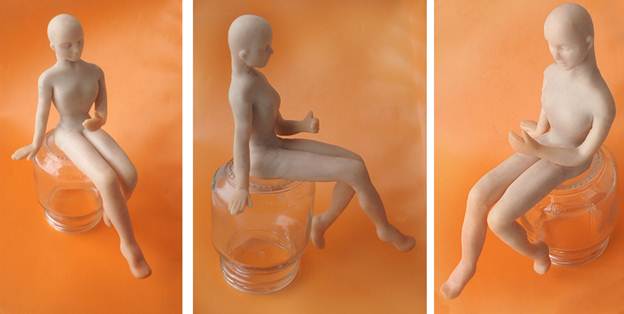
We start work, of course, with the creation of the image of the future figurines. Thunderstand its posture, approximate dimensions and appearance. It makes sense to make a light doll sketch on paper. As a basis, you can take a photo or illustration from the book. When the image is formed, you can proceed directly to the modeling.
For whom it will be the first experience of the molding of a human figure, a silicone form with parts of the human body will have significant help, allowing even a novice master to create a completely realistic figure. You can purchase such a form along with puppet plastics in stores with goods for needlework or via the Internet.
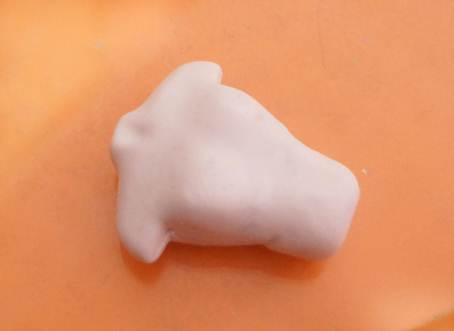
Puppet plastics is harder than ordinary plastics baked, so before starting work, it is carefully smeared and heated.
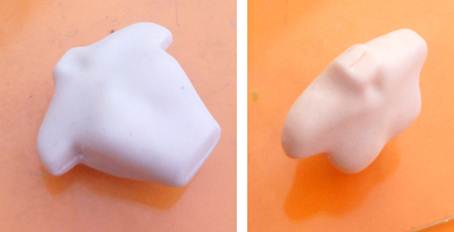
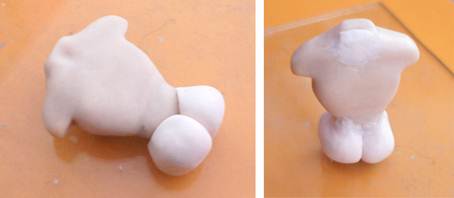
Let's start with the body. A preheated piece of plastics suitable size is tightly tamped into the appropriate recess in the form. We give cool, and carefully cut off the unreasonable plastic.

Trying not to damage this part of the doll, take it out of the form. For additional curing, the shape can be placed in the freezer, then there will be less damage. We do the entire procedure twice, having received two identical parts for the body as a result.

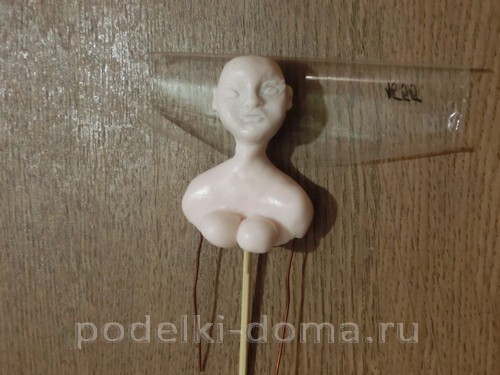
That part that will be the front of the body of the pupa, we try to leave unchanged, but the second half give the view, more suitable for the back. Following your chest, clavicle and recess on the neck. Fingers and stack smoothing the seams between parts. Seams need to be smoothed especially carefully so that in the process of baking they did not dispense.
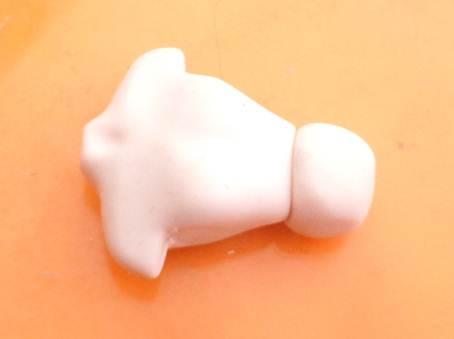
From the extra ball plastics we make the waist doll. Spindle the ball in the appropriate form corresponding to the width and thickness of the body and smoothing the seam.
One of the features of plastics is that it can be baked several times. It is this feature that we use for the convenience of work.
The resulting torso bake in the oven for 15 minutes at a temperature of 130 degrees.
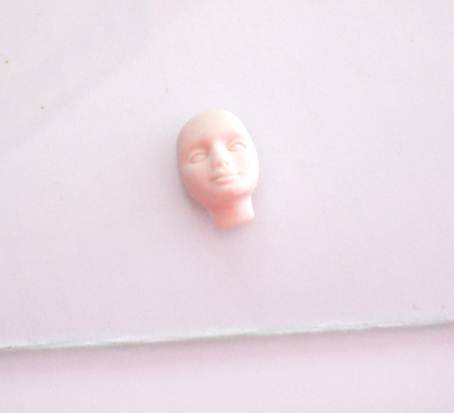
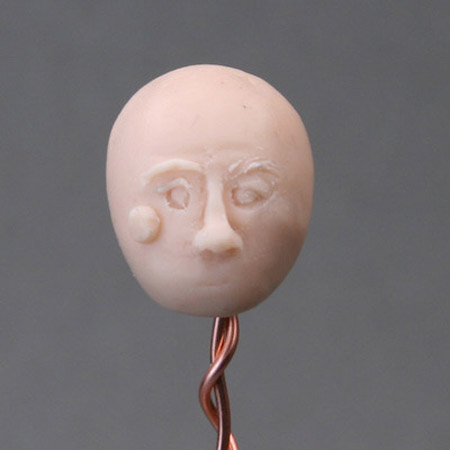
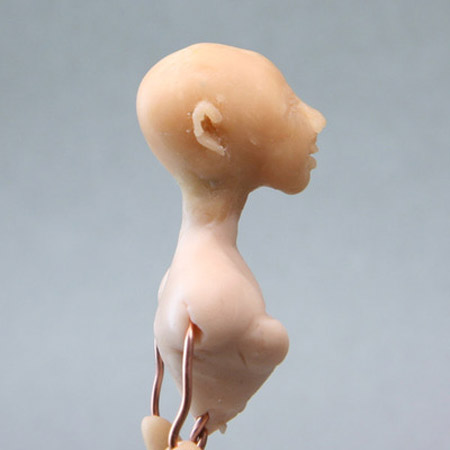
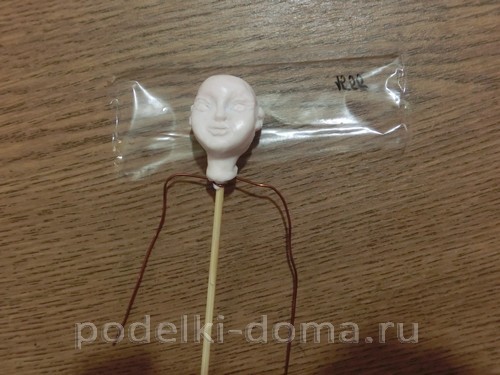
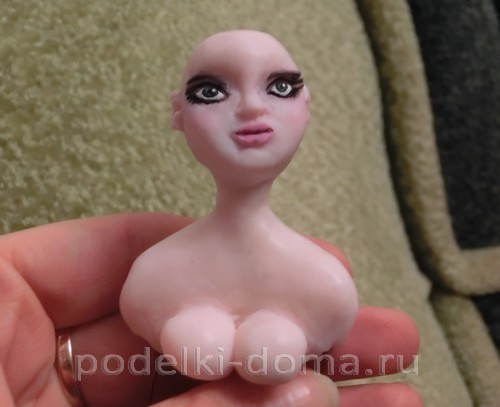
In the same way, we do the head of the doll. In the form that I use, there is a separate notch for the face and the nape.
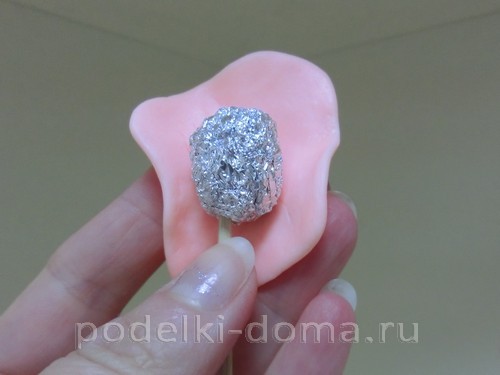
By the way, both in the torso and in the head you can make a small deepening and fill it with foil. So the doll will become easier and the plastic flow rate will slight slightly.
Here such a cute face is obtained by the doll. It can be fixed a bit with the help of stacks - stretch or shove your nose, to show cheekbones, change the form of the mouth, independently giving the doll individual traits.
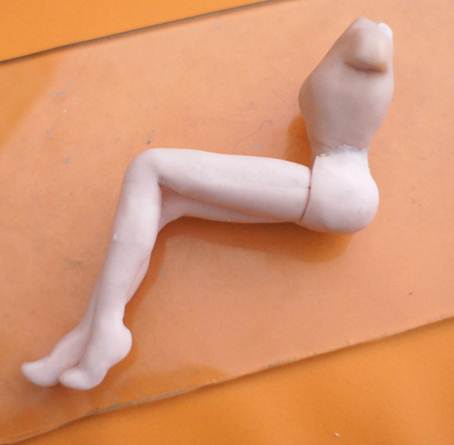
A rather time consuming will be the process of making legs, because in the form there is only the front side. Fill the plastic immediately both filters for the legs.

We take out and combine the details. Our doll will sit, so give your foot the appropriate form.

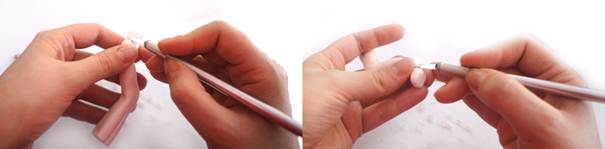
Now you can contact the photo on the Internet or more often throw a look at your own limbs. Fingers and stack smoothing the seams. We add a recess in the foot, bend fingers, achieving the maximum possible detail.
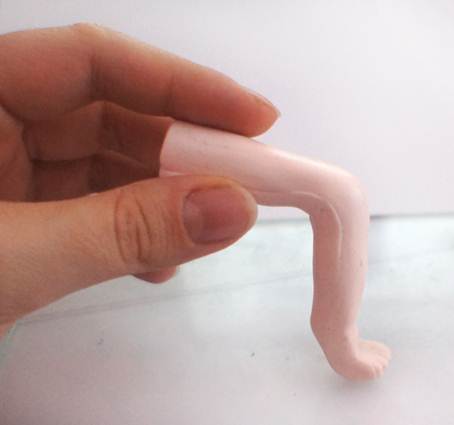
I cut off the excess material under your knee and in the ankle area.
Create a second leg in the same way. Watch them to be as small as possible in length and thickness.
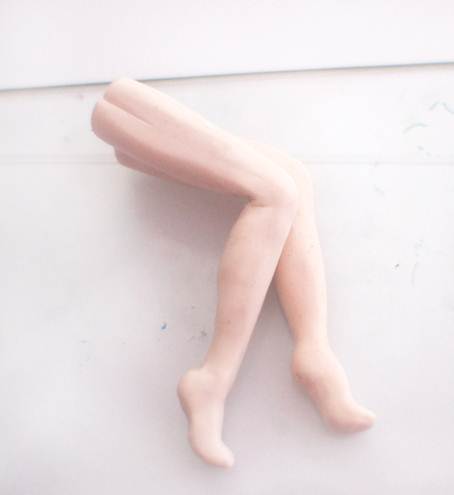
We regularly check how the leg will look in the position in which the doll will sit.
![]()
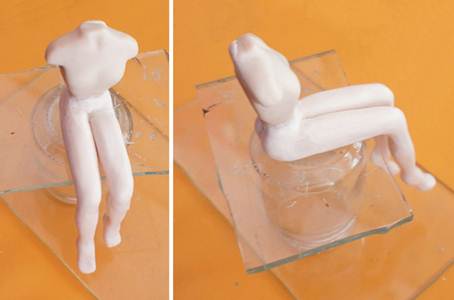
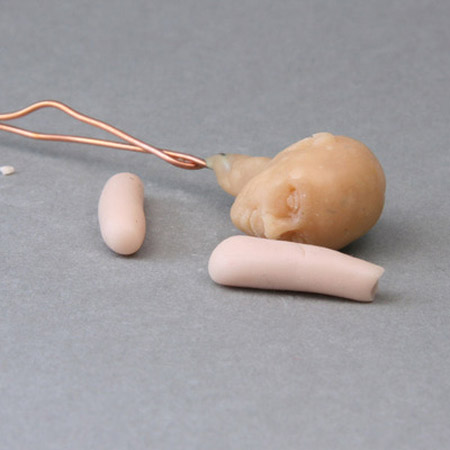
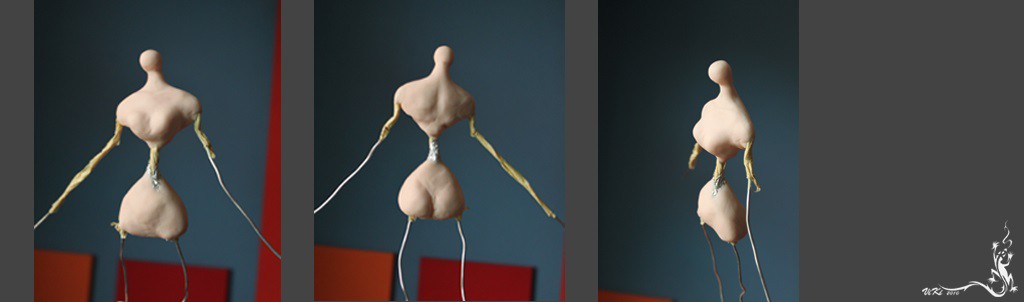
Now proceed to the connection of the body and legs. Since the torso has already passed the heat treatment, you can safely hold on for it, without fearing to damage.
The plastic ball is pulling into a small thick sausage and cut in half. The thickness of the resulting halves must correspond to the thickness of the legs.
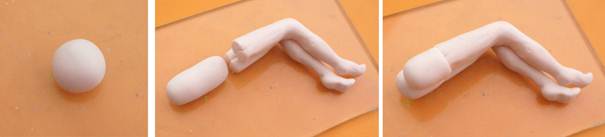
These two pieces carefully smoothed to the body, creating smooth transitions from the waist to the thighs of the pupa.
Now you need to come up with a doll stand to understand what position to give the body to correctly arrange its center of gravity. I have a small piece of glass on the bank.
![]()
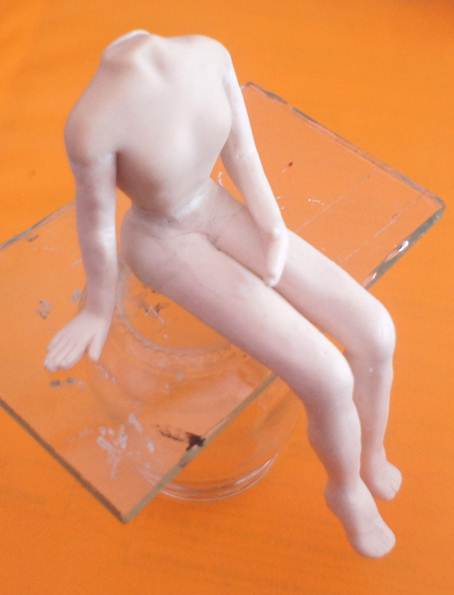
After you checked the landing of the shape, we climb the seams in the field of foot connections and hips.
Special anatomical details of the doll, as it seems to me, for nothing, so we simply create smooth transitions. Possible drawbacks will eventually be securely hidden under clothing.
Similarly, we join the body. Hands are similarly manufactured using silicone shapes and smoothing the seams and irregularities.
The most responsible moment is the joining of the head. The details of the face are small, so they are very easy to damage, that is, the limit accuracy is needed.
My doll will look at the subject in my hand, therefore the tilt of the head of her corresponding.
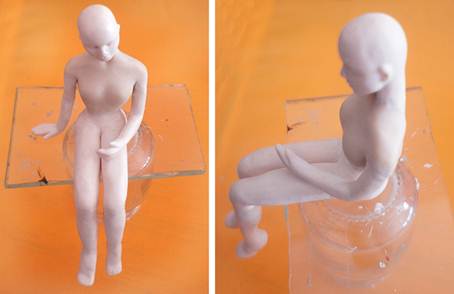
Now you need to prepare a figurine to baked. Under the influence of plastic temperature, first becomes soft, and then hardened, so you need to provide reliable fixation of the posture. I put a doll on my back, I used a glass jar as a backup of the legs. Under the hands lay small pieces of crumpled foil.

In this form I send a doll into the oven. It is necessary to arrange it at an equal distance from the heating elements.
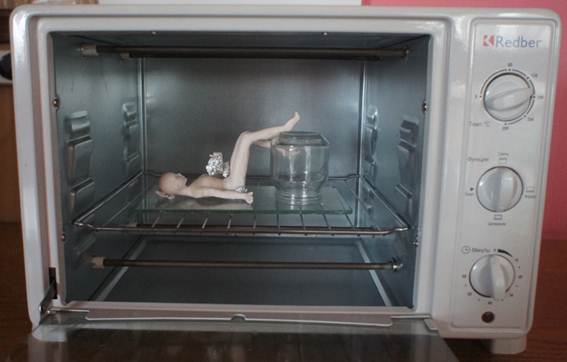
We bake also 15 minutes at a temperature of 130 degrees.
From polymer clay, not only zeal and a large amount of free time. You also need certain drawing skills, modeling and sewing. A particularly difficult moment in the process of creating a doll - drawing damn face (after all, the doll should get very natural, almost "alive").
To date, such material as plastic is most often used to create a doll from plastic mass, it is a polymer clay, it is also a model. Plastic for creating dolls is different: one must be left in air for a while so that it can freeze: another temperature is needed higher, so it is kept some time in the oven (burn).
It's more difficult to work with the first, since it quickly solidifies and, moreover, it is white, that is, it will be necessary to paint the finished doll to create a natural color of the skin. But the second is very plastic, so suitable for creating the smallest details, such as the features of the face. The roasting polymer clay happens a few shades that imitate natural skin color, so it does not require additional painting or processing. In today's master class, we will work with such a polymer clay.
Preparation of the necessary tools and materials
To create a polymer clay doll at home, we will need a certain set of tools and materials so that the work is high-quality and beautiful:
- flexible wire;
- plastic and metal sticks;
- pliers;
- paper sheet and pencil;
- hollofiber / Porolon;
- flicched polymer clay;
- a small cut of the tissue (20 x 30 mm is quite enough);
- scissors, threads, needle;
- super glue;
- a small wig / bar of artificial hair;
- paints (acrylic), nail polish;
- decorative elements (beads, lace, etc.).
After all necessary materials Prepared, you can start creating your own clay masterpiece.
Making Clay Dolls
Start the process of creating dolls is best from the most difficult part - head. That is how we will do.
Mastery puppet head
Consider the process of creating a puppet head step by step:
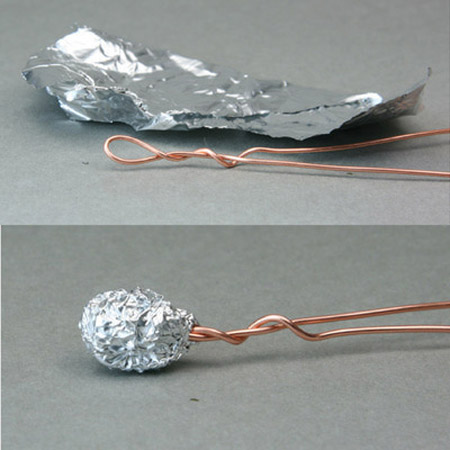
- Form a small tight ball from the foil - it will serve as a frame for the head. Snack it on a small wand (even the skewer is suitable). This is necessary in order to subsequently at the bottom of the head remained a small hole, which will help put on the finished head on the puppet body.
Council. Try to give the ball made from the foil shape as much as possible to the human skull: be sure to form cheekbones, chin, etc. Observe one important proportion: the ratio of length and width of the head must be 2: 1.
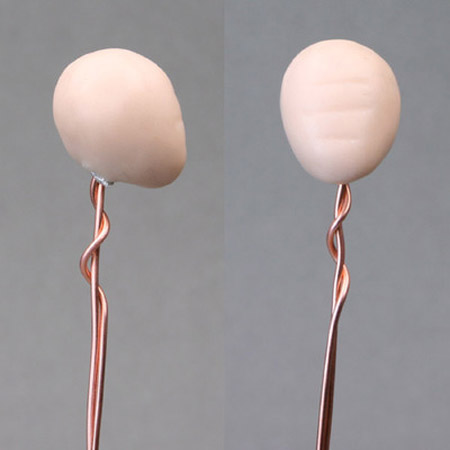
- Stick up a small piece of polymer clay and a little heats her in her hands so that it becomes plastic.
- Cover the foil shape of a layer of clay with a thickness of several millimeters and with a wet napkin carefully crumple all surface irregularities. Leave the plastic for a while she can dry.
- So that the face of the doll is symmetrical, divide it vertically into two parts. In each of the parts, form the eyepad and insert the pre-prepared and burned balls there - they will become eyes. Gently crumple the plastic district of the eye.
- Take the nose and sponge. To do this, we need two small pieces of the model. One of them (in the form of a small pyramid) to fly to the surface of the face. Then carefully form a small sharp object of the wings of the nose and nostrils. It all depends on your imagination. The second is to face below the nose (in the form of cakes). Cut it gently in half and form the form of future lips.

- Only the littleness remained - ears and eyelids. To create eyelids, use two small pieces of the model - attach them from top to your eyes and apply the shape. To understand where to mount the ears, visually divide the head into two parts: the facial and occipient (side view). The ears are attached to the line that you figuratively spent between these parts.
Create body and limbs
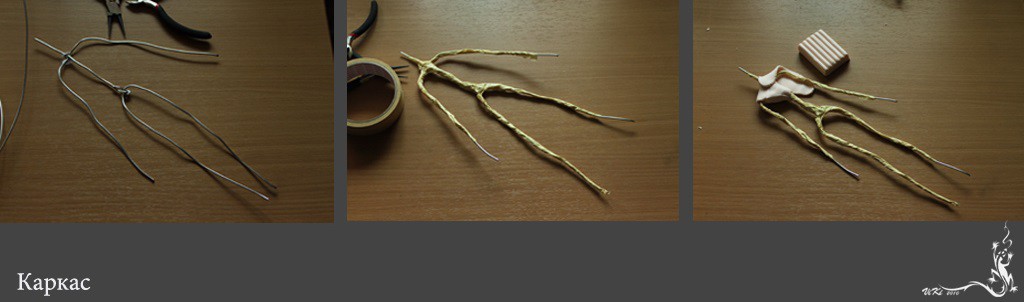
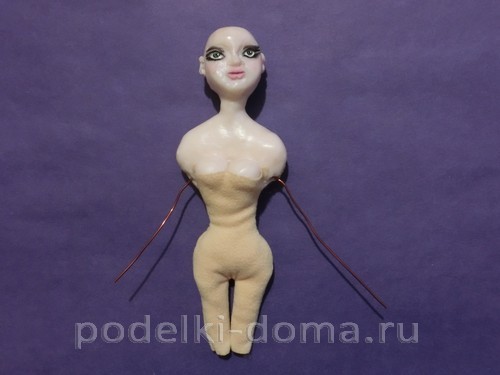
So, the most difficult part of the path is passed, it remains only to make the basis. To create a puppet frame, use a fairly thin flexible wire. You should get a "spine" with "branches" of hands and legs. Wrap it with painting scotch.
Before modeling the body with plastic, make a sketch of dolls on paper to imagine a fully finished image. Thus, you can simplify the task and faster to understand how best to make a puppet frame.
Stick up a few small pieces of plastics and put them on the frame. Make a neck line, chest, waist (if you want) and hips.
Council. If the doll model will have a frank neckline, then you should take care that breasts have a natural attractive look.
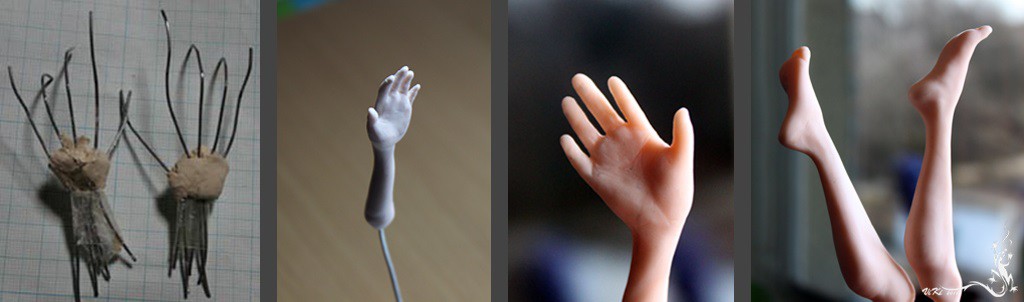
For hands and legs, the frame must be made of a thinner wire. Make five small wire segment length and secure them together by a fan with an ordinary tape. Then put the small piece of the model and form your hands from it to the elbow. According to a similar scheme, model the legs to the knees. All billets burn in the oven.
Then we connect together. We try on your head. If necessary, we are taking it or the body details of the shallow sandpaper. At seats, deprived of the clay base, we wind thin pieces of foam rubber and wind their threads.
We proceed to the creation of the chapels. You can use either a finished wig for these purposes, or a large strand of artificial hair. Mocher is ideal. On the head of the head, drill a small hole (you can make it still in the "fresh" clay). Then draw a spiral on my head, ranging from the center. Moving along the spiral, stick the hair strands. Then, in the hole done in the center, the extension of the hair beam (secure it with the help of glue).

Think out details of clothes for doll in advance. Hands, legs and waist whipped with pieces of fabric, then enter the missing elements of clothes and decorate them decorative elements. Draw a doll eyes, eyebrows and eyelashes with acrylic paints. On the lips and eyelids we apply a little nail polish. Doll is ready!
Our master class came to an end. His goal was to help you in such a difficult matter as creating a polymer clay doll. Follow the instructions provided in the article and you can create an incredibly beautiful and original doll - it is enough just to show a droplet of zeal and turn on the fantasy.
Creation of polymer clay dolls: video
Production of hinged dolls with their own hands - it is always time-consuming and long work
The history of the manufacture of hinged dolls behaves since deep antiquity. So, often they are found in the excavations of ancient Egyptian, Greek, Roman graves. A wood or clay was used as the master material, and the parts were connected by knicks and rods.
Today, hinged dolls are still popular. Many lovers buy them in stores, and those who love to do creative work make such dolls on their own. However, not everyone knows how to make a hinge doll - the process of its manufacture is quite long, time-consuming, but very exciting, cognitive and interesting.
Materials for making dolls on hinges
Doll can be made of different materials: Polymer clay, baked plastic and even from papier-mache. The last material can be called the most simple, cheap and affordable, often make carnival masks from it, so it is best to use novice masters. It is worth noting that experienced masters are simply gorgeous dolls from Paper Masha, made by their own hands, however, their surface is also covered with a layer of polymer clay. Thus, a doll is obtained, at the same time consisting of papier-mache, and from polymer clay.
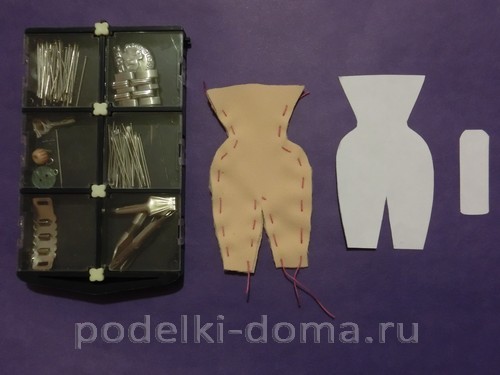
Before you start making dolls, you need to prepare everything required tools And materials:
- Tight foam sheet.
- PVA glue.
- Manicure set.
- The drill of the smallest diameter.
- Awl.
- Filter.
- Sandpaper.
- Several wooden speakers, toothpicks and tubes for a cocktail.
- Roll of toilet paper.
- Acrylic paints with tassels.
- Plastic self-sharpening.
- Beads for eyes or purchased glass eyes.
- Set of stationery clips.
- Thread "Iris".
- Water container.
- Napkins.
Step-by-step instructions, how to make a hinge doll
- Sketch is needed to create dolls. It can be easily found on the Internet or draw yourself. Total will require three identical instances.
- Take one instance and cut your head and torso in the profile and in the FAS. Spread the resulting details on the foam and cut them down in contours.
- Now turn over the foam blanks of the side, attach cut out drawings and cut down the contour again.
- Now you need to remove everything too much and give foam details smooth outlines.
- To work with Papier Masha, it is necessary to equip the blanks by the holders whose role will be performed by wooden sticks. Insert one of them into the neck, and the second - to the place where the foot should be (any).
- Next, you will need to prepare a working mixture. To do this, the toilet paper is mixed with PVA glue. The resulting mixture needs to be saved the surface of foam parts. A hinge doll with their own hands for beginners is a rather time-consuming and complex process, so it should be done very carefully and in advance to study the technology of its manufacture. So, if you plan to make your eyes with a bead doll, then it should be inserted at this stage. Glass or painted eyes are applied after, already on the finished product. The obtained billets must be dried within two or three days.
- Now you need a wooden skeleton to a cocktail tube, roll on top of the hinge and also send to be dried for 1-2 days.
- Take off the stationery clips and cut the four wire segments of 40 mm long. Each segment is required to be beaten with the help of round-ups as indicated in the photo.
- From the same disinued clips need to cut another 20 small segments - it will be fingers and foots.
- Threads "Iris" wrap half of each finger in two rows and lubricate PVA. Collect them five, form with a thread brush hand with your fingers and feet legs, apply glue again and remove dry.
- On the brushes and feet, put the papier-mâché, giving the form of real stop and brushes. At the same time, round hinges are needed in the location of the joints.
- From plasticine to cut two balls and wrap and wrap their food film, so that they do not stick inside the body of the doll.
- Now it is necessary to do in a foam blank in places where hinges must be, notes, sack their papier-mache surface and try on the excavation of the ball hinge. If necessary, adjust the size of the hinged size.
- Now the same way, but without the use of foam, you need to cut out of the polymer clay hands and legs, inside which a cocktail tube should be. On the surface of the head, body, stop and brushes should also be applied with a layer of liquid polymer clay. When the items get dry, you can note the pencil or marker to mark the locations of the propulsion and holes on all hinge parts (brushes and feet, knee and elbow flaying hinges).
To understand how the details should look like, and how they are then properly collectable, you can watch the video.
Video on how to make a hinge doll from polymer clay
- Next, the drill must be drilled by the marked holes. If there is no need for the tool, you can use the usual sewer. To create propyl speakers, you can take a conventional nail file or a stationery knife.
- In the propylene hole you need to insert a clip.
- Reconvert, cover all the details of the layer of liquid polymer clay, leave until complete drying, and then carefully, but carefully seize each item. At the same time, it is necessary to make sure that all holes (cocktail tubes) in working condition.
- To build the doll, it is necessary to fix in its head with a bracket with a curved round-up end. In the round hole of the bracket, insert the end of a thin round gum and make it on the knot. Form two loops from the gum, as shown in the photo and insert every end of the loop in the tubes inside the parts of the body of the doll. Then, in the same way, secure the rubber band on the brushes and fix its ends.
- Tighten with the need for a gum, squeeze the joints, checking the mobility of each part.
- Then glue your hair, draw paint eyebrows and lips.
The manufacture of hinged dolls with your own hands is a rather complicated and time-consuming process, and little to make a doll itself, you need to sew clothes for it. The main key of the successful result in this matter is the observance of all proportions and sizes according to the sketch. In order to more accurately repeat all the bends and the removal of the human body, it is necessary to carefully examine its structure. So, you can consider your body carefully or use another factory-made doll as a model.
Do you like hinged dolls? Would you like to do this? Share your opinion in
More adults are engaged in art handmade. Polymer clay dolls became the favorite occupation of many people. It is engaged in this not only the youth, but also older people. Puppet makes polymer clay. Correct call this material with plastic. Plastic exists in several varieties:
- Pink or beige - Super Sculpey.
- Translucent - Cernit.
- Fragile and hard - Fimo.
- Ideal for dolls - Promat.
- Paperclay, in its paper.
Our master class consists of two parts: a simple figurine-blank and a princess doll.
Simple Figurine Caller
Let's start with the creation of a simple dweller figurine. First you need to calculate the proportions of the doll. The formula sounds like this: the length of the body \u003d 7 toy heads. In dolls with a model appearance, the body will be 8-9 units of measurement.
Take a steel wire and begins it in such a way that it turns out the loop. At this frame tightly wrap foil. We must get the necessary scalp.
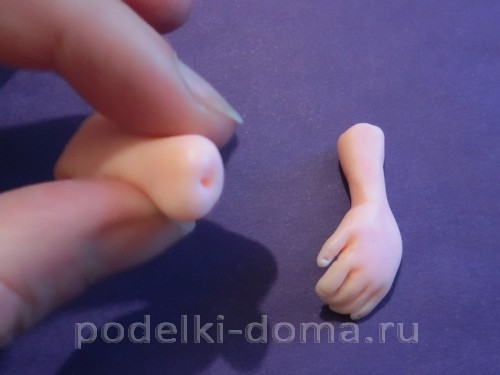
Making hands. Roll over a piece of clay in the form of a cylinder, until it looks like a puppet palm. Cut the part, slightly pushing your fingers. Round nails. The thumb should be a little outper.
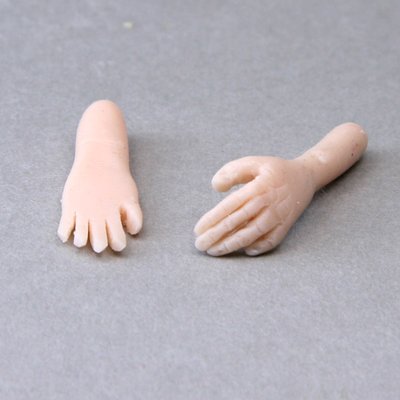
We connect hands with wire.
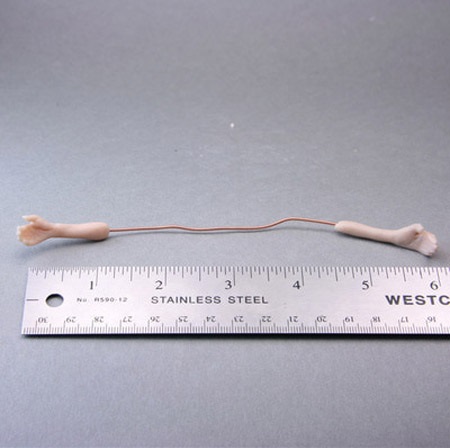
From clay we form a billet of the feet. On the one hand, the thicket (heel), with another ending (sock). Stack of fingers, draw nails and bends. We add rolled in the form of a cylinder cylinder clay (continued legs). Insert long pieces of wire into your feet.
![]()
We plan on my waist by twisting the wire. We form a torso. We wear foil on the wire, smoothing the chances. With the help of clay balls, we make breasts.
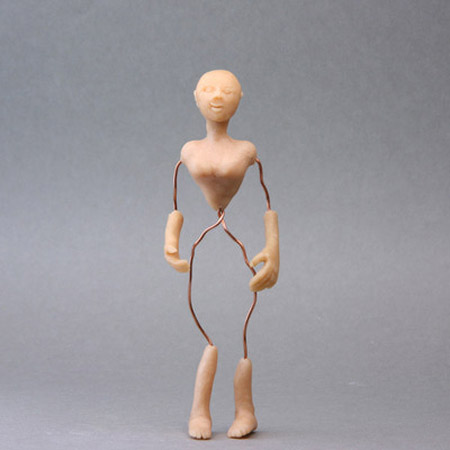
Our figure is ready. Clothing, hair, painting - it all depends on your imagination.
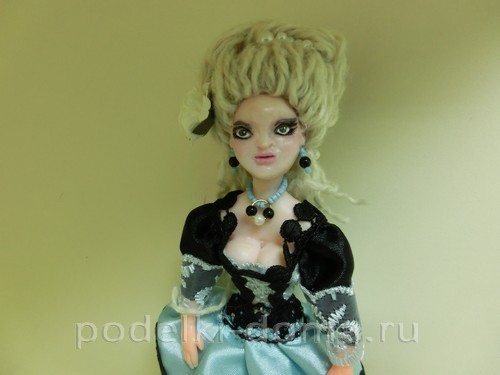
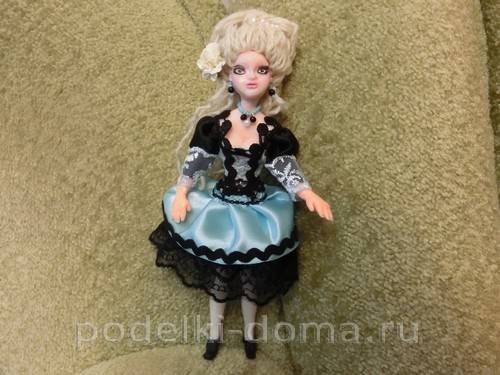
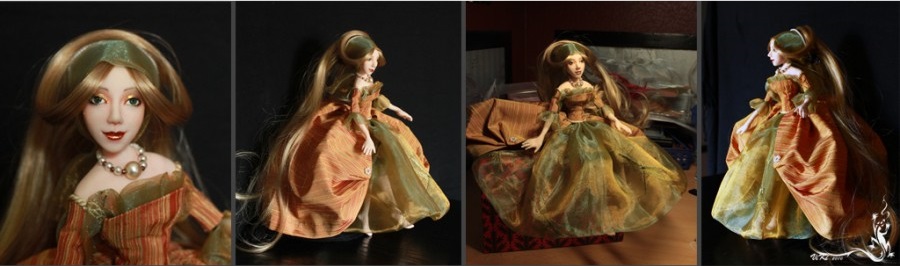
Doll Princess.
Lepim the princess of polymer clay doll. In childhood, every girl dreams of becoming a princess. Let's go back to childhood for a moment and think how you can wear such a doll so that it looks like a princess. Growth in the doll can be any, it depends on your desire. Start better with a small doll.
To work, you will need:
- Wire.
- Scotch larger.
- Polymer clay color clay.
- Acrylic paints and nail polish.
- Pastel.
- Hair (wig).
- Porolon.
- Fabric for dresses.
- Braid, beads.
- Glue for fabric.
Getting to work
We make out of the wire frame of dolls and wind by it with painting sticky tape.
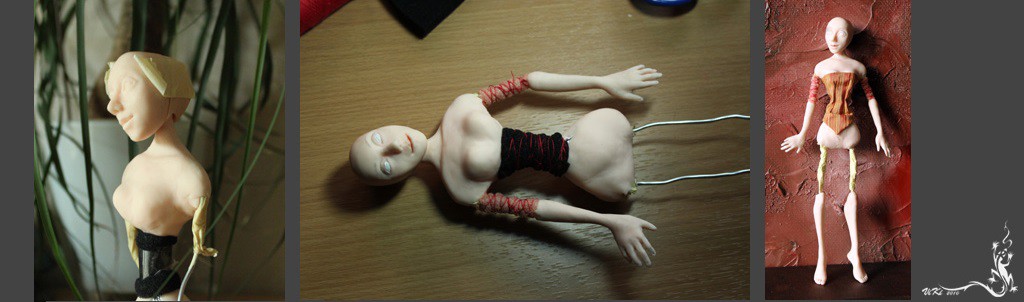
Warm frame with plastic. Lepim the body. Well smoothed the details that are visible. The doll will be with a deep neckline.
Our master class will help you to make your head. After cutting out, cut the blade of the head line. The line passes from the neck to the top of the head. We take out the pieces of plastics in the place where the neck is connected to the head. The head should rotate freely.

Lepim hands. For hands we make a frame of a thinner wire. We fasten the sticky ribbon wire and bending your fingers. Put the hands of a clay doll. Almost the same form and sculpt legs. We bake the resulting blanks in the oven.
We connect all parts of the doll. Irregularities with sandpaper. We try on your head, subscribe, if necessary. Cut and customize. Then glue and gluate seam. We glue your arms and legs to the body. The waist and the wire part are wrapped with foam rubber and threads.
Doll is almost ready. She needs clothes. We select fabrics, make sketches. Parts of the hands, legs and waist, wrapped in foam rubber, are bakingly with a cloth. Send the rest of the dress. Decorating the dress with beads, beads.
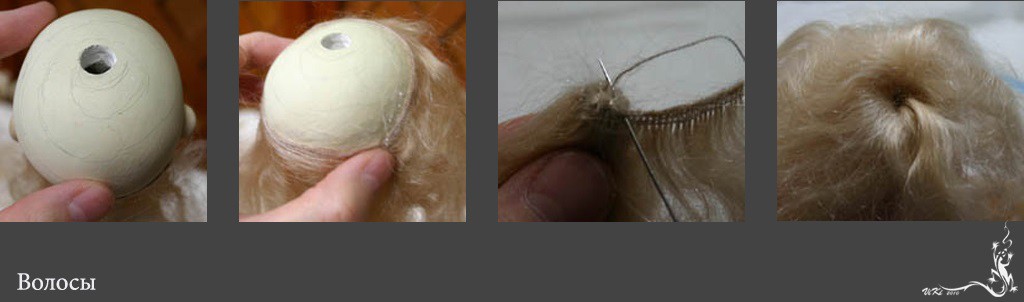
Or buy a ready wig, or glue your hair yourself. Best for this purpose fits mohair. If it is not, we take artificial hair. On the top of the head of the doll drills a hole, painting the spiral on the head (like hair grow). Glue through drawn lines hair. At the end, smear glue a bunch of hair and insert into the hole on the head. Draw acrylic paint eye. Pink paint applied blush. Alternatively and lips apply nail polish. We draw brush eyebrows and eyelashes. Princess is ready.
Clothes and decorations can be different:
It became a very popular kind of needlework. The availability of materials, many books, master classes on the Internet made it possible right at home to create interesting specimens. Special attention should be paid to such a material like plastic. From this type of material it is easy to sculpt. Of course you need to adapt. Natalia Nallow shared his experience.
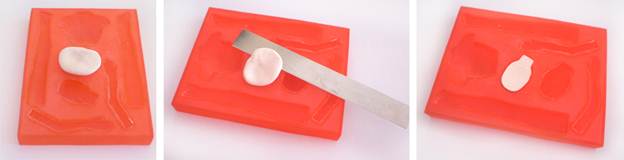
Now the most diverse is sold, I buy multicolored in chopsticks. For this craft, I bought 3 clay color chopsticks. From her I cut my head with the neck and chest, hands and legs. The modeling is usually produced, as a rule, not only with fingers, but also with the help of special tools, but it is quite quite and a stick for a pedicure. You can cut the facial features to the sharp edge, smooth out unnecessary wrinkles on the clay, and the cutting tip of the wands can be made deep cuts, for example, cut your mouth.
Polymer clay doll
So, for work, we need the following materials:
Foil
Pedicure sticks (Wooden)
3 Polymer Clay Polymer Clay
White knitting threads for hair
Threads, Needles, Fabric, Ribbon
Decor elements - beads, beads, flowers
Acrylic Paints, Thin Brush
Nail Polish acrylic
Glue "Moment"
Wire
Remember that before starting the modeling you need to clean your hands well with soap, because the clay light and dirt on it will immediately be visible. Also undesirable to wear clothes with a long pile, which will quickly stick to clay and spoils the look of your crafts.
Head and Neck
For a start, we take foil and form a layout of my head from it, and then plan it on a wooden wand for manicure. Now you should smash a piece of clay in your hands and, having caught a thin plate from it, fully cove your foil with these plates of clay.

Scroll the edges, ride the clay stick, removing wrinkles and equalizing the relief. Next, roll out small pieces of clay in the hands of plastics and impose them on the scene of the cheek, so you will have the desired convexities on the face - cheeks and grooves for the eyes. The nose is lying in a similar way. Take a small clay reservoir, sculpt him in the form of a svolka and press to the place between the sockets. Using the fine end of the sticks form the nose and nostrils. Do not forget to remove extra wrinkles. Eyebrows, eyelids and lips. First, the small circles are inserted on lips or thin strips forever, then attach them to smoothing movements to face. After you finish your face, cut the neck and chest dolls. For the chest, roll two small bowls and adhering them to the chest to then get a beautiful bust. Insert a wire doll in the hands of hand mobility.
Try to face your fingers lying on the face of the doll. If they are, you can ride them by the side of the finger.
Now let's go to the modeling of the legs and hands of the hands of the doll. In the hands of the hands, do the holes of that wire that you inserted into the shoulders of the dolls, because later we will be able to drive the brushes to these wires so that the hands of the dolls are moving.

Cooking products
The next moment after the modeling is finished, all wrinkles are smoothed, it is a cooking product in water. Pour into the saucepan of cold water and put on the stove. Wait for the boil and check the time of 10 minutes. After that, gently drain the water and let you cool your product. Now it's time to discones the paints of your doll lyrco. Use acrylic paints for this. Removal in water pink paint, impose it on cheeks, eyelids. A fastened pink color is suitable for lips. Do not forget that in the eyes you need to draw the pupil and put a white light color light beyond the blue iris. At first, put the whole eye with white paint in two layers, then draw a blue iris, then a black pupil and white gleam. Apply varnish acrylic. it important moment. Varnish will refresh the face of the doll, one can say, revitalize and will help keep the color of the paint for a long time.
Torso and hair
The next step is to sewing the body and hand from the fabric. We make the pattern and apply it on the fabric. We cross the torso, stick it with cotton and thicker stick to the chest dolls.
We sew beautiful clothes for doll, pants with lace, dress.
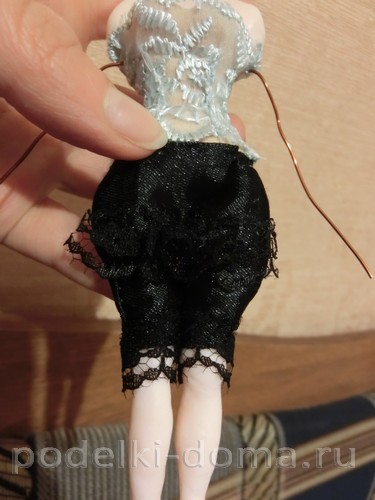
We make a hairstyle from threads. We produce from beads and beads jewelry.
In order to make the hair of the doll, you must first glue the mesh to her head, I used the fate of the fetot. And then already stuck to the head. You can use conventional thin ribbons or a thin fabric that does not limit. Hairstyle formed with threads and needles, beads.