Many who have been knitting for more than a year have heard such a thing as an English elastic band. What is its feature and how does it differ from a simple single gum?
A simple elastic, consisting of alternating purl and front loops, is most often used to obtain an elastic edge of the garment. It can be used for processing the neck, cuffs or bottom. This pattern does not give much volume and stretches well. And here english rib knitting- a knitting pattern for a pattern that gives volume to the loops, special elasticity to the fabric, and a beautiful texture. It is great not only for edge processing, but also used independently, as the main pattern of the entire product. By english gum pattern knit pullovers, cardigans, it is good for hats, snoods and scarves.
So, let's highlight the main properties of the knitting pattern english ribbing made with needles:
- exquisite texture that creates a beautiful canvas even in large items;
- excellent elasticity, which makes it well suited for decorating the edges of products;
- looseness and splendor of the pattern, formed due to the peculiarities of knitting, allows you to create a warmer fabric.
But this pattern also has its own small drawback. For example, it is recommended before starting execution knitting patterns with english elastic knitting needles, knit several rows with a simple elastic band. Otherwise, the edge of the canvas may stretch during wear.
It is also worth noting that english gum, in contrast to a simple single, requires more yarn consumption. Yes, it is not entirely economical, but how impressive it looks in products.
Knitting technique and pattern of the English elastic band with knitting needles
Swivel knitting pattern "English elastic" 1x1
We said earlier that a single simple elastic band consists of alternating the purl and the front loop. The English elastic in its essence also consists of purl and front loops, but with the addition of a yarn and throwing over the loops, without knitting. Let's consider the diagram in more detail:

It is worth mentioning one more important feature - the number of dialed loops for knitting a pattern must be odd. This is done to create a tighter edge to the canvas.
So, on the needles we collect the required number of loops. For example, 15 + 2 hem \u003d 17 loops.
1st row:Remove the first edge loop without tying (). Next, knit alternately 1 purl, 1 front loop to the last loop. Knit the front loop.
2nd row. Remove the first loop as an edge loop. Then * 1 front loop, yarn, remove 1 purl loop, without knitting *. Complete the row with an edge loop.
3rd row - yarn, remove 1 loop without knitting (thread at the back of the work) *, knit the loop and yarn of the previous row together with the front, yarn, remove 1 loop without knitting *.
4th row - * knit the loop and yarn of the previous row together with the front, yarn, remove 1 loop *, knit the loop and yarn of the previous row together with the front. Next, alternate the 3rd and 4th rows.
If you end the canvas with an English elastic, then the last one to knit the 3rd row from the above description, and then close the loops in a way convenient for you. Then your edge will be neat.
Circular knitting pattern "English elastic" 1x1
At its core, circular knitting is practically no different from rotary knitting. The purl and front rows, for example, in the front surface or in a regular elastic band, go one after another, without any changes in the technique of making the pattern.
But now you are about to knit a snood or a sweater with a raglan sleeve with an English elastic band. And here you may have difficulty knitting yarns or loops together. But do not panic, everything can be solved easily, you just have to figure it out.
- In the first row we knit: 1 front, make a yarn over, and remove the loop without knitting.
- In the second row: Crochet, not knitted loop, we knit a purl loop.
- Third row: we knit two loops together, then there is a not knitted loop.
- Important! In circular knitting, do not forget to highlight the beginning of the row with a marker. This way you won't get confused by the alternation of rows!
Types of English gum (step by step lessons for beginners):
Above, we considered a standard English knitting pattern for knitting. In fact, it is the only correct one. But since the pattern is quite popular, many simplified versions have appeared.
False English rubber band (fake or simplified)
 One of the most famous imitations of the knitting pattern of an English elastic band with knitting needles is called false or fake. Purely visually connected in this way, the canvas is practically indistinguishable from the original. But working on it is much easier.
First, you should type loops, their number should be a multiple of 4 + 2 edging. The entire rapport of this pattern consists of two repeating rows:
1 row: Edge loop, * 3 front loops, 1 purl * - repeat to the end of the row, end the row with an edge loop.
2 row: Edge loop, * 2 front loops, 1 purl, 1 front * - turn to the end of the row, finish the row with an edge loop.
As you can see, in this version, there are no crochets at all with a false English elastic band.
Volumetric two-tone English rib knitting
If you love experimentation and simply adore the variety of colors in clothes, then pay attention to the possibility of knitting an English elastic band pattern from two colors. The technique may seem a little complicated, but the result is worth it. You will receive a voluminous and elastic fabric, which can be used as a pattern for knitting a hat or even a pullover.
The whole uniqueness of the two-color pattern lies in the fact that each row is knitted twice - once with a thread of one color (color A), 2 times with a thread of a different color (color B).
Important!
All purl loops of this pattern should be knitted in the classic way.
The principle of knitting with a two-color English elastic band with knitting needles:
Cast on the needles an odd number of loops.
1st row: knit with thread A - * 1 front, 1 yarn, remove 1 loop without knitting *, 1 front
2nd row: knit with thread B - * 1 yarn, remove 1 loop without knitting, knit 1 loop with the yarn with a front loop *, 1 yarn, remove 1 loop without knitting
3rd row: knit with thread A - Attention! Knitting is moved to the opposite end of the knitting needle * 1 loop together with the yarn knit with a purl loop, 1 yarn, remove 1 loop without knitting *, knit 1 loop with a crochet with a purl loop
4th row: knit with thread B - * 1 yarn, remove 1 loop without knitting, knit 1 loop with the yarn with a purl *, 1 yarn, remove 1 loop without knitting
5 row: knit with thread A - Attention! Knitting is moved to the opposite end of the knitting needle * 1 loop together with the crochet knit with the front loop, 1 yarn, remove 1 loop *, knit 1 loop with the crochet with the front loop. Rows 2-5 are repeated.
Double english elastic
 It is logical that if there is a classic variation of the English 1x1 gum, then there should be 2x2. This knitting method will definitely look good in pullovers, especially in oversized models. To perform it on the needles, you need to dial the number of loops that is a multiple of 4 + 2 edge loops.
- The first row is knitted with a standard elastic band 2 front, 2 purl. There is one caveat: the last two loops must be facial.
- We start the second row with a yarn over, then two loops are removed to the right knitting needle, not knitted, two front ones. At the end of the row, a yarn is made and the last two loops are removed not knitted.
- Third row. We knit the yarn over and the loop of the previous row together with the front one, 1 front one, the yarn over, leave two loops not knitted. At the end of the row, we knit the penultimate stitch with a crochet front and the last also front.
- Fourth row. We knit according to the rapport: yarn over, two not knitted loops, the next loop is knitted together with the front yarn, then the front again. The row ends with one crochet and two not knitted loops.
Repeat rows 3 and 4 until the size of the web reaches the required dimensions.
Methods for decreasing, adding and closing loops in an English elastic band
To preserve the beauty and integrity of the pattern in the canvas, it is necessary to decrease, add and close the loops of the English elastic band in a special way. it important point especially when working on large products - cardigans or pullovers, where the evenness of the loops on the armholes or sleeves when knitting from above at the bottom determines the beauty of the whole product.
How to decrease the loops of the English elastic:
Decreases are made in 3 loops, this allows you to maintain the sequence of the running loops of the pattern.
So, we knit an edge loop. Then the loops from the previous row (1 front, 1 purl, 1 front) are knitted together as follows (decrease on the right): Remove the first loop as the front loop, knit the next two loops together and pull the removed loop through the resulting loop. Then knit according to the pattern until 4 loops remain on the needles. Decrease left: Three loops together knit. Edge loop.
How to add gum loops.
To add loops in an English elastic pattern, you need to knit the swatch first. It is enough to knit 5-7 rows. In the next front row in a convenient way for you, add 1 loop on each side. Then add evenly over the sample.
Closing the loops of the English elastic band
To make the edge of a product tied with an English elastic band look neat, the loops should be properly closed. To do this, you should:
- Tie the product to the last row.
- Then knit a row with a simple 1x1 elastic band. This is done in order to remove the crochet stitches so that holes do not form on the edge.
- Since the density of a regular gum is less than an English one, it is necessary to make the edge thicker. To do this, you can close the loops in the usual way, but with a double thread.
The video how to decorate a raglan line with an English elastic band demonstrates how to add loops in a pattern:
Products related to the English rubber band with a detailed description

You will need: 250 g green-blue or 200 g in green-red Schachenmayr Mouline Art yarn (55% acrylic, 45% wool, 50 g / 55 m); needles No. 5, 6, 7, 8, 9 and 10; hook number 6, 1 button.
Knitting density, English elastic, knitting needles No. 5: 12 p. And 28 p. \u003d 10 x 10 cm. Knit from top to bottom.
English gum: odd number of p. 1st p. (out.): chrome., 1 person. * remove 1 p. as out. with a crochet, 1 person., repeat from *, chrome. 2nd p .: chrome, remove 1 p., As out. with a crochet, * 1 st. with a crochet, knit persons., remove 1 st. as out. with a crochet, repeat from *, chrome. 3rd p .: chrome., 1 p. With a crochet to knit persons., * Remove 1 p. As out. with a crochet, 1 st. with a crochet, knit persons., repeat from *, chrome. Run 1 time 1st - 3rd p., Repeat 2nd and 3rd p.
Blue knitted vest with hood
The size: 42-48
You will need: 350 g of blue yarn in 4 ply (30% mohair, 70% acrylic, 50 g / 275 m); circular needles No. 5.5; large button in the color of the yarn; 2 buttons.
Weave
Front stitch, garter stitch,
English gum:
1st p .: chrome, * 1 persons. n., 1 out. n. *, chrome.
2nd p .: chrome, * 1 persons. p., straight yarn, 1 p. remove without knitting, like purl *, chrome.
3rd p .: chrome, * 2 p. Together persons., Straight yarn, 1 p. Remove without knitting, like purl *, chrome. Repeat row 3.
Knitting density: 10 p. X 16 p. \u003d 10 x 10 cm.
Knitted knitted poncho and mitts

Poncho sizes: (38)40(42-44)
Finished product dimensions:width of the lower part - (117) 129 (142) cm, length measured from the neck - (44) 48 (50) cm.
You will need: Sandnes Alpaka yarn (100% alpaca, 110 m / 50 g) - (250) 250 (300) g white for a poncho and 50 g for mitts, each (50) 50 (100) g gray and black, Sandnes Silk yarn Mohair (60% kidmoher, 15% wool, 25% silk, 280 m / 50 g) - 100 g white for a poncho and 50 g for mitts, 50 g each in gray and black, circular needles no. And no. 7.5.
Attention! Knit with 2-fold thread: Alpaka + Silk Mohair in matching colors.
English gum:
1st row (front): * 1 persons. p. remove, without knitting, with a crochet, 1 out. p. *, repeat * - *, at the end remove 1 person. p. with a crochet.
2nd row: * knit a loop with a yarn over, the next person. remove the loop with a yarn *, repeat * - *, finish 1 out. p. Repeat the 1st - 2nd rows.
Front surface: persons. ranks of persons. loops, out. rows - out. rows - out. loops; for circular knitting - only faces. loops.
Knitting density: 17 p. Persons. satin stitch and 11 p. English elastic band on needles No. 6 \u003d 10 cm.
Hat with pompom knitting needles English elastic

Head circumference 50-53 cm.
You will need: 50 g of LANG YARNS Maxi Tosca purple melange yarn (55% virgin wool, 45% acrylic, 92 m / 50 g); set of knitting needles number 7.
Main pattern, circle, p .: 1st p .: * 1 persons. p., 1 p. with a crochet, remove as out., repeat from *. 2nd p .: * 1 persons. p., 1 p. with a crochet, knit together, repeat from *. Repeat 1st and 2nd p. Knitting density, basic pattern: 16 p. And 18 p. \u003d 10 x 10 cm. Attention! The hat is knitted on the seamy side.
How to tie a cap with an English elastic band:
Performance of work: dial 72 sts, distribute them on 4 knitting needles (\u003d 18 sts per knitting needle) and knit with the main pattern. Through 13 cm from the typesetting edge in every 2nd circle. R. at the beginning and end of each knitting needle, knit 8 x 2 sts together. Pull the remaining 8 sts with a working thread and turn out the cap.
Assembly: make a medium-sized pom-pom and sew on top of the cap. Tip: The typesetting edge will be very beautiful if you make an "Italian set"
Knitted hat and scarf from Drops Design studio

Cap size S / M - L
Head circumference ~ 54/56 - 58 cm.
Scarf size: 33x 180 cm.
Yarn: (wool; 100 g / 36 m)
For a hat: 200-200 g
For a scarf: 600 g
Knitting density: 6p.x8 p. (English elastic band) \u003d 10 × 10 cm.
7p x 8p (person. smooth surface) \u003d 10 × 10 cm.
For knitting you will need: circular knitting needles 15 and 10 mm
Plat. knitting by straight and reverse p.: all items knit persons.
English. elastic band: straight and reverse p.
Description
1 row: p. Boards. viscous, * persons., yarn, reshoot the trace. n. as n. *, repeat from * - * to the last 2 p., then p. persons. and n. boards. viscous.
2nd row: p. Boards. viscous, * yarn, remove the item as wear., knit the faces together. yarn over and p. * removed in the last row, repeat * - * until the last 2 p., finish: yarn over, remove p. as out., p. boards. viscous.
3rd row: p. Boards. knit, * knit together persons. yarn and nakid removed in the last row, yarn, remove n as wear. *, repeat * - * until the last 3 sts, we knit the faces together. yarn over and removed p., p. boards. viscous.
We repeat 2-3 p.
We attach a new ball by wetting and twisting the ends.
We knit the hat with straight and reverse p. per circle. knitting needles.
Cast on 27-29 stitches on 10 mm needles. We knit a row of out. with IP, then continue with an elastic band with LAN: p. boards. viscous, elastic face. / out. until the last 2 p., persons., p. boards. viscous. Thus, we knit an elastic band of 7 cm (we knit the last row with IS). We switch to 15 mm needles and continue to knit English. elastic band with drugs. At a height of 26-28 cm, we knit a number of faces. with LS, knitting 3 persons. together along the row. We get 14-15 p.
We cut the thread, stretch it through all the stitches, tighten and hide the tip.
We carry out the back seam.
We knit a scarf. We collect 23 stitches on 15 mm needles and knit the boards. viscous 10 cm upward straight and reverse p. In the last row with the IC, we evenly add 4 p. We get 27 p. Continue with the LS: 6 p. Boards. viscous, out., M.1 (\u003d 6 p.), out. M.2 (\u003d 6 p.), Int. and 6 p. boards. viscous. We get 27 p. (From LS with IS we knit persons.). Thus, we knit up to 170 cm up (we lay the pattern completely vertically), then boards. viscous in all p. up to 180 cm, while evenly decreasing in the 1st p. 4 p. We get 23 p. Close all p. All the necessary knitting patterns you will find
If you want to knit something interesting for yourself, then choose an English rubber band. You can't go wrong!
What is English gum
The English rib knitting is a very effective and beautiful knitting. It is suitable for people who are already familiar with the basics of knitting. That is, for those who have already knitted their first scarf. The knitting process is quite simple. Having learned it, you can easily use the English elastic band when creating the same scarves, winter hats and the edges of sweaters - the knit is elastic and keeps its shape well.
The appearance of the English gum differs from the usual one due to the characteristic scar, because of which it looks more prominent.
Features of the English gum
By themselves, knitted elastic bands represent a chain of front and back loops, the number of which can vary from one to several.
Unlike the usual one, the English elastic band (knitting needles) has the following technical features:
- when knitting it, it is imperative to make yarn overs, which give the product splendor, and do not form holes;
- the resulting canvas has neither the front nor the seamy side.
For knitting English elastic, it is best to use medium to thick yarn. And in order to correctly calculate its required amount, it should be borne in mind that the material consumption will be approximately twice as much as compared to simple patterns.
How to knit an English elastic with knitting needles
In order for the bottom of the product to not be tightened when knitting an English elastic, the following should be done: take the thread for a set of loops in half and leave the double end on the left side.
Then start typing on the loops. To create an English elastic, the number of loops must be odd. After dialing the first row of loops, pull out one knitting needle.
The scheme of the English knitting needles will be as follows:
- we remove the edge loop, we knit the next one with the front one, so the free thread will be in front of our work;
- remove the next loop with a yarn; then we knit the front;
- we observe this order of loops to the end of the row, which ends with the front and edge, knitted purl;
- turn the work over;
- remove the edging;
- now remove the purl loop with a yarn;
- the next loop, which was previously with a crochet, is knitted with the front one for the front wall;
- we observe this order until the end of the row and further for the whole work.
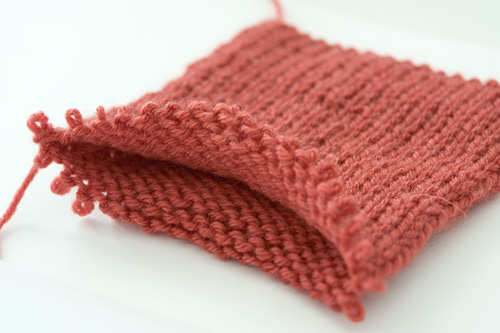
As a result, the work will look like this:

With this set of loops, the bottom edge is not pulled at all.
Two-tone English rib knitting with vertical stripes
This type of elastic is very original, because it has sides of different colors. Therefore, contrasting threads are often selected for work - dark and light.
A two-color English elastic band with vertical stripes knitting needles has, in addition to color, another feature, which is also complexity: the work is performed only on knitting needles that have two sharp ends, or on circular ones, by moving the knitting from edge to edge of the knitting needle.
The English elastic band with needles with vertical stripes is performed according to the following scheme:
- we knit loops from a dark thread in this order: front, with a crochet, remove;
- we knit loops from a light thread like this: front (a loop with a crochet is knitted), with a crochet, remove;
- we move the work to the opposite edge of the knitting needle;
- we knit loops from a dark thread in the order: with a crochet, remove, purl (crochet with a loop is knitted);
- light thread loops: with a yarn, remove, purl;
- again we move the work to the opposite edge of the knitting needle;
- a row with a dark thread in the order of loops: front, with a crochet, remove;
- row with light thread in the order of loops as in the second paragraph.

As a result of the applied efforts, we get such a product as above in the figure.
On the eve of the warm season, people want to put on cozy and attractive accessories - or rather a hat and a scarf. Several years ago, sets connected with an English elastic band were in vogue, but today more complete products are knitted with it - jumpers, jackets, sweaters and solid vests, snoods. English elastic band for knitting is actively used not only by beginners, but also by experienced craftswomen, because this is a great way to make a product that should stretch well to the sides. Yes, the pattern got its name for a reason - its canvas can be increased in width by almost one and a half times. Also, the related thing increases in length perfectly. This unusualness is explained by the description and technique in knitting - here they use front loops with crochets. A certain alternation leads to a "false" stretching of the canvas.
Features of the English gum
The pattern in question is a double-sided finished canvas that looks exquisite from both the front and the wrong side. Therefore, craftswomen recommend using a description and a pattern for knitting products that will visually look around from both sides - scarves and stoles. Also, experienced craftsmen know that it is convenient to knit leggings with a fluffy English elastic band - these are such amazing stockings that constantly get dirty during the thaw or rainy weather. In order not to waste a lot of time washing and not walking down the street in stained clothes, the leggings are simply turned inside out and put on again with the "false" side. The English elastic is used for knitting children's clothes, but only partially. For example, a knitted shirt-front or a turtleneck neck will save the child from the difficulties of dressing on his own, prevent pain when stretching over his head, which will save parents from screaming.
Attention! Since the double knitting technique involves the use of yarns, yarn should be taken for the product approximately 1.5-2 times more than the calculated amount. The pattern entails a lot of consumption, so if the recommendations are not followed, you can run into trouble.
Advantages and Disadvantages of Double Pattern
The pattern is popular due to its advantages:

Among the disadvantages, only a large consumption of yarn is distinguished, which was already described above, you can save with circular tools. Craftswomen also note excessive deformation of the knitted product. And if in the case of a scarf this is forgivable - the product is often simply stretched in length - then knitting sweaters with circular or straight tools may be useless. Such products are not considered suitable for long-term everyday wear - they are deformed. Therefore, it is recommended to wash large items only by hand and dry them on an unfolded towel.
Attention! Experienced craftswomen give advice to beginners - so that the product, knitted with a fluffy English elastic band with circular or straight tools, does not deform much, it is recommended to knit 3-4 rows immediately after dialing by alternating front and back loops 1x1. Along the edges of the fabric, you can also cheat - immediately after and in front of the edge loops, put another loop on, which is constantly knitted with front loops. This will slightly disturb the pattern, will be slightly noticeable, but will retain the original appearance of the knitted product for a long time. Use the circular method correctly.
How to knit an English elastic band
There are two options for how to knit an English elastic with knitting needles. There is an easier way - the description of the classic one, which provides the previously agreed elasticity. But the second method seems to be with less deformation, therefore, choosing a knitting method follows from your own preferences and the chosen model for the embodiment of beauty.
The first way
To knit a bulky fabric using the first method, dial an even number of loops on circular or straight knitting needles and add two hem to the nickname. Then we knit in sequence according to the description:
- 1 row - remove the first edge loop without knitting, and then knit a row false rubber band 1x1, the second is knitted with a purl loop.
- 2 row - the edge loop is again removed without knitting, the front loop is knitted identically, and the next purl loop is thrown onto the knitting needle without knitting, and one yarn is made - the thread remains at work. Thus, the product is knitted to the end of the row, and completed with an edge in the form of a purl loop.
- 3 row - remove the hem, the next knitting needle is also thrown onto the knitting needle without tying with a crochet, and the loop previously thrown off with a crochet from the previous row is knitted with the front one with the yarn over. Alternating, you should go to the end of the row and knit the last hem with the purl. Then everything fits in a circle, which can be found in the video.
Then repeat knitting from the second row of the description presented. Thus, a less elastic elastic band is knitted, although outwardly it is completely similar to the standard scheme shown in the photo.

Second way
This method is classic - it is somewhat easier to knit a volumetric double fabric, so it is better for beginners to start by studying it. For the second method, we collect and knit an even number of loops and 2 additional edging. The English elastic is knitted in the second way in accordance with the following description:
- 1 row - remove the hem without knitting, then tie the row with a 1x1 pattern, complete it with the last loop, which must be tied inside out.
- 2 row - remove the hem loop without knitting, throw the front loop with a crochet, knit all purl loops further according to the figure. The last edge is knitted with a purl loop.
- 3 row - then the second row is knitted to get a pattern that matches the circle.
The presented methods of knitting for craftswomen will not lead to any difficulties. Beginners will need to figure out the loop sequence. But since only purl and front loops are used here, it means that the training will be faster - it is only important to figure out where to remove the loops with a crochet, and which to knit correctly. Having linked 2 rows according to the description, then the work will go easier - the craftswomen are guided by the resulting pattern, which is shown in the photo and video. 
Features of knitting with a pattern
Since many things can be knitted using an English elastic band, you should carefully consider the technique of applying the pattern. Craftswomen give the following recommendations:

To a greater extent, it is recommended to use an English elastic band when knitting scarves, mitts, bibs, leggings or stockings. Surprisingly, loose-fitting sweaters connected with the presented pattern are in fashion today. If you follow all the above recommendations, the product will last a long time. It is also recommended to use the model with raglan sleeves for knitting large sweaters - this will prevent the already mentioned stretching and deformation. Live out your most unexpected fantasies. To prevent deformation, it is better to take a harder thread (cotton, linen and other natural yarns).
A very light and elastic product is obtained by knitting it with an elastic pattern. Such knitting is often used for knitting the bottom of sweaters, blouses, product necks, and scarves. In the collection of hand knitting, there are several varieties of the elastic pattern, differing not only in the way of knitting, but also appearance... In order for the canvas to turn out to be more accurate, it is better to knit an elastic band with knitting needles with a diameter either equal to the thickness of the thread, or no more than 1.5 more. The most common types of this pattern are:
- Simple: 1 × 1, 2 × 2, etc.
- English,
- Double,
- Polish,
- French
How to knit a simple elastic band
 A simple elastic is knitted using a different combination of basic loops, that is, front and back. Due to the fact that the fabric knitted with this pattern turns out to be elastic and well stretched, knitting with a similar pattern is used in cases where it is necessary to achieve the effect of fitting the product itself, for example, a turtleneck, or its individual parts, such as a cuff, collar, edges neck and bottom of the product. Simple elastic bands are usually conventionally designated by the numbers 2 × 2 or 1 × 2, where the first number indicates the number of front loops, and the second is purl in the report. Thus, you can knit an elastic band with simple knitting needles with almost any combination of main loops, the main thing is only to observe the proportions that will allow the canvas to be elastic. Consider several options for simple elastic pattern patterns:
- Elastic band 1 × 1. We knit all front rows in a sequence of loops: front, purl. We knit all the purls over the front, over the purl.
- Elastic band 2 × 2. The number of loops should be a multiple of two plus two edging. In all odd rows, two front ones are knitted, two purl ones, and in odd ones, to comply with the pattern, as well as for the 1 × 1 elastic band, purl over the front ones are knitted over the purl.
- Elastic band 2 × 1. The number of loops for such an elastic should be divided by three plus two loops on the edge:
- 1r. We knit 2 front, 1 purl to the end of the row.
- 2p. Throughout the entire row, the report is knitted: 1 purl, 2 facial.
- With 3 rows, the knitting pattern is repeated from 1 row.
An important point when choosing the option for knitting a simple elastic band is the size of the product itself, so, for example, for a large one, you can take a 4 × 4 combination, as well as the scheme of the main pattern, since for a harmonious look of the product it is very important that everything in it is combined.
How to knit an English elastic band
 The English elastic band is the most popular among all the representatives of this pattern. It also has a second name pearl. Currently, thanks to its lush and embossed appearance and soft texture, it is widely used in knitting such items as a jumper, scarf, hats and other bulky items. It is not advised to knit an English elastic with knitting needles for the cuffs and the edges of the product, since the fabric knitted with this pattern turns out to be soft and not very elastic. An English elastic pattern is made using the main loops and yarn loops. The scheme for creating an English gum 1 × 1 pattern is as follows:
- We collect an odd number of loops, after which we knit the first row according to the report: 1 yarn, 1 loop, removed not knitted, the working thread is thrown over the canvas, 1 front.
- 2 row. Nakid, 1 loop removed not tied, two loops are knitted as one front.
- 3 row. Two loops are knitted as one knit, yarn over, 1 loop is thrown not knitted.
Closing the loops of an English elastic is a little different from finishing a simple canvas. To make the edge beautiful and even, the preparatory row is first knitted. To do this, follow these steps:
- The fabric is knitted according to the same pattern, where a single crochet loop is thrown not knitted onto the right knitting needle, but a loop with a crochet, the previous row is knitted as one front, thus, the actions are repeated until the end of the row.
- Then you can close the loops of the product as usual.
If an English elastic band1 × 1 is knitted in circular knitting, then the sequence of loops will be slightly different:
- 1r. front, yarn, not knitted loop.
- 2p ... Crochet, not knitted loop, purl.
- 3p. Two loops together, not knitted.
 The English elastic band 2 × 2 also looks very good, for it the number of loops is taken, divisible by 4 plus two edging:

 In order for the fabric on such elements of the product as the neck or cuffs, as well as when knitting scarves, belts or hats, to be denser and better able to keep its shape, one of the types of elastic is used, called a double elastic. It will be as easy for beginners to knit such an elastic band with knitting needles, as well as for more experienced needlewomen:
- The set of loops for double elastic should be equal to an even number and divisible by four plus two edging.
- We knit the first row as follows: the front one, knitted behind the front wall, 1 loop is removed without being knitted, the working thread moves in front of the fabric and so on until the end of the row.
- 2nd row. 1 purl, 1 loop is removed not knitted, the working thread is thrown over the product.
- In the third and subsequent rows, knitting is repeated from the first row.
You can more clearly see how to knit a double elastic band using the following video:
For belts and scarves, double or hollow elastic is best done in circular knitting, using special knitting needles. But in this case, all rows are knitted according to the same pattern: front loop, 1 re-knit not knitted.
How to knit a Polish gum with knitting needles
 The Polish elastic band is an excellent solution for creating such items as snoods or collar scarves, as well as for children's things, thanks to its loose and airy structure. You can knit a Polish elastic in one of the following two ways:

The following video will help beginners to knit a Polish elastic band with knitting needles:
 In order to knit a French elastic, the number of loops must be set so that it is divided by four plus two loops for edging. The elastic is performed by the following alternation of the main loops:
- 1r. We alternate 2 purl loops and 2 front loops behind the back wall.
- 2p. We repeat the sequence: 1 purl, 2 knit stitches for the back wall, 1 purl.
- The next rows are knitted again from the first.
You can knit a French elastic in the following way:
- We collect loops, the number of which must be divisible by three plus 3 loops for edge loops and symmetry.
- In all odd rows, we knit sequentially until the penultimate loop: 1 purl, then remove 1 loop not knitted, then we knit the next one behind the back wall, again return the removed loop to the knitting needle and also knit it behind the back wall with the front loop, the last loop of the row is knitted with the purl.
- We knit even rows as follows. We knit a sequence of loops 1 front loop, reshoot a loop not tied, knit the next one with a purl, return an unkit loop to the left knitting needle and knit it with a purl. We end the row with a front loop.
There are a lot of types of elastic bands, so when choosing a particular model, in order for the product to look harmonious, you need to take into account the following nuances:
- The density and pattern of the elastic should correspond to the main pattern of the canvas and the type of product for which the elastic is made.
- Not all types of elastic bands can be used in circular knitting, since many of them have a patent, that is, a double-sided pattern. These are, for example, such rubber bands as French or English 2 × 2.
CIRCULAR KNITTING OF ENGLISH RUBBER
English gum 1x1 round
Two-tone English round elasticFor the sample, we collect 33 loops. We distribute them 8 for each knitting needle. There should be 9 loops on the 4th spoke. We reshoot this 9 loop on the 1st knitting needle and knit one of the first two loops(on the 4th needle there are 8 loops).
1 circular row - (1 front, 1 purl);
2 circular row - (1 front, 1 reverse yarn, remove 1 purl without knitting);
3 circular row - (1 reverse yarn, 1 knit one off without knitting, 1 purl loop with an adjacent yarn, knit with a purl loop);
4 circular row - (knit 1 front with the adjacent yarn with a front loop, 1 reverse yarn, remove 1 purl without knitting);


Front side Seamy side For the sample, we collect 33 loops with white thread. We distribute them 8 for each knitting needle. On
The 4th needle should have 9 loops. We reshoot this 9th loop on the 1st knitting needle and knit one of the first two loops (there are 8 loops on the 4th knitting needle). So we closed the knitting in a circle. Now you can start knitting the main pattern:1 circular row (white thread) - (1 front, 1 purl);
2 circular row (blue thread) - (1 front, 1 reverse yarn, remove 1 purl without knitting);
3 circular row (white thread) - (1 reverse yarn, 1 front yarn off, 1 wrong yarn together with an adjacent yarn, knit with a wrong yarn);
4 circular row (blue thread) - (knit 1 front yarn together with the adjacent yarn, 1 reverse yarn, remove 1 wrong yarn without knitting);
http://babush-klubok.ucoz.ru/publ/vjazanie_spicami/rezinki/anglijskaja_rezinka/6-1-0-10
Scottish elastic.

 Scottish elastic. One of my favorite patterns in knitting. Looks great both on hats and on vests, sweaters. Thick and dense pattern. Perhaps someone will call it a Bulgarian rubber band, but the technique is the same, but the density of the pattern is different.
So let's start:
we collect the number of loops a multiple of three (3x ...) * + 2 edging.
1st row: remove the rim, * 2 front, 1 purl *; and so on to the second border.
2nd row: hem, * 1 front, yarn, 2 front. We throw the yarn over the last two front ones. *, Border.
We repeat everything from the beginning. Row by row until you get bored.
source- http://www.livemaster.ru/topic/403395-shotlandskaya-rezinka?msec\u003d24
A hat knitted with an English elastic band is very fashionable now! You probably know that chunky knit hats with and without a lapel are very popular this year. A beanie hat with English elastic knitting needles is good because it stretches easily, fits any head size. The hat turns out to be voluminous and soft, the pattern looks good both on the front and on the inside. We present to your attention 5 options for hats tied with an elastic band.


Let's start with the simplest version of an adorable hat, which can be knitted with an English knitting needle or, as it is also called, a patent elastic band. The stocking cap is knitted on circular knitting needles, but you can also take ordinary stocking knitting needles, and at the end, carefully sew the seam with a large needle and thread to match the color of the hat. The classic English gum looks like this:

The basic techniques of knitting with an English elastic band (Fig. 1, Fig. 2).

The first version of the English gum... To understand the principle of knitting, you can first practice on a small fragment.

The second version of the English gum. Master class of a hat with one lapel.
A beanie hat with an English elastic band can be made to any length. If you need a hat without a hem, knit 19.5-20 cm before decreasing the loops. If you decide to make a hat with one hem, then before decreasing the loops, knit 25 cm from the typesetting edge. And there is also a third option - a double hem, this will already be a Takkori hat. In this case, you need to knit 28-30 cm before decreasing. How interesting it is to make the crown will be described below.
Hat size 52-56 cm... To avoid bandaging the product, tie a 10/10 cm sample with an English elastic band. Measure how many p. Turned out in 1 cm, multiply by the size of the head. So you will determine the exact number of p. Dialing row.

For a hat with one lapel, we took just such a Turkish yarn: Alize classic, wool with acrylic, 100 g / 240 m. 1 skein is enough for a product. We knit in 1 thread, needles 2.5 or 3 mm. Take circular knitting needles, but if you are comfortable with simple ones, knit on two, 35 cm long knitting needles are perfect.At the end of the work, make a seam on the back of the head. The same is true for snood: we knit on two ordinary knitting needles, at the end we sew along the width.

Cast on 68 loops + 1 stitches to connect round. If you decide to knit a hat of stockings on circular knitting needles: do not forget to mark the end of the row with a pin and when moving from the 1st row to the 2nd, so that there is no hole between the loops, we do this: put the 1st item of the typesetting row on the right knitting needle , on it we throw the last point from the right knitting needle. We return the 1st p. To the right cn. and tighten the main knitting thread. On our cn. now 68 p. Pattern rapport - 2 loops.
We begin to knit the 1st row like this: yarn over the 1st loop and remove the yarn together with the loop (see Fig. 1)., 1 front, again p. With a yarn, 1 front, p. With a yarn, and so on we knit to the end of the river. The last item is persons. We hang a pin.
2nd p.: The opposite is true: * p. with a crochet we knit together with a purl (Figure 2), add a crochet * to the front, a double crochet with a purl, to the front - a crochet, repeat from * to * to the end of the river. At the end of the river. - p. With a crochet.
3rd p .: yarn on the 1st p. (Tighter so that there are no holes), p. With a yarn together with the front one, yarn over and take off, p. With a yarn over together. - and so on until the end of the river.
4th p .: as 2nd.
5th p: as 3rd.
That is, the principle of knitting is as follows: in further rows we add a crochet to a single front, and we knit a loop with a crochet, like 1. In even rows, we knit a loop with a crochet, like a purl, in odd rows - like faces.

We tie it up to the moment when the height of the cap is already 25-26 cm. Next, we will make the crown.

If you want to make a double lapel, you need to continue knitting until decreasing so that the height is 28-30 cm.
Decreases.
1st p: we get rid of the crochet along the entire row: persons. knit with a crochet front.
Next, 3 rows with a simple elastic band 1 * 1 p.
Next p.: We reduce the purl loops (2 persons together., 1 persons., 2 persons together., 1 persons. And so on - until the end of the river).
Track. R. : 2 p. Together, 2 p.
And at the end of knitting, 8 sts should remain, cut off the thread and pull it through the stop. n. Tighten the thread. Sew a seam on the back of the head.
In the video: a beanie hat with an English elastic band:

Photo number 1. Beanie's hat is not high.

Photo number 2. The beanie's hat is high, with an elongated crown.
This beanie hat with a 1 to 1 elastic or English elastic. It is knitted from bulky yarn with circular knitting needles 5 mm thick. Cast on 82 loops on a 52-56 hat. We knit to the crown (the beginning of the decrease) the length you need. There may be an option with one or two cuffs, or without bending the bottom at all. Divide the entire number of sts in half (82: 2 \u003d 41 sts), mark with pins or markers. Select the central 11 points with markers on each of the two sides of the cap. We put markers in front of the 1st loop and after the last point of 11 points on both sides.
An important point: if you do not want the hat to be not high, make the deductions in each row (photo number 1). If you want an elongated top of the head, make the deductions through the row!
We make an elongated crown. Knitting in a circle. First, we subtract before the first of eleven p. (We move this first p. So that it is on top of the previous one each time, we knit together). Then we knit up to the next marker (next 11 sts), again we make a decrease at the beginning and at the end of these 11 sts. Next row: we knit without decrements. Next row: again decreases at the beginning and at the end of 11 sts. Gradually, the loops decrease, and the central track remains unchanged. We tie up until there are 11 sts left on one side and on the other. We close 2 together, 11 sts remain.
Cut off the thread, collect all the loops at one point and tighten.
In the video: how to knit a hat with a 1x1 elastic band and make a beautiful crown:
A snood tied with an English elastic band is perfect for such a hat. The size of the snood is 24/60 cm. We knit in the transverse direction, then we sew the beginning and the closed edge. The knitting pattern is a little higher.

Hat with double elastic band - master class
An excellent hat will appeal to those who do not like large, voluminous hats. The hat is tied at the beginning with a double 1x1 elastic band, and most of it is made with a semi-patent elastic. A very successful combination: the initial elastic looks neat and does not stretch, and the semi-patent elastic provides the required volume.

For work you will need:
- Drops Cloud yarn (alpaca and polyamide, 50 g / 80 m) - 1.5 skeins with a pompom.
- Circular knitting needles 5 and 7 mm thick.
- Scissors.
Density of knitting gum 1x1 - 10/10 p. Are equal to 15 p. / 22 p. knitting needles 5 mm.
Semi-patent elastic bands - 10/10 p. Are equal to 12 p. / 17 r. knitting needles 7 mm.

Cast on 56 stitches on 5 mm needles. and knit 20 rows in a circle with a simple 1x1 elastic band. We reach 21 rubles. At 21 p. you need to fold the elastic in half and knit it together with the 1st row, picking it up by the item of the typesetting (initial) edge. It is important here to make sure that the product does not warp and not to miss a single point from the initial p. Consider that there should be an alternation: persons., Out. Do not get confused while typing p.

The double elastic will fit snugly against your head and won't stretch too much.

It turns out a neat bottom of the cap.

We made 21 rows.
In the 22nd row, change the knitting needles by 7 mm. and move on to a semi-patent rubber band. There is no need to add p., Since we changed the needles for large ones and changed the pattern. With a semi-patent elastic band, we must knit 36 \u200b\u200bp. The knitting pattern for a semi-patent elastic band looks like this:

English gum.

Semi-patent rubber band.
As you can see, the semi-patent elastic band is not much different from the English one, except that if you look at the light, you will see more intertwined threads.
A semi-patent elastic is knitted like this:
There must be an odd number of loops.
1st p .: 1 out., 1 persons., At the end of the river. - 1 out.
2nd p .: how the knitting looks (1 person., 1 out.), At the end - 1 person.
3rd p .: 1 out., 1 person. (we enter the knitting needle in the item of the previous p. and we carry it out.), at the end - 1 out.
4th p .: how the knitting looks (1 person., 1 out.), At the end - 1 person.
We repeat the 3rd and 4th rows.

This is what this gum looks like.

In the 37th row, knit the front p. And the purl along with a tilt to the left. There are 28 6p left on the needles. In the 38th p. the whole r. performed by individuals. 2 sts together.

We tighten the last 14 sts of the crown and fasten the end of the thread inside the knitting.
That's all. Another master class on knitting hats is over.
Another option for knitting with an elastic band, similar to the English one, is a beanie hat with French elastic knitting needles. There are so many options for all kinds of rubber bands, but faceted rubber bands still look more beautiful: for example, Polish, French.
For such a cap size 54-56 made of DROPS LIMA yarn - 50 g / 100 m. (70% wool, 30% alpaca), you will need 2 skeins of yarn.
Knitting density: 22 p. / 30 p. Corresponds to 10/10 cm on 3.5 mm needles.
Needles: Simple 2.5 mm needles. and 3.5 mm. The length of the needles is 40 cm. You can knit on circular needles, if it is more convenient for you.
In order to find out how much we need to dial in, we knit a small fragment on the needles of 3.5 mm.
The number of loops should be divisible by 4, since we are knitting with a French elastic band, which has a rapport of 4 loops.
Our threads are thin, for needles 2.5 mm. you need to dial 108 p. At the end of the work, we just sew a hat on the back of the head.


Cast on the needles 2.5 mm. 108 sts and knit 3 cm with elastic band 1 person. / 1 out. Then we move on to the needles 3.5 mm. and French elastic pattern.
1st p .: 3 persons., 1 p. Remove on the right knitting needle, thread before work (see the diagram), 3 persons., 1 point remove the thread before work, 3 persons., 1 point remove, and so on until end of the river, the last item - out.
Turned knitting over.
2nd p .: 1 person., 1 p. Remove the thread in front of the slave., 3 persons., 1 p. Remove, 3 persons., 1 p. Remove, and so on until the end of the river. At the end, the last - 2 persons.
3rd p .: as 1st,
4th p .: as 2nd.
After 20 cm from the typesetting edge, we begin to decrease. We will decrease through the row.
Decreases. We have a pattern with elongated faces. P.
We need an odd p. We knit: 1 person., 2 together out., 1 out., 1 person., 2 together out., 1 out., 1 person., 2 together out., 1 out., And so on until the end of the river.
Next p .: no subtraction.
Next row: 1 person, 2 together out., 1 person., 2 cm. out. and so on until the end of the river.
Track. p .: no subtraction.
Next row: persons. item knit together with out. Only persons remain.
We see if we have already removed the p. If enough, then collect all the p. In a heap and thread it through the p. Thread and tighten it tight.


A stocking hat with knitting needles with a 2x2 elastic band is a great opportunity to knit a hat for yourself in 1 evening. Elastic band 2 by 2 - knits without problems, if you take thin knitting needles - the product will look like a store version.


