By ordering plastic windows, most of us simultaneously orders the service of their installation. But in principle, this is not necessary, and you can do without additional spending by completing this work yourself. Especially if we are talking about installing windows in the country, much more convenient to bring them yourself in optimal time.
To install plastic windows on your own, you do not need to have some incredible skills, or have exclusive tools. It is enough just to be able to work with your hands, and also want to do everything yourself. At the same time, the windows measurement is best to trust the company's specialists. First, in this case there are enough thin nuances, and you can do not consider everything from the first time, which is why the windows are or too large, or too small, or not the configuration. Secondly, if in the measurers you will be wrong, you will also answer for your mistakes, and if the seller - he will be forced to fix everything. But everything else can be done and with your own hands - there is nothing too complicated.
What do you need to have plastic windows for installation?
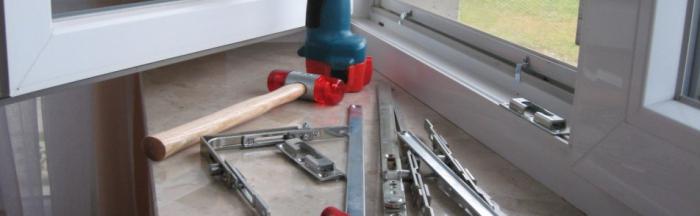
In addition to the windows, sings and window sills need a small set of tool, consisting of:
- roulettes;
- screwdriver;
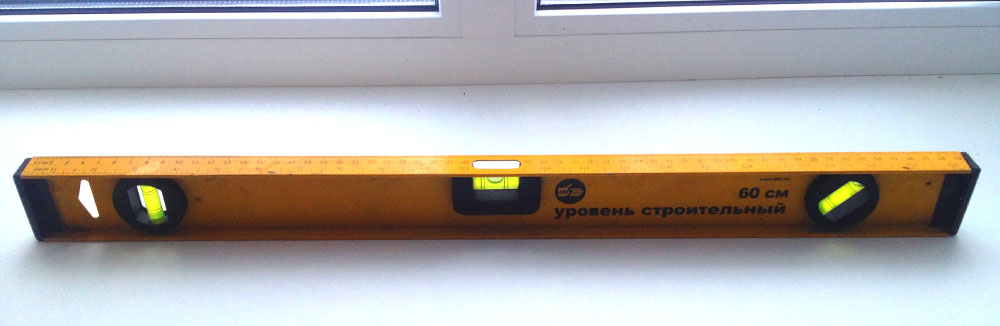
- level;
- perforator;
- set of hexagons;
- hammer;
- stationery knife;
- pencil.
Also, the mounting foam is needed, in the amount of at least two cylinders per window, silicone and gun for it. Do not do without mounting plates used when installing plastic windows And some other little things.
Sequencing
Preparation of the window
The windows themselves can be mounted in the collected and disassembled state. The second option is easier, but risky, because you can always randomly damage the double-glazed windows or strokes, collecting set window. Therefore, specialists, and amateurs, prefer to mount the collected windows.
The preparation of the window boils down to check, whether it is fully assembled, and whether there is a protective film everywhere. If the window is not deaf, it is possible to mount it only in a completely closed state, and open the sash even on the window is prohibited for at least 12 hours after the installation is completed. This is necessary so that the mounting foam is completely dried and stopped the extension, during which the open window can be deformed or shifted.
Installing the window
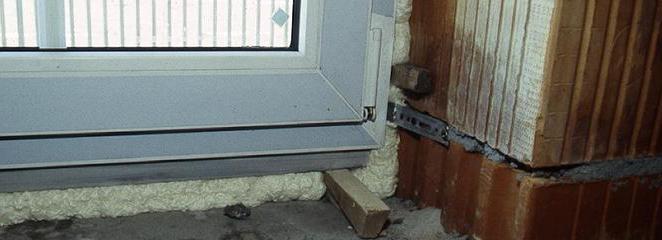
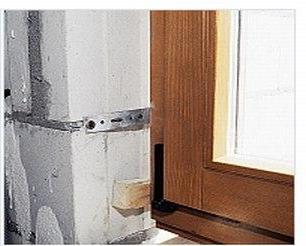
Molding in the opening window will be using the mounting plates, each of which starts the mustache in the groove, and then rotates in such a way that the plate looks inside the house. Each plate is screwed to the end of the window profile, and the edge - to the slopes or walls of the house. It is necessary to attach a minimum of two plates from all four sides of the window. The maximum distance between the plates on one side should not exceed 70 centimeters, if you want to achieve good structure strength. The extreme plates are usually located in 5-15 centimeters from the corners of the window.
The further sequence of actions is as follows:
Exposing a window in the opening, it is important not to forget to lift it so that the windowsill can be started under it - so it will be possible to do everything beautifully, avoiding the inesttic docking in the future. As a rule, the wind measurers this moment take into account immediately, so you will have such an opportunity, and in most cases the windows are initially supplied with a mounting plate screwed down, the height of which is just equal to the height of the windowsill.
Mounting a plastic window
The sump is ordered precisely by the size of the window opening, and at the facility is insignificantly cut and rejected for better outflow of water.
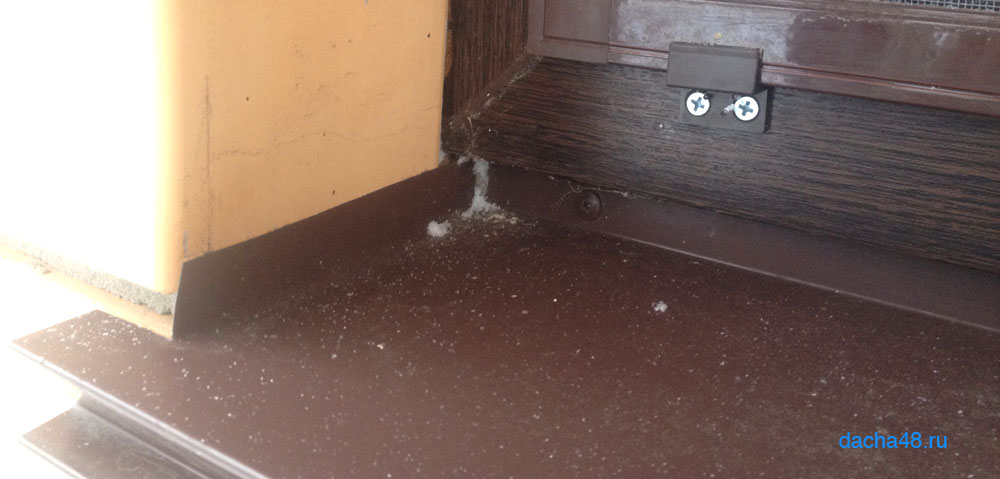
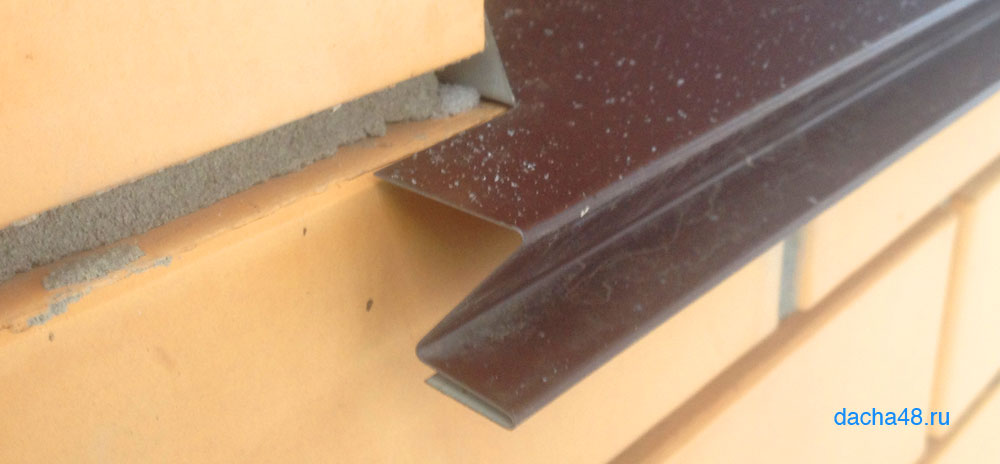
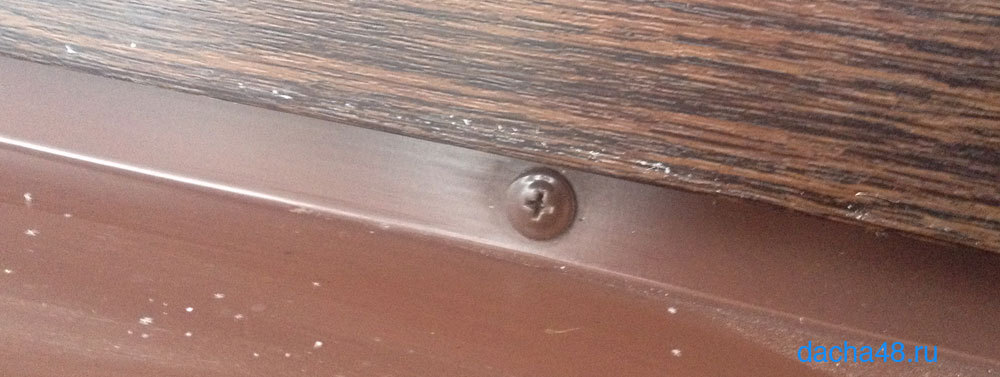
When the window is already fixed with a dowel, you need to attach the sump from the street, mounted at the bottom of the window. It is just done: the sump is screwed to the bottom window profile Self-threads for metal 9 mm of length and 4 mm diameter with a painted head in the color of the face. The gap between the window and the tump, even if it is minimal, can be sealing with silicone to completely eliminate moisture from entering the window.
Pre-adjustment window
The first part of the installation is completed, so it is necessary to check whether the window fittings should be properly working, or it must be adjusted. The sash of the window must open easily, nothing is assisted in any of the modes. Also, the open sash should not close or open further. If necessary, it can be adjusted by window loops using the hexagon.
Scatter
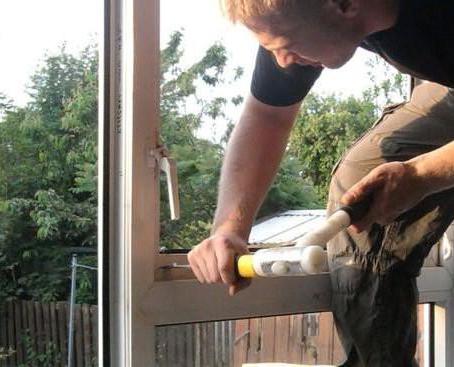
Further, the window must be completely closed again, just in case it is once again to check the level and on the correctness of the location in the opening, after which the slots between the window frame and the opening are bleed by mounting foam. It is important to take into account that the filling must be complete, without the formation of voids, so large gaps It is better to poison in several techniques with an interval at 2 o'clock. In addition, it is necessary to use foam on the season - that is, in the cold, use the special all-season or winter foam.
Hours after 12, when the foam completely freezes, when neating, you need to cut off the stationery knife all unnecessary. Sutting off the foam, consider that it is destroyed by the action of direct sunlight, so it is desirable to be desirable to hide it under the layer of plaster or putty.
Installation of the window sill
To begin with, it is necessary to cut out the jigsaw or the grinder of the windowsill of the desired size, cutting off all unnecessary, since the plates with knowingly greater configuration are most often supplied to the object. Having cut the windowsill, it is desirable to calculate everything so that it goes to the parties to the slopes, at least 2-3 centimeters on each side. This will consolidate it as much as possible and avoid the formation of unnecessary slots. When using the width of the windowsill, do not forget about the side plugs, which should be glued to the superclamp in their place immediately after completing the fit to do not forget.
The prepared window sill with the help of all the same wooden, plastic or other wedges is fitted with the window and is set strictly in terms of the level, and it is important not to forget to observe the horizontal in both planes (checking the level shown in parallel and perpendicular to the window).

When the windowsill is exhibited correctly, load it from above with something heavy, for example, several large bottles with water. This is necessary in order for it not to raise the mounting foam, and so that it does not accidentally move from the desired position itself, or with someone's help.
The final chord is to join the windowsill mounting foam, and all - after 12 hours the window can be used without restrictions, and it will only be decorative finish slopes.
- Date: 01-03-2015
- Views: 253.
- Comments:
- Rating: 43.
Many people often ask whether it is possible to carry out the installation of plastic windows on their own? To implement it, you need to know the rules that will help you do. Below is shown by yourself. To make this, only the skills of owning the instrument, attention and strict implementation of the recommendations below are required.
Procedure for performing work: how to install a plastic window yourself.
Plastic windows can be installed with your own hands, following step-by-step instructions.
Installation work is carried out in this order:
- if the replacement is carried out, the old windows are first removed;
- acquired double-glazed windows prepared for subsequent work;
- make the installation and align the coaching profiles.
- mount elements of fixing on the window;
- in these places there are grooves in the walls;
- strengthen the window and straighten it with a plumb and construction level,
- using the installed fastener, windows are fixed in the opening;
- fill the mounting foam all the gaps that were formed by opening and the window
- installation and thorough leveling of the windowsill are made;
- at the next stage, the slopes are mounted;
- regulate product fittings;
- mounting is mounted on the outside of the window.
The last operation is performed after the installation of the windows is completed if a private cottage or house is built. If the installation is made in the urban apartment, then the lowers are mounted on the windows without a glass package. To do this, the screwdriver is invested between the sealing rubber (gasket) and the glass pin with the glass, and with light blows get it out of the groove. Empty the glass and through the opening in the window the opening produce alignment and low-rise installation. This small cunning greatly facilitates the production of such work.
Initially, it is necessary to make measurements of the opening. You can call a specialist who is engaged in installing plastic windows or make it yourself, but when you error you purchased the windows you can not get the opening.
Dismantling of the old product
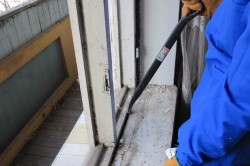
Figure 1. Building lomick is used to remove the old window box, upholding the window frame.
On that day, when you plan to install new windows, you need to remove old. If the frames are not needed, then disassembly are made. The sash of the old design is removed or burst along with their shuruses. The window box and frame are squeezed in 2-3 places and, uploaking with them with a nail or a small lombing, removed in parts (Fig. 1). If the location of the holding of construction nails hold the design is known, then it is necessary to pre-get them from the body of the frame.
Under construction is usually the insulation with the seal - they should also be dismantled.
Sucks are removed using a perforator. Then remove the cement substrate from the windowsill. All the garbage must be collected in packages and make a place for it intended for him.
The window itself is cleaned with dust and dirt, swollen places align, and all surfaces are ground.
When the windows change in wooden house, It is necessary to pave a layer of new waterproofing along the opening so as to eliminate the penetration of condensate into the mounting foam. It may be necessary to strengthen the design of the opening. This is done using a tree box.
Back to the category
How to install a plastic window yourself: step-by-step installation
Initially, it is necessary to mount the coaching profile: it is put in a designated place, align the level in the horizontal plane and poured foam. Before that, you need to put the window to the installed profile, make sure that it is normally inserted into the remaining opening. If the top of the big cracks, then the profile laid small brins of wood. If there is a groove on the window (in its lower part), then to simplify the installation, it is necessary to fix the coaching profile to it. But sometimes it does not include a complete set, then you need to use small bars, which are put under the window to the height of the future window sill, which will then be installed in the lower groove.
By mounting a coaching profile, it is necessary to install the window itself on its own. Protective film from the product is better not to remove until the complete end of work.
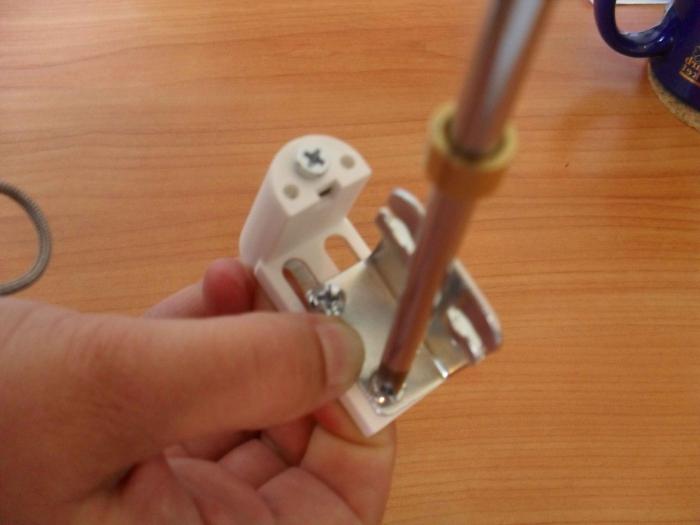
Attach fixing elements in its set to the window. Flat anchor plates are usually used. They are inserted perpendicular to the plane of the product. From the corners of the window frame itself, they must be removed by 10-15 cm from the edges.
Their mounting to the frame is produced by a 10 cm long-term suggestion in that order:
- 1 screw is screwed into the frame from the outside with a dowel;
- 2nd - on the other end of the same plane they fastened into the wall with the same plastic dowel.
When installing the window with empty frames (without glass), the self-tapered screws are twisted from the inside of the frame with plastic dowels. They must be started up to the stop, but so as not to spoil the plastic parts of the product. To simplify this task, the electric drill can be drilled holes in the frame and wall. The diameter of the drill must be less than the caliber of the screw.
After strengthening the anchor plates, the window is inserted into the opening and then align. In places of attachment to the wall there are grooves under the entire mounting plate. All fasteners will then be smeared with a solution, and the wall is aligned for mounting the slopes.

Figure 2. Waterfront is attached to the frame at the outer edge of the glass package using screws and liquid nails.
Do not try to completely twist the screws. First you need to check the correctness of the installation of the product. This is done with the help of a level and a plumb. To align the product in the opening, you will need an assistant - it is needed to put wooden bars in the appropriate places.
The next operation is filling the foam of slots between the opening and the window. At the interval between them, more than 20 mm foam is applied 2 times, with an interval of 2 hours. It will dry at least 1 day.
If the installation of the product occurs at a temperature less than 5 ° C, then for this operation it is necessary to apply the mounting foam for the cold period.
After that, it is covered with glue from tiles or protective film. This is done to eliminate the action of sunlight on the foam.
After that, double-glazed windows in the frame are inserted into the frame and strengthen them with the help of upper pins (strokes), then install the lower and last time - the side. They are drunk until it stops with a light rubber hammer. After a complete assembly, the window is checked for smoothness: on the positions of opening 90 ° and 45 °, the sash should not open or close. At the outer edge of the window there is a special groove for installing water reservoirs. It is fixed to the frame design with screws in 3-places (Fig. 2).
Back to the category
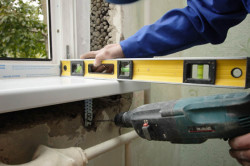
Figure 3. In order for the condensate between the window and the windowsill, it creates a bias of 2-3 ° using a level.
To perform this work, it is necessary to initially bring it to the size of the opening. This is done by a jigsaw or a grinder, and if there is no, then a simple knife is suitable.
After that, the windowsill to the undercut profile are put on and align. If there is a large gap between them and the opening, it is necessary to fill this space with a solution. If everything is fine, then small gaps eliminate filling foam. At the end of the windowsill should be on the walls of 5-10 cm. It is attached to the frame of the window with 4x70 mm screws, which are screwed from its inner side in the middle and around the edges.
Plugs that need to be glued to it with synthetic glue on the windowsill. Align it and check for seed at several points. If everything is in order, then the windowsill put heavy items and fill the emptiness foam. After drying it, the surplus is removed on the other day.
To eliminate the seepage of condensate between the window and the windowsill, the last part must be installed with a small slope, not more than 3 ° (Fig. 3).
Plastic windows, despite the very unfair assertions of some of their non-environmentalities, today they beat all the records of popularity. What, in principle, is not surprising. Is it possible to compare a beautiful, convenient to operate, protecting against noise and cold window from PVC with a rich old wooden analogue! Naturally, you can't call this pleasure cheap, as you pay not only for the product itself. Installation of plastic windows (the price of such a procedure is usually from forty to sixty dollars) also has its own, separate cost. And imagine if you need to replace them in the whole apartment? It turns out a rather solid amount. But you can also save a little. How? Yes elementary! So how to install plastic windows is not so difficult, then why not try to do it yourself? Provided, of course, that you can distinguish a nail from a screw and know how to handle a drill. And everything will certainly work out! And therefore, our review on the topic: "Installing plastic windows with your own hands" is intended for economical and skillful owners. However, homemade newcomers are also invited to join. And together with us, it is detailed to study such a procedure as the installation of a plastic window. The instructions offered in the review (quite detailed and understandable) - to help you!
Small retreat
Before talking about how to install plastic windows, it is advisable to talk a little more about the product. The fact is that it will have to be ordered from the manufacturer's company. Or cause the measurers to the house, or remove the sizes on their own and go to the company. And if in the first case everything is much simpler, as it is possible to get a competent consultation directly from the arrived specialist, then in the second it is still necessary to have at least similar knowledge as to what the PVC windows are. Because, making the wrong choice, you simply throw money into the pipe, because you will remain unhappy with the purchased products, which is fraught with (with the worst cut) re-replacement of windows. And then, no economy and speech can be. Even the installation of plastic windows with their own hands is unlikely to help patch the breakdown in the budget.
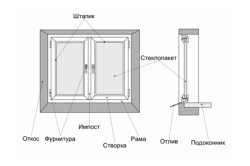
Types of windows
After making the decision to replace the window in the house or apartment, you need to clearly determine what you want to get at the exit. The fact is that these products are very diverse. Starting from the easiest and ending, so to speak, "sophisticated." And depending on this varies and their cost. Thus, the PVC windows are single-holder, and two-, and three-, and even four-dimensional. It all depends on the width of the opening. In addition, they are divided into a method of opening. The plastic window (it is still in the people often the name is simply a glass bar) can be allegedly deaf, open by type of ordinary window (inside the room) or by type of fraumuga (fold). Today, the two recent options are most often combined, which is extremely convenient. Also need to decide how much cameras in the window are preferable to you. Than they are more, the naturally, the cost of the product, at the same time, is true, the same warmer and calmer in the apartment. Therefore, if the room is warm, and also leaves windows in a quiet courtyard, it is quite possible to do with a two-chamber glass. And since you are assembled by plastic windows yourself, then the cost of repair will be noticeably less. All this is very important. Therefore, such nuances must certainly consider when ordering PVC windows. And now we go from words to business.
Remove dimensions
Everything is simple enough. The only thing to take into account is that measurements need to be carried out from the outside. For which they open the sash of the old window, and then measured the width of the opening and its height (from the top jumper to directly by low tide). After that, add two or even three centimeters to the obtained parameters on each side. This will be our source size. Everything. You can go to the company or call her representative to the house. The latter is not always desirable, because quite often, issuing the contract, the measurers do not put the client to know how much the installation of plastic windows is, and immediately put in it a total amount, including the cost of the product, and its installation. And since you are going to implement this process yourself, then this option is not for you. Therefore, either you need to immediately stipulate these moments with the manufacturer, or order double glazed windows directly at the company.
Accessories
Since installing plastic windows is decided independently, you need to take care of the order or purchase on the construction market (which will be cheaper) components. You will need to purchase (at the rate of one double-glazed windows) windowsill, two plugs to it, a tide, a special starter, intended for the glass package, profile (in the number of three pieces), the profile is coaching. If you plan to put a window in a room that has access to the loggia, then the sampling will not need, but you will need to purchase two windowsill and four plugs. In addition, you will have to do yet, so you need to take care of the purchase of special plastic panels. All major components need to be purchased, leaning on the original width of the inner opening, low tide and windowsill.
Materials
Need to purchase some construction Materials. This is a mounting foam (count so: we buy three cylinders for a two-rolled window - four), a bag of plaster (you can take a domestic, luxury, weighing fifteen kg), a few foam sheets in five centimeters wide, a tube of liquid plastic, one liter of waterfront paint, as well as special ribbons for hydro and vapor barrier. You will also need to buy racks that will be useful when installing slopes (in the number of three pieces).
In addition, it is required to purchase fasteners. These are anchor plates (take five pieces), a dowel length of forty and sixty millimeters, self-tapping screws (and wood, and metal).
Instruments
It is clear that the installation of the plastic window is not possible without the presence of appropriate tools. Therefore, we carry out a revision in your working cabinet (which is not enough, then we buy) and we reserve:
- screwdriver;
- level;
- pistol for mounting foam;
- perforator;
- silicone pistol;
- a set of hexagons;
- lobzik;
- stationery knife;
- pencil;
- roulette.
Sequence of work
Installation of the glass package includes quite a few stages, the main of which are listed in:
Dismantling
Since the technology of installing plastic windows provides for the presence of a free opening, the first thing is getting rid of the old window. For which you remove all the removable flaps first, and from the deaf we take the glass. Now you need to remove the frame. Here, especially if we are talking about old windows, you will have to sweat. Because, at least the sash themselves have come true for a long time and have acquired, gently say, not quite presentable, the frame, as a rule (and oddly enough), was made of excellent tree, which, after many years, not on the teeth, even the most acute saw . Therefore, it is best to use the grinder to dismantle, and put a circle on metal on it. We make deep contigels in the frame in several places and from all sides, after which I cautiously remove it in some kind of scribe tool (say, lomik). Then we get rid of the same way from the old window sill. We remove with myself, cleaning the opening from all kinds of garbage (which will be as much) and dust.
We prepare glass windows
Here everything is simple, it is enough to check whether the sash closed well. This is extremely important, since if they are ajar, then in the subsequent, after the bounce of the openings, the mounting foam can cause the profile deformation. So remember: upon completion of the process, the glass pack must be tightly closed for at least twelve hours. As for the protective film on the profile, it is recommended not to remove it, in order not to scratch when installing plastic.
GOST
As with any other building process, in this case, it is also necessary to follow all the requirements of this strict standard. The installation of plastic windows according to GOST should be made not only by professionals, but also by domestic masters. What will provide a long life with a new window and guarantees them to fulfill their direct destination - protection against noise and cold.
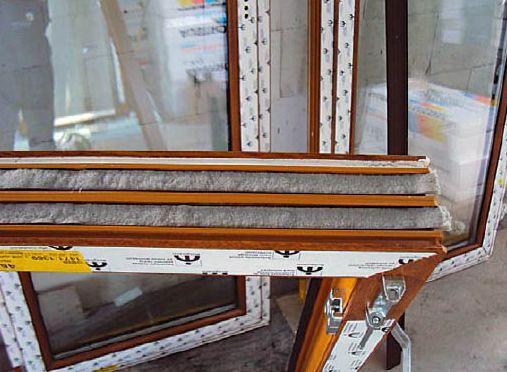
In principle, of course, it is not important, at what distance from the top or the bottom of the window opening you will fix the same anchor plates. The error in a centimeter-other special role will not play. Another thing is important. The installation of plastic windows according to GOST requires strict compliance with the two most important rules: the installation must be carried out necessarily using specially manufactured tapes - vapor and waterproofing. They need to be caught a new frame around the perimeter. Moreover, the first tape is glued from the outside, and the second - with the inner. By the way, many professional installers are not particularly puzzled by this, which is why multiple customer claims arise: the windows are fisted from the inside, mold appears on the glasses, etc. In other words, such plastic windows will hardly be delighted. Installation (reviews of furious customers on numerous forums - to that bright confirmation) of the glass package in a similar way can lead to the fact that dampness will appear in the room, up to the point that the corners and the ceiling are turning into the room. And therefore, without waiting for unradical craftsmen, the first thing is formed by the frames called the acquired ribbons.
Marking
Immediately need to make a reservation. Installation of plastic windows alone - occupation time-consuming and ungrateful. And this is why it is necessary to get an assistant, at least at the initial stages of installation. The glass is heavy enough, put it as a level, and even just raise to put in the opening - it's not so simple. Well, we will assume that the assistant we have, and therefore will continue. Important! A glass unit cannot be installed directly on concrete. Therefore, it is necessary to place small lumps on which later and mount the window.
The first thing on the window frame is applied. Fasteners need to be located at seventy centimeters from each other. You can and less often, but the indicator is not recommended in one meter. As for angular fasteners, they need to be placed at a distance of five to fifteen centimeters from the angle of the window frame. So, the markup is made, on it we attach screws for metal anchor plates. We insert the glass in the opening, mark the place of the attachment, reach the window, and in the brick or concrete we salary for anchors. In principle, if installation is planned plastic slopes On the windows, you can mount the plates and on top, as the plastic disguises them. In the case, if the slope is made of plaster, then these gaps are still desirable to do. Then it simply no need to impose extra layers of the solution to hide them.
Installation
When all the work is made, we return the glass in the opening and exhibit it in accordance with the level indicators. Here, there will be lower lumps-pads, which can be adjusted by the position of the window (that is, some of them may be thicker, some thinner). Once you have verified that the window is really exactly, you can be mounted with screws on concrete Anchor plates for the impact. Now you need to adjust the glazing accessories. Everything is simple here. It is necessary to check that the sash are free to open, closed tightly, kept the specified position well, did not cling to anything. The existing shortcomings need to be corrected by twisting the screws directly on the fitness itself. You can marry. If nevertheless, something in the measurements was incorrect, and the gaps between the opening and the glazing themselves turned out to be quite wide, it is possible to partially fill them with foam, and then the mounting foam. In principle, it is possible and not messing, because the goal of this process is one - to save the canister of a fairly expensive foam.
Sill
Now go to such a procedure as the installation of windowsill plastic windows. Since they are usually standard, then you need to take a grinder or jigsaw, and then trim extra centimeters. The windowsill is mounted in a special installation profile that is available below the window frame. Then you need to take a construction level and adjust its position. To do this, in those places where it is necessary, you can put the slices of cardboard, wood or, say, laminate under the windowsill. After that, we throw all the cracks under it, and on top evenly distribute the cargo. As the latter, you can use anything, right up to conventional polyethylene bottles filled with water.
Films
Installing plastic windows completes the installation process. They are attached to the window frame with the help of metal screws, naturally, from the outside. As mentioned above, if a window is installed, overlooking the loggia, the windowsill is mounted instead of low tide.
A few words about slopes
It is worth noting that the installation of slopes is a single topic, and a satisfied serious conversation. However, so that you still have the concept of a further algorithm of your actions, briefly touch this topic. As for external slopes, only one option is acceptable here. They are placed, and then paint emulsion paint. With the inside, everything is somewhat different. They can also be placed, and then paint, make plasterboard or plastic. Each option has the right to exist, but it is worth noting that in lately Plastic sandwich panels are most popular specially manufactured for double-glazed windows. They are aesthetic, have the same texture as the window itself, hygienic, easy to install and carry additional load - contribute to thermal insulation. What, you see, it is important.
A private house
Quite often, many home masters have a question about how to install plastic windows in a wooden house. Yes, indeed, today the windows are decorated with facades not only high-rise buildings, but also almost most of the private houses. In principle, there are no special differences in montage, with the exception of some nuances. As you know, one-story buildings, and also wooden, are subject to shrinkage. Therefore, in order not in the process of operation, the double-glazed windows are not deformed, it is before installing the window opening in the window itself, conclude into a special framework. Sometimes some homeowners do not want to dismantle the window box, trying to try the double-glazed windows with all the truth and untrue. This is strongly not recommended both from the point of view of technology and aesthetics. More beautiful from this facade is unlikely to become, and it is hardly possible to achieve tightness, because all the cracks that are available in the old window box, as they were and remain. So, perhaps, such a sheepnik, well, it is not worth the release.
In the same way, the installation of the glass package does not differ from that produced in high-rise buildings. So, if you are in the plans to replace windows, it is not important, in the house, in the country, in the apartment, arm your knowledge and tools. Come on!