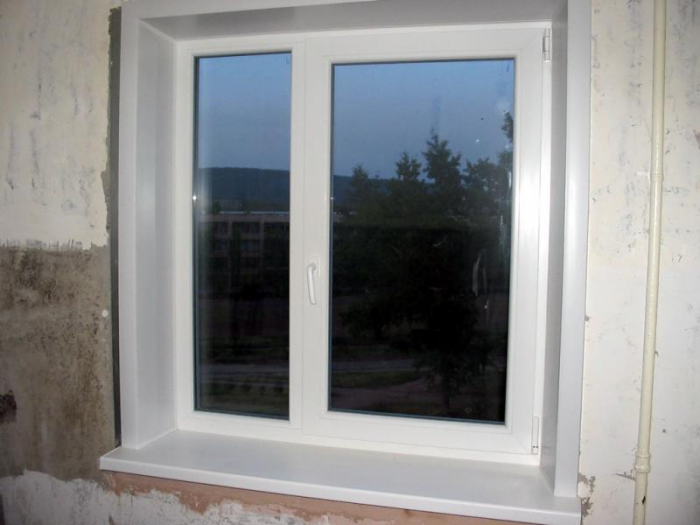
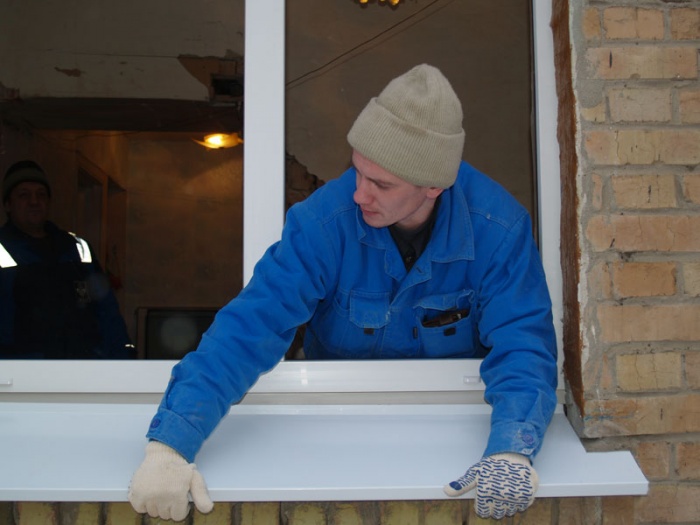
Any more or less thorough repair begins with the replacement of windows, since modern PVC systems have very good thermal insulation characteristics and allow us to significantly increase energy savings. Practice shows that it is not enough to choose an expensive complete set of a new window unit, well suited for a certain climatic zone. The main useful characteristics plastic windows can be lost if the installation is done incorrectly.
Installers of manufacturing firms (and even more so intermediaries) do not always have the necessary knowledge or deliberately neglect elementary construction requirements in order to save time and consumables, and ensure good performance. Doubtful pleasure costs us about 10% of the cost of the entire order.
Buy plastic windows from those who assemble translucent structures at their own facilities, and install them yourself! Do not worry about the warranty, especially since no one gives a one-piece window (read "assembly") for over 3 years, and even more so, installation does not.
What size window should I order?
The first priority is to create a measurement map. Make a simple drawing of the opening, frontal and sectional. Based on the results of the study, we will note several indicators on it:
- opening width,
- opening height,
- outer wall thickness,
- width and height of the LIGHT opening (between quarters),
- deviations of all planes from the vertical and horizontal.
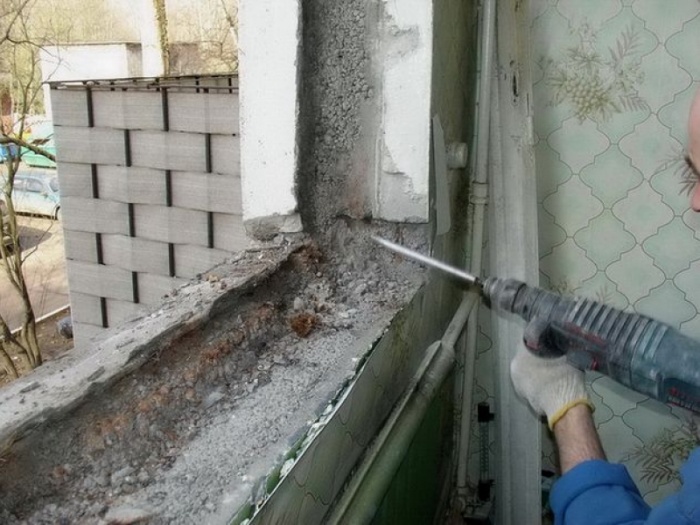
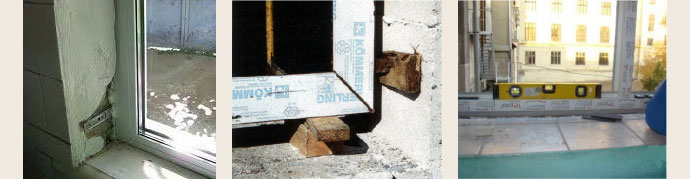
The main difficulty of this stage is that the load-bearing edges of the opening are closed by the slopes and the frame of the old window. Therefore, before measuring, we recommend knocking down the plaster from the slopes, at least partially. It is necessary to take measurements in several places (we write down all the indicators, select the smallest ones). We recommend that you measure each opening.
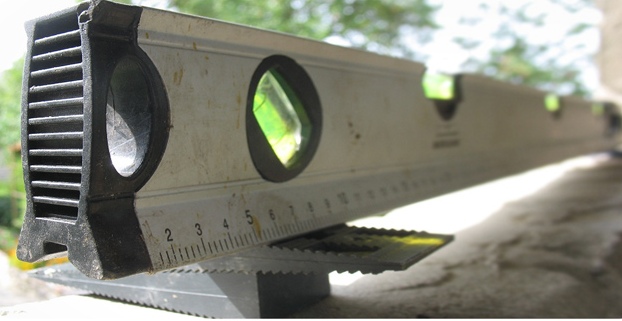
Now it is necessary to determine the level differences of the planes. The usual rack level is useless here - it is necessary to fix a plumb line along the window and measure the verticality of the slopes from the stretched thread with a tape measure (we write down the data on the "blockages" in the diagram). The horizon is checked with a water level - put marks directly on the frame of the old window and look for drops from them.
So, the dimensions are there, we are designing window block... Frame dimensions are primarily determined by a quarter:
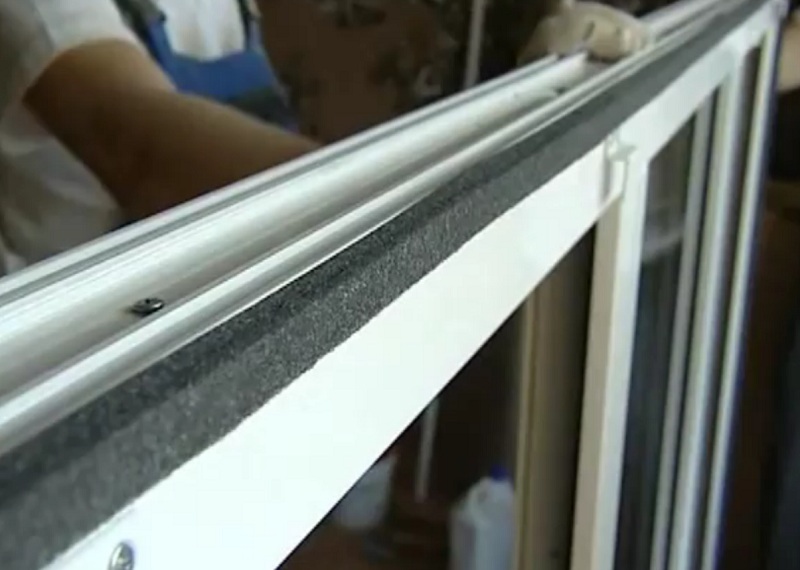
- on the sides and on top, the window profiles should be at least 20 mm overlapped by a quarter (in order to properly seal the front abutment);
- but at least 20mm profiles must remain visible from the outside (for attaching mosquito nets to plastic pockets).
Other possible restrictions are the distance between the ends of the frame and the wall. For products up to 1200 mm long on the right, left and top, a gap of at least 15 mm must be ensured. If we have a window side from 1200 to 2200 mm - at least 20 mm. Please note that the window height is indicated to the manufacturer together with the support profile, and a gap is also needed under it - about 10-15 mm. The maximum permissible width of the assembly seams is 50 mm, if there is too much distance between the quarter and the edge of the opening (this is often the case in Stalin-era houses), then it will be necessary to use expanders - special additional profiles that are screwed to the ends of the window to reduce the gaps.
The width of the ebb, sill and slopes depends on the thickness of the selected window profiles. The window sill should protrude from the wall by 30-50 mm, approximately the same overhang is made for the low tide. Please note that these elements of the window system are joined with the support profile, and it is about 2 cm narrower window profile, so one centimeter should be added to the dimensions. They will help you calculate the dimensions of the mosquito net at the time of ordering (it all depends on the actual light opening behind the sash and the type of frame fastening).
Plastic windows installation technology
Preparatory work
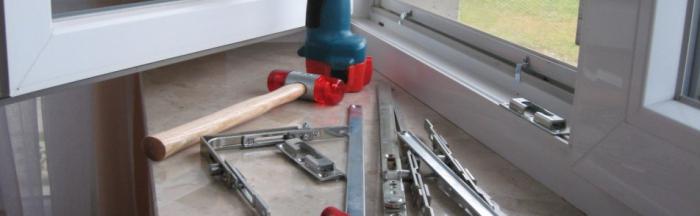
For installation plastic windows we need the following tools and supplies:
1. Perforator + drills (length 150-200 mm, diameter: 6 mm and 10-12 mm).
2. Drill or chuck for hammer drill + bits + drill for metal (diameter 10-12 mm).
3. A gun for polyurethane foam + foam (professional, about 1 can for 2 windows) + a spray for water.
4. Plumb line, hydro level, rack level 60-80 cm.
5. Roulette, pencil.
6. Shoe knife.
7. Rubber and steel hammer.
8. Stepladder.
9. Mounting plates, quick-assembly dowels 6X40, self-tapping screws for metal with a drill (length 40 mm, diameter 5 mm).
10. Spacer anchors or self-tapping screws for wood (the diameter of these fasteners is from 8 mm, the length is such that at least 40 mm goes into the wall).
11. Wooden wedges, polymer backing wedges.
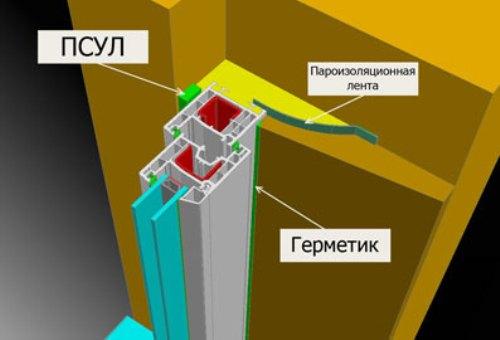
12. PSUL tape, vapor barrier tape or mastic.
13. A set of hexagons for adjusting fittings.
14. Dry cement mixture for repairing the opening and restoring the outer slope.
15. Wood saw (hand / saber / jigsaw) and pry bar - for dismantling.
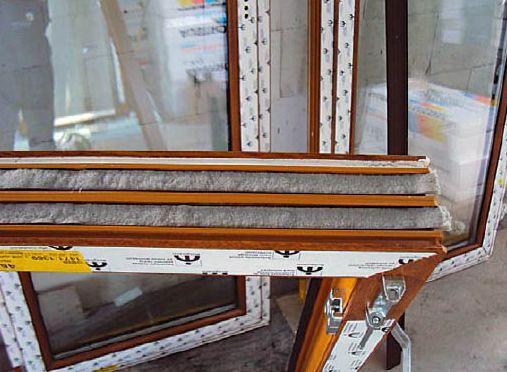
Having received the window, check the complete set, the conformity of its dimensions with those specified in the order, inspect it for damage. We prepare the window block depending on the chosen installation method.
Attention! Plastic windows must be secured in the opening through the body using expansion anchors (metal fasteners for solid bases, plastic plugs for foam blocks) or self-tapping screws (if the walls are made of wood). Mounting plates are used if the outer wall is multilayer and the frame falls on a fragile layer, such as insulation.
We remove the movable sash from the window. Pull the rod out of the upper loop, remove the canvas, and, lifting it, remove it from the lower loop.
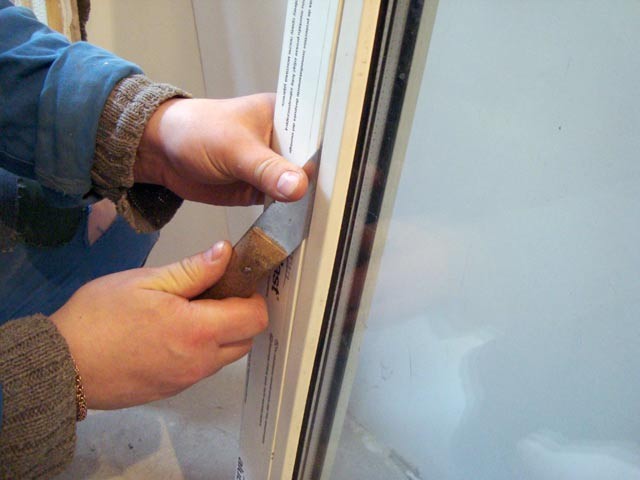
If we do not fasten with plates, then you will have to remove the double-glazed windows. Insert a sharp boot knife between the frame and the glazing bead (in the middle of the window) and apply gentle pressure. First of all, long glazing beads are snapped out, and then short ones. We recommend that you sign them: "what - where".
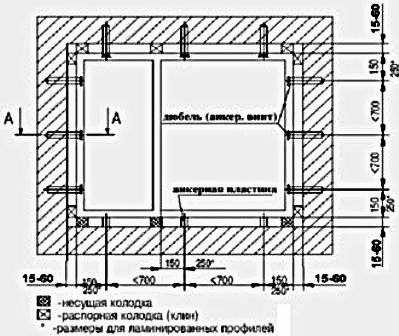
With a metal drill (in the rebates from the inside of the profiles), we make holes for the passage of the anchors. From inner corner boxes should retreat 150-180 mm and 120-150 mm in each direction from the impost (vertical bulkhead of the window). In most cases, it will be necessary to drill for intermediate fasteners, since the distance between fixation points for white windows should not exceed 700 mm, and for colored windows - 600 mm.
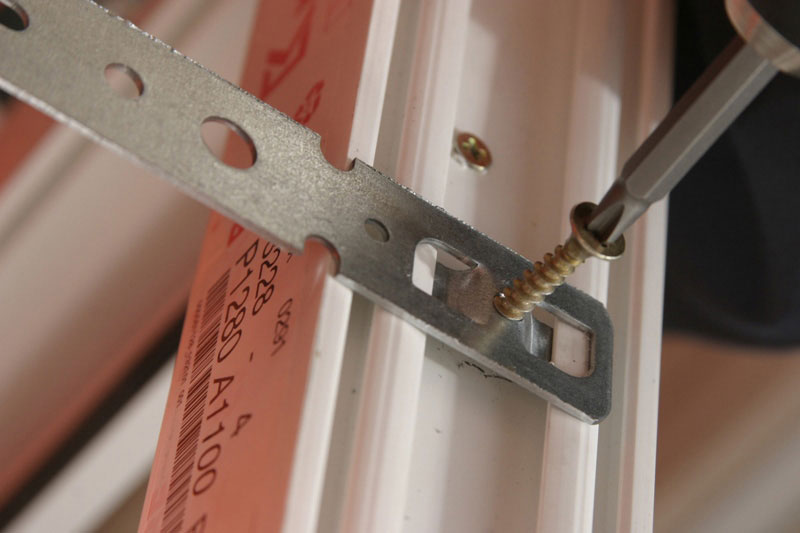
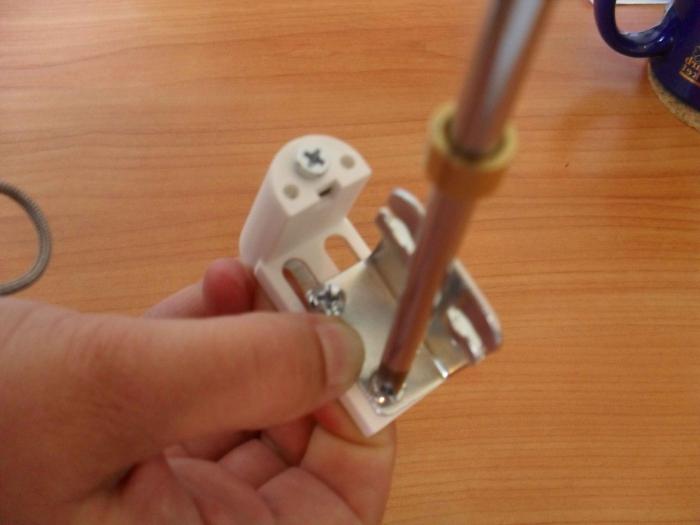
If the fastening is carried out with plates, then they are snapped at the end of the frame at the same intervals and screwed with galvanized self-tapping screws (the specification is in the list of materials).
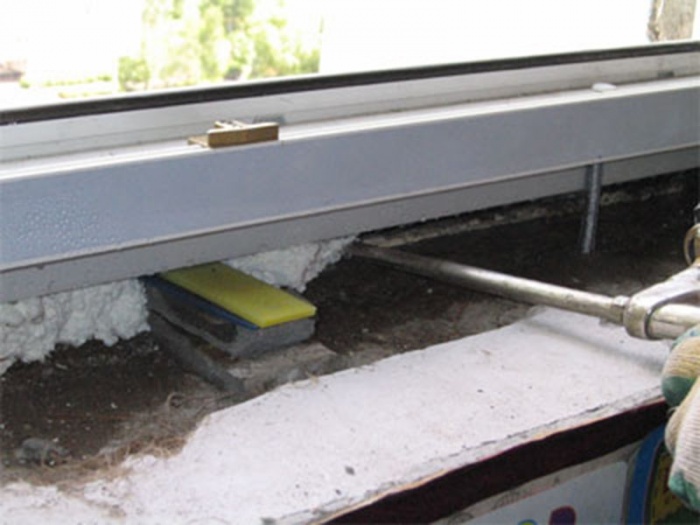
A support profile is fastened to the bottom of the window and fixed through the body with self-tapping screws. Expanders are also mounted. A PSUL (pre-compressed sealing tape) is laid between these products and the main window profiles. We also recommend foaming their cavities (use an extension cord for a gun, or drill several holes in hard-to-reach places), since, often, being single-chamber products, they worsen the thermal insulation properties of the window system.
While the window is not in place, screw the mosquito net pockets onto the outside of the frame.
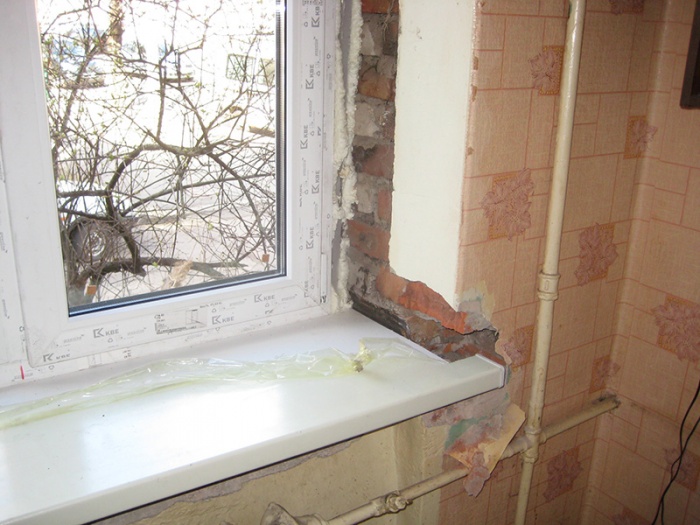
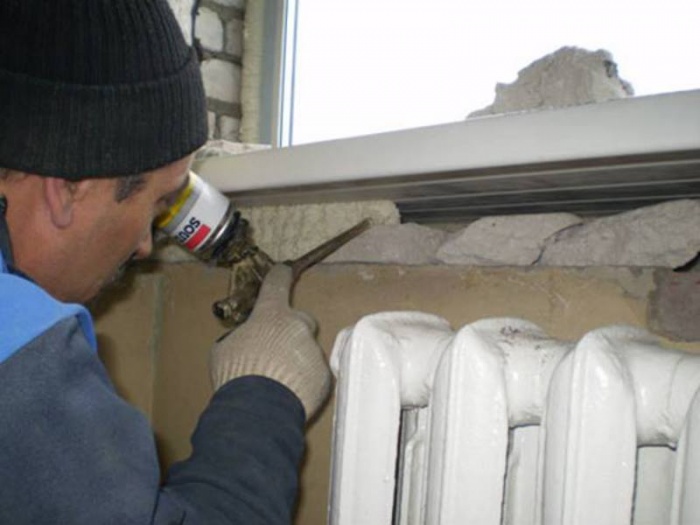
We carry out dismantling works. Everything is more or less simple here: we remove the sashes, knock down the slopes, remove the window sill, saw through the side frame of the frame, fold the box with a pry bar and pull it out. Next, you should completely clear the opening to load-bearing structures... It is very important to eliminate all through gaps before installing the window - use polyurethane foam. Inspect the plane of the quarter, if there are sinks more than a centimeter deep, seal them with a repair compound.
PSUL is glued along the plane of the quarter (some craftsmen attach it to the frame).
We expose the window to the design position
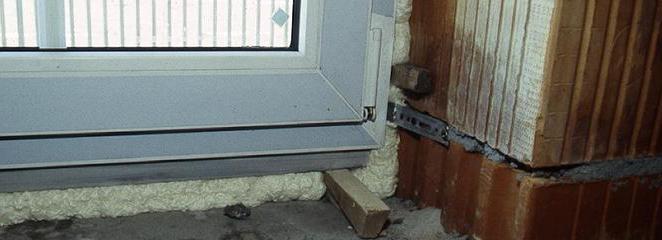
The window unit must be installed on polymer backing blocks that will transfer the load to the base. They are located at the corners of the frame and under the impost (if any).
Press the window to a quarter, the PSUL should shrink by about 25%. Using wooden wedges in the corner area, the window is temporarily fixed in the opening. Our task is to level it in all planes. You can qualitatively "catch" the vertical only with the help of a plumb line (lower it along the side racks of the frame and take measurements with a tape measure from the cord). Check the horizontalness of the upper and lower profiles by the marks obtained by the water level. The rack level is convenient only for preliminary setting.
According to all known GOSTs, the permissible deviation should not exceed 1.0 mm per meter, but no more than three millimeters along the entire length of the product. We recommend using a tape measure to compare the diagonals of the unfastened window - the difference should not exceed 7 mm.
Now holes for the anchors are drilled through the frame (they should be at least 10 mm deeper than the length of the fastener). We insert the anchors and slightly expand, check the levels again and tighten all the screws one by one. Be careful not to overtighten or bend the profiles.
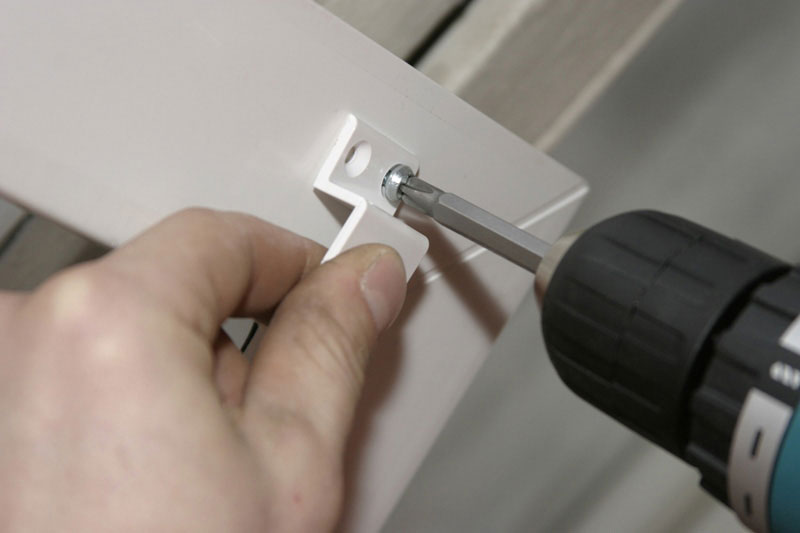
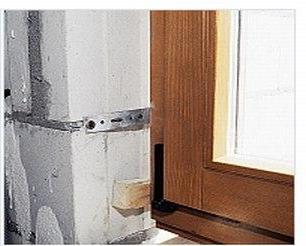
If plastic windows are installed on anchor strips, then the plates are slightly bent and drilled into the slopes. Each of them is attached with at least two dowels.
Cut the ebb to size, screw it to the installation profile.
Filling of construction joints
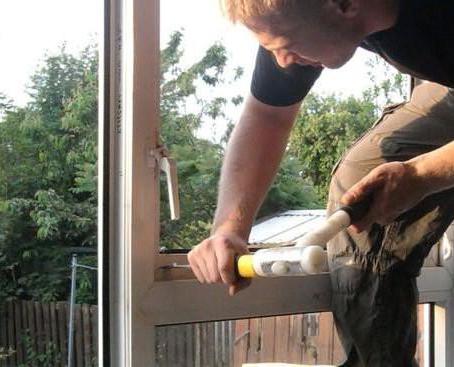
Beforehand, you should not install double-glazed windows (do not forget to place polymer gaskets). Collect the beads in the reverse order, snap them into place using a rubber mallet. We return the sash to its original position. It is worth checking its performance; if necessary, adjust the hinges using a suitable hexagon.
Remove all wedges except the bottom support wedges.
Spray the installation joints moderately.
Fill under the tide with foam and close the window.
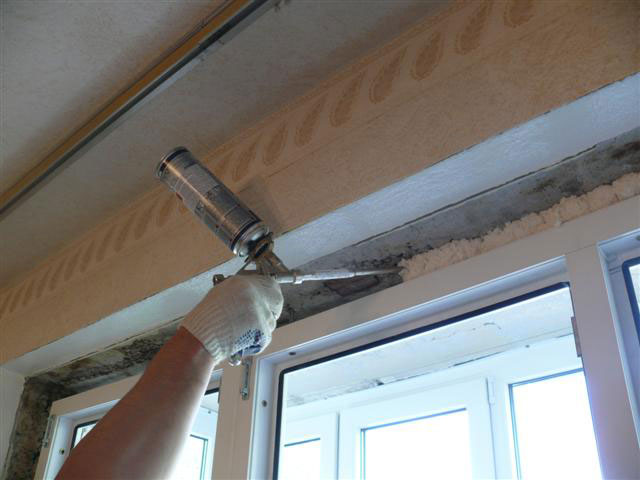
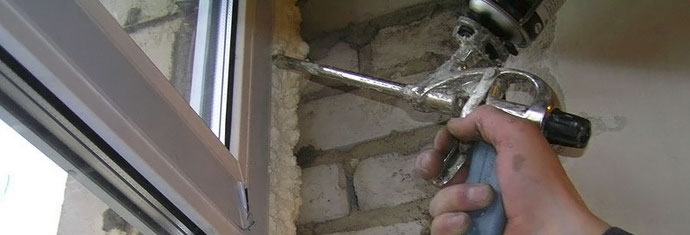
Gradually fill the gaps between the frame and the wall with foam, working from top to bottom on vertical joints. Don't try to foam the space in one go - take two passes. The foam will expand, but should not protrude much beyond the frame. Note that trimming is prohibited, as this will damage the dense top layer of foam and make it too vulnerable to moisture. Before starting work on a small area, check how much the foam you purchased expands. Do not use amateur foams, as it is very difficult to control material output without a gun.
Final operations
The next day after installing the window, you can start installing the slopes and the window sill. We also recommend installing these elements using polyurethane foam. Whatever materials these elements are made of, the filling of the installation seams of the PVC window should be protected from humidification by water vapor moving towards the street from inside the room. For this, the foam applied the day before is pasted over with strips of vapor barrier membranes or covered with special mastics.
Special compounds - “liquid plastic” or silicone (only in depth, as it can get dirty), are used to seal the junction of the window sill and slope panels to the window profiles.
We seal the outer slope with a cement compound (with a small amount of polymer additives), paint it only with "breathing" facade paints so that moisture from the seam can go out. The use of various cover strips can be considered a good option for finishing this unit.
Last but not least, do not leave any protective film on the frames (outside or in the room). If necessary, it is better to glue masking tape around the perimeter.
Plastic windows are increasingly being installed by owners of country houses, as they have many advantages over wooden products. They also differ in acceptable cost. But before installing, you need to carefully prepare for such work. To do everything yourself, you need to know the specifics of performing all operations.
All plastic products are supplied with parts for installation, so with proper preparation, you can install the window without outside help. It is worth performing all actions very carefully so as not to damage the structure. In order to secure the windows in the opening more accurately, it is worth working with an assistant. In some cases, before carrying out work, it is necessary to reinforce the opening.
Materials required for work
Before starting the installation, you need to prepare the following materials:
- wedges inserted for correct positioning of windows;
- polyurethane foam;
- sealant;
- hydro-vapor barrier material required to protect joints from moisture;
- anchor bolts.
Wedges are used during the installation process for a more accurate fit plastic profile... It is much more difficult to follow without these materials. Construction foam is an insulating material that fills the space between the wall and the frame. When choosing a foam, it must be borne in mind that it must correspond to the temperature at which the work will be performed. If you purchase a material intended for use in the summer, its use in the winter can lead to the creation of a poor quality insulation layer.
Also, during work, a self-expanding sealing tape will be required. This material glued along the perimeter of the window from the outside, after which it expands. Sealant is used to fill the space between the slopes and the window sill.
How to determine the correct position of a plastic window
Before carrying out installation work, it is important to correctly determine the position of the frame relative to the wall thickness. The plastic window should go inside from the street side by about a third. This rule is optional, but when shifting the window in any direction relative to the specified distance, it should be borne in mind that the length of the ebb and sills must correspond to the project.
It is important to consider the size of the radiator and its position. The window sill should not overlap it by more than ½ the width. If the radiator is completely shut off, this can negatively affect the room temperature in winter timeas well as on the state of the window. If installed incorrectly, plastic windows usually start to fog up.
The length of the window sill should be about 15 cm larger than the window opening. This allows you to process the edges of the window sill when finishing the slopes. The window sill comes with side caps, which should also be fixed after installing the window.
Methods for fixing plastic windows
The choice of a particular fixing method depends on parameters such as the size of the window opening and the material of the walls. This should be taken into account when choosing fasteners for plastic structures.
Fixation of plastic windows can be done in several ways:
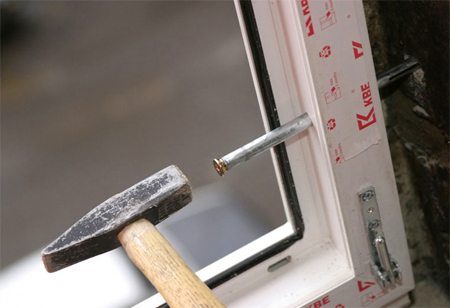
- With dowels or anchor bolts. They are fixed in holes pre-created in the wall.
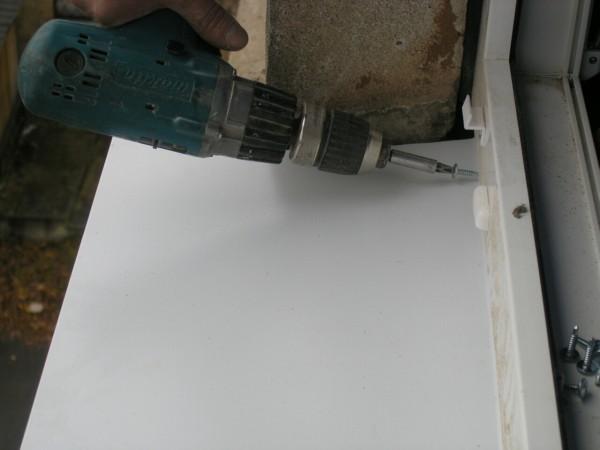
- Serrated plates that are located outside the window profile. They are installed on a spacer and secured with self-tapping screws.
The first described method is considered more reliable. That is why, with the help of dowels, fastening occurs plastic structureswhich are large. The fastener passing through the window unit is more reliable and able to withstand impacts.
If you decide to install a plastic window that is small, you can fix them using anchor plates. These fasteners can be hidden by slopes and finishing materials... But before carrying out the work, you should prepare small indentations for them. This will avoid problems with plane alignment.
It should be noted that when installing plastic windows, professionals combine the above methods. In this case, anchor bolts are used to secure the base of the profile and its vertical parts. The upper part is fixed with plates.
Basic rules for installing plastic windows
To properly install windows, you should follow a few basic rules:
- Installation of plastic double-glazed windows should be carried out using polyurethane foam. This material allows you to give the structure additional rigidity. It also acts as a retainer and heat insulator.
- To protect the space between the window and the wall, it is necessary to fix a waterproofing material on the outside, and a vapor barrier on the inside.
- You can install windows at any time of the year. Many professionals recommend carrying out work in the winter, as this will allow you to immediately see if mistakes have been made.
- Before purchasing foam, you must carefully study the features of the composition. Such materials differ in several ways. One of them is the solidification temperature. The instructions on the cylinder indicate the most favorable conditions for using the foam. If ignored, the material can begin to deteriorate during the operation of the structure.
- When foaming the gaps between plastic windows and walls, it is necessary to fill in small portions. This allows less foam to be consumed.
- If the opening is crumbling, it is necessary to clean the surface of old materials and make it stronger.
![]()
Observing the described rules, you can install windows with your own hands, without making mistakes that people who do not have experience of such work make. The technology of installing plastic windows in brick house simple enough, but it is important to carefully follow each action so as not to make a mistake.
How is the preparation of the opening
Before carrying out work on the installation of windows, it is necessary to thoroughly clean the opening from dirt and dust. It is important to remove all residues of paint and building materials. It is also important to compare the dimensions of the opening and the plastic frame before installation. If the gap is more than 4 cm, it is necessary to use more than foam. This is due to the fact that when using it, it will not be possible to create an even and high-quality seam. In addition, a lot of foam will go away.
Before installation, the sashes must be removed from the frame. To do this, simply pull the pin out of the hinges. If it is necessary to get the glass unit out of the frame, the glazing beads holding the glass are removed. Perform these steps very carefully so as not to scratch the glass.
After removing the sash and glass units, place them on a soft mat and lean against the wall so that they are in a stable position. Double-glazed windows do not fit flat, as this can lead to scratches on the glass surface.
After that, the protective film is removed and markings are applied to the places where the fasteners will be located. The distance between them should be about 40 cm. It is important to take into account that the indents from the corners should be more than 15 cm.
Installation process
After carrying out the described actions, insert into the window opening in brick wall spacers to create the necessary clearance. Frame alignment should be done using a building level. It is also important to control the side clearances.
In the openings of brick houses, it is necessary to mark the location of the anchors. After that, holes are created in the walls. If fastening is done with anchor plates, it is necessary to bend them so that they fit well on the wall.
The next step is to install the frame. It is important to check the horizontal and vertical structure of the structure before proceeding. How it will be finally fixed. After that, the bolts are finally tightened until the head protrudes no more than 1 mm above the surface.
After all the described work, the doors and double-glazed windows are installed, as well as the functionality of the entire structure is checked. If you installed the products with your own hands for the first time, you should carefully inspect the opening and make sure that no mistakes were made during the work.
Installation of slopes
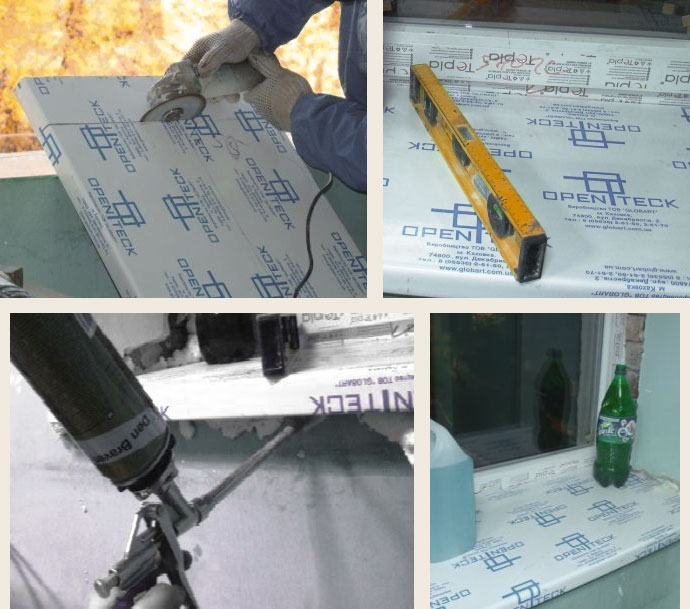
Before installation outer slopes it is necessary to measure the width and length of the opening. Cutting plastic slopes produced with a circular saw.
Important! It is necessary to fix the slopes only on clean and leveled surfaces.
At the first stage, the upper horizontal part is fixed. It must be drowned as deep as possible, and the space must be filled with polyurethane foam. It's worth remembering. That it should not be produced too much, since when the material hardens, it can change the shape of plastic products.
After this, the installation of vertical slopes takes place. During these works, it is important to check the verticality of the elements. The installation of the lower slope takes place in the same way. It is important to ensure that all elements are properly docked, and there are no gaps between them. The corners between the plastic slopes are closed with a special piece.
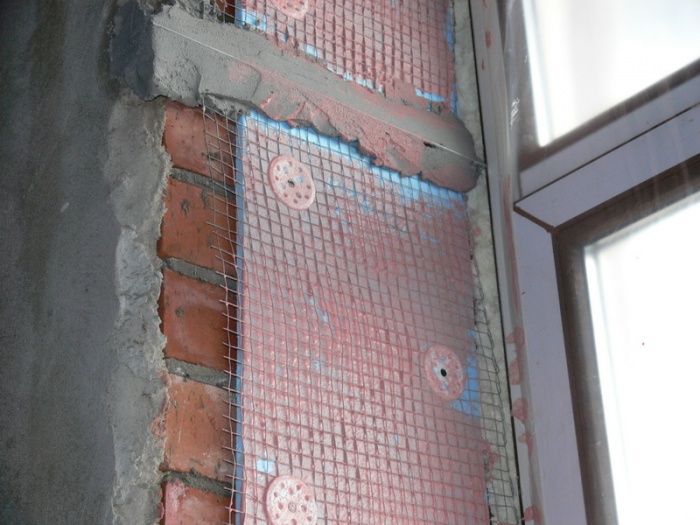
The installation of internal slopes should be done only after careful surface preparation. If the opening is crumbling, it is better to clean it up to the main wall and only then carry out further work. After that, the opening is leveled and filled with insulation. If necessary, the window opening is reinforced.
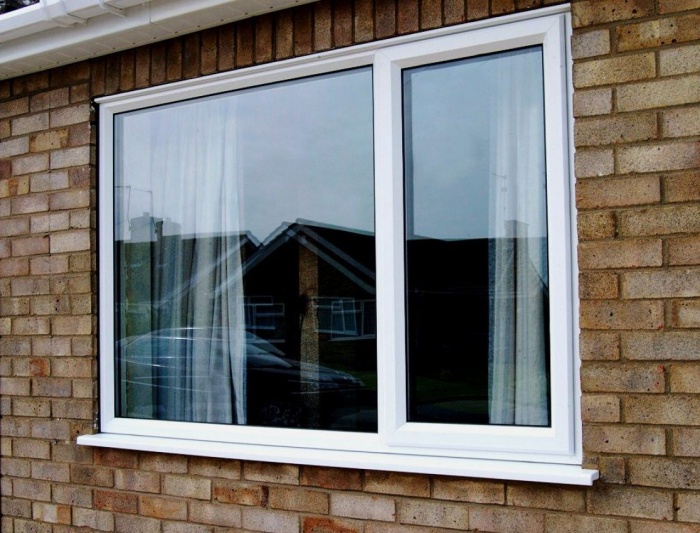
Plastic windows, despite the very unfair statements of some about their non-environmental friendliness, today beat all popularity records. Which, in principle, is not surprising. Is it possible to compare a beautiful, easy-to-use PVC window that protects from noise and cold with a crumbly old wooden analogue! Naturally, this pleasure cannot be called cheap, since you have to pay not only for the product itself. The installation of plastic windows (the price of such a procedure is usually from forty to sixty dollars) also has its own, separate cost. Imagine if you need to replace them throughout your apartment? It will turn out to be a pretty solid amount. But you can also try to save a little. How? Yes, elementary! Since it is not so difficult to install plastic windows, why not try to do it yourself? Provided, of course, that you can distinguish a nail from a screw and know how to handle a drill. And everything will certainly work out! Therefore, our review on the topic: "Do-it-yourself installation of plastic windows" is intended for economical and skillful owners. However, we also invite beginner home craftsmen to join. And together with us to study in detail such a procedure as installing a plastic window. The instructions offered in the review (quite detailed and understandable) will help you!
Small digression
Before talking about how to install plastic windows, it is advisable to talk a little more about the product itself. The fact is that you will have to order it from the manufacturer. Or call the measurers at home, or take measurements yourself and go to the company. And if in the first case everything is much simpler, since you can get competent advice right at home from a arrived specialist, then in the second you still need to have at least rudimentary knowledge of what PVC windows are. Because, having made the wrong choice, you simply throw money down the pipe, because you will remain dissatisfied with the purchased products, which is fraught (in the worst case scenario) with the repeated replacement of windows. And then there can be no talk of any savings. Even installing plastic windows with your own hands is unlikely to help patch up the gap in the budget.
Window types
Having made the decision to replace windows in a house or apartment, you need to clearly define what you want to get at the exit. The fact is that these products are very diverse. Starting from the simplest and ending, so to speak, "heaped up". And depending on this, their cost also varies. So, PVC windows can be single-leaf, two-, three-, and even four-leafed. It all depends on the width of the opening. In addition, they are subdivided according to the method of opening. A plastic window (even popularly often referred to simply as a double-glazed window) can be generally deaf, open like a regular window (inside the room) or like a transom (recline). Today, the last two options are most often combined, which is extremely convenient. You also need to decide for yourself how many cameras in the window are preferable for you. The more of them, the naturally higher the cost of the product, at the same time, however, the same warmer and calmer in the apartment. Therefore, if the room is warm, and even overlooks a quiet courtyard, then it is quite possible to do with a double-glazed window. And since you decided to install plastic windows yourself, the cost of repairs will be noticeably less. This is all very important. Therefore, such nuances must certainly be taken into account when ordering PVC windows. Now let's move from words to deeds.
Removing dimensions
It's pretty simple. The only thing to consider is that measurements must be taken from the outside. Why open the sashes of the old window, and then measure the width of the opening and its height (from the upper lintel to the ebb). Then we add two or even three centimeters to the obtained parameters on each side. This will be our original size. All. You can go to the company or call its representative at home. The latter is not always desirable, because quite often, when drawing up a contract, the measurers do not inform the client how much it costs to install plastic windows, but immediately put down the total amount in it, including the cost of the product and its installation. And since you are going to carry out this process yourself, this option is not for you. Therefore, either you need to immediately negotiate these points with the manufacturer, or order double-glazed windows directly from the company.
Components
Since it was decided to install plastic windows on our own, you need to take care of ordering or buying components on the construction market (which will be cheaper). You will need to purchase (based on one double-glazed window) a window sill, two plugs for it, an ebb, a special starting, designed specifically for a double-glazed window, a profile (in the amount of three pieces), a support profile. If you plan to put a window in a room that has access to a loggia, then an ebb tide will not be needed, but you will need to purchase two window sills and four plugs. In addition, you will also have to make slopes, so you need to attend to the purchase of special plastic panels... All basic components must be purchased based on the original width of the inner opening, ebb and sill.
Materials
You will need to purchase some construction Materials... This is polyurethane foam (we count as follows: we buy three cylinders for a two-leaf window, four for a three-leaf window), a bag of plaster (you can take domestic, "Lux", weighing fifteen kg), several sheets of foam plastic five centimeters wide, a tube liquid plastic, one liter of water-based paint, as well as special tapes for hydro and vapor barrier. You will also need to buy slats that will come in handy when installing slopes (in the amount of three pieces).
In addition, you need to purchase and fasteners. These are anchor plates (take five pieces), dowels forty and sixty millimeters long, self-tapping screws (both for wood and metal).
Tools
It is quite clear that the installation of a plastic window is impossible without the availability of appropriate tools. Therefore, we conduct an audit in our closet (what is missing, then we buy it) and stock up:
- screwdriver;
- level;
- a gun for polyurethane foam;
- puncher;
- a silicone gun;
- a set of hexagons;
- jigsaw;
- clerical knife;
- pencil;
- tape measure.
Sequence of work
The installation of a double-glazed window includes quite a few stages, the main of which are:
Dismantling
Since the technology for installing plastic windows provides for a free opening, the first step is to get rid of the old window. For what we first remove all the removable sashes, and take out the glass from the deaf ones. Now you need to remove the frame. Here, especially when it comes to old windows, you have to sweat. Because, although the doors themselves have long dried up and acquired, to put it mildly, not quite presentable, the frame, as a rule (and oddly enough), was made of excellent wood, which, even after many years, is too tough for even the sharpest saw ... Therefore, for dismantling, it is best to use a grinder, and put a circle on it for metal. We make deep cuts in the frame in several places and from all sides, after which we carefully remove it piece by piece with some improvised tool (say, a crowbar). Then we get rid of the old window sill in the same way. We clean up after ourselves, cleaning the opening from all kinds of debris (of which there will be oh so much) and dust.
We prepare a double-glazed window
Everything is simple here, you just need to check if the doors are closed well. This is extremely important, since if they are slightly opened, then subsequently, after foaming the openings, the mounting foam can cause deformation of the profile. So remember: at the end of the process, the glass unit must be tightly closed for at least twelve hours. As for the protective film on the profile, it is recommended not to remove it, so as not to scratch the plastic during installation.
GOST
As with any construction process, in this case all the requirements of this strict standard must also be followed. Installation of plastic windows in accordance with GOST should be done not only by professionals, but also by home craftsmen. That will provide a long life to the new window and guarantee that it fulfills its intended purpose - protection from noise and cold.
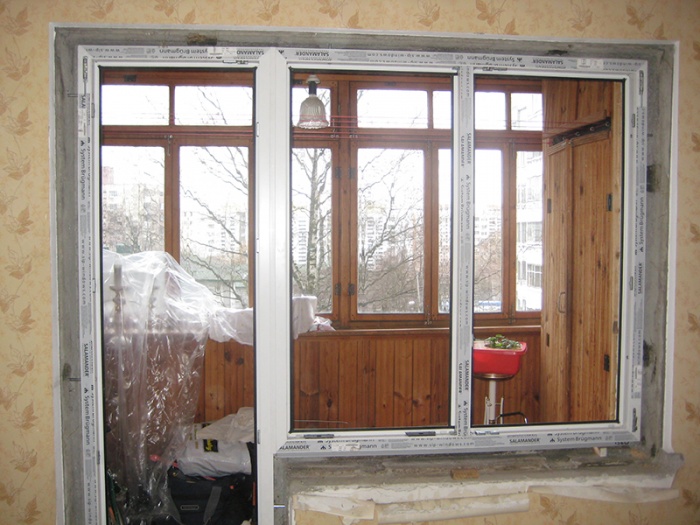
In principle, of course, it does not matter at what distance from the top or bottom of the window opening you will attach the same anchor plates. An error in a centimeter or two will not play a special role. Another thing is important. Installation of plastic windows in accordance with GOST requires strict adherence to the two most important rules: installation must be carried out using specially made tapes for this - steam and waterproofing. They need to paste over the new frame around the entire perimeter. Moreover, the first tape is glued from the outside, and the second from the inside. By the way, many professional installers are not particularly puzzled by this, which is why then there are multiple complaints from customers: the windows fog up from the inside, mold appears on the glass, etc. In other words, such plastic windows are unlikely to please their owners. Installing (reviews of angry customers on numerous forums is a vivid confirmation of this) of a double-glazed window in this way can lead to dampness in the room, to the point that the corners and the ceiling will turn black in the room. And therefore, not being like careless craftsmen, the first thing we do is cover the frame with purchased tapes ahead of time.
Markup
Immediately you need to make a reservation. Installing plastic windows alone is a laborious and thankless task. Therefore, you must definitely get an assistant, at least at the initial stages of installation. The glass unit is heavy enough, putting it under the level, and even just lifting it to place it in the opening is not so easy. Well, we will assume that we have an assistant, and therefore we will continue. Important! The glass unit must never be installed directly on concrete. Therefore, you need to place small blocks from below, on which you can then mount the window.
First of all, we apply markings to the window frame. Fasteners must be placed seventy centimeters apart. It is possible and somewhat less often, but it is not recommended to exceed the indicator of one meter. As for the corner fasteners, they must be placed at a distance of five to fifteen centimeters from the corner of the window frame. So, the marking is done, we attach the anchor plates with self-tapping screws for metal. We insert a double-glazed window into the opening, mark the attachment point, take out the window, and hollow out recesses for anchors in brick or concrete. In principle, if you plan to install plastic slopes on the windows, then you can mount the plates on top, as the plastic will mask them. If the slope is made of plaster, then it is still advisable to make these gaps. Then you simply will not need to apply extra layers of the solution in order to hide them.
Installation
When all the work has been completed, we return the glass unit to the opening and set it in accordance with the level indicators. This is where the lower block blocks come in handy, with which you can adjust the position of the window (that is, some of them can be thicker, some are thinner). Once you are convinced that the window is really level, you can fasten the anchor plates to the opening with self-tapping screws on concrete. Now you need to adjust the glass unit fittings. Everything is simple here. It is necessary to check that the flaps open freely, close tightly, hold the given position well, and do not cling to anything. The existing shortcomings need to be corrected by tightening the self-tapping screws directly on the hardware itself. Can be foamed. If, nevertheless, something was wrong in the measurements, and the gaps between the opening and the glass unit itself turned out to be quite wide, you can partially fill them with polystyrene, and only then with mounting foam. In principle, you don't have to bother, since the purpose of this process is the same - to save a can of rather expensive foam.
Window sill
Now let's move on to a procedure like installation of window sills plastic windows. Since they are usually standard, you need to take a grinder or a jigsaw, and then cut off the extra centimeters. The window sill is mounted in a special installation profile at the bottom of the window frame. Then you need to take building level and adjust its position. To do this, in those places where it is needed, you can put pieces of cardboard, wood, or, say, laminate under the windowsill. Then we foam all the cracks under it, and from above we evenly distribute the load. As the latter, you can use anything, up to ordinary plastic bottles filled with water.
Low tide
Installation of ebbs on plastic windows completes the installation process. They are attached to the window frame using self-tapping screws for metal, of course, from the outside. As mentioned above, if a window is installed overlooking the loggia, then instead of an ebb tide, a window sill is mounted.
A few words about slopes
It is worth noting that the installation of slopes is a topic for a separate, and quite serious conversation. However, so that you still have an idea of \u200b\u200bthe further algorithm of your actions, we will briefly touch on this topic. As for the outer slopes, only one option is acceptable. They are plastered and then painted with emulsion paint. With the internal ones, everything is somewhat different. They can also be plastered and then painted, made of drywall or plastic. Each option has the right to exist, but it is worth noting that in recent times the most popular are plastic sandwich panels specially made for insulating glass units. They are aesthetic, have the same texture as the window itself, are hygienic, easy to install and carry an additional load - they contribute to thermal insulation. Which, you see, is important.
Private house
Quite often, many home craftsmen have a question about as install plastic windows in a wooden house. Yes, indeed, today double-glazed windows decorate the facades of not only high-rise buildings, but also almost most of private houses. In principle, there are no special differences in installation, with the exception of some nuances. As you know, one-story buildings, and even wooden ones, are subject to shrinkage. Therefore, so that the glass unit does not deform during operation, it is enclosed in a special frame before being installed in the window opening itself. Sometimes some homeowners do not want to dismantle the window frame, trying by hook or by crook to push the glass unit into it. Doing this is strongly discouraged, both in terms of technology and aesthetics. The facade is unlikely to become more beautiful from this, and it is unlikely that it will be possible to achieve tightness, because all the cracks in the old window box, as they were, will remain. So, perhaps, such a game is by no means worth the candle.
In all other respects, the installation of a double-glazed unit is no different from that produced in high-rise buildings. So, if you plan to replace windows, it doesn't matter, in the house, in the country, in the apartment, arm yourself with knowledge and tools. Come in handy!
Do-it-yourself installation of plastic windows is not as difficult as it seems at first glance. However, in order to properly install a plastic window, you need to know some things that you cannot do without. We bring to your attention instructions for self-installation of plastic windows.
Do-it-yourself technology and procedure for installing plastic windows
Sequence for installing a plastic window:
- Dismantling of old windows (if replacement is in progress).
- Preparation of a new plastic window.
- Installation and alignment of the support profile for the future window.
- Fastening fasteners to the window frame.
- Creation of recesses in the wall at the points of fastening of fasteners.
- Inserting and placing a plastic window horizontally and vertically.
- Fixing the window in the opening using fasteners in the places of the holes for them.
- Foaming (filling with polyurethane foam) of the gaps between the plastic window and the window opening.
- Installation and alignment of the window sill.
- Installation of slopes.
- Adjustment of window fittings.
- Installation of an ebb from the outside of the window.
The last point can be performed at the end of all work if you are building private house, cottage. If you live in an apartment, then the ebb installation must be done after inserting windows without double-glazed windows. To do this, before installing the window, the glazing beads are removed (a screwdriver is slipped between the glazing bead and the rubber gasket, and knocks the glazing out of the groove with light blows), and then the double-glazed windows are removed. Thus, it is easy to align and install the ebb through the window.
Before installing the window, a support profile is mounted. It's as easy as shelling pears: lay the profile in the right place, level it horizontally and foame it. But before foaming, it is better to put a window on the profile and see if it fits into the remaining space normally. If there is too much free space at the top, then something should be placed under the profile.
It is better to insert the support profile directly into the bottom groove of the window. If a profile is not provided in the configuration, then under the window you need to put blocks at the height of the window sill in order to fix the window sill under the lower groove of the window.
When the installation of the support profile is completed, we install the windows. It is recommended not to remove the protective tape until the completion of absolutely all work.
Advice: to increase the thermal insulation properties of the window, the space in the support profile can be foamed using an extension nozzle on a nail gun.
First, you need to attach fasteners to the window on which it will hold. It is best to use flat anchor plates. They should be located perpendicular to the plane of the window at a distance of 10-20 cm from the corners of the frame on each side. Fastening to the window is made with a self-tapping screw for metal about 10 cm long (1 self-tapping screw is screwed into the dowel at the end of the anchor plate into the frame from the outside, the second at the other end of the plate into the wall and also into the dowel).
If you insert a plastic window without insulating glass (with empty frames), then the fastening screws are screwed into the wall from the inside of the frame using dowels, but not completely, so as not to damage the frame structure. For the dowel, you first need to drill a hole.

When the anchors are fixed in the window, insert it into the window opening and align it. After that, in the future places where the anchor fasteners are attached to the wall, we punch out recesses under the entire fastener plate, so that later we will cover the entire fastening with mortar and level the wall to install the slopes. After fixing the plastic window in the opening, check its vertical and horizontal again. Therefore, you should not immediately screw the screws into the opening completely.
It is better to do the leveling work together, so that one person holds the window, and the second puts the bars for leveling.
We proceed to filling the space between the window opening and the plastic window with mounting foam. The main thing is that the foaming is one hundred percent. If the space between the window and the opening is more than 2 cm, then it can be foamed in 2 stages with an interval of 2 hours.
Important! Always wet the surface with water before foaming. (using pshikalki, for example). Only in this way will the foam grasp as much as possible with the structure of the walls.
If you install the window at temperatures below 5 degrees, then use all-season or winter polyurethane foam. If the temperature is over 5 degrees, any foam will do.
The foam should dry for at least half a day. After that, it must be closed from the harmful effects of the sun's rays. This is done either with ordinary mortar, tile adhesive, or a protective impermeable film.
Diy window sill installation for plastic windows
Installation of a window sill requires preliminary trimming of excess length, since it comes with a margin of size. A jigsaw or a grinder is perfect for these purposes. Then you should move the window sill to the support profile (if any) and align. If after alignment there is a large gap between the window sill and the opening, then it is better to seal it with a solution, having previously removed the window sill. If everything is fine, then a simple foaming is enough
Do not forget to put plugs on the windowsill. It is advisable to cut the window sill so that it fits into the opening clearly together with the plugs. The plugs are best glued to the windowsill with super glue.
After leveling the window sill, it must be checked for subsidence by pressing with your hand in several places. If everything is fine, then you can start foaming, having previously pressed down the window sill with heavy objects (for example, several bottles of water) in order to avoid bulging up from the polyurethane foam. The next day, excess foam under the windowsill can be removed with an ordinary knife.
By the way, you can install a window sill with a very small slope from the window (literally 2-3 degrees) so that possible condensation does not seep between the window and the window sill.
Do-it-yourself installation of slopes on plastic windows
Before installing the slopes, you need to remove the excess foam around the frame perimeter with a knife (this should be done very carefully so as not to damage the window material). To install the slopes, PVC panels are taken and cut to the required length (two - to the height of the opening, the third - to the width of the opening). After vertical alignment, the fastening is made on polyurethane foam.
And so that the foam does not push the panels away from the wall, they must be glued to the walls with masking tape (preferably in three places).

After the foam has set, the final framing must be made at the ends of the panels. For this, there is an F-shaped profile (thanks to this design, it is inserted between the wall and the strip).
DIY installation of ebb windows on plastic windows
The ebb tide is mounted very simply: first, it is inserted into the groove under the window, and then it is leveled, pressed, fastened with self-tapping screws to the support profile and foamed.


