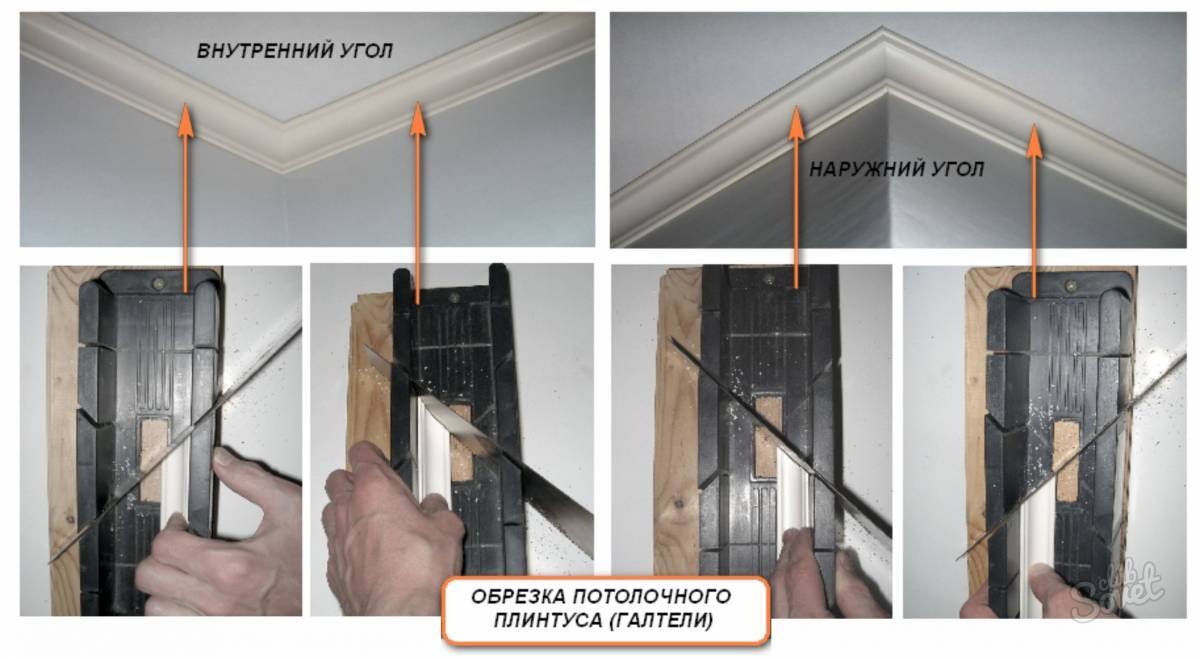
Internal corner - concave part of the wall at an angle of 90 degrees.
Outdoor - Convex part of the wall at an angle of 90 degrees.
- Internal corner
For the inner angles, the cut is made from top to bottom: the upper part is cut off at the angle of 45 degrees relative to the bottom of the cartel.
What makes the plinth?
To draw an oval or ellipse, you will need to put two pins, one for each ellipse tricks, a piece of string, long enough to give you the desired ellipse and pencil. No matter what design you mean, always paint it on the surface before starting the remedy of plaster.
Tip: Take a string at hand. Plaster columns and pillars are not structural products, they are decorative products designed to provide visually obsessive structural necessity, such as a concrete, brick or steel rack necessary to stop the building. For this reason, plaster columns or pillars and all the parts associated with them, such as plinths or capitals, are supplied in two equal halves, which go together, like two halves of the Easter egg, and glue with glue.
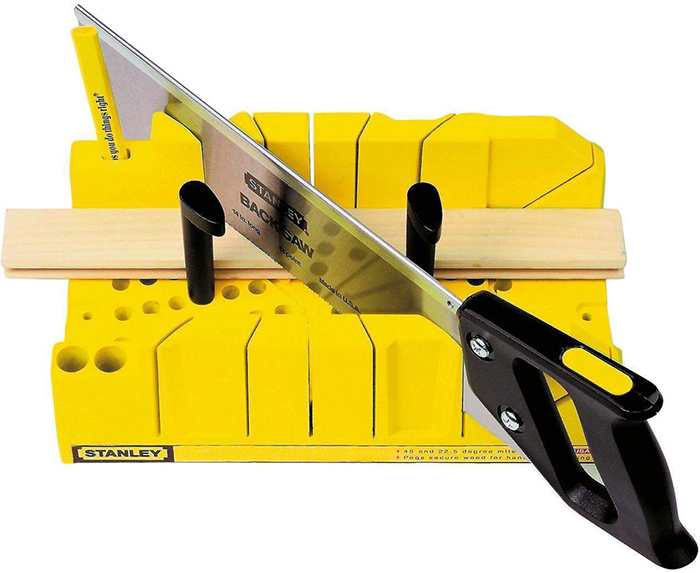
If you compare the stouch with the dial from the clock, and the metal with an arrow with an arrow from the clock, then when setting the one cartoons in the stood on the right side, the metal knife is directed at an angle of 45 degrees to the area of \u200b\u200bfourteen hours.
And vice versa, when establishing another cartoons in a stubborn on the left side, the metal knife is directed at an angle of 45 degrees to the area of \u200b\u200bten o'clock.
Facing plasters are made in such a way that they can be cut to length without losing the pattern, and they have an inner diameter of 18 inches, which is usually large enough to cover most structural columns. We supply plinths and tables for compliance.
First, put the base around the base of the rack that you want to hide, and glue together using our glue. Wipe the excess glue with the tip of the finger. Plinth can be fixed or scunned to the floor. Any screw holes can be easily hidden with a small adhesive filler.
- Outdoor
For external corners, the cut is made from below: the lower part is cut off at an angle of 45 degrees relative to the top of the quilt.
When installing one carter in the stood on the right side, the knife is heading at an angle of 45 degrees to the area of \u200b\u200bten o'clock. When installing another quilt in the left side, the knife is heading at an angle of 45 degrees to the area of \u200b\u200bfourteen hours.
The column is placed inside a small excavation made for this purpose on the top of the base. Measure from the landing edge of the recess to the ceiling. If you use capital, measure the depth of the capital from the column of the lip seating to the top of the capital, where it meets the ceiling. Remove the depth of the capital from the height of the ceiling from the landing lip in the basement and cut the half of the columns on this length.
Place the column half into the landing lip mounted in the basement, first apply sufficient adhesive into the planting edge, so some of them are squeezed out of the connection when you press the half column. Make sure that the full surface of the post is addressed to the room, so the final connection between the two half will be down the least visible parties, and not in sight.
- Internal corner
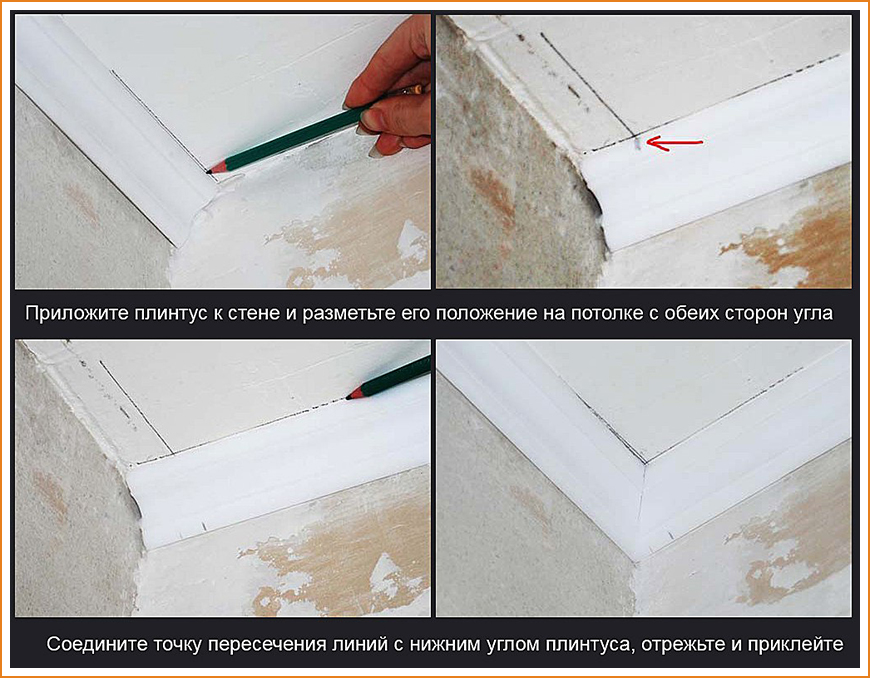
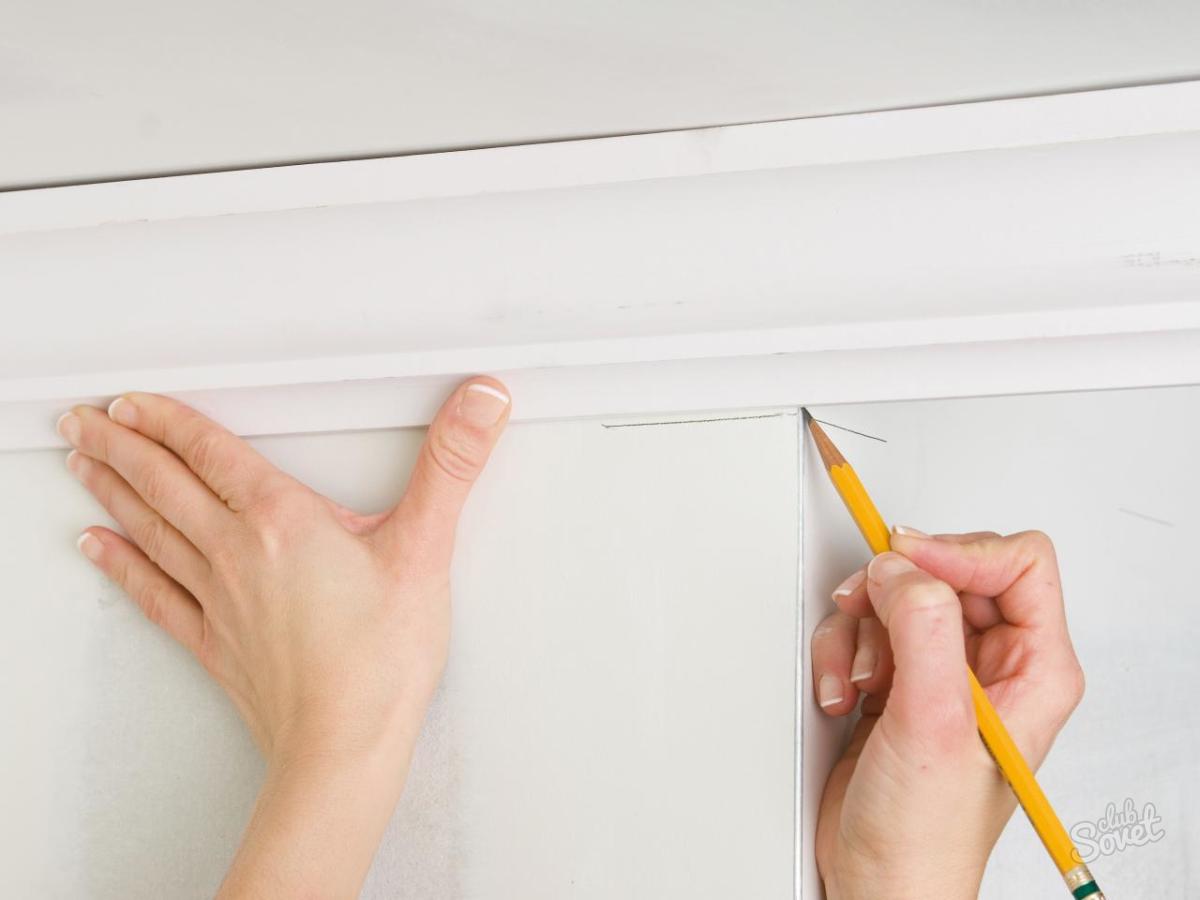
Sides of the cartoons applied to inner corner Walls must be perpendicular to smooth. On the wall, in the area of \u200b\u200bsticking the cartoons is made by a pencil markup. For this, the hall is taken and is applied to the inner corner of the wall at the same time in contact with the ceiling and part of the wall surface of the wall connecting with the inner angle.
Wipe the excess glue with your finger using any surplus to fill all the gaps that you see. It should be sheer, but sometimes it is not, so do not hope for it. Leave the first half in place for half an hour or so to give glue to install. Support it with the help of support, if you do not feel confident enough to get away from him without any support.
After the first half will be correctly installed, apply a small amount of glue to its rear edge and in the boarding lobe of the base and place the second half into place. Press the two halves together so that the glue squeezes from the connection. Pressing them together, make sure you hold both halves, or you will knock on the first half.
The pencil draws the line on the upper edge of the cartel on the ceiling (from the angle of the wall) with a length of approximately 30 centimeters. Another hallver is taken. It is applied to the inner corner from the other wall, simultaneously in contact with the ceiling. At the top edge, the applied carton is drawn smooth straight line (from the angle of the wall), about 30 centimeters long.
Tie two halves tightly along with some string and go and make yourself a cup of tea to give the glue time to install. When you finish your tea, you will be ready for the capital. First, make sure that the halves of the capitals will fit tightly to the top of the column without spaces between the ceiling and top capital Cities. If it is too dense, cut the plaster on top of the column. If it is too loose, apply additional glue to the seat for the seat or on the top of the capital to take a gap.
Be sure to apply glue by contact. Make sure that the plinth seams, the columns and the table are located along the same line on the least visible sides of the entire assembly. At the same time, place both tables at the top of the column. If you need help, ask a friend to hold half on site until you find the second half. Press both halves tightly together so that the glue squeezes from all connections. Tie two halves with a lot of strings, wipe the excess glue with your finger, and Ey Presto you built your first column and hid this terribly unsightly steel or concrete rack, which just keeps your building.
The first peller is applied to the corner from the wall of which there was a markup from it. And in the area of \u200b\u200bcontact, the cartel with the specified point of intersection, the pencil on the upper side of the kart make a mark. We do the same with another alert, on the upper side of which we put the same mark with the pencil.
They are commonly used to decorate the ends of the beam or something similar to the beam through your ceiling. Usually a thing that looks like a beam, but is not t, in fact it is a box, usually consisting of plaster or drywall, which was built around a jumper or steel beam, which provides support for floor overlaps or ceiling above.
Corblers can also be used to provide decorative functions over doors, random shelves for jewelry or vases around the room or to decorate the fireplace. The fastening of them is easy until you forget to support them until the stickers are pasted. They can be quite severe because they are usually made of solid pieces of plaster. Effectively, they are intended to simulate stone or brick brackets used to provide additional support for beams, but, of course, plasters are not supporting structures.
We apply to the cartel ruler in such a way that one part of it comes into contact with the point marked on the upper side of the cartel, and the other in contact with the alarm of the bottom of the cartel. Holding in this position a ruler and pickle make a cut with a hacksaw, leading it towards the line. The same procedure is done with another alert.
Coloring - Final Installation Stage
To fit into the bracket, first measure its depth. Bring two pins 40 mm or 50 mm into the wall in an exact point where the base of the bracket reaches the wall, leaving them protruding about 1 from the wall. Apply the liberal layer of glue on the back and the upper part of the Corbal, where he meets the wall and ceiling, and press it on it so that extra glue squeezed, leaving the base on the pins. Slide another pin to the ceiling close to the front of the bracket, wipe the excess glue with your finger, then leave it for an hour or so to give glue.
- INnEMPORT
Marking is made according to the same principle. With the help of two cartoons, there are marked two lines on the ceiling. The intersection point of these perpendicular lines is formed. Applying the cartel to the outer corner from the same side of the angle walls, in the place of contact of the point of intersection with the upper sides, the cartel marks are made.
Production material and required amounts of baguettes
Other decorative elements are applied in the same way as above. Always mark the wall where you want your function before starting. Always maintain plaster until the stickers are pasted. Always follow the compliance with the rule of symmetry. The eye can get the slightest error. Always contact your help if you really do not know what you are doing.
How to install foam plinths
If you start - carefully read everything that is written above before starting. Golden rule for you to help you in life. "This is a bold, which spends most of his time, making everything right." Repair of painting and decorating your decorative plaster.
At the same time, at the site of contacting the lower sides of the cartoons with the outer angle of the wall, on the lower sides of the cartoons are made with a pencil mark. Using a ruler, marks on the top and bottom sides, the cartel are connected. Holding the line and the hallor in such a position is made with a cutting, leading it along the line. The same is done with another alert.
What to take into account when buying
The advantage of the fact that natural plaster has almost any material, is that it can be cut, cut, drilled, saw, penetrate nails and draw without any special processing or consideration than you naturally could give any construction material .
If it is damaged in any way, it can be repaired infinitely. For plaster, even a new plaster, normally have hair cracks, chips or other small defects. All this can be easily renovated or done well. In most cases, a thin smear of glue or filler disappears almost with any defect in seconds. Even if it is very cracked or broken, it is still easy to restore or do well. Always remember, decorative plaster is not structurally significant, it's just a decoration.

Installation marking for the ceiling quilt can be made in several ways:
- Using level
- Using a marking cord, colored shallow or blue
Experienced masters make marking on the walls when installing wide quantities. To exclude various types of slopes and appearance of gaps. Either when installing cartoons from plaster stucco, which has a large mass.
Use of liquid nails
This is not the way if it was a fractured jumper, split or crashed wall. Quite often, any stains on her hair or stains disappear under a layer of white emulsion paint. Many times over the years we received phone calls from panicious customers who told us that their plaster was hacked on the way, or they dropped it, and she broke down, and they fear that all this will fall apart when they tried to fit, we Even we get such calls from the so-called professional plasters.
On the entire perimeter of the walls, at the level of the control line, the bars with a smooth surface are mounted on which the hall of the gypsum is laid out. Bruks perform the function of supporting the cartel during a clutch with a wall surface.
The need for marking occurs during uneven ceiling or wall surfaces.
The beginners in this area are recommended to mark up. The width is measured. A ruler or level, in contact with the wall surface, are applied to the ceiling and based on the width of the cartel on the wall there are points in 4-5 places (depending on the level of level).
The plaster is strengthened with fiberglass threads, millions of them. He will not fall apart, because it has several cracks. Almost in all cases, a small filler or glue, applied to the surface, will disappear due to all cracks on her hair. Wiping it with a damp cloth, the surface will become smooth and the same perfect, as ever.
All manufacturers and suppliers of decorative plaster make everything possible to deliver their product to the buyer in perfect condition. Carriers, as you know, clumsy, because they do not bring insignificant damage to decorative plaster products when they move and processed it. The most important rule that should be remembered is that it is almost impossible to damage the decorative plaster without repair, so Don consider it as if it is made of glass, and some cracks are normal, and not unusual.
A level is applied to marked points, the accuracy of its horizontal position is checked, and the straight line is drawn along the surface of the level.
If the ceiling surface is irregularity, then without the ceiling cord just can not do.
From two edges of the wall to the ceiling, a ruler is applied and based on the width of the cartel on the wall with a pencil, two marks are made. So, putting the parcel to the ceiling and to the wall, the marks were at the level of the bottom of the cartel. Drill takes, two holes are drilled at the specified points.
Learn to work with the product as it is, and not try to achieve perfection. Perfectionist is experiencing life ever disappointed. How we are dealing with old buildings. Often in very old buildings, where the walls or ceilings are not very flat, we must actually break the decorative plaster so that it fit correctly, and then make it good after. Sometimes, to get a "weathered" effect, we break it and repair it to merge with everything else around him, so it does not stand out as "too new."
How to mount plastic plinth
Do not cry if you throw chips or cracks. Fiberglass fittings usually guarantees that the crack will not be completely bloated. In fact, it is quite difficult to break the fibrous plaster, even if you want, the fibers simply do not allow. Stucco can be drawn using almost any ordinary household paint. Color, water, acrylic or oil, it does not matter. It can even be drawn using the paint "Marble Effect" or "Granular Effect". The French used this technique for a magnificent effect for the 18ths and 19th centuries, and it now comes into fashion.
Screw plastic plugs are installed in the holes and two screws are not completely twisted. To one of the screws, on the one hand, the marking cord is tied, stretched until the wall is stretched along the wall surface and is attached to another screw, on the other hand. After that, the surface of the marking cord is rubbed with color shallow.
From the center of the wall, the cord is stretched and released. From a sharp contact of the cord with the surface of the wall, a smooth straight line is formed on the wall. Which will be the control line. The same is done all over the perimeter of the walls.
For these purposes, you can use a chokline. In essence, this is the same. Motor venger cord located in the cassette in which Xinka falls asleep.
How to glue the plinth on the ceiling - a step-by-step scheme (mounting cartoons around the perimeter of the walls)
- Before drawing the control line on the walls, the walls must be cleaned of paint or old wallpaper. This is done with a spatula or a metal brush for deeper cleaning.
- If there are irregularities on the walls, they need to be aligned with putty.
- The purified wall is processed by primer for better clutch of the surface of the walls with cartoons. The primer is absorbed within 4-5 hours.
- The walls are marked by applying control lines throughout the perimeter of the walls.
- Polymer glue is taken either divorce with putty according to the instructions.
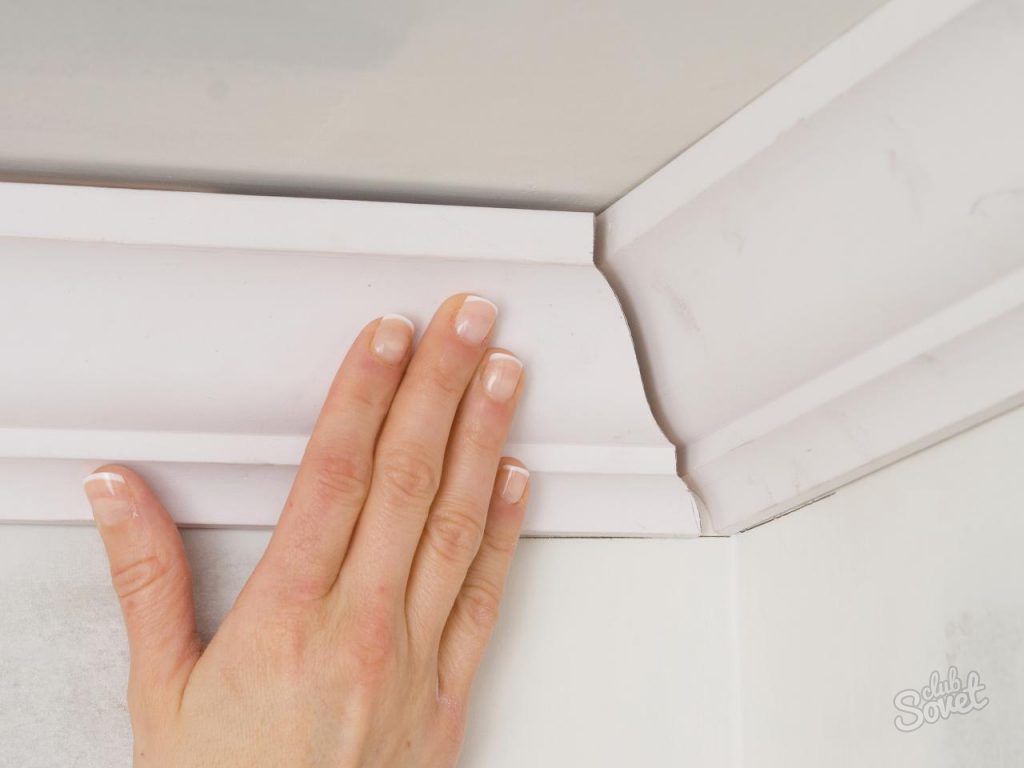
- Doings begin to glue from one of the corners of the room. Using the stouse or markup on the wall and the ceiling, the angles are cut on the kallers (the order of cutting the angles is described below).
- To the surface of one of the angular cartoons is made of glue or putty. After that, the carter is glued to the wall surface based on the markup of the control line.
- The same procedure is done with another angular alert. Formed gaps between angular cartoons; Packing, wall and ceiling are embarrassed by putty using a spatula.
- The putty, the remaining at the junction between the carts, gently erases with them. This can be done by hand or sponge. The putty, remaining when the gaps of the gaps between the cartoons, the wall and the ceiling surface is removed by the spatula and is cleaned with a sponge.
- By this way, the carter is glued throughout the perimeter of the walls.
Tools and Primary Material
The following tools will be needed for work:
- Pencil.
- Roulette.
- Level, at least one meter, or color chalk and marking cord (for the markup of the control line)
- Stuslo.
- Putty knife.
- Putty.
- Polymer glue.
- A piece of sponge (for cleansing from putty).
- Hacksaw for metal or shoe knife.
Selection of plinth
FROM greek The plinth is translated as a stove (tile), an element created to protect the angle between the wall coating and the floor. What can come to the conclusion that ceiling plinth - This is an element for protecting the angle between the ceiling and wall coating designed to decorate the interior of the premises.
Ceiling plinths are designed for the following purposes:
- Hiding uneven surfaces between wall surfaces and ceiling.
- Decorative home interior decoration.
- Visual change in the volume of space of premises due to the width of cartoons and their color scheme.
- With plastic cartoons from polyvinyl chloride, you can wash off dirt and dust. They are recommended to use in the kitchen or bathroom.
- Polystyrene foam cartel differs in light weight and low cost. Well absorb moisture: it is not recommended to install in the bathrooms and in the kitchens. Have a flammability property.
- Polyurethane cartoites contain rubber and possess high plasticity. They can be given different forms when installing. Due to water-repellent properties are used in rooms with high humidity.
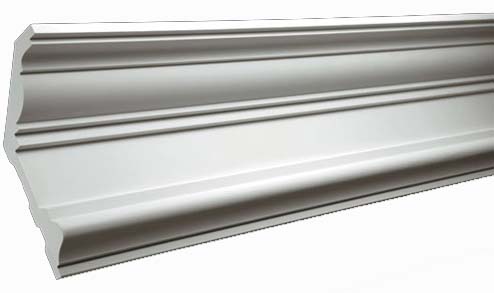
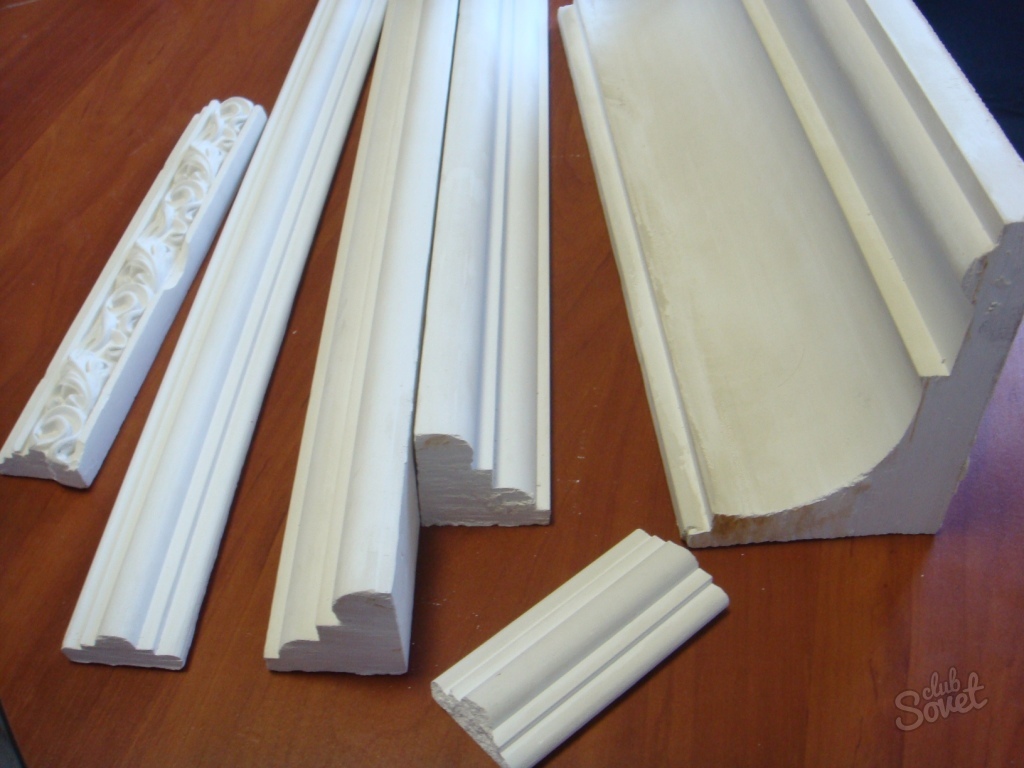
- Cartoons made of plaster stucco consist of environmentally friendly natural material. Are a decorative element of indoor interior decoration.
- For beginners in repair it is better to use stublog.
- Polystyrene cartoons can be glued to putty, it is better to attach from polyvinyl chloride to screws, from polyurethane - on polymer glue, from plaster stucco - on plaster mixes.
The composition of polystyrene foam has properties similar to foam, but manufacturing technology is different. Might by weight. Well absorbs moisture, so it is not recommended to mount it in the kitchens either in the bathrooms.
Unlike plastic cartoons, expanded polystyrene can paint in different colors. Experts recommend attaching it using polymer glue, but in practice it is possible to carry out installation using putty. It has the property of flammability.
Polyurethane
The chemical composition of the plinth contains rubber, which contributes to its flexibility, elasticity and the presence of water-repellent properties. It is used to finish the premises with high humidity. Mount is recommended using polymer glue.
Gypsum lepnel
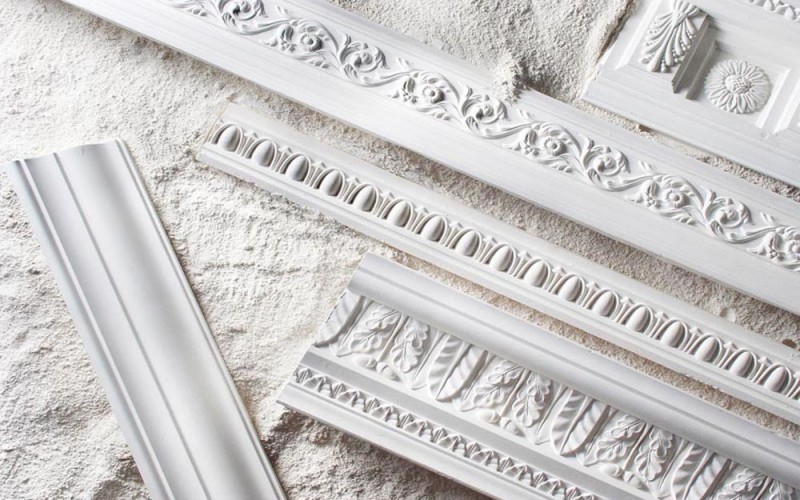
The main component of plaster stucco is a natural mineral (sulfates). Environmentally friendly material. Often, the halls of plaster stucco are manufactured manually under the order. Therefore, the price of such cartel unlike the cartoons from other materials is higher.
Gallers from plaster stucco are used as decorative decorations of the premises. Installation is carried out on plaster mixtures.
Plinths on the ceiling are a binding decoration element. It is recommended to install cartoons before sticking wallpaper, as it may take a spacure of an uneven surface. If you aligned the ceiling and walls in advance, you can put the plinth after wallpaper. You need to be able to choose the right product and know which tools will be needed for mounting the ceiling plinth:
- pencil - will need for placement of the room;
- special glue depends on the choice of the plinth material;
- glue gun - for uniform supply of mass;
- sharp knife and hacksaw;
- measuring instruments - roulettes, rules, squares;
- stuslo - a carpentry tool for fitting plinths in the corners;
- putty, sealant - may need to eliminate irregularities on the surface.
How to glue ceiling plinth - choose product material
- Plinth of plaster. Gypsum, which used to be almost the only material from which the ceiling stucco was made, now became less popular due to potential danger: frozen, plaster becomes heavy, but at the same time fragile, which can provoke the drop in the product. Installation of plaster plinths only professional wizards are engaged using special glue.
- Plinths from foam. An excellent alternative to the gypsum is polystyrene foam. Its products from it are very light, absolutely safe and easy to install. how decorative element It looks very beautiful, in appearance practically not distinguishable from gypsum plinths. Before installation, it will be necessary to level the surface almost to the perfect state, otherwise the foam due to insufficient plasticity over time to turn around and will be saved.
- Plinths from polyurethane. An excellent option for designing non-standard in shape or rough surfaces. Also very similar to gypsum products. In general, polyurethane is well glued, but requires a neat cutting.
How to glue ceiling plinths - we make the calculation of the required material
- Measure the perimeter of the room.
- For rectangular and square rooms, measure the length of each side and fold.
- If the room has different protrusions or, on the contrary, the recesses - we measure each distance from the angle to the corner and also fold.
- The resulting distance is divided by the length of the plank desired cartel (usually from 1.5 to 2 m) and we obtain the final number of individual units of the material that needs to be purchased;
- Just in case you can buy 1-2 replacement planks.
How to glue ceiling plinth - we make markup
- We apply the plinth and mark the pencil butt marks on the wall and the ceiling.
- We look at whether irregularities are formed during the preliminary laying of the plank, if yes - you have to use a putty to eliminate flaws.
- In the corners we try to make particularly accurate marks, as these places are the most difficult.
How to glue ceiling plinths - Customize plinths under the perimeter
- To solve the problems of docking the ceiling cartoons in the corners, you can purchase special corners, which are perfectly suitable for installed plinths and serve as an additional decoration element.
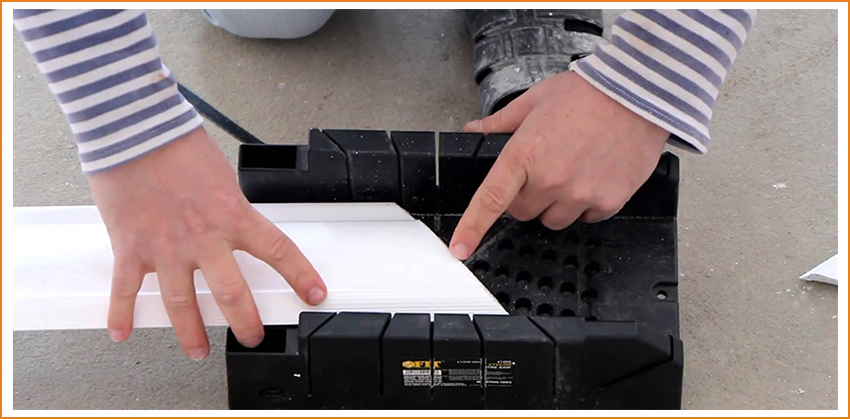
- For fitting plinths in the corners without decorative corner We use a special tool - stood, with which the cartel can be carefully fired at an angle of 45 degrees. With this item, there may sometimes arise problems, for this we have additional planks on which you can take care.
- We try to combine the planks in the outlined angles, if the gap appeared - we close it with putty.
How to glue ceiling plinth - the process of sticking
- Plinth, which passed fitting around the perimeter, glue to the treated surface: wallpapers, twisted or painted surface.
- We apply glue to the inner part of the quottle or inseparable thin line. We use glue for liquid nails panels.
- Excess the awesome glue after applying we remove immediately with a wet rag.
- If you still appeared slots between the plinth and surfaces, you can close them with a sealant or putty.
Independent installation of ceiling plinths - the case is performed, but not simple. The main thing is that the savings on the services of the invited master went not to the detriment of the quality of the work done.