The warm floor in the house is the guarantee of the health of the whole family. To date, there is a huge variety of heating types. The most efficient and popular is the electric heating of the floors, which is easily calculated and mounted. This method is very simple and economical in use, the principle of its work is heating the floor from a special heating cable, which is located under the surface of the floor when mounting.
The heating device is placed in such a way that the entire surface receives the same amount of heat, and the host has the ability to adjust the heating power. Today you have the opportunity to learn how to calculate the warm floor, make it installation and prepare the necessary materials.
Collect the necessary data
Warm floor is very convenientBefore purchasing all the necessary materials, you need to measure the room, which is preparing for insulation. At the same time, you need to take into account not only the floor area, but also the specifics of the room. Decide how much this room needs heating. It is also necessary to take into account the proximity of heating batteries or auxiliary heating equipment to avoid overheating of the room.
You will need to choose the type of heating:
- using heating cables;
- using hyperfine floors.
Heating cables are heated on the basis of cement mortar Using non-combustible lightweight materials. When buying a kit, make sure that all its constituents are available:
- section with heating cable;
- tape for mounting;
- device for heating sensor in the form of a corrugated tube.
The thermostat that will need to adjust the heating process is usually not included in the general set of the system. Please note that two types of cables are used in the heating system:
- two-housing;
- single.
Each of them has its purpose, but they work in the complex, so make sure both cables are in order before buying.
 Laying of a warm floor
 Calculation depending on the room
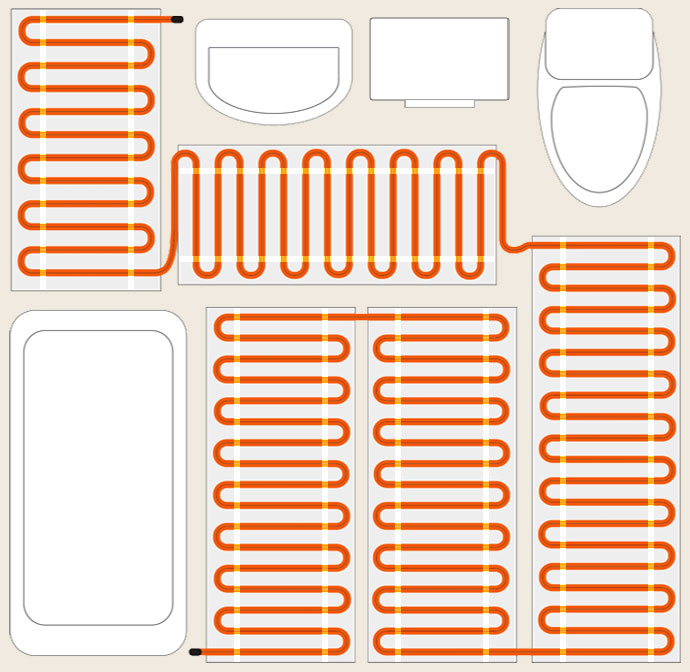
To understand how to calculate the electric warm floor, you need to start calculating the accurate ("clean") area of \u200b\u200bthe room at which laying will be made. Under the notion of "clean" area, the surface of the room, which is not occupied by any objects and furniture is implied. In the figure below, you can schematically see what is the free space of your home, in this case, the bathroom.
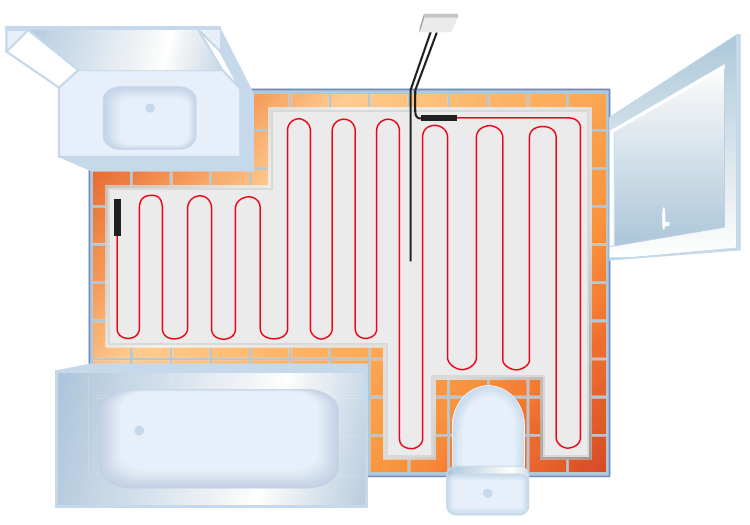 Scheme of the location of the heating element
 Warming cables should not run under the shell, bathroom, toilet, you must use only a useful area that needs heating. Thus, when calculating, you need to calculate the total area of \u200b\u200blarge objects that are not located on the useful area. Then from the total area of \u200b\u200bthe room you need to subtract the previously obtained number. As a result, you will receive a "clean" area of \u200b\u200byour premises.
After that, you can proceed to the calculation of the heated area, taking into account the previous data. Insulation cables should run not only on the useful area, they must be removed from the main furniture or plumbing. For example, if the useful area of \u200b\u200byour room is four square meters, then the heated area should be 3.9 square meters.
Note!!! If the furniture and plumbing in the room are close to each other, then you need to remove heating cables as much as possible. The surface of the objects should not come into contact with the heated surface, in which case you need to expect heating by 3.8 square meters.
If the room is very small, then it makes sense to purchase a miniature heating kit. Minor deviations will not play a big role, especially if we are talking about the toilet, in such premises you are not long, and the floor does not need enhanced heating.
 In the process
 Heat insulation for the floor
 Heat insulation
 Today, the extruded expanded polystyrene was logical for the heat insulation of the floor, this method will save energy by reducing the degree of radiation of thermal energy in cases where it is not necessary. Materials of this type help increase efficiency to a maximum, which will save you from extra costs.
Extruded expanded polystyrene has such special characteristics as:
- high mechanical strength;
- excellent thermal insulation properties;
- effective and high-quality insulation of any surfaces.
Such material is capable of long and effectively insulate even the thinnest layers of the floor, which is not unable to other materials.
Usually, the extruded expanded polystyrene is mounted on the overlap panel from above, only after that you can lay all other parts of a set of warm floor.
Note!!! Any installation of a warm floor requires the conduct of waterproofing and reinforcement procedure, the instructions for these works are offered by each manufacturer individually depending on the synthet system specification.
Temperature regulators
 Temoregulator
 Whatever type of electrical heating of the floor you chose, the thermostat will be the main part of it. This element of the system will have to be purchased separately from the entire set. Temperature regulators are several types:
- plain;
- complicated.
The device may have a liquid crystal screen, which will simplify the operation with the control. Complex thermostators have software that allows you to create an individual floor heating schedule.
Any thermostat performs such basic functions:
- regulates the necessary temperatures;
- cutting heating cable from overvoltage.
Obviously, complex thermostators will help you save a lot of energy, which without his work will spend money on nowhere. Sophisticated devices have a higher cost, but according to general estimates, such devices save from thirty to fifty electricity percent. Therefore, it makes sense to purchase a more expensive thermostat to subsequently save on energy waste.
Cable selection for electric heating floor
Before deciding with the type of cable for heating, make the capacity calculation of the heat. When calculating, pay special attention to such factors:
- accurate area of \u200b\u200bthe room, which will be heated;
- view of the room;
- types of heating used indoors.
If the electrical heating of the floor is the main source of energy in the room, then the heating area should be at least seventy percent of the total area of \u200b\u200bthe room. Wherein electric power Heating should be at least 150 watts.
 Warm floor mounting kit
 If there are basic heat sources in the visit, and the floor is only an additional heating, then the power of electricity should be a maximum of hundred and forty watts. This option is most often used in multi-storey houses, where there is a full-fledged heating system, and additional sources of energy are most necessary before or after the heating season.
Note!!! The power of electricity of the warm floor is calculated on one square meter.
Functional features of different rooms in the house will help to understand how to calculate the power of the warm floor. The fact is that not all premises in the house require the same amount of heat. It is necessary to take into account this fact in the calculations in order to create a comfortable atmosphere in your home.
Calculation cable for warm floor mounting
 Cabling
 The selection of a type of cable for insulation depends on the power that is necessary for the heating system. In order to get the desired result, you need to multiply the sum of the entire free area of \u200b\u200bthe room to the number of specific power of the system.
When calculating the cable, it is also necessary to pay attention to the type of room for which heating is created. For such premises, like a loggia or balcony, the specific power will be higher, but the kitchen and the bedroom require less specific power. When buying a heating kit, you can ask the consultant to a table that will help you know exactly what the specific power needs your room.
1. What is warm electric floors
Warm electric floor is a cable heating system of increased reliability, which can also be used as a system of comfortable heating of the floor, and as the main heating system. Heating sections of warm floor systems are two layers of insulation shielded single-core and two-housing cables, as well as reliable couplings. From traditional ways Heating, where heat is transmitted by convection flows, the warm floor has a number of benefits:
- The heating part of the system is hidden into the floor design, which allows you to increase the useful area and diversify the design of the premises, while the floor covering can be any: tile, marble, carpet (except for parquet).
- Does not dry the air indoors, since the heating cable does not have direct contact with the atmosphere.
- Double insulation and shielding braid cables allows the use of warm floors in the premises of any humidity.
Primarily choose your system.
Before starting the installation of a warm floor, we advise you to make sure that you have chosen exactly the system that is suitable for your room and the desired type of heating (comfortable or main).
1. The main system of heating in separate buildings, including in cases where there is no possibility to connect to the central heating system. The main heating system involves the use of a more powerful cable and a screed device with a thickness of at least 5 cm. At the same time area warm floors It should be at least 70% of the total area of \u200b\u200bthe heated room. The recommended specific power of the system when using a warm floor as the main heating system - from 160-180 W / m 2. For example, a warm floor with a capacity of 0.19 kW, heating area - 1.2 m 2; Check the power: 190 W / 1.2 m 2 \u003d 158 W / m 2.
2. Additional (comfortable) heating system. It is installed in conjunction with the heating devices of other types and is intended to achieve thermal comfort. The most relevant indoors with cold floors (bathrooms, bathrooms, kitchens, pools) and on the first floors of buildings. Recommended specific power of the system with a comfortable heating of the floor 120-140 W / m 2. For example, a warm floor with a capacity of 0.19 kW, the heating area is 1.5 m 2; Check the power: 190 W / 1.5 m 2 \u003d 126 W / m 2.
Observe the standards
Check if the electrical wiring is available in your room. Call additional electrical devices that can be connected to the same network. Specify also the permissible current of safety devices (automata). Electric heating systems with a power of 2 kW and more we recommend connecting through special wiring and separate automatic. We also recommend using the UDO with a nominal trigger current not higher than 30 mA. This is a small device mounted on the electrical panel, which monitors the safety of electrically insulating your equipment. When warm floors are mounted in wet rooms (bathrooms, saunas, pools), the heating section screen must be connected to the grounding conductor of the supply network, which, in turn, must be combined with all available metal parts, such as: metal shower pallets, Metal frames of shower cabins, etc.
How to choose a warm floor
- Determine the free area, not occupied furnished and household appliances.
- Retreat from the walls and from furniture 5-10 cm.
- Pick up the heating mat or section on the free square.
- The area of \u200b\u200bthe heating mat or the section area of \u200b\u200bthe section should not be more free area.
- It is allowed to lay a warm floor under furniture, if the height of the legs is not less than 15 cm.
Heating cables
The basis of the design of the warm floors is the heating cable. Externally, it resembles radio frequency cables to transmit television signals, but its purpose is not to transmit electrical signals or power to the distance, but to convert all 100% of the power flowing over it electric current To heat. Allocation of this power on a unit of cable length (specific heat generation) is the most important technical parameter of heating cables.
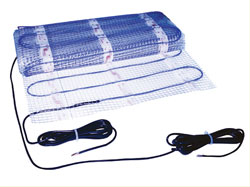
Warm flooring system
- heating section or heating mat;
- control instrument (thermostat with temperature sensor);
- accessories for facilitating and accelerating installation (mounting tape, corrugated plastic tube, etc.);
- heat insulation.
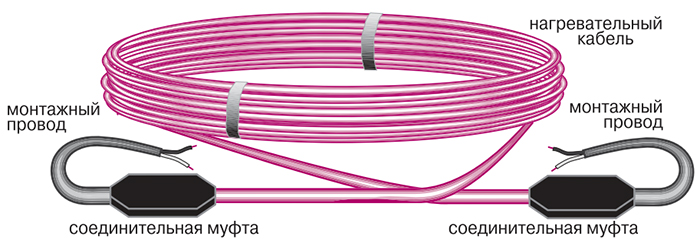
Section of a warm floor
Heating sections
The heating sections are structurally consisting of a segment of a heating cable of a certain length, and so-called. "Cold ends" - segments of the usual wire connected to the heating cable coupling. Sections can be made of a single-core and two-cable cable, while at the ends visually you should see: in single-core sections - two wires on each side (screen and load), in the two-core sections - three wires on one side (screen, load, load) .
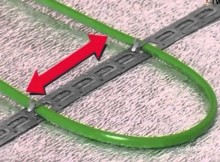
Step styling cable
calculated as follows:
Stacking step (cm) \u003d (100 * S) / L,
where S is the area to which the warm floor is stacked, and L is the length of the cable section.
Minimum laying step - 8 cm
It must be remembered
And single-core and two-housing heating sections are mandatory shielded! They can be used both in dry and in humid premises. Two-layer cable insulation is made of non-combustible and non-melting materials.
These sections are distinguished by constructive features and, according to methods of laying on the floor surface.
Installation of warm floors
1. Warm floor based on heating sections
For the installation of the system you need:
preparation | 2. Watch in the wall of the groove for the electrical wiring, the mounting ends of the heating section and the tube for the temperature sensor. |
heat insulation | 4. To lay thermal insulation. |
fastener | 5. Fasten the segments of the mounting tape. |
installation | 6. Put and secure the heating section. 7. Mount the temperature sensor. |
screed | 9. Perform the necessary electrical connections. Check the lack of damage to heating sections and temperature sensor. Measure the resistance of the section and the sensor. Their values \u200b\u200bmust correspond to passport data. Measurement results Fix in the protocol or on the layout diagram of the section. |
coating | 10. Pour the cement-sand tie. After 72 hours on the floor, you can walk. 11. To lay the decorative flooring of the floor according to your taste. 12. After complete drying of the screed - 28 days, the system "warm floor" is ready to work. |
preparation | 1. Prepare a place in the wall to install the thermostat. 2. Watch in the wall of the groove for the elevating section, the mounting ends of the heating section and the tube for the temperature sensor. 3. Prepare the surface of the floor (align, clean from garbage). |
|
| 4. Prepare in the semi groove for a temperature sensor with a connecting wire that is stacked in a corrugated tube ... |
|
| 5. Mount the temperature sensor. 6. To lay the heating mat, lining it to the surface by sticking the lower side of the mesh or with the help of aluminum self-adhesive tape. |
|
| 7. Perform the necessary electrical connections. Check the lack of damage to the heating mat and the temperature sensor. Measure the resistance of the mat and the sensor. Their values \u200b\u200bmust correspond to passport data. Measurement results Fix in the protocol or on the mat layout scheme. 8. Install the thermostat. |
|
| 9. Pour the heating mat with a layer of solution for fastening the tile with a thickness of 5-8 mm and give it to dry. 10. Seared the groove with a solution on the wall and lay the decorative flooring of the floor according to your taste. 11. After complete drying of the solution for fastening the tile, the superctic warm floor is ready for operation. |

|
|
For the premises where the cement-sand screed has already been made, or it is not possible to lay it, ultrathine heating mats have been developed, which are an electric cable of reduced diameter (up to 3 mm), fixed with a constant step (about 5 cm) on the carrier glass. Heating mats are the finished design that eliminates the procedure for laying and fastening the heating cable, so their installation is extremely simple. Mat can be easily cut into fragments (not disturbing the integrity of the heating cable), which allows it to decompose it on a heated area of \u200b\u200bany form. Installation is possible even on old tile. Two-housing heating mats are the most high-tech and eco-friendly ultra-thin warm floors. |
IN lately Warm flooring has great popularity in the market, and in particular the system of cable heating of the room. Of paramount importance for the proper functioning of such an electrical system is the correct calculation of the power of the heating cable. We will talk about this in today's article.
Calculation of the power of the heating cable
The calculation of the power that the heating cable for heating the floor of the room is needed so that in the room there is always a pleasant and comfortable microclimate, but with it did not spend more energy resources from the necessary. Simply put, the electrocabel must spend so much energy as needed for a full heating of the room.
The algorithm for the calculation of the power characteristic of the heating cable is as follows:
1. In principle, it is worth deciding on the type of work of the "Warm floor" system, that is, it will act as the main source of heat or still as an addition. In the first case, when the "warm floor" is the main system, consumed energy for heating one square meter will be 160-180 watts. When using it as an additional - the optimal power of the heating electrocabel will be at the level of 100-150 watts.
2. Next step need to determine the useful area of \u200b\u200bthe room. A useful area is called that part of the floor, which will be labeled heating electrical wire. Note that the area under furniture, equipment that is in one place is constantly not taken into account. For example, the room has an area of \u200b\u200b17 square meters, and the area under furniture and equipment is approximately 4 square meters, then the useful area of \u200b\u200bthe room will be equal to the difference of these numbers, that is, 17-4 \u003d 13 square meters.
3. Now you can determine the optimal power of the heating cord of the "Warm floor" system. For premises, where the system is the main source of heating, the cord power must be 13x160 \u003d 2.08 kilowatt. For rooms, where "warm floor" is used in addition to the main heating system, the optimal value is 13 * 100 \u003d 1.3 kilowatta.
4. For the heating electrocabel, it is calculated, in accordance with the required power for heating 1 square meter of the useful area. Note that the purchase of a cable in the store, the main indicator is the overall heating capacity, and not a meter. In accordance with the calculations obtained, we have it that for heating the useful area in 13 square meters, an electrical circuit with a heating capacity of 2.08 kilowatt is required. Focusing on the table below (there is available in all specialized stores), with a useful area of \u200b\u200bthe room in 13 square meters, in the table it is 12.8, we will need 140 cable routines with a specific power of 160 watts per square meter.
Approximate power ratio table and cable heating length
In most shops as an additional service, sellers will make calculations of the power indicators independently. At the same time, it is necessary to know the technology of calculations and you, so to speak, to double-check the correctness of their calculations.
5.The setting step in the installation of the heating electrocable. Stacking step is the distance between laid parallel with cable strips on the useful area of \u200b\u200bheated floor. The calculation of the step is necessary for uniform installation throughout the useful surface. To do this, you need a useful area of \u200b\u200bthe floor to divide the length of the heating element. In our case, it will look like this: (13x1000) / 140 \u003d 93 millimeters. Before installing, you need to pre-draw a laying plan in a particular room.
Plan styling of single-core and dwelling heating cables
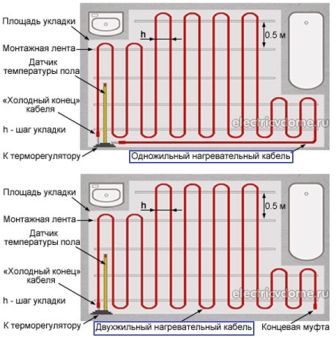
If you bought a heating cord on one core, then its connection must be made from both ends. Accordingly, if the cord has two veins, then connecting one-sided.
Having in mind that the electrocabels are sold as standard pieces with fixed power and fasteners at the ends, the size of the segments cannot be reduced, nor increase, otherwise the cable can quickly fail. In addition, you will also lose the manufacturer's warranty commitment.
Our tips can be useful to both people who are going to buy a warm floor for the first time and independently establish it at home and some professional professionals "on all hands."
Firms
How to choose the electrical floor floor.
The right choice is the main condition for the effective, long and economical operation of the warm floor.
So, in the article, we will consider the following questions: For the main or additional heating, the usual or ultra-thin type of cable to choose for a warm floor (laid under the tie and under the tile), what power and length or area take a warm floor, with a single-core or twin-tie cable, heating Mat or heating section, with which flooring is better to use a warm floor, which thermostat to choose other.
The first questions that should be solved in parallel, as they are interconnected and it is difficult to allocate more important, will: "Warm floor will be the main heating indoors or additional?" And "the warm floor will be mounted under a screed layer or on top of it, for example, in a layer of tiled glue?". But let's start, probably, from the first question, as the answer to it, gives us some restrictions when answering the second.
Warm floor will be used as the main heating or as an additional?
Electric warm floor systems can be used as the main source of heating room or as an addition to an existing heating radiators or other heaters.
Most often, of course, warm floors are used as an additional comfortable heating. In this case, your further choice is not limited yet. You can make a warm floor of any configuration and any area free from furniture in your room (for example, at least one square meter in front of the entrance in the corridor).
But if you decide that the warm floor will be the main and only source of heat in the room, then you can no longer use systems based on a hyperfine heating cable (in the form of a mat or on the coil). You also need to know that the total area on which the warm floor will be laid must be at least 70% of the entire area of \u200b\u200bthe room. Well, naturally, the coils of the heating section should be located closer to each other, and, therefore, the specific power of the heating section will increase and the specific power of the heating section per square meter of the room (as we will talk below).
Ordinary warm floor or heating mat?
"Normal" warm floor based on a single-core or two-housing heating cable is a classic version of a warm floor. It is preferable to almost all indicators: it is more efficient, consumes less electricity and, in the end, its value is lower than that of the sets of a warm floor based on an ultra-hot cable (mat or on the coil). But such a warm floor can only be mounted under the layer cement-sand tie Multime 3 centimeter thick. And it's better that the screed was 5-7 cm: in this case, it will be possible to avoid the so-called "zebra effect": when the floor directly over the heating cable will be heated stronger than the sections of the floor between the heating sections.
Two-core warm floor
Tepluxe Elite TlbEkomplekt heating mat
TEPLUMUX MINIENCING MAT.
National Comfort TNK
As a rule, make a screed (and, accordingly, raise the floor level) only during the construction of a new house. With or reconstructing an existing building, there is usually no such possibility. Therefore, in such cases, it is necessary to use warm floors with an ultra-thin cable (mats or heating sections), which can be put on top of an already existing screed, for example, in a layer of tiled glue or screeds of approximately 5-10 mm under laminate, linoleum or carpet (as the superfine diameter The cable is 3-4 mm).
Repeat again: heating mats or warm floors on the ultra-hot heating cable coil can only be used to obtain a comfortable floor surface temperature, and not for heating the room.
In addition, it is worth considering that the installation of the heating mat is much easier: it is necessary to simply spread it on the floor, to do in the right seats in the grid, to fit into the configuration of your room and connect to the thermostat. Everything is simple! However, if the room is a complex configuration and there is no possibility to make a screed, then it will be better to buy an ultra-thin warm floor on the coil.
Under the classic warm floor, the thermal insulation is mandatory, and for the warm floor, the thermal insulation is not needed over the screed (under the tile).
What power and which area to choose a warm floor?
Power parameters and plates of warm floor are closely interrelated. General recommendations For a climate of the middle strip of Russia with ceilings up to 4 m These: when using a warm floor as an additional heating - 110 ... 130 W per 1 square meter of the room, when used as the main heating source - 130 ... 150 W per square meter Room area. The manufacturers themselves have already taken care of "recalculating" watt power into square meters of floor: on each box, in addition to the power of the heating section, the area is also specified on which this kit is calculated. For example, for a set of Teploup 18TLBE2-23-420, it is indicated that its power is 420 W, and the area is 2.8-3.8 m2.
How to understand such a scatter? If you use a warm floor as the main heating, then its area should be closer to 2.8-3.0 sq. M, if as an additional, then it is possible on the area of \u200b\u200b3.5-3.8 square meters, but Typically take the average value, that is, somewhere 3.3-3.5.
Mounting scheme of the two-core section of the classic warm floor under the tie
It should also be considered that when installing a warm floor, for example, on the balcony, in rooms with a large glazing area, the first or last floor of the building is everywhere, where thermal insulation is weaker, you need to increase the specific power per square meter and reduce the area. That is, when demanding not to heat, but to make the temperature of the floor comfortable, for example, on the balcony, the kit from our example is suitable on the area not 3.3-3.5 sq. M, and 2.8-3.2. It is also worth noting that the area is less than 2.8 this kit should not be taken, since the cable sites located close to each other will cause mutual overheating, which can lead a warm floor to failure.
For heating mats, the choice of power and is simpler, since the matte the heating cable is fixed on a fiberglass grid with a width of 50 cm and the area for each set is fixed. For example, the heating mat National Comfort TNK-440-3.0 has a capacity of 440 W and an area of \u200b\u200b3.0 m.
When choosing a power / area of \u200b\u200ba warm floor, you should evaluate the possibilities of your wiring, whether it will cope with the increased load. Ideally, the power of cable heating systems should be connected to a separate line from the distribution panel with its circuit breaker or differential machine.
Single-core or two-housing warm floor?
So, we have already identified a warm floor based on the classical heating section or an ultra-thin cable we needed, calculated and chose the power and space of the kit. Further, any seller will task the same question: "Do you need a single-core or two-housing floor floor?".
Single-core heating mat
TEPLIVUX MINIDVUKHLY HEAT WORK MAT
Teplux Tropix.
The heating element of electrical heat floors is a special cable consisting of one or two lived, insulation, shielded braid and shell. And the warm floors under the screed, and the warm floors over the screed are single-core and duct.
Connection diagram of a single-core and two-housing heating cable to the thermostat
The main difference between single-core and two-housing heating cables - in the method of connecting it to the thermostat. If when installing a single-core cable, both of its end must be connected to the thermostat, the two-core cable is connected only from one end, and where it turns out to be the second - no longer affects the connection. The last option, naturally, is more convenient when installing (especially when laying the heating mat). Well, the second most important difference is that a two-hungry floor has electromagnetic radiation 300 times lower than the sanitary standard, and at a single-core - 60 times. But the price of a set of warm sex based on a two-core heating cable is higher by 20-50% compared to one-core.
Warm floor can be done only under the tile or under laminate and carpet too?
The perfect flooring for the use of heated floor is ceramic tile, Natural stone and porcelain stoneware. These materials have high thermal conductivity and therefore perceived by a person as cold. And their combination with warm floors gives the best result: the floor surface quickly becomes warm and comfortable with minimal electricity costs for heating.
Also, the warm floor can be laid under carpet, laminate, parquet board And linoleum. Due to the earliest thermal conductivity, these coatings will warm up longer, and their surface temperature will be lower than that of the floor with tiles. But such coatings are better kept heat, and therefore it is possible to take the specific power less - usually recommended in the region of 110 W / m2. If possible, the laminate should be as thin with the substrate, the thickness of the carpet should be as little as possible, and the linoleum is better, if it is without a warming layer.
It is not recommended to install a warm floor under the coating with a very bad thermal conductivity: wooden floors, parquet, etc. Because over time, the parquet from heating can dry and between "parquets" can appear slots and cracks.
What thermor regulator to choose for a warm floor?
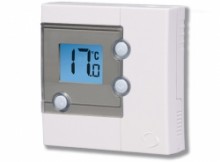
Sometimes they ask: "Why do you need a thermostat?" And it is necessary in order to turn on and off the warm floor. But its main function is still in maintaining the temperature of the floor as you are most comfortable. Plus, the thermostat helps to save electricity, because the floor will not constantly work at full capacity, and the expensive "Kilovatchs" of electricity is expensive to maintain the required floor temperature. Almost all thermostators (thermostats) can be divided into three main types: simple with manual control, with LCD display and programmable with LCD.
Classic hand-controlled thermostators. On the left - AURA VTC 235, right - Tepluxer TP510.
The most simple in the management and cheapest in their series are hand-controlled thermostators. The whole "interface" consists of a swivel regulator, which is set to the desired temperature, and the switch (it can be in the form of a lever or key) to turn on or completely disconnecting the warm floor, respectively. That is, they pressed on the switch, turned the regulator to the pointer to the temperature you need and everything! The warm floor is configured and already running! It's easier now! Precisely because of its simplicity and more affordable price Such regulators are most popular with buyers.
Temperature regulators with LCD displays. On the left - AURA VTC 550, right - Tepluxer TP715.
In second place in popularity (and at the price too) there are thermostators with liquid crystal (LCD) displays. Why do you need a display? It will show the current floor temperature and the temperature you want. Managing such thermostat is carried out through the buttons on the front panel. Some models can work not only with the floor temperature sensor, but also have a built-in air temperature sensor. That is, you can set out what temperature in the room you want and the warm floor will constantly maintain it.
Prices

Relevant.
A very relevant article for those who want to put the system with warm fields on their own. When I read this article, it took a lot of useful and necessary recommendations to weapons. And if it is notified armed.
In this article we will tell about ten major errors that are most often allowed when installing a warm floor. Our tips can be useful to both people who are going to buy a warm floor for the first time and independently establish it at home and some professional professionals "on all hands." Tips will be from the simplest (at the same time, for some reason, not always obvious to some masters), to those that, although they may seem unnecessary, proceeding from our experience are not. Remember that most of the malfunctions associated with the operation of the warm floors are caused by unqualified installation or mechanical damage to the cable during or after it is styling. If you are not sure about your abilities, it is better to entrust this work to professionals.
Error №1 When choosing a heating cable or mat, focus not on the total area of \u200b\u200bthe room, but on a clean area, not occupied by furniture. Remember that under stationary furniture or constant items of a large area (baths with screens, sofas, etc.) The warm floor laying not only does not make sense, but also should not be able to prevent overheating and the output of the warming cable.
Error number 2 Remember that choosing the cable length to reduce it will not be possible. Two-housing shielded heating cables that are used in most warm floors or mats, it is impossible to cut! This will lead to the exit of cables in order! Surprisingly, how many masters still make this error and try to "trim" the cable at the place. 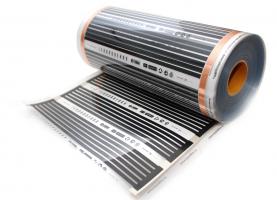
Error number 3 in no case should not include a cable for testing performance before the moment when it is laid and the screed and adhesive solution will dry! Turning on the cable even for a short time can bring it out of order. Checking the cable is faster and easier - its resistance is measured.
Error number 4 should not put the heating cable or mate on a dirty unselected surface. To clean the floor, it is better to use an industrial vacuum cleaner, it is very desirable to treat the surface of the primer.
Error number 5 Do not go to the heating cable in solid shoes and do not let others do it. If without going through the cable or mat, do not do, do it with the greatest caution!
Error №6 Do not clutch the temperature sensor of the warm floor in the solution! The sensor must be placed in a corrugated tube. The tube should not contain holes through which the solution could penetrate and should not be curved too much. Remember that the temperature sensor breakdown sometimes happens and the possibility of its easy extraction must be provided for such a case. You will be surprised if you find out how often it is a simple and obvious requirement is not fulfilled, which greatly complicates the simple operation of the sensor replacement in case of its failure.
Error number 7 Do not neglect "formalities". Measure the resistance of the warm floor before- and after laying, make sure that it corresponds to the value in the product passport. If the value is not specified in the passport, enter it and specify the installation date.
Error number 8 Do not forget to draw a warm-alone laying scheme by specifying the distance to the walls or other objects. To do this, in most instructions for warm floors there is a corresponding page. You can take a picture of heating cable. It will always be useful if you then need to drill the floor to install door stop or plumbing.
Error №9 Do not leave air pockets around the "hot" part of the heating cable. This is especially important when laying a "fine" warm floor into tile glue. Failure to comply with this rule in order to save a solution or simply by overwhelming can lead to overheating and quick-release cables after the start of their operation.
Error number 10 Do not turn on the warm floor immediately after installation so that "the screed rather dried and faster grabbed." By this, you will almost certainly damage the warming cable! It is necessary to wait a few weeks depending on the thickness and type of solution.
Electric Warm floor and Parquet Board Kahrs - Best Solution
Outdoor coating is part of the interior with which we contact most often. Therefore, not only the degree of our aesthetic satisfaction depends on its quality, but also health. Warm floors at home is an additional health protection, because your legs will always be warm where electric warm floor is installed.
A parquet board is a beautiful floor covering, with which no other coating can be compared for aesthetic value, naturalness and comfort. But in a chart with the electric heating floor system, a parquet flooring can give an additional degree of comfort. You can walk on a parquet board with a warm floor barefoot technology, even if the street is raw autumn or cold winter and do not wear woolen socks or warm sneakers.
Physiotherapists recommend keeping the legs in heat to reduce the likelihood of getting a cold. Electric wooden warm floors just give such an opportunity. In the cold season with warm floors under a parquet board, you can be sure that your feet are in dryness and warmth, and your children can safely play and crawl through the floor without risk to catch a cold.
The technology of electric heating gear lies in the placement of special heating elements under the floor coating, converting electrical energy to heat. The electric heating cable or special heating film includes an electric heating cable or a special heating film.
The electric heating cable in the warm floors looks roughly as an ordinary electrical cable, only in contrast to the conventional current conductor also performs the function of the converter electrical Energy To heat. It is this warm and makes the electric wooden floor warm, pleasant to our feet.
Another heating element in an electric heating floor can be a special film. In film electric heating floors, a special film, as in the case of an electrical cable, acts as a resistive element converting electricity to heat. Such a film can also be used to heat the walls, ceiling and outdoor sites, and not only to enter into an electric film warm floor.
Electric heating floor
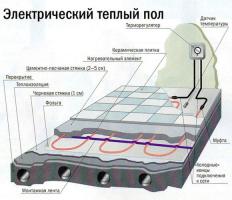
Installation of electric heating floor begins with alignment of the floor surface. Then the wall creates a niche for the installation box, where the sockets, switches, regulators and thermostat are included. Next, under the niche for the installation box in the floor, the groove is made to accommodate 2 plastic tubes in it - one for power cables, and the other for the temperature sensor wiring. The tube for the temperature sensor of the floor is further stacked along the floor surface at a distance of about 100 centimeters from the wall, and its end is closed with a plug in order to eliminate the possible fall of the cement mortar into the tube.
Next, the laying of electric heap floor is directly carried out: thermally insulation material is placed on the aligned surface, and a damper tape is glued to the height of the electric height floor, which serves as a thermal expansion compensator. concrete screed. Then the heat insulation material is mounted on the insulation tape, on which the electrical heating cable is fixed in a certain way. It can be coated with a spiral or in parallel way. A spiral method implies the formation of a spiral on the base of the floor, and a parallel method - the location of the cable in the form of a snake. There is no special difference in the heating plan between them, because the cable is heated evenly throughout its length, so it is better to use the method of laying a snake as more simple in laying.
Before mounting the heating cable along the plastic tube, power cables are laid on the thermostat box, which should not intersect, and the coupling must be in a concrete screed. Then the floor temperature sensor is installed. Installation of electric heating floor ends with styling heating cable and testing system performance.
Laying of electric heating floor is completed by the floating floor with cement mortar, and after it hardens, the system is connected to the electrical network of the house, tuning and adjusting the electric heating floor. Then the facial laying is carried out outdoor coating. In our opinion, a parquet board is best suitable for this purpose.
There is also electrical warm floors on heating mats. According to the principle of operation and installation, these are the same warm floors in which a special cable is the heating element, only it is immediately laid a snake on a special heat-resistant film and sold in rolls that are lined up on the floor as mats. One side of the mat is glued to the fastened base of the floor, and on top of them there is a facial floor covering. Concrete screed in this case does not pour.
Laying of electric film warm floor
Installation of film warm floor begins with alignment of the floor surface. Then the place is determined and the box with a thermostat is set, as well as when installing electric heating floor with heating cable. The floor temperature sensor can be mounted as a plastic tube located in the floor and directly to the surface of the film, depending on the manufacturer's requirements.
The installation of the film floor begins with the laying of thermal insulating material on the floor surface, then the roll of the heating film is declined to the thermal insulating material on the floor surface. The film can be cut only in the place installed by the manufacturer, the copper strips along the edges of the tape in the area of \u200b\u200bthe cut must be insulated with adhesive insulating tape.
Installation of film warm floor continues to connect separately on the heating sheets. Sheets are connected according to the principle: each right conductive copper tape must be connected to each right ribbon of the adjacent heating sheet, and each left - with the left. Connecting wires must be isolated and not intersected with each other.
Then the power cables, the floor temperature sensor, the system of electric film warm floor is checked for performance and is configured.
The installation of film warm floor is completed with the laying of a clean flooring, for example, a parquet board directly to heating sheets.
The use of warm electric floors
Warm electric floors are better to use for heating small rooms in apartments or small sites. country house With heating. Water warm floor is better suited for heating large areas or fully country houses. The heating of large areas using electric heating gear technology will require high electricity costs, which will entail large financial losses. In the case of heating large areas, it will be the use of warm water floors.
Advantages and disadvantages of warm electric floors
The advantages of electric warm floors can be attributed:
simplicity of laying and installation, compared with a water warm floor - do not need to install a water pump, connect the system to the general heating system at home and receive permission to install;
lack of probability of pipe leakage;
when installing a warm film and electric warm floor on mats, a cement screed is not needed - a dry laying method;
easy temperature adjustment of floor temperature compared to a water warm floor system;
electric warm floors heat the air in the apartment more comfortably and naturally for a person compared to the radiator method of heating - heat spreads from the bottom up, from the legs to the head. When heating the room using electric heating floor technology, heat is concentrated in the field of the floor, in the legs, and when heated with a radiator method - in the region;
uniform heating area of \u200b\u200bthe floor;
visual absence of heating elements;
environmental safety of electric heating floor.
The disadvantages of electric heat floors include:
increasing electricity fees;
small electromagnetic radiation.
Thus, electric warm floor has much more advantages than deficiencies, both in front of the radiator method of heating and in front of the water heating floor system. The latter is more profitable to use for the heating of large areas, in other cases there will be more effective installation of electric heating floor. Laying and installation of electric film warm floor does not even require cement tie. And it can be carried out with almost any kind of flooring.
Why do we recommend using an electric wooden warm floor based on the Kahrs luxury parquet board? Because it is not only a combination of beauty and comfort, but also your confidence is that a parquet board, despite the substantial differences of temperatures, will serve you long years. Kahrs - one of the few manufacturers able to go through such a not a simple test. An environmental aspect is also important. Betting a parquet board Kahrs on a warm floor You can be absolutely sure that you will not get as a result of this harmful evaporation that may occur in the case of a poor-quality cheap parquet board.
Try combining the highest Swedish quality parquet boards with a heating floor system and the result will not disappoint you. Using the Kahrs Parquet Board together with the electric heating floor system, you can admire the natural beauty of the elite parquet board and feel warm and comforted, walk barefoot and sit on the floor, even in the cold season, not afraid to get up and get sick.
Remember that it is undesirable to use a cloth parquet board and beech with floor heating system. These wood species are very hygroscopic.
Calculation of a warm floor
First, calculate the free area (SSV) \u003d Total area - furniture area and equipment.
Then it is necessary to determine the purpose of the warm floor:
comfortable warm floor or complete room heating. It is necessary to select the heating power of 1 sq. M (specific power Wood) and calculating the total power consumption of our area according to the formula:
W (watt) \u003d SSV x Wood.
Having determined the power, select the heating cable from the tables.
Heating cable stack step
Having the source data (S, W and the length of the LCAB cable.) Determine
the distance between the cable turns (laying step L).
Setting step laying can be done:
a) along the length of the cable and
b) at specific power.
L \u003d Wed.Kab. × 100.
L - laying step in see S - Square in sq. M. LCAB. - Length of the cable (m)
Wed.Pol - the power of a warm floor for 1 sq. M.
Wed.Kab. - Specific (rose) power cable W / m, i.e. Power of one cable meter.
For example, for the SVK-20 cable, it \u003d 20 W / m (at 230V) or 18 W / m (at 220V).
"100" - Translation M in cm.
Comfortable warm floor
The term "comfortable warm floor" implies the temperature on the floor surface of 24-26 degrees. The main application is to create comfortable conditions for the floor with a coating of ceramic tile, compensating for heat removal with high thermal conductivity. Specific power: 120-140 watts / sq.m. For residential heated premises of the 2nd and above floors. For the 1st floor (unheated basement): 150-180 watts / sq. M.
For wooden flooring (parquet, laminate): 90 watts / sq. M. This value can be increased to 110-140, in the case of the 1st floor, while the temperature should not exceed 27 degrees.
3rd fl. residential building. Free space - 15 sq.m.
W \u003d 15 m2 x 130 watts / m2 \u003d 1950 W.
SVK-2250 is suitable (SVK-20 brand, power 2250 W (230 V)).
Full heated
Full heating of rooms with warm sexes are used in the absence of other heating devices. The values \u200b\u200bof the specific power are 150-180 watts / sq. M. For premises with a ceiling height of 2.5 m. Calculation of a warm floor - on the entire area, laying - on free (SW), for which the laying step is made.
Warm floor. Electric warm floor
Advantages of electric heating floor
Comfortable temperature distribution in the height of the room. Not depending on which system is chosen (basic or additional), the main advantage of electric heating (as well as warm heating) will be a more comfortable distribution of temperatures in the height of the room. The main system allows in each room to automatically maintain an individual temperature, while ensuring high accuracy. In the case of using an additional scheme, the selected local heating portion will have such characteristics.
Electric warm floor has a smaller inertia than water. This means that after switching on the system for heating, the room temperature will reach the premises faster.
Also, the advantages of electric "warm floors" should include service life of up to 50 years (at least some manufacturers declare such operational resources) and environmental friendliness of the materials used.
With an additional scheme, there is a laying of electrical heating and flooring on top of the old. As a rule, this option is used in kitchens, bathrooms and bathrooms, because In these premises, the flooring is made using ceramic tiles or porcelain stoneware. In this case, electrical heating mats are used. The height of the floor will increase by 1 ... 1.5 cm.
In the event that the need to repair the electrical heating, do not need to open the entire floor. With the help of special equipment, you can easily determine where the cable is damaged. Open a small section of the floor, you can easily restore the cable using a special couplor. If for any reason there will be damage to the cable, then with the touches of the person to the current parts, (UZO), will almost instantly turn off the voltage.
Disadvantages of electric heating floor
The main disadvantage of electric heating floor is increased electricity consumption. Especially relevant when using electric heating as the main system. The same cause limits the use of electrical heating in homes, built more than 10 years ago.
In these homes, power supply is calculated on old standards. As a result, the use of electrical drive can only be used as an additional system. In this case, care should be taken, in view of the possibility of overloading the feed cable. Even in the houses of modern buildings before using electric heating, you should make sure that the house wiring allows the estimated current load. If, in this case, there will be no such possibilities, the output will be connecting the system through a separate wiring and a separate machine. Valid loads are shown in Table 1
The consequence of increased energy consumption is quite high operating costs. For example, the cost of electric heating of the floor with an area of \u200b\u200b10 ... 15 m.kv. For a biennium, the cost of equipment can exceed. 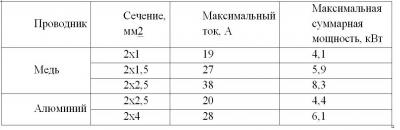
Also for disadvantages electrical systems Preheating can be attributed to the harmful effect. magnetic field on the human body. However, everything is not so unequivocal in this matter. There are a large number of opponents of this statement that do not doubt the environmental safety of electric warm floors. Many experts lead data from their research conducted in residential premises, which prove that the testimony of tension and induction does not exceed background values.
Another disadvantage of electric heating is an unequal distribution of the temperature field in some systems. The result of this will be the filling of flooring, which are made parquet and laminate. To avoid this, it is necessary to strictly observe the installation technology, in particular, do not break the step and depth of laying cables.
Select type outdoor finishing coating
Before choosing and buying equipment and materials for electric heating floor, you need to decide on the type of finishing coating. In addition to aesthetics, wear resistance and strength, it should be suitable for using such a heating system.
In the design of such floors, such coatings can be applied:
Ceramic tile or porcelain
linoleum
laminate
Parquet or board
At the same time, it is important to consider such moments:
From listed options the best choice There will be a ceramic tile or porcelain stoneware, because They are well conducted warm and have a small specific thermal expansion.
If you apply linoleum, then it should not have an insulating basis.
If you decide to apply parquet, then the wood must be well sucked, otherwise it can be swore.
It is necessary to take care of good quality of glue and varnish, in order to avoid unwanted evaporation when heated. Be sure to learn from the seller the temperature range of operation (if there is no such information on the package) of glued connections or lacquer coatings before purchasing glue or varnish. Do not focus only on the price, because even any glue is designed for a certain operation mode, and even the most expensive glue may not come up for the conditions you need.
When choosing any material for floor covering, the main criterion should be the presence of an appropriate marking indicating the possibility of using it with such a heating system.
Coatings that are not recommended to be used in conjunction with electric heat floors:
Cork, because It has a low thermal conductivity (will not pass heat into the room). In addition, the plug is "afraid" overheating.
Thick carpets, because They will perform the function of thermal insulation
Cable selection for electric heating floor
Resistive heating cables
The most important element in the electrical heating system is cable. It is the cable that transforms the energy of electricity running on it in thermal energy. The heating cable externally is practically indistinguishable from a regular cable, it also happens one-time and two-room, and be sure to be shielded (sometimes books).
However, it is significantly different with the electrical resistance of the main (heated in this case) of the veins. If in the usual cable the main core is made of material having the smallest resistance (in order to reduce the losses associated with the heating wire), then in heating (they are also called resistive) cables, as a rule, from nichrome, material with high electrical resistance. As a result, the cable performs the function of the heating element and is already selected by the value of the specific heat generation (power supply). As a rule, this value is in the range of 15 ... 21 W / m. However, it is not necessary to think that an increase in power capacity will definitely lead to an increase in the efficiency of the electrically heating system. First, when laying a cable to the floor, the formation of an air cavity is possible near the surface, while the cable material overheating occurs and the risk of failure is increasing. Secondly, with an increase in the specific power of the cable of its length, which comes to a specific area is reduced. At the same time, such an increase in the distance between the individual threads is possible, which will become a noticeable heating unevenness. In all manufacturers, the magnitude of the permissible distance between adjacent threads may vary from 5-6 to 10-12 cm. Reducing linear power below these quantities leads to the overruns of the cable and the risk of unacceptable convergence of the adjacent cable threads.
If you are planning to warm the bedroom, a children's room or a living room, it is recommended to use heating sections based on a two-core cable. Single-core cables are more suitable for hallways, bathrooms and bathrooms. These cables are distinguished. In addition to constructive performance and installation. When using a single-core cable, the cold ends (copper wires connecting the cable with electrical network) Connected on both sides. If a two-core cable is used, then the cold ends are connected on one side, and on the other hand, heating and auxiliary veins are soldered and insulated.
The advantage of the two-core cable is that when it is used, it is not necessary to connect it both ends to the thermostat. This greatly simplifies the selection of the cable laying track. In addition, the level of electromagnetic radiation of the two-core cable is lower than that of one-core.
Heating cables regulating heating cables.
In addition to resistive cables, self-regulating heating cables exist.
Self-regulating cables differ from resistive not only external species, but also the principle of action. As can be seen in the figure in the cable there is no heating lived, both residentials play the role of the conductor. The heating function is performed by a polymer matrix. It also performs self-regulating, which is based on the semiconductor properties of the matrix. With increasing temperature, the conductivity of the matrix decreases, i.e. The magnitude of the current flowing through it is reduced, as a result, the thermal power decreases. When the temperature decreases, the reverse process takes place.
Thanks to the self-regulation property, such cables are not afraid of local overheating in contrast to resistive. As a result, you do not have to take into account the location of the furniture in the room when laying the cable and you can not be afraid that your parquet or laminate is boring. However, the cost of self-regulating cables (5 ... $ 10 per 1 m / n) does not contribute to their wide distribution in electrical heating systems. Usually cables are sold to bay familiar.
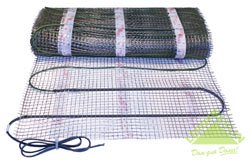
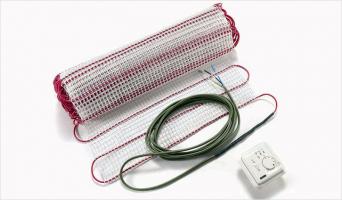
Heating mats
Also on sale presents a large range of electrical heating mats, which are based on thin low-power cables.
The cable in the heating mate is pre-laid in the form of a snake and attached to the grid of polymer threads. Mats, depending on the power, there may be different widths (40, 50, 80 cm) and length (from 0.5 m to 25 m). Length of the cold ends of heating mats 1.5 ... 4 cm.
Mount the heating mats is much easier than the cable supplied in the bay. However, the mats are not suitable for laying on the floors with non-standard geometry, and they are noticeably more expensive than the cable section of similar power. With comparable quality, a warm floor using mats will cost 20-50% more expensive than cable.
Heating wires and mats are sold or as an independent product, or in the form of a finished mounting kit. In addition to the cable or mat, the thermostat with the temperature sensor is included in the set of such a mounting dialing, to install the sensor to the floor, as well as the installation and operation instructions.
Selection of thermostat for electric heating floor
An equally important component in the electrical heating system is a thermostat complete with a temperature sensor. Thermostats may be unprogrammed and programmable, embedded in the opposite or overheads, as well as mounted in the electric cabinet on a DIN rail.
For the heating of the hallways, bathrooms and toilets, as a rule, simple electrical heating systems are used using unprogrammed thermostats. The cost of such thermostats is within 40 ... 120 $. Temperature control is performed using either a multi-position switch (stepwise) or using a resistor (smoothly). The programmed thermostats give significantly more opportunities to control the electrical heating system. In addition to maintaining a given temperature with their help, you can install the time parameters of the system.
You can turn on and disable the system at a certain time, set different temperature ranges at different times of the day. Such devices have a set of several programs with different temperature and temporal parameters. Moreover, all programs may vary at the discretion of the host. In addition, programmable thermostats are quite easy to fit into the popularity "Smart Home" system. The cost of these thermostat will be 100 ... 200 $ and higher.
If you need to install a thermostat in the electrical cabinet, then there is thermostats mounted on a DIN rail to this case.
DIN Rake is deciphered as Deutsches Institut Fur Normung (Institute of Standardization of Germany). Designed for fastening various electrical equipment of the DIN standard (electrically automatic, RCD, DIFAV, contactors, zero tires, switching terminals, sockets, calls, etc.). DIN-rail material - galvanized steel, DIN rails have a thickness of 0.9 mm. DIN rail length ranges from 70 to 1000 mm, 15 mm hole pitch. Released DIN Rake complies with GOST R IEC 60715-2003
If the switching power of the thermostat is not enough (as a rule, it is not more than 3 kW), then the magnetic, which will be controlled by this thermostat. Or you can install a separate thermostat for each section.
Selection of thermal insulation for electric heating floor
The heat-mall system is necessarily insulating that the power of the system does not go to heating the overlap, or soil.
As thermal insulation, it is recommended to use EPPS with a density of 30 kg \\ m3, thickness, as a rule, 20-30 mm. If the room that needs to be heated on the ground floor or the base is generally soil, then the thickness of the thermal insulation will be required, of course, large than for the floor over the heated room (on average 1.5-2 times thicker).
Thickness in each case is determined by the calculation.
Often used thermal insulation with a reflective layer of foil. It is believed that the foil in addition to the heat reflection, contributes to a more efficient redistribution of heat from the cable over the floor surface. However, there are opponents of using foil thermal insulation. According to some specialists, the foil under the influence of an alkaline medium of the cement mortar for 3-5 years is completely destroyed. This is especially true with high humidity in the room, in addition, for the correct operation of the foil to reflect heat, between the foil and heating element, there must be an air layer, which is almost impossible in the floor.
Warm electric floor do it yourself
Recently, the popularity of warm electric floor has only increased. Mount this floor with your own hands is not at all difficult.
Electric floor is very convenient and easy to operate. The main disadvantage is a big bill for electricity, so such a system is installed only in separate rooms at the cottages either in homes.
All installation works can be held with their own hands, except one.
Attention! The electrician must connect this heating system to the network. In this case, the system will be reliable, safe and economical. On the warm floor, the manufacturer always gives a guarantee.
Cable electric warm floor
The cable system consists of a heating cable mounted on the floor surface and connecting with power wires that go to the source of electricity.
Selecting heating cable
Heating cables are classified into two types:
1. Resistive.
Their composition includes heating custody, transforming energy to heat. It is protected by a metal braid, which is grounding and protecting from electromagnetic fields. The protective shell is covered with this system from above.
Resistive cables are classified on:
single-core
two-housing
Warm floor mounting scheme
They are distinguished by the fact that there are also conductive lives in a two-housing cable, due to which the current can go in various parallel directions and even one end of the cable is used to connect to the power grid to the power supply, which greatly simplifies the cable installation scheme.
2. Self-regulating.
They have a similar structure with a two-housing cable, except that both veins conductive, and between them is a polymer material that is a heating element.
Heating wires can be purchased as a separate independent product, or already as part of a finished set of warm floors, on some of them there is an inscription "suitable for installation with their own hands."
The composition of cable floors includes:
heating cable
electric wires
paul temperature regulator
temperature sensor with corrugated tube
assembly tape
connecting clips
set for isolation
instructions for laying and operating
the following materials are also necessary:
heat insulator
dampfer tape
scotch construction
concrete screed pouring materials
Installation of thermostat
Thermal mode in the room is controlled manually either with a thermostat. To do this, it is necessary to simply set the temperature, and the thermostat itself will be the power of the system to adjust, while maintaining the desired room temperature.
Stages of laying thermostat:
A hole is made in the wall, as for an ordinary outlet and insert the mounting box there. The distance from the floor is approximately 50-100 cm.
Supply from the distribution box to the place of installation of the phase, zero and grounding.
In the wall from the thermostat to the floor, the groove is made by which the heating system and the temperature sensor are summarized to this box.
In accordance with the passport of the regulator compound.
The thermostat is fixed in the mounting box.
Attention! Mount the thermostat in the mounting box and connect it after the load check process. All these works are carried out with a disconnected voltage. In the gap of the phase wire, the automatic switch (AV) is installed in front of the thermostat, which is designed for 16 A to protect the system from.
The process of preparing the foundation
Before the device of water and electric heating floor, it is necessary to start with the process of preparing the base. To do this, remove the outdoor old coating and clean it from garbage and align it.
Temperature seams are made throughout the perimeter of the room. It is needed to compensate for the temperature residual screed expansion, for waterproofing between the walls and the screed.
Dampfer tape or special sealants is a temperature compensator. If the area is large, then this seam is made 10 meters.
Installation of the heat insulating layer of warm electric floor
To reduce heat loss several times, the high-quality thermal insulation layer should be installed. To select the material for this layer, it is necessary to be based on the following characteristics:
If the heat loss in the room is small, then the fool-foam polyethylene is a heat insulator, the thickness of which is 3-5 mm, which has the necessary properties preventing the weight loss.
If the heat loss in the room is large, use more efficient and overall insulation, with a thickness of 20-50 mm or a cork substrate.
Rolled or slab insulation laid on the prepared surface. With the help of aluminum scotch, the joints of the cubs of foam polyethylene are sized.
Installation of cable fasteners
To eliminate cable filament offset during concrete workThey are fixed on the surface of the insulation using the mounting tape or the reinforcement grid.
Mounting tape.
Laying the cable using the mounting ribbon
If a foil is included in the insulation, then a mounting tape is installed on it, with a sticky base. In other cases, the insulation is poured a concrete thin screed with a thickness of 1 cm, and the mounting tape is stacked on it.
Therefore, with heat insulator, the heating cable will not contact. Perpendicular to the lines of cable laying are laid ribbon strips, taking into account the distance of 30-40 cm from each other. Fix this cable on the tape using tape flexing fasteners.
Reinforcement grid.
A metal grid is placed on the insulation. Plastic clamps are used for fastening. The grid does not allow you to contact the cable with a layer of insulation, creating an additional rigidity of the tie from concrete, and prevents its temperature expansion.
Laying heating cable
Before starting laying, the cable is checked for the absence of a break. To do this, you need to measure it electrical resistancewhich should coincide with the specified number on the label.
The cable should be laid in accordance with the scheme and stacking step.
Put the cable on the guides with a certain tension, but without effort, and it is impossible to twist it and be engaged.
Cable bending minimum must have diameter 6. This should be observed in the connecting places of the heating cable and the power. Therefore, connecting couplings are on direct sections of the cable passage.
Cable threads should not intersect.
You can not do any work after laying the cable on the floor surface, except for a concrete screed, so that the cable isolation is not damaged.
If work is carried out at temperatures below zero, then the cable must be turned off and connect to the network for 5 minutes, so that it becomes flexible and elastic.
Important! You can not cut off an extra piece of cable from the selected length. Two-housing cables cut categorically. After the cable is laid, it is necessary to make a laying scheme and save it. With the help of the tester, it is checked to fill with concrete screed resistance of this cable, which should coincide with the passport value plus minus deviations not more than 10%.
Mounting concrete tie
Installation of electric floor on a concrete screed
The concrete mix is \u200b\u200bmade independently made of cement, sand and water (M150), but it is best to apply special dry mixtures for warm floors, based on a cement binder, which includes quartz fractionated sand, additives, edible granite and a complex of modifying additives.
These solutions have high plasticity, crack resistance and heat resistance.
Important! Concrete screed for these floors should have a thickness of 30-50 mm. With this optimal value, the surface of the floor will quickly and evenly warm.
Before mounting the mortar mixture, small through holes are made in the heat insulator, approximately 4-5 pieces per m². It allows the concrete screed to rigidly connect with concrete base Floor.
The heating system is evenly covered with this solution, starting from the most remote from the outlet of the wall. For beacons, this solution is smoothed. Smoothed it along cable contours.
There should be no air pockets in the screed, especially near the heating circuit and connecting couplings, which could be the local overheating of the cable and to break the performance of the entire system.
System operation
It dries the usual screed of concrete to 28 days, until this time, the heating system will not turn on. But with the help of special mixtures for a warm floor, this period may be much less.
For the first time, the system of warm floors exploit no more than 3-48 hours, starting from 20ºС and daily gradually increase the temperature by 3-4ºС.
After 4-5 days, the finishing coating on this heating system can be laid. If the finishing layer is represented in the form of a laminate or parquet, then you should give the screed to completely dry.
If mounted on a warm floor tile, then the interline seam should be at least 2 mm, so that the temperature expansion does not form the tile cracking.
From the above, we can conclude that you do not find it difficult to mount the warm floor. But familiar with the main moments of such work, before its start, is simply necessary.
Repair of cable warm floors
A breakdown of professionally installed electric warm sex happens quite rarely. At the same time, over many years of work, we often had to find and eliminate various kinds of faults, incl. caused by unqualified installation.
In such cases, it is best to turn to a specialized firm, which sells, installing and repairing warm floors, such as "HeatingLight" (see section on the cost of repairing a warm floor).
If you have sufficient qualifications and a tool for self-repair, this article will surely help you.
First of all, try to determine which component of the system (thermostat, temperature sensor or warming cable) is faulty. Sometimes it can be easily defined, for example, in cases where the floor drilled and damaged the cable (put the door stop, etc.).
If the reason for breakdown is not obvious, measure the supply voltage. It must comply with the value given in the instruction manual of the thermostat, without deviating from it by more than 5%.
If the root floor is not running on the thermostat (light bulb or icon on the electronic display), it is necessary to check the presence of voltage (220V) on the outputs for connecting to the heating cable when the external temperature sensor is connected (if provided). If there is no voltage - the problem may be caused by bad contacts on the thermostat due to poorly tightened locking screws, as well as the temperature sensor fault or the thermostat itself.
In order to check the temperature sensor (remote), it is necessary to disconnect it from the thermostat and check its resistance. You do not need to remove the sensor from the floor for this. The resistance value must be within 5 ... 30 com at room temperature (the exact value can be found in the instructions). If the sensor is faulty, it must be removed from the corrugated tube, to which it is placed during the installation, and replace it. At the same time, pay attention to the fact that the sensor reached the end of the tube. To do this, it is better to note on a new sensor the length of the one you was taken out.
Unfortunately, we often faced with an improper installation of the sensor, which makes it impossible to replace it. For example, when installing, a corrugated tube was not applied and the sensor looked stuck in the floor screed; There is a tube, but it is laid with such an inflection that the sensor cannot be pulled out. Situation is complex, but solved.
Such problems and ways of solutions are disclosed in detail in our article a heating floor temperature sensor: missing or it cannot be removed to replace. For a specific situation, the following recommendation is suitable:
To avoid opening of the floor when the sensor is replaced, the thermostat can be replaced on the model operating in the power controller mode, for example, the OCD4 temperature regulator. Such regulators allow warm floor Work in timer mode (for example, half an hour - work, 15 minutes - shutdown). This option is not particularly convenient to operate, at the same time it may well come out in some cases, because It will ensure the heating of the floor in the room.
During checking the health of the thermostators themselves, it is recommended to disconnect the warming cable from them. In the event of a thermostat breakdown, it can be replaced by identical, connecting the old sensor to a new device. If you chose another model, the sensor is better to replace that it is not difficult when proper montage Sensor, and the sensor most often comes complete with a new thermostat.
If the thermostat, and the temperature sensor is quite working, the reason that the system does not work, you need to search in the heating cable. How to check the cable of a warm floor? To do this, make a measure of the cable resistance, insulation resistance, compare it with the values \u200b\u200bspecified in the passport (or warranty coupon) of the product. In case of professional installation, these values \u200b\u200bare always checked and fit after installation. With their absence, that, too, to our regret, is found quite often, the resistance of the cable can be approximately evaluated, based on the square and the specific power of 100-120 W / m square. Most often we face too large resistance values \u200b\u200b(megaoms), which definitely speaks of a cable breakage caused by usually mechanically damage. Another sign of professional installation is the presence of a cable laying scheme - first take a look at it. As a rule, the floor is drilled under door limiters, cabinets, plumbing, etc.
When the heating cable breaks, the insulation resistance is often significantly reduced, incl. Resistance between heating residential (or both veins) and braid. In such cases, a special device is used to search for a break site - a high-voltage generator, which often allows you to apply a high voltage to form a high-voltage arc between heating residential and braid or cable veins. Next, this place can be found using another instrument - an audio detector, the principle of operation of which is similar to the metal detector.
Sometimes, when the audio detector does not manage to find the location, the so-called is used for its search. Thermoplasty. This method can be applied in cases where after the "burning" of the cable and its cooling (for a pair of hours), a conductive track is formed between the veins of the heating cable. When the reduced voltage is applied, the part of the cable is heated and you can define the warm-up zone and cliff, applying the plates to the floor. This method can also be applied in those rare cases when the cable resistance is significantly lower than the nominal, which is possible in cases where heating veins are in contact due to damage.
So, the damage is found (which, unfortunately, even possessing a high level of professionalism and technical equipment, it is possible not to implement in all cases). Now it is necessary to carefully release the part of the heating cable and repair it. The torn veins are connected using the values \u200b\u200bof the corresponding diameter, which are crimped with press clamps. The connection location is insulated with a shrink coupling and a construction dryer: a heated clutch cools, compressing and seals damage damage.
Please note that the search for cable damage and its repair are very laborious and complex operations that require high qualifications and a special tool.
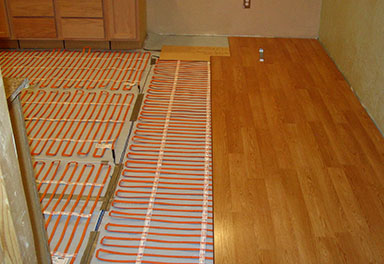
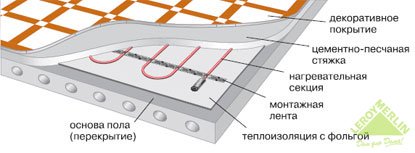
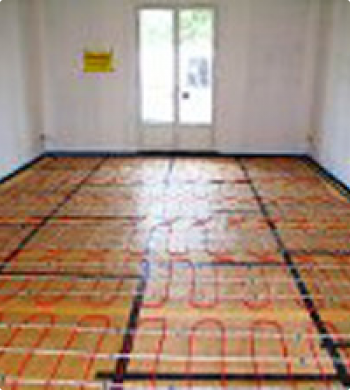
Installation of a warm floor
The sequence and content of operations for the installation of warm floor are little different for the heating cable or for heating mats.
1. Scheme of a warm floor device
Before starting to install a warm floor, make a schematic drawing of the heating cable laying or laying the heating mats on the heated area. This scheme will help to avoid mistakes when installing a warm floor, and will also be useful if you decide to produce any repair work, when performing which it will be necessary to take into account where the thermocabel is laid under the floor covering.
With a warm floor device, it is necessary to maximize the area of \u200b\u200bthe room, but it is possible to avoid laying the heating cable in places where plumbing, equipment or light partitions will be subsequently mounted to prevent possible damage to the thermocabel due to drilling or flooring. Also, when developing a warm floor scheme, a cable of the warm floor does not have a cable in areas where furniture will be installed with a low bottom, since the difficult heat transfer from the heated surface creates unfavorable conditions of the thermocabel, and significantly reduces its resource.
Heating cable. It is very important that heating cable of the warm floor is evenly distributed across the entire heated area. For this, the laying step of the heating cable is calculated. The value of the laying step can be determined if it is divided by the size of the heating area by the length of the heating cable. Usually, the thermocabel laying step for the warm floor of the direct action ranges from 8 to 12 cm. The minimum allowable step of laying the KIMA heating cable is 7 cm.
Heating mats. When choosing heating mats, it is extremely important not to be mistaken when choosing its size. Warm floor mats are a kapron mesh 50 cm wide with a heating cable fixed on it. To "shorten" or "to zapod" the heating mats during their laying is simply impossible.
2. Preparatory work
It is necessary to determine the installation sites of thermostat and provide the supply to them. Connecting the load and must be performed in accordance with PEU and SNiP standards.
With a hidden cable eyeliner to the thermostat, it is necessary to prepare an end of the floor in the wall to the thermostat. The width and depth of the plot should provide a laying of the cable channels of the zipping wire of the warm floor and the temperature sensor cable.
With a small thickness of the heat-mall string, the Shtroba continues to the location of the temperature sensor. When preparing this shorter, it is necessary to take into account that the heat-load temperature sensor needs to be located in the middle between the adjacent filaments of the thermokabel and not closer to 50 cm from the wall.
Before starting the installation of a warm floor, it is necessary to clean the area of \u200b\u200blaying from the construction trash, dust and dirt. When using heating mats, the floor surface is required to be predicted to ensure adhesion of glue applied to the opposite direction of the piping mesh mats for fixing them during the installation.
3. Laying of electric heating floor

When performing work on laying heating cable and heating mats, it is necessary to respect special caution to avoid possible damage to the thermocabel. Works should be kept in shoes with a soft sole, it is necessary to take measures to protect the heating cable from the fall to it.
Heating cable. The minimum temperature in the room where the installation of a warm floor is performed, should not be lower than -15ºС. Begin laying the warm floor from the installation site of the thermostat. Heating cable must be laid with the same step on all sections of heated area. It is not allowed to cross the threads of the heating cable or their rapprochement for a distance less than 5 cm. The radius of the bending of the threads of the heating cable during laying should not be less than 3.5 cm. Shrink coupling clutches, end and in the junction of the heating and supply cable, must be located only in rectilinear sections Gaskets of cable filaments. To exclude the displacement of the decomposed threads of the heating cable in the process of the warm floor screed device, it is necessary to fasten them on the surface of the base. When installing warm fields of direct action, the mounting tape is usually used for this purpose. Ribbon bands are perpendicular to the direction of laying of the heating cable every 30-40 cm. Fix the heating cable using the tie-up petals of the mounting tape.
Heating mats. When laying heating mats, the temperature in the room should be not lower than + 5ºС. Mata stacking starts from the place where it will be connected to the temperature controller. The kapron mesh with the heating cable pasted on it is rolled on the basis of the floor until they reach the wall. Then carefully, so as not to damage the heating cable, the mesh is cut, then the heating mat is deployed 180º and continue to roll it in the opposite direction.
At the same time, the adjacent web should be located at such a distance so that the heating cables passed on them are not closer to the distance of the meter 60 mm. On problem areas of laying, the grid must be cut to "bypass" a complex area with one thermocabel. At the same time, the radius of the bending of the cable of the heating mat on curvilinear sites should be no more than 30 mm.
4. Installation of temperature sensor
When using a thermostat with a remote temperature sensor, it is necessary to provide a supply cable channel, for example, a corrugated plastic tube with a diameter of 16 mm. This is necessary to extract the temperature sensor during the operation of a warm floor for prophylactic work. The tube is placed between the adjacent threads of the thermocabel from the open side of the loop. The end of the tube is drunk to prevent ingestion of its solution when pouring a screed. The distance from the location of the sensor to the nearest wall should be at least 50 cm to ensure adequate data of the heating temperature of the warm floor.
5. Warm floor screed device
After laying the heating cable or heating mats, depending on the intended thickness of the heat-floral screed, the space around the thermocabels is either filled with tiled glue, or is poured with a screed solution. The mixtures used to prepare should have labeling on the packaging confirming the possibility of using them when a warm floors. To exclude possible damage, the smoothing of the alpine layer of the screed must be made along the threads of the heating cable. Thermocabel and its heat shrinking clutches must be completely covered with a screed solution. Education is not allowed in a layer of voids around the heating cable threads. It is unacceptable to start the operation of the warm floor earlier than 30 days after the fill of the screed, that is, until the moment of complete becoming concrete.
6. Air connection
Heat-Half Cable and temperature sensor are connected to the thermostat according to the instructions attached to it. If necessary, several sets of warming cable or heating mats can be connected to one thermostator. At the same time, even if the total current in the thermocabels will be greater than the value allowed for the thermostat, the connection can be performed through a magnetic starter. The supply of electricity to the thermostat must be stationary through a separate automatic. It is recommended to install a protective shutdown device (UZO) with a leakage current of at least 30 mA.
7. Measures of the resistance of a cable of a warm floor
Connecting a heating cable or heating mats to the thermostat must be performed only by a qualified electrician. To control the integrity of the thermokabel, measurements of the insulation of conductors and shielding braids are made. The magnitude of the resistance should be in the range of values \u200b\u200binstalled for each of the set of heating cable and heating mat. The resistance measurements are made three times - prior to the start of laying, after laying before the fill and after filling the thermokabel, the screed solution. Measurements are performed at room temperature above 5ºС.
Tools and technology to create warm floors with their own hands
The warm floor is a very convenient addition to the already existing heating system in the house. Eggspow can be mounted with your own hands. It is only important to prepare well, know the device technology and comply with the installation sequence. After all, the reliability of such floors by 99% depends on the quality of the installation.
For example, consider the installation of electric heating floor.
The initial stage in the equipment of the warm floor will be layout and purchase essential materials. This can be done independently, but it is advisable to consult with specialists. With the help of special computer programs, they will help to calculate the parameters of the future warm floor. Now there are ready-made sets for laying warm floors, they can make a mark "Suitable for self-mount" For additional heating, there will be a power of 100-110 W per 1 m2 of the room, provided that good heat insulation. For example, for a kitchen area free from furniture with an area of \u200b\u200b10 m2, there will be about 50 meters of cable (all cable parameters are better to clarify the seller). The average specific heat generation of the cable is 20 W per m, and the assembly distance is 20 cm.
DVP, when laying under such soft coatings As linoleum and carpet.
The next step in the arrangement of the floor will be the preparation of the draft floor. The room is exempt from all the furniture and the old flooring. Further, using a long level, the floor surface is measured. If necessary, it is necessary to align it with a screed or thin bulk floors.
Laying of warm floors step by step looks like:
1. Suitable scheme (drawing) of heating area.
For safety and savings, the warm floor is located only on the area of \u200b\u200bthe room free of furniture, plumbing and household appliances. The drawing denotes the places of the future location of the thermostat and the temperature sensor. Also on the diagram you can depict the laying plan for the heating cable. In the future, this will make it faster and easier to find emerging problems and eliminate them.
Method of calculation The length of the heating cable and the floor laying step.
With the advent of warm floors, the task competent heating The premises are much simplified.
The use of such systems in heating not only allows minimize expenses For the acquisition and installation of heating devices, but also significantly expand the possibilities of copyright design for the premises of any destination.
Electric warm floor has several indisputable advantages In front of other systems, which is why it enjoys the most popular in the heating of premises. Moreover, two ways of its use are possible - as the main heating system and as an element of a common system to create a larger comfort in the room.
Before purchasing and mounting the warm floor, it is necessary to produce right calculation The required parameters of the system to find a compromise between excessive heat generation indoors and spending money for the purchase of consumables. This will help save considerable funds at all stages of installation work.
In the calculation process It will become clear what characteristics should have a warm floor, its power, the total area and the width of the laying of thermoelements for different premises.
Attention! When laying the heating floor systems, it is necessary to remember that the placement of heating elements under stationary furniture without legs, and, consequently, good ventilation is strictly prohibited.
This is due to the fact that without proper removal of heat from the floor surface, the heating elements will constantly overheat and very soon fail. This nuance also should be considered when calculating:
- The first thing to do is calculate the total area indoorswhich requires installation of a warm floor. To do this, you need to make an exemplary room plan on scale and indicate on it the location of stationary furniture is also on the scale. Then from the total area of \u200b\u200bthe room, to take the surface area on which furniture is located. For example, the total kitchen area is 10 m 2. Furniture and household appliances occupy 4 m 2 squares. Then the warm floor must be laid on the remaining 6 m 2.
- The total power of the heating system of the floor is calculated.. For each room there are its own power rates per unit area. The table below can be familiar with the main of them. It can be seen that for comfortable heating of the floor in the kitchen of the first floor, the recommended power is 140-150 W / m. We find the usual multiplication that the total power in this room should not be lower than: 6 m 2 * 140 W / m2 \u003d 840 W. Knowing this indicator can be calculated by the required length of the heating cable or the power of the mat when using this type of products.
Calculation of the warm sex as the main type of heating
When using these systems as the main source of heat in the house or apartment, it must be remembered that the area that the heated floor should occupy should be not less than 70% From the common space of any room.
If this parameter will not follow, The likelihood is great that the warm floor will not cope with its function.
Calculates total heat heat loss In this room. Heatlopotieri is present in all buildings without exception. They depend on:
- Climatic conditions in which the room is operated.
- The presence and area of \u200b\u200bwindows.
- The degree of insulation of walls, gender and ceiling.
- Orientation of the structure on the sides of the light, etc.
During the construction of buildings in compliance with all the requirements for the heat insulation of structures approximate power heat loss It is calculated and amounts to 100-130 W / m 2 for different premises in new homes and 150-170 W / m 2 in old dilapidated buildings.
When using a warm floor as the main source of heatHis power should exceed 1.5 times heat loss. That is, in the case of the above-described kitchen, in which heat lifting is, for example, 1000 W, the power of the heat source, in our case, the heat should be: p \u003d 1000 W * 1,5 \u003d 1500 W.
Taking into account the fact that the heating elements will occupy only 6 m 2 areas, we obtain: 1500 W / 6 m 2 \u003d 250 W / m. It is such a specific power that the square meter of the warm floor should be possessed. When purchasing materials are necessary be sure to take into account.
Important: With the result of the power of the warm floor, over 200 W / m 2, it is recommended to consider the use of an additional heating system.
Calculation of the length of the heating cable
Manufacturers produce a large range of various heating cables, characterized by length, power, cross-section and, of course, quality. For purchase required quantity of cable For a particular room, it is recommended to use the formula:
where L is the length of the cable, S is the floor area that needs to be insulated, PP is the power of one cable rowing meter.
For the described example with the kitchen, in the case of the use of heating cable with a power of 20 W / mAnd this type of cable has many producers, we will need 75 rimons: L \u003d 1500 W / 20 W / m \u003d 75 m.
A cable length of 75 meters is now necessary to properly put on the entire required surface, with an area of \u200b\u200b6 square meters. m. for this you need calculate laying step (h). The calculation is made according to the following formula:
where SY is an area for laying a cable, L - cable length. Final result: h \u003d 6 m 2 * 100/75 \u003d 8 cm.
That is, it is necessary to put the heating cable so that between its turns distance in 8 centimeters. This is a completely normal value, although the initial data on heat loss in the example was invented.
In the case of a selection of a warm floor as the main or auxiliary heating source, it is necessary to carefully make the required power, from it the length of the cable and laying step. it will avoid unnecessary costs, as well as prevent the situation when the power of the heating system is not enough, and the need to redo everything to the most inopportune moment will appear.
Calculation of warm electric floor Devi from the company Elektrokontrol LLC Watch video:


