Floor screed is a necessary process before laying on it of any materials, without it to achieve a smooth, smooth horizontal surface is impossible. Neglecting this work entails the appearance of depressions and tubercles, which will not give a qualitatively putting parquet, laminate and will be clearly noticeable on linoleum. In addition, furniture on floors with even very small inclons, failures, disclapses will never be stable.
One method of obtaining an ideal surface with a thickness of 2 to 7 cm is a cement-sandy solution.
For more subtle layers it is more expedient to use self-leveling mixtures.
Preparation of the foundation
If, after removing the old floor cover, it will be found that the previous screed in good condition, that is, there are no bloats, cracks and other visible disadvantages, it will be enough to clean the surface:
- remove the glue and other materials that remain from the dismantling of the flooring;
- eliminate fatty, oil stains, lunch them or applying chemicals;
- cut the high bumps.
If the old screed is unsuitable for the floor device, then it must be completely removed.

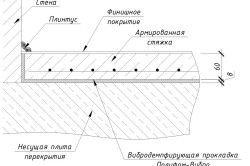
Earth base requires sealing, drainage layer and alignment. Tampering better wet ground, putting on her boards, chunks chipboard, etc. After that, 10 cm of sand, on top of which the waterproofing material is placed, completes the drainage layer of the rubble layer more than 5 cm. For alignment, stretch the threads, attaching them to nails as close as possible to the wall, after which they measure the distance from them to the waterproofing layer. The minimum thickness of the cement-sand tie in residential premises is 3 cm, the maximum - 7 cm. For garages and other buildings, where a large floor load is planned, the thickness of the cement-sand layer must be at least 5 cm. Based on these values, the basis for Required evenness by adding or removing crushed stone.
Preparation of wooden floor under the screed more time-consuming occupation for which it will be necessary:
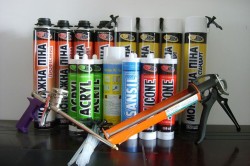
Mounting foam is suitable for eliminating all the slots and holes on the floor.
- polyethylene film;
- mounting foam;
- a knife for cutting excess foam;
- epoxy putty;
- master OK;
- sealant;
- moisture-resistant primer;
- brush.
Since the boards will have to withstand a large load, then the first stage is their careful inspection, replacing the elements that have come into disrepair.
After bringing the board, the preparation of it under the device of the cement-sand surface is performed in the following order:
- All the gaps, the holes are standing with putty and the mounting foam.
- Floor adjustment places to the walls are treated with moisture-resistant sealant.
- After complete drying building materials Their excess is cut, removed from the floor of garbage and dust.
- Apply primer.
- Place the film, leaving the battery on the walls of about 10 cm. It should not have folds, cuts, holes, other defects, through which moisture can leak. It is desirable that the insulating material does not have seams, but if it is impossible, the joints are made of the mustache and are carefully skiing with scotch.
Installation of beacons and cutoffs
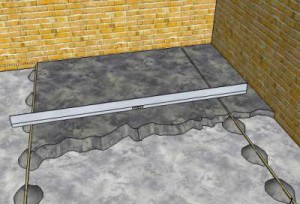
Making a smooth horizontal surface of a screed will help the installation of guide rail or lighthouses for stretched laces. In all the corners of the room, a nail is robbed or screwed up the self-sufficient length of the solution layer of the solution. They are attached to the fishing, thread or cord. With the help of the construction level, the distance from the Hat of the nail to the floor, seeking exactly horizontal location Forers around the perimeter in compliance with the minimum height from the surface. To control the levels of the whole area, the same guide laces are installed in parallel to each other and one wall.
Lighthouses will be located perpendicularly strained threads and under them. For their fastening along the entire length of the room, heaps are applied with a solution, the distance between the beacons should be no more than 2 m and not exceed the level length. The installation of guide rail is accompanied by a control level of horizontal at their length and together. After grappling the fastening of beacons, 1.5 hours, you can start the mixture. Building lights made of galvanized steel or treated with anti-corrosion products are usually not pulled out after filling. If the rails are used, which are destroyed by water or enter into chemical interaction With it, they should be removed 2-3 days after the device of the screed and pour the emptiness remaining from them.
Near the walls, partitions, it is necessary to arrange a damper ribbon with a width of 5-8 cm (depends on the size of the room) from any foamed polystyrene, for example, isolon. The need for this is caused by fluctuations in the volume of the solution during drying. The cut-off can be glued to the walls with instant glue or liquid nails, a week after the device of the cement-sand layer, the excess is cut off.
Preparation of solution
To do this, you will need:
- cement brand M400 and above;
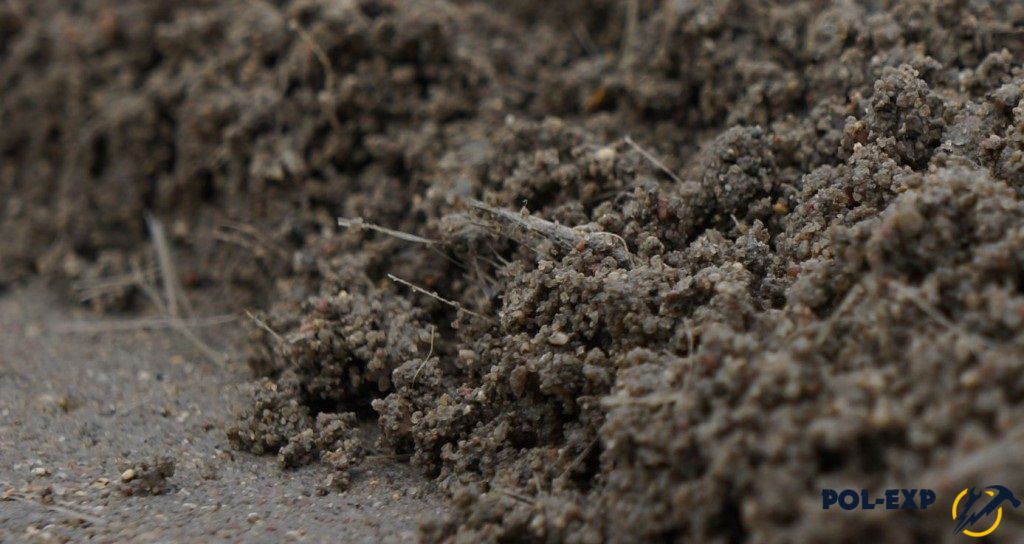
- sand, preferably quartz;
- capacity for mixing ingredients, a volume of at least 20 liters;
- perforator or drill for mixing mixture.
For the preparation of the solution, cement, sand, a solution for a solution and a drill for mixing will be required.
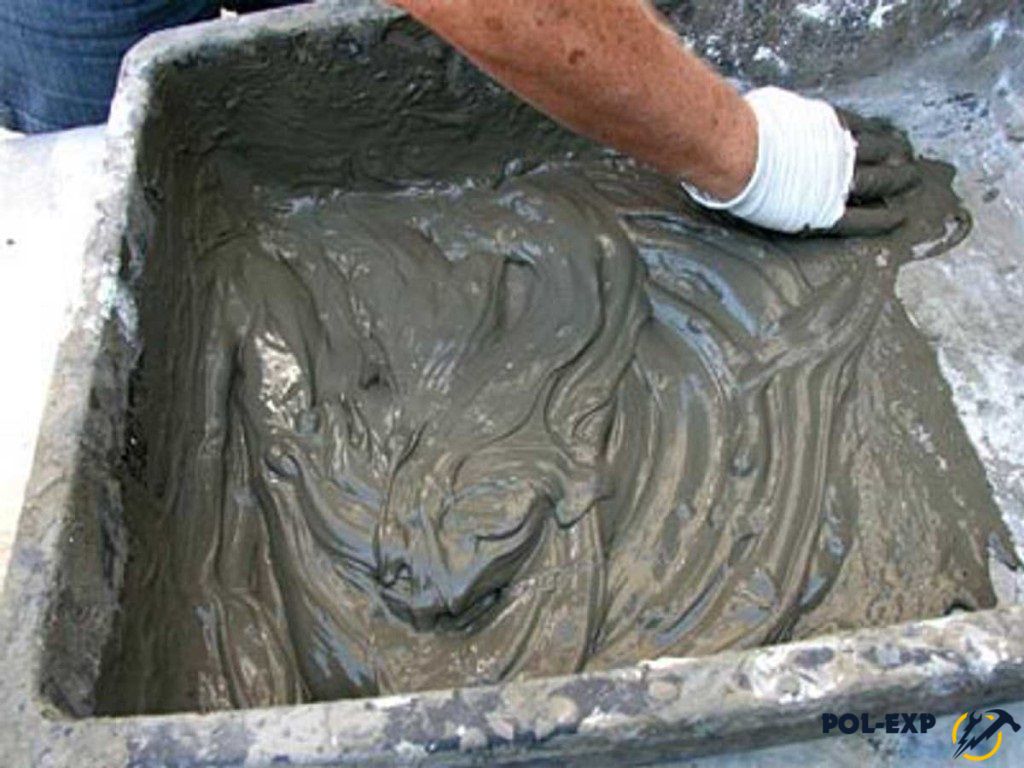
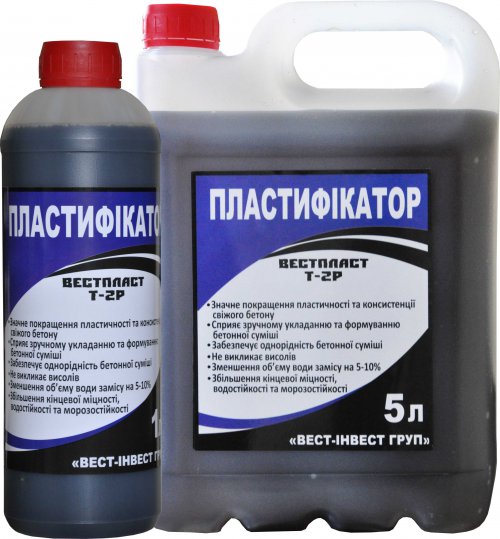
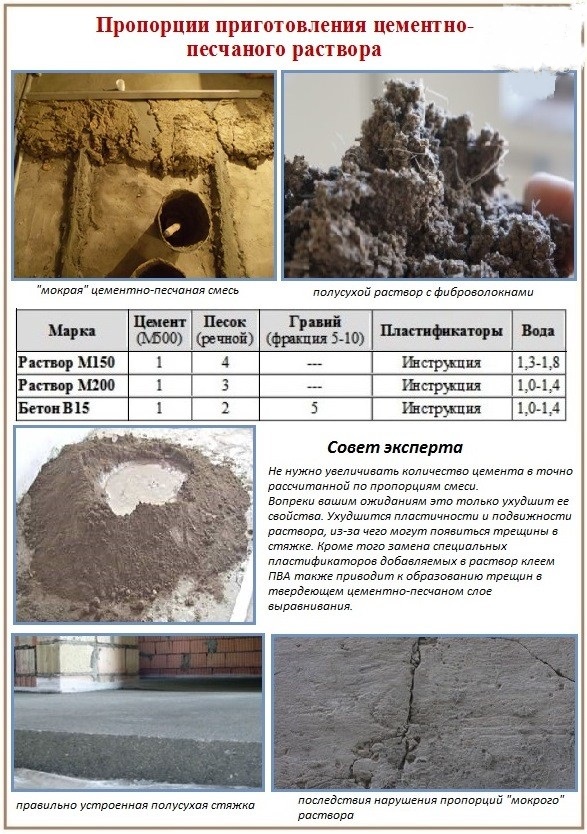
The solution is prepared in the following ratio: 1 part of cement, 3 parts of sand, 0.5 water. Adding a plasticizer will give elasticity, facilitates work. An increase in the amount of water in order to give a solution with special plasticity leads to a decrease in the strength of the screed, which is unacceptable. It is more convenient to use ready-made cement-sand mixtures, since there are already different additives that improve the characteristics of the solution.
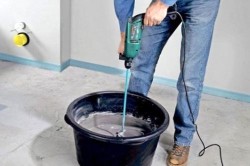
The required amount of water is pouted into the container, the mixture is falling asleep, only a high-quality solution is obtained in such a sequence. Using the perforator, everything is mixed until a homogeneous mass, similar to thick dough. In the finished solution should not be lumps! After 2 minutes, stir again. It is necessary to use the prepared mixture for 1.5 hours, otherwise the solution will begin to dry out and lose strength, no tricks do not help to keep it on the "future". For the preparation of the mixture, it is convenient to use portable concrete mixers, which are enough at tool rental points.
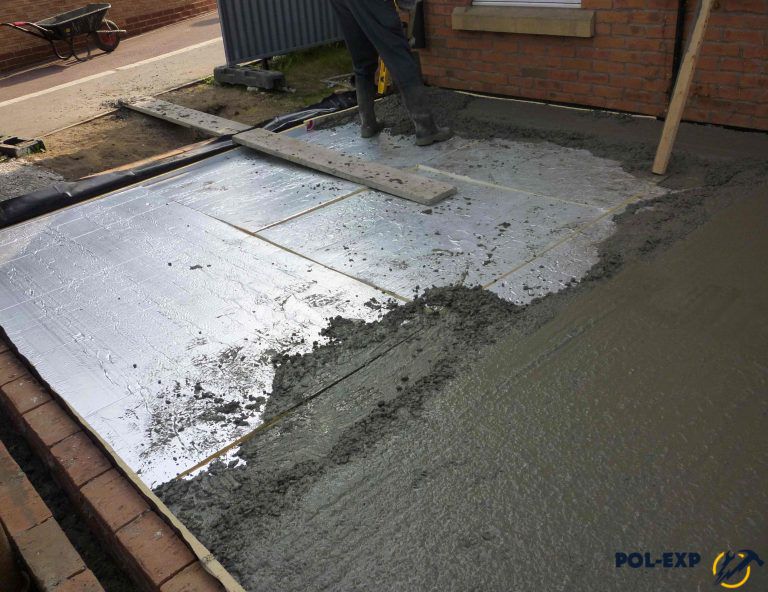
Filling the mixture and subsequent care

To the floor screed turned out to be smooth, the solution must be poured only once.
Before starting work, the surface of the floor of the entire premises is wetted with water. The device of the screed starts near the wall that is most remote from the entrance to the room. The following tools will be needed for work:
- soviet shovel;
- 2-meter construction rule.
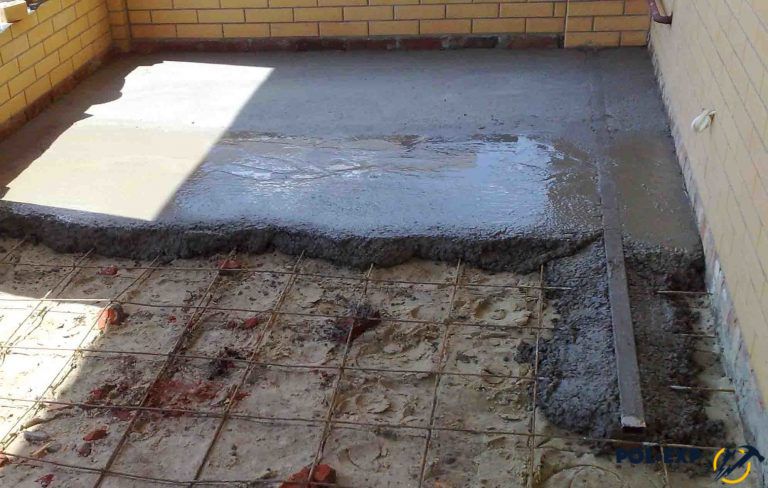
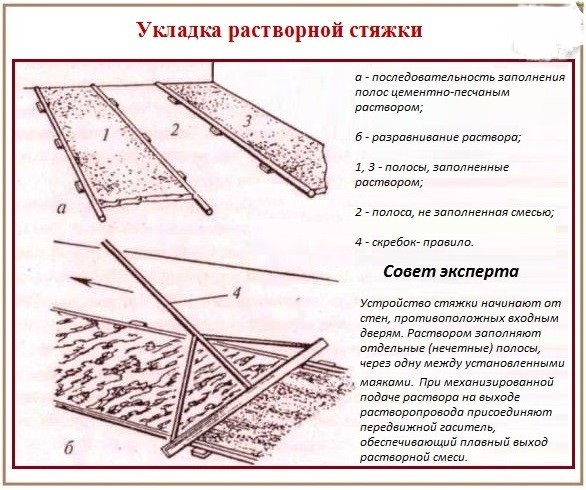
The shovel lay the solution between the beacons, cut off an extra rule, twitching it to the right and left and moving towards itself. Immediately after pouring, it is recommended to make several layer punctures to remove the resulting internal small emptiness with air.
Careful alignment of the layer, preventing occurrence on the surface of its small irregularities will allow immediately laying flooring. Otherwise, the need to finish the fill with a solution will arise. The entire room must be poured with a solution at a time, creating a screed in parts in the same room is permissible only when constructing stepped structures with the organization between them of damper seams up to 2 cm.
Within a month after filling, the screed will gain strength, at this time it is necessary to prevent drying it. Therefore, the first week requires abundant wetting of the floor 2-3 times a day. Next, after moisturizing, cover the tie film and leave for 2 weeks. It is recommended to start laying outdoor coatings not earlier than 1 month after removal of the film.
Strong base of the floor is the key to the fact that the finish coating will be laid beautiful and will live long years. This is especially true of materials such as tile. In order for the base to be perfectly smooth, it is necessary to hold a number of procedures. Cement sand screed The floor is the possibility of creating not only smooth and even, but also a solid foundation. However, work on her fill is not so simple, as they seem at first glance. We will figure it out how to create such a screed yourself.
A screed made of a solution that is cooked from sand and cement is an almost perfectly level base that is suitable for laying absolutely any flooring, be it tile, laminate, linoleum or parquet. It is with the help of such a screed that most often align the draft bases - concrete floors in homes, the floors of the brick and even simply create the base lying on the usual soil. On average, the thickness of the cement-sand screed varies from 3 to 8 cm. It can be more, but because of the big weight construction solutionUsed to fill, when calculating the thickness of the screed, it is necessary to take into account the strength of overlaps.


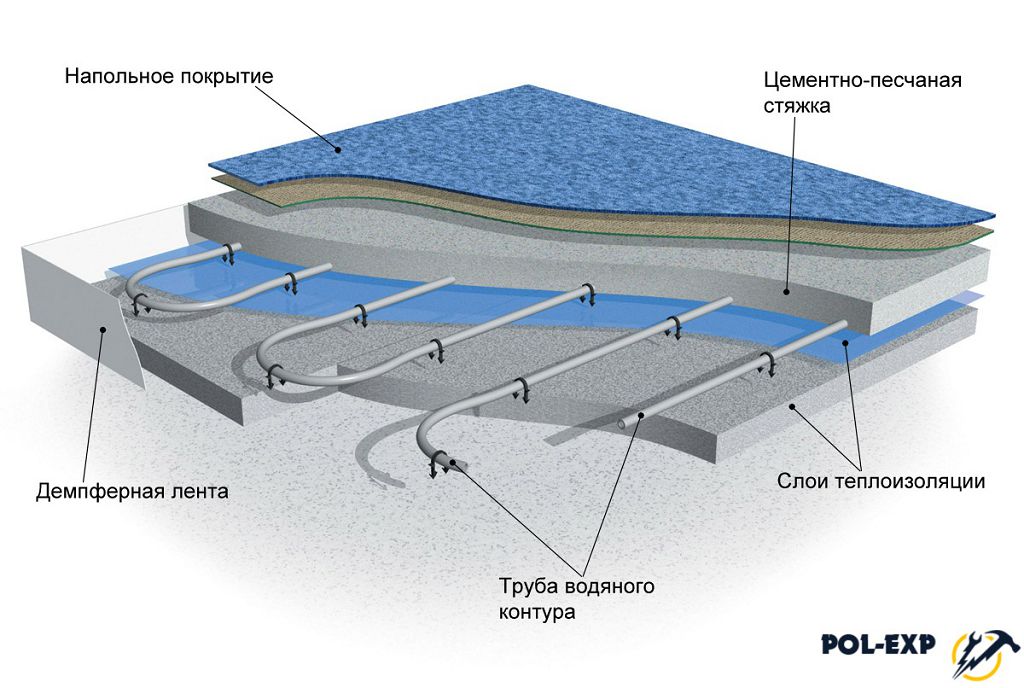
The main tasks of the screed are not only in alignment of the surface, but also that it will redistribute the load tested by the floor, will create a solid base, will provide an opportunity to equip heat and waterproof layers and even in itself is an excellent option for heat and waterproofing. Inside this structure can be laid different kinds Communications, equip, etc.
On a note! Certain types of screed, which are called bulk floors, will help embody the most bold design solutions. Such floors can be different color or have a very interesting picture. Special compositions make it possible to create on the floor.

Benefits and features
The cement-sand screed has a lot of advantages. This refers to its physical and physico-chemical indicators.
![]()
The advantages of a sandy cement screed.
But, like any other way of alignment of the floor, the cement-sand tie has its drawbacks, which should be needed before the installation work is carried out on the basis of this type of base. Cons of cement-sand tie are below.
- Significant mass. Cement screed has a significant pressure on overlap, and therefore use it may be limited by this factor. For example, 1 m 2 cement-sand screed laid with a layer of 1 cm, weighs about 20 kg.
- Long dried period. Before the screed can be calmly move and produce further floor finish, it is necessary to dry it well. Duration of drying is large - about a month.
- Smooth surface to achieve manually difficult. Fortunately, if this could not be done, but evenness is necessary, the screed over can be pouring a self-leveling mixture.
- Complex mounting. Pouring screed is a very complex process that is carried out often with the help of foreign people. Work, of course, can be performed independently, but it is important to observe all the steps and key points during the fill of the screed. Otherwise, it cracks.

In any case, the correct scrolling is a great base option for any type of finish coating. In addition, it is easily cleaned after drying during operation, even not covered with trim, and not afraid of water.
Types of cement screeds
There are a large number of ways to make such a tie. However, it is possible to highlight the main - connected and unbound screed and floating.
![]()
Method tied ties It is used if the allowable layer of alignment may have a thickness of up to 4 cm. The base becomes like a single integer with the floor and walls. This version of the screed needed a thorough preliminary preparation of a draft base - all major holes, cracks, the cracks of the ceiling are close, all significant irregularities are removed as much as possible. If there are small tubercles or fumes on the surface of the overlap, they do not need it in the seal. Builders even recommend fresh laid overlaps artificially cutting, walking along them with a metal brush - thus, the clutch of the solution with the surface will be better.
A pouring solution of a screed must have a consistency of sour cream or cream for cakes. It turns out enough liquid and about 20 minutes after the fill will begin to gradually stick. Therefore, pour and make a screed need to have time for this time.
Attention! Large rooms are usually poured in gradually, as one person is unable to quickly dissolve such a number of mixture.
It can be carefully walking around the room the next day, but the duration of drying such a screed is great - up to 40 days. It is important to dry out such a reason correctly - it is impossible that water quickly evaporated from the layer, it must be released gradually, so the fresh screed is recommended to moisten with water and cover with the film.
there is screed unbound, on the contrary, mounted on the perfectly smooth surface. At the same time, the base should not have water-absorbing properties in order not to stretch moisture from the screed. The thickness of such a layer can reach 5 cm. The main difference from the previous species is that the primer is not used before filling such a screed. No methods that can increase the adhesion strength of the solution and rough base are also not applied.

Floor screed - mortar and grout
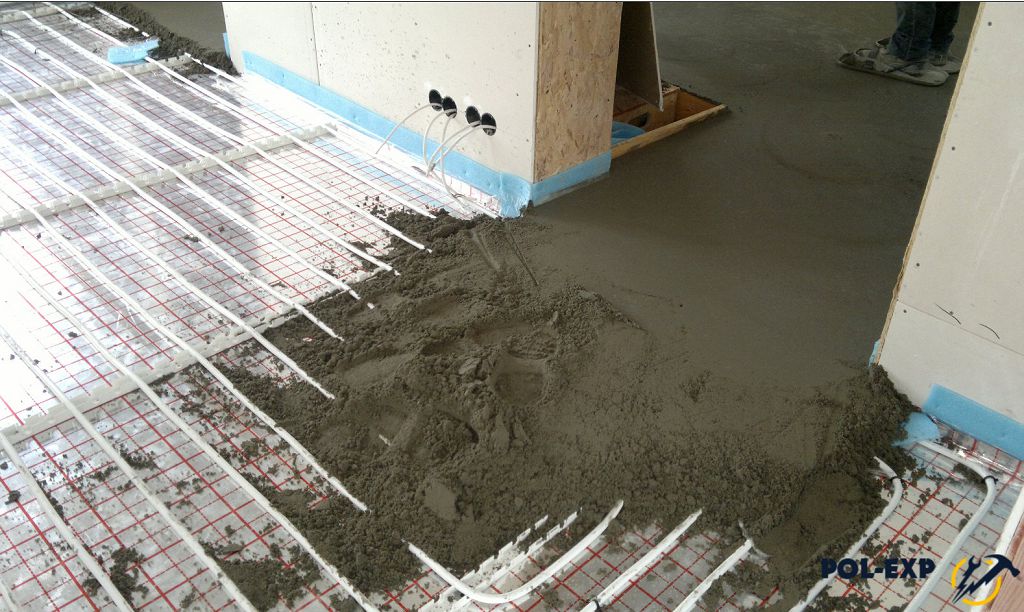
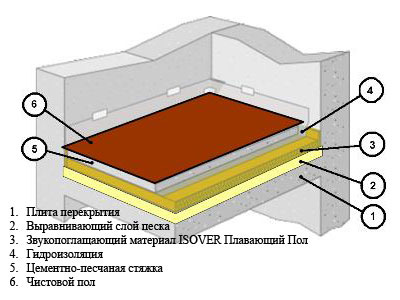
It is also often mounted so-called floating screed. It is usually used if its thickness should be 5-7 cm. The design of such a layer is distinguished by the fact that it is not even in contact with the rough base - on the contrary, layers of hydro and thermal insulation are stacked between the solution and it, various materialswhich will simply not allow the solution to gain a foothold at the overlap.
Attention! It is this type of screed strengthens most often with the help. Also in solution to increase its strength, reducing the risk of cracking and reducing the risk of shrinkage can be added.
Such a screed due to the high thickness could have the maximum weight, however, it is poured using the so-called semi-dry technology. That is, the solution is mixed using a small amount of water and reminds of the structure of wet sand.
Cement and sand proportions
Depending on which version of the screed is selected, the composition of the mixture for its manufacture is determined. The proportions of the two main components are selected depending on which brand cement will be used and what kind of sand. For the arrangement of the screed in the apartment is enough to use cement M200. Ready base It will be able to withstand a significant load - about 200 kg / cm 3. You can take 1 part of the M500 brand cement and mix it with 3 parts of the sand. And the water will need as much as it is necessary to achieve a solution of the required consistency. It is about 1 l per 1 kg of cement.
Attention! It is not necessary to add a lot of water, since the solution will become less qualitative.

It is very important to choose the right sand to create a solution. It should not contain (or at a minimum to contain) various inclusions - Il, clay, etc. These components negatively affect the strength characteristics of the finished tie. It is best to use river sand washed. Career sand is also suitable, but he is somewhat worse than the river due to the angular shape of the sand.
Table. Compositions of mixtures according to GOST when using cement M400, masses. h.
| Mark solution | Cement | Water | Sand |
|---|---|---|---|
| 150 | 1 | 0,55 | 3 |
| 200 | 1 | 0,48 | 2,8 |
| 300 | 1 | 0,4 | 2,4 |
Calculator calculating the number of ingredients of the floor screed
The cement-sand tie of the floor with their own hands is the traditional and proven type of floor creation. It is used to align concrete, stone and brick surfaces. Well what cement-sand screed Does not need additional elements during the preparation of the solution. Here everything is simple: 2.5-3 pieces of sand on 1 part of cement M300. And to increase the strength of the screed into the solution, plasticizer often add. If there are strong loads on the room cement screedThe reinforcement will be more relevant.
Reinforcement
The cement-sand screed is able to withstand the specific pressure from the point loads of 500 H / cm2, as well as a very active movement of pedestrians, and even motor vehicles on rubber tires. Of course, to ensure the presence of all parameters before proceeding to work, certain calculations should be made, among which the weight will be an important indicator.
Preparation
The base should be cleaned of dust and garbage, after which water is moistened. If there are cracks or coarse irregularities in which the solution will fall, they need to be selected by a special material, for example, dense cement mortar or putty. Then you need to remove dust, preferably a construction vacuum cleaner. Next, the surface is ground to ensure a high-quality hitch.
Horizontal definition
First of all, check the geometric forms of the room - the evenness of the angles and walls. Even an experienced professional is not always able to make laying and perfectly align the floor "on the eye". The markup of the base is done using lighthouses, after which the guides of wooden rails are stacked. Thus, a given level of the planned gender is indicated, which means the thickness of the future screed. This parameter also depends on such factors:
- the presence of an insulating layer;
- view of the upper flooring;
- the degree of irregularities of the foundation.
If there is a plasticizer in the component composition, the minimum string thickness is 3 cm, and in the presence of a floor heating system, this indicator reaches at least 5 cm.
To begin with the zero level. It is easier and more convenient to make a laser level if you have no such, you can do the usual water level. It is impossible to use the usual carpenter or linear level.
Zero level designation should be made immediately in all rooms at home, in which the screed is planned. The height can be arbitrary, but, as a rule, a distance is taken in 1.2-1.5 m. Using a water level, the check mark is transferred to the walls of other rooms. So you will have many marks located on the same level relative to the horizon, not the future floor.
When the angular and intermediate lighthouses are installed, they need to be connected to one solid line - it will be "zero level", which will be used to be used to determine the perfect horizontal plane.
Lowakov's exhibition
The main lighthouse should be located near the wall, then with the help of a rail and level of 2 meters die from it and alternately exhibit other lighthouses. It requires increased attention from the master, since the smoothness of the created screed depends on this manipulation. As lighthouses are taken metal profiles or iron pipeswho will serve as guided. The main requirement in sufficient rigidity to ensure reliable fixation. Wooden beacons can not be used.
In places where there is a split level difference, it is necessary to install a plywood formwork that will not allow the solution to spread. Lighthouses themselves can be set either on the slides of the thick cement mortar, or attach to the base with screws. It is important that the possibility of adjusting the height and ensured a rigid fixation. Lighthouses must be installed in parallel, this is done with a rack.
Preparation of solution
To prepare cement-sandy solutionThe portable concrete mixers are used, the preparation of the solution is manually inactive. Quality concrete mix It turns out at times higher than with the old method of its manufacture. Easy to laying a screed can provide water in a slightly larger quantity than necessary, but it will greatly worsen the strength of the screed, so do it undesirable.
Thus, the consistency of the solution should turn out to be a thick dough for pancakes - this is the most accurate definition. Ready solution must be used for one and a half hours. In each room, the tie will need to be done at a time, which means the option when the pubes are made today and tomorrow is not suitable. During the drops in the levels of the screed between the planes, 1-2 cm of the damper seam should be left.
On the video below shows the fill of the screed.
This is how the laying of a sandy cement screed occurs.
Additional Information:
Cement screed, made in compliance with technology, is a universal, smooth, durable and durable base, not afraid of moisture and temperature shift.
The alignment of the sand cement is used in construction most often, because: cheap, suitable for any premises and does not spoil from frost, it is used for any finish coating, provides the desired slope and can serve as a base for warm water floors. The cement floor withstands without damage to alkaline attacks, the effects of fats and acids, carries out heat.

Making a screed from the floor cement "do it yourself" is a time-consuming process, but quite affordable even a novice builder.
The technology of manufacturing and device cement-sand screed is extremely simple. The solution consists of the cement of the brand 300 and above, sand and water. The ratio of components 1: 3: 2. In order to increase the tie density, the solution is complemented by a plasticizer or a similar adhesive adhesive. For a screed, you can use ready-made self-removable mixtures.
Cement-sandy solution is applied on concrete, stone and brick grounds. On average, the square meter of the black floor after the device is distributed loading up to 90 kg.
The screed thickness varies from 3 to 10 cm. If the coating in separate areas is less than the minimum, be sure to enter the plasticizer to the mixture so that the layer does not crack. If the screed thickness is more than 10 cm, be sure to reinforce the layer. More than 10 cm ties are inconspicuously expensive.

Cement with 400 brand is the perfect option for a screed in the apartment of a high-rise building. But the cement M-500 does not mean that it is a more reliable ingredient. The value of this labeling is the presence of specific additives in the cement that does not affect its durability.

Types of cement screeds
Laying the cement layer on the draft floor can be carried out with different purposes. To create height, slope, heat pillow, etc.

For different purposes, 3 types of screed are used:
- screed tied with a rough surface of the floor and walls;
- independent of the construction surfaces of sand-cement I scumping;
- chat with floating design and insulating interlayers for walls and floor.
Surface preparation
Before working with the cement-sandy mixture, you need to prepare the surface and install beacons.
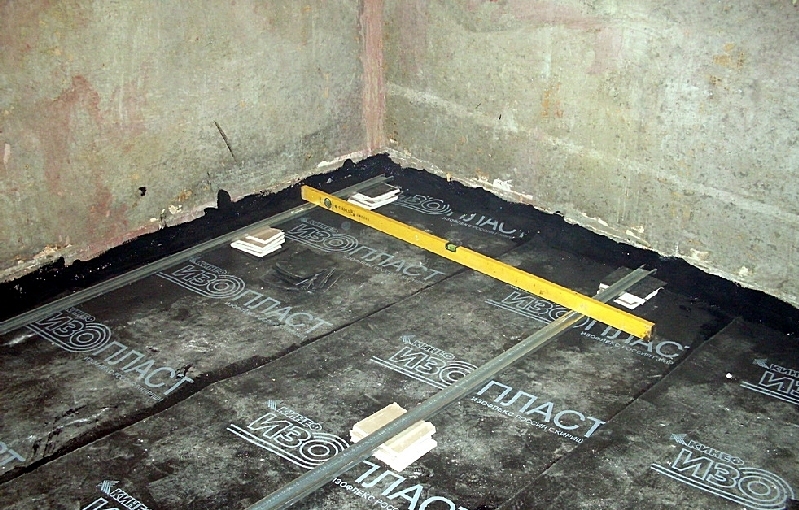
First stage. Paul indoors, where it is planned to make a screed, should be smooth and purified from dirt. If the work is carried out on the ground, it should be at first to catch and pour the bitumen composition so that the cement screed is smooth. Secondly, if there are dry mixes in the cement screed, then the surface must be predetermined and covered with primer so that the screed is better grabbed with the floor surface.
The second stage is the installation of beacons. It is necessary to measure the space using a level and install over the entire area of \u200b\u200bthe beacon, corresponding to the level of the future floor. This is done so that the surface of the screed is the most horizontal and smooth.
Installation of Mayakov
The installation of beacons in accordance with the measurements carried out allows you to subsequently filling the room with a solution quickly and without unnecessary pondays.
On the floor every 30 centimeters are installed "Cups" or cement (alabaster) columns of such a height to which the specific section of the future floor should be raised. Then on the "Cooks" put and secure the lighthouse rails.

The highest point of the rail is the height that the cement mortar should be reached. Experienced builders Frequently cost without beacons, setting the level with a thread or fishing line. However, those who make a screed for the first time, we strongly recommend installing light rails - this is not fast, but clearly and conveniently. With the rail, you can be confident that there will be no significant drops on the surface, and the solution will not occur during the pouring. In addition, the rail allows you to accurately calculate the amount of solution.
Stroke work

In cases where the alignment layer is not more than 4 cm, apply the associated screed. Fill in the end forms a single whole with a rough base and walls of the room. Before starting the fill, you need to repair the surface, remove cracks, holes, extraneous elements. The screed must "stick" to the surface: For better clutch with a solution, the floor is cleaned with a metal brush and moisturized.

Cement-sand alignment of unrelated type
If you need a screed with a thickness of 5 centimeters, choose an unrelated level of alignment. In this case, the most flattened and waterproof surface is required. It is impossible to use primers and other substances that increase the adhesion of the draft surface to avoid the formation of cracks and shells in the layer of screed. Otherwise, the technology of the tie device is the same as in the associated type.
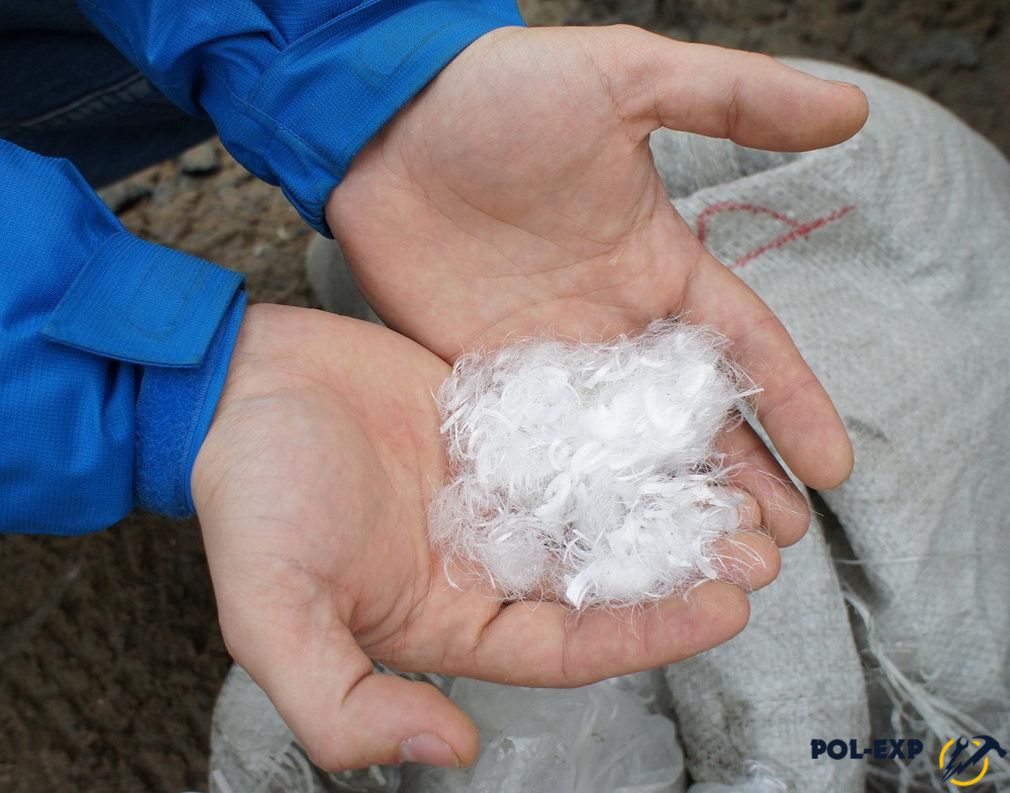
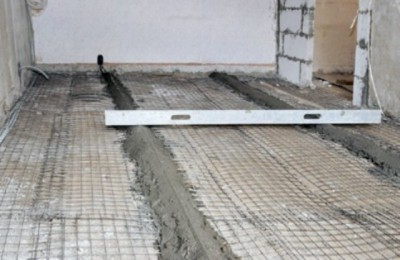
The base of the floating type is suitable for the premises, where it is advisable to the device with a thickness of 5 to 10 cm. In this case, measures are necessary for waterproofing a rough base. And from the walls of the screed layer is separated by a polystyrene barrier. With such a high power (5-10 cm), the screed is necessarily reinforced (grid or fiber fillers).
To reduce the weight of the resulting stone slab, the solution is prepared by a semi-dry way. In this case, the drying of the layer intensifies I 5-7 times. A floating screed solution should be touch as a saczo and when rolling in the palm can form a loose ball, which is nevertheless not crumbling. Polymeric substances can be introduced into the solution so that it is more plastic. When using a semi-dry solution, the finishing finish is possible after 4-5 days.

Pouring is carried out in 2 stages so that the edges of the screed are not twisted during drying. First laid a 2-centimeter layer, which is given a day for shrinkage. Next, the solution is adjusted to the level of lighthouses and align. Otherwise, the rules are the same as when working with conventional cement mortar.

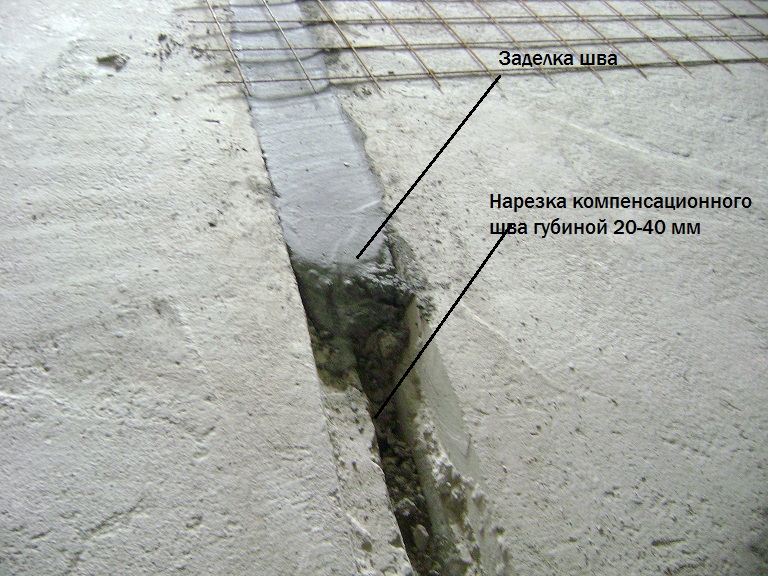
Cutting damper seams
If the area of \u200b\u200bthe screed exceeds 30m2, then after the primary drying of the screed layer of any type, but not earlier than 72 hours, the damper sutures are cut in it. These cavities in cement monolith will help avoid cracks. The seams need to be done every 10 meters, taking into account boundaries on the base plates and the reinforcement grid inside the layer. The groove of 3 mm wide and one-third depth of alignment layer is filled with sealant.
5 tips for cement-sand coating
- Cook a solution for a screed portions: Liquid cement begins to fit already in 20 minutes after the kneading.
- Controls the density of the cement-sandy layer can be, pressing the area of \u200b\u200braw ties. A deep excavation and a puddle say that the kneading should be more dense.
- To check the horizontal surface of the surface of the raw screed, you need to establish "Rule" -temo in different directions.
- You can step on the flooded floor after a day if you have special shoes with an enlarged foot surface for weight distribution. And after 7 days, you can safely walk on the screed. Laying the finishing coating is allowed not earlier than 40 days.
- A week after filling the screed need to moisten to the cement to score the fortress. Humidity will help avoid pipes and cracking. It is important not to do on the surface of the puddle, but to spray water evenly. If possible, you should hide the screed with a cellophane or any polymer material so that it has evaporated moisture as slowly. During the drying period, cement coating also requires protection against drafts, frost, direct sunlight. In the room it is desirable to turn off the batteries and other heating elements so that the drying is uniform.
Video - Cement screed floor with their own hands
The repair is always accompanied by a number of problems that are simply impossible to predict in advance: then the cement is suddenly ended, then the wallpaper was dug. To avoid similar incidents, you always need to count and think over your actions. Cement Sand screed is no exception - everything should be immaculate here, because from the quality of the floor, the outcome of all repairs will depend on its ideal state.
The cement band screed is a way of aligning the surface with a special solution consisting of cement, sand, water and some additives that give it additional strength. This type of screed is quite reliable, because its service life is calculated by decades. Alumming the floor in this way can be in any rooms regardless of their destination: in apartments, country houses, warehouses, saunas, shops, etc.
Among other things, the cement-sand screed can serve not only to the floor alignment, it is, in principle, can be the floor itself, for example, in warehouses or in public baths.
But even such an ideal coating has one, although not very significant disadvantage - a cement screed requires a long drying, unlike its "fellow", because it has water in its composition. By the way, about the compositions. Ingredients for the screed and their proportions can be different - it is not even necessary to be sand, cement and water, you can add clamzit here if you need to make a thick layer, glue composition, plasticizer.
You can and do not mess with independent preparation of the solution, and it is already ready to buy, especially since the cost of such a mixture can be equated to the price of cement and sand purchased separately. The composition of the finished mixtures includes various modifiers and reinforcing fibers, which contribute to the rapid drying of the screed and prevent the formation of cracks during shrinkage.
The law of meanness or is there a chance at the old coating
What is the law of meanness and what does he have to do with the cement screed? Everything is very simple! You remove the floor covering and ... oh, horror! Under it, the old, exhausted by permanent mechanical loads, the floor, who has already become unusable for years. That's exactly at this moment and the notorious law of meanness is triggered. You wanted to remove the old linoleum and to lay a new one, but not, it was not there. We'll have to remove the old screed and pour a new one.
The most optimal option is a cement screed that will create not be an ideally smooth surface, but at least as close as possible to it, and with the proper level of experience, this process will go smoothly, as they say "without a bitch and zadorinka."
To remove an old screed, you will have to use a perforator or a jackhammer. By the way, the second is much more convenient, because its capacity is several times more classical perforator.
By destroying the "remnants of the past luxury", you need to carefully remove, without leaving a trace, and then proceed to the next stage.
Removing an old screed. Garbage, of course, a lot, but it will be perfect
Yes, the old coating has a chance if it has a more or less smooth surface on which there is no (well, or almost absent) cracks and chips. Such a screed can be simply pouring a self-election fluid, which will give the floor to the perfect smoothness or "patch" with a hole with a solution.
Why do you need lighthouses?
A strange question, however, some do not understand, and prefer to do everything on the eyes. Such experiences are better not to put, because the "Eyemer" has different, and even align the floor using only their eyesight, you can hardly succeed.
Lightaching is the most difficult floor alignment stage with a screed, but if you have a laser level, this work will not take much time. By setting the level in the center of the room, or consolidating it on the wall, you can safely take care of work, namely for beating the level.
Laser level is good in that it forms a flat virtual plane that makes it easy to put lighthouses. Spin at one end of the room at the wall screws to the height of the future screed (the length of the self-press should be at least 10 mm), then take the rule and cut it vertically directly on the self-tapping screw. In the place where the rule crosses the laser beam, make a mark.

Here it is - a laser level
Now exactly the same procedure must be done at the other end of the room - screwed the self-tapping screw, put the rule and, focusing on the mark, adjust the height of the self-press, twisting it or vice versa twisting it. Thus, you have to place the entire area of \u200b\u200bthe room, but you do not need to screw the screws too often, it is enough to place them at a distance equal to the length of the rule.
No laser level? No problem! Take advantage of water or just pull the fishing line.
Having finished markup, you can start directly to the placement of beacons. If your screed is not very thick, even thin, then the beacons can be made directly from the cement solution, which is neatly laid in a not too wide bed between the screws. Cover the solution of scotch (so it will not stick to the rule), press it with the help of all the same rules until it is represented from both sides into the self-tapping screw. After this simple manipulation, check the lighthouse and remove the surplus with a spatula. After 12-15 hours, when the beds are completely dried, you can remove the scotch and take on the tie.
If the thickness of your screed is more than 5 mm, you can set conventional lighthouses that are used in plastering walls. In this case, the self-tapping screw will be tightened at a distance of about 50 cm from each other. Next, straight on the self-tapping screws are postponed with small grooves from the solution (the solid garden is better not to do, since the probability of cracks appear) and insert lighthouses in them until they disappear into the self-tapping screw. With the help of the level, make sure that your work is not in vain and you did everything right. Excess the solution remove the spatula.

Preparation of the mixture. Just about the difficult
If you coped with the lighthouses, then you can also cope with the preparation of a mixture for a screed, because there are no special mind here, it is enough to follow some rules and comply with the proportions.
Cement mortar for screed is prepared very simply, although such "recipes" are very and very much. But there is one who has been successfully used by the builders in their business for several decades.
So, per 1 kg of cement take 3-4 kg of river sand and 0.5 liters of water. This mixture should be thoroughly mixed up to a homogeneous consistency and it is advisable to do this not in a huge tank (some particularly lazy do this, and in the usual bucket. So you can control the consumption of the mixture, and the solution itself will always be fresh.
You can add a plasticizer that will save your lighter from cracking, but it is not necessary to use it. And you can also buy a ready-made mixture for a screed and save your time and the strength that you will also be useful during the fill.
Fill tie. Rejoice - You are on the finish line
When all the most difficult is left behind (markup, lighting), you can rest a little and do the floorproofing of the floor. Of course, to rest in this case you will not succeed, because work on waterproofing requires the same attention to your person, as well as other events for laying a screed.
All joints and gaps between the plates need to be lubricating a waterproofing mixture, and around the perimeter of the room you will have to consolidate the damper tape, which will continue to protect the screed from seasonal deformations of the "compression-stretching" type.
This tape has an adhesive layer, thanks to which it holds on the wall. Just do not forget that its height should be slightly more thickness of your screed, otherwise the solution will simply flow into the interval between the wall and the ribbon.
After hardening the screed of excess damping tapes are cut off with a conventional knife, and the resulting gap successfully "hides" by the plinth.

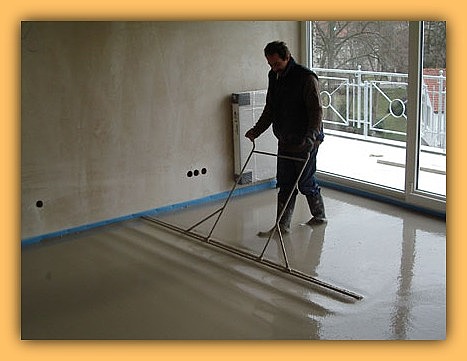
So, it's time to start the pouring of the solution. Starting the best from the wall opposite to the one where the door is. Prepare a pair of buckets of the mixture, pour it in the far corner between two lighthouses and immediately start the rule. Movements should be not only "to yourself", but also to the right and left - so you can evenly distribute the solution and create a flat, smooth surface.
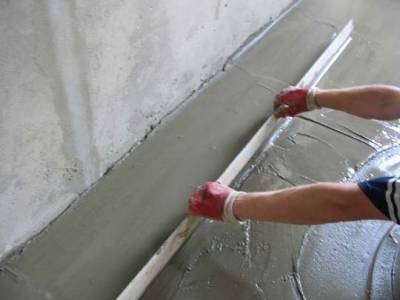
Rolling a screed rule
It is advisable to align the screed not to the end, leaving 1-2 mm to the edge of the beacon, since in any case the solution is a little bit.
While you drop the first batch of the mixture of your assistant (if any) must prepare the second. Thus, the whole process will be continuous and parts of the screed will be filled simultaneously.
Caring for tie
The next day after the fill on the screed, you can already walk, but it is necessary to do it carefully not to damage the surface. Why go on it? Then, that you will need to carefully remove the surplus of the solution and wipe the tie to the grater to give it even greigh.
It also happens that after drying on the surface of the screed, lighthouses are manifested, they become too noticeable, and sometimes at all uncessly stick out. They can be simply removed, and the remaining holes gently close with a solution. You can also go with small depressions, which manifested themselves after shrewing after shrewing. But the tubercles need to be tried to remove the rule, the main thing is to make it preferably on the first day, otherwise then get rid of them will be more difficult.
To give additional strength, it is possible to carry out an iron chamber procedure using metal ironing and pure cement. It is done when the screed has already grabbed a bit and it can be safely walking along it. The essence of the work is simple: dispel the cement on the surface of fresh screed and smooth it with a smoother. In this way, you will kill two hares at once - give the screed additional strength and smoothness.

But on this work does not end, you will have every day for another 2-3 weeks to make the surface of the screed with water with a sprayer or roller. It is done to protect the floor from cracking and giving it additional strength.

This is how your work should look like
As you were able to make sure the cement screed of the floor with their own hands is not such a terrible occupation, as it is usually all represents. Many who are still thinking about repairs, break their heads over how to avoid a similar event, but they don't even guess how simple everything is. Do not think, but act, after all, the earlier you start repair, the earlier you finish it.


