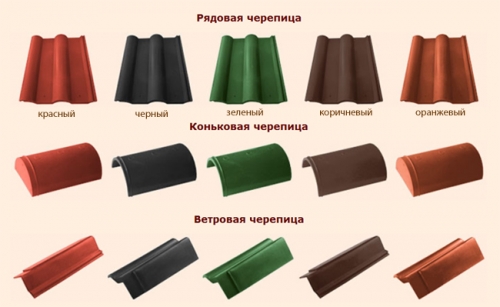
Ceramic tile has long been used as roofing material. Thanks to its naturalness, tile and today remains quite popular. Production of roofing ceramic tile As a business, of course, requested certain costs, but with the right organization everything will pay off, and quite in a short time.
Basic Sector on Russian market Imported manufacturers are used to sell ceramic tiles. The goods offered by them is quite expensive and not every person on his pocket.
Ceramic tile is very valued by consumers.
It has a lot of advantages:
- Durability.
- Natural and environmentally friendly.
- Prevents the formation of condensate. What allows for longer to save carrying construction Roofs.
- Soundproofing.
- Ceramics are not prone to deformation.
- Aesthetics.
How to make ceramic tiles?
The technology of production of ceramic tiles, for all the time its existence has practically not changed.
It includes such steps:
- Preparation of raw materials. Clay must be crushed. After being, they are broken down and mixed with water and plasticizers.
- Formation of tiles. Depending on the desired shape of the tile formate in two ways: tape and pressing.
- Drying. Formed products must be dried by 48 hours.
- Coating. The coating happens two types: glazing and angovo.
- The firing is produced at a temperature of 1000 ° C.
On the production of genuine ceramic tiles Enormous influence such factors as: quality of clay and accurate adherence of firing technology. It depends on the frost resistance and waterproof material.
If you yourself do not really understand the production, it is better to hire a qualified technologist.
How to open your business tile business?
The demand for roofing tiles does not decrease with time, and the simplicity of manufacturing technology makes it possible to open the production of ceramic tiles at home.
It is necessary to premise with an area of \u200b\u200bat least 150 m2 - directly for the workshop, plus storage and service premises to it.
The first thing to be done to open the production of ceramic tiles in Russia is to develop a business plan.
The main cost of expenses, as a rule, the purchase of equipment. Install the workshop can be different.
The list of the most necessary equipment includes:
- Mixer.
- Press.
- Drying chamber.
- Furnace oven.
It is difficult to say about the cost of equipment to be unambiguously. It all depends on how modern, powerful and automated it is. Costs can be from 350000 p. up to 1500000 p.
It is necessary to take into account the more automated workshop - the more high-quality products produced in it. And if, initially, it is not possible to buy equipment for the production of ceramic tiles expensive, we recommend modernization of the workshop over time.
It is necessary to find suppliers of raw materials, and as much as possible an audience to present your products. It is necessary to accurately calculate all costs, the cost of production and possible profits.
In addition, you need to consider all possible risks.
How to extend product information?
To date, the dissemination of information is not a problem. Regardless of the scale of the business, let's advertise ads in magazines, newspapers, the Internet. Create directories and stands for visual product demonstration.
Tile is one of the most ancient roofing materials that are special demand in the construction market. However, the cost of natural ceramic tiles is high enough, and to reduce it, the manufacturers resorted to the bold move, implying use in the production process roofing material Synthetic polymeric raw materials. Polymer-sand tile, resulting in the indicated manipulations, is a new generation material for those who are looking for a compromise between affordable price and high quality. Appearing on the market building materials Relatively recently, the polymerpess tile has won close attention of consumers due to its unique characteristics that combine the durability of quartz sand, aesthetic advantages ceramic tile and the durability of polymers. It is a reliable and easy roofing coating, ideally suitable for finishing the roofs of both residential and industrial structures. Its advantageous combination with the surface of walls from any materials, ranging from a brick and ending with the tree, contributes only to strengthening it in the arena of the modern building market. To make sure that we consider the main advantages of the polymer tile and the features of its production and installation.
Polymer Tile: Historical Information
The pratcher of the polymer tile is a ceramic (clinker) tile, whose popularity was due to the availability of raw materials used for its production (clay). In this regard, the places of its greatest distribution were areas close to sandy and clay careers. The production of clinker tiles was carried out on brick factories, and its transportation was significantly complicated due to its greater weight and relative fragility. Moreover, its production was sufficiently costly, since it required large energy consumption for firing of finished products. If you trace the changes that the tile production has undergone, then it can be noted that soon the clay, which is the main component of production, was replaced by cement-sandy solution With the addition of slag, which led to a minor reduction in the weight of finished products. In addition, the porosity of products has increased, as a result of which they became a favorite place of spread of fungus and moss. Given these disadvantages of the material, the manufacturers concluded that it is necessary to develop a new generation material, which will not only retain its aesthetic attractiveness, but will allow you to get rid of the existing shortcomings due to the features of the raw materials. The idea that clay and cement should be replaced by polymer compositions acting as a binder, which was investigated on a molecular level and assumed mixing preheated polymer masses with sand.
Features of the production of polymer-tile
Production of polymer tile - a multicomponent technological process that includes several stages:
- Preparation of the polymer composition, which is the main component of the tiles;
- Production of polymer tiles using specialized equipment;
Important! Due to the fact that work with polymeric materials is potentially harmful to human health, the installation of industrial equipment for the manufacture of polymer tiles should be carried out in a well-ventilated room.
Raw materials for the manufacture of polymer tiles serve quartz sand, plastics that have passed secondary processing, and dyes, thanks to the extensive color scheme of which it is possible to obtain roofing material of virtually any shade. Moreover, in addition to decorative, the dye performs a functional role, speaking a binding component for quartz sand and polymeric materials.
As for the secondary recycled plastics, they include:
- Agglomerate, obtained by melting polyethylene, during which a certain amount of water, contributing to the formation of balls, is pressed on it. They are the main component for the manufacture of polymerpess tiles;
- Solid polymer, whose function can perform polypropylene or polystyrene.

- The basic principle that must be adhered to at the initial stage of tile manufacturing is the observance of the correct proportions of the components in the process of cooking the working mixture. Thus, the initial stage of production involves grinding the agglomerate and mixing it with sand and dye on special equipment in proportions 24: 75: 1, that is, the working mixture is 75% of sand, by 24% of polymers, and 1% falls on the fraction of coloring Pigments. Failure to comply with these proportions can lead to the manufacture of a tile of worst quality with a lower operational period.
- The first link of the technological chain for the manufacture of tiles is the grinding of plastics into smaller particles using crushing equipment. Sand used at this stage should be dry, in connection with which there is also special equipment for its drying.
- After carefully drying the sand and grinding polymers, the components are mixed using an extrusion machine, inside which they are mixed and melting to form a viscous mass that resembles yeast dough. A ball is forming from the mixture obtained, which is immersed in cold water, after it is allowed to cool at room temperature, which is necessary for the entry of all components to the reaction. After cooling the finished balls, they are immersed in the crushing machine for the subsequent grinding and the production of the mass intended for the manufacture of polymerpess tiles. The resulting mass is immersed in a thermo-mixing machine, where heating and mixing of all components again occurs. As a result, sand is enveloped by dispersion polymers and the yield of a mixture of the unit in the form of small pellets, the mass of which does not exceed 2 kg. Then they are sent under the press, followed by the formation of polymer tiling using special molds. In order for the surface of the finished tile to acquire a glossy surface, it should be cooled at uneven temperatures.

Specifications of polymer tiles
- Despite the fact that the polymer-tile is analogous to the natural, it represents a qualitatively new roofing material, which in terms of its characteristics is largely superior to similar materials.
- Unlike genuine tiles, the polymerpessic is characterized by a lighter weight and low cost;
- Unlike metal tile, the polymer tile is not inclined to form corrosion and provides greater level of heat and noise insulation;
- The roof, for the arrangement of which a polymerpessage tile was used is characterized by greater durability, unlike a bituminous roof, when installing which it is necessary to carefully prepare the roof shawl.
What are the technical characteristics of the polymer tiling?
- The specified material is characterized by resistance to sharp drops of temperature and exposure to direct sunlight, in which mono is verified by studying the results of laboratory tests conducted at temperatures from -65 to +100 degrees. Due to the fact that in vivo for the decomposition of the polymer film will require not one hundred years, material long years retains its initial appearance;
- The distinctive feature of the polymerpessage tile is the low coefficient of moisture absorption, which is its natural protective mechanism from the appearance of mold, fungus, moss and acid rains, which are devastable to aggressive impact;
- Low thermal conductivity, which is another distinguishing feature of the polymer tile, contributes to the maintenance of the optimal temperature regime in space under the roof. It is due to this, it is one of the most sought-after materials in the arrangement of the terraces and the attic;
- The combination of the two above characteristics - low thermal conductivity and low moisture absorption is a factor contributing to the creation of a reliable barrier from condensate formation, which contributes to the effective protection of roofing structures, especially made of wood;
- The polymer tile is characterized by effective sound absorption, in connection with which, in the process of its installation, there is no need to use sound-absorbing layer;
- The cost-effectiveness of the roofing of the polymer tiling increases due to the impact resistance of a material that does not be fighting in the process of laying and transporting;
- The material is manufactured in accordance with the requirements for sanitary, epidemiological, fire and radiation safety.

Polymer tile photo


Advantages of polymer tiles
Considering the above, summarize, which is the advantages of polymer-sand tiles.
- Resistance to harsh climatic fluctuations and high free-proof of frosts;
- The low cost of polymer-tile, due to the low cost of raw materials used for its production;
- High heat and noise insulating characteristics, as well as complete incompetence of corrosion processes;
- The high stability of the polymer-sand tile to burnout, due to the use of equipment with an UV stabilizer, not only on the surface, but also in mass;
- The polymer tile is an effective dielectric due to which there is no need to install lightning protection;
- High impact resistance of polymer tile, due to which the probability of obtaining material with a marriage, which arose in the process of production, transportation or laying tends to zero;

Disadvantages of polymerpess tile: what to pay attention to?
Despite the extensive list of previously designated merits of the material, it is impossible to forget that there are also certain drawbacks for it. Consider what they conclude.
- Erosive destruction of the surface of the tile, due to the fact that after a certain time, the surface of the material is gradually thinned under the influence of ultraviolet radiation. However, according to specialists, the specified feature of the material is difficult to consider the disadvantage, since the thickness of the polymer tiling is quite large, and the erosion of the surface is a long process;
- The laying and transportation of the polymer tile is significantly complicated due to the large weight of the material (the weight of each tile is at least 2 kg);
- Despite the proven stability of the polymer tiles to sharp climatic changes, under the conditions of temperature drops, a linear deformation of a material occurs, which may cause the depressurization of the lock compounds and the subsequent roof flow. It is this deficiency, according to specialists in this field, is the main one.
- As for the deficiencies of the market as a whole, it is often acquired by polymerpessic tiles from unreliable suppliers who have not proven themselves in this area, you risk to face incutable products, the quality of which does not meet existing standards. A bright representative among reliable materials that have proven themselves in the market and deserved consumer confidence is the polymer tile Rufplast.
Laying of polymer tiles: installation features
Even if you are not a specialist in the field of installation of roofing structures, but only at the amateur level we own a "technique of hammer and nail", you can independently carry out the installation of polymer-sand tiles, during which you will get the opportunity to move freely on the root, which is caused by impact resistance Material used. Moreover, considering the properties of the polymer-sand tile, you do not have to be additionally spent on the purchase of heat and sound insulation materials.
Main preparatory activities before installing polymer tiles
Installation of the rafter design
Among the orders there is an opinion that the use of polymer-sand tiles is significantly limited to its large mass, not peculiar with metal tile and other light roofing materials. In this regard, non-professionals are confident that this determines the need for additional costs for the purchase of lumber for the manufacture of crates and the arrangement of powerful rafters. However, in practice it turned out to be a deep misconception - a myth that is not difficult to debunk. Experts calculated that in the estimated load on the roof the proportion of its own weight of the polymer tile is not so great (if you compare it with the wind and snow), therefore, according to the results of the studies carried out, it does not exceed it for metal tile and other light roofing Materials. With this in mind, as well as axioms, that weight is 1 square. M Tiling does not exceed 22 kg, you can come to the conclusion that there is no need to improve the additional strengthening of the rafter design, for the installation of which the bar can be used, characterized by a cross section from 50x150mm to 60x180 mm. For the manufacture of rafters, dry wood should be used, the humidity of which does not exceed 15%. In the classical options, the step between the rafters should not go beyond the distance from 600 to 1200 mm, while its width is directly proportional to the corner of the roof inclination.

Important! If the roof inclination angle exceeds 45 degrees, the rafter step must be increased to 1000-1200 mm, if, on the contrary, the angle of inclination is small, the rafter step must be in the range of 600-800 mm.
Arrangement of waterproofing layer
To protect the underlined attic space from soot, dust, rain and snow moisture, as well as ensure proper ventilation of water vapor, experts recommend using underpox films with microporphoration. It is placed on rafters, using the counterbuchka, which is stacked along each rapid beam. The installation of the waterproofing layer is starting the edges of the eaves, gradually moving to the skate and providing proviscial films of at least 20-40 mm. We must not forget that on the shadows, it is necessary to perform the flip of the film at least 200-300 mm and pave an additional layer of film. To ensure the optimal level of insulation under the roof, the film layer, ice-skating and the covers, are not adjusted to the upper point by 30-40 mm. It is necessary to trim the film only at the end of work.
Installation of crates
To mount the crates, it is recommended to use a bar not lower than the second variety with a cross section of 50x50 or 60x40. The shape of the crate, which needs to be clearly withstanding when it is laying, is 350 mm. If you do not neglect this rule, you can be firmly confident that when screwing off screws, you will be clearly in the wood. To mark up, use the lacing that you need to pull on extreme controls and simultaneously measure the possible provis company of each case of the crate.
How to equip the crate in some sections?
Installation of crate on the roof with a remote cornese:
If you are using the polymer tile on the roof with such a mounting type, it is necessary to take into account the step value on the slice of the sloth of the skate, which should take into account the optimal scan of the upper row of the break to the lower. The top beam of the belt of the remote carnis is pinching close to the place of the rafted breakfast;

Downtown roofroom:
When calculating the shade of the crate in the process of its installation for the attic roof, it is necessary to take into account not only the angle of inclination of the lower and upper semi-samples, but also the thickness of the crate. The main features of the styling are as follows:
- The angle of inclination of the lower row of the polymer tiles of the lower slope should be the same as the angle of inclination of the top row of the tiles this time of the lower row;
- The lower row of the polymer tile of the upper rope of the roof must be mounted in such a way that it provides a sufficient lack of scope over the upper range of the lower slope tile;
- Before proceeding to the rise of the tiles on the roof, it is necessary to complete the laying of the bars of the crate. To prevent uneven load on the rafters, the tile is raised to the roof, laid out on all its slopes in small batches (5-6 pieces).

Tile installation: step-by-step guide
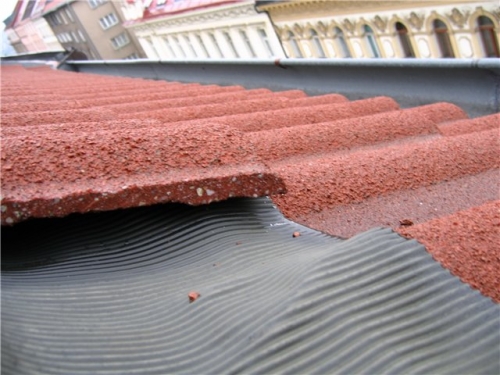
Without fixing, lay out the first and last rows of the tile. On the crate, mark the paint every 3-5 rows. Installation of tiles must be started from the bottom row. To facilitate the fastening of the tile manufacturers have provided a special protrusion at the top of its back side, with the help of which it clings for the crate. In addition, thanks to the stipulated lock designs, the tiles cling to one over the other, forming a solid tiled carpet that prevents possible roof leaks.
The tile fastening is carried out to the crate through the self-tapping screws, which are screwed into the special technological holes provided for in the upper part of the tile.

Important!To prevent the appearance of rust flutters on the front side of the tiles, the specialists recommend using nails or anodized (stainless) self-tapping screws. The fastening of each individual tile should not be tough, as it should be able to have a minor free movement (must have a backlash). The presence of this structural feature of the roof will allow to compensate for the natural expansion of the tile, which is occurring under the influence of temperature drops, and will also contribute to the adequate perception of the load of the load caused by the shrinkage of the building, as well as wind and snow pressure, and will prevent possible deformations and roof destruction.
After you laid every third row, check the horizontal and vertical symmetry of the series. To ensure uniform load on the building, laying the tiles are evenly on all slopes. If you need to trim the tile on the joints, use the grinder or hacksaw for this metal. After you were cut and drilled tile, moisten it with water. Even if the mounted roof is characterized by a complex configuration, the tile costs will be minimal.

Montage Konkova Tiles
The skate tile is fixed using self-tapping screws to the ski board. It is important to remember that it is necessary to ensure the optimal gap between the skating board, the skate and the screw of the self-press (the so-called, small backlash), which will allow compensate for the temperature deformation of the flexible polymer tile. The length of self-samples does not exceed 65 mm.
Installation of the skunk tiles should be carried out in such a way that it overlap the screws, which were used to fasten the above roof tile.

Arrangement of the polymer tiling drainage system
Features of the performance characteristics of polymer and bitumen-polymer tiles, along with a qualitatively organized drainage, allow its use in the absence of effective drainage when water will be flushed from the roof to the ground. This type of drainage is relevant only in small buildings characterized by single RoofAt the same time, the removal of the carnis should be at least 60 cm.
If you plan to operate the roof from the polymer tile in the conditions organized drainage, We should be aware that in this case the use of both traditional systems is allowed to manufacture a galvanized iron or asbestoscent and modern, made of PVC and galvanized steel.
Polymer tile video
(Ceramic and cement-sand) is made from natural raw materials. From a long time, a ceramic tile was considered an ideal coating for the roof, which attracted the consumer with its texture, shape and color gamut. Modern high-tech production lines made it possible to improve the process of manufacturing a natural roof. Our company offers to buy natural ceramic tiles at a low price, delivery in Moscow and the Moscow region.
Natural cement-sand tile
The product of the collaboration of the Russian company "Baltic Tile" and the Swedish holding benders. It was launched in production a few years ago and enjoys great popularity among Russian buyers.
Natural ceramic tile
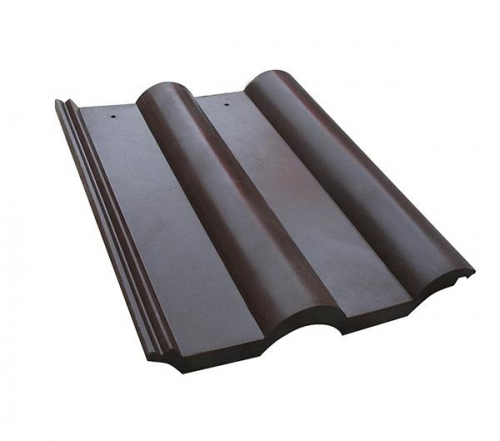
Reliable - Popular roofing material from natural raw materials. It has the following consumer characteristics: durability, heat resistance and attractive appearance. Big assortment of models and colors
 |
It has a wide variety of brick formats, architectural forms and curly elements, and therefore you can embody her even the most original design ideas. |
from 1242 R. / m2 |
 |
For all connoisseurs of Italian traditions, with a bright-pronounced Mediterranean style shown in highly profile form and a special color scheme that mimics the aged surface. |
from 2169 R. / m2 |
 |
From Japan is made of natural high-quality raw materials. . |
from 2000 R. / m2 |
|
For more than 150 years, Erlus plant produces high-quality products. For production, the best clay is used, which gives it high technical characteristics. |
from 1435 R. / m2 | |
 |
It has an extraordinary wide range of color gamut. The Glazers of the ceramic tiles of Noblessse and Finesse transmit almost the entire palette of color shades. |
from 1084 R. / m2 |
| Ceramic tile Braas. . The classic beauty of this genuine roof Brazz does not come out of fashion. For many centuries have already gained increasing popularity. | from 929 R. / m2 | |
 |
The best traditions of classic forms and rules of classicism, imitation of nature. The appeal of the modes to the forms and images of ancient art, as an ideal aesthetic standard. |
from 1087 R. / m2 |
|
(Nelskamp) is produced on the most modern equipment in Europe. This brand of tiles is distinguished by the lowest water absorption. |
from 1050 R. / m2 | |
Production technology
Under the general name, natural tile can be combined with ceramic (made of clay) and cement-sandy, which is made of cement (essentially the same clay, or rather, clay-carbonate mergels, pigments and quartz sand).
 According to the functional characteristics, ceramic and cement-sand (concrete) roofing are the same, and have similar main indicators and properties. Concrete even exceeds her by strength and frost resistance. For the price of M2, natural tile is not cheap, but its magnificent appearance gives roofing a special style that cannot be compared with anything.
The difference between them is the production technology. The production of ceramic natural roofs runs three stages: preparation of raw materials, molding of a shard and firing. For this, ceramic (pottery) clay - stirred to a homogeneous mass and plasticizers facilitating plasticizers add to it.
Next, the products are produced by ribbon and stamping methods. In the first case, a tape is formed, which is then cut into separate tiles, in the second - tile tiles are pressed in metal forms. The material obtained in one way or another is roaming at a temperature of about 1000 ° C.
The advantages of ceramic roof
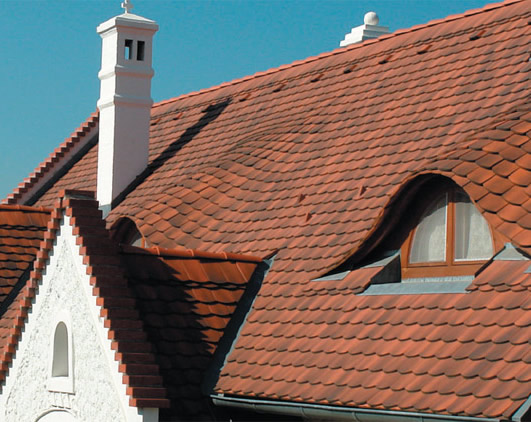
In the roofing materials market, ceramic products are of great popularity. German technologies Allow the widest range of ceramic tiles, different color and shape.
 The process of manufacturing the roof begins with the impression of a clay blank of a certain form. The billet is then dried, coated with a color composition and subjected to burning in the furnace at a temperature of about 1000 ° C.
Those who wish to buy natural ceramic tiles every year more and more, so matte or glazed roofing is performed on technological lines with great performance.
The German technologists scrupulously monitor the manufacturing process at all stages, and only high-quality products comes to the CIS building market. The price of natural ceramic tile corresponds to its excellent characteristics.
Cement-sand roofing
Natural cement-sand tile is an alternative to ceramic. Modern material is significantly cheaper than traditional, while possesses all its advantages and advantages. The new material is becoming increasingly popular with owners of private houses and country cottages.
 Cement-sand tile includes: cement and natural quartz sand, natural clay, gypsum and water. The components are stirred and an artificial stone is formed as a result of the crystallization process. Iron oxide is used as a pigment to give a tiled color. The finished material is not subjected to high-temperature burning.
Specifications Cement-sand tiles are identical to traditional ceramic. The material has high tensile strength and bending, differ in water resistance, frost and heat resistance, as well as excellent forms. In addition, this tile is not susceptible to aggressive impact. ambient, UV rays, has a high level of noise insulation and fire resistance.
The price of cement-sand roof is slightly lower thanks to a more simplified production process. The roof equipped with this type of roofing will serve at least 100 years without visible external changes.
Benefits:
- durability - sold with a guarantee, the service life may exceed 100 years;
- reliability - ceramic roofing withstands a strong mechanical and aggressive chemical impact;
- invulnerability for ultraviolet - does not fade, keeping the appearance throughout the service life;
- refractory - natural tile does not support combustion;
- ability to absorb noise;
- the ability to prevent static charge accumulation on the roof surface;
- the low degree of thermal conductivity - retains heat inside the room during the cold season and does not miss the heat in the summer;
- the ability to withstand significant temperature differences.
Photo

Installation of the tiles of BRAAS (video).
Requirements for roofing tiles are quite strict. Must have accurate geometric dimensions, the presence of factory defects are not allowed - such as fuses, swollen, chips, cracks and ruptures. The tile should have a certain degree of porosity, while remaining impenetrable for moisture, and have high resistance to negative weather conditions. Therefore, the production of ceramic tiles requires close attention at each stage of production.
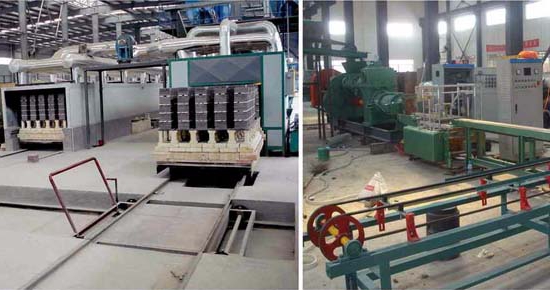
The production of ceramic tiles begins with the development of a clay career. Valuable raw materials (clay) are mined in clay careers, as a rule, owned by the tile manufacturers. The extraction of raw materials is carried out using an excavator. Already at this stage, large foreign inclusions are removed from raw materials. High-quality raw materials are obtained from several clay varieties with a certain plasticity, clay of different varieties are thoroughly mixed. The raw material mixture is prepared in several stages. In the falling device, the clay raw material undergoes the primary processing, to obtain the desired composition of the mixture there, the quartz sand or tiled flour is mixed. Then the raw material goes to the mill, it turns out and crushed with mechanical devices, after which it enters the rolling crusher. In the roller crusher are crushed out of the raw mixture of foreign inclusions (limestone, particles of humus and quartz), which could reduce the quality of roofing tiles. Then clay enters the repository, where water is added in the raw material. The duration of finding raw materials in the repository also affects the quality of roofing tiles. From the repository, the raw material enters the rolling crusher for fine grinding, when leaving the clay mass, the plasticity is obtained necessary to impart harvesting of the required form. Billets for the manufacture of tiles are made using a press, then they are shifted using automation to the frame and are sent to the drying sets in which exactly specified temperature mode is supported. Billets are dried at temperatures up to 100 ° C with a certain and precisely controlled humidity. In the process of drying from soft clay, water evaporates, added earlier in the raw material mixture.
After the moisture evaporates, the billet acquires a greater hardness, the size of the workpiece is also reduced. The drying cycle lasts about 16 hours. With too fast drying, shrinking cracks may appear on the clay blank, so it is important to adhere to the time frame. After drying, the blanks are burned in a ring (or tunneling) oven. The firing process occurs in the following order - first there is a pre-heating of the blanks, then the final firing and then the cooling should be cooled. In the firing process in clay occurs chemical reaction For the transformation of silicates, which makes it insoluble in water. As a result, the internal structure of clay is completely changing. Due to the effects of high temperatures, it is created, which has excellent characteristics of weatherproof, withstanding significant loads and non-transmitting water.
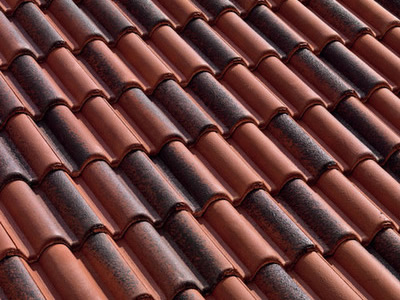
After the final firing, the ceramic tile gets also its final color. The color of the final product, first of all, affects the initial raw materials. So, for example, the tile made of clay with a high admixture of iron has a red shade, from clay with a high manganese - dark brown color. Also, the tile color is attached to the minerals added to the raw material mixture during its preparation. For example, the addition of magnesite gives the tile of light red color, and the addition of manganita is dark brown. The result is a tile, painted in mass. With a simpler manufacturing technology, the tile blanks are dip in Angob (clay suspension having a certain color) or spray it. Angob is applied before the final billet firing, during the firing, the coating is firmly connected to the clay harvest. Depending on the choice of Angoda Tiling acquires a certain color after firing. The glazing tile is made as follows - the clay blank until the roasting is plunged into the glaze or spray with icing. During the firing, the icing melts, makes it smoother and paints it in a certain color. The glazing tile can be produced in any color solutions. Agglomerated (clinker) tile is a tile, burned at temperatures close to the melting point of clay. Due to sintering in clay, the pores are closed. The clinker tile as a whole has a darker color, a smoother surface and a higher firing point (about 1400 ° C).
In order to make sure that the ceramic tile meets all the requirements for this product, primary typical tests and primary quality control are carried out. When monitoring quality control, tile, produced in the usual order. As a rule, individual samples are chosen from large tile batches. The main indicators on which tests are conducted are frost resistance, waterproof, bending strength, the proportionality of forms and accuracy of geometric sizes. Test results are recorded, they are evaluated. After that, the tile is marked - the factory labeling, the date, designation and grade are applied, as a rule, for each two-hour tile.
Ceramics tile is the oldest view of the roofing coating that has a centuries-old history. Despite the tremendous variety of modern finishing materialsShe confidently leads in his segment. Production technology for this period has practically not changed, only equipment for the production of ceramic tiles has been improved. Consider this popular view of the roof, the method of its manufacture and advantages.
Production technology
Thought technological process It implies that industrial equipment is used to produce ceramic tiles, eliminating the possibility of handicraft manufacturer.
The prepared clay is stirred with water to obtain a plastic homogeneous mass, compacted and squeezed out in the form of a flat ribbon, which is dissolved on fragments of a certain size. In the process of drying, temperature control of temperature and humidity is required, in order to avoid uneven shrinkage, cracking and curvature finished products. The firing completes the manufacturing process, giving tiled strength and water resistance.
Heat treatment is an energy-intensive cycle, this is precisely the high price of clay products. The line for the production of ceramic tiles is mostly automated process, increasing productivity and improving product quality.
The natural color of the tiles of terracotta, therefore, to change it, the surface having the shape of the tile, covered in the firing with special compositions:
- angobom - burglar or colorful clay providing a stable color;
- the glaze is a vitreous coating applied on the product and a fixed firing.
Using the latest equipment for the production of ceramic tiles, completely eliminate cases of failures due to the "human factor". Control at all stages of redistribution lies with automation, largely due to this, the very high quality of the product is achieved.
Fastening of protective coating
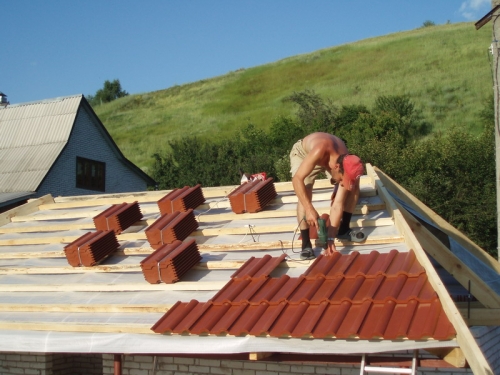
In the installation work includes styling on the rafters of the insulation, waterproofing and vapor barrier layers, the counterbursters, and from above - the bars of the root. The pitch of the wooden flooring is affected by the heavy weight and the size of the tile of ceramic. It is calculated individually and depends on the model. The marking of the rows is made with a cord.
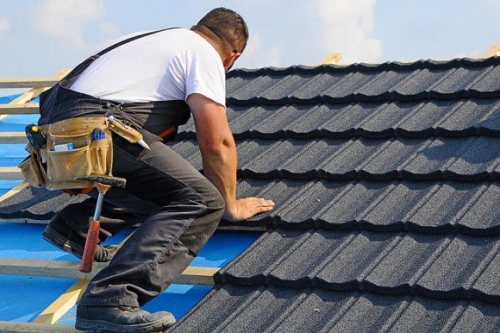
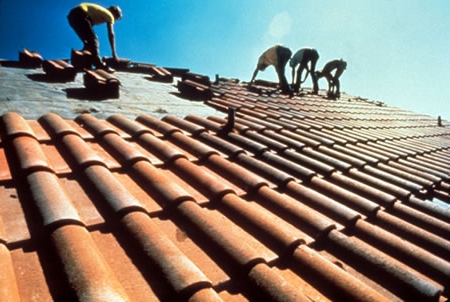
Stacked roofing From right to left, then - bottom up. The high weight of the tiles of ceramic causes its placement on the roof until the installation starts - stacks of 5 pieces for a uniform distribution of the load on the cut and rafters.
Fasteners are produced galvanized screws. With a bias over fifty degrees, the roofing material is additionally attached to the beammers. The groove tile should be laid with a single inclusive, and flat, respectively, with double. The tile located in the upper row must overlap the joints of the two lower ones.
Installation of tiles from ceramics is a job that requires high qualifications, so it should be trusted only to professional roofers.
Advantages of ceramic tiles
Only strictly observing the technology and using specialized equipment for the production of ceramic tiles, one can be sure that the durability of this roofing material will be about a hundred years. The pluses of the unique coating include:
- environmentally friendly raw materials;
- reliable sound and thermal insulation;
- ease of repair;
- low water absorption;
- resistance to atmospheric effects, temperature drops;
- minimum waste during installation.
Cons of clay roof
Discharge in natural tiles Minor quantity:
- high cost, which is covered only by an increased service life;
- the impossibility of mechanization of installation work, an increase in the cost of arrangement rafter system by 20%, while the reliability of the coating is very high;
- the choice of colors gamma is limited only by natural shades.
The appearance of the house covered with ceramic tiles becomes aesthetic attractive, source and comfort. This roofing is elegantly repeats all the bends of the roof, it looks spectacular, standing out by restrained nobility natural materials. This is the quality, really tested by time.


