The ceiling decoration plays an important role in the formation of the interior. One of the most convenient and practical finishing materials - Plasterboard. Installation of plasterboard on the ceiling opens up ample opportunities for room design.
With his help:
- create multi-level structures;
- leveled surfaces;
- form original design using embedded lamps;
- hiding elements of communication systems that disturb the beauty of the room (air ducts, electric pipe).
To figure out how to mount drywall, each is capable. This is not necessary to receive a special education. It is enough to study the subtleties of this technology in detail and correctly perform the calculation.
Figure two-level design with lamps
As a result, you will get a smooth and smooth surface without long plastering works. it will reduce the amount of time spent to eliminate cracks and various irregularities.
Installation of drywall on the ceiling is not possible without properly made markup. It is a fundamental part of the installation of any design.
This stage of construction is necessary to schedule appearance future design and correctly calculate the purchase of materials.
- It is impossible that the step between the profiles was less than half the width of the plasterboard sheet. Otherwise, the GLC will lead and the result will be obvious irregularities.
If you cannot fasten the drywall sheet well, with time it is deformed.
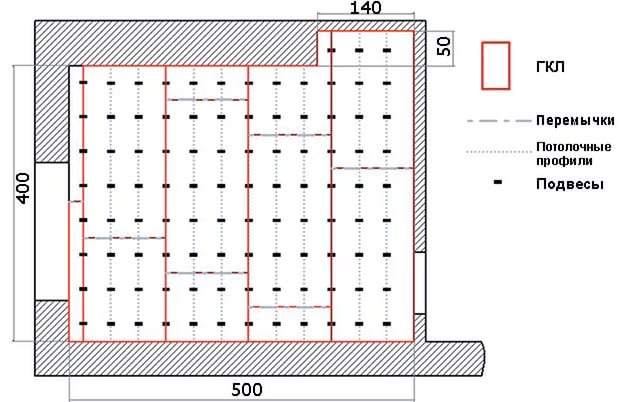
- The process of applying marking starts from the central part of the base, gradually moving to the walls. Locked the profile fastening grid evenly, catching squares with parameters of 0.5x0.5 m or 0.6x0.6 m. This will give the profiles with the correct step, which does not exceed the permissible indicator.
- The mounting scheme is better to apply on paper so that in the process of transferring the markup it was easier to navigate.
- In the drawing of curvilinear lines for non-standard structures, various devices will help. For this, templates made of plywood, cardboard or dvpo are suitable.
- In those zones where communication systems are assumed, make the mark. In these places you need to install hatches (hidden type) to ensure unobstructed access to them.
- The markup of the ceiling level is applied around the perimeter of the room. There are certain restrictions on matters minimum distance Between the suspended design, which is going to install, and the base. In the standard version, this minimum is 50 mm. If you wish to install embedded lamps, this indicator increases to 60-70 mm. There are also dimensional communication systems in which the minimum indentation from the base is 150-250 mm.
 Frame
Frame In the process of applying markup, use additional devices that are designed to facilitate the work. These include a laser level that helps exactly measured and apply lines. In the absence of such a device in the Arsenal of the Master, replace it with a twine, which is stretched directly along the metal frame.
 Suspension Construction Scheme
 Preparatory stage
Mounting drywall technology on the ceiling does not imply the use of any special tools. The tools and necessary tools are in almost every home where even elementary repair work is carried out.
 Using clamps to facilitate work
 The list includes:
- a perforator for performing holes in a concrete surface or drill (if the base is made of wood, sufficiently the possibilities of the screwdriver);
- the previously indicated screwdriver, which is useful not to drill holes and twisting the screws;
- the hammer to drive the dowels (there is no need if you work in a tree house);
- hoven for a metal surface, which together with scissors is useful in the process of cutting profiles;
- level (construction or laser);
- brushes, spatula, roller - fixtures for the final stage;
- sand paper with small grain.
Since the installation of HCLs on the ceiling is performed at height, ensure predetermines to perform such work. If the size of the room allows, it is recommended to make forests. For the bathroom or bathroom and a stepladder is suitable.
 Insulated ceiling with wiring in a corrugated hose
 Since it is difficult to raise the HCL, enlist the assistant support. Security is the most important part of this process. Work gloves and safety glasses will not interfere. To protect yourself from dust when drilling, use a special mask.
 Alone all work performed very difficult
 Installation of frame construction
If you have gathered to install a suspended design, it is not necessary to align the main surface. However, there are problems from which it is necessary to get rid of.
These issues include mold and fungus. To eliminate them, close the cracks and seams with a putty, and the stuck area of \u200b\u200bthe ceiling with the walls with the sealant. In addition, you will need to treat the surface with antifungal composition, which will destroy mold and fungus, not allowing to spread further.
Profile installation looks like this:
- According to the markup, place the suspension at a distance of 0.5-0.6 m from each other.
- Fixing the ceiling profiles with each other is carried out with the help of fasteners called "Crab".
- Next, fasten the communication systems if there are available.
- Profiles need to be well fixed. It is not allowed that they shake or dangle. However, a small step is allowed when moving from one side to another.
In general, the technology for high-quality installation of the plasterboard ceiling is simple for understanding.
 Fishing frame for figure structures
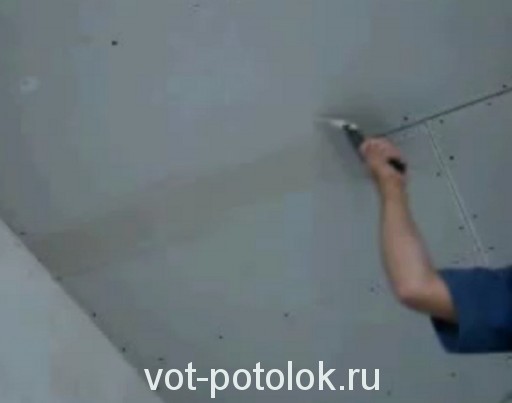
  Ceiling with partially performed trim
 For those who want to see this process with their own eyes, the video is attached to the video review, which reflects the performance of work.
Turning Stage: Frameworking Frack Plasterton
If you are working with an assistant, then in general the technology should not cause difficulties. Alone to cope with the installation of drywall is not easy.
There are three ways to overcome the problem:
- Purchase a specialized lift. The cost of such a tool is high. It is used by specialists of companies that make several installations of such ceiling structures daily.
- Build a design from wooden bars under the very ceiling. Method of manufacture is simple, however, there may be problems with lifting.
- With the help of the same bars, the so-called "chicken paw" is constructed, which is stacked by GKL. After that, the device rises from the floor and is fixed with a tripod fixed on the floor.
Sheets are mounted in 150-250 mm increments. With the correct calculations of the seam between the two adjacent sheets falls on the middle of the profile. Do not forget to leave a small gap between sheets - 2-3 mm. This is done with the help of self-tapping screws. After that, the surface is grounded, the seams are put off, at the end of the ceiling is rubbed by sandpaper.
In contact with
Undoubtedly, occupy a leading place among other suspended ceiling systems. A successful combination of plaster mixture and cardboard provided the ability to quickly collect smooth suspended ceiling structures and wall partitions.
This material is capable of taking all sorts of bent forms. Allows building multi-level curly structures. When using special backlight, such ceilings can acquire a truly fantastic look.
Before you begin, you need to understand how to entee a plasterboard is a simple or single-level ceiling.

Plasterboard ceiling is primarily a system that includes:
- Metal carcass
- Plates
- Layer of finishing
- Instruments
Consider in order each component of the suspension system and how to bother. By and large in the installation of such ceilings there is nothing complicated.

Almost every novice homemade master already has skills to work with power tools and hammer. Also almost everyone is able to manage with a measuring tape measure, a ruler and pencil.
Tools for installing the ceiling

If they started the tools, perhaps it is necessary to present all their list to perform installation works:
- Water or laser level
- Motion folding paint
- Rule 1.5 m with level
- Measuring Roulette and Pencil
- Perforator or shock drill
- Concrete drill with a diameter of 6 mm
- A hammer
- Screwdriver (recommended with two batteries and magnetic nozzle)
- Construction knife or ordinary stationery
- Metal or Bulgarian Scissors with Cutting Circle for Metal

Dear power tools can not be bought, but take a rental store. Water level can be made by himself. To do this, it is necessary to buy on the market or in the store a polyethylene tube with a diameter of 8 mm and a minimum length of 5 m.
At the ends of the tube insert ordinary flasks from medical systems (droppers). On the flasks are applied to calibration by the usual marker and ruler. After that, the tube is filled with water and the flasks are closed. Hoody hydraulic system is ready for work.

Metal carcass
Metal galvanized profiles, connections and suspensions are used for the manufacture of metal frame.
- UD-27 guide profile (3 m)
- Ceiling profile CD-60 (3 m)
- Single-level crab connector
- Direct connector
- Direct suspension P-shaped

Elements of the metal frame between themselves are combined with galvanized screws with a length of 12 mm. At the end of the self-building there is a drill, which greatly facilitates installation. The walls and frame are fastened to plastic dowels and self-draws with a length of 60 mm.
It's important to know! To facilitate the mounting of the suspension frame, it is recommended to use a dowel-nail of 60 x 40 mm quick installation.

Plates are attached to the frame. It has the following dimensions: width 1200 mm, length 2500 mm, thickness 9.5 mm. Color plate gray. On the surface, the symbols of "X" indicate the places of attachment to the metal profiles of the frame. The mount is produced by 25 mm with self-storms for drywall or black wood.
The last element of the suspension plasterboard system is a finishing layer. After mounting the gypsum plates, they align the layer of putty. The joints reinforce the self-adhesive mesh and put off with a special putty for the joints.

Calculation of component elements and materials
- To calculate materials for plasterboard ceiling, there are simple rules that have appeared a few more than a few years ago:
- The area of \u200b\u200bplasterboard sheets should be equal to the ceiling area.
Important to remember! It is necessary to add 5% to the figure. This is necessary to compensate for the consumption of material in trimming.
- The number of UD-27 guide profile is the ceiling perimeter.
- The amount of CD-60 ceiling profile can be calculated by the formula: the first and last row are fastened at a distance of 300 mm from the wall, the interval between the remaining rows is 600 mm or less. The same profile will be required for jumpers
- The number of direct suspensions is equal to the length of the ceiling profile divided into the fastening step or 1 m that, for mounting 10 m, the ceiling profile will require 10 P-shaped suspensions
- Single-level connectors or crabs are fixed on the ceiling profile with an interval of 600 mm. To calculate their quantity, divide the length of the CD-60 profile in meters 0.6 m
- The number of direct connectors is equal to the number of rows of the ceiling profile (if required)
The consumption of plaster spacing for seams is approximately 400 gr. / M.kv. Consumption of primer deep penetration 200-300 gr / m.kv. Finish gypsum spacure It has a consumption of 460 gr / m.kv with a layer thickness of 1 mm.
Wall markup and ceiling
It is performed to determine the horizontal plane of the suspended ceiling. To do this, use a water level or laser. On the walls put marks in the same plane and combine their painting thread.
Note! The level of the plasterboard ceiling can be lowered by 3 cm. If dotted embedded lamps are applied, then the ceiling is lowered by 12 cm.

According to the existing ceiling, the axes of the ceiling profiles are applied. On them with increments of 1 m put marks for fastening P-shaped suspensions.
According to the marked line on the walls of the dowels, the guide profile UD-27 is fixed. At the ceiling over the axes of ceiling profiles, p-shaped suspensions are mounted. CD-60 profile is mounted to the suspensions of 12 mm self-pressing.
Carabs are fixed to the ceiling profile with a range of 600 mm crabs. Krabam mounted jumpers from the ceiling profile. There should be 600 x 600 mm cells.
This will ensure the reliable strength of the entire design. Jumpers at the walls are filled into a guide profile and also fixed with a self-tapping screw. For this, a shock drill or a perforator, a hammer and a screwdriver with a magnetic nozzle are used.
Mounting drywall on a frame
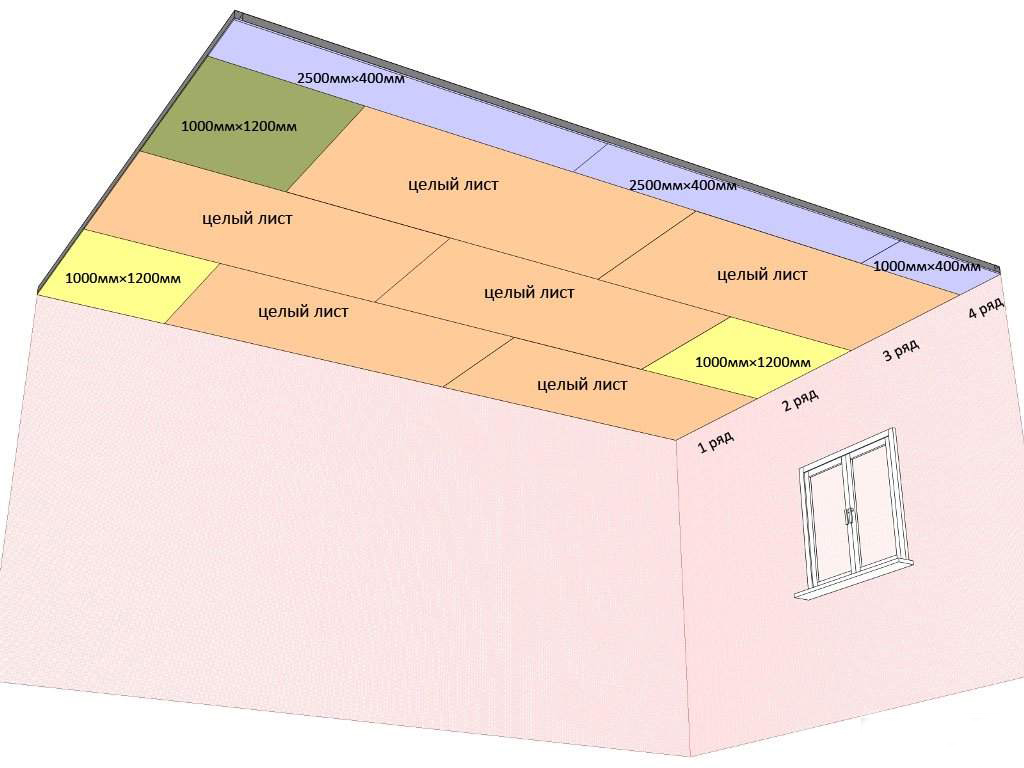
Plasterboard on the ceilings begin to mount from a whole sheet. Initially, only plates are installed.
When installing, each subsequent row should be shifted relative to the previous row at least 1 profile (like brickwork).
Fastening to the frame is made by black screws 25 mm on plasterboard plates. The remaining windows are sewn cut slices.
Previously on plasterboard ceiling The primer is applied. It will provide reliable adhesion of putty and plasterboard. After drying, all the joints are sampled by the reinforcing mesh and put off the putty for the joints.
When the joints are applied, the entire surface of the ceiling is applied with a layer of finishing putty. After its drying, it is grinding with an abrasive grid and sandpaper shallow fraction.

After putty, the ceiling is rejected again. Now the ceilings made of drywall are ready for the final or finishing finish. They can be painted with water-mounted paint or stick on it. To visually familiarize yourself with the technology, look at the video drywall ceilings.
Due to its versatility, the plasterboard has long acquired the status of an indispensable material when finishing work. People used to using it when aligning the walls and the construction of a variety of architectural forms in the rooms, as GLC plastic and keeps well the shape that he will be given. Installation of drywall on the ceiling with its own hands allows apartment owners to improve sound insulation and thermal insulation of the room, as well as make the ceiling finish completely unique.
- Environmentally friendly material, absolutely harmless to humans, so you can use it in any room, including a nursery and a bedroom.
The need to create a ceiling drawing
Before proceeding to perform mounting work, it is necessary to decide which type of suspended design you will be installed. IN apartment houses The height of the ceilings does not always make it possible to build structures consisting of several levels. You need to be prepared for the fact that even two levels will make the room below 10 cm.
Therefore, first it is better to create your design project, and only then proceed to the preparation of materials.
- The drawing is performed in a reduced scale.
- It marks all elements of communications, heating system.

- Draws out the location scheme of fixing systems.
- There are places of fixation of sheets of plasterboard.
- The distance between the lamps is measured and the place of their installation is marked. It should be borne in mind that the standard built-in ceiling lamp has a height of at least 9 cm.
- In the case of laying for plasterboard sheets of heat and it is necessary to specify their dimensions and accurate location. Mineral wool stacked in the cell along the frame after its installation, clinging to the suspension.
What is needed for installation
To carry out installation work, you will need a certain set of materials and tools.
- The guide profile is UD, which is located in the corners and places of contact of the ceiling with walls.
- The main ceiling profile is CD, located around the ceiling perimeter, with a step of 40 cm.
- Mounts for the main profile - CD-suspensions and distant esters, make it possible to lower the ceiling coating on 10-12 cm below the slab of the overlap.
- Sheets of plasterboard, which are chosen according to the purpose of the room in which the design will be installed. Simple GLCs have gray, and moisture-resistant - green. It must be remembered that for the installation of plasterboard on the ceiling, the sheets are taken with a thickness of 8-9.5 cm.
- Sealing tape, used to improve sound insulation when installing a frame.
- Levels - laser and bubble, - as well as a painting thread for precise lines markup.
- Spacure for seams, acrylic primer and reinforcing ribbon will be necessary for sealing seams at the last stage of finishing works.
- Perforator, electric drill and electric jourver.
- Self-tapping screws, selflessness with a washer and a dowel-nails - all these are the necessary elements of the attachment.
- Roulette, spatula, hammer, knife cutter.

Assembly of crates from profiles
Installation work is made in the following order:
- It is necessary to find the lowest angle in the room, for this, the height of the room is measured in all corners. How it is done, you can look at the video.
- At this corner, the horizontal is measured using a level. If the direct spent correctly, the end of the line will come to its beginning. If it is necessary to lower the level of the plasterboard design below, from the bottom point of the ceiling, the required distance retreats.
- Through a line, every 40 cm, the holes for fastening the dowels are drilled and guide (UD) profiles are installed.

- The video is clearly seen how the parallel lines are stolen on the ceiling at a distance of 60 cm, the holes for fastening systems are drilled and the suspensions are fixed. Suspension fastening sites are better to calculate them so that they coincide with the size of plasterboard parts.
- Main (CD) are inserted into the guide profiles and are attached to the suspended structures to the ceiling.
- If there is a need to produce a bunch of GLK, then the main profiles are attached minor, this process can be viewed on the video.
- When assembling the carcass, the constant application of the level is required, so that the base happened perfectly smooth.
- After mounting the frame is completed, the wiring for the future lighting system is laid. In places marked in the drawing, the ends of the wires are displayed for further attachment of the lamps.

Mounting process GCC on the ceiling and seams
If the plasterboard design has a complex form or installation is performed for the first time, then the ceiling assembly work is better with the assistant.
Before work, the material should be searched in the room in which installation will be made, at least 2 days. Store sheet can only be in a horizontal position.
Installation of GCC on the ceiling is made as follows.
- Locked extreme sheets. For this, 2-3 cm are retreating from the wall.
- The following row is attached to a chess order in relation to the first. It is clearly visible in the image and video.
- Self-tapping screws are screwed up at a distance of 20 cm, while the screw of the screw should be slightly recessed into the sheet.
- The joints of the joints should not approach the outer corners of the ceiling closer than 10 cm.
After completion of the installation of sheets on the ceiling, you need to dilute a special putty and near the wall, joints and hats of self-tapping screws. When the seams are dried, they stick sickle on them and put sand again. This is done to exclude the probability of cracking of cracks on the ceiling in the future.
Today, the most the best option ceiling design is suspended metal designHaving covered with plasterboard. But here you should know the features of designing such a design. This article will help you deal with the installation stages and will tell you in detail about all the nuances of the installation work.
From the point of view of structural components of the suspended ceiling of plasterboard, the following parts are:
- metal profile (less often used wooden beams and bars). It is the basis of the entire frame. In order to make the suspended ceiling itself, you should take ceiling guides and rack profiles. They allow you to more effectively assemble the frame on the ceiling than when using wall profiles;
- suspension. With their help, you can perfectly align the ceiling surface, thereby smoothding all the existing irregularities of concrete overlap. These elements are attached with dowels and screws;
- connecting elements. Special brackets and crabs can act in this role. With their help, you can achieve high strength and stiffness of the structure;
Design elements
- sheets of plasterboard. Depending on the room in which the mounting ceiling will be installed, the type of sheets should be selected. They can be moisture-resistant, refractory, standard or fire-resistant.
All of the above elements are mandatory, but changing their placement and distance, a suspended ceiling of plasterboard can be made absolutely any design.
At the same time, various materials can be used as additional elements: acoustic, thermal insulation, etc.
Also, the modern building market is replete with various materials and adaptations, with the help of which even curved and curvilinear fragments of the ceiling can be done without any problems. Such devices will be necessary when installing suspended structures with non-standard design solutions (dome, arches and much more).
Technological process
In order to make a hanging ceiling of drywall with their own hands, you need to know which technology is applicable here. Regardless which type of suspended design is planned to be created, its assembly technology will contain the following steps:
- markup;
- mounting frame;
- fastening of plasterboard sheets;
- final finish.
As you can see, the technology is quite simple, but only if you know what to do.
Important nuances
Installation of the suspended ceiling of plasterboard is carried out according to the technology, which is described above. The technology is designed to sequentially do all the necessary manipulations. At the same time, you need to do everything in a clear accordance with the instructions. Therefore, newcomers are that they do not know all the nuances of the installation work for creating suspended structures from drywall can make mistakes that will negatively affect the final result.
What to pay attention to:
- select the type of frame. Today, the frame for plasterboard structures makes from metal profiles or wooden bars, and it is preferable exactly the first option. Metal is longer than a tree. Therefore, the metal frame will serve a much longer wooden. In addition, he will be able to withstand the weight of any ceiling;
- sheets of plasterboard. Choose only the type of sheets, which is perfect for its properties for a particular room;
 Options for sheets
- before mounting sheets, it is necessary to give them a day for acclimatization;
- the thickness of the sheets should vary from 8 to 9.5 mm;
- it is recommended to use materials for the final finishing of the same company as drywall sheets.
Note! Today, the best foreign manufacturer of this product is the company KNAUF. But also domestic manufacturers Also not inferior to this company in quality, standing with all the cheaper.
Remember that you should not save on building materials (especially plasterboard sheets), as in the future the ceiling can be saved, go cracks or just get around.
Marking is important
From how correctly the markup on the wall and the ceiling will be applied, the entire future appearance of the design depends. In order for all marking lines to be applied exactly, it is necessary to use a construction, laser or water level. It is better to use laser or water levels, since they have accuracy higher, and they are somewhat easier to use.
The correct markup is as follows:
- choose the lowest angle indoors. To determine it, it is enough to simply measure the tape measure;
- we make a mark at a distance from the ceiling of 5 cm (without backlight) or 8 cm (with backlit);
- using the hydroelectric system, we make similar marks on other angles;
- next, we stretch the greasy cord between the marks and let it go sharply. Pre-cord need to get into the paint. Similarly, we carry out the procedure for three other walls.
 Malyary cord
Note! For simplicity of fastening metal profiles at this stage, you can make a mark of them to simplify the installation in the future.
Installation of carcass
Mounting technology frame elements looks like this:
- first you need to make holes in the ceiling and install the suspensions. With their help, we get the opportunity to adjust its position in height.
- the first series of suspensions should be done in a step of 25 cm, and the second is 75 cm, etc. (step for each of the following row is 50 cm);
- suspensions are fastened to anchors, since such fasteners will be able to withstand any weight of the suspended ceiling;
- next to the walls of Krepim guide profile. Previously attaching a profile to the wall, we make a pencil mark in places of its fastening to the walls;
Note! At the edges of the guide strip must be holes. In the absence of those, make them alone with a drill at a distance of 10 cm from the edge.
 Profile extension
- if necessary, the profile can be cut, as its factory length is 3 m;
- under the profile you need to put the seal. It should be done to better fix the frame element and soundly insulated the design;
- the profile is attached at least three dowels;
- if you need to increase the bog profile must be on the same line. In this case, near the junction should be suspension;
- after that, fasten the main rack ceiling profiles. The distance between them should be 40 cm. So a sheet of drywall will definitely fall as the edge of the middle of the profile;
- the installation of profiles on the suspension is starting with the corners;
 Fasteners with crab
- when using such a step, jumpers will be needed only on transverse joints of plasterboard plates. Therefore, jumpers are drip every 2.5 m;
- the jumpers are fastened with the help of special fasteners - crabs.
- crab is attached to jumpers with four screws. If the indentation from the concrete ceiling is small, then the fastening needs to be done in advance, as the crab will not climb here on top and it will be simply impossible to install it.
The most common ceiling crates are the following two schemes:

- carriers or secondary profile, we have in the form of segments perpendicular to the main one. In this case, X-shaped couplings are used. This scheme is used, if necessary, save height in the room.
After completion of the installation work, it is necessary to check the erected horizontal design. To do this, use the level. Ideally, all elements must be in the same plane. Such a procedure is best to do together with a partner, as it will be very difficult to copory itself, because the length of the profiles is 3 m.
Nuances of Montaja Carcasa
Very often, multi-level structures are used as suspended floors. In this case, the framework is done depending on the evenness of the initial concrete surface. So, the second level can be made in the form of boxes or to build separate figured elements or boxes on the first plasterboard level.
 Multi-level frame
Therefore, in the secretions of the second level, the framework of the first requires additional stiffness. Additional jumpers should be made here. Thus, you will avoid excessive load and your ceiling will last for a long time without visible finishing trim disorders.
Mounting plasterboard
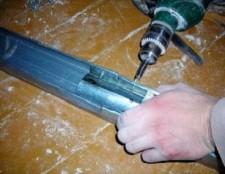
 Removing chamfer
When the frame for the suspended ceiling has already been removed, it should be seen by plasterboard sheets. Make it will be much easier than the frame assembly. But here there are certain nuances.
The main one is that the sheets of at least the knocks, and better for several days, lay in the room where they will be attached further. At the same time, they need to be stored exclusively in a horizontal position.
Installing drywall sheets on a prepared frame occurs as follows:
- from the sheets remove the chamfer. For this, at an angle with a knife, we cut the edge. This will then effectively smear the putty joints between sheets;
- setting sheets start with corners;
- self-screwing step should be made at 20 cm. In this case, 10-15 cm should be retreating from the edges;
- we blend a screw of 1 mm inside the sheet;
- on the adjoining sides of the sheets of self-tapping screws at different levels;
- the fastening of the sheets themselves is also in the disintegration. You need to do this at least one cell;
- each sheet is krepim around the perimeter, as well as in the center. At the same time, the edges of the sheet should always come to the middle of the profile.
Do not allow knockers in the corners. An indent must be at least 10 cm. Otherwise, a crack will definitely be.
After that, it will only be left to carry out the final finish of the ceiling, and the repair will be completed.
Following such uncomplicated instructions, you can make a gorgeous suspended ceiling of any complexity from drywall.


