A niche of plasterboard on the ceiling serves as a bright example of the universality of using HCL, which is used for both ceiling structures and niche with different functionality.
Varieties of niches from plasterboard on the ceiling
The ceiling of plasterboard with the built-in niche is mounted in any room.
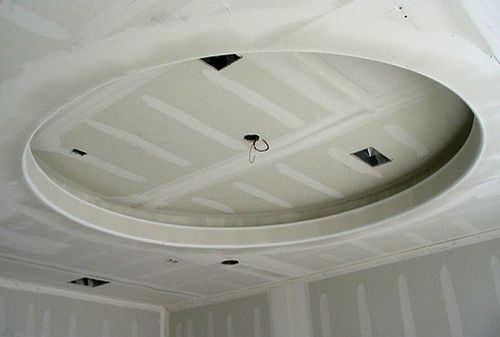
So looks like a niche of plasterboard on the ceiling
Ceiling niches are used to illuminate any zone, hidden curtain cornices or for stretch ceiling. But still, in various rooms, niche in the ceiling can perform different functions.
Kitchen
With the help of a ceiling niche in the kitchen, you can hide the laid communications, install hidden eaves, set point lights. In some design projects, niche kitchens can be used as an additional place to store kitchen items, especially if we are talking about the rooms of a small area, where every square meter on the account.
Living room
Thanks to the installation of ceiling niches, in the living room you can change the geometry of the room and thereby carrying out any designer idea.
 Project Nishi from plasterboard on the ceiling in the living room
 However, the main function of ceiling niches is not only a visual effect, but practicality and convenience. For example, niches can be collected for highlighting in the living room, to install point lights and distribution of zones in the room. And also in them frequently mounted LED tapes. A niche of plasterboard for curtains can be combined with a box around the perimeter of the room.
Bedroom
Niches in the bedroom are used mainly to underline the ceiling geometry, in the center of which can be installed a stretch ceiling. In a niche on the ceiling, installed around the perimeter of the room, lighting can be built, hidden backlit eaves are installed. The ceiling niche not only decorates the room, but also creates an additional place to store things, allows you to hide many communications.
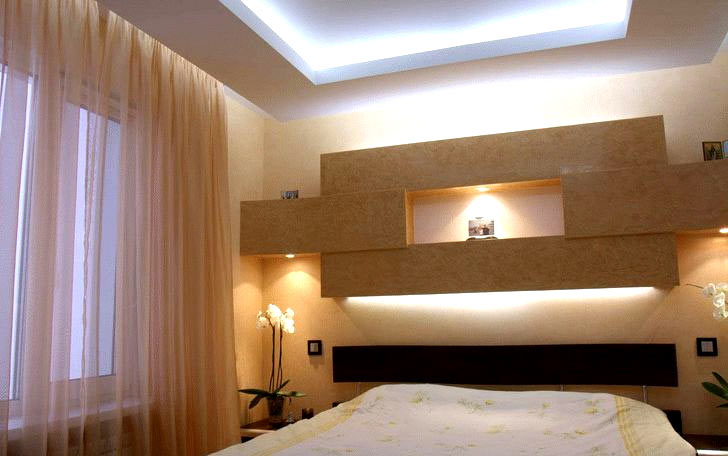 Niche design on the ceiling in the bedroom
 Design features: drawings and calculations
To niche from drywall, with its own hands, it is technically correct, aesthetic and convenient, calculations and preliminary drawing of the structure should be prepared. Making a niche drawing follows from its design and destination. If this design is multifunctional, for example, with built-in backlight and a TV site, then such a design can be called a combined layout. In such drawings, all features of the frame should be taken into account. If the niche is collected in the form of a box under the stretch ceiling, then the installation of the canvase is taken into account.
 Scheme and drawing of a niche design on the ceiling
 In cases where ceiling niche Used for eaves and several lamps, then frame calculations do not require additional tricks. If a niche is constructed under the cornice, the framework of which will be an additional load, you can add the amplification in the form of plywood or chipboard sheets.
As for the design drawings, it all depends on the fantasy of the master, as metal products and plasterboard allow you to create various designs of any complexity. The video shows the process of mounting a niche of plasterboard on the ceiling.
Read also
Highlighted High Carton Niche
Required Material and Tools
List of materials
- Guide profile.
- Suspended profile.
- Connectors between profiles.
- Connector single-level "crab".
- Metal suspensions.
- Screws for metal.
- Dowel nails or clinia anchor.
- Insulation.
- Plasterboard sheets from 9.5 to 12.5 millimeters.
List of instruments
Preparatory work
Before installing a niche, you need to make placement of the room. First of all, it should be declared for what a niche is being made. If its functions are to hide the ceiling cornice, first of all you need to measure the distance of the niche to the batteries so that the curtains subsequently hurt them.
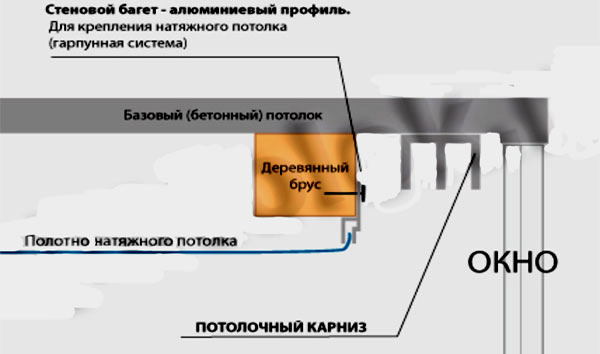 Niche device diagram for ceiling cornice
 For a niche with luminaires along the contour of the room, it is necessary to note the desired distance from the wall. Next, the folding thread to beat off the horizontal strips on the ceiling and with the help of the level of the line on the walls. The length of the vertical lines will depend on the thickness of the niche. For the bottom of the niches, markups on the wall are also made. They can be applied using a hydroevoy or laser level with the horizon function.
Marking a niche from concrete slabs The ceiling is not recommended, since there may be significant differences, which will affect the flatness of the design.
If a niche is planned along the contour of the room with the installation of lamps, it should be pre-conducted a cable in corrugated hoses attached by clamps to the ceiling. Cable output under cartridges must be respected equal to step.
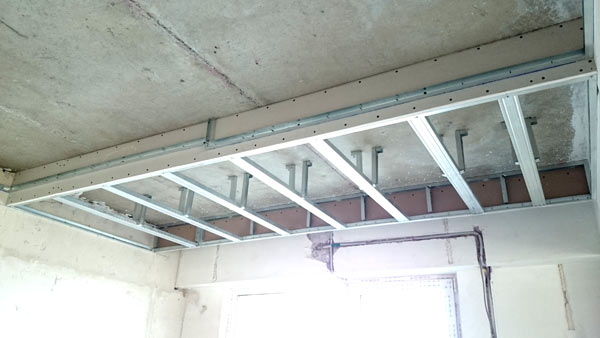
The main stages of the work on the creation of a plasterboard niche
 Drawing for the device plasterboard Nishi.
 After finishing preparatory work, In particular, markings for the installation of guide and suspended profiles, you can proceed to the mounting of the frame.
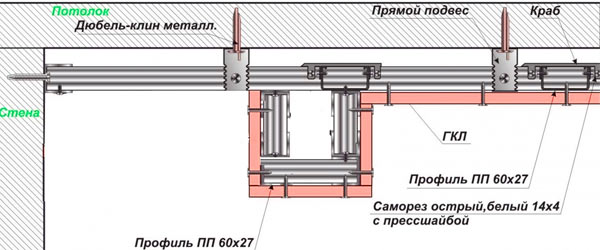
Installation of metal profile
Stages of assembly of a frame of a metal profile for the future niche:
Fastening sheets of GCL and setting the backlight
After the box is assembled, you can proceed to the installation of plasterboard sheets. First of all, the material should be cut and sew the side parts of the niches. For this, the GLC is assigned to the ends of the design and is screwed with the help of self-tapping screws. As for the lower part of the niche, the installation occurs exactly also, however, it should be noted that after installation it will be necessary to do holes for the reflectors of the lamps. Further, the wires of the lamps are outlined into the holes, after which the processing of the camp ends is coming.
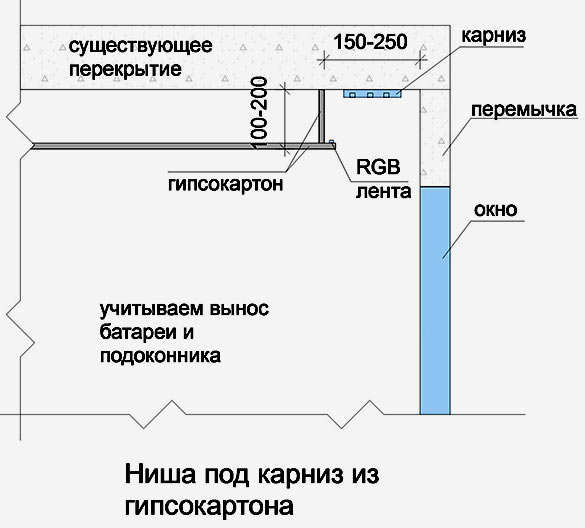 Diagram of device and mounting backlight and fastening of drywall
 In order to smooth out the protruding edges, you can use the stationery knife, gently cut off an excess cardboard from the edges of the box.
After all the corners of the niche are sharpened and acquired a symmetrical shape, you need to output the cable through the holes and try to connect the lamps.
After the check check, the lamps can be connected to the wiring. But they should not be attached to the deepening finally, since the box must be sharpened without damaging the external reflectors of the lamps.
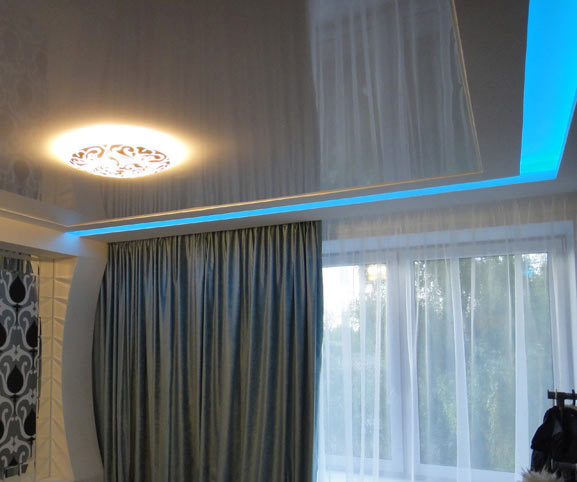
If there are suspended ceilings in the room, you need to take care of the installation of the cornice, which can later hang heavy curtains, in this case the ceiling niche for curtains from drywall is usually made.
1 Why do I need a niche for curtains from plasterboard?
In the room with new double-glazed windows, beautiful wallpaper and wonderful curtains will look at the entire wall, but special tires for them look far from presented. Attempts to decorating plastic cornices strips of wallpaper rarely lead to positive results. Therefore, when planning the cover of the upper overlap, a niche in the ceiling for curtains, from drywall and aluminum profiles is mounted in advance.
This is a very convenient design in order to completely hide not only the tire for which the runners are moving, for which the tulle or curtain clips are clinging, but also the entire suspension system. As a result, it seems that Gardin descends from the ceiling. In addition to the camouflage effect, the illusion of a higher room is created with a niche, since the eaves are removed from the field of view, on which the curtains are suspended. This is especially noticeable if tension glossy ceilings are installed in the room, due to the reflection of the curtains in them.
In addition, it is convenient to hide the location of the blinds in the niche, especially if they are equipped with an electric drive. The block with a mechanism usually does not fit into the interior of the room, and many have the opportunity to hide it from prying eyes. By the way, there is a solution and such a task, how to make a niche under the eaves for the absence of a false plat. For this, the separating part of the overlap over the window, and in the front part it is separated. The design made in the form of a block right on the slab overlap or part of the frame suspended ceilingcan be used to accommodate light sources in it.
For this, the wiring is laid inside, and in the outer plane facing the floor, the holes are cut into the built-in luminaires. Another option to ensure a beautiful illumination of the Gardena or Lambrene - lay a LED ribbon along the inner wall of the niche. This option is beneficial in that it gives beautiful lighting, and at the same time does not heat the fabric. If you have stretch ceilings, niche under eaves is done using a regular large cross section (it will become the base for baguette), the depth can be adjusted using brackets.
The most effectively looks a niche on the whole wall, however, if such long curtains are not planned for considerations of savings, it is better to do the design a little more window opening.
2 niche under drywalk cartridge: Determine the dimensions
IN panel houses The windows rarely have protruding parts indoors, if not to take into account the handles of the valves, fixing the frames in the closed position. It would seem that it can prevent hanging curtains almost close to the glass? And here it's time to remember the heating radiators. Yes, in a brick building, special niches are once again allocated, but these are quite rare cases. Therefore, a niche for hidden cornice is necessarily calculated with the battery.
In addition, on the side of the window, the windows are sometimes supplied with wide windowsills, between them and curtains should also be indented. All these factors affect the width of the niche under the ceiling carcossome of drywall. Let's carry out the calculation for the room in which there is a double-glazed glass with a sash opening on the lower horizontal axis, and the impressive size of the heating battery.
Suppose you have a two-row eaves for the curtains that you will hang not only curtains, but also Tulle. If the radiator is wider than the windowsill and, let's say, performs 15 centimeters from the wall, measure it from it to the tulle at least 2 centimeters (instead of the fabric we use a plumb). If on the contrary, the windowsill is far back to the room, accept the edge for the starting point. Next, add the width of the cornice and we throw a couple of centimeters so that the curtains are not rubbed the folds about the inner plane of the niche. If you want to hang out more lambrequins, add and their thickness.
3 How is the niche under the curtains from plasterboard?
When the question is how to hide the ceiling eaves or a curtain string, gets up a rib, it is useless to look for a kit for assembling the barrier, followed by the suspension system. Such designs do not have standards and are collected, based on the set of nuances, such as the width of the niche, indent the window, the length of the wall and so on. Therefore, a niche under the curtains from drywall is made according to individual, one can say, a unique plan.
Niche for curtains from plasterboard - step-by-step scheme
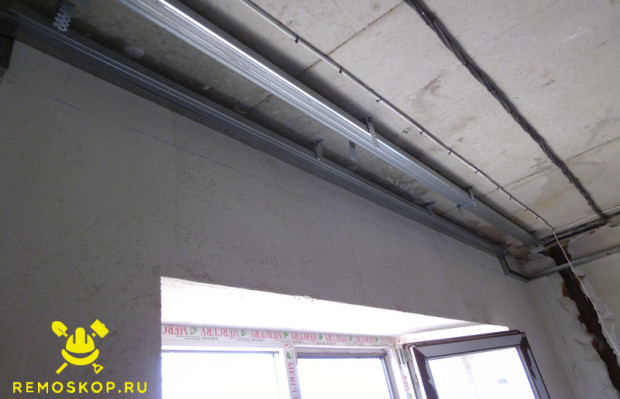
Step 1: Surface markup, Installation of profiles on the wall
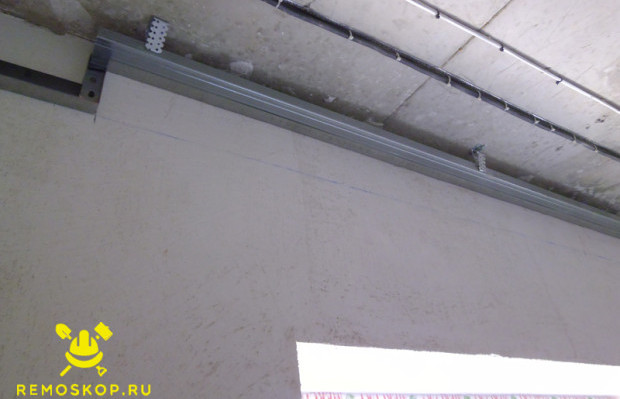
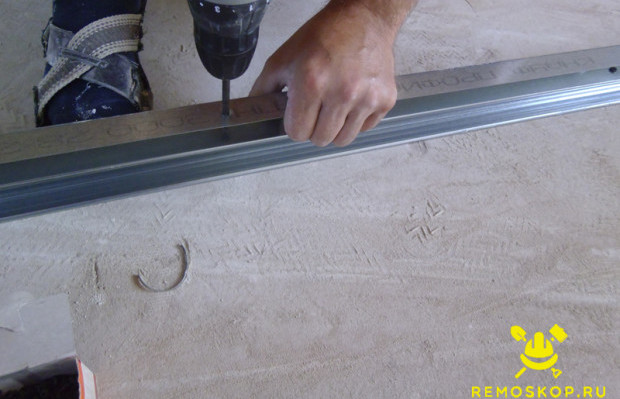
Determining the depth and width should be niche, measure the position of its upper (internal horizontal) and lower (outer) planes on the wall. By markers, repeal two lines on the wall and one on the ceiling, with an indentation of at least 20-25 centimeters. Fix the marking of the guide profiles using screws with plastic dowels for mounting.
Step 2: Fasteners Ceiling Elements Frame
Inside the guide insert a wide profile, fixing it on the outer board with the suspensions screwed with the help of the screws to the overlap. Further, a row of holes were drilled by a row and insert plastic dowels to secure a series of suspensions into them to fix a series of suspensions and set another wide profile to them.
Step 3: Top plane covering niche
Self-pressing through the frame elements screw the lane of plasterboard. Pre-on the fragment of dry plaster cut the necessary recesses where the vertical segments of the guide profile are installed on the wall.
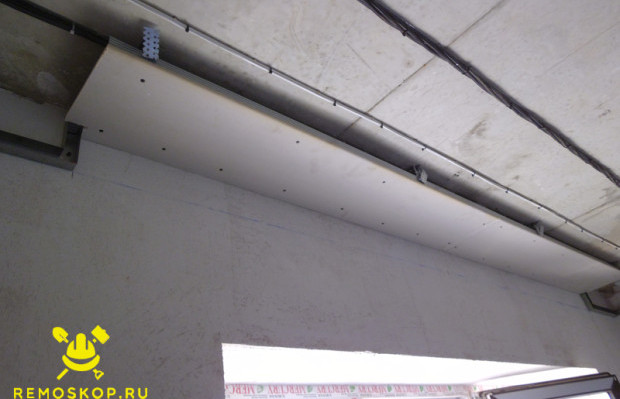
Screws screw with approximately 20 centimeters in increments.
Step 4: Base assembly for vertical wall niche
To establish the vertical planes of our design (there are only three of them, since the fourth is the wall of the house), we need the foundation to which the gypsum card will be attached. We collect the items, based on the depths of the niche, we have 10 centimeters, therefore it is enough to connect the guide and the ceiling profile to the sides.
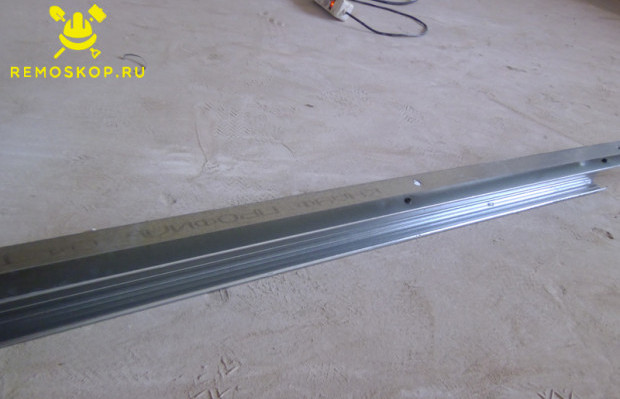
For other dimensions, the niche walls can be selected by different combinations of the dimensional range of aluminum elements. The ends of the guide do protruding at 20-30 centimeters for the ends of the profile.
Step 5: Niche wall assembly
Basin the gypsum cabarton strip to the previously assembled base is more convenient on the floor. The reason for the absence of space between the wall and the location of the bulkhead of the bulkhead, which makes it difficult to use the screwdriver. The strip is screaming slightly wider than the required size, given the fact that the ceiling plinth will be pasted on it. The guide is located in such a way that after setting the wall it was below the profile: in the future it will be to become part of the frame of the suspended ceiling.
To make a niche of the drywall, you need to sew this material of the main ceiling, as in the photo. The next stage of the preparatory process is to apply markup, namely:
- Marking on the walls. It is necessary to make labels on the walls with the use of a special upholstery cord, retreating from the ceiling at a distance equal to the width of the niche, and spend the line between all the labels along the entire length of the markup.
- Marking on the ceiling. To apply this markup, it is worth using a square that will help to apply the mark at an equal distance from the walls, so that the figure resulting from the markup has a kind of correct rectangle. If your walls are smooth, and the room has straight angles, then the markup can be applied, retreating at the desired distance from the wall, without using a special tool.
Montage niche
The installation process includes several stages:
- Fastening profiles. At the same time, the profile on the ceiling must "look" in the floor, and the profile, fixed on the wall, should be directed opposite. To implement a reliable connection of fasteners, the guides must be screwed into the base frame profiles. All components must be on their markup.
- Preparation of racks - suspensions. To make such racks, cut profiles on parts equal to the length of the height of the niche. Then, on the one hand, cuts are applied to segments, with a height of about five centimeters, and the rear wall is rejected inside. How much will these segments you need, you can find out yourself. They must have a step distance of fifty or sixty centimeters among themselves, and to be located all over the perimeter of the frame.
- Fastening racks - suspensions. To do this, they must be inserted into the profile located on the ceiling, and their cut side should remain free. The design is fixed using self-tapping screws.
- Preparation of the necessary segments. To do this, it must be cut into parts equal to the length of the lower surface. Since the lower part must have a shelf to secure the backlight, the length of the segments will not coincide with the distance between the wall and the profile on the ceiling, exceeding it into several centimeters (5-7), which will be sufficient to place the accurate light sources. The number of required segments is equal to the number of racks.
- Fixing segments. To do this, insert one end of the workpiece into the profile on the wall, and fix it with self-draws. Shelves "watch" up. The other end is fastened at right angles with suspension.
- The protruding segments in the resulting carcass niche must be drowning. To do this, it is necessary to cut into the segment of the desired length from the profile and insert them inside. On this basis, a sheet of drywall serves as the basis for fastening the backlight will be attached.
- The last step of the frame assembly is the closure of protroscopes of the guide profile, fixing the structure using self-samples.

Facing a frame for a niche
- Cutting drywall to the required strip. In order for Niche to look neatly, as in the photo, the material must be cut with a special knife or saw, and its edges require additional processing using the plane.
- Laying electrical wiring for backlight.
- Fastening the strip, which will serve a shelf using self-tapping and angular bits.
- Facing the vertical part of the niche. To do this, screw the plasterboard to the suspensions and the guide so that the joints are on the suspension.
- Facing horizontal box.
- Fastening the side, which will close the backlight on the shelf.
The niche for the curtain is necessary to hide the plastic tire that performs the function of the curtain. Niche for curtains can be made different waysHowever, most often a niche is formed at the expense of a drywall box. To do this, install a box of plasterboard on the ceiling, retreating 10 - 20 cm from the wall, along which the curtains will be hung. Depending on the idea of \u200b\u200bthe designer, the drywall box can be divided into two types wide and narrow, and the design of the box frame and the approaches in the design are different.
Popular niches for curtains
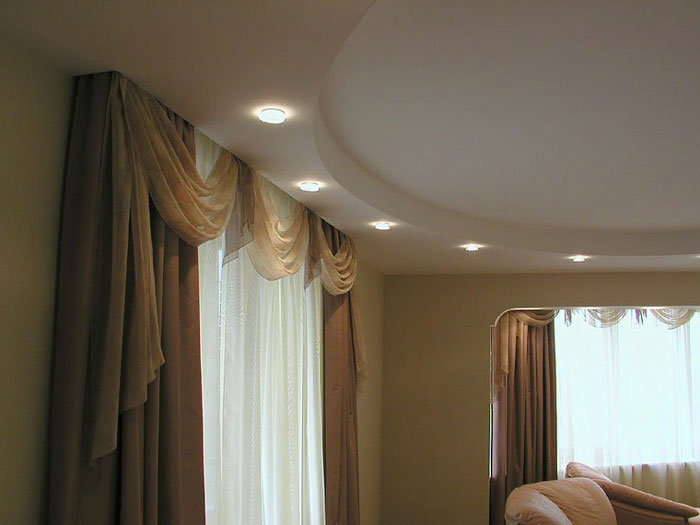
Fig.1.
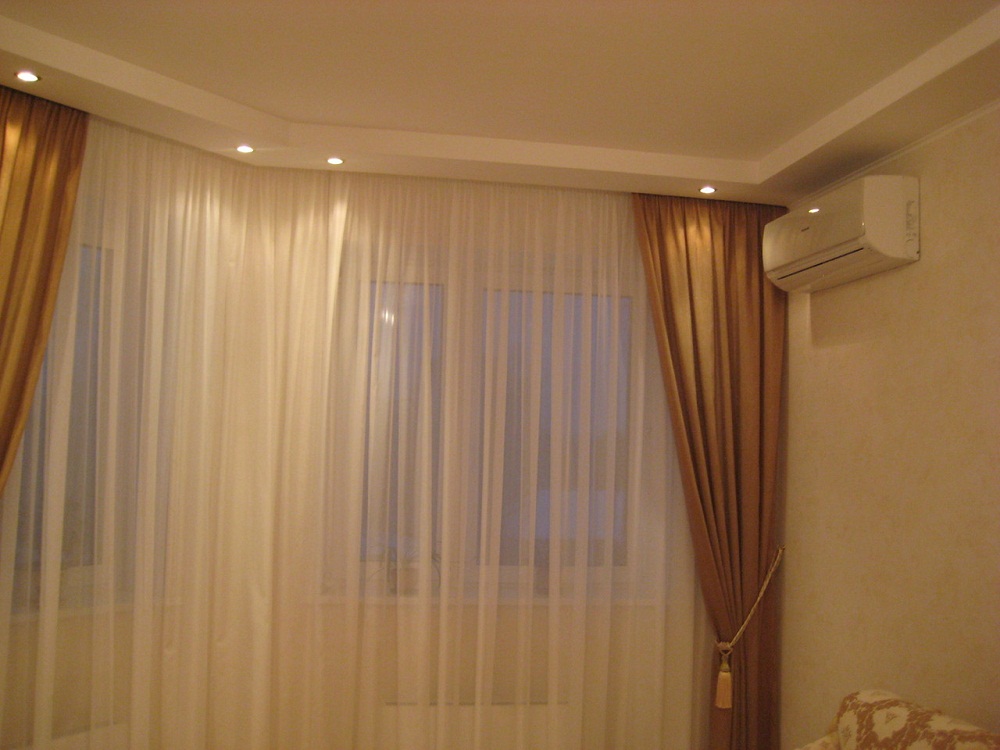
Fig.2.
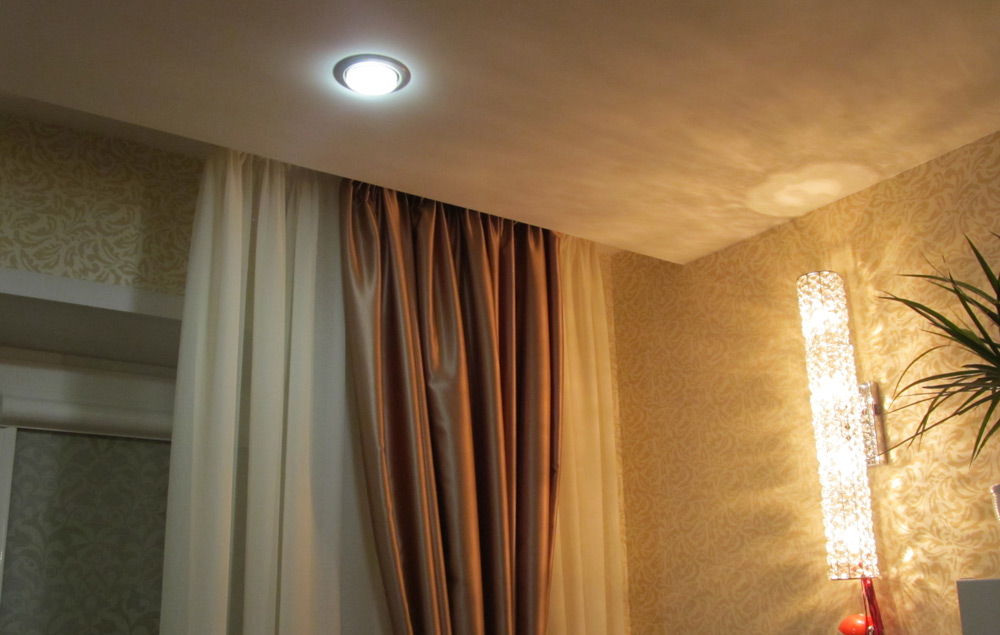
Fig.3.

Fig.4.
A wide box for organizing a niche for curtains is used when the installation of point lamps is planned. In this case, the width of the box is 40 - 50 cm, and the height of the box 7 is 10 cm.
Increase 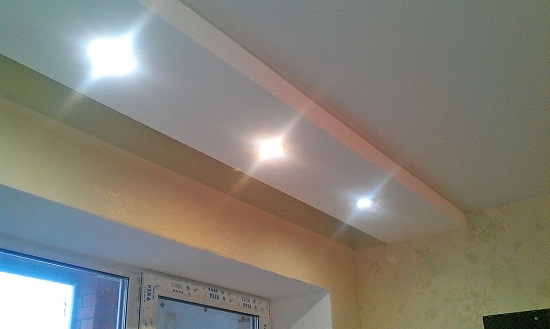
Fig.5.
The drywall box for a niche is collected in a traditional way. The assembly starts with a frame. On the ceiling and walls make marking, the overall dimensions of the box are applied. According to the markup, the ceiling and walls are fixed metallic profile. After that, rejecting from the ceiling, 7-10 cm set two horizontal jumpers and fasten them with the ceiling profile by suspensions. The suspensions are made from the ceiling profile. Any profile can be applied to creating a frame. But most often apply the guide profile (Mon).
Increase 
Fig.6.
Increase 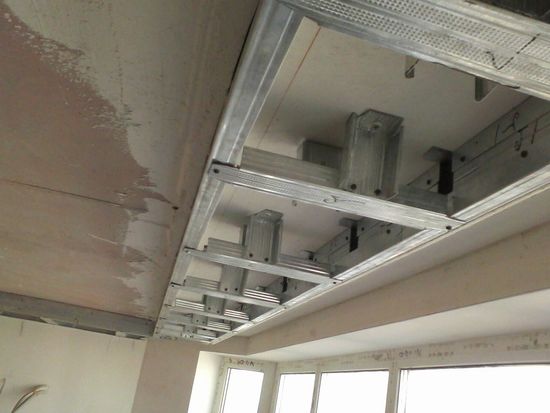
Fig.7.
After assembling the frame, it is sewn it with plasterboard. The remaining space between the wall and the box forms a niche for the curtains.
Increase 
Fig.8.
Increase 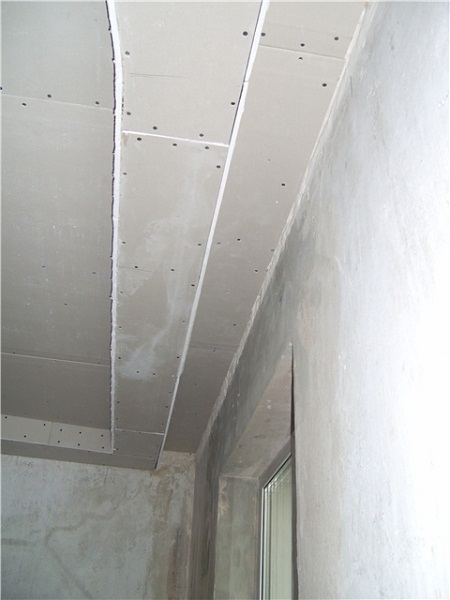
Fig.9.
In addition to the installation of point lamps, a LED tape is mounted in a curtain niche, thus the curtain illumination is organized.
Increase 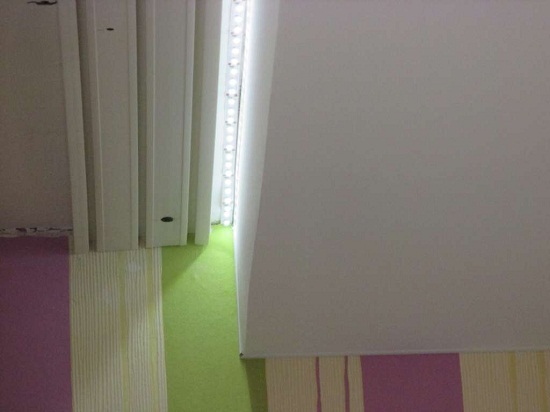
Fig.10.
Increase 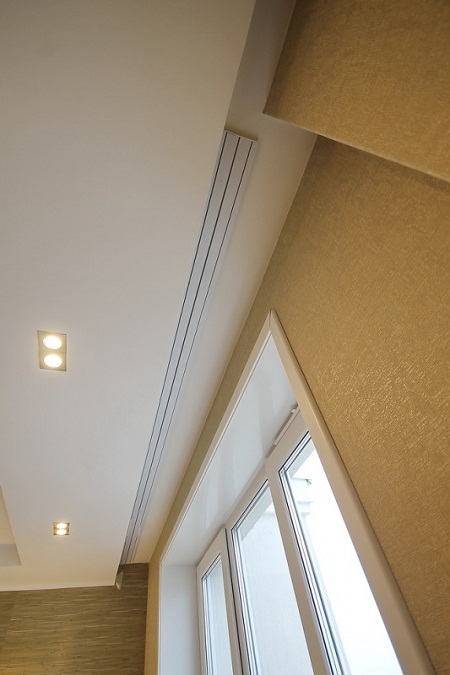
Fig.11.
Also, often for interior design niche for curtains is made using a narrow box. Such an approach is used if it does not plan to install point lamps, and a wide ceiling plinth (baguette) is used to design the ceiling. In this case, the box is necessary to hide the curtain and fastening the baguette.
Increase 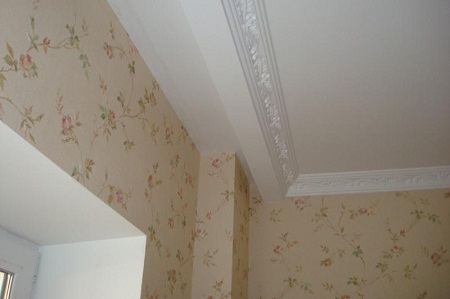
Fig.12.
For the design of the niche baguette, the height of the box must be equal to the height of the baguette, and the width of the box is minimal, i.e. Approximately 5 cm. Such a box is manufactured on another technology. The guide profile is installed on the ceiling and the wall in the installation site. After that, the horizontal jumper is installed, the vertical jumpers are made from the ceiling profile.
Increase 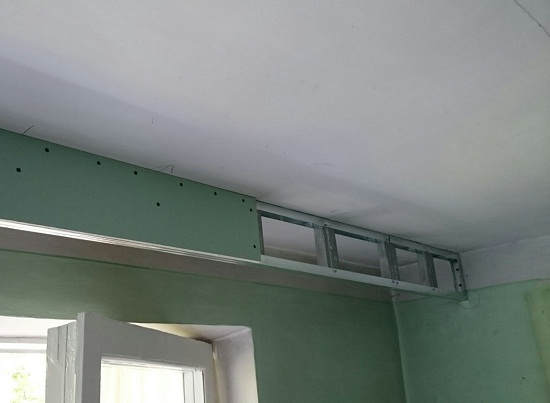
Fig.13.
After that, the frame is sewed with plasterboard.
Fig.14. It turns out an elegant box of small sizes. Despite the small size of the box in its cavity is enough space to install electrical equipment designed to illuminate the curtains. However, to establish any other lighting equipment in such a box will not work.
The result is a neat and elegant niche for curtains, and the consumption of materials and forces is minimal.
Increase 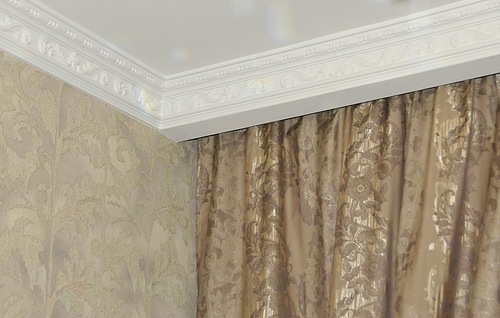
Fig.15.
Also, quite often, when creating and designing a niche for curtains, a combination of described methods is used.
Increase 
Fig.16.
Increase 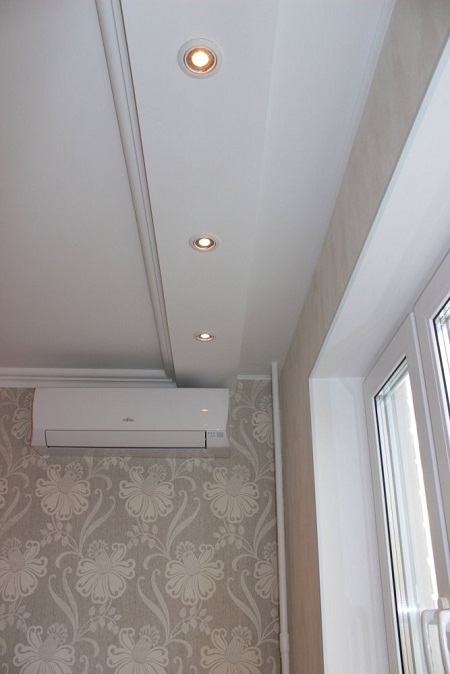
Fig.17.
We looked at the two most common ways to form a niche for curtains. These methods were gained great popularity due to ease of implementation. Such niches for the curtain can be made with their own hands with minimal consumption and strength. At the same time, the considered structures create a comfortable and neat niche, which will tailor the guide bus and elements of the decorative lighting of the curtains.
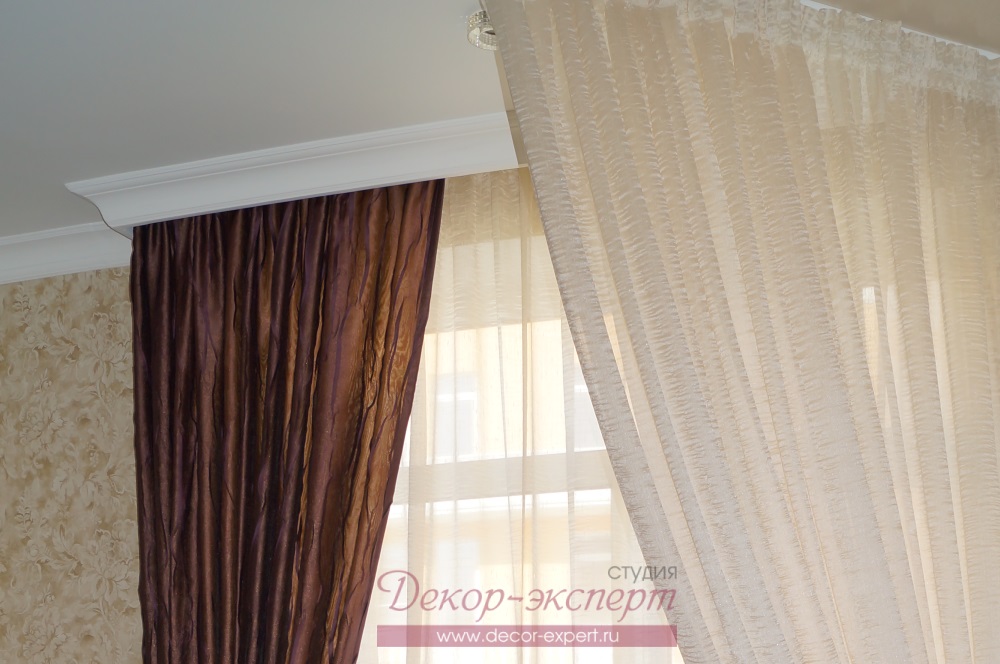
A simple thin white profile aluminum cornice allows to achieve a similar (like a niche) aesthetic result, and the folds formed by a high-quality curtain ribbon will only increase it for the better and do not need to hide it, and it is much easier to mount the eaves to a flat ceiling, in the end everything costs everything Cheaper. True, there are customers who do not like regular folds of the curtain ribbon. Then they need to be hidden in niche or close ceiling plinth. In addition, there can also be hidden eaves with an electric drive for the Roman curtains. Spectacular LED backlighting curtains is also placed in a niche.
In practice, I had a case when both living room for two neighboring windows were implemented alternative options Ceiling. Here is a photo: You can use the mouse button to enlarge the image, and compare both options. What will be done with you - to solve you.
What do you think that you have decided to make a niche and we, accordingly, go to the subject of our article: " How to make a niche in the ceiling for curtains". Or rather - how to set its size and its location. Articles from the "Ceerations" on the theme "How to do" is scored by the whole runet, but the question of the right preliminary measurements there is extremely poor. As a result, I constantly, year after year, meeting the wrong niches ... like this, found by me on the topic with the first tent of the issuance of Yandex:  So do patience and eliminate this information gap, refreshing the problem from the point of view of the decorator designer, the curtain specialist ...
The width of the ceiling niche.
Suppose, for the certainty that the long vertical wall of the niche lies in the plane of the main wall, on which our window is located. The distance from her to the closest to us vertical wall of the niche and will be its width W.. Well, we, of course, look at all this from the inside of the room.
To begin with, you must draw your attention to the heating radiator. Yes, yes - dancing from it, since ignoring is its presence is a source of 90% of errors in the design of ceiling niches. Watch Will there be a radiator play the edge of the windowsill. If it acts, we define the first parameter p. - Battery removal for the plane of the simpleness, otherwise (extremely rare), this parameter will be the removal of the windowsill.
- just tulle (single row cornice)
- tulle with porters (double row or three-row cornice)
- tulle with curtains plus lambrequin (three-row cornice, possibly plus another guide)
From the first option to the third increases the width of the cornice and distance k. Between (extreme) guides of the eaves, respectively, the internal width of the niche increases. Another model, for example, the Roman Curtain - corresponds to the first option in its needs, and Japanese curtains correspond to the third. For certainty we assume that you, dear reader, will be the second option - tulle with dense porters on a double-row plastic carnous ( k.~ 4 cm). To understand the two remaining parameters of the calculation of the width of the niche carefully look at my drawing:
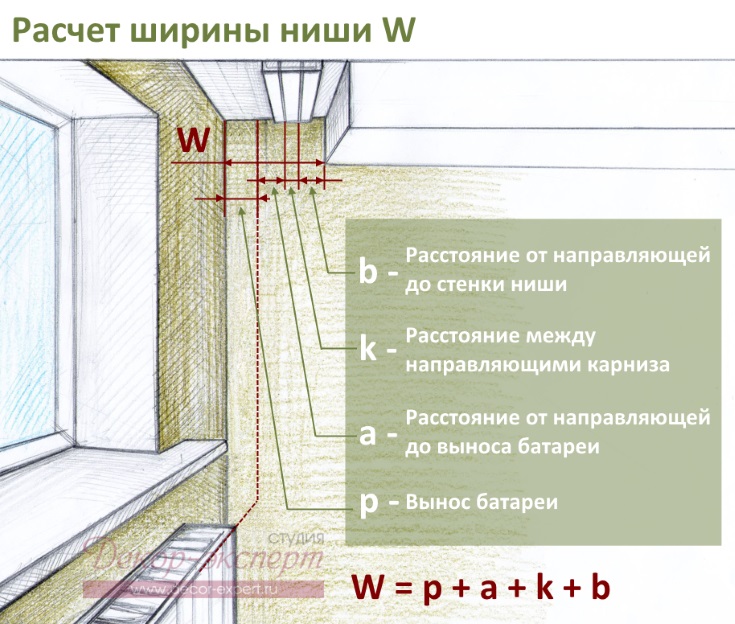
Parameter a.this is the distance from the removal of the battery to the first (neighbor to the window) guide cornice, parameter b. This is the distance from the second guide to the right in the drawing of the niche wall. The spaces defined by these distances (enough from 3 to 5 cm) are needed so that the folds of the tulle and the port can be freely fit into them, so that they do not break the heating radiator either by the niche wall so that the friction coefficient when moving the curtains hooked for hooks in the guides Carnishes, was minimal.
From the figure above it is clear that the width of the niche W. equal sum Considered four parameters. And if you forget when calculating the biggest parameter p. (Battery removal), then Niche is likely to be incorrect. It was such a problem that I got it before me when I was fulfilling, there I had to hang in a niche as much as much as possible to her neighboring wall, and instead of ordinary Tulle, come up with the original Roman scope with chalivers and hang her a little ahead of the porter already on the ceiling.
Ceiling niche length.
This size L. Between the left and right edge of the niche depends on its location - near the window, in the whole wall (the length of the niche is determined by the size of the wall), from one edge of the window to the opposite wall and vice versa. For definiteness, take the option "near the window". In this case, the niche must go for the opening of the window to the left and right. The question is how much?
Suppose you have a small relative to the size of the wall window, and you do not want to the afternoon the tight delicties (selected by us earlier for certainty), overlap it, reducing the flow of light. In this case, the niches at the opening of the windows must be at least 50 cm to provide enough space for taking porter fabric assemblies .. But if you firmly decided to hang it on this window, instead of our version, the Roman corter, will be enough and 10 cm for each call. Those., We again observe the dependence of the size of the niche from the selected model of the curtain.
Another nuance: if your non-standard windowsill are far-consistent on the edge of the edge, then the length of the niche should be such that our curtains can then hide these edges. In connection with this, too, is indicative of another case from my practice. Here is a variant of windows with the wrong niches, I met in the hall of the cottage at his customer: 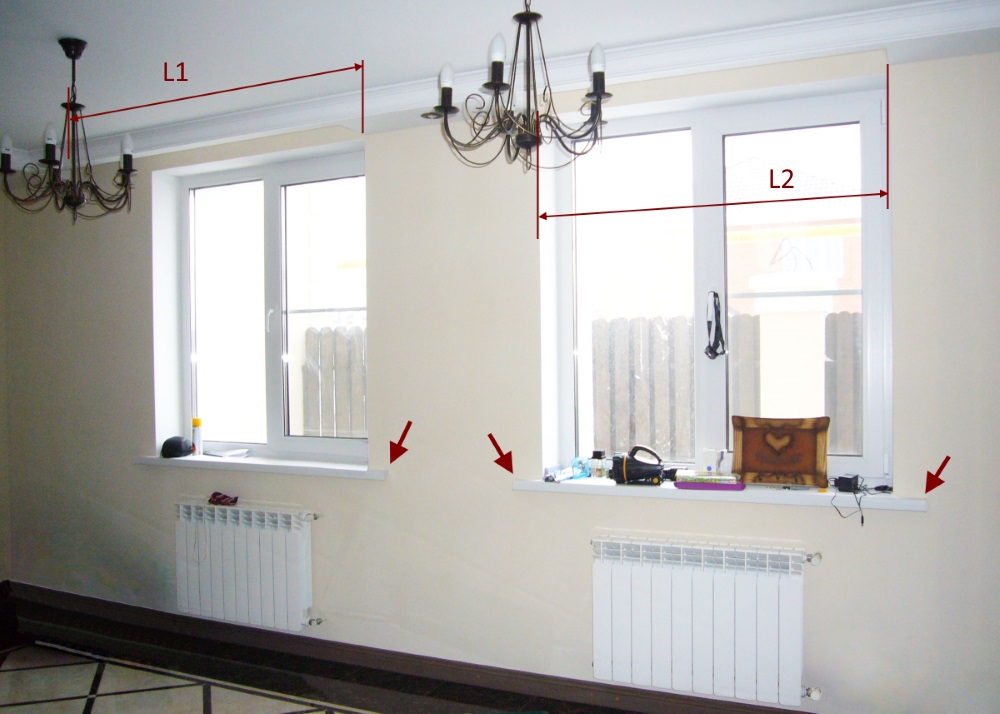 L1 and L2 lengths of two niches are such that in three places They ends clearly at the level of the walls of the window of the window, completely ignoring the significant occasion of the windowsill on the simpleness ... i.e. Only the left ending, reaching almost the wall, the first window niche is correct. How they came to such forms - a story is silent. I like it to legate the disadvantages of niches in this case:
 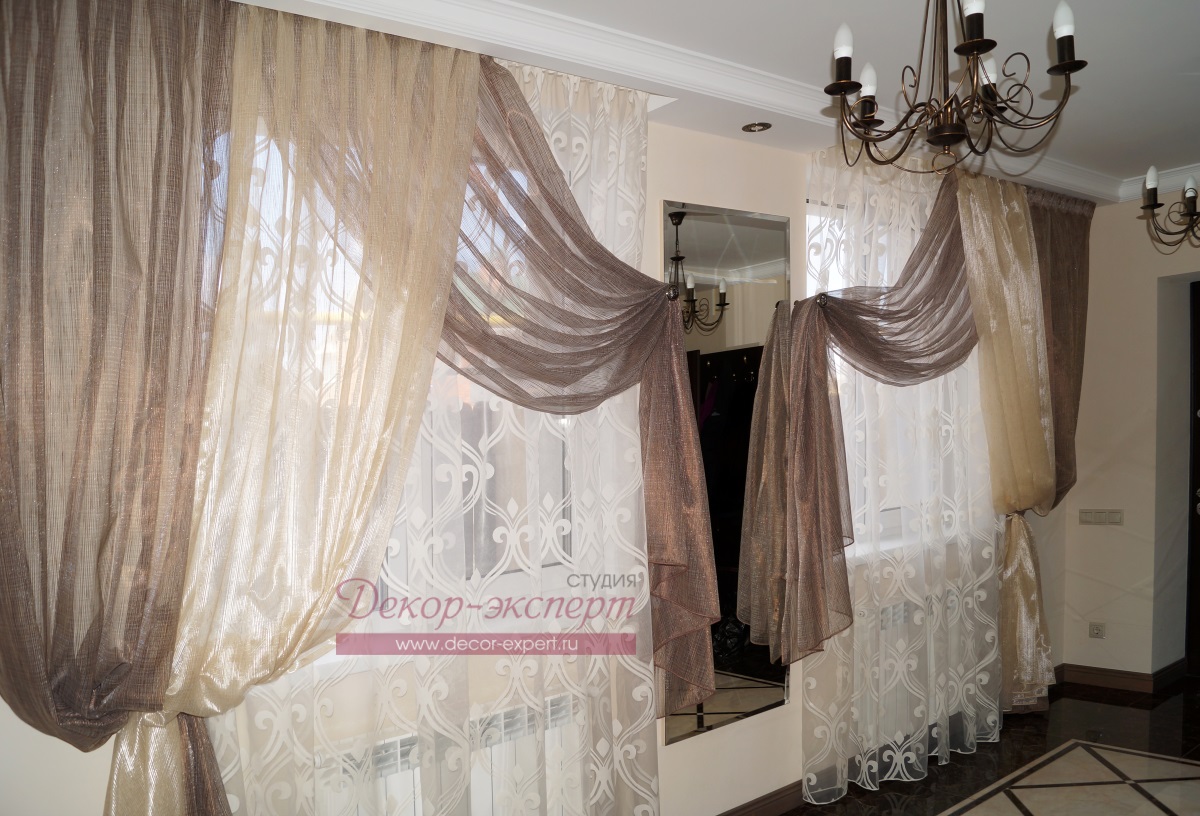 I simulated the continued niche to the right to the right to the second window mentioned at the very beginning for the second window and closed the bottom of the windowsill on the saint. Curtains can be corrected much ... and the ceiling niche including ...
Continue niche to one of the walls (or before both), thus the length L. It makes sense if I want to hide on the wall with Curtains, something that failed to hide constructively during repairs. Well, or, maybe, you like a beautiful curtainic cloth with a ceiling with a ceiling ...
Ceiling niche depth.
With a depth, everything is simple ... the minimum value G. It should be so to hide, as we agreed above, the folds of the curtain ribbon. Calculate: Cornise thickness h. (~ 1.5 cm) plus tape height s. (from 5 to 15 cm depends on the type of tape) plus amendment u. (~ 8 cm) At the compensation of the angle of view of the view of an overlooking you upward up on a niche from your sofa.

From my point of view, the optimal depth of the niche should be 15-20 cm, if the niche is fine, then it is not worth doing it. Well, the maximum depth of niche depends on the design of the entire ceiling and its design features. It should not exceed 40 cm, otherwise the installation of the eaves and the curtains hide will be difficult. There is another nuance, a bit connected with the depth, which makes sense to discuss exactly here:
- It may turn out that the upper horizontal niche plane will coincide with the treated and painted concrete The surface of the original ceiling, in this case, in the future, the curtain eaves will be attached without problems in the place we need.
- In case, when forming a niche at all its faces will be used plasterboardIt is useful to provide a standard mounting metal profile running around the middle along the entire length of the niche above its upper face. For fastening the drywall, this profile may not have much sense, but it will not be very useful for reliable fastening of our plastic double-row cornice ...
- For the option of making a niche technology Stretch ceiling (Such an option is occurring more and more) over the future upper horizontal plane of the niche at the desired points, special mortgage elements are set to which our cornice will attach. The position of the mortgages is determined by the attachment points of the cornice.
Here, in fact, all basic information on the preliminary definition of the size of the niche in the ceiling: width W. Length L. and depth G. ... Of course, there are also complex cases and unforeseen nuances in which only high-level professionals can figure out ... But if you, at least, control the process, correctly turning the attention of your interior designer or builders for the procedure for execution right measurementsT. niche in the ceiling with a high degree of probability will be done correct! I hope this text will reduce the number of my meetings with incorrect niches))) ... about that, read a separate article in this blog.
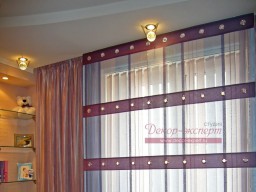
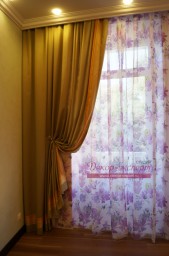
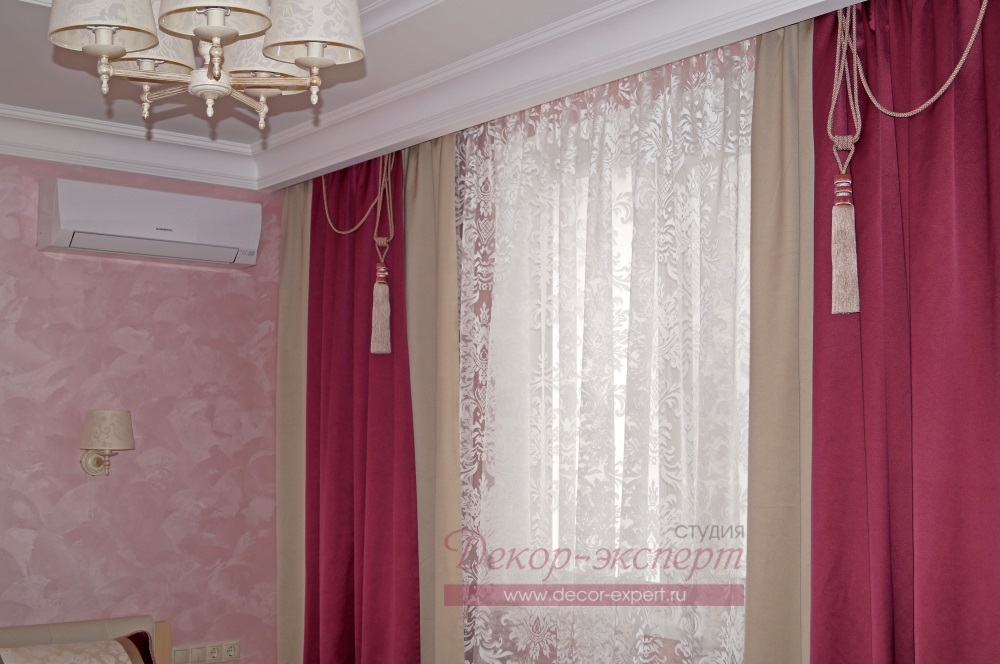
Another photo of the curtains fixed in the right niches from the projects performed by me:


 PS: If you already have the right ceiling niche and in it have long been hanging on the plastic cornice your favorite curtains and you want to update the project by adding a new decorative element -, then our studio can help you. We will make specially for your carnis under the depth of niche elements of openwork lambrequin with an enlarged top plank. It remains only to choose to order, and ask the color. Yes ... and new curtains we can do ... Moreover, our delivery to the transport company is free! And the cost of shipping transport lambrequins or lambrequins with curtains will be the same 300-400r, depending on the region.