Modern materials and technologies have replaced traditional wood from many industries, but in individual cases it remains irreplaceable. If you need antique styled bath utensils or country house, then you can't do without a tree. We will tell you how to make a wooden bucket with your own hands.
Wood bucket
Appointment
Many readers will be surprised: who in our time can be interested in the technology of making wooden buckets? In any supermarket, you can easily find inexpensive plastic or metal products that are lighter, stronger and more convenient than antediluvian board vessels.
In addition, modern models are much cheaper than their older brothers, which can be easily seen by looking at the prices in the bathroom accessories department. However, if you are intimidated by the price of the finished product, you can easily make it yourself.
However, back to the main question. The fact is that everything old acquires value as a kind of props, when it is necessary to create a certain atmosphere and entourage. This fate befell, among other things, wooden dishes.
So, let's list the most characteristic areas of the antique stylized:
- Restaurants, cafes and clubs, the interior of which is designed in the style of old hunting lodges, taverns or taverns;
- Hotels and holiday homes, the style of which corresponds to the ancestral estates, estates or castles of the past;
- Baths and saunas made in traditional interior solutions. This is perhaps the most extensive area, and you can hardly find a Russian bath without a wooden bucket or font;
- Many owners of private log houses like to decorate rooms in the style of old Russian chambers;
- Finally, all kinds thematic events, reconstruction of past events, filming of films, clips, commercials and various programs may also require appropriate props.
Important!
It should be remembered that the props may be purely decorative and may not fulfill their functional tasks.
If you want to use the dishes for their intended purpose, you should make them conscientiously according to all the rules.
Materials and tools
To make a bucket from wood with your own hands, you can use raw materials of various species. Considering that large volumes are not required, there is no need to worry too much about the cost of the array, because you don't need a lot of board to produce one or two vessels.
In addition, you should buy a 2 mm thick hot rolled steel strip. The length should be enough for two girths with an overlap of 80 - 100 mm. The width of the strip is chosen according to the tastes of the master, but usually it is 30 - 50 mm.
You will also need a pair of bolts with nuts with a diameter of 8 - 12 mm and a length of about 100 mm to tighten the hoops around the board rivets.
If we talk about breeds, then the choice should be guided by the table:
| Wood species | Properties and features |
| Oak | Service life in water over 35 years, at first it can give a bitter taste and color the liquid in a brown tint. The strongest and most durable raw materials |
| Larch | The service life in water exceeds 25 years, it does not affect the taste and color of water. Larch is the strongest and most moisture-resistant coniferous wood, from which the supporting pillars of Venetian houses are built |
| Elm | It can last about 20 years under underwater operation, but it is afraid of rotting in the air |
| Alder | The durability in contact with water is approximately the same as that of an elm, it does not stain the water and does not affect the taste, rots in the air |
| Birch tree | It can last in water for 10 - 12 years, it does not affect the quality of the liquid, it is afraid of rotting |
| Pussy willow | The least durable material, its service life is on average up to 8 years in contact with water. At the same time, it does not affect the characteristics of water and is not afraid of decay |
From the tool you will need:
- circular saw for slicing;
- jigsaw;
- manual frezer ;
- mallet;
- two clamps;
- vice;
- plane;
- hacksaw;
- file;
- sandpaper and pencil.
A flip-flop bucket, a home-made waterfall, a hand shower - as soon as they don't call a dousing device for a bath in everyday life. Specialized centers have long outlined an upward trend in demand and make good money on the sale of ready-made systems. What if you do everything yourself?
Features of functioning
There are no complex structures and high-tech devices. This is an ordinary bucket, not plastic of course, but made of wood, to match interior decoration, movably mounted on the wall. In terms of capacity, it can be more than the standard 10 liters. With a free movement of the hand, pulling on a cord or chrome chain, as you like, it falls over on the visitor, dousing him with a stream of cool water. After releasing the rope, the bucket returns to its original position and is filled from the central water supply of the bath.
For the first time, a primitive version of the pouring device was patented by our great-grandfathers. And the prototype was a container made of birch bark or a solid log with a hollowed out middle. For a while, the invention was forgotten. The widely developing bath industry made people remember this device, and today the inverted bucket can be seen in many saunas and private bath buildings.
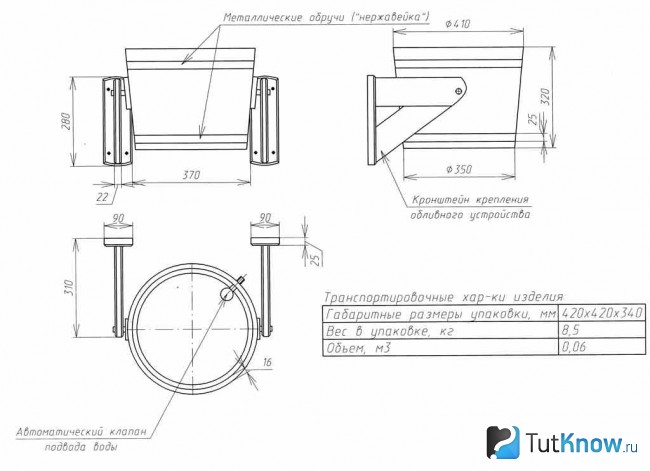
The design of a modern, functional pouring device includes the following elements:
- brackets for mounting the tank on the wall;
- liquid level control systems;
- rope or chain for driving the mechanism;
- capacity.
Everything is ingenious and simple. Even a student attending labor lessons can make and install a mechanism. In design, there are several options developed by modern craftsmen. Naturally, a bucket serves as a prototype for the creation and the most problematic in this regard will be the manufacture of a wooden container.
 It is good in oak basins, but in order for a container made of wood to perform its functions in a pouring device, it is necessary to keep it in water. The wood will swell and the cracks will not let water through. At the same time, it is also impossible to keep the bucket filled constantly. It will become covered with mucus (over time), the water will be cloudy, and an unpleasant smell will simply force you to change the container.
But the sauna craftsmen found a way out of this situation. Plastic inserts were mounted inside. This insert allows you to avoid unnecessary hassle and at the same time leave presentable appearance.
A simple innovation will interest every owner of your own bathhouse, and in order not to be a black sheep and know what you need, consider the recommendation tips for arranging the mechanism.
The size of the bucket can be anything large, medium or small - just your preference here. But the location of the mechanism must be thought out in advance so that you do not have to reinstall it later.
In most cases, the "flip" is installed in the washing compartment on the wall or partition, so that leaving the steam room you can immediately stand under it and cool down. Here, the water drainage system is established and there is a supply. Although a centralized system is optional for a mini waterfall. You can run a separate hose from the reservoir at the time of acceptance of the procedures, or pour water manually. The latter option is not entirely convenient, but for lack of a better one, it will do. In small baths, I mount the dousing device on the street. In this case, you can also use rainwater, having previously installed a collection container and organizing a drain to homemade construction.
The most crucial moment in the work is determining the installation height. For a person with average height, indicators of 2 or 2.2 meters are recommended. For tall users, the level of 2.6-2.8 m is just right. Determine the average height of your family members. If there is a strong spread, mount the system at a height recommended for a tall person. Everyone can use the homemade waterfall, you just need to make the rope that drives the mechanism a little longer. Another recommendation would be advice not to install the rinse aid next to the sauna lighting.
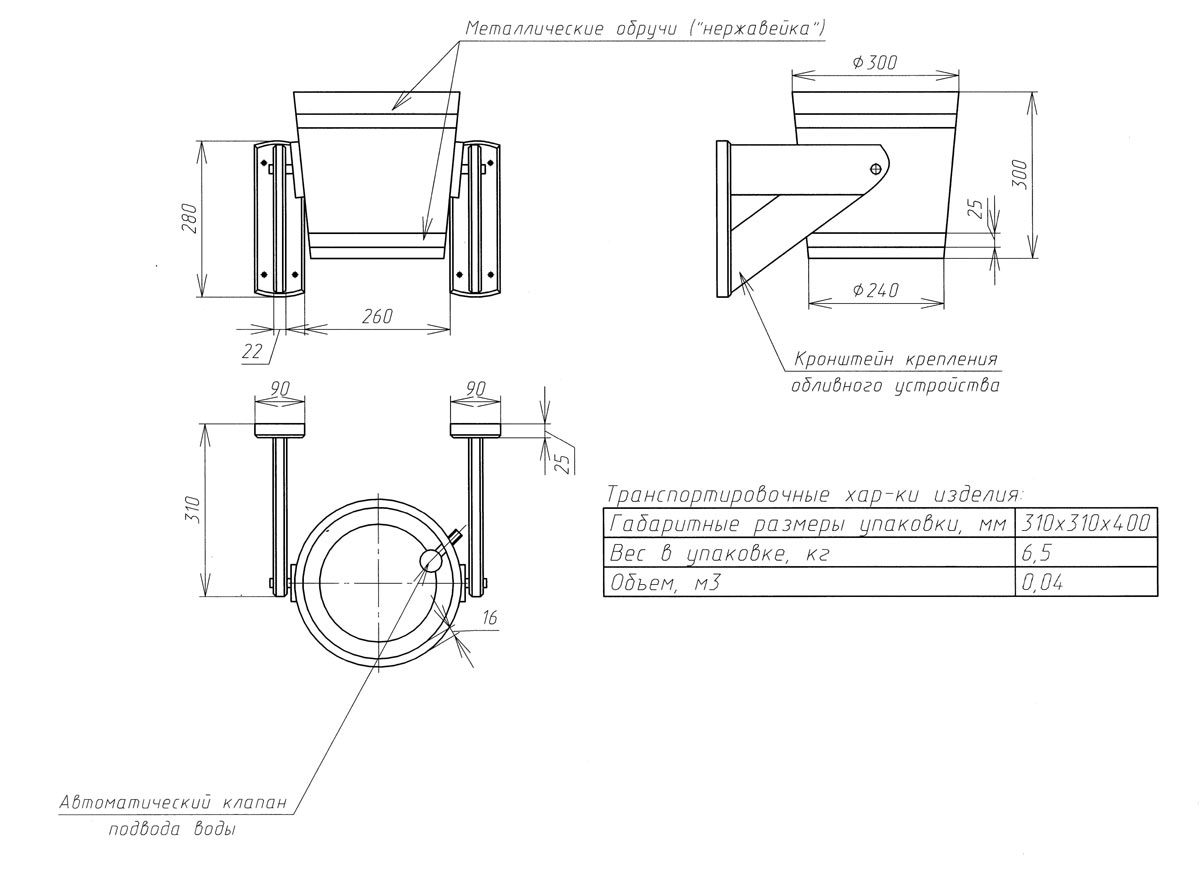
Having decided on the place of installation of the rinse aid, take a closer look at the choice of brackets. Buy only stainless steel models. When making parts yourself, also choose a metal that is resistant to moisture. The brackets must be able to support the total weight of the container filled with water. Weld the metal brackets to the holder to create a movable joint for the tipping bucket. It is even easier to mount a rod through the container into the holder.
Having dealt a little with the technical issues, let's move on to direct actions to manufacture a functional pouring device. The whole short process takes place in several stages:
- we select a plastic bucket of white or azure colors, in it the water will look more advantageous;
- remove the handles from it;
- prepares 25–30 polished planks in length equal to the height of the bucket;
- we fix the strips around the bucket with moisture-resistant glue, and coat the joints with a colorless sealant.
The wooden bucket with a built-in plastic insert is ready, all that remains is to fix it on the bracket. You can go the other way and make a "wrap" of the lining used for interior wall cladding. Surely you will have scraps. But this is a more technologically advanced process, you will have to soak the panels and tighten them around the bucket. For those who have not dealt with wood processing, this option will be difficult. But still, as a small educational program, we will also consider the method of individual assembly of a pouring device from wooden planks without fastening a thorn-groove. 
Working with wood
This process is more complicated, but the effect will be different visually. First, prepare a template for cutting the bottom and side strips. We cut out to size from a flat planed board, several elements, which should be enough for the outline of the bucket. To do this, first measure the circumference with a tape measure.
Then sand all the details and mark the front side with a pencil or marker. Now you need a jigsaw, although if you have a plane (electric), it will allow you to make the cuts smoother. You need to cut off the side walls on each plank, at an angle of 3 degrees, so that when they are connected, they fit snugly together, forming a circle.
Next, you need a flat plane. If the floor is tiled, work on it. Having processed the planks, lay them in a row, and from the supposedly lower part, stepping back 4 cm, draw a line. Make a cut along it with a hand cutter. This will be a recess for installing the bottom. Then turn over all the planks to the right side and number them, after which make the first fitting.
This work is best done together. One collects and holds the panels, the other ties them with wire. Having adjusted the parts, measure the radius of the bottom, along the grooves cut out inside the bucket. Then make a template and cut out the bottom of the bucket.
Now that all the parts are ready, it remains only to assemble the container. But for this, we first cut off two metal strips, for the lower and upper bypass. Repeating, it must be said that the material must be moisture resistant. Metal thickness 1–1.5 mm. Use a hammer to tap the strips to make them rounded and drill holes for the clips at both ends. If the electrical wiring in the bath is carried out, do it in place, checking how the clamps will converge on the bucket.
- we collect a bucket from the slats, having previously installed the bottom part;
- holding it, first we circle the lower part with a metal bracket and attach the clamp;
- having trimmed the strips as necessary, carefully install the upper ring and fasten it;
- then we check the evenness of the assembly and finally fix the fastening of the contours.
The bucket is ready, it remains only to drill a through hole to install it in the bracket and fasten the rope. Outside, the container can be varnished, but first fill the bucket with water so that the wood swells a little and blocks all connecting gaps.
How to supply water
In this situation, you can act in several ways, and it is not necessary that there is a centralized water supply. If a volumetric accumulator for cold water is installed in the bath, you can organize a supply from it. The question is not so much in the supply as in the installation of a control device that limits the filling. Factory models are sold with built-in sensors. The principle of operation of these devices is similar to the operation of the cistern system. You can purchase the mechanism separately and install it on the supply pipe section. When filled, the float will rise with water and shut off the liquid flow to the douche device.
 In a homemade version, it can be easier to do. Water pipe, is displayed at the level of the container, and the feed shut-off valve is installed at a convenient height for you. Before entering the steam room, you can fill the bucket by opening the valve. A bit primitive. But this option is easier, and it will take a little time for manual filling.
The pouring device for a bath is a unique opportunity to diversify the acceptance of procedures. For those whose dimensions do not allow making a pool, and simply because of the lack of funds to put it into operation, a flip-flop bucket will be an excellent solution to the problem.
The tradition of taking baths and dousing with cold water is an integral part of Slavic culture. For a comfortable pastime in the steam room, accompanying accessories will be a mandatory attribute. These include a wooden bucket, which serves as a convenient device for pouring and storing bath accessories.
More than an accessory
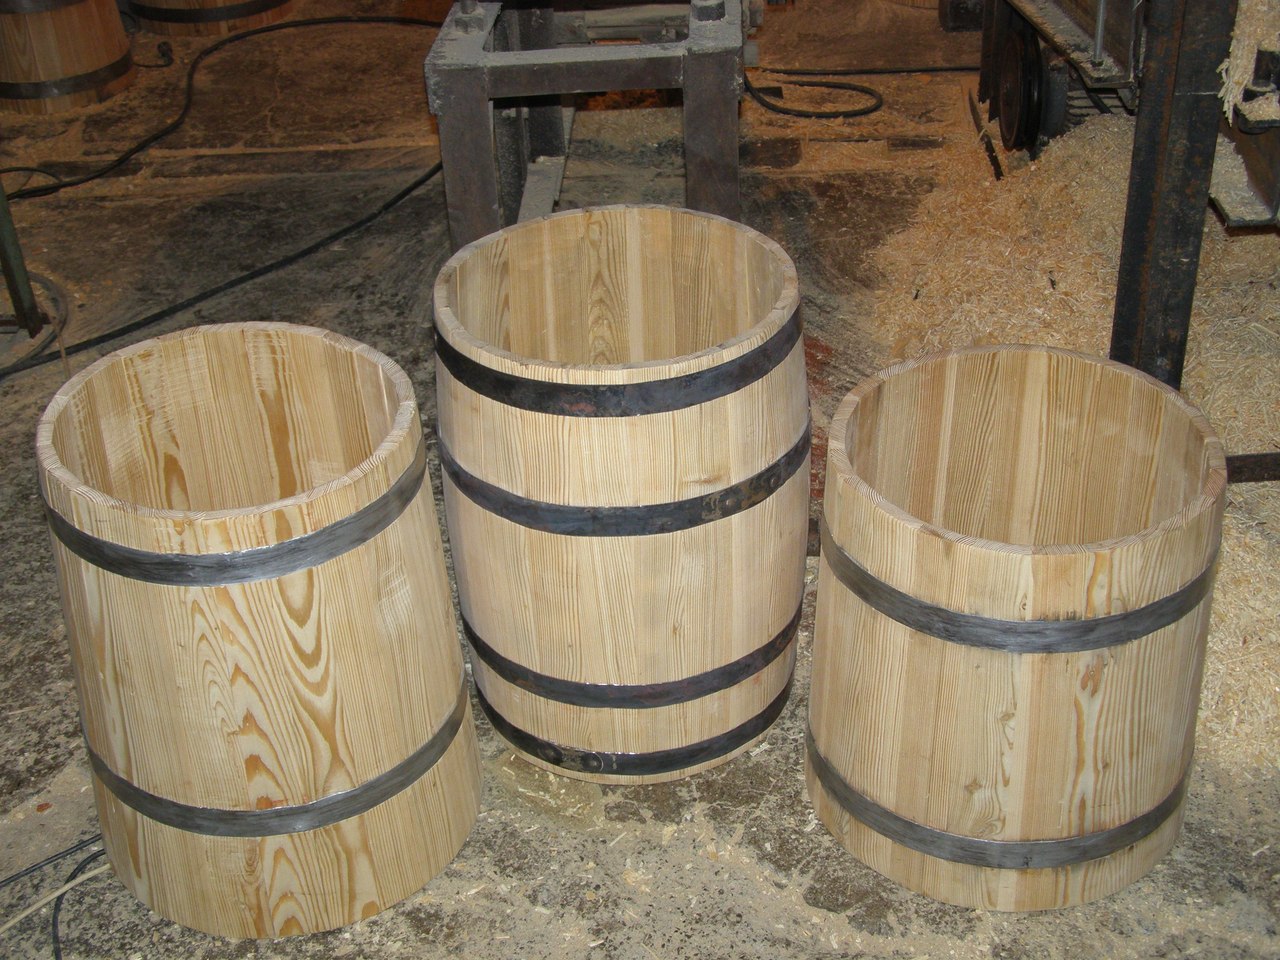
In ancient times, buckets for baths were made of birch bark or hollowed out from a solid log of a certain type of wood. Of course, the most convenient and practical is obtained from typesetting boards. It was very lightweight, durable, and looked extremely aesthetically pleasing. Buy a wooden bucket today favorable price in our online store.
Options:
- material - oak, birch;
- volume - 10 liters;
- handle - braided, rope;
- frame - metal, rivet.
Before visiting the baths and saunas, we recommend that you take with you such an irreplaceable attribute in which you can place a douche bucket and other accessories. With such a device, you will look conservative, practical and pay some tribute to the traditions of the Slavic people. It can also be used for its intended purpose: take cold water and pour yourself over, thereby tempering the body.
Product advantages
Our wooden bucket has great value to purchase. First of all, these are:
- environmental friendliness of materials;
- quality of production;
- affordable price.
We make products from natural materials... A wide wooden bucket will serve you for a very long time. It looks great in any interior. It is not problematic to purchase such an option - we work in Moscow, St. Petersburg and other settlements.
Delivery will not take a lot of time. All that is required of you is to indicate the details and pay. And the staff will help you choose the right accessory for the bath. Our online store will gladly supply you with a wide variety of attributes for a sauna and steam room.
A bucket for a bath is a simple and affordable type of font, which is easy to translate into reality with your own hands. Read about the necessary materials, prices and methods of manufacturing and installation in this article.
Features of using a dousing bucket in a bath

The list of bathing pleasures is incredibly wide. An honorable place among them is occupied by the process of cooling a hot body in a cold reservoir, a snowdrift or under an invigorating drenching bucket. All these procedures not only give physical pleasure and acuteness of sensations, but also provide invaluable benefits to the body: they accelerate blood circulation, tone the skin, cleanse toxins and toxins. In a word, they strengthen and rejuvenate the body.
It is good to have cold water diving facilities in or near your bath. Otherwise, we recommend that you make a douche bucket and enjoy all the delights of a primordial Russian bath.
The bath bucket is a modernized improved version of the wood bucket, movably mounted on the wall of the washing room. This is a kind of container of considerable size, which instantly throws cold water onto the head of the visitor who pulls the cord or chain. In terms of functionality and similarity of form, such a device has acquired several more popular names. For example, a waterfall bucket for a bath or a flip-flop bucket.
On a note! For the first time, the primitive form of such a bucket was invented by ancient Russian bath attendants. At that time, birch bark or a solid log was used for manufacturing, from which the middle was hollowed out. Only over time, barrels began to create them, which used smoothly planed dies and metal rims.
Bath bucket design

Regardless of what material was used to create the pouring mechanism, its design will always be the same. The bucket for pouring into the bath consists of the following components:
- Brackets for fixing the vessel to the wall;
- Wooden or other water container;
- Water level control systems supplied from the water supply system;
- Rope, with which the bucket is tipped over if necessary.
Some of the inconveniences of a wooden bucket are associated with the need to fill it with water in advance. The bucket should swell, otherwise cold water will simply ooze through the cracks. At the same time, you cannot leave the container filled regularly. Over time, the wood will become covered with mucus, and the water will become cloudy and start to stink. The solution to the problem can be plastic insertmounted in a wooden vessel. It will help to avoid unwanted hassle of caring for the system, while leaving the appearance of the structure completely presentable.
Requirements for installing a dousing bucket in a bath
If the size of the pouring bucket can be chosen personally by the owner of the bath (large and tall or small and wide), then its location must certainly meet special requirements. In most cases, the inverted bucket is installed in the washing room: water is supplied there, and the drain system is established. Although the presence of a water supply system is not at all a prerequisite for the functioning of the “Russian soul”. Water can be brought to the container using a flexible hose or simply filled in by hand, standing on a bench.
Sometimes the douche bucket is mounted directly on the street near the bath itself. This option allows you to collect and use useful rainwater for good purposes. But it is worth remembering that a drainage system on the street is needed no less than inside.
The most difficult stage of installing a bucket in a bath is a competent determination of the required height. For people of average height, the recommended height is 2 or 2.2 m. For tall owners, it is worth putting a mark at 2.6–2.8 m. In any case, a person should be placed under the douche bucket with arms outstretched to the top. Do not forget that the vessel will turn over. Therefore, it is worth adding the height of the bucket itself to the planned mark.
The calculation of the level for a person with an average height will look like this: 170 cm (height) + 40 cm (outstretched arms) + 40 cm (tank height) \u003d 2.5 m.
Regardless of the location for the bucket, the mount must be strong and durable enough. Please note that the fasteners must be able to support at least 60 kg! In the traditional version, the container is fastened to the wall with metal brackets (even better stainless ones). To create a movable connection, special ears can be welded to the tank barrels. And even easier - to install a stainless steel rod, passing through the wooden boat.
Pouring bucket for a bath with a plastic liner

It is possible to make a dousing bucket in the most primitive way, accessible even to people who have not previously had any business with wood. To do this, it is not necessary to get acquainted with the basics of cooper and learn to use special tools.
A couple of simple steps will help you quickly make a wooden container that costs a lot of money on retail shelves:
- First, pick up an ordinary plastic bucket of the most successful color. For example, white or azure blue. Water in such a container will look very advantageous.
- Next, remove the handle and any other items from the bucket. You don't need them at all. Do not rush to throw them away, perhaps they will be useful on the farm in the future.
- Prepare 25–30 not too wide sanded wooden planks. Their exact number depends directly on the size of the plastic bucket.
- Using a super strong glue, attach the strips to the outer walls of the plastic container, simulating a wooden bucket. Coat the joints with transparent silicone.
- Cover the "wooden" container with a suitable varnish and reinforce it even more with metal rings.
Pouring bucket for a bath made of wood

This method of creating a wooden bucket will be more to the taste of those who have previously dealt with the processing and use of wood. For a high-quality pouring device, you will need a piece of iron strip for two rims (about 3-5 cm wide) and a 1 cm thick board 1 cm thick.As a result, we get a 10 liter bucket with a height of 40 cm.
The manufacturing process is a little more complicated than in the previous method, but the result, respectively, is much better and more aesthetically pleasing:
- Prepare a template for the bottom parts and rivets (side plates).
- Saw the existing board into parts corresponding to the riveting pattern. Thoroughly work them with a plane and scherhebel.
- Bring every detail to a state similar to the template. That is, carefully cut off the excess, giving the rivets a slightly trapezoidal shape.
- On each rivet, mark the outside. At an angle of 3 degrees, cut the ends so that when the planks are connected together, a circle is obtained.
- Also, on each rivet, make a 4 mm depression 4 cm from the bottom edge. Such a recess is necessary to install the bottom of the container.
- Make your first fitting. Collect all the parts in a heap, picking them up metal wire... Number all the rivets. Size the bottom part.
- Using a template, cut out a piece for the bottom. Cut the top and bottom of the ends, forming a circle, so that the diameter is 1 cm less than the initially measured one.
- Measure with a margin and cut a piece of metal strip for the lower rim. Use a hammer to give it the required round shape. Make holes at both ends and rivet them (with a five wire).
- From the pieces of metal strips, make two tight clamps.
- Attach two opposite rivets to the rim, securing them with clips. Next, insert all the other parts, tightening them as needed. Thus, completely fill the entire clearing on one and the other half of the bucket.
- Place the workpiece in its natural position and install the bottom piece.
- Measure the top girth of the bucket and make a second rim 10 cm from the top.
- Sharpen and file the product if protruding places are visible anywhere.
Bringing water to the water bucket in the bath

A factory douche bucket is usually sold already equipped with a water level control system. In most cases, the principle of its operation is identical to the system in the cistern. In fact, the system for supplying water to the dousing bucket is as simple as the design of the mechanism itself. The pipe is brought into the room at the height of the container. The crane crashes one and a half meters from the floor.
A rubber, plastic hose or a stainless steel braided tube is connected to the pipe itself. A water level control system (if any) is connected to its second edge. In most cases, it is similar to mechanisms installed in toilet cisterns. This completes the simple process of supplying water and connecting the pouring bucket.
The technology for making a wooden bucket for a bath is presented in the video:
The bath bucket is ready! You can ignore small cracks, as the wood will swell on contact with water. It remains only to bring water to the selected place in the bath.


