First of all, classification: the roofs of the balconies are made to divide on dependent, that is, structures partially laid into the wall of the building, and independent - fixed to the wall using all sorts of mounting agents. Such separation is relevant only for construction work. When repairing and glazing the balconies, it is practically unrealistic to arrange a dependent roof, and there is no reason to do this - it is easier to use light mounted structures. Therefore, it will be correct to classify the roof of the upper balcony for the presence of glazing on it.
Safety with high-altitude work
Note that the independent implementation of this kind of work without training and equipment may have depository consequences. Do not attempt to independently organize insurance from falling and performing work on the side of the roof. To eliminate the very possibility of falling, the entire installation should be carried out from the inside of the balcony, except in cases where it is impossible to be made due to the design features.

Of these exceptions, the most common styling and fixing roofing, Installing ties and protection of adjoining nodes. This scrupulous operation of an unprepared person, being at the height, is difficult to perform. It will be more correct to contact the services of promalpinters: if you independently mounted a frame and a crate, you have everything necessary materials (including consumables) and pre-prepared scheme and laying technology, climbers services will be at a minimum.
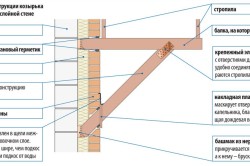
Frame carcass device
The roof on non-beam balconies is absorbed from the triangular farms cooked from the square pipe 40x40 mm. All the complexity of the manufacture is reduced to the calculation of the desired slope of the skate (on average - 30 cm per 1 m), the length of the cornese swell (25-35 cm) and the optimal step of the farm installation (70-100 cm).
In the case of glazed balconies, it is necessary to provide space for laying the insulation, so the farm should be in the form of a trapezium with a length of a smaller base on the inner side of at least 50 mm. Farm length should be such that they rest in the glazing frame. Naturally, it is necessary to carry out glazing before laying the roofing coating in this place.

Due to the direct stop of the window frames in the farm, absolute resistance to frontal wind loads is provided. Reverse wind loads are compensated by compounding the frame with farms by means of steel plates with a thickness of at least 3 mm. Side racks are resistance to wind absorces due to direct mounting to the wall and by means of an angular profile to the front frame.
Installation of crates
To fasten the roofing coating, you should fill over and across metal farms wooden bars Or boards with a thickness of at least 40 mm. The length of the skate usually does not exceed 1.5-2 meters, so in most cases enough only three regions, but they must be solid. The task of their attachment is quite trivial, but on the balcony it has its own specifics.

First, the crate is placed on top of farms and temporarily secured clamps or wire. The mount is performed using metal corners, which are connected by a bolt through the farm pipe, and the other side is attracted to the bars with two screws. After the crossbar is temporarily fastened with two straps, then the doom is removed from the mounts and ropes rises to the roof.
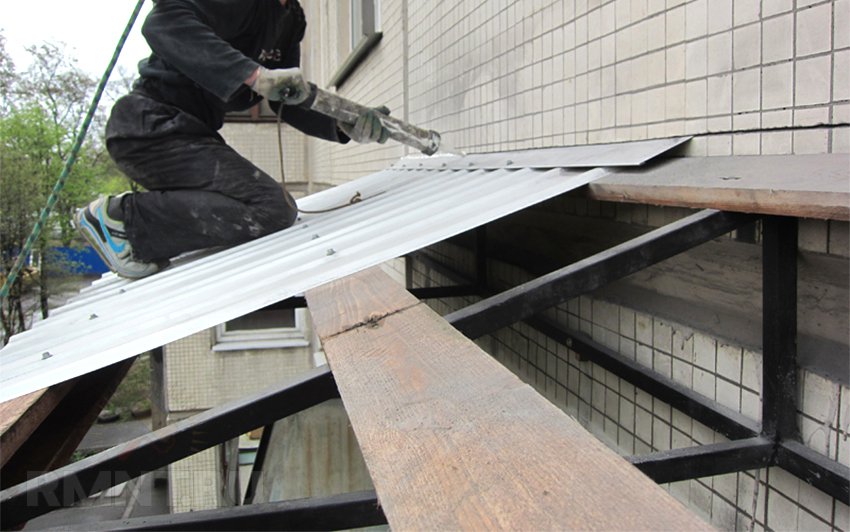
Roofing
The roof of the upper balcony almost does not have access to maintenance, so the coating should be resistant to precipitation, temperature fluctuations and mechanical effects. The appearance, on the contrary, is not important, so the balcony is better to cover with conventional profile sheets. The coating should have the greatest possible reflection coefficients, so preferred colors - matte white and silver metallic.

Now you can safely and without risk, fasten the roofing coating, and then the insulation. Sheets have a cropped edge to the top of the slope, the extreme leaf is mounted solid and with a large overlap. Then the assembled design is served back and fasten the bolts to farms.
Adjoint and skates
When the roof improvement is critical, it is critical to quality adjustment units, eliminating moisture seeping inside. One of the most problematic places - outdoor corner Between the roof and the wall. It often happens that water flowing down the building falls under the protective horse and saturates the insulation, or further flows along the inner wall.
The problem can be solved for sure: in the wall it is necessary to make a diamond disk to a depth of 50-60 mm, fully fill the gap with a sealant and insert a Z-shaped bitch into it. This method of sealing supports corner connections and guaranteed to protect even the progress brick wallswhere thick seams are not always able to close the sealant.
The front and side skes of the roof are laid by an angular skate for the proflist. The space between the window and the roofing coating should not have a single lumen: it is filled with foam, which is trimmed after frosting along the frame. Open section of foam abundantly cover roofing or ordinary bituminous masticThen the angular nicknik is mounted on the self-tapping screw.
From the inside, it is necessary to re-process all the joints and adjunctions to walls and glazing using a mounting foam, in the corners it should be left a fiber with a thickness of at least 40 mm. If the frame consoles protrude beyond the glazing line, they must be sewed with the same metal skate cut from one side through the thickness of the console edge. The narrow space in the corner under the sink of the roof is also necessary to fully fill the foam.

Balcony roof liner
The insulation under the roof of the balcony is not laid to preserve heat. The balcony in principle can not be warm: three outer walls will not work capitally insulate without significant loss indoor space. Nevertheless, even on laptop, but glazed balconies must be layered under the roof some layer of thermal insulation.

This is done to maintain a healthy microclimate on the balcony in the summer. On hot days, the roof will inevitably be heated up to 50-60 ° C, slightly decaying the air inside. To avoid this, there will be enough roll of mineral wool. The insulation is pushing into the gap between the roof and farms, tightly filling the space between the crates of the crates and breaking the resulting chest wool.
Mounting siding or another finish directly to farms is not always convenient, so they are bubbling with wooden minimum thickness bars. It is possible a black ceiling or plywood device, in this case it is necessary to carefully fill the seams with polyurethane foam, which, after circumcision, is covered with a protective layer of alkyd paint.
- Design features
- Stage 1: Required tools and materials
- Stage 2: Preparatory work
- Stage 3: Installation of Visor
The most frequent question that appears in the construction of the house is how to make the front of the front of the roof so that it organically fit into the overall structure of the structure, defended from precipitation and saved power during the installation process. The finish of the front of the roof is quite important and necessary work, since it largely depends on the appearance of the house (or build).
The trump card on the front allows you to protect the ends of the bearing walls from rainfall.
It is quite difficult to carry out such work, this is due not only to dangerous work under the roof, but also a need to carefully consider and implement a design that will correspond to the design of the building. Often, a person who made such work knows how important it is to think in advance the design of the fronton: it is she determines the shape of a visor. About how to make a perton trump card, told in this material.
Design features

It is better to use as a force structure wooden beams.
The trump card on the front is the necessary element, since it allows you to protect the ends of the bearing walls from the fallout, just as the fronton protects the roof. This significantly reduces the risk of wall destruction, and also improves the service life. When installing it, it is necessary to remember the aesthetic appearance of the building. After all, if it is completed untidy or not under the design of the house, it will be strongly rushing in the eye. What will be necessary to make at least 2 visors for the fronton, probably understand everything. After all, often build at home with double roof. Accordingly, the building has 2 fronton.
At the moment, the visor can be made from a variety of materials, the main of which will be discussed below. An important point In the process of construction, the fact that the carrier structures under the visor should be mounted before the trimming of the fronton. Otherwise, it will have to be attached to the walls and trimming of the fronton, which significantly reduces the reliability of the design of both the front-line and the visor. Literate masters are planning the construction of a visor long before the roof is designed. In this case, the design should provide the following functions:
- Protection of bearing walls and structures from water from entering water.
- Stability and strength of construction under the influence of precipitation and wind.
- Decoration of the building. The visor will look like a "skirt", which should be organically enter in the design.
- Coverage materials visor and carrier structures Must be durable, provide the necessary protection and have a pleasant shape and color.

Hardware are used to fasten both power structures and roofing.
Almost always the visor make a single one (less often flat). In this case, the design for mounting the visor is trying to provide in advance. In the event that a canopy visor will occur after the completion of work on the front, the visor will have less strength. There is a possibility that it will take him by the wind or he will not stand the precipitation.
As a force structure, wooden beams or wide boards can be used, which are installed either parallel to the ground (flat frontoth) or at some angle. The width of the visor is recommended to choose so that under it could sit down during the rain (so that the rain does not wet him). For buildings with the height of the walls about 3 meters, the width of the visor should be about 0.8 meters. The minimum allowable width is 0.5-0.6 meters. This will protect the wall of pouring. To ensure the necessary width, the canopy should be calculated in advance the length of the beams of the supporting structure so that the canopy is completely lying on them. At the same time, the length of the beams should ensure their reliable fastening.
After the idea of \u200b\u200bwhich the design should be in a canopy, you can start creating it.
Back to the category
Stage 1: Required tools and materials
To build a visor, we need the following materials:

- Bar 50x100. We are necessary for building supporting structures. The number of timber is determined by the width of the house, selected width of the canopy, roofing material for a canopy.
- Roofing material. It can be slate, metal tile, professional flooring, etc. It is important that the material has a color and texture, similar to the wall or roof finish.
- Hardware. Used for fastening both power structures and roofing. Most often they are self-tapping screws or anchor.
- Corners. For mounting the bar to the roof design (rafters or other carrier elements).
- Material for sings.
- Measuring instruments. You should get a roulette, ruler and pencil, plumbing, level.
- Screwdriver with a set of bits.
- Glue.
- Stairs.
After all the materials are collected, proceed to the installation of a canopy.
Back to the category
Stage 2: Preparatory work
Before purchasing materials, you need to draw up a drawing of the future canopy, in which to specify the exact location of the carrier elements. The fastening step for the visor should be taken depending on the amount of precipitation in a particular region and windiness. On average, the step should be 0.5-0.6 meters. After that, count the required amount of materials and acquire them.
Next, after the preparation of the scheme and the acquisition of materials, all wooden and metal parts should be processed. The tree is treated with anti-grib fluids in 2 layers, primer and aquastop. Metal materials (if there is no factory protective covering) Fit in 2 layers and color. All materials need to give time to dry, and the boards need to withstand several days so that they straightened and did not have internal stresses after transportation. After that, their cutting on the details of the desired size occurs.
Installation of parts is carried out before the plating of the fronton. Fasten them with self-draws or anchors. It is recommended to make an additional mounting corners. In the event of the construction of a single-handed canopy, the crate must be placed at an angle. In this case, the width of the visor is considered on the plane parallel to the ground, and not the length of the bars of the crate. If necessary in the power structures of the roof, you can make small feeders for the best fixation of the visor's crate. The chatter design for the visor is very similar to miniature rafters for the roof. From the bottom side of the crate for a canopy, it is recommended to drive and consolidate the backups for the hardening of the design.
The next step is to work on the cutting of roofing on the necessary pieces. It is recommended to do it in advance below, because it will do it on the roof.
When all the works described above are completed, you can proceed to the front of the fronton, otherwise the visor will interfere with the process of the trim.
The transparent roof significantly increases the amount of passable light. Ideally, for the maximum effect, if you want to have a truly bright room, it is better to make a combination of translucent glass roof and frameless or French glazing.
Roof of glass
Perhaps the glass roof is one of the most elite options. It creates visibility of light, air construction, visually increases the space, making it limitless and light.
In fact, the roof glazing is a monumental and robust design. The base for the glass roof of the balcony serves a welded frame, which is subsequently installed by a ceiling-rigle profile used in facade glazing. As a roof, we use a tempered triplex - an extremely strong glass, which is not satisted when destroyed, but simply cracks. A variant of warm glass roofs is possible, using double-glazed windows. As an option for glazing, the roofs can be used tinted glass or matte.

For our shoulders - rich experience in designing and installing glass roofs on the balcony. All installers have passed a special training of industrial mountaineering. VIP balcony makes the roof glazing efficiently and safely.
Polycarbonate roof
Polycarbonate roof is a good glass roof alternative. Polycarbonate as a material for the roof is extremely relevant, after his appearance, he instantly won the market and is already becoming the usual solution in the construction of the roofs. Therefore, we adapted this material under our scope and successfully manufacture and install the transparent roofs of polycarbonate.


The roof of polycarbonate has several advantages over glass and other roofing light-effect materials:

All-glass visors
Russian climate multifaceted, there is everything: and rain, and snow, and hot sun. All these natural phenomena are good, but in moderation, and therefore no facade of the building costs without a canopy. Sheds are different, but for a number of reasons the most best Material For the manufacture of visors recognized glass.
The all-glass visor over the entrance or the porch will protect from snow and rain, in sunny weather, it will create a shadow (for this it uses glass toned in mass), protects from falling icicles. What else is the transparent canopy? The glass visor does not close the overview, does not create an excessive shade, allows the sunlight to always illuminate the building. The visor from the glass will never spoil the appearance of the building, it is completely impaired, especially for historical facades.
All-glass canopy will be an excellent addition and for country house, combining elegance and respectability. The ease and airiness of the design only emphasize the merits of your home, and its futuristic start will be the highlight of the entire architectural ensemble.


Reliability and functionality of glass visors depends largely on the quality of fittings. We use German accessories made of stainless steel with anti-corrosion resistance, which is absolutely not afraid of moisture and temperature drops. When installing a glass visor, we use only tempered glass triplex thickness from 12 to 20 mm, which makes the design of the glass canopy as strong as possible.
Photos of our works: Transparent and glass roofs

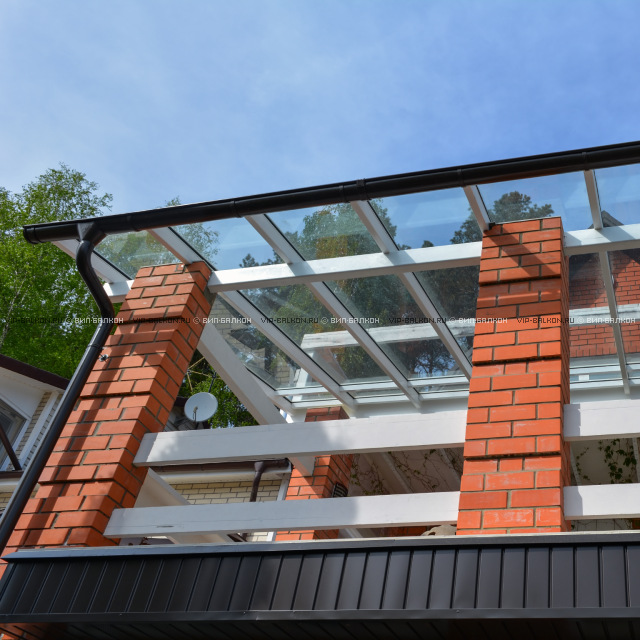
When the facade of the second floor is glazed to protect against precipitation, it was necessary to close the roof part of the veranda protruding from under the roof of the house. VIP balcony specialists designed and installed a transparent roof of a monolithic polycarbonate with a thickness of 12 mm. Monolithic polycarbonate is unpretentious, safe, sufficiently durable and lightweight material for translucent roofs. The roof design relies on the glazing aluminum frame and, partly, on the roof of the building. The transparent roof does not at all overlap with the veranda look, harmonizes with the rest of the glazing, maximizes the sunlight.
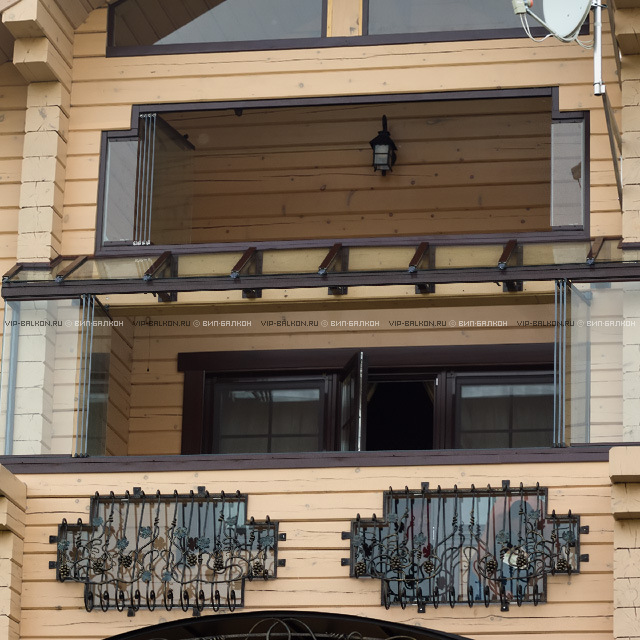
Transparent balcony roof at SMOSMAN
The roof of the balcony on the top floor of the house on the spacecraft of the promenade. On the balcony, we installed French glazing, it is completely transparent, so the transparent roof turned out to be naturally selected for this balcony. Durable monolithic polycarbonate, lightweight and durable, is great for glazing such a roof.


Glass roof terrace on the roof of the house in Lyubertsy
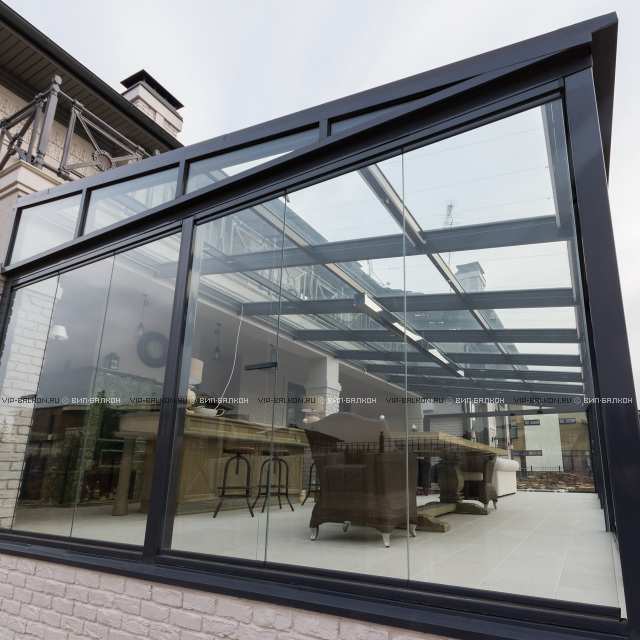
The terrace was decided to glall completely and make a glass inclined roof, because it will be a winter garden on the plan, and plants need sunlight. In the part where the terrace enters the balcony of the upper floor, the roof had to gently describe around the balcony plate. Over the main part of the terrace of the roof construction independent. The fasteners of the roof mounting arm are recessed into the decorative buildings of the building and how they grow out of the wall. Even the roofing glass is placed in the facade cladding, providing excellent adjoining and water protection. This solution looks very neat and beautiful, does not violate the architecture of the building.
Transparent roof over a balcony in Altynovo
The glass roof over the balcony in Altynovo rests on the welded steel farms, painted by powder painting. Roof material - Triplex glass tempered. The roof design has a sufficient carrying capacity, so that we can "hang" the friction glazing of Lumber.
Transparent roof on 2 balconies on the youngwind
Roof over the outdoor terrace
Reliable and practical translucent roof over the terrace of the second floor, the settlement of the office.
Transparent roof over terrace glazed terraces
Glazed recreation area with a transparent roof in the village of Millennium. Frameless glazing around the perimeter fully saves a great overview and can be carefully removed when not needed. The roof glass perfectly complements the idea of \u200b\u200bspace openness and at the same time reliably protects against possible precipitation and wind.

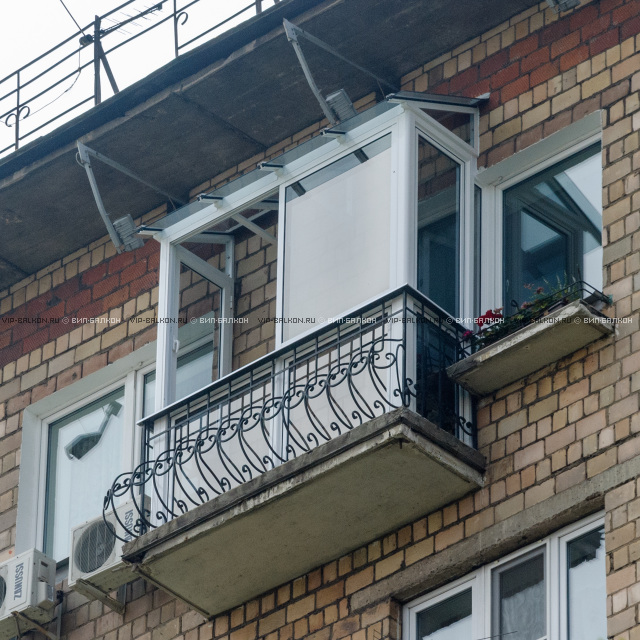
Glass roof over a balcony with french glazing on Tverskaya
On this balcony of the top floor of the Stalinist multi-storey house on Tver, it was decided to install a glass roof. Due to the complexity of high-rise work for the roof mounting, an industrial climber was specifically invited.
-> Sections of the site -> Log -> Roof -\u003e Visorok and Leaf FrontonInstallation of frontal visors.
Svet visor (the distance from the wall to the edge of the visor) is chosen so that the rain does not get on the walls. I have a Svea Visorok 60cm, but it is not enough. If I did a visor now, I would have done about 80 cm so that during the rain under the visor you could stand and breathe fresh air (i.e. to smoke).
Complete the installation of visors after installing the frontones.
Installation of frontones.
FRONTON is an end part of the roof.
To reduce the time to fit the boards, it is possible montage of Fronton Before mounting the rough roof flooring. The boards go beyond the edges of the rafting legs and cut off with a hacksaw or chainsaw after the fronton is completely closed (all the boards are nailed).
For improvement external view Fronton, it is desirable to paint it: paint for external work, moisture-resistant acrylic varnish, wood coating. It is possible to paint the frontoth on one side - from the side of the street. To extend the service life of the fronton board, the inner side is not desirable to paint.
Fronton log cabin can be made of any material. It depends on your taste, fantasy and opportunities. For example, I saw the frontones from plywood, plastic, slate, ondulin, metal tile, flat asbestos - cement plates. Principle of installation roofing materials As a front, the same as when coating the roof. For example, if we use slate, then we mount the frontton from the bottom - up, first the lower row, then the second ... the extreme sheets are scolded at an angle so that they come up to the bias of the roof and tightly sucked with the nasha. The number of nails is at least 5 on the sheet.
I finish telling this topic to talk about the construction of a log box (structure), consisting of the foundation, walls and roofs. As you were convinced, in all these works there is nothing particularly difficult, and everyone can master them. After all, it is not for nothing, in the old days, housing in the villages were built, mostly on their own. And since the basic principles of wood processing were observed strictly, then at home or baths were durable, warm and cozy.


