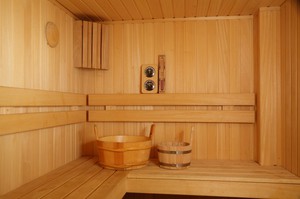
Bath has an amazing healing effect. At the same time, the important role is played by the material that is used for its interior decoration. Ideal in this regard is the clapboard from the tree in mind its naturalness, the ability to "breathe" and favorably affect the human body.
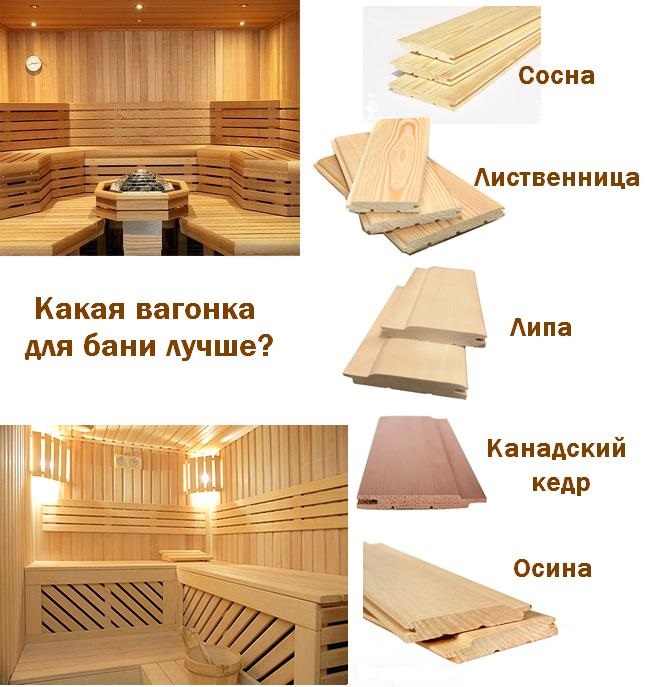
The lining is considered a popular solution when finishing the bath, as it is made from high-quality wood, well dried and processed specially. For the inner covering, the steam room is suitable exclusively wooden lining. But in the rest of the premises - a pre-banker, washing, a rest room - you can use its other types. Boards are universal, because they are suitable for finishing the floor, ceiling and walls. The surface is perfectly even smooth and smooth, which does not let out of foreign sounds, perfectly carrying heat, as well as high humidity, if it is impregnated with a protective composition. Under the lining, various communication and surface irregularities are successfully hidden. In addition, such a casing looks attractive and is considered an ideal solution for the bath "under the log". Features of the choice of lining for a bath:- Linden. Such material is a priority, and its ancestors also appreciated its quality. The tree does not react to the effect of water and steam, does not change its structure and color.
- Aspen. It is considered a good analogue of the linden, as such lining is indifferent to moisture and heat, but has a more democratic price. However, it is necessary to remember about the lack of this breed: it is possible to spread inside the wood hidden rot.
- Cedar. The material is expensive, but with this and very high quality. Due to the trim from cedar, air in the pair is filled with resinous substances, without selection to the surface of the resin, and the effect of aromatherapy is created. In addition, it is less heated than others. Be careful: at the moment there are many fakes of cedar lining!
- Pine. The material is cheap due to the ability of wood to be isolated under the influence of steam and heat resinous substances. Therefore, it is practically not practically used for the wage, but performs an excellent solution for the pre-banner and rest rooms.
Remember that the lining for the internal decoration of the bath should not contain bitch and other vices, because such a structure contributes to the rapid heating of the surface, which may cause a burn.
- stapler with brackets;
- electrolovik;
- perforator;
- drill with nozzles;
- suspensions;
- measuring tool - plumb, construction level, mounting plumb;
- a hammer;
- screws 6 cm, wood screws - 3.5 and 7.5 cm, 2 cm cloves;
- triangle.
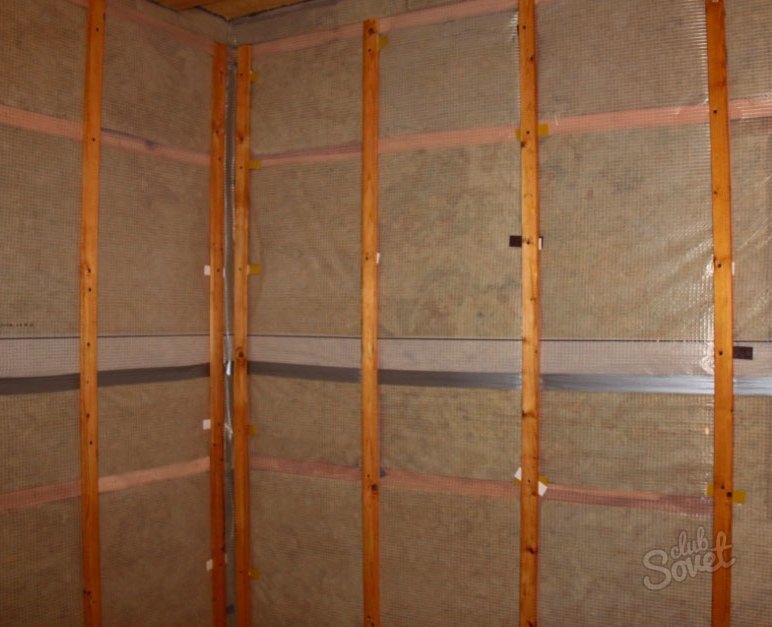
In addition to the lining itself, prepare the heat-insulating material - Minvatu, the Bar 4 by 5 cm, waterproofing material and vaporizolation, which is perfectly proven by PVC film. Since wood is sensitive to moisture drops, it should be seen in the room and adapt to the microclimate of 1-2 days.

- Use bars that have a thickness more thermal insulation material.
- Fasten the crate in the direction perpendicular to the installation of the lining, sticking to step 50-60 cm.
- In areas with irregularities, put under the bars of crates of gaskets made from the same wood.
- When mounting the frame to the walls built from brick, stone or concrete blocks, screws and plastic dowels are used. Galvanized screws are suitable for the wooden surface.

- Protect your body, hands, eyes with appropriate products to exclude watts.
- Place the insulation mats in the intervals formed by the crate. They have from the bottom up, pressing the good one top mat to the bottom.
- Watch that no gaps and cracks are formed, as they form the bridges of cold, through which heat will go.
- If necessary, cut the top mats with a knife.
- If a log house was used in the construction of a bath, then it should be borne in mind that it is able to give a precipitate. Therefore, it is better to carry out the lining of the clapboard after that, namely, after 1.5-2 years, to exclude the deformation of the material.
- Constructive elements that are made of wood must be treated with a protective antiseptic.
- First, the horizontal rails should be attached over vapor barrier to which the material will be fixed. We install them in 60 cm increments, controlling the horizontality using the level.
- Make sure the lining has adapted to the microclimate installed in the bath, and lacked at least 24 hours there. Work is starting from the most hard-to-reach angle.
- Place the first board so that its spike is in the corner of the wall, and the groove watched you, in the vertical direction. Remember that it is a guideline for all fixed boards of this series.
- A plank is recorded to a horizontal rail with screws so that their caps are completely closed after a decorative corner is installed. Kleimers need to be started in the protruding edge of the groove. Speak them to the raids.
- Each next board, boil the luggage to the slope, which is already fixed. To protect it from damage, adjust it with China and secure Kleimer to Raiki.
- It is possible that the last chalkboard will have to be cut to fit into width. Fasten it similarly to the first.
- Attach the rest of the material and plinths to the trim. In addition, all angles need to close decorative cornersUsing finish nails that have a copper coating. Thanks to a small hat, such a fastener is immeasured for the eyes.
- To provide ventilation in the space under the trim, and protect the material from water, a clearance, millimeters 10 should be left between the lower end of the lining and the floor.
- When the bath is trim, remember that in the car wash and the wage, the lining should be treated in a special way before mounting. But it is categorically impossible to paint and cover with varnish. To protect it from mold, black spots and insect attacks, a water-based antifungal composition is used. Previously, the lining is echoed by sandpaper to remove all roughness, so impregnation will fall in a smaller.

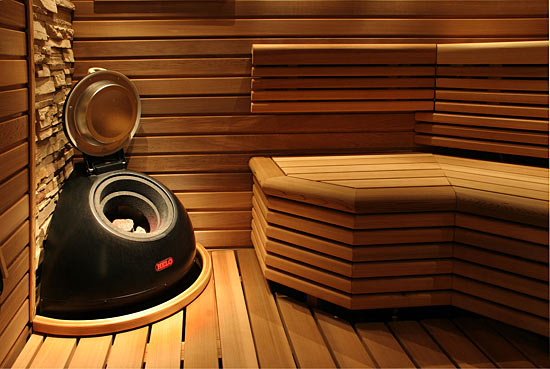
And finally: remember the fire safety, to do this, leave the gap between the chimney and the combustible material, which should be at least 25 cm.
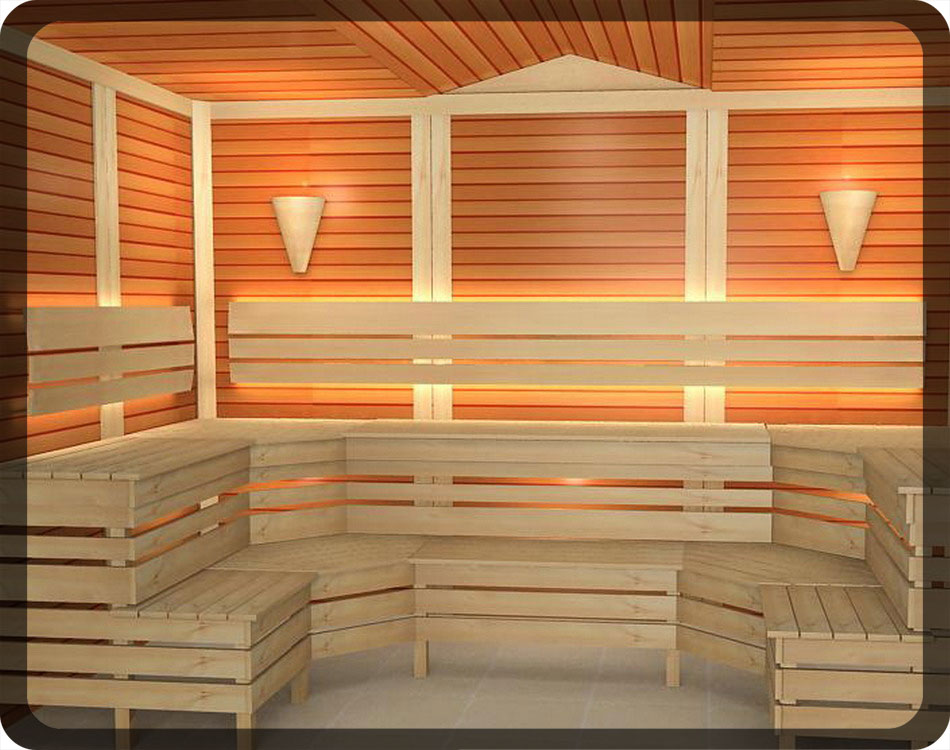
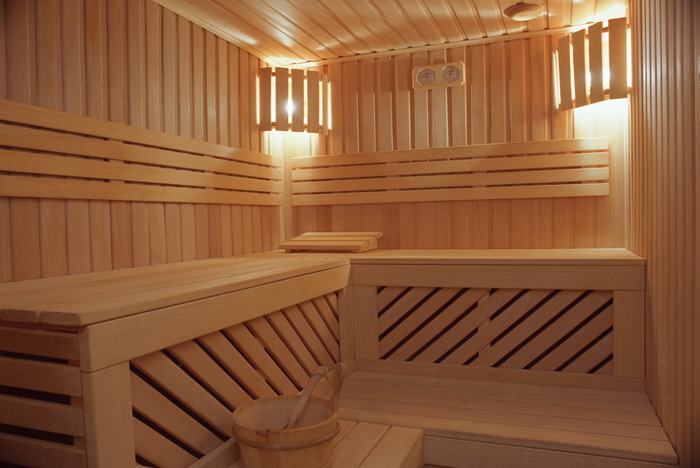
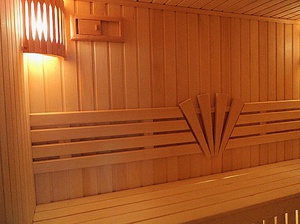
The inner trim of the bath, especially, the steam room is one of the most important elements of the interior. The most popular material is considered the lining, the use of which will achieve an optimal combination external view and high performance material characteristics.
It has long been determined the circle of wood species, which, as a rule, are used when interior decoration Baths:
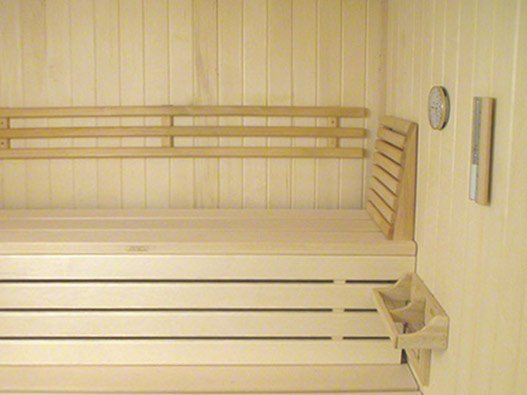
- Linden. Along with Osin is the most popular material used for bath interiors. It has high resistance to humidity, while maintaining the color and structure of the material. In addition, it has characteristics, thanks to which the Lipa is used in the manufacture of shops, buckets, shelves used in the bath, as well as doors in a steam room.
- Aspen. Soft and fatty material with no less high resistance in relation to water and pair. Special attention must be paid to the proper drying of the aspen, after which its density and strength increase significantly.
- Cedar. The most expensive of the materials used during finishing. Less linden and aspen heats up, does not secrete resins, like pine, which prevents skin burns.
- Pine. A cheap version of the coniferous tree of wood, rarely used in the steam room, g and much more often - in a pre-tribbon or rest room.
Definition of technology
In fact, almost always the technology of the sheat is the same. Unless there are two options for the location of the lining - vertical and horizontal.
In most cases, the second method is used, as it is more convenient in the production of finishing works and operation.
Performance
Cutting device
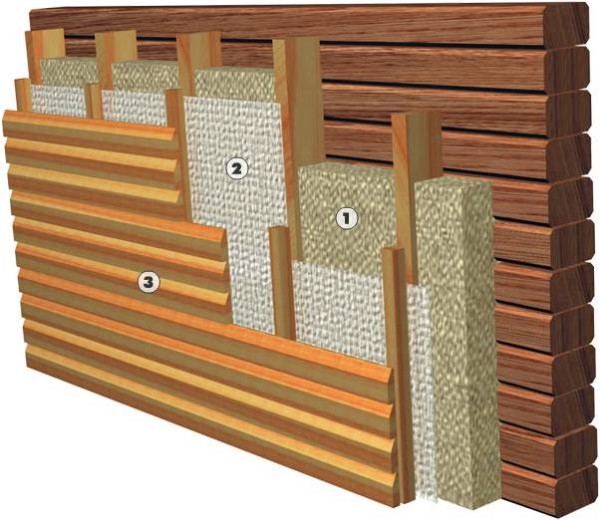
A low-larger beam is used than that of the insulation used (mineral wool is usually used as a heat insulating material). It is installed perpendicularly to the selected direction of the lining in approximately 45-55 cm. When the walls are irregularities of significant sizes, it is necessary to use lining from the same tree species or any material of sufficient density. The cutture is attached to the wall with screws with plastic dowels or galvanized metal self-drawers.
Laying insulation
In most cases, a mineral wool presented on the market of a wide variety of species and modifications was applied above. The main rule of laying insulation is the lack of gaps between the material in order to avoid the formation of cold bridges.
Video instruction:
Sometimes the mineral wool does not fit at all - if there is no need for additional insulation, and the lattice is made only for fastening the wall paneling.
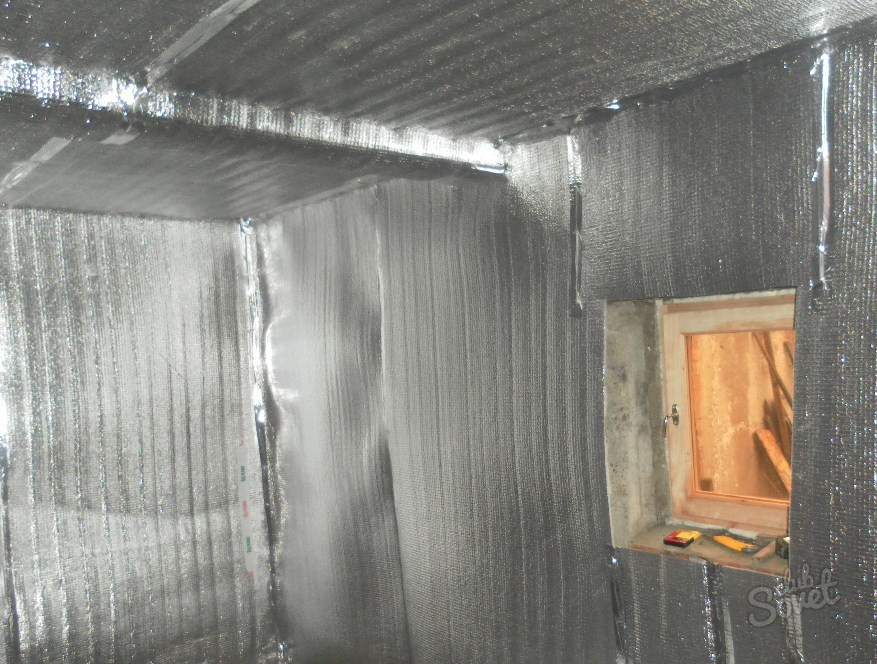
Device of vaporizolation
Pergamine, rubberoid or simple polyethylene film can be used. The strips are fastened with a stapler for furniture work with a mandatory overlap at least 5-7 cm. For greater reliability, it is additionally punctured with a sticky ribbon or scotch, as wide as possible.
Ventilation device
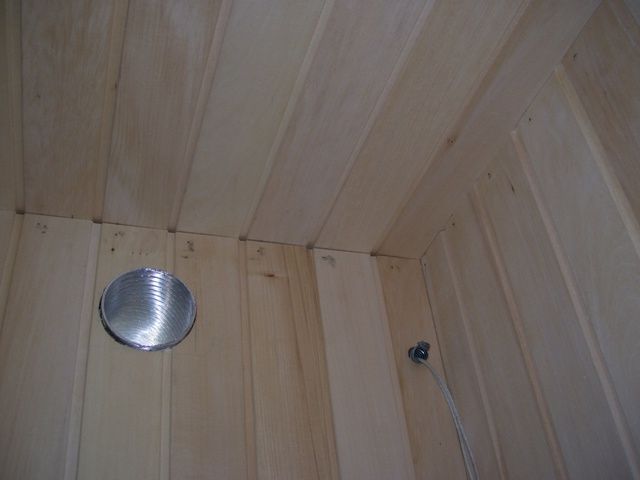
A favorable microclimate in the bath largely depends on the proper ventilation operation. For its normal functioning, when the insulation is determined, ventilating holes must be provided.
Installation of lining on the walls of the steam
The mount is performed necessarily using the hidden method, using self-tapping screws, kleimers or nails.
This is necessary in order to:
- avoid contact with heated methome;
- prevent it from contact with steam or water, and as a result, prevent corrosion, which can spoil the surface of the lining
Device of wall covering baths of lining
Standard technology is applied, during the production of work on which the following points must be considered.
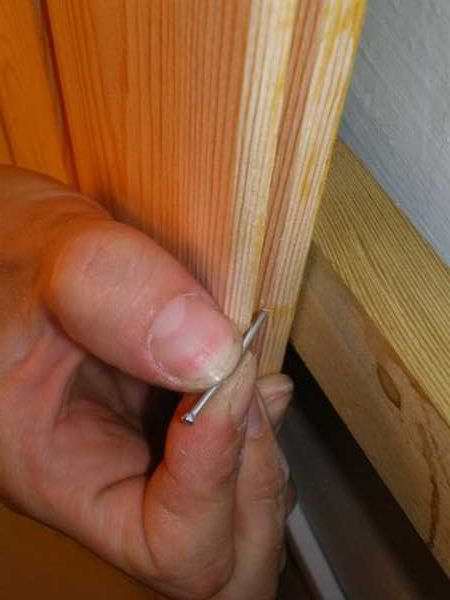
- The molding of the lining is carried out by galvanized steel soldering in the thorn, and the drilling of holes for avoiding chipsets must be performed. It is allowed to use fastening with nails or kleimers (special brackets for wood).
- The coating device begins on the angle, access to which is most difficult. This is explained by the fact that the last board will need to be customized as in length, the same in width, which is practically impossible to do with insufficient access to the place of its installation.
- The trim of the corners is carried out with the help of a wooden plinth, which is mounted with stainless steel nails.
- We should not forget that all wooden designs It is necessary to process the antiseptic composition.
Device Ceiling Ceiling Paired Flooring
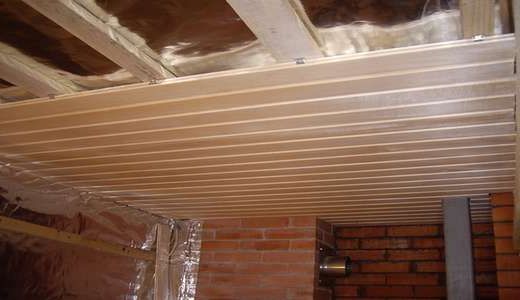
The ceiling coating device from the clap, as a rule, starts from the entrance. For fastening, only klyamimers or nails are used. This is due to a sufficient serious load from the mass of the material. When installing the last boards, a secret nail without a hat is applied, which is clogged with the help of Dobochnik. To give a pleasant appearance, the location of this nail is processed by sandpaper. It is necessary to take into account the need to leave the gap of 4-5 cm. Between the ends of the clap and the wall of the bath for normal ventilation. In addition, it is necessary to provide the possibility of the "Play" design, as the temperature under the ceiling will be highest.
Correct gap between boards
The coating is most attractive, where all the junctions are made by the same type.
It is easy to achieve, making marks on the boards when they are installed, as well as using the level in order to withstand horizontal or verticality. The wall covering should be close to the ceiling coating.
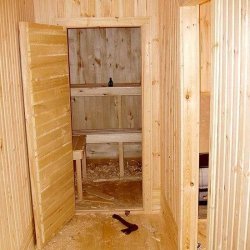
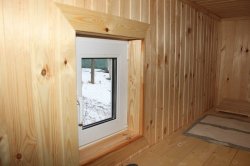
Testing of door and window slopes
When finishing doors, it is preliminarily necessary to prepare the boards of the desired length. Door openings are separated by platbands.
Advantages of using clay
- Versatility (possibly use on any designs - floor, wall, ceiling);
- Relatively long service life;
- High aesthetic qualities. Lining like no other material allows you to preserve the battery, which is associated, first of all, precisely with wood and wood materials;

- Protection of trimmed structures from high humidity and reduced heat loss.
- In order to answer the question of how to cross the battle with your own hands, it is necessary to clearly and consistently go through the following steps: the choice of material
- Definition of technology
- Performance
For the interior of the bath, it is not recommended to use unnatural materials. High temperature and permanent humidity are forced to use for finishing only stress-resistant skin types. One of the classic is the lining. How to shelter a bathing with a lining inside you can find out after reading the article to the end. We will help the reader not easy to fulfill the inner finish but also tell me how to choose the material.
Wood-plated linden steam-covered oil
Which lining is suitable for a bath
 Lindening from Linden must lie in front of the unpacked finish
 The lining for the interior decoration of the bath is chosen depending on the purpose of one or another room, the degree of humidity in it, the temperatures used, etc. All material is divided into several features: size, made of wood, type of wood.
Separate material can be in size :
- Classical. It has non-sized size, it is better to fix it upright, since the horizontal location opens the ceiling of the already low in the bath. In addition, the horizontal mount prevents the water freely to drain down, and it accumulates in the connecting locks.
- Eurovale. These are wider and heavy panels, more interesting in the design of the premises and have the topic of high-quality characteristics as thin lining. From the back of the Eurooval, there is a special propyl, which removes the tension in the product and eventually the finish is not cracking.
In terms of its composition, the material is divided: vinyl, plastic, wooden and metallic. For bath the best way From the wood, the rest for the finishing of the facade.
Types of wood for the manufacture of trims for a bath
 Parsted with aspen clapped looks attractive
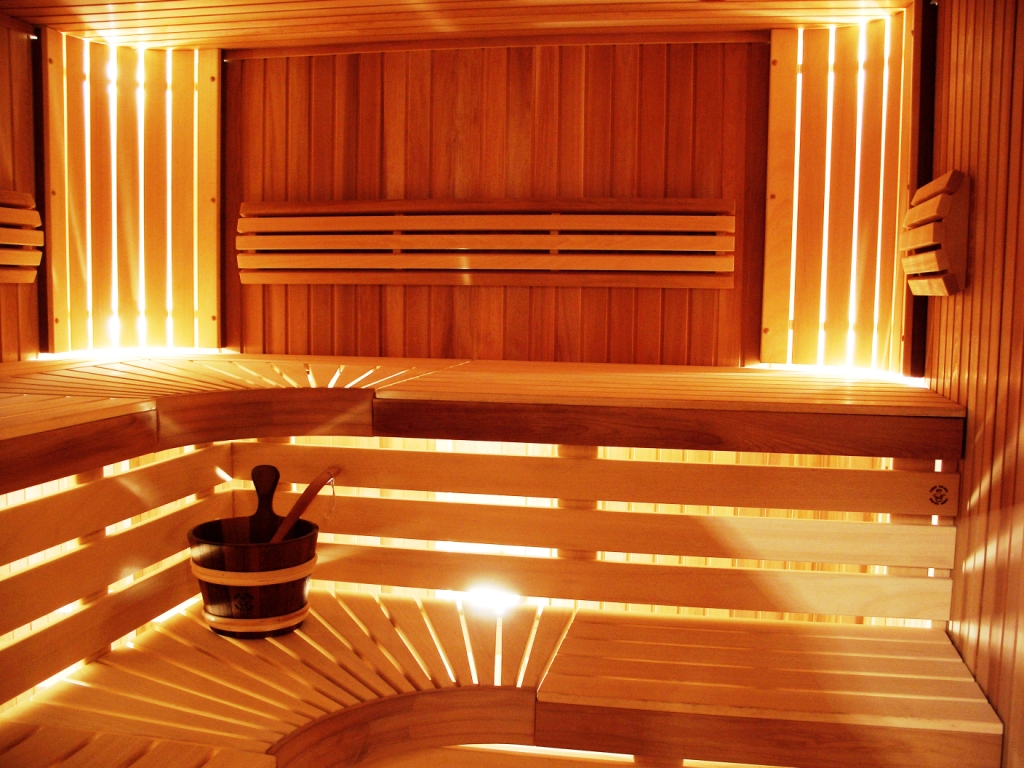
 It is important from what type of tree a product is made. For a bath, the wood finish with the lowest thermal conductivity: linden, aspen, abashi, cedar, alder. Moreover, cedar can not be taken any, but only the northern. It is less resin and when heating the wall and the ceiling will not start crying. Larch species have a smaller density of wood and with tactile contact in the bath lining will be more pleasant, even at high temperatures in the steam room. It is worth such lining more expensive, but expenses will be justified. Each of the views under consideration is better suitable for various rooms of the bath.
Aspen: It has a beautiful reddish shade and increased moisture resistance. By their resilience, we can only compare aspen with larch. Upon contact with water, the aspen wood is not destroyed, but the opposite hardens. It is better to use to finish a rest room, a washing office. The only minus is a high price, due to which they do not recommend applying a branch and pre-banker.
 Original version of the wagon wrappers
 Lipa: The lining has become traditional to finish the bath from the inside. Lipa does not heat at high temperatures and has a pleasant whitish color. But Lipa has a serious drawback - if not to handle with antiseptics and protective compositions quickly begins to darken and rot.
 Cedar lining in combination with Lipova looks great
 Cedar: This is a coniferous tree, but its structure of the reduced density is therefore used to be used for the bath. Cedar has excellent antiseptic properties And when heated, it highlights a pleasant smell. But it is not recommended to use it in the steam room, since some percentage of resin in it is still there.
 Olch lining in the bath interior looks original and modern
 Alder: It has a pleasant pinkish shade with a pleasant velvety texture. It keeps the temperature well and is not afraid of moisture. In the baths can be used in any part.
Choosing the lining for the trim of the bath is better to take the chamber drying of Extra or AV varieties. Since the change in temperature and humidity in the bath is constantly happening, then the material cannot be used with inaccurate or curved forms. And in the upper grades it is unacceptable.
PEDIA DESCRIPTION OF MANDATE CLOTHING IN THE BAT
 Wallating from aspen is marveling to the ceiling
 Before finishing, you need to decide only the walls or the ceiling. To do this, you can see photos of finished works and stop on the design you like.
Singing the bath inside you need from the ceiling. Only after this wall. But pre-walls need to be hydroizing and insulated.
Wall insulation and bath ceiling
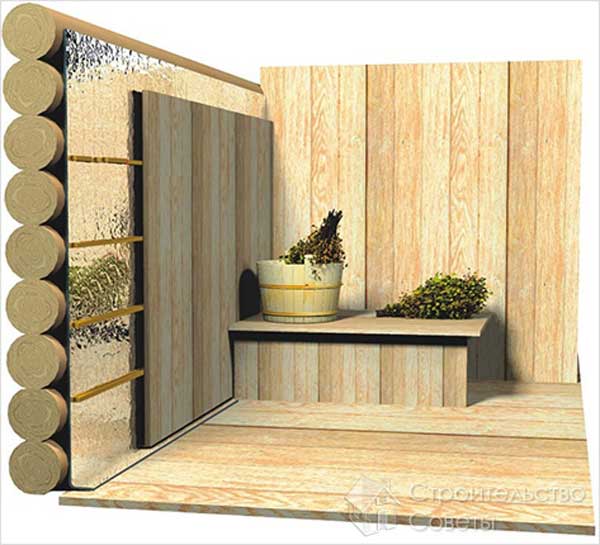 Scheme of a simple case of cladding wagon steam steam
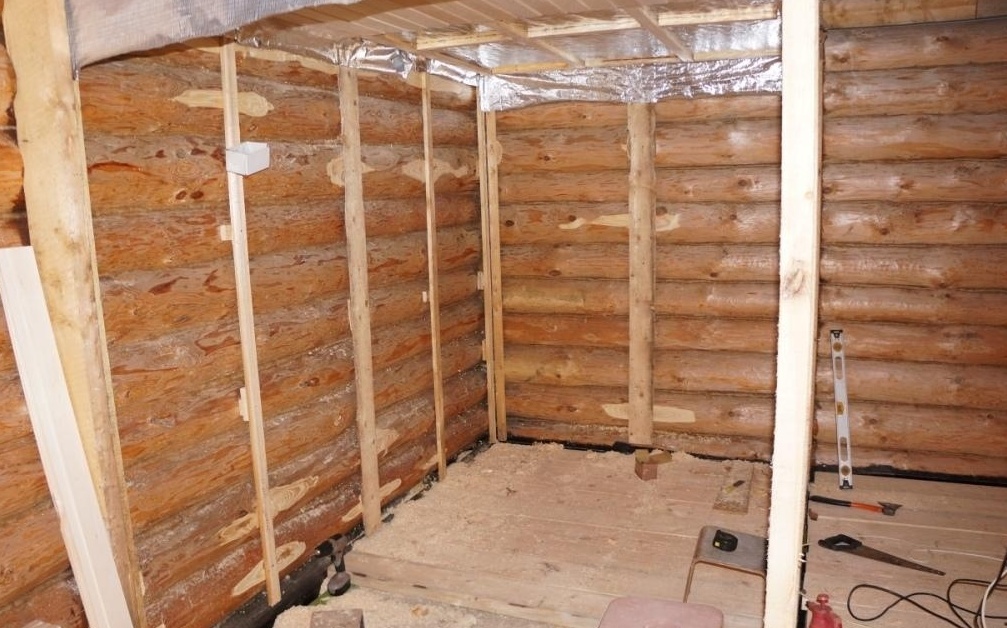
 It is not necessary to warm all the walls of the bath, especially if it is a summer small log house in size in 3x3 m. Only the steamer is insulated in these. In other cases, the whole Russian bath is from the inside including a pre-tribbon and a rest room.
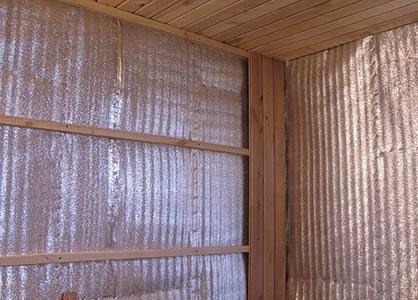
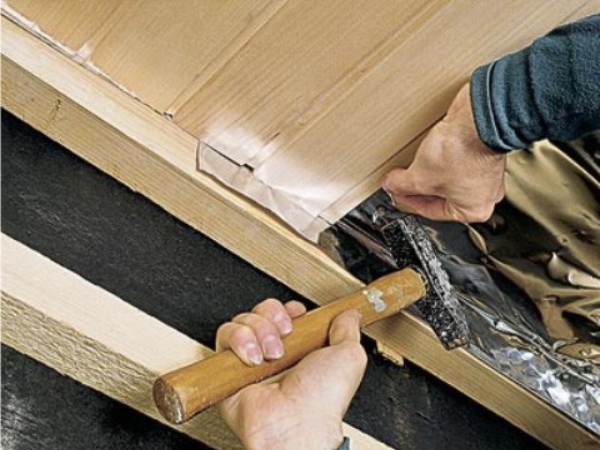
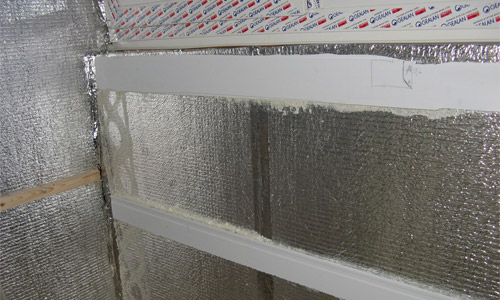
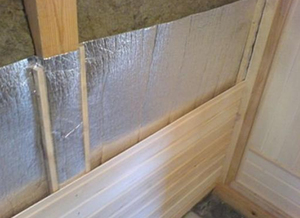
As a insulation, you need to choose a fire-resistant material, such as a Basalt wool. All materials, like foam plastic, do not even even consider. The insulation is attached to a pre-prepared clamp of one that the vaporizolation is fixed. Because of the big temperature difference on the walls, condensate can accumulate, steam insulation will protect the insulation.
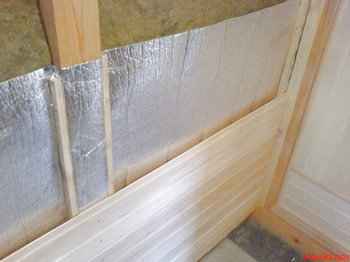
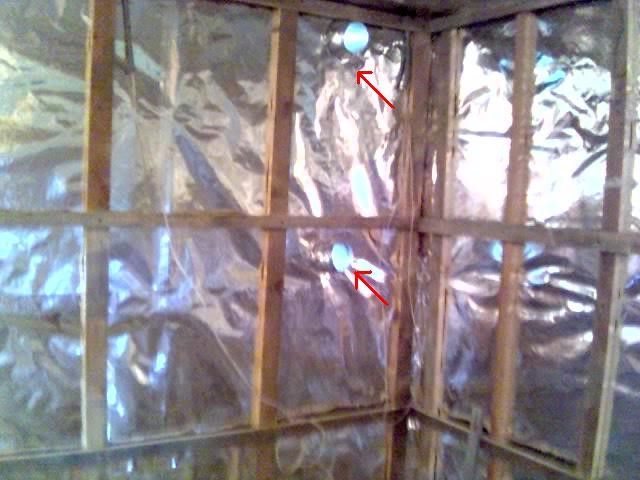
On top to this design, pergamine should be fixed. It will play the role of waterproofing All seams are sampled with special water-repellent glue. Then everyone is tightened by foil, it will reflect warm and will not give a couple to go out. Folgu is installed between the crate using a construction stapler or a 10-15 cm buttons.
Processing material
Bath walls begin to sow from the opposite corner from the entrance The lining before the fastening should be unpaved and hold in the bathroom 1-2 days. The fact is that manufacturers to protect the material after chamber drying are sealing it into hermetic film. And falling into the natural environment, the tree absorbs moisture out of the air and swells a little.
After that, you need to choose than to process the material. It is better to take the composition intended right for baths. Such in the composition have antipyrins and moisture-proof components.
Fastening on the walls and ceiling bath
Bold the lining start with the ceiling finish. The first bar should be attached opposite the door. Fastening the links in the bath can be in two ways:
- Small carnations to the main cut in the groove at an angle of 45 0. This fastener will be unclear and the ceiling will look at a single system. Do not bring the lining tightly to each other with a moisture content, it will sweep the whole design or it will simply go away from the wall with separate links. Leaving the Cleaning Clearance receives space for natural movement.
- Small cloves through the cladding to the crate. This method is more suitable for Eurovantia. Previously in each attachment, the link is drilled by small recesses, and then the nail is driven. These places are closed with trims from wood and plow glue.
Since the lining is thin, then nail the nail with the help of a hammer is inconvenient. To simplify the instrument - Dobochnik
To the wall of the link, you need to start mounting from the most visible corner to the door. Mounted it in exactly the same methods as on the ceiling.
Between the clap and walls should remain a ventilated gap of 4-5 cm. Between the walls and the ceiling, also leave the gap of 3-4 cm. In order for the air well under the flooring on the main crate, the planet tonic is fixed. On this second crate will be attached finishing material. The shap shave is 40-50 cm. The direction is perpendicular to fasten the trim.
After attaching the bath warm and look at what will happen after cooling. Incorrectly fixed links are additionally strengthened with cloves.
Substones finishing inside a bath
- Do not mount the lining horizontally in the washing and steam room. The water splashes will fall into the castle, and the lining will quickly darken. But if the design you need a horizontal mount, then the spike should look up.
- All fasteners need to be taken with a zinc coating, since with moisture iron quickly rusts.
- All fastening angles and planks at the top you need to sharpen the bottom, so water droplets will be faster down.
- Planks are fixed by 4-5 cm from the base, so as not to overlap the ventilated clearance.
- Think up a ventilation system in the bath, so moisture will be faster and the lining will last longer.
- If the lining turns around it, it is necessary to immediately treat whitening compositions, for example, Senezhese sauna
We looked at how to perform the internal trim of the bathroom with their own hands. Observing all the technique and reviewing the thematic video, in this article, even the newcomer will be able to cope with their own hands.
For the steam room in the bath, the only suitable arrangement material indoor space is wooden lining. This is due to its environmental cleanliness, which is so important for the premises of baths and saunas. But not everyone knows how to properly shelter with a wagon. And it is on the literacy of the work that should lead to a qualitative result, we will talk in this article.
How to choose the lining to not regret
First of all, you need to decide on a variety of material. On the market building materials presented big choice. Therefore, the question arises - what is the lining for the steam room?
Classification of lining by type
Wood panels are classified according to such parameters: profile type and class. The lining of the tree is an easy way to imitate the surface of the bar. It is manufactured not only of wood, but also on the basis of plastic and other materials.
But, for obvious reasons, instructions for pVC panels Does not allow applications plastic panels In rooms with high temperatures, which can lead to their deformation and allocation of evaporation harmful to health.
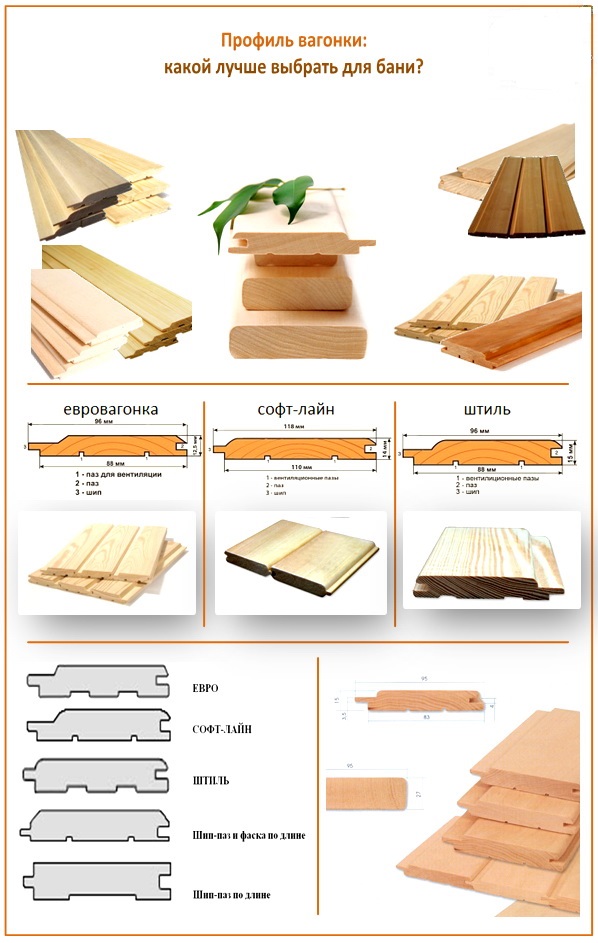
- Evrovagona - For the purpose of the convenience of mounting, equipped with characteristic recesses located longitudinally on the involving side of the panel. These excavations provide ventilation and serve to drain the surface of the moisture. Eurovantia is most often used when finishing external surfaces;
- With a convex outward profile. Such a board more often than other species applies to those in front of whom the question arises, which clapboard the steam room. Such popularity is explained by its high aesthetics. This material is a reliable imitation of a wooden rounder and gives the bath an attractive look.
Division of lining in quality
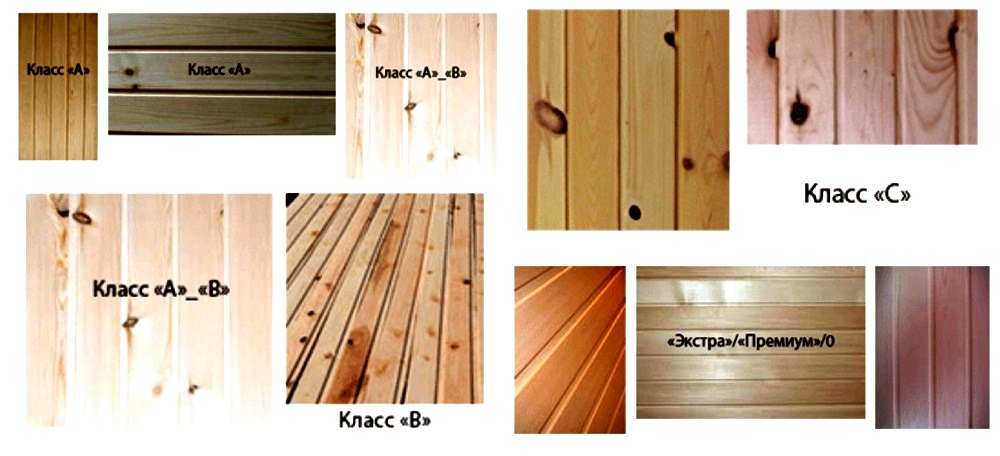
Wooden lining is accepted also on the 4th grade.
They differ in the number of surface defects per unit area:
- "Extra" class suggests the complete absence of any visible flaws (surface darkening, knots, etc.). The lining of the wagon of the clapboard of this class will provide the perfect surface;
- In the panels of the class "A" are allowed small darkening. In addition, on such a lining can be no more than two bitch For one meter, the molding material. The size of these bitch should not be greater than the sample head;
- Requirements for class "B" allow the material on the route meter no more than three bitch. In addition, spreads are possible throughout the surface;
- The class "C" is represented by the lowest, from the point of view of the appearance, the material of this segment. Its surface may contain different kinds Defects - from color divorces and bitch of various sizes to the holes. therefore this type of material is commonly used for the device of closed structural elements..
Select the material suitable in all parameters can be based on the above data. Of course, it is preferable to use the world's best "extra" class, but its price is high enough.
Professionals argue that the decoration of the room of the bathrooms does not require the mandatory use of the highest class material and it is quite possible to restrict ourselves to the acquisition, for example, the classes "in" class.
Surface preparation
For mounting, you first need to prepare material and surface. Before handling the lining in the steam room, its base surface needs careful preparation. Preparation is necessary for high-quality fastening of the material and to eliminate various negative manifestations of the impact of high humidity and high temperature.
Let's proceed:
- We remove the protruding elements from the surface (decor, lighting, etc.). After that, carefully check the walls on the availability of chosel and cracks. If any, you remove them. Even small gaps should be seen, because they will break the thermal insulation of the steam and will increase over time from the effects of an extreme medium characteristic of this room;
- After sealing the gaps, check the smooth surfaces. It is best done using a laser plane builder. If the wall surface is characterized by a noticeable amplitude, they need to be aligned using wooden gaskets for this;
- Next, we clean the surface from various formations (fungus, flare, mold, etc.). It is no less efficient than soaking the lining in the steam room with an antiseptic. Although the impregnation of the material by the antiseptic is also obligatory, since the bath is a room, humidity in which is significantly higher than the norm;
- At the next stage, we lay an additional layer of heat-insulating material. In this case, thin insulation will be better suitable, which are usually sold in rolls.
Processing material
With the arrangement of the bath, many are asked as a reasonable question, do you need to handle the lining in the steam room? It is worth noting that it is just necessary. But use for wood processing in the steam room is permissible only specially intended for this substance.
Important! Do not use lacquers for processing, because at high temperatures they will have an unpleasant and unsubstantiated chemical smell.
- Now wide popularity has acquired a protective agent for Wood Eurotex-Sauna. Its base is an acrylic composition, supplemented by an antiseptic and special wax that protects wood from high humidity. The use of this makes it possible to significantly extend the wood service.
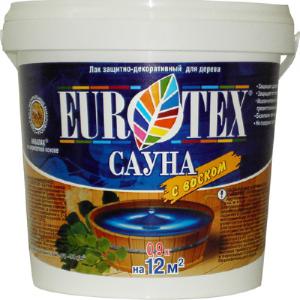
In addition, this composition does not hide the drawing of a natural tree, creating a completely colorless coating. You can see the photo of the premises, the wood is processed in this way. The composition of the means does not include organic solvents. This allows you to apply in closed rooms;
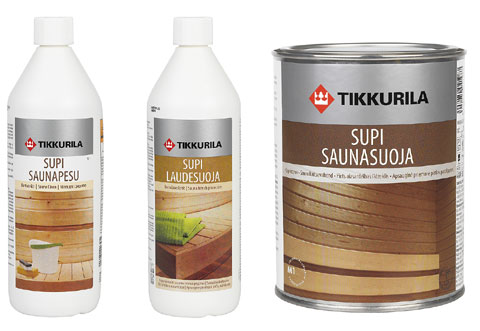
- It is also necessary to note the impregnation and "y-409" and supi saunasoja (). These compositions are designed specifically for use in the baths. Such formulations form a colorless, resistant film that allows you to easily wash the surface of the lining and protect the material from temperature drops.
Before covering the lining in the steam room by any composition, you should consult specialists (the seller - a construction store consultant). The building materials market today is very dynamic and regularly offers new qualitative protective materials. In addition, it is necessary to competently compare these means with the type of wood treated.
Step-by-step installation instructions
Of course, not all those who are accepted for creating a bath, clearly imagine how to see a wagon wagon. Therefore, it will be logical to submit a detailed instruction compiled by experienced masters.
So, now the four main ways of fastening clap.
First method
The proposed technique will provide high-quality and rawlings as quickly as possible. In addition, the use of this method will allow in the future without a significant effort to disassemble the lining, if, for example, some part of the material damages or deteriorate.
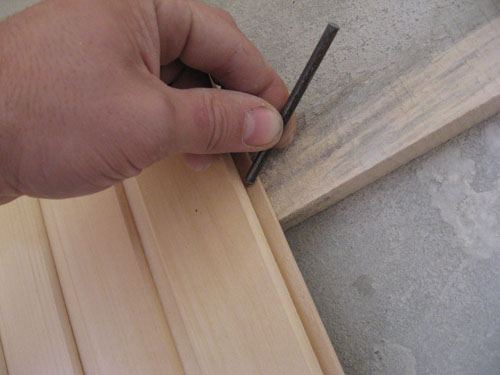
- The following panel attached to the special groove on the base surface of the panel;
- Special clamps (kleimers) are dressed on the inner protrusion;
- These clamps are attached to the grade galvanized nails or screws;
- The mounting of the panels can be performed only by fully fixing the adjacent elements;
- If necessary, the last of the mounted panels is cut and attached the same as the previous ones.
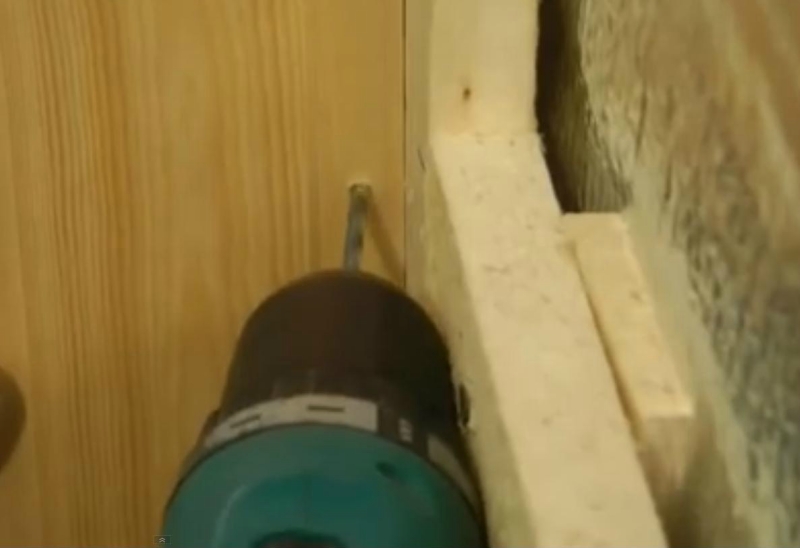
Second method
This method is most convenient for those who decided to install their own hands, in addition, it is the most fiscal option.
- This method assumes that nails are driven through the grooves into fastening rails;
- Hats at the same time bleed with Dobochnik, so that when installing subsequent panels, they did not create obstacles.
Professional advice: more convenient and more efficient to perform accurate and infrequent blows with a hammer, and not part, as inexperienced, beginner builders do.
The main disadvantage of this method is a big percentage of material damage, which arises due to inaccurate or very strong blows.
Third method
This method is usually used by mounting the lining on the seats and shelves:
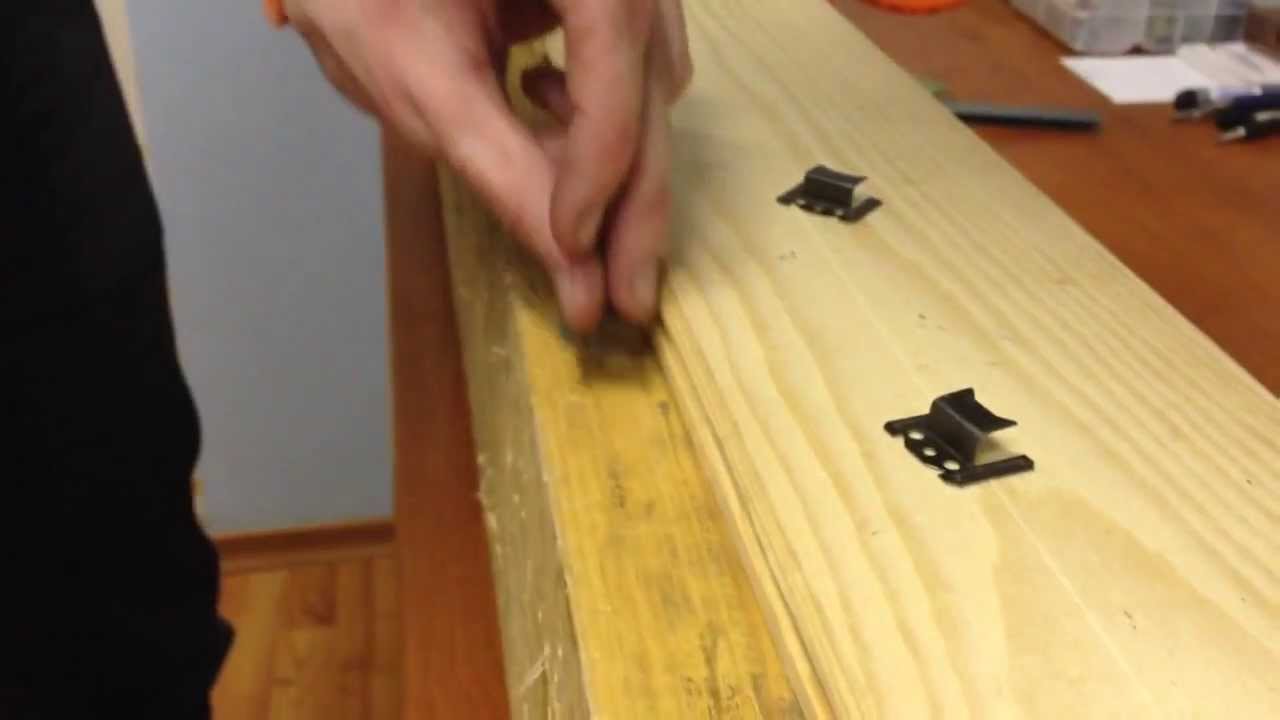
- The panel drills a hole for the screw screw (the depth of the opening should be approximately equal to half of the panel thickness);
- Then screws screwed into the board;
- The manufactured holes are closed with a pin with a pint;
- Then the surface is grouped. This method is conveniently used when installing the design elements, where the fasteners are open.
If you have any questions, look at the end of the article by the teaching video. This material will help in more detail in the nuances of the method.
Fourth Method
This method is suitable for mounting exclusively panels of the old type:
- In the panels are drilled by screws for screws;
- The chamfer of the hole is cencing under the hats of the screws;
- Screws screwed into the board flush with the panel.

conclusions
We briefly acquainted you with the installation of lining. Relying on the information provided, you can answer the main questions on this topic. For example, what a lining is better for the wage and in which case. And everything else, of course, will determine your desire to perform a qualitative work.
What only materials are not used in the construction of baths - bricks, gas-silicate and foam concrete blocks etc. But to create a unique microclimate can only a tree that provides the most favorable impact on the visitors.
If the bath is built of stone, arbolit and other similar materials, then it is recommended to sow it from the inside only with wooden clapboard, which moves high temperature well and increased humidity. So how is the trim of the bath inside with your own hands? We will try to figure it out.
What lining is best suited for a bath?
For the plating a bathroom can use classic lininghaving a small size. It is best to fix it vertically, because thanks to the horizontal location of the ceiling, and without that low, visually sinks. In addition, due to horizontal fastening, water can not flip down and starts to accumulate in the connecting locks.
Much more interesting is the design of the room, if the inner cover is used by Eurowork. The qualitative characteristic of these wide and heavy panels is the same as the thin lining. On the back of the Eurovantia, there is a special propyl, thanks to which the tension is removed in the product and therefore the finish after a certain time is not cracking.
In terms of its composition, the lining happens:
- vinyl;
- wooden;
- plastic;
- metal.
Bath clapper with their own hands from the inside is usually carried out of wood, and all other types of lining are used to finish the facade.
Types of wood for the inner lining of the bath
 It is very important which tree was used for the manufacture of material. Usually the trim of the bath inside perform low thermal conductivity wood, such as:
- aspen;
- cedar;
- linden;
- abashi;
- alder.
Moreover, the cedar should be only the northern, as it contains little resin, and it will not start drip when the walls are heated. Larch species have a smaller wood density and such lining in the bath is very pleasant with tactile contact. Its cost is quite high, but such expenses are quite justified. Each viewed view can fit well for various rooms of the bath.
Aspen
Wood from this tree is characterized beautiful reddish tint and increased moisture resistance. When interacting with water, it not only does not destroy, but, on the contrary, it starts to fit. It is recommended to use it for finishing a washing department or a rest room. The only lack of wood from Osin is a high cost.
Linden
Lining from such wood is traditionally used for the inner covering of the bath. Lipa at high temperatures does not heat up, and its color is pleasant for the eyes. But there is such wood and a significant disadvantage - if it is not to handle protective compositions and antiseptics, then it rapidly darkens and rotates.
Cedar
The structure of such wood has a reduced density, so it is often used for the bath. Cedar is characterized by excellent antiseptic properties, and when heated, a pleasant aroma exudes. But for the steam room, such material is unsuitableBecause there is still a small number of resin in it.
Alder
Olhi wood has a pleasant velvety structure and pinkish shade. It is not afraid of moisture and keeps the temperature well. In the bath material is used in any part.
Preparatory work
Before carrying out the bathing of the bath inside with their own hands, should be held preparatory work. First acquire required tools And materials:
As a rule, self-tapping screws can easily be corroded, so they are used for fastening wood only if the lining will be subsequently coated with paint or varnish. However, the material processed in this way cannot be used to cover the steam room, as toxic evaporations may occur. Therefore, instead of self-tapping screws for work in the pair galvanized metal skimmers. They are distinguished by high anti-corrosion properties.
Also completed all the work on laying communications, which will later be located under the clapboard. After purchasing the material, it must be left for several days in the bath in folded. Thanks to this, wood gets used to temperature and humidity indoors, which makes it possible to significantly increase its service life. It is also desirable to treat anti-naile compounds, which will prevent the appearance of posting and mold.
When all preparatory procedures are completed, proceed to the main stage - the internal trim of the bathroom with their own hands.
Conducting interior
Ban trim from the inside with their own hands provides for a certain sequence. Installation starts with the preparation of the frame. To do this, take a bar and collect it all over the perimeter of the room. Sew steam it is recommended only vertical. This is explained by a large number of condensate, which in case horizontal location The material begins to accumulate in his joints. It is for this purpose that the ram for the frame is attached in a horizontal position to the walls of the steam room.
First, the upper and lower guides near the floor and under the ceiling, using a screwdriver and self-tapping screws. In order for the timing to be accurately horizontally, use a plumb, and intermediate elements are assembled so that between them the same distance over the entire area of \u200b\u200bthe walls. Creating a frame, use a standard distance between the bars of 70 cm. If the insulation is used during the trim, the elements are placed, focusing on its size. For example, with a width of the mineral wool sheet in 80 cm, the distance between the bars should be exactly the same.
Ready carcass impregnate with antiseptic solution And leave to dry. After that, between the bars, the sheets of mineral wool are placed, which are attached to the walls with the help of a construction stapler. In places of contact, they must be placed on 10 cm, and the wool itself is covered with a waterproofing film attached by the stapler to the frame, and the joints are isolated by the assembly scotch.
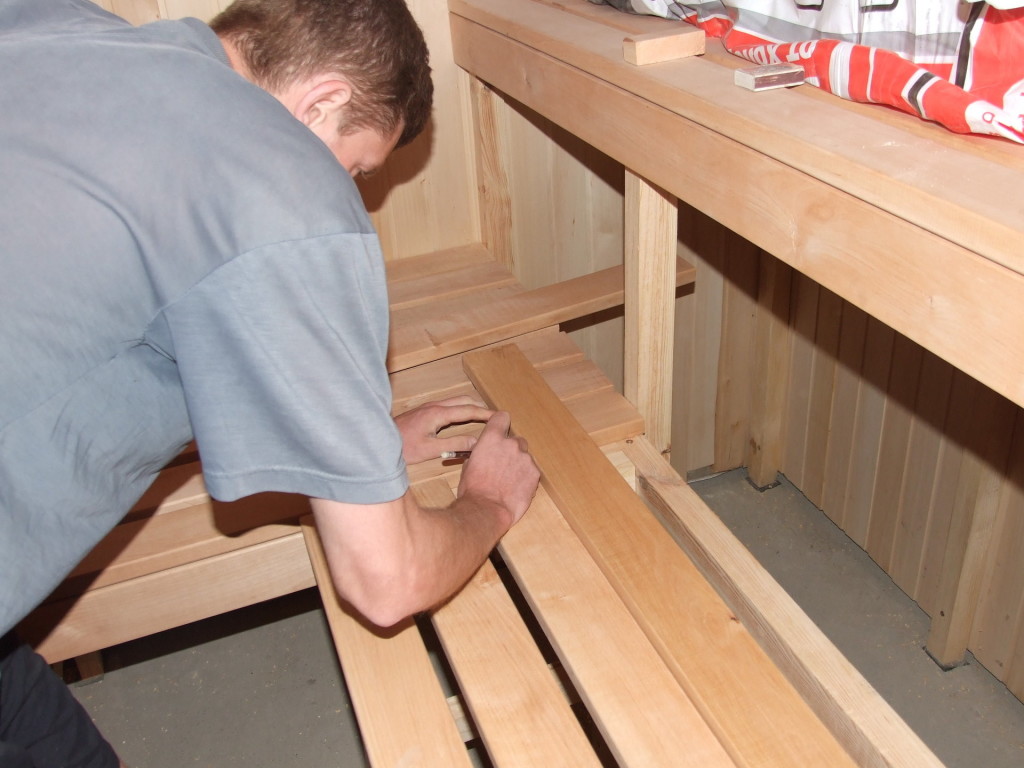
As soon as the frame will be ready, the trim begins with the wallboard. First, the distance from the floor to the ceiling is measured, after which the prepared boards are cut by the desired size using an electrolovka. Embed from a long corner to work on finishing the indoor room, moving around the perimeter. The first element, fixed in the corner, should be located strictly vertically, which is evaluated using a level. The lining is attached to the bruster with a hammer and nails. If the work is carried out in the steam room, use galvanized klimers.
Treatment of lining made of wood after mounting with your own hands
 As already mentioned, before sowing a bath from the inside with a clapboard, the material should be treated with antiseptic solutions. But finished walls also need special processing. In the steam room and the washer, where it is wet and very hot, in no case can be used by varnish. In this case, a simulator or protective wax is used, thanks to which the wood is well protected from the impact of moisture, and also gives it a very attractive appearance.
The lining used for the premium of the pre-banker is covered with colorless varnish, which retains the natural color of wood. Experts advise sowing such a wood room from pine, because it allows you to significantly save on the construction of a bath. But the steam room is recommended to separate expensive and high-quality materials.
Thus, if you adhere to all the necessary recommendations, you can even make a bun from the inside with your own hands. The main thing is to choose required Material For work, as it greatly affects the performance characteristics of the room.


