It is very often necessary to independently branch wiring around the house, install sockets and switches. The main thing is to have instructions at hand and the fault of the right installation. Since connecting the light switch with your own hands is very simple, everything can be done without the help of specialists.
Exist different types Light switches that are used to control lamps in an apartment or house. Consider the main:
- Classic;
- Two-block;
- Three-block;
- Touch;
- Remote.
A model light switcher is the most simple of existing ones. A metal bracket is installed in the device's housing using a screw connection. It controls the turning plate. On the sides of the brackets there are paws, with which the entire design is installed in the box. Also in the case is a branch with wires.
Two-block represents two classmate switches in one case. A feature is a greater number of wire groups. You can connect chandeliers with plenty of light bulbs or several lamps in different rooms. Three-block models have a similar design.
Photo - one and two keys
The sensory model works at the expense electrical circuitbuilt into the housing. Frequently equipped with a diode, backlighting or shutdown regulator. The box has a special infrared indicator, which recognizes the heat of the human body and closes the contacts of the lamp. The model with the indicator is often used in public areas.

Photo - sensory
The remote is perfect for controlling the lighting of a big house or apartment. It consists of a switch equipped with a receiver of signals and a control unit. You can turn on and off the light directly from the block or using the remote for this purpose. Mainly used in various complexes, as well as in the Smart Home system.
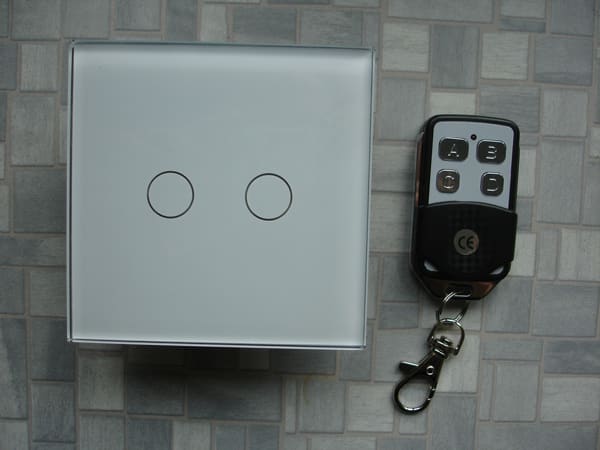
Photo - remote
How to connect one-blocks
You will need a selected switch, junction box and a lamp to work to work, which will be connected. Directly connect the single-button model is very simple. How to connect a one-block light switch on one light bulb:
- The phase power wire must be connected only through the contacts of the switching device, otherwise the lamp will always be under voltage, which is very dangerous. Always the phase is connected to the gap. Very often, homemade masters establish a zero wire connection, which may cause short circuit or even fire;
- Next, consistently connect the wires of the wall switch light and the device lighting device. Power phase - to switch, zero lamp to zero phase, lamp phase with zero switch.
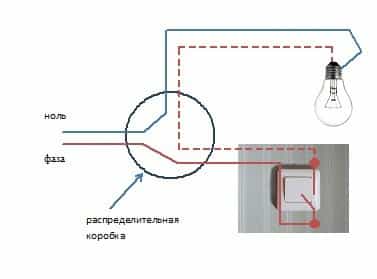
Photo - Connection of a classroom
It is more difficult to establish a connection to several lamps. There you need to take into account the phase wires of several consumers at once. Just be attentive and strictly follow the voiced scheme. It works as follows: when the light switch is turned on (up), the lamp begins to do electricity. If the key to lower down - the circuit is broken, and the flow of directional particles is stopped.
Connecting a two-lying model
The standard two-button light switch is designed to control various lighting devices or several groups of one lamp from a single place. Most often, they are used if there are more than 2 lamps in the chandelier (5.6). At the same time, you need to know that two keys are used to control only two groups, if the lamp is divided into more than their quantity, then you need to use a triple switch.
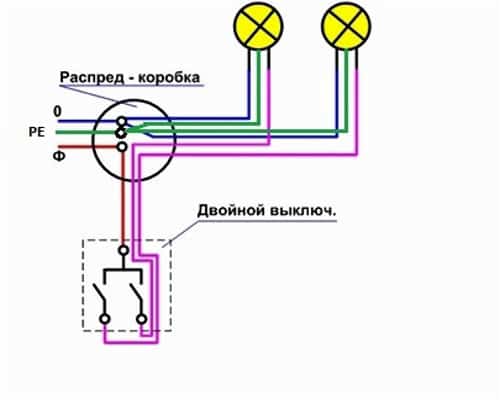
Photo - Connecting a two-lying model to the chandelier
How to connect a two-block light switch yourself:
- In such a model there are three contacts - input and two outputs. At the same time, the input contact joins the phase from the camshaft, and the conclusions are needed to control individual chandeliers;
- In the junction box, you need to start the network network and its zero;
- The first thing to be connected with each other zero conductors. Phase is summarized electrical switch Sveta;
- Also there are wires for each group of lamps. They are most often separated by color labeling. To each group can burn, regardless of another, it is necessary to connect each one with a separate phase wire. For example, a yellow and gray cable: yellow is assigned to a group 1, and gray - per group 2;
- The zero switch of the switch is connected with zeros of lamps and networks;
- It remains only to isolate the conductors.
In this case, the double light switch can be connected so that when the one group is turned off (main), the second (optional) turned off, then the scheme will be slightly different. You need to switch the device not every group separately, but both at once. Triple can be connected according to the same scheme. The main thing is that when the keys are disconnected, the phase is disconnected, and not zero.
Also, it is also very often necessary to connect the switch to the scab lamp and the outlet. This very much saves a room in the room allotted under electrical outputs. Then the scheme has the following form:
- The socket is installed in parallel to the feeding wire. Phase, respectively, to the network phase, and zero to nul;
- The inclusion of the lamp does not change, do it all as well as described above.
In this way, the LEGRAND (LEGRAND), VIKO, UAZ or any other can be installed.
Video: How to change the switch
How to set the passage
Now it was very popular to install switches that allow from different parts of the room to disable one group. Consider how to properly connect the passage switches of light:
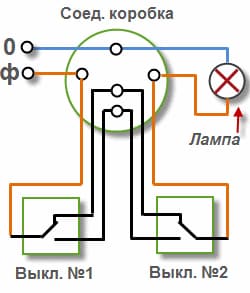
Photo - Connection diagram for passing switch
- The circuit takes into account the connecting box, since without it it will be difficult to connect;
- You need a zero phase wire to start in the distribution unit and connect it with zero lamps. The central phase cable is connected to the contact of entering one of the switches to choose from;
- After that, the two switchable contact of the same switch is required to be connected with similar conclusions of the second;
- Now after connecting the switches of the phase from one (to which it has been connected earlier) is transferred to the second. Everything stacked in the box and closes.
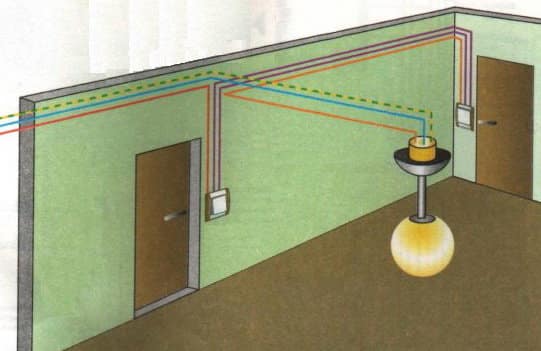
Photo - Principle of operation of the passage model
Be sure to insulate all contacts, otherwise they will be sore. Many specialists recommend using spike contacts - it is more reliable and more durable than the tape.
Light Switch Connection SchemeAs a rule, it causes difficulties from many unprepared people, although in principle there is nothing difficult in it. I will try to convince you.
This article presents detailed step-by-step photo The instruction in which the full process of installing and connecting the scheme is stacking, as well as connecting its main elements.
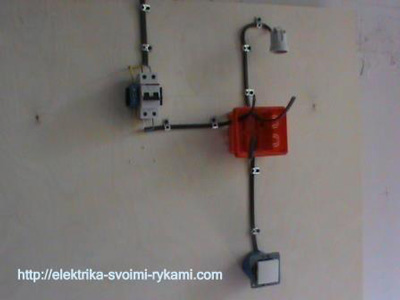
The main misunderstanding causes a visual example. After all, what do we have in fact trying to understand the scheme and at least to raise the principle of its device? Under the ceiling there is a camshaft in which a bunch of incomprehensible connections, a circuit breaker, on the ceiling chandelier or lamp, and all the wires are hidden under the thick layer of plaster. To figure out what goes and how it all works quite hard. That is why, in this article we approached this issue so seriously, disobeying the entire installation of the very beginning and to the end. By reading this manual Schemeconnecting light switchi will not cause any difficulties.
Lighting control
Before we consider the instructions, it should be noted that there are so many different lighting control devices. Below is a list of the most common:
- a classic light switch (its scheme is considered in this article);
- two-lying light switch;
- three-block light switch;
- dimer;
- switch with motion sensor (presence);
- color Light Light Switch (Switch);
- two-block Light Switch (Switch).
The selection of the lighting control device occurs individually for each specific case, since any of the devices presented in the list has its own functional features. In more detail, the description, purpose and connection of each of the devices, can be viewed in the relevant instructions presented on our website.
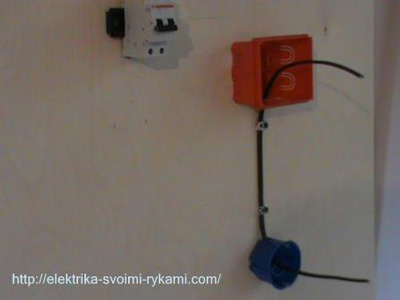
Installation of the preset elements of the single-wave switch circuit
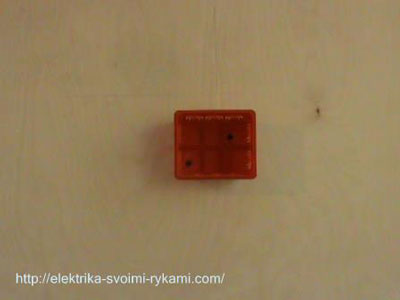
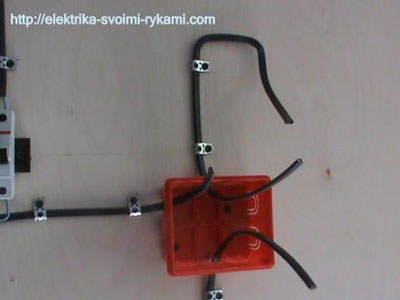
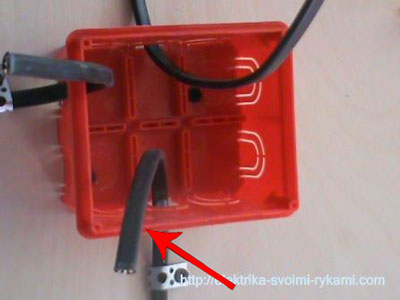
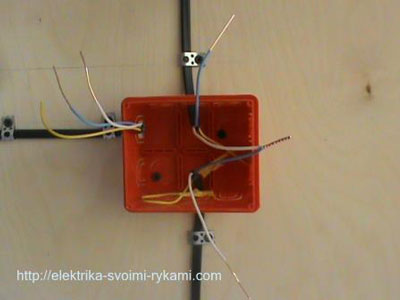
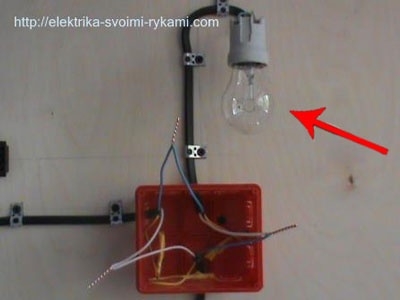
Any scheme starts with a junction box. It is in it that all the necessary wires will soon gather, the veins of which are connected to each other in a specific sequence by creating a diagram of a single-wave switch.
In this example, a method for executing hidden wiring, in a compact form you will be entered what is usually under the plaster. For hidden and open wiring, the connection circuit of the switch is the same.
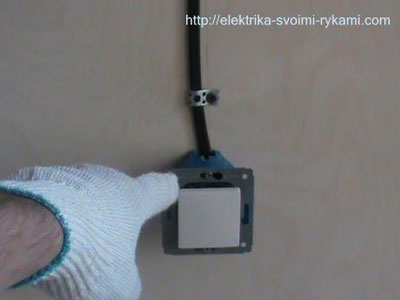
Mount the subtle, It is the basis for mounting the mechanism of the socket or switch.
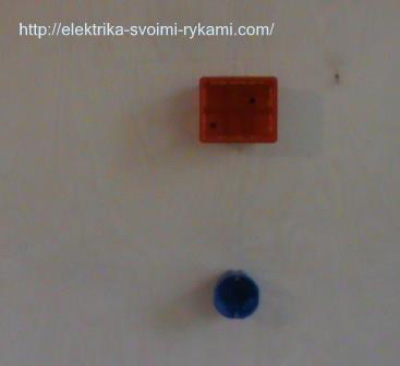
The installation of this element of the scheme is presented in more detail on our website in the following instructions, and.
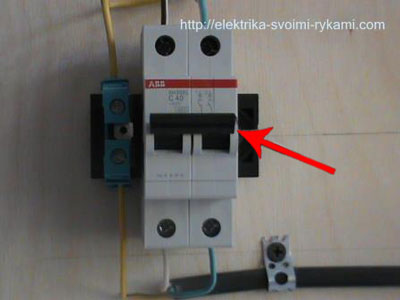
Now, add a circuit breaker, it performs the protection function electrical chain From overload and short circuit currents, it is usually installed in the power shield.
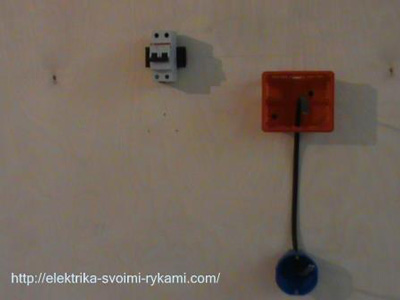
For a complete picture, we lack the last element of the scheme - the lamp, we will perform it a little later, and now we go to the next stage.
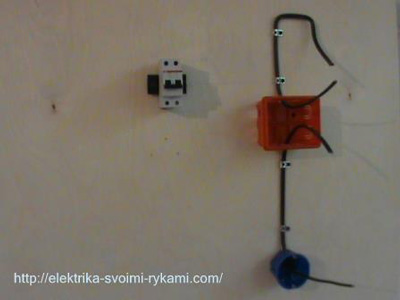
Laying the wires required to execute a single-wave switch circuit
The turn of the Wire mounting. In our example, the Wire of the VOGNGP 3 * 1.5 brand is used, three-core, cross section of 1.5 mm, designed to perform stationary wiring inside residential and non-residential premises.
You can read detail about this brand in the article, "".
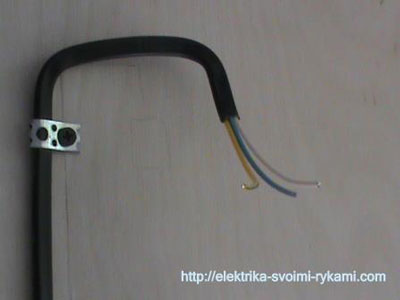
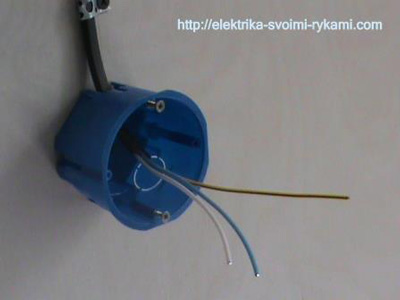
Let's start installing the wire gasket from the junction box to the pickle.

In the junction box and submerscribe, it is necessary to leave the wire supply for the connection, 10-15 centimeters will be enough.
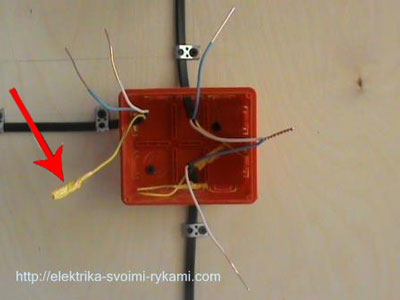
Now, lay the next wire, from the junction box to the lamp.
![]()
The next wire will be the final scheme, it is designed to supply power to the automatic switch, goes from the electricity meter or an introductory automaton to the upper contacts of the automaton of the outgoing group or direction.
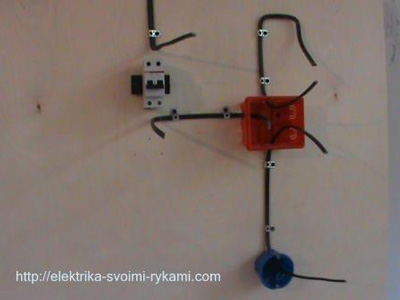
Attention! If you already have the feed wire and there is a voltage on it, then before carrying out all electric work It must be turned off. After disconnection, it is required to make sure that it is aback on the Wire, the easiest way to perform this action to use the voltage pointer. If necessary, you can take advantage detailed instructions On the use given on our website in the article.
Go to the next step of the implementation of the circuit, the connection of the equipment.
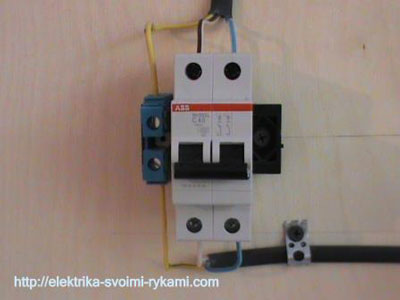
Connect the device for protection, control and lighting
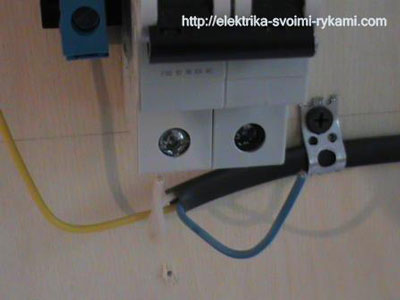
Let's start connecting the protection device that will protect the chain from the occurrence of overload and short circuit currents. In our example, this role is performed by a two-pole circuit breaker.
Also, such devices are used as chain protection devices as, and voltage limiters. We will get closer to these devices, find out how they work and for which you can go on the relevant links.
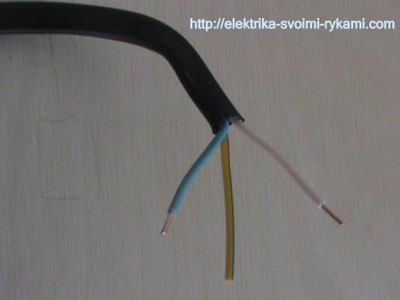
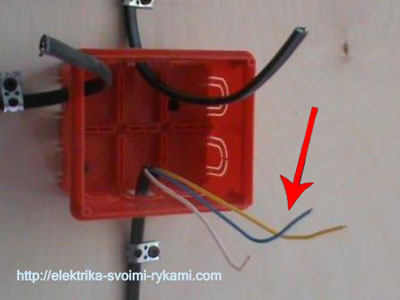
Before starting installation, it is necessary to be determined with the colors of the wires. Our wire has a coloring blue, black and yellow with a green stripe. Blue wire is always used for zero, yellow with a green stripe ground, white phase.
Using a knife, we carefully remove the first protective insulating layer.

Now remove the required amount of insulation from the phase and zero core for the connection, approximately 1 cm.
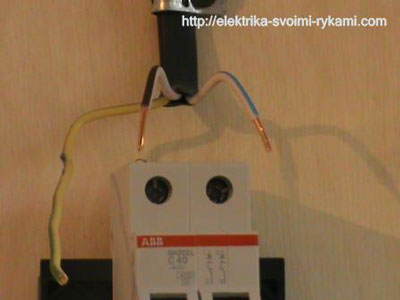
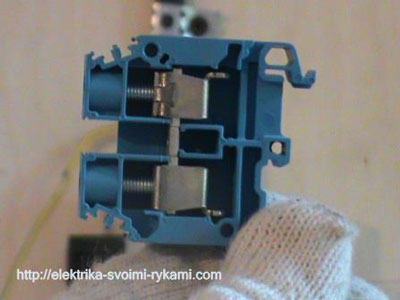
Insert the stripped wire into the contact terminals and tighten the clamping screws. Check the reliability of fixing the wire, pulling it from the contact clamp up and shaking left, right. If the wire remains stationary, the contact is good.

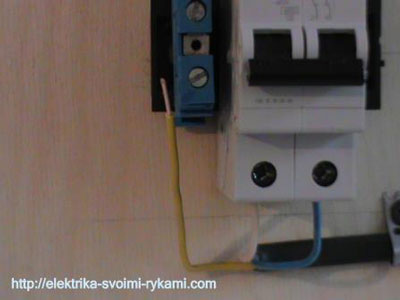
Similarly, connect the exhaust wires to the junction box. We definitely comply with the color coloring of the wires, if on suitable contacts of the machine from above, the zero was right, then it should be on the bottom from the outgoing contacts. Accordingly, the phase will be left.
Please note that on the outgoing wires the coloring of the wire has changed a bit, the phase wire has become completely white. Different manufacturers in different ways are painted wires of wires, changes most often are subject to phase and earth wire, zero invariably blue. I would recommend for ease of installation, to not be confused, use the wire of one manufacturer.
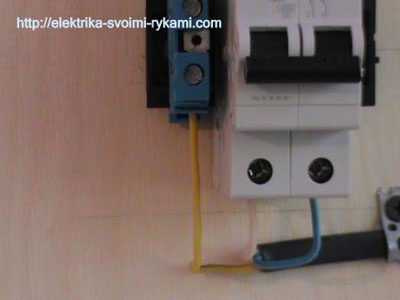
Remove the first outer insulation, measure the required amount of wire you need to connect to the machine, we clean and connect. Check the reliability of the fastening of the wire in the contact clamps, if everything is in order moving on.

In our example, a three-core wire was used and this is not by chance, the fact is that this wire is universal. For example, now you want to hang the luminaire in the room, which is turned on by a single-block switch, but it will take time and after 3 years another repair you want to hang no luminaire, but chandelier. To connect it, another switch is required, two-block, and for it is not needed double, but a triple wire. Having a three-in-room wire in the junction box, you can easily change the scheme by making only one additional twist. Also, if necessary, the third wire can be used as. This option is suitable if you install the lamp having a metal case, in a room with high humidity, the ground contact on such lamps is usually provided.
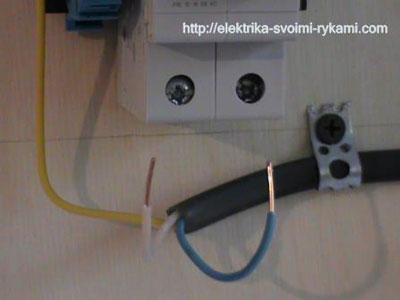
To connect the grounding wire, we use a special contact clamp.
Measure the required amount of wire, we clean and connect. Check the reliability of the contact connection.
We are doing the same on the depotable contact.
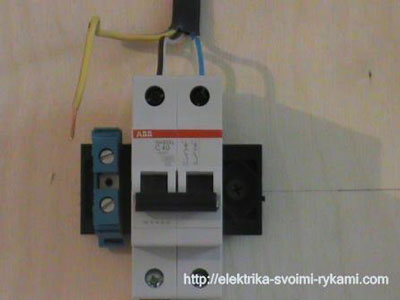
The circuit breaker is connected. All necessary wires in the junction box are required.
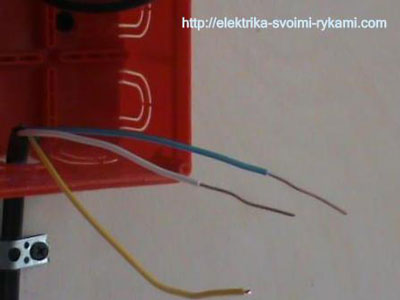
Go to connecting the lamp. In our case, a cartridge is installed with a light bulb. We prepare the wires to connect, remove the outer insulation, measure the required amount of wire to connect.
We clean the phase and zero cores for connecting.
In the case of a light bulb and patron, the ground wire is not needed, it is insulated and rejected to the side. When connecting the lamp or chandeliers, do the same, it is not necessary to cut it, in the future it can come in handy.
Connect the wires to the cartridge.

Now our scheme has practically gained proper form, to complete the pictures perform.
We clean the wires, remove the required amount of outdoor isolation.
We do not need grounding wire, we are insulating it and remove it into the opposition. Remove isolation with copper veins of phase and zero wire.
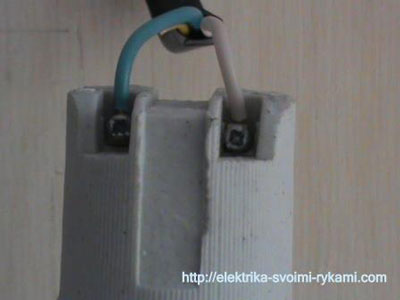
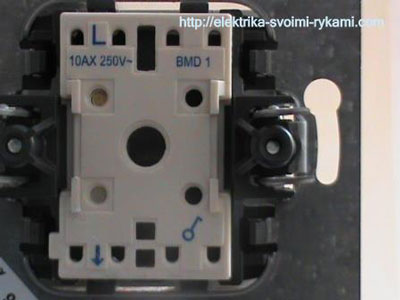
Our classic switch has full contacts, it will greatly facilitate our connection.

The contact of the appropriate phase is indicated by the letter "L", and the exhaust arrow down.
White wire is connected to the right contact, blue on the outlet.
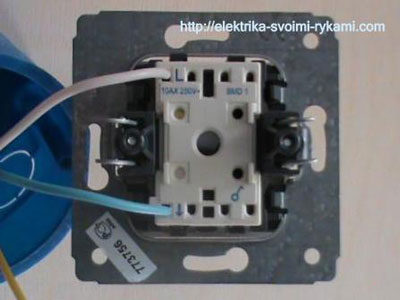
It remains to establish a mechanism in the converter andthe circuit breaker is turned off.
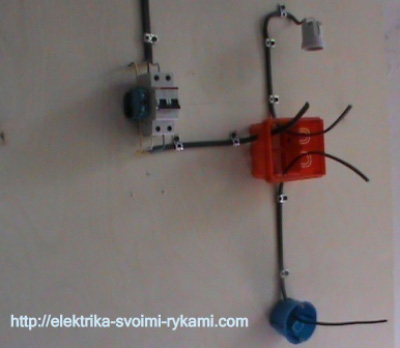
Our scheme has acquired a general view, all the necessary equipment is connected.
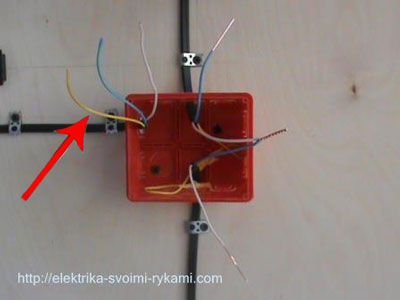
Go to connecting wires in the junction box.
We deal with the details of the connection scheme, how to connect the light bulb and switch
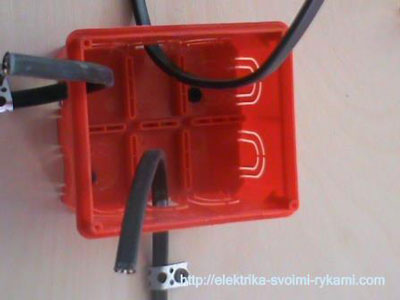
We will pass over the wires.
Wire left feeding.
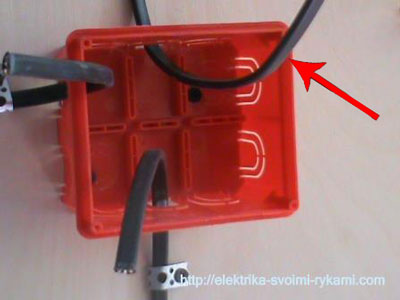
The wire comes from above goes to the lamp (chandelier). In our example on a cartridge with a light bulb.
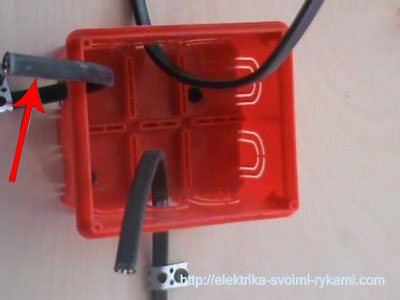
The bottom wire goes to the switch.
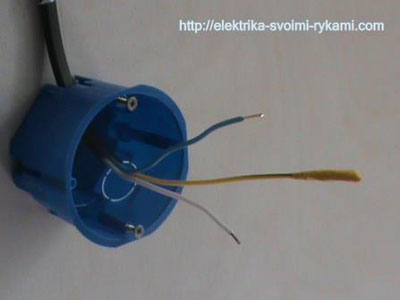
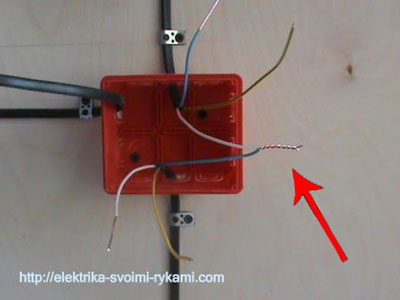
Watching the circuit Connection of the switch start from the wire going to the switch. We clean it, remove the first layer of isolation. It is not necessary to crop the wire, the box should remain at least 10 cm of each wire.
Remove isolation from the copper veins of the phase and zero wire, approximately 4 cm.
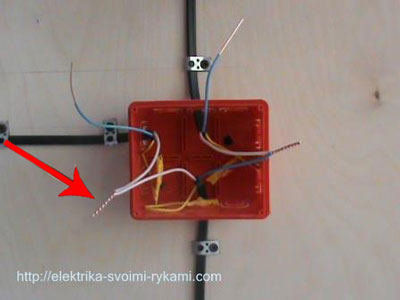
Go to the wire that goes to the lamp. Remove the upper insulation, we clean 4 cm on the phase and zero wire.
![]()
Now we can proceed to connect the wires.
Zero to the light bulb comes directly from the supply wire, and the phase is made in the gap. It will break it with a switch, when you press the power button, it will lock the circuit and give the phase to the light bulb, when you turn off, the phase will disappear.
We connect the phase white wire going to the light bulb, with the exhaust blue wat switch.
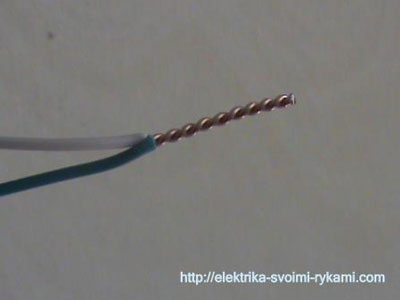
Exist different kinds Connections of wires, in our example, perform the most simple way, twist. First twist the wires with your fingers.
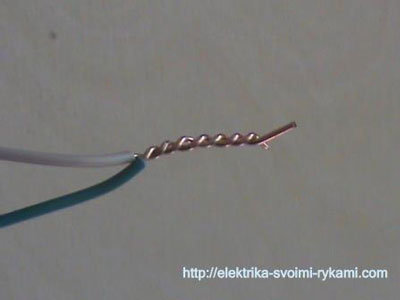
Then we stretch the connection with the pliers tightly twist both cores with each other.
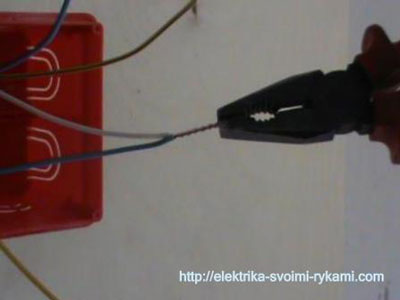
An uneven tip of a twist is biting.
In this circuit, we do not use the ground wire, so we insulate them and put them, so as not to be interfere with, in the junction box.


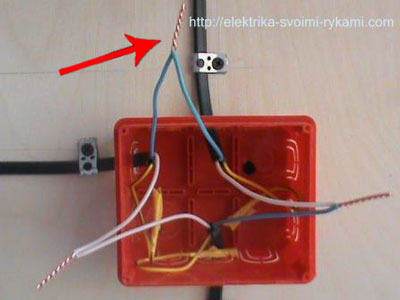
Now go to the feeding wire. We clean it and prepare for the compound phase and zero wire.
The ground wire is insulated and laid in the junction box.
Now, we feed the power to the switch. Phase vein feed wire with a phase residential wire going to the switch. Two white wires twist.
And at the end of the circuit, the zero core of the supply wire connects with the zero living wire going on the lamp (lamp).
Connection diagram of a single block switch ready.
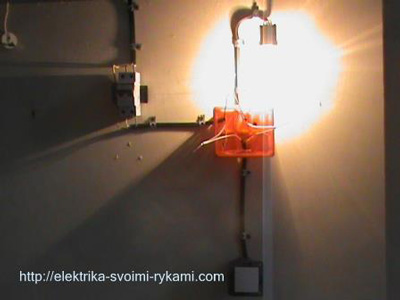
Now, we need to check the work of the scheme in the case. We screw the light bulb in the cartridge.
Apply voltage. Turn on the circuit breaker.
With the help of the voltage indicator, check the correctness of the circuit connections, we are convinced that we did not confuse anything, there should be a phase on the phase wires, on zero zero.
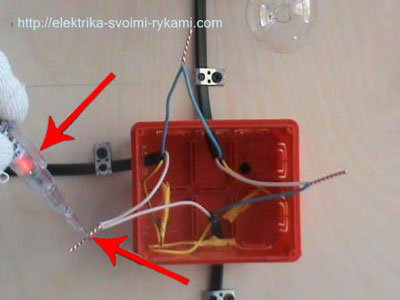
And only then turn on the switch.
Light bulb caught fire, the scheme is connected correctly. Turn off the voltage, insulating the twist and laid in the junction box.
Installation of the scheme is made, the question is how to connect a light bulb and the switch is disassembled in detail and disclosed.
In this paper, we used:
Material
- junction box - 1
- podrottor - 1.
- color switch - 1
- luminaire - 1.
- wire (measured by specific standards of your room)
- circuit breaker - 1
- ground Contact - 1
- insulating tape - 1
Tool
- pliers
- kusachachi
- flat screwdriver
- crosshead screwdriver
- voltage indicator
How much we saved by following the connection scheme with your own hands:
- departure of a specialist - 200 rubles
- installation of the internal installation junction box - 550 rubles
- installation of the ceiling lamp - 450 rubles
- installation of pearanteed internal installation ( brick wall, drill, installation) - 200 rubles
- installing a single-wave internal installation switch - 150 rubles
- installation of two-pole circuit breaker - 300 rubles
- installation of ground contact - 120 rubles
- installation of wires open to 2 meters (1 meter - 35 rubles), For example, take 2 meters - 70 rubles
- wire mounting is open above 2 meters (1 meter - 50 rubles), for example, take 8 meters - 400 rubles
- strokes of the walls of 8 meters (1 meter - 120 rubles) - 960 rubles
TOTAL: 3400 rubles
*The calculation is made for hidden wiring.

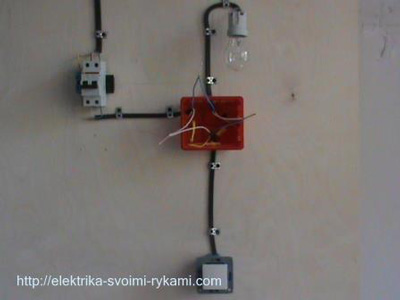
Hello dear site readers. Many are faced with such a problem how to connect the switch. In fact, it is quite simple. The main thing is to have a minimum idea of \u200b\u200belectricity from the school course of physics and the ability to work with a plumbing tool.
It's one thing, just replace the old switch to a new one, and another thing, add a new one to the existing wiring. Consider possible options for connecting switches.
Attention! All operations on replacing switches, produce with a voltage 220V.
As you can see the scheme is very simple. Phase (brown) wire (1) (2) Connects to the bottom (input) switch of the switch. From the top (output) contact, already a dashed line, phase Wire (2) Enters the box and connecting in a box with a residential wire (3) , comes to the light bulb. Zero (blue color) wire (1) Enters the box and connecting with residential wire (3) , comes to the light bulb.
Remember! Zero lived (zero) from the junction box goes immediately to the ceiling to the light bulb. Only phase lived on the light bulb goes to the switch.
So provided by the rules and done for your safety and safe operation electrical equipment so that when the switch is disconnected, it is the phase, not zero. Since when disconnected from the load with the zero wire switch, the wiring remains under the voltage of the phase, and this is dangerous and not convenient. For example, when the light is replaced, it will be enough to turn off the switch and there will be no voltage on the luminaire.
To determine the phase wire, it is enough to use the indicator screwdriver. Before working, the screwdriver is checked for goodness, in the place, knowingly under voltage. For example, your socket. The displayed indicator indicates the presence of a phase.

Now consider the scheme with two-block switch.
This scheme added one phase and a light bulb. Here phase (brown) wire (1) Enters the box, connecting with residential wire (2) Connects to the bottom (input) switch contacts. From the upper (weekend) contacts of the dotted line phase, breeding two, wire (2) Enters the box, connects with wires of the wire (3) And comes to the light bulbs. Depending on what kind of contact switch is closed, such a light bulb and lights up. Zero (blue color) wire (1) Enters the box and connecting with residential wire (3) , comes to the light bulbs.
There is one nuance here. If you want a regular switch to replace on a double, then you will have to pull one "phase" camp to the switch, and another "phase" core to the light bulb.
To determine the input and output according to the contact scheme, it is enough to look at the rear side of the switch. Double, as a rule, there are three outputs: two on one side (L1 and L2) - weekends, and one on the opposite (L3) - input.
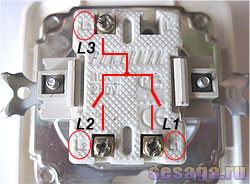
You can also use a measuring instrument, for example, a multimeter. , and measuring arrows sitting on the intended input and one output contact. Including and turning off the switch key, follow the instrument readings. If the contact is closed, the multimeter erupts the beep or the indicator will appear the magnitude of the short circuit resistance, that is, zeros.
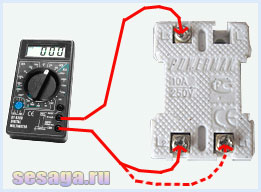
Now one multimeter probe is left on the estimated entrance, and others sit down on the second output contact and also try pressing the next key of the switch. If the device shows the magnitude of the resistance of a short circuit or emit a beep, it means that we did everything correctly and the input contact is found.
Well, if you still have questions about connecting the switch, look at the video, which should dispel them.
And in the next post you will learn.
Good luck!
In every home or apartment, periodically arises the need for. Among them, most often you have to decide how to connect the lamp through the switch. This operation does not represent a special complexity, and it is quite possible to fulfill it personally, not attracting specialists. In addition to the minimum knowledge of electrical engineering, it is necessary to comply with certain rules relating to preparatory work And the installation itself.
Preparatory work
Before starting work, first of all, it is necessary to turn off the supply voltage. To do this, it is enough to turn off the machine and check the device no voltage.
When a single block switch connects, three wires must be gathered in the junction box. The very first - feed wire, with a voltage of 220 volts, which was supplied from the plugs or circuits. The second will be a two-tier wire, summarizing to the switch. The third wire goes directly to or lamp. It can be with three veins if the luminaire case is equipped with a grounding clamp.
After all the wires gathered in the junction box, it is necessary to remove the insulation and prepare for the subsequent cleaner. After that, you can proceed to the assembly of the circuit and direct connection.
Connecting the lamp and switch
Full assembly of the scheme is as follows. The switch itself must be connected in the phase break. The zero wire through the junction box is connected directly with the lamp. Thus, the phase passing through the switch allows the lamp on and off, as well as the repair and maintenance of the lamp.
The introductory phase wire, which comes from the machine, is connected to the same wire that goes to the switch. For this, best. Another phase returned from the switch to the distribution unit is connected to the feed wire connected to the lamp. Zero wires lamps and nutrition are also connected in the junction box.

After that, you need to visually check the connection scheme. Wires must be properly interconnected. In the finished scheme, all twists are additionally compacted using pliers, and the PKV tubes are put on top and are fixed by the tape. Twisted wires neatly fit into the box, after which it closes with a lid.
Thus, the question is solved how to connect the lamp through the switch with one key. This scheme underlies the connections of other switches with a large number of keys.
Double Switch Connection Scheme
How to connect a light bulb?
In order to connect the light bulb to the switch, it is not necessary to invite the wizard-electrician at all. Connection diagram is quite simple, so it can be done at home yourself. It may not save time, and it will be necessary to tinker with work, but you will be able to save money that it would be necessary to pay for a call to the wizard for the installation of switches, wiring, etc.
Just once with the procedure for connecting the switch to the light bulb and having done it yourself, you can continue to do these procedures in other places in your apartment that, again, will save your money.
What will be needed for connecting
Knowledge. Of course, if you never worked with an electrician, and do not understand this at all, then for your security, contact a more knowledgeable person or specialist. And in this case, let it be confused by the issue of money, because the master will install everything correctly and guaranteed safely.
So, if you still have previously performed operations with wiring and electrical engineering, then the following tools and system elements will be needed to connect the bulb:
- Light bulb;
- switch to which we will connect it;
- cartridge for the lamp;
- cable consisting of two wires required length;
- tools for installation.
Connect the light bulb to the switch
- Mark the places in which the corresponding items will be placed. The switch in the standard situations is set at an altitude of about 80-90 cm, but if it looks nonethetically, or the placement of furniture in your apartment is such that this height does not fit in any way, then establish as your switches are placed.
- Mark or think how to pass the wires to your switch.
- Further, if you want everyone to look beautiful and there are no wire sticking throughout the wires, you will need to do special grooves under the wiring wall in the wall. After the wires are laid, all places are simply stuck with wallpaper or other cosmetics. There is also an external wiring option when the wires are located in special trays, or if the wires are not embarrassed, you can simply fix them with special brackets (if, for example, the wiring will pass by the cabinet or sofa).
- Now it is necessary to pave the wiring itself. Take the two-wire cable and pave it into the furrows. Do not be greedy, cut off the wires with a good stock, as long wires can always be shortened, and the short extension is harder.
- Now you need to connect the switch. It will take 2 wires from the light bulb - neutral and phase. Connect the switch to the phase. The neutral wire will be held from the distributor immediately on the light bulb.
- Find out which of the phase wires, and what zero (neutral). It is necessary to reset the voltage from the outlet - turn off all the electricity. Check if the voltage is disconnected.
- Examine the circuit of the switch device. Note that in the mechanism there are two contact screws - one of them leading the current to the switch, and the other - the outgoing on your lamp (designations can be viewed from the reverse side of the switch).
- Clean the wires and insert the cleaned part between the contact plates. Next, tighten the screw and secure the wire. Be sure to check the fixation of the wires. It happens that the wires are pulled out of terminals or, plotters, disappear. This occurs as a result of improper fixation of wires.
- Do the same operation and with the second wire, which takes the current to the light bulb.
- Check the locking of the switch and how reliably fasten the switch mounting bolts (spacer).
- Install the protective frame on the switch and the on / off key.
- Now you can turn on the electricity and check the operation of the switch.
Now you know how to connect the light bulb to the switch. You can read about connecting other devices in the articles.


