Hello everyone. With you again, I, Maxim Aleiniki.
Now everywhere in private homes, in dachas, cottages you can find a stove, despite the growth of gasification, power supply, etc. The benefits of civilization. But the stove stove is dispersed.
Agree appearance It is important. The untreated oven looks outstretchly, due to the assembled dust spreads an unpleasant smell. To avoid these phenomena, cladding is recommended (decorative ceramics, tiles, glazed stove, etc.).
So, did you think about bringing your old oven in order? Or decided to stack a new one? But do not know where to start. Do not worry. You will succeed, and with your own hands. What will this give us? Yes, at a minimum, the nearee appearance of the furnace, the strengthening of the strength and tightness of the masonry.
About how to plaster oven, and let's talk today. I will try to tell you how to choose, prepare a high-quality solution at home, some nuances of applying a finishing layer on the furnace surface.
What kinds are solutions
I think it is not a secret for you that in the process of heating the solution will have to withstand multiple temperature changes. And it will be able to withstand not every material. Therefore, I advise responsibly consider the choice of components for the solution. It should be environmentally friendly, elastic and with good thermal conductivity.
You can subdivide solutions for successful finish furnace system 2 large types:
- Simple - its base consists of sand and clay, it is easily manufactured independently and is easily applied to the surface;
- Complex - it is quite possible to cook yourself either to buy ready-made in specialized stores.
The complex includes:
- lime-gypsum;
- cement grinding;
- lime mlarice.
How to cook clay (simple) solution
A prerequisite for the start of the process of applying plaster is complete drying and hardening of all binding materials. If you do not withstand this period (about a month), then the period of the service of your cladding is significantly reduced. And high the possibility of cracking and detachments.
- clay - 1 share of the composition;
- sand - 2 shares;
- asbestos fiber or fragmented fiberglass - no less than 1/10 stakeholder.
It matters in this form of a solution of clay quality: if it has increased fat, then sand can be carried out up to 3-4 parts per 1 piece of clay.
The role of bundles in this solution plays asbestos fiber or crushed fiberglass. Someone will advise instead of adding a straw or crushed hemp to reduce the negative harmful influence on the body, because Asbestos is considered unsafe.
How to cook "complex" solution
Composition of lime-gypsum solution for brick stoves
- Harated lime - about 2 parts of the composition;
- Building gypsum - 1 part;
- River sand - 1 part;
- Fiberglass or asbestos - not less than 0.2 parts from the total volume.
If you have discovered on this solution, keep in mind that the gypsum has a property very quickly (about 5 minutes and complete hardening after 30 minutes). This increases the strength of the solution, however, to move will have more active. Agree?
The composition of the cement-grinding solution
What is a cement-grinding solution?
Its composition in parts:
- Portland cement - 1;
- Clay - 1;
- River sand - 2;
- Asbestos - 0.1.
The composition of the limestroke solution
- Harated lime - 1 part;
- River sand - 2 parts;
- Asbestos - no less than 0.1.
So, the type of solution for your furnace you chose. What's next? And then you need these components to prepare correctly. Clay must be soaked in the capacity of great preferably volume per day. It is necessary so that the clay does not have water and swelling.
Sand is better to take a river. Before starting work, it is well sifted to remove seashells and other small garbage.
Cement is better to take M400 brands. In general, the higher his brand, the stronger the quality. This brand begins to stick after 15 minutes, and captures completely after 12 hours. Note that the final strength of the cement layer will reach in a month.
Lime - has excellent knitting characteristics and it provides a good grasp of the solution with the surface of the furnace. But sinking it is slow.
Before applying the cooked solution, the furnace must first be cleaned from dust, stains and other contaminants and protruding and the layer of plaster applied on a warm surface.
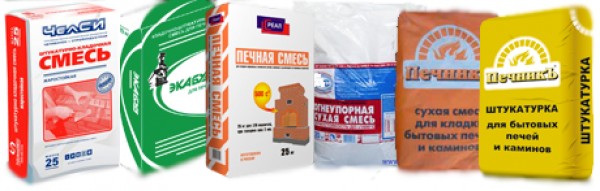
As I said at the beginning of the article, the mixture can be bought in finished video. Such a choice is considered more costly. But the choice is yours, as many professionals and homemade masts of newcomers consider them more efficient. Just follow the instructions that are attached to the package.
Special heat-resistant plasters for which you can read about.
In any case, you prepared a solution yourself or bought in a specialized store, if it is high-quality, it is applied to the surface it will be easily and smoothed without problems.
Stages of the process of plastering
Stuccing starting with its top part. It is important to remember that before applying the composition you need to moisten a brick water and apply liquid first, and only then a thicker mixture layer. With this layer, all irregularities are filled. Do not try to immediately fade the furnace immediately, since the layer should be a thickness of no more than 0.5 cm. And it should be as soon as possible, which will ensure its uniform drying.
2nd layer - surface primer after setting the 1st layer. It is a solution resembling dough. Ground thickness on average 3-5 mm.
The 3rd layer - its purpose is the final leveling of the surface. Its layer is not more than 2 mm. When the plaster is grabbed, but it will be still soft enough, you need to achieve a smooth and smooth surface with a wooden curriculum.
If your homework is distracted, and the solution has already grabbed and does not want to slip, not a disaster! Just moisten the surface with a brush or brush. But in general, the layer of plaster should not be more than 1 cm.
Special attention will have to devote the corners of the furnace. We take wooden or metal levels, exhibiting them. After 10 minutes, how the solution was applied, carefully remove the rail. If necessary, correct the angle and rub the brush.
Solution of possible nuances when applying a plaster layer
There are some nuances when applying a plaster layer on the oven. If it is peeled, it means that the incorrect thickness of the seams or dressing of the rows of bricks or the overseas ovens.
But there is a solution and these problems. Namely, before the furnace will be facing, cover it with burlap. This will strengthen the roughness and strengthen the strength of the connection. But first, moisten a burlap in a liquid clay solution, and on the walls of the furnace, apply a thin layer of clay solution.
When applying burlap on the furnace walls, avoid so-called air stoppers between their surfaces.
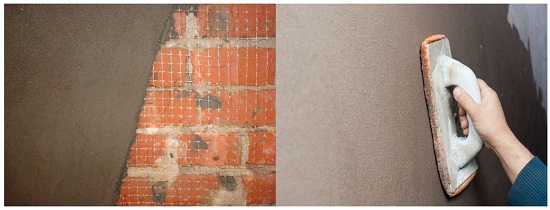
Burlap can be replaced with a steel reinforcing mesh with the cells of the cells not more than 1 to 1. It is attached to the brick with a wire with a thickness of 3 mm. But it is necessary to start it in each of the rows of masonry in advance, i.e. In the process of building a furnace.
After the final frozen composition, the furnace is covered with lime milk with the addition of salt (somewhere 100 grams per bucket).
If, after complete surface drying, you noticed that there are cracks, you need to expand them, moisten with water and replenish with a solution. After repeated drying to swee.
Plastering can also be done using a special plastering gun. How it is done clearly shown in the following video.
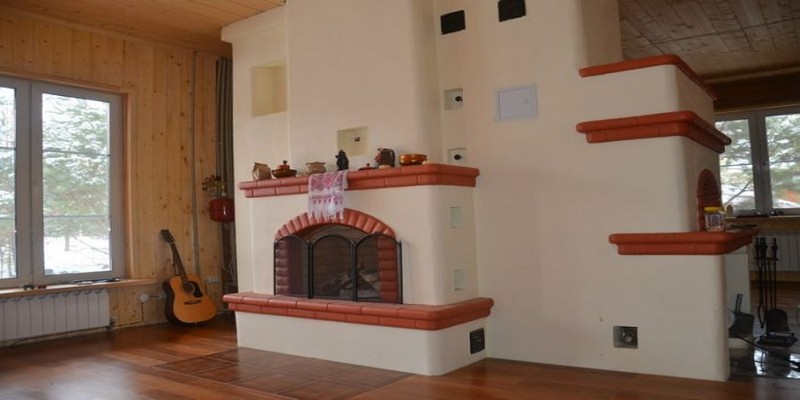
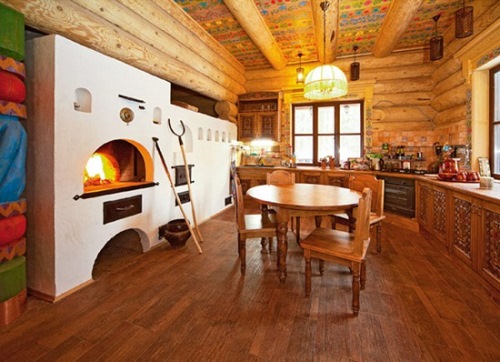
With the right cladding process, your oven will become an indispensable part of the interior and decoration of any room on long years.
Leave your comments. To new meetings!
Plaster
Stucco furnaces with your own hands
IN lately in country houses, in dachas and in the baths, it became fashionable to do overseas furnaces: plastering with clay plasters and play chalk with lime. Natural components, fresh smell, antibacterial effect from whitewash - our ancestors knew that useful properties Building materials and healthy living conditions!
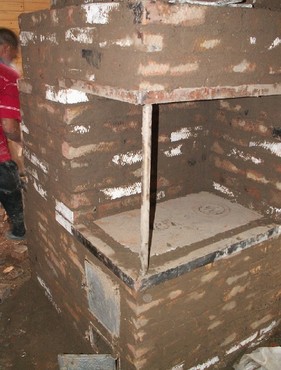
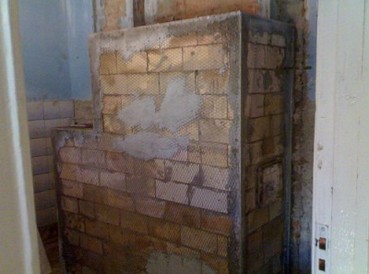
The furnaces without a facing look not aesthetically, dust and garbage is going in the seams of masonry, which is not enough that it is bad, also spreads unpleasant odors, burning when the oven is dried. Plus to all, (especially if the burning lay the laying very quickly, since he "burned the pipes" and the lunch was expected by legitimate hundred grams and cucumber), through different microcracks in the seams formed under poor masonry, some amount of smoke and carbon dioxide who are harmful to health. To avoid all the above, plastering furnaces, facing tiles, thin-layer printed concrete or other types of furnaces of furnaces that require some costs. Therefore, plaster stove is one of the economical options.
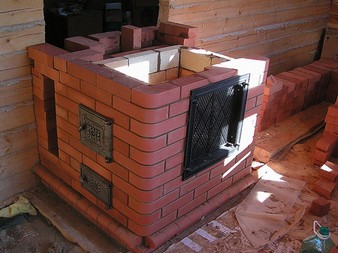 If you are only planning to do the stove, and then stucked it and read this article, it is possible that you will be more expedient to buy an originally beautiful smooth brick or facing brick, put the furnace from it smoothly, in accordance with the construction level and beautifully dismissed the seams between the bricks, then it will initially look great, especially if you opened it with a special lacquer for water-based furnaces, for example, with a wet stone effect. This may (but not a fact) will cost a little more expensive than the laid out of the oven from the old or curved brick, which is then closed by plastering, but then it will not be necessary to mess around with the plaster, and the furnace itself will originally look very beautiful and constantly please You are your appearance. In addition, you avoid possible peeling of plaster, (taking place over time), as it often happens due to errors allowed when the furnace is plastered. But if you already have a ready furnace and, most likely, it is made of a coronal or old brick, then without plastering the oven, which can be done with your own hands, you can not do.
Secrets of durability for .
Why is the plaster from the surface of the furnace fall off?
The furnace plaster is peeled, mainly for such reasons:
1) Because of who did the oven - he could make the wrong thickness of the seams or dressing the rows of bricks.
2) overheating oven. 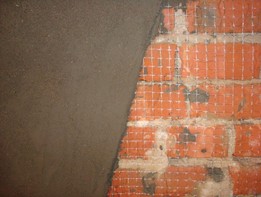 To prevent this problem, a thin steel reinforcing mesh is used, the sizes of the cells of which are not greater than 1 cm. The grid is fastened with wire to the brick masonry, wire with a thickness of 3 mm. It is advisable to start a wire in each row of brickwork even when erecting a furnace.
Instead of a steel reinforced mesh, you can cover the stove furnace, which you first need to soak into the liquid diluted clay and on the walls of the furnace apply a thin layer of the clay solution. The burlap is unfolded and plastering on the surface of the furnace so that there are no air suits between them. Such a furnace can not be very overheated.
Plaster oven with your own hands
I prepare a solution for stoves furnace with their own hands
The furnaces are placed in a clay simple solution or lime-gypsum, cement-clay, lime-molded solution. You can purchase these solutions in the store in a dry form, packaged in bags or prepare them with your own hands.
Arrivine for stucco furnaces with their own hands Enjoy the popular solution from clay. The stove plaster is made after the brickwork is completely hardened and its shrinkage will be excluded (about a month). If you correctly prepare a solution and carry out the stove plaster, the plaster will last for many years.
A high-quality solution for the plastering of the furnace should be applied easily onto its surface and well smoothed, the amount of sand mixed in clay depends on the degree of thickness of the clay. If the fat content of clay is high, then the proportion of the components of the mixture for plaster should be 1/3, or 1/4. To the solution on a clay basis in order to increase the strength of the plaster you can add 0.1 / 0.2 The shares of the crushed fiberglass or asbestos fiber.
 Now about how it is necessary plaster oven.
Before starting work on plastering the oven, its surface must be cleaned of dust, residue of a masonry solution and other contaminants. In order to improve the adhesion of a solution with brick masonry, it is necessary to deploy about 0.5 cm to clear the seams between the bricks. Before applying the plastering solution, it is necessary to protrude the stove and the solution to be applied to the warm walls.
The proportions of the most common plastering makeups for plastering furnaces |
proportions in parts: |
clay -1, sand - 2, asbestos - 0.1; |
gypsum - 1, Lime - 2, Sand - 1, Asbest - 0.2 |
clay - 1, sand - 2, lime - 1, asbestos - 0.1; |
clay - 1, sand - 2, cement - 1, asbestos - 0.1; |
gypsum - 1, lime - 2, sand - 1, fiberglass - 0.2. |
Stucco
After the preparation of the plaster mortar, we proceed to applying it to the surface, that is, stoves furnace with their own hands.
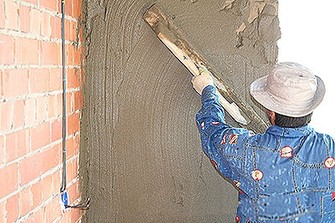 Plastering the oven start from the top. Brick masonry are wetted with water and applied to cell or grater first liquid layer of solution, and then more thick. It is not recommended to apply layers thicker 0.5 cm. In order for the stucco to dry uniformly, it must be applied, if possible, a smooth layer. After the plaster is grabbing, but will still be soft, it is necessary to lure it with circular movements using a wooden grater. At the end of this procedure, the furnace surface should become smooth and smooth. If the plastering surface of the furnace is badly burned - this indicates that the plaster has already managed to grab. In this case, it is necessary, spraying a large brush or brush, moisten the clutching surface of plaster and continue the thicker work with a wooden brush. Ultimately, the thickness of the facing layer of the plaster should not be greater than 1 cm.
The corners of the furnace are placed in the type of door and plastering openings are plaster, with the help of wooden or metal rails exhibited by level. After applying a plaster mortar, after about 10-15 minutes, the rail is neatly removed and the angle is corrected if necessary and rubbed the grater.
After hardening the solution for plaster, the furnace is recommended to be covered with lime milk to which it is necessary to add salt (approximately 100 grams per bucket). You can also breed a limestone dough, taken when scattering with milk.
The process of plastering furnaces, with their own hands, must have such a result:
deviation of the furnace surface, pushing out the vertical plane for the entire height, should not exceed more than 1 cm.
Similarly, horizontally - no more than 2mm.
The deviation of the thrust between the corners from the straight line should not exceed 3mm.
When applying a rule 2 m long, the detected differences between the relatively flat plane should not exceed 2mm.
Painting the furnace with your own hands. You can paint the stove as in the old way - chalk on lime milk, dyes for water-emulsion paints are added for the color. There are also many heat-resistant enamels, paints and varnishes. Some paints have a specific smell when the furnace is heated, but over time it disappears. Emulsion, silicon, silicate paints with semiam and matte films are used to dye furnaces and fireplaces.
Metal parts of the furnace, such as the doors of the furnace and the casing paint the paints of various colors on a silicone-based basis (KO-84, KO-818, KO-822, KO-828, KO-5125, KO-174, KO-286, KO-198)
I will focus on one inexpensive, but quite beautiful and modern method The coloring of the plastered and inactive furnace is painting with stoves by water-emulsion paints of E-VA-27A E-VA-27APG, E-KCh-26, E-KCh-26A, E-CHH-28. For this, the plastered or inactive surface of the furnace is purified from dust, it is grounded by a universal primer, or a primer for mineral surfaces, after drying, a pair of layers of water-emulsion paint is applied. The temporary break between the layers is written on paint packaging. The paint can be given the shades of the necessary colors with the help of coloring pigments (colors) for water-level paints.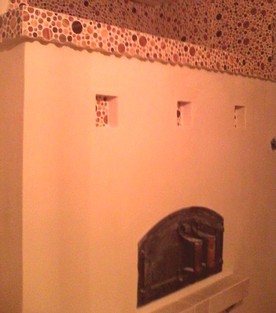
The furnace can be painted in several colors, or to apply the drawings manually either using the stencil. The only drawback of this paint is that it does not wash, but quickly updated if you need one new layer of paint. So that such a furnace can be easily wiped with a damp cloth, it is necessary to use a stove for painting and drawing patterns through the stencil of washing water-level paint and, after its complete drying, reveal the painted surface of the oven heat-resistant matte or glossy lacquer-based. When using a glossy varnish will be bulging small irregularities, so if any, it is better to take advantage of the matte varnish, then they will not rush into the eyes.
Before applying the varnish, the water-emulsion is to completely dry (the drying time is indicated on the package), otherwise it will be blurred when applied heat-resistant varnish on a water basis.
The varnish will make the surface of the furnace painted with washing water-level paints, more comfortable for cleaning and wet wiping its surface.
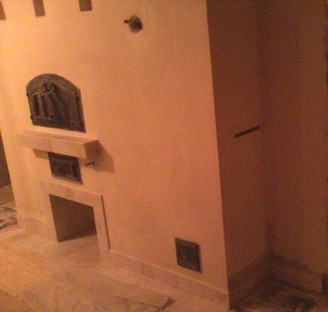
Building a furnace or fireplace is a labor-intensive task, but a skillful master having skills and experience in the field of construction will easily cope. The focus in the house can perform solely decorative functions or used in direct intended purpose, i.e., for heating the room, and the furnace is also for cooking. But in any case, this construction requires finishing.
About how the stucco stove is performed with her own hands, told in the article.
Why should it be plastering ovens and fireplaces?
The oven is a rather large structure that attracts attention. Regardless of the material used, the appearance should admire flawlessness. Thanks to the application of plaster, the furnace looks attractive.
The refractory mixture prevents the formation of cracks, inevitably arising in brickwork after time. The appearance of defects is important not allowed for two reasons. First, through them a carbon black gas can penetrate into a room that can lead to severe poisoning. Secondly, in those seasons of the year, when the heating structure is not used, the columns of microorganisms, insects, spiders, fungus can be laid in cracks.
The plaster of the furnace with a clay or a special mixture performs three functions at once: aesthetic, strengthening and protective.
Features of mixtures for plastering furnaces and fireplaces.
Many, speaking about plastering for finishing furnaces and fireplaces, represent the mixtures of Soviet production, which were so short-lived that the structures had to be sinking every year and sweep or painted as they crumbled. The walls were terrific uneven, so the plastering performed a double function: protect the masonry from cracking and put the furnace neat and decent appearance. For the purpose of alignment, the mixture intended for plastering furnaces had to be applied with a thick layer, because of which she soon began to crumble.
Now everything is different. Masonry of chicks and fireplaces are most often engaged in professional firing, and ready-made high-quality mixtures with a variety of characteristics are produced. But plastering still causes many questions from those who decided to independently add and bind such a structure.
Remember: The result of the work largely depends on the quality of the solution for plastering the furnace and its proportions.
Choose ready mix Or make it yourself - the question of personal preferences. When buying a finished finishing material, you will have to focus on the features of a particular structure. Find a universal brand, equally suitable for all fireplaces, most likely will not work. Better before purchasing consulted with a professional firing.
A good alternative to the purchase of mixtures is a heat-resistant plaster for finishing stoves and fireplaces cooked with their own hands. There are many recipes, and here are three of them:
- A mixture of chamotte clay for plaster plaster, asbestos and sand in a 1: 0.2: 2 ratio.
- Sand, lime, clay and asbestos in a 2: 1: 1: 1: 0.1 ratio.
- Mixture of portland cement, sand, asbestos and clays taken in the ratio of 1: 2: 0.1: 1.
The listed materials are passed through a sieve with small cells to save them from lumps and extraneous impurities. Carefully wash your hands without adding water. It will need to add later.
Important! Before holding plastering, the furnace must be cleaned from everything that crepts or peeling, and deemed. In order for the mortar for plastering the furnace better, the laying seams need to be made deeper. The recommended blowout is from 0.5 to 1 cm. It is more impractical to do - this will lead to excessive consumption of material.
The prepared surface is well primed, and if the walls of the furnace have pronounced irregularities, stretch the grid, fixing it with nails, self-drawing or dowels. What exactly relices the oven during the plaster, the master chooses himself, the main thing is that the grid is not made from the melting or fuel material.
Also, the finishing itself decides what should be the degree of smoothness of the surface. It depends on whether the oven will be painted, whiten, decorated with tiles, stucco, finishing brick, porcelain tiles or other materials.
Watching fireplaces and furnaces: important nuances.

Know the composition of the solution for plastering the furnace and be able to prepare it properly-owl. The process of applying plaster differs from similar work on finishing ordinary walls indoors or outside. If you have already had to deal with the finish of the house, but you didn't deal with the furnace, pay attention to some key features, otherwise then you will have to knock down the applied layer and plaster again.
- The solution for plastering the furnace can be prepared both on the basis of lime and on the basis of cement, but the main thing is that asbestos must be present in it. It is needed so that the surface does not crack. In rural settlements, instead of asbestos, a straw or sex can be used as a reinforcing material.
- If the furnace or fireplace has just been folded, it should not be plastering. There must be some time to make the laying shrink.
- In order to the surface of the surface of the temperature, the surface is not covered with cracks, a reinforcing mesh with large cells will be required.
If the finishing finish will be performed by the coloring method, take care of the purchase of suitable paint. Oil is not suitable, because it is made on the basis of olifa, and the latter when heated has the property to burn and spread the unpleasant odor.
Important! The plaster of a brick furnace is unsuccessful when the Mount Master does not take into account the operating conditions: regular increases and decrease in temperature.
Tools and devices required for work.
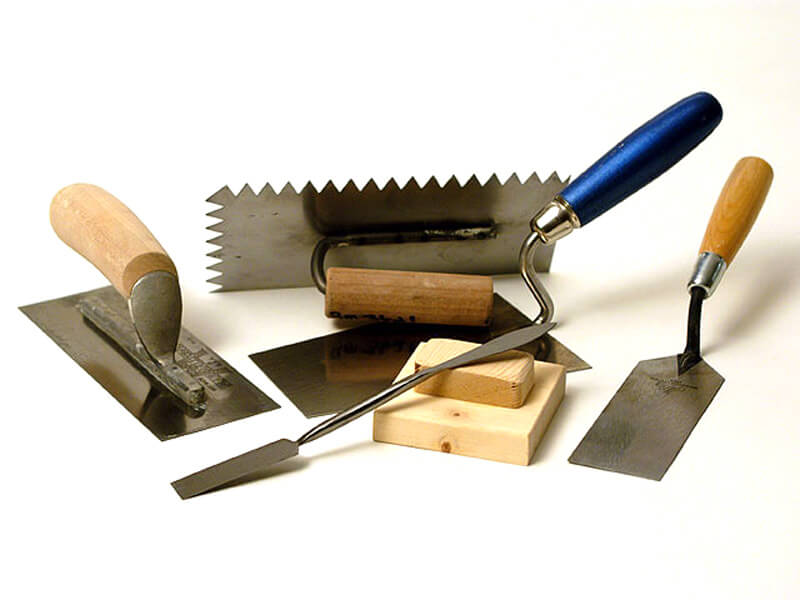
Park all inventory in advance. The plaster of the brick furnace was not interrupted due to the lack of instrument, materials and fixtures.
- To knead and recruit the solution, removably remove the surplus comfortably bayonet shovel.
- You need to stock bucket - type the mixture. The optimal bucket capacity is 1 liter.
- Apply and smuggle the solution is more convenient. They need several. They can be both the same and different in width and length.
- To align the corners and slopes, you may need a large or small rule. The tool is an aluminum rail with rubber coating. If the furnace or the fireplace is small, replace the rail rule with smooth edges.
- Also need a level and plumb.
Preparation of a clay solution.
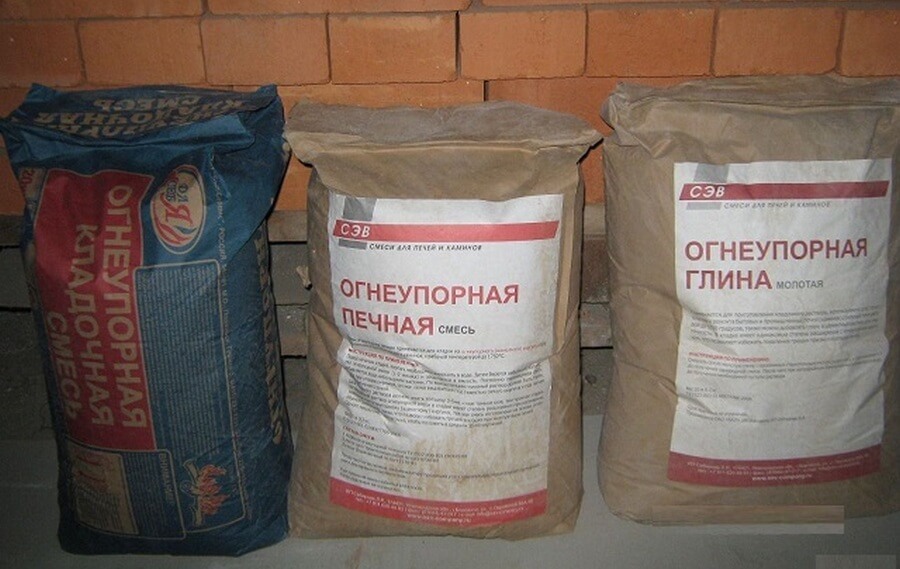
Are you planning to buy a ready heat-resistant mixture? Please note: Manufacturers offer lime-plastic, lime-gypsum and cement-grinding modifications.
At this stage you can bring cleanium For plastering a fireplace or oven.
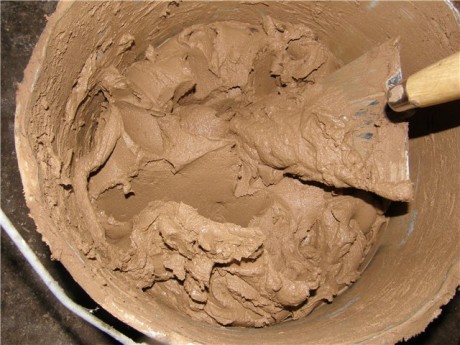
The previously sainted mixture was bold with water and stirred using a mixer or perforator, to such an extent so that a homogeneous mass is obtained, a bitty like a fatty sour cream. SD ideal she should be such that it can be easily applied to the oven and easily ram.
Invalid the presence of pebbles and other extraneous particles - they interfere with work. Make sure that the solution is pure and homogeneous!
The ratio of skinny clay and sand should be 1: 2. See that clay fat? Increase the amount of sand up to 3 or 4-parts per 1 piece of clay.
The technique of proper application of plaster.
So that the plaster for furnaces and fireplaces is stronger, the wizard add asbestos fiber or asbestos. It should not be done: this material It is considered toxic, and therefore, in the room it is not a place.
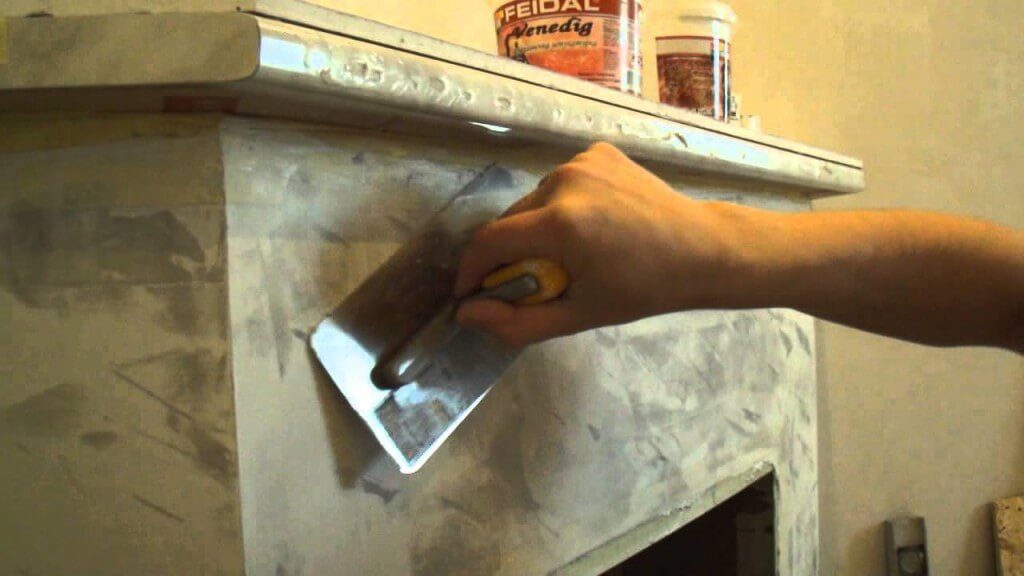
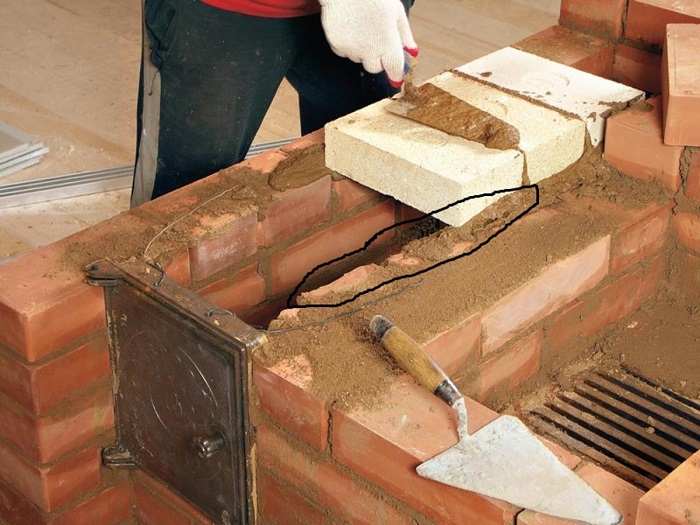
We proceed to apply plaster. Start from the top row and gradually move down. Make it with water, after that, apply the solution first first, then walk, trying to the thickness of each layer does not exceed 0.5 cm. Consistently thin the mixture from the bottom up with a sequel, and then finally align the shallow currency. As a result, the surface should be smooth and smooth, without depression, protrusions and grooves. If everything turned out this way, it means that the plaster of the Russian oven is done properly.
The complexity may occur with the design of the corners of the furnace. To facilitate the task, you need to fold metal or wooden rails in the form of the letter G and thus equalize the plaster. The main thing is that the edges of the rivers did not have a jar. When the plaster is applied at the entire angle, the rails should be fixed and leave for a while, until the solution is grabbed. Then they are removed, and the surface is aligned with a cooler.
If you do not want to deal with how to make an independently prepare a solution for plastering oven, or in the process you see that something went wrong, it is better to buy a ready-made mixture.
Final stage - decoration.

You can not create yourself difficulties and buy finished paint, the main thing is that it is designed specifically for fireplaces and stoves. Suitable water-based dyes. If you cover the oven in one color, it will have a neat look. Want something exquisite? Choose several colors that are well combined with each other, and make painting. This work must be performed before the surface will finally dry, that is, the plaster must be a bit damp.
However, in the villages they do not think about how you can paint the furnace after plaster, and simply suggest a lime milk, add to it a mustache salt, stirred and the resulting solution is applied to the plastered surface. The limeseer has a pronounced advantage: after drying, it does not dock hands and objects.
Alternative - finishing the surface with smooth or embossed decorative plaster.
How much is the ready-made plaster for furnaces?
The most popular heat-resistant plaster for furnaces and fireplaces is "Terracot". For sale at a price of 90 rubles per package weighing 3 kg. This manufacturer has many types of mixtures. To not be mistaken, consult with the seller. The cost depends on the packaging: the larger, the more economical. So, to buy a packaging of a masonry clay chamotte mixture weighing 20 kg in 322 rubles, and a bag of a similar mixture weighing 5 kg costs 103 rubles. Such prices are offered by official manufacturer dealers. Obviously, the price per M 2 depends on the pricing policy of the store, where you decide to order plaster for finishing the furnace with your own hands.
The oven with a husky stucco is unlikely to decorate your interior. That is why it is impossible to hurry with plastering - not every mixture is suitable for finishing works of such a complex object of the situation. To begin with, it is reasonable than plastering the furnace so that it does not crack and did not appear.
1 folk composition for plaster plaster
On fashion wave on country houses Choves are becoming relevant to many homeowners. You can use new-fashioned building materials, but in most cases it is much easier and cheaper to do with tested by clay solutions - the stove loves folk, like she herself, ways to give her an external beauty. Before plastering the oven, make sure that the masonry fully hardened and settled.
It is better to let the stove stand in an unsightly form of several months (so that her shrinkage occurred), than to reap the fruits of their rush in the form of numerous shrinking cracks. In addition, the stove should stick out more than once. The greater clay, the greater the composition of the solution for plastering the furnace should be sand. Therefore, the final "recipe" of the composition you still have to determine yourself, based on this indicator. For oily clay for one share you need 3-4 Sand shares!
Clay solutions are also made with an admixture of cement or lime. In this case standard solution Clay and sand add another share of one of these materials. Lime is particularly beneficial when you plan to paint it into white - in this case there will be fewer paint layers in the future. Cement makes the solution even stronger.
2 plaster Furnace clay - make a solution tightly!
Reinforcement of furnace plaster is a separate topic for conversation. And again, folk Methods By no means losing modern, the only question is that in the process of plastering you will have at hand or that it will be easier to get. Reinforcement is carried out both by adding components to the solution itself and with the help of foreign materials, for example, burlap. In the first case, chopped fibers of flax, straw, horse manure were often added in the peoples. To date, asbestos is added to the clay solution - at least one tenth lobe.
In addition to asbestos, if you are not a supporter of this material, you can add chopped fiberglass in the same ratio.
Burlakov is still used by many masters for reinforcing chimney plaster. This method has its pros and cons - such a stove cannot be overheated, but burlap is the easiest, environmentally friendly and affordable way to strengthen plaster. Burlap can be replaced with a thin grid of steel wire, the size of the cells of which is not greater than 1 * 1 cm.However, the fastening wire must be installed in the laying when erecting the stove. If this moment you missed, you will have to use additives into a solution or burlap.
3 How to twist the oven - Step-by-step instructions
Furnaces of clay looks like a whole rite of antiquity. It is not surprising, the conditions of operation of the stove are the most difficult in the house, therefore, she needs much more than the rest of the objects. Before watching the oven, prepare everything required tools Both materials: Wooden grater, container and shovel for kneading, materials for reinforcement, component of the solution.
How to launch the oven - step-by-step scheme
Step 1: I sit down the stove
Before cooking a solution for plastering the oven, prettaking it with it, so that it hurts where she is laid and warmed the walls. This rule cannot be broken even in the summer, despite the heat.
Step 2: Cooking the surface
As you follow over the surface of the furnace with a broom and a brush to remove the accumulated dust and residues of the laying solution. To improve the clutch, it is better to clean and slightly deepen the brickwork slots, but not more than half a hundred.
Step 3: First clay layer
Moisten the surface of the stove with water and apply a thin layer of liquid clay with a cluster brush. Give her a little bit.
Step 4: Reinforcement
If you decide to use burlap for reinforcement, this step is for you! Pre-sliced \u200b\u200bon the necessary pieces The fabric should soak in a liquid clay and sandy solution and shove on the stove from top to bottom as the wallpaper glue. You can combine pieces and jack, but better mustlest no less than 5 cm.
Step 5: Apply Plaster
Remember that the thickness of each of the layers of plaster should be no more than 5 mm, and the total thickness of the facing layer is not more than 1 cm. The solution should be applied from top to bottom, to a smooth layer so that the lining was dry uniformly. As soon as the plaster grabs well, it should be swallowed with a wooden grater, circular motions. If the composition is too hardened, moisten it with water. In the people, at the end of the application of plaster, it was smoothed by a cloth moistened in a liquid solution from the same composition.
After the process is completed, do not rush to pull the stove, give the layer of plaster finally dry. If cracks were formed during drying, they should be slightly expanded with a conventional knife, moisten with water and lure the same solution. If you have noticed new cracks on the surface of the furnace over time, analyze your actions - peel and crack the stove may be due to shrinkage, due to excessive layer thickness or incorrect dressing of brick series. In addition, cracks may appear due to overheating.
4 The heat-resistant mixture for plastering stoves - when it does not do without it?
The mixtures cooked independently suitable for those furnaces that give heat evenly and without strong temperature surges. If these conditions are not met (this is especially true for new furnaces that are doing inexperienced masters), then, no matter how hard you try to plaster it, because of the sharp overheating of the plaster will be cracking and crushed. In such cases, you will need a modern mixture for plastering furnaces, which is able to withstand without compromising the temperature to +200 ° C, pick up and buy which you can on any construction market.
Undoubted plus modern furnace finishing materials – these are their heat transfer, which at times exceeds the same characteristic in clay solutions. Applying such solutions is practically no different from the process. The same requirements for the shrinkage of the furnace and to prepare the surface, just also the stove should be slightly dried. It is preliminarily recommended to treat the surface with heat-resistant primer. For such plaster, the best reinforce will be with cells are not larger 2 * 2 cm.
The solution is prepared according to the instructions indicated on the package. In addition to the main solution, which will go on shuttering, prepare also the solution is not curved sour cream for the so-called "spray", it is applied to a brush to the surface for a better clutch of materials. When mixing the main solution, do not immediately make larger damps - the mixture solidified in the bucket can already be used for work. It is recommended that the stove is recommended no earlier than 3 days after plastering, and then half of its heating. Each time you can increase its temperature, gradually reaching the maximum value.
It is advisable to process the stove after the brickwork fully solids and the possibility of its shrinkage will be excluded. As a rule, the masonry dries about 5-8 weeks.
Remember that the plaster will last you only if you make a solution correctly. As a rule, plastering the usual clay mixture. However, today there are wide popularity of lime-gypsum solutions.
It is also possible to use cement-grinding or lime-grinding composition. You can easily purchase all these materials in any construction store in the form of a dry mix either to cook yourself.
A high-quality mixture for plaster should be applied with ease and easily smoothed on the surface. The amount of sand, which needs to be mixed into the clay solution depends on the degree of fattyness of your mixture.
If you use fatty clay, the ratio of the main components in the resulting mixture should be approximately 1: 3-1: 4. To increase the density of plaster on a clay basis, it is possible to add about 0.1-0.2 fractions of crushed fiberglass or asbestos.
How the process occurs
We dealt with what solution need to be processed, so that the finish does not crack. Now let's look at how to apply the plaster correctly.
Before you begin to shuffle your fireplace, it is necessary to carefully clean the surface from dust, the residues of the solution for masonry and another garbage.

It is desirable before plastering to protruding the stove and apply a solution on the warm walls.
- To improve adhesion with masonry, you must clear all the seams between the laid bricks about the depth of 0.5-1 cm.
- Watching the oven must begin from the top.
- It is advisable to thoroughly brick masonry water.
- Then, with the help of a special grater, or Kelma apply a liquid layer of solution.
- After he dry a little, you can begin to apply a thick layer.
- In order for the plaster dried uniformly, try to apply it to a smooth layer.
- After it grabs enough, but it will be slightly soft, set it down with a wooden grater
Council: Apply a layer with a thickness of more than 0.5-0.7 cm is irrational.
After you perform these operations, the surface of your fireplace or the oven must be smooth and perfectly smooth. If you notice that the surface layer is well burned, it means that the plaster did not have time to grab.
If this takes place - you need to moisten a clumsy part of plaster with a brush. Then you can continue finishing work with a wooden brush.
The thickness of the facing layer of the plaster should not exceed 1 cm.
For trim, use wooden or metal rails. Be sure to set them down. After turning the angles after 10-20 minutes, remove the rails. If necessary, correct an angle with a grater.
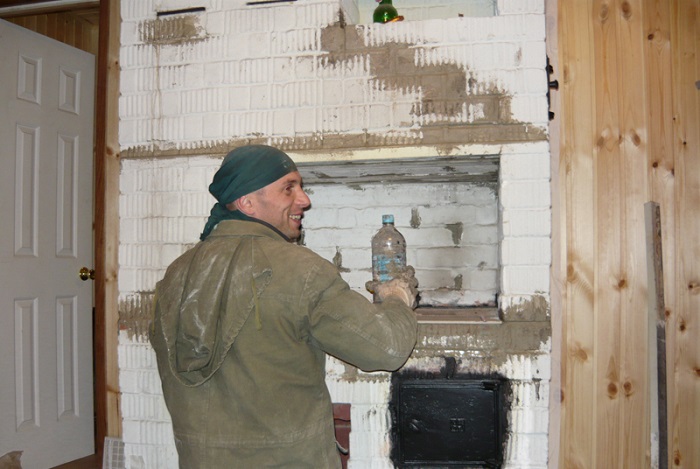
After you finish the plaster oven, it is necessary to cover the surface with lime milk. In the composition of the milk necessarily add salt.
The layer applied from the furnace either the fireplace for the following reasons:
- Wrong brick bandage.
- Too narrow or wide seam.
- Strong overheating.
Council: To prevent these problems, specialists are advised in the process of plastering to use the reinforcing grid, in which cells will not exceed 1-1.5 cm.
The grid must be installed using wire on brickwork. Wire thickness should be about 3 mm. It is advisable to make it in each row of masonry before you begin to build a fireplace.
If you do not have the ability to use a reinforced grid, you can take a burlap. It must be pre-kept in liquid clay, and the wall of the fireplace is to deceive with a clay solution.
Remember that the burlap on the furnace must be installed so that completely eliminate the air layers between it and directly the stove.
It is worth noting! The stove, covered in burlap, should not overheat.
If, after plastering, you found a crack, then you need to prepare a special solution. For sealing cracks of the masters, it is recommended to use a refractory mixture.
Such a furnace plaster is a conventional prepared mixture with the use of refractory clay, lime, cement:
- All components must be asked through the sieve.
- Clay soak for a day.
- Later pay off lime with water.
Remember that your clay solution must be homogeneous and thick.
The mixture with the use of cement is suitable for use only an hour.
Before using this solution, it must be diluted with water. Then add PVA glue and you can start plastering the pipe and the rest of the surface.
After receiving the solution, well clean the crack. It is desirable to moisten them with warm water. Then cover the surface of the stove using a metal mesh and bring it with nails. It is advisable to bring the grid in a checker order at a distance of 10-12 cm.
As noted above, the cracking of cracks must be made only on a heated stove. This is done so that the seams expand and ensure good clutch with the plaster. During the heating of the pores, the brick will be revealed, and will be effective in contact with the mixture.
If, after drying the plaster, you will find new cracks, then pray their edges and moisten with warm water. Then set with a thick solution.
After all the layers are completely dried, it is advisable to whiten the stove surface. Apply paints better on the basis of chalk or lime. It is extremely recommended to use oil compositions, since they begin to decay in the process of heating and smell unpleasantly.