Building any home always includes the construction of the roof and installation roofingensuring reliable and long-term protection at any time of the year. Permanent technological progress provides consumers a wide range of roofing materials.
Many of them successfully combine practical and aesthetically beautiful solutions, created centuries ago, with the latest scientific developments. This most brightly demonstrates a soft tile, the technology of installation and the wide possibilities of which are the consequence of the achievements of modern developers, and the unique appearance is the merit of the builders of medieval Europe.
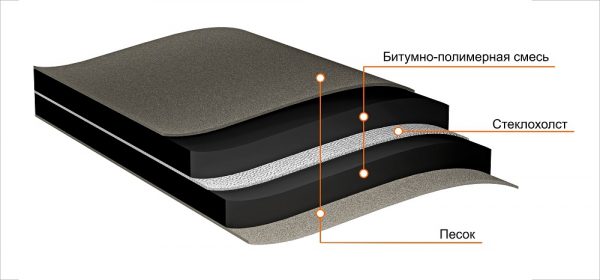
Soft roofing or is a modern material that is used to cover the roof and consists of fiberglass, bitumen and stone granules.
History, varieties and composition
Despite the fact that the first bitumen tile appeared at the beginning of the last century, she received mass distribution only in the middle of the century in America. First of all, due to the form with three petals, with the result that almost every second house was covered with such a roof.
An interesting fact is related to the title. Installation technology in all countries is almost the same, but in America, the word "shing" is more used, by analogy with wooden floral boards, and in Europe, as before, "Tile".
Modern production technology, which includes the use of fiberglass-resistant tissue, modified, with additives from polymers of bitumen and basalt coating, led to the creation of universal roofing material.
Advantages, disadvantages and extent of production
The use of any roofing coating has its pros and cons. Not exception and soft tiles. Mounting technology, high performance and wide color grades allocate it in a number of other coatings.
Among the main advantages can be allocated:
lack of moisture absorption, which automatically eliminates the destructive processes and provides reliable waterproofing;
resistance to any temperatures;
not exposure to the action of ultraviolet, in particular the lack of melting at high temperatures;
good tolerability of almost all mechanical impacts;
light and flexibility.
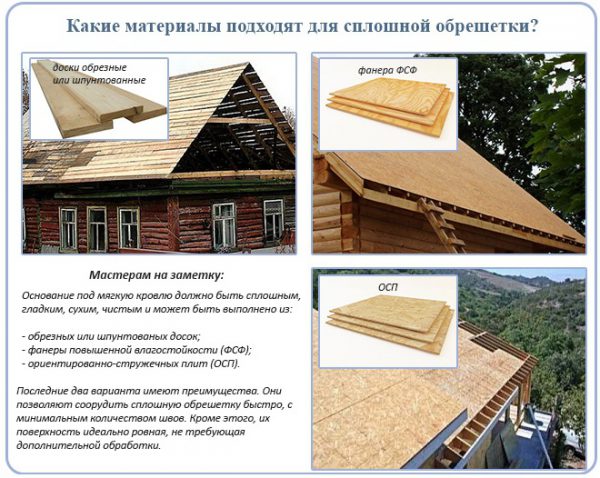
One, but significant disadvantage is the total cost of work. When a soft tile is used for coating, the installation technology includes a mandatory continuous basis, which is usually done from plywood or OSP plates. Even if the board is used, it is presented to it very hard requirements for the thickness and location on the surface. Sevective rings must be directed downwards.
Today, production is carried out in many countries of the world, mainly in America and Russia. Schinglas (Tekhnonikol), Rufleks, Dock and Tegola (together with Italy) are allocated from domestic producers.
Terminology and materials
The technology of each manufacturer has its own nuances. But all the same stages are the same. For better perception of technical information, which is contained in all instructions, it is necessary to understand the terms used by the terms and the main applied materials.
Any tile element consists of several conventional parts:
adhesive strip;
petal.
visible surface;
overlap places;
Roofing usually includes:
fronton and cornice skes;
endovma or internal angles in place of connecting two rocks;
ribs and fractures that are places of joints of two different surfaces.
The laying of the coating is made after the preparation of roofing structures, including hydro and vapor barrier, insulation, if necessary, as well as a mandatory space for ventilation.
Montaja technology soft tile implies the use of several mandatory materials:
roofing ordinary and universal start-up, applied to eaves and skates;
lining base (carpet), which can be several species;
lining base for endhouse;
metal strips for sinks and endands, as well as for adjustment, for example, to the pipe;
ventilation elements;
mastic based on bitumen and polymer additives, allowing to work without prior heating;
roofing nails.
Preparation of roofing and ventilation
When a soft tile is used for roofing, installation technology requires strict execution of all stages contained in the instructions for use.
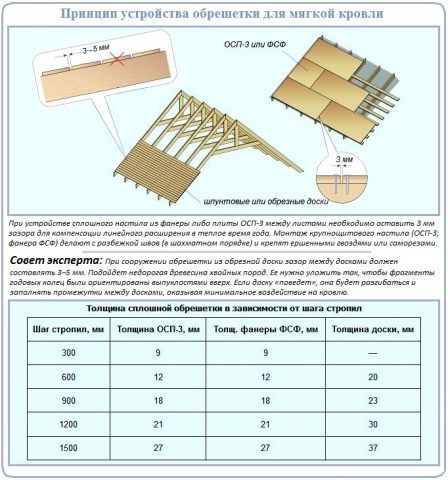
The first step is always the preparation of the roof surface for the tile laying. To do this, you can use plywood, OSP plates or edged board, which are better secured by self-drawers. The thickness of the base is determined by the distance between the raplot structures and is calculated according to the table given.
| Distance between rafted, mm | OSP, MM. | Plywood, mm. | Board, mm. |
| 300 | 9 | 9 | - |
| 600 | 12 | 12 | 20 |
| 900 | 18 | 18 | 23 |
| 1200 | 21 | 21 | 30 |
| 1500 | 27 | 27 | 37 |
For the board, the gap is left to 5 mm. In cold times, it is necessary to preserve a gap of at least 3 mm for a possible expansion under the action of temperature in the summer. The resulting surface should be smooth, rigid and solid.
Competently made ventilation has air flow, space over insulation and exhaust channels. At the same time, the outlet area should exceed 15%. Often the eaves are sutured finishing material, without holes for the tributary, which is a gross violation.
Installation and lining base
To demonstrate the main steps of the installation, the use of soft tiles "Shinglas" is used for example, which takes more than 40% russian market.
On the prepared basis throughout the perimeter, special metal eaves are fixed, often called drippers. They are installed with the allen up to 50 mm and are fixed in increasing to 150 mm zigzag. At the joints, the step is reduced to 30 mm.
After that, the installation of a lining basis begins, having small differences for rods with different angles.
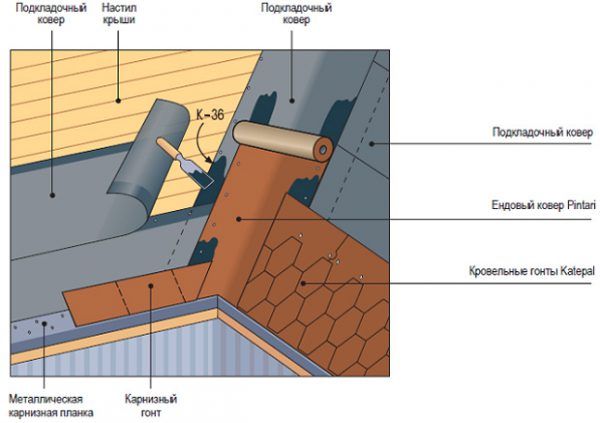
For endands and cornese soles, a rolled material is used, coated with glue composition, which is mounted to the surface of the roof and is necessarily installed throughout the perimeter of the eaves, not reaching the plank 30 mm.
In the endows, it is placed at 500 mm per side, along the eaves along the entire width of the sweep and additionally 600 mm inside the roof. The backrest horizontal is 100 mm, vertical - 150 mm. To increase reliability, the framework is fixed along the perimeter with nails in a step of no more than 250 mm.
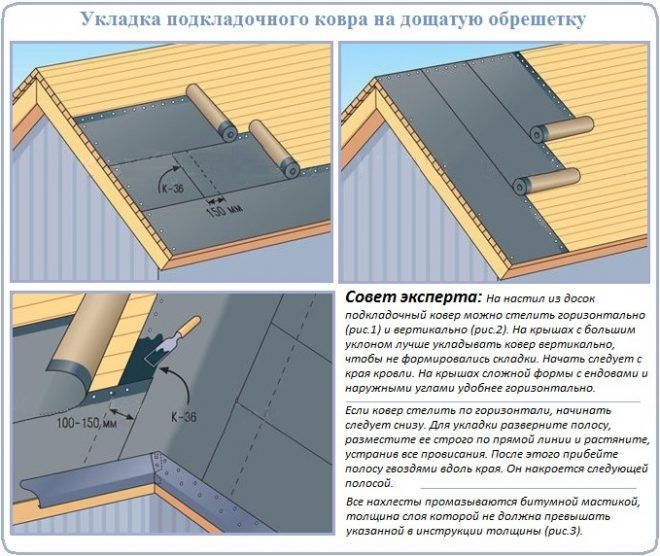
For the rest of the roof surface, a conventional lining base is used, which is stacked from the bottom up parallel to the eternity and is fixed with nails. The places of overlap are additionally processed by a mastic of at least 100 mm.
On the ribs, skates and fractures of the skates, the base is laid 500 mm per side, that is, on the whole width. For the frontones and along the compounds with walls, only half of the roll is applied equal to 500 mm.
At the end of this stage, frontal strips protecting from wind and moisture are installed. They are fixed with nails in increasing no more than 150 mm.
Installation of the protection of endanda
Endova is the most vulnerable place in the entire design. In addition, during the repair it is necessary to disassemble two roof slide at the same time. Therefore, when installing the tiles, she pays special attention.
After installing the entire lining layer, it is necessary to separately make endanders. For this, a special lining of 1000 mm wide is applied, which is laid 500 mm per side over the already fixed base with offset to 30 mm.
The edges around the perimeter are labeled with a mastic width of at least 100 mm. After gluing, the entire perimeter is additionally fixed by nails no further than 30 mm from the edge with a step of 250 mm.
If it is impossible to make the basis of a solid, the width of the adoption should be at least 300 mm with a mandatory scan of the entire area. It is necessary to have as close as possible to the top.
Preparation for laying and installing starting strip
The soft roof has its own subtleties caused by the structure and features of production. For work simultaneously uses several bundles to avoid the concentration of one shade. For the same reason, when used soft tiles, installation technology in winter time It requires work only with several packs that get out of a warm place.
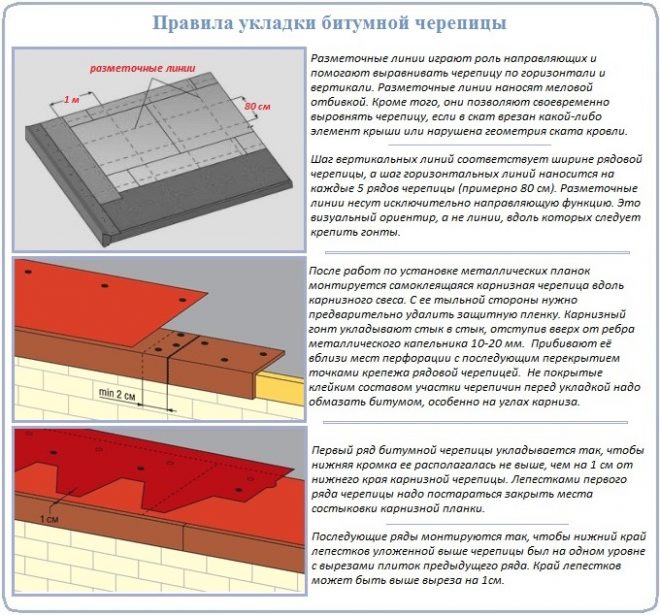
On the lining basis, it is recommended to apply a grid with a painting cord that will facilitate the installation process. The horizontal distance corresponds to the size of the 5 rows of the tiles, vertically equals 1000 mm or dimensions of one shingle. This will allow you to quickly align or simplifies the task if an additional element is present in the roof.
Installation begins from below from the center of the skate. For the starting band, a special universal element is used or a regular ordinary tile without petals. They are installed on the adhesive base on the reverse side and is fixed with 4 nails around the perimeter at a distance of no more than 30 mm. If the starting tile is used for the start without adhesive base, it must be missed by mastic.

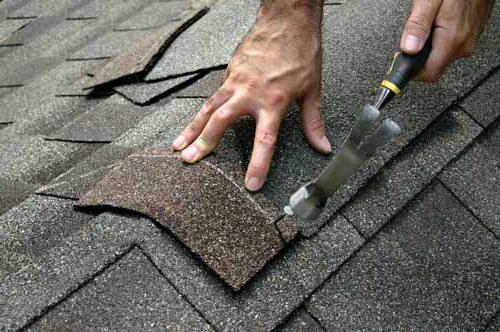
Montage tiles
Installation is made with a cut down with an indent of 10 mm from the starting element. The tile is fixed by nails along the selected place. For rods with an angle to 45 °, 4 nails are used, which are attached 25 mm from the edge and visible plot, which allows you to fix 2 elements at the same time. For 90 °, the number of nails increases twice. Depending on the shape of the petal, different options for laying, allowing you to create both a chaotic drawing and orthogonal one.
In endows, it is pre-noted by the location of the alash, from which 300 mm is retreating in each direction, they define the zone where nails do not make their way. The tile cuts into the necessary size and is necessarily fixed with nails and mastic. Middle to the ending the upper angle is cut to the out of water.
On the front of the tile is fixed without reaching 10 mm to the edge with the required cutting of the upper angle, as in Undova. Fixation on the edge is carried out using mastic, which is applied with a layer of at least 100 mm, and nails.
Pipes, ventilation and skates
For fastening to the pipe, a lining base is used for endand or metal with anti-corrosion processing. The material is starting to a pipe for 300 mm and on the ordinary tile of 200 mm with the obligatory missing of the entire area of \u200b\u200bthe mastic. After that, the tile is fixed to it, forming a yellow width of 80 mm. The top closes with metal straps, after which it is processed by a sealant.
Ventilation or others technological elements Mounted using special elements fixed on the surface of the roof using mastic and nails. After that, the tile is attached around them.
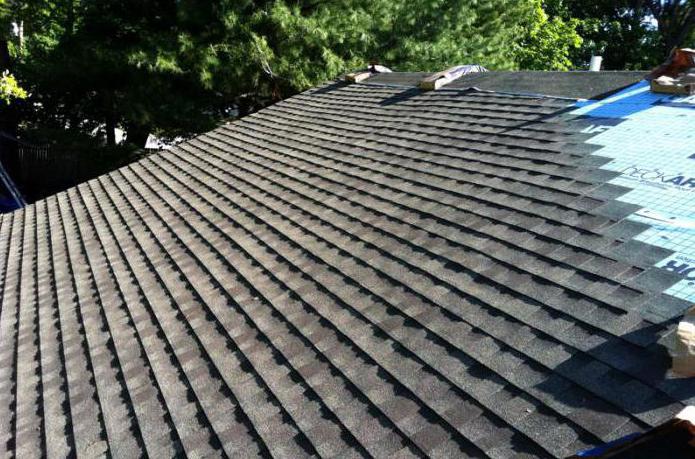
The horse is closed by a special profile, which is fixed with nails, then together with the ribs is covered with skating tiles of the same color. To obtain it, you can cut into three parts of the usual ordinary. Mounting is made from the bottom up with the allen up to 50 mm and is fixed with 4 nails.
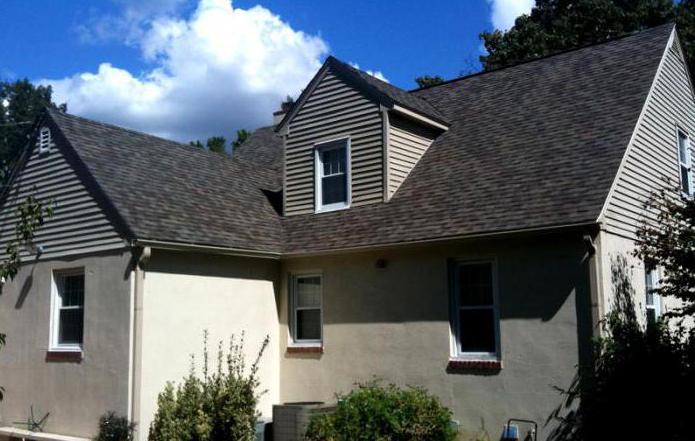
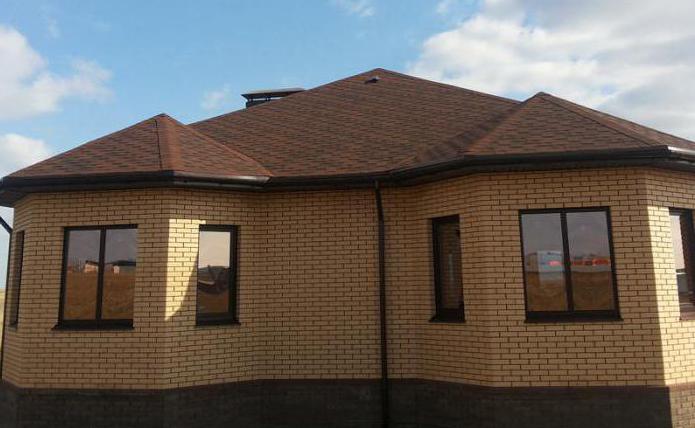
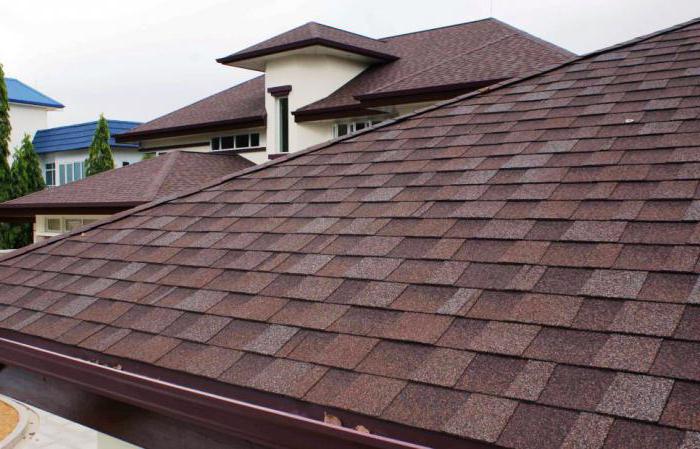
As can be seen, soft tiles, installation technology in the photo above and below it confirms, is a practical and convenient material that is deservedly popular.
Features of the tiles of different manufacturers
The technology of installation of soft tiles "Tegola" is practically no different from Schinglas. The main difference in the form and name of the elements used during installation.
Another manufacturer, "dock", distinguishes a comprehensive approach to all materials for the roof arrangement, which, in addition to the coating, includes insulation, vaporizolation and ventilation channels. Mounting soft tiles "Dock" has all the main stages inherent in the first two manufacturers, differing in the absence of a special coating for problem areas and individual color solutions.
Whatever tile is chosen, all their distinguishes high quality, available cost, guarantee and detailed instructionsresponsible for all questions in the process of installation and operation.
Many companies of the European and Russian market are engaged in the production of bitumen shots. However, before choosing a tile to arrange the roof, you need to decide under what conditions the material can be used. Despite the large number of identical qualities and properties, different roofing brands are distinguished by stability only to a certain climatic load. So, in the middle lane and in the northern regions you can lay the Finnish or Canadian tile, while the stages of the installation of the material will differ from the work in the southern mills.
How to prepare the roof
Many private houses of Canada use the tile supplied by Certainteed. These materials are offered in several versions, but the premium class sheets are considered the most presentable - they resemble or slate.
In this case, you should consider how the soft tile should be attached correctly - the technology of laying it, in general, is similar to the traditional installation of the roof, but there are some nuances:
- The American tile of Hallmark or Independens from the Shangle collection is installed only on the previously harvested crate. OSB plates are suitable for it, while the thickness of the canvase must be about 9-11 mm. Plywood is also well mounted, the sheet should be thicker than 9 mm. In general, installation is similar to installation.
- This coverage series is rather demanding, so the lining carpet cannot do. If the roof is common (from 10 to 19 degrees) or, on the contrary, cool (the angle of the inclination of about 60 is 90 degrees), then for high-quality installation it is required to carry out additional waterproofing (read: ""). The roofs with skates, the slope of which is less than 9 and more than 90 degrees, are used extremely rare, so this tile is not suitable for their arrangement.
- The design of the cornese swelling and endanders is equipped with a lining carpet from special materials. So for making roofing droplets An anti-corrosion raw material is used, as a rule, metal sheets with polymer spraying, or aluminum. Farmery plank, as well as endands are made only from metal.
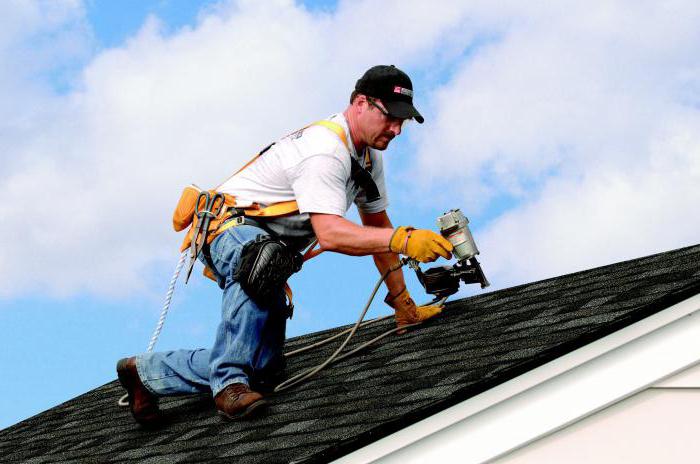
- The reliability of the entire design depends on the quality of the coating fastening, it is first glued with a special adhesive composition, and then nails nails with hats from 9.5 mm.
The number of fixing elements on 1 sheet is determined depending on the angle of inclination of the slope:
- if the mark does not reach 60 degrees, then 4 nails are enough;
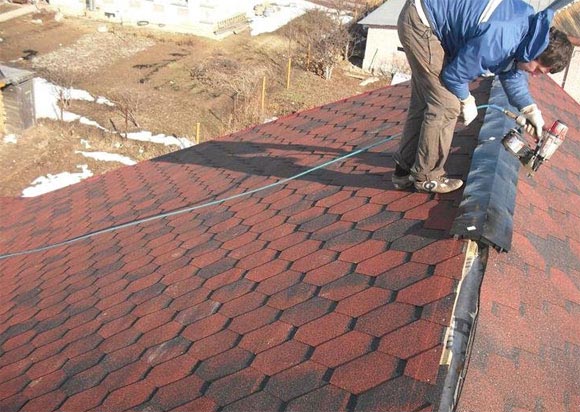
- if the inclination of the roof is 60 degrees and more, then 7 nails will need, in addition, at least a minimum, bituminous glue is applied in six places. The work is performed as follows: 4 nails are driven slightly higher section cuts, and 3 - on the corresponding laminated tongues, as shown in the photo.
Using the "Six Rows" method
E each construction company Or brigades have your own rates for the crate, flooring filling, additional processing and protection roofing elements. It is not necessary to hope for those developers who offer the lowest cost - after all, the installation technology described earlier requires high quality of work.
IN lately Roofing bituminous Tiles Acquired great popularity among developers. This roofing has an attractive appearance, not inferior by beauty traditional tile, long service life and high moisture resistance. Thanks to the self-adhesive layer on the reverse side of the shingle laying soft roof With your own hands can be performed even in the absence of professional experience. In this article we will tell you how to prepare the basis, collect the crate and strost flexible tile.
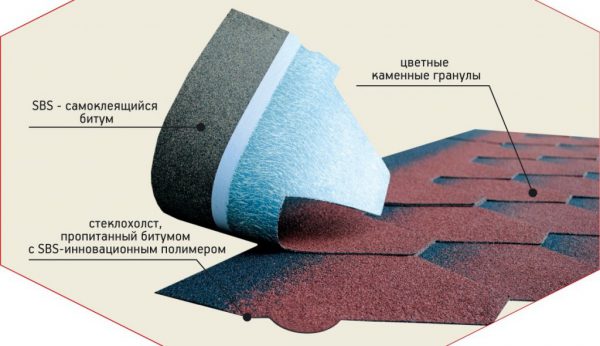
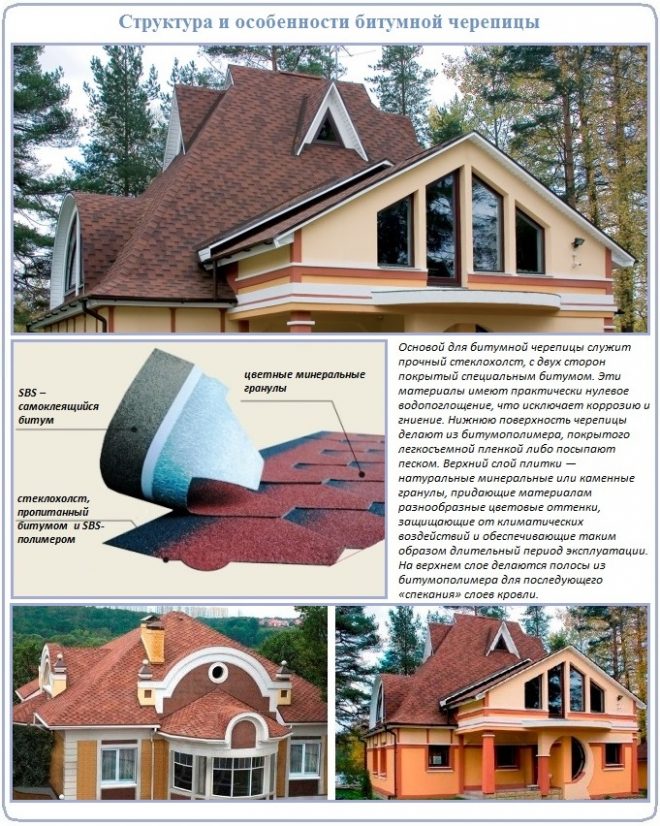
Flexible tile is called tiles with a curly edge made of fiberglass, impregnated with modified oil bitumen. Locked braziness, such a roof imitates a small-spread, but aesthetic trim coating of wooden chocks. The glass cholester, which is part of the bituminous tile, can be a simple or reinforced polyester. The production technology of this material includes the opposite side of the front side of the booking sputter from the stone or basalt crumb., Gives the color and rough circuit in the roof. The advantages of flexible tiles are considered:
- Durability. The service life of a soft roof based on a fiberglass, reinforced with polyester, is more than 70 years, which completely pays for the cost of the roof device.
- Weather resistance. The soft tile withstands the effects of atmospheric moisture, ultraviolet rays and other adverse environmental factors, while maintaining performance.
- Aesthetics. The variety of forms and coloring of the material opens up huge opportunities for creating a harmonious, solid image of the house.
- Flexibility. Flexible, elastic bituminous tile tiles are suitable for arranging the roofs of a complex shape with a large number of skates, undershones and other decorative elements.
Important! The technology of laying of bitumen tiles is distinguished by its simplicity, so it is easily performed by non-professional. Soft roofing with your own hands is a great solution for the roof of a private house, a country cottage, gazebo or townhouse.
Work features with material
Before covering the roof of soft roof, you must make sure that a reliable basis has been prepared for work. Also, the technology of installation of a soft roof involves performing work subject to certain weather conditions. If you do not comply with the manufacturer's recommendations, you can encounter the following problems:
- If you lay bitumen tiles at temperatures ambient Less than 5-10 degrees, then the self-adhesive layer on the reverse side of the tiles is not melted independently. To melt bitumen you have to use gas burner. or construction hairdryer. However, it makes it difficult and slows down the tile laying.
- If you install the flexible tile at a temperature of more than 25 degrees, the self-adhesive bitumen layer is melted too much and flows down the slope. In addition, high temperature leads to roof deformation.
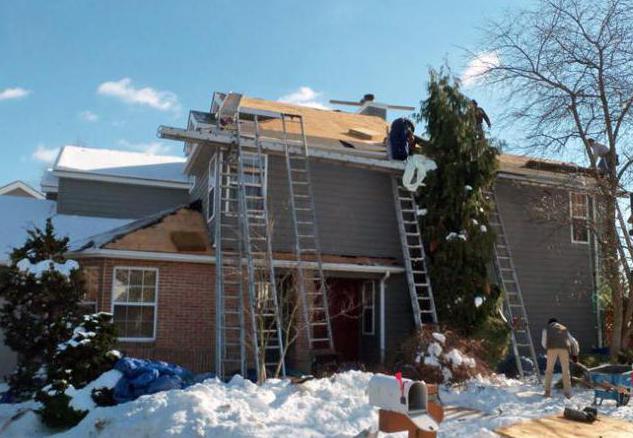
- If you perform the installation of the roof in crude weather or during the rain, the rainstream frame and the doomle take over the excessive humidity, which negatively affects the service life of the tile, leading to shockting.
Important! Mounting technology recommended by manufacturers, prescribes laying at a temperature of 5-15 degrees in dry weather. Most often, these conditions are consigned only in the summer. However, in the winter period, it is possible to collect a rafted roof frame and prepare the base for roofing flooring.
Installation of crates
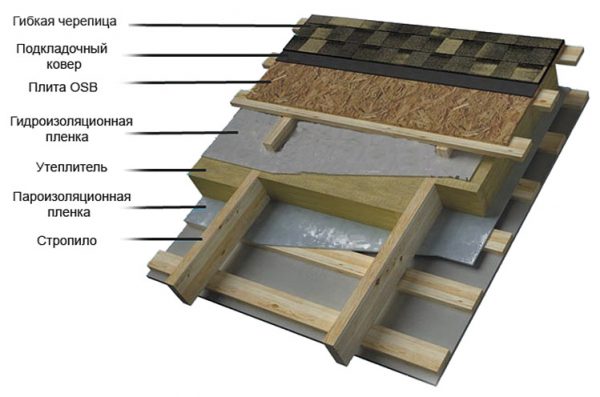
Before making a soft roof, you need to assemble a high-quality, solid crate. Bituminous tile laying technology involves the use of a solid base that gives rigidity and mechanical strength to a soft roofing coating. The lamp should provide a uniform distribution of the roof weight between the rafters, so it is created from 3 layers:
- Control. The counterclaim under the soft tile is made from wooden bars with a thickness of 3-4 cm. It is attached along the rafter feet of the frame on top of the waterproofing material. The task of the counterclaim is the creation of a ventilation gap between the roofing plated raplots.
- Rewrked doom. This element of the base under the soft tile is made of a cutting board with a size of 20x150 mm. Boards are adopted perpendicular to the counterclaim at a distance of 30-50 cm.
- Solid doom. It is made of moisture-resistant plywood, sheets of OSP or edged board, laid by a clear-dryer with a gap of 1-3 mm, compensating for the thermal expansion of the material. To prevent damage to the soft tiles, you need to take an eye or stinging the elements of the crate to be smooth.
Please note that for the manufacture of crates under the soft roof it is properly used to use up to 20 percent wood of coniferous rocks. To prevent the premature rotting of the wooden elements, with antiseptic preparations. If the construction has high risk Fireings, the crate impregnate with fireblocking compositions.
Lining carpet
Soft roofing with their own hands is placed on a solid crate made of chipboard or plywood moisture resistant. Over the base, the lining carpet is placed - lining from moisture resistant, resistant to mechanical damage to bitumen material. The lining carpet protects the roof from leaks, as well as damage to the bituminous tiles with irregularities of the crate. Coating Technology Recommends:
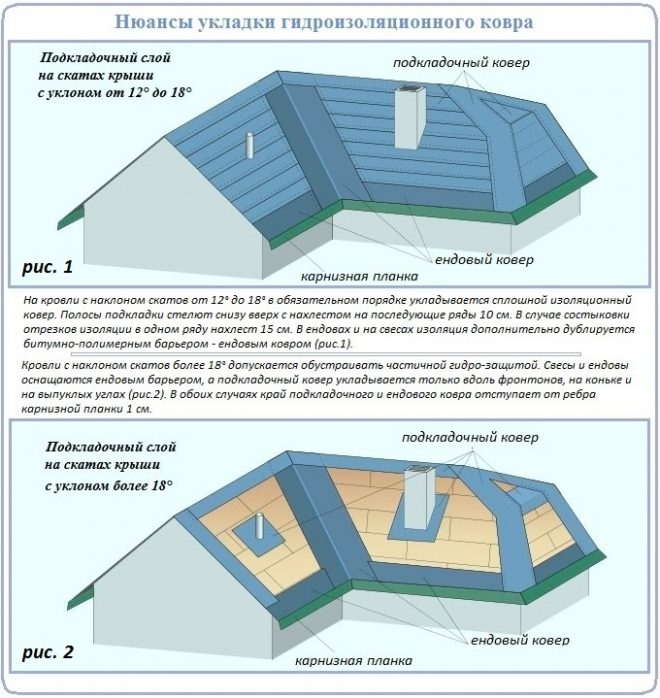
- When the roof is less than 15-18 degrees, laying a lining carpet on the entire surface of the slopes with an adhesive 15-20 cm, as water can be delayed during the melting of the snow mass of large volumes.
- With the angle of inclination of the row, more than 20 degrees, the lining carpet can be treated only in particularly vulnerable places where water can accumulate or stammer. Additional waterproofing is protected by the endands, butts of the rods with vertical surfaces, horse.
- Do not use a regular runner end as lining. Low price It does not compensate for poor quality, fragility and small service life of this material.
Experienced masters advise that the material recommends that the manufacturer recommends as a lining carpet, since it is guaranteed compatible with the selected bitumen tiles.
Laying
Installation of a soft roof is performed in a dry, weak weather at a temperature of 5-15 degrees. If the laying of the material is performed on the old rafter frame, then it is necessary to check the condition of the wood, and then replace the rotten or deformed items. Installation is performed in the following order:
- First, the skate is placed by horizontal stripes marking the location of the rows of a soft roof with a white chalk.
- Stacking material correctly start from the bottom of the skate using the starting strip. Fix the roofing coating with nails or self-adhesive layer. If the tile is self-adhesive, then it is enough to remove the protective film for it, and then tightly give it to the base of the roof.
- If nails are applied for fixing the coating, then they need to be placed not closer to 2.5 cm from the edge, as well as score to the surface with the surface of the material.
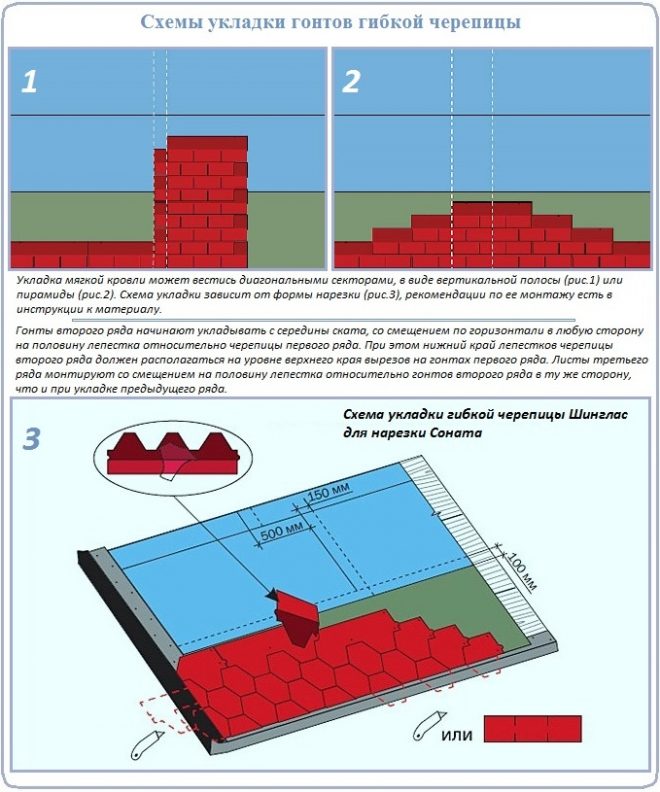
- The second row begins to lay the tile from the left side of the tile from the left side of the tile, from which 143 mm is cut off from the left edge, thus shifting the pattern of bitumen tiles diagonally.
- For the start of the third row from the tile, a fragment is cut off a length of 286 mm from the left edge to also shift the coating pattern in the diagonal direction.
- After completion, it is drawn up with a skate element, adjoining nodes with vertical surfaces and endhouses.
Note! In order for the roof of a soft tile function correctly, it is necessary to equip the ventilation system to avoid the "greenhouse effect" and reinforcing the ternary framework frame.
Video instruction
Soft roof - term combining a series of flexible roofing materials with excellent consumer qualities. Its piece and rolled varieties flawlessly protect the house from the atmospheric "misfortunes" and spectacularly decorate the exterior. Few weighing, do not require efforts in stripping and fastening. Among the advantages, solid appears to lay the coating personally. For the perfect result, it is not necessary to own the skills of the roofer. We need snarling, patience, tool and information about how the technology of laying a soft roof is different from other ways and how to properly arrange a roof.
Materials from a group of soft roofing coatings are modified variants of an old-good rooferoid. New developments borrowed from the predecessor flexibility and ease, rightly heading a list of advantages. Preserved unshakable water-repellent properties, thanks to which the wooden base and the rafter system serves longer. The composition has improved, due to which the deadlines for the impeccable work of materials increased in three times.
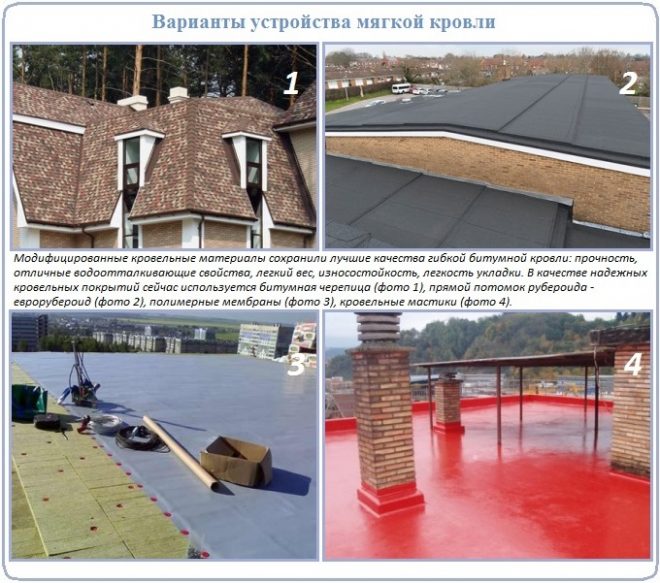
With a benchmark on the laying method, the class of soft roofing coatings is divided into three types:
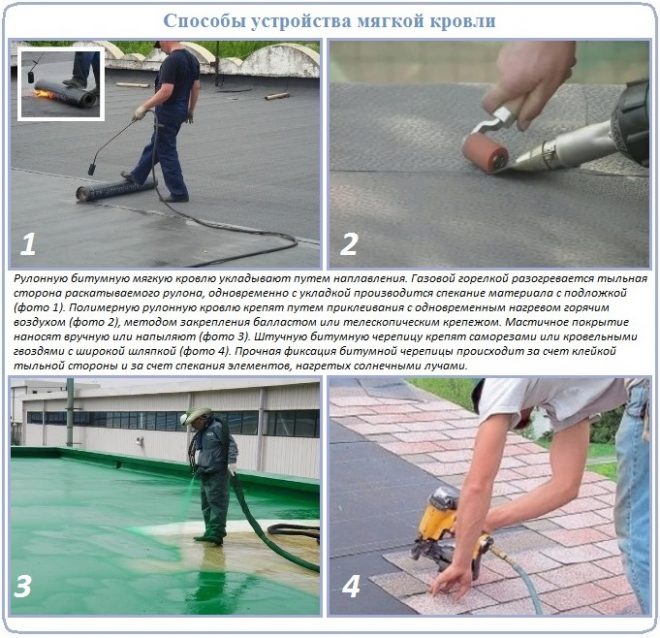
- Rolled materialssupplied in the appropriate format name. These include bituminous descendants of rubberoid and new representatives, such as polymer membranes. Rolled coatings are laid by stripes. Bituminous materials are attached by catching, polymer - by means of partial or complete gluing. With their help, they are mainly equipped with flat and gentle roofs with skates up to 3º, permissible to 9º. Rolls are in demand most in industrial construction;
- Roofing masticSupplied in the finished or in the cold form to be heated. Spoke or applied with a thick layer on flat roofsAs a result, a monolithic coating without seams is obtained. A reinforcing grid is used to strengthen. The scope of application is limited to flat roofing.
- Bituminous tilesupplied in flexible tile gear. In fact, this is an improved runner, cut into relatively small sheets. The edge of the trunks is decorated with curly petals to simulate a ceramic prototype. The back side is equipped with a stick strip intended for fastening to wooden based. Print piety. In addition, roofing nails or self-tapping screw are clogged into each shing. From the heating of the bituminous roof, the solar rays occurs sintering tiles and turn them into a solid roofing shell.
In private low-rise construction, a piece variety is actively demanding, because flat and low scanty roofs over single or two-storey residential houses Construct extremely rarely. "Flat" fate at domestic buildings, however, not every owner will decide on the purchase of membranes and mastics for the roof of the shed. It means that we will pay attention to the installation of the most popular bitumen tiles.
Step-by-step laying of bituminous tiles
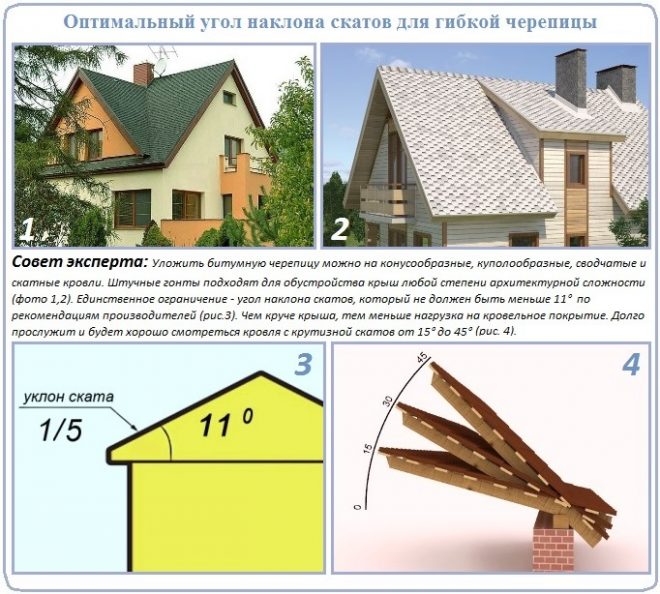
A piece flexible material covers the roofs with any steepness and degree of architectural complexity. True, bituminous tile is not recommended for roofing, if the angle of slope is less than 11.3º. The material is produced by numerous manufacturers. Each of them seeks to report its own products unique qualities and useful properties for stacker.
Despite some differences, the technology of the soft roofing device is performed along the same scheme. There are small nuances, but they are not fundamental.
Rules for the preparation of the foundation
Flexibility - the dignity and lack of bitumen coating. On the one hand, it allows you to noticeably speed up the process. After all, on the formation of the adjoints, penetration of pipes, the arrangement of endands and eaves takes a little time and at least forces. On the other hand, due to the flexibility of the material, a solid doom is required, so that the rush trunks are completely based on a solid smooth base.
Conduct a solid crate before mounting a soft roof possible:
- from OSB-3 plates recommended on the basis of budget value and sufficient strength;
- from sheets of moisture resistant plywood with FSF marking;
- from a trench or edged board whose humidity should not be less than 20%.
Sheet material stacked in the type of type brick masonry. It is important that there are no cruciform connections. It is necessary that the weak parts of the pillars of the plates are evenly distributed according to the counterclaim. In the seams should leave the gaps of 2-3mm required for free movement rafter system at temperature fluctuations.

The boardwalk is installed parallel to the sinks of the roof. Also in disintegration, if the skat does not have enough board length. The place of dusting two boards on the skate should be opened on the bar of the counterclaim, you need to score four nails in it. Private boards are attached to two nails on both sides. It is necessary to lay them so that the gap is 3-5mm between the longitudinal elements. Before working, edged boards sort. Those that are thickening should be distributed at the base of the skate, those that are easier to send to the top.
Ventilation - pledge of impeccable service
Excellent water repellent properties of the bituminous coating are caused by a meager amount of pores capable of passing moisture and air. Reliable hydro-barrier acts in both directions. Drops of rain do not penetrate inside the roofing design, but the steam does not come out. If you do not provide evaporation free path, condensate will accumulate on wooden rafting farms and crate. Those. A fungus will be headed, because of which it will have to say goodbye from a solid roof.
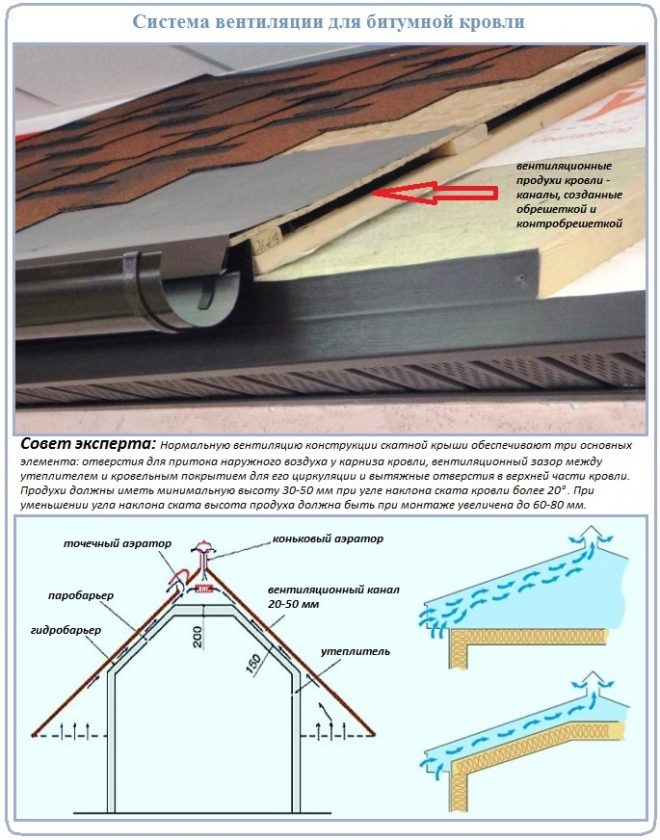
In the name of a long-term impeccable service, it is necessary to arrange a roofing ventilation system comprising:
- production intended for air inflows in the karnis area. In addition to the tributary, they are required to provide free air movement from the bottom up the planes of the skates. Production is open channels formed by cladder and counterclaim;
- ventilation gap between bituminous roof and laid over vapor barrier insulation. Designed for the overeximation of the air flow of the insulation;
- holes in the upper zone roofing cake. It can be either unclothed at the top of the rods, or specially arranged inventories with a plastic barrel resembling a miniature chimney pipe.
Ventilation must be arranged so as to eliminate the formation of air bags in the underpants space.
Laying insulating carpet
All without exceptions manufacturers of bitumen tiles are strongly recommended to retain an additional waterproofing carpet before installing the shingles. The list of materials suitable for carpet is usually indicated in the briefing. It is allowed to use the products specified or similar in characteristics.
Replacing extremely undesirable, because A coated incompatible composition will prevent the combination of bitumen layers in the monolith and will contribute to bloating. Polyethylene is excluded. Ruberoid, too, because service life flexible roof more. It is unreasonable to sharpen under the coating, designed for 15-30 years of operation, less durable material.
The technology of laying insulation carpet under flexible tile includes two options depending on the roof resistant:
- The device of a solid carpet on the pitched roofs with an angle of inclination from 11.3º / 12º to 18º. Rolled waterproofing with strips, starting from the sink, moving to the skate. Each laid laid must overlap the previous strip with their own ten, see if you need to docile two segments in one row, they are put on the allen in 15 cm. Taste carefully, but without fanaticism is missing bituminous mastic. To the base of the isolation strip is attached with roofing nails after 20-25 cm. The strips of barrier water-repellent protection in the endowes and on the sinks, as well as around the roofing adjoins, are stacked over the solid carpet. Then the bitch and convex roof angles are equipped with an initial insulating material;
- Laying partial insulation on the pitched roofs with a slope of 18º and more. In this case, the bitumen-polymeric material is protected by endands and skes, and only the edges of the frontones, bitch and other convex corners are covered with strips of insulating carpet. Insulation, as in the previous case, the places of intersection of the roof of communications pipes and roofing adjoins are used. The width of the bitumen of the polymer barrier along the sinks 50cm is equal to 1M, so that each of the protected skates accounted for 50cm. When laying around the adjoints and pipes, the insulating strip is partially set on the walls so that the material overlapped 20-30 cm vertical surface.
The device of flexible roof with partial waterproofing is allowed by manufacturers, but in their number Yarh supporters this method not. Naturally, precipitation is less detained on steep slots, but circumstances are different: Flash, oblique rain, etc. It is better to progress.
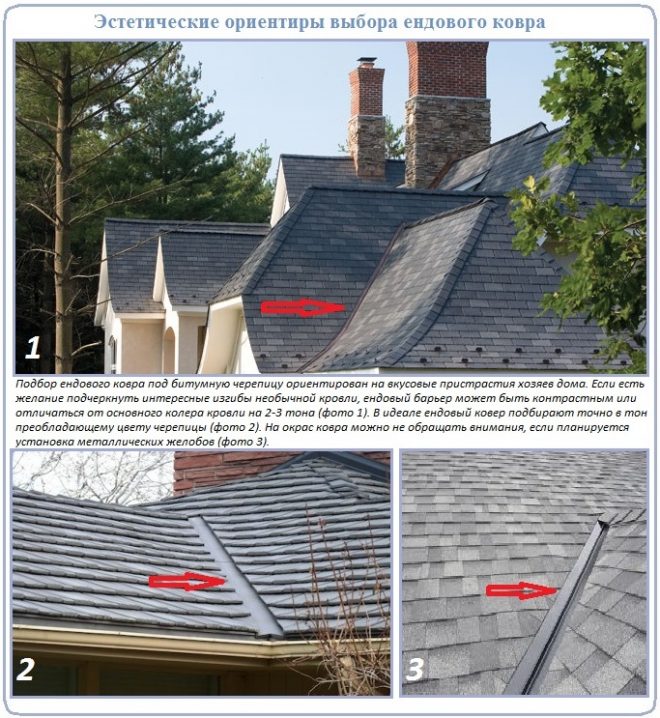
The bitumen-polymer carpet for infants is chosen in tile tone. An insignificant deviation from the flavor of the coating is allowed if there is a desire to emphasize the lines of open spaces. It is desirable that endanders have covered with a solid barrier insulation strip. But if the pile of two pieces can not be avoided, it is better to arrange it in the upper part of the roof of the adhesive 15-20 cm. There is the smallest load. Fall is mandatoryly missed by bitumen mastic.
Protecting of frontons and cornice skes
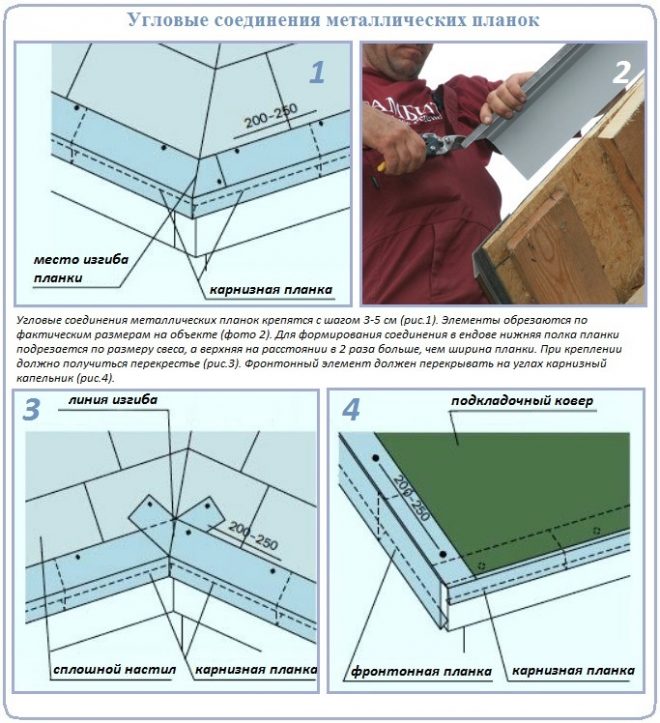
The perimeter of the roof is equipped with metal straps. They are needed to protect the weakened sections of the crate of moisture and as elements of the roof. The planks are placed on the edge of the frontones and rings. The line of the ribs should coincide with the linen of the roof abris. Fasten roofing nails on a zigzag principle after 10-15 cm.
If there is a need for dusting two slats, they are placed with the allen, which make up 3-5 cm, at least 2 cm. Fronton planks are overlapped on the corners of the roofing cornice. In the places of end and dust overlap fasteners are clogged after 2-3 cm.

Most flexible roof manufacturers advise both types of metal protection over the lining carpet. However, the developers of the brand "Shinglas" recommend the cornice planks to start the carpet, and the frontal top of it. Before installing the frontal and cornice slats on a pavement crate, they advise first to navigate the bar, and to it already attach metal protection.
Formation of passages through the roof
Crossing roof flue pipes, communication risers, antennas, own ventilation holes need special arrangement. They create a potential danger in the form of an open path for water leaks. Therefore, before mounting the coating of the place of roofing, overlap with sealing devices or systems. Among them:
- Rubber seals designed to close small diameter points. Antenna holes, for example;
- Polymeric passage elements used for equipment intersection of the roof by sewer and ventilation risers. We produce them specifically for the arrangement of the roofs. Touchs are attached to trite nails to a solid crate. Top lay bitumen tile, which are tricked around the passage and fixed with bitumen mastic;
- Plastic adapters for their own roofing ventilation. Close the holes of the openings, the skate element with the channels for the removal of evaporation, perforated devices for the eaves.
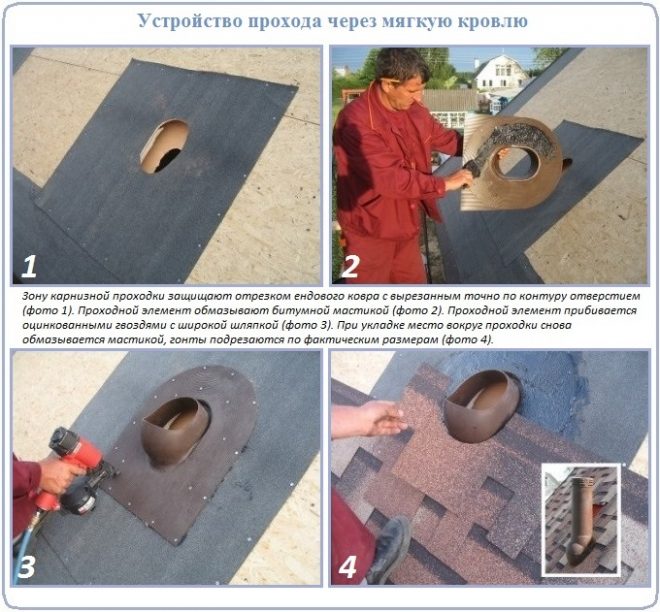
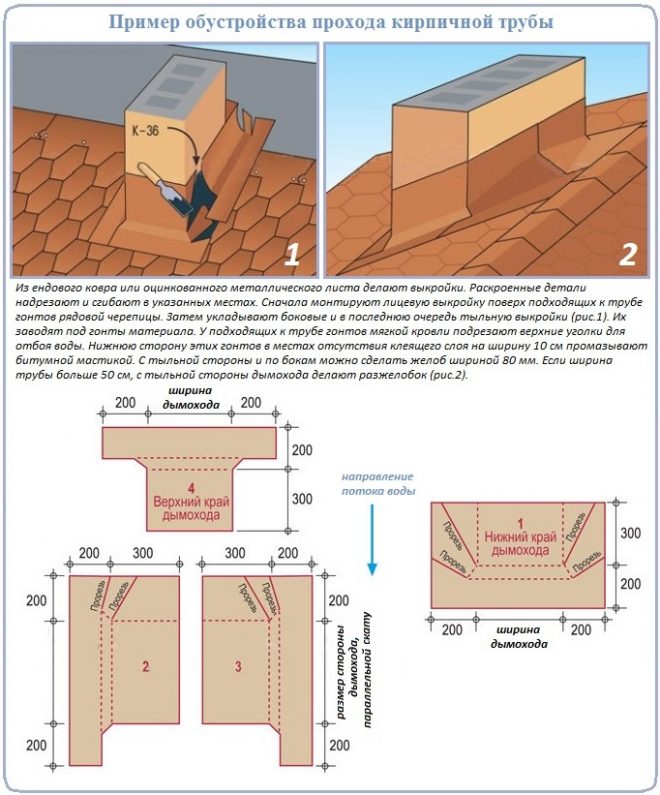
The rules for the arrangement of the passages of large-sized chimneys should be considered separately. In addition to the threat of leaks, they are also flammable. Seal chimneys in several stages:
- pipe walls are protected by parts cut from asbestos-cement plates according to its actual sizes;
- on the perimeter of the pipe is mounted a triangular strap treated with antipiren. For its manufacture, you can split on the diagonal bar. Plinth is suitable for replacement. The bar for the arrangement of the chimney will not be attached to the crate! Fix it should be on the walls of the pipe;
- put the flexible tile, the shinks on the bar;
- from the end carpet, it is cut out the details on the size of the pipe with the installed plank. The width of the parts is at least 50 cm. Fasten patterns with a 30xantimeter on the walls of the pipe on glue or bitumen mastic. First glue the facial part, then the side, at the end of the back. The lower edge is placed on top of the roof tiles, the top is starting into the trumpet on the pipe wall;
- at the end, the multilayer insulating system is fixed by installing a metal apron with the treatment of compounds with silicone sealant.
There is a simpler and cheapest way: the parts of the insulating pipe cover are cut from the carpet, but immediately from galvanized metal. Then half of the stages of work will disappear by itself.
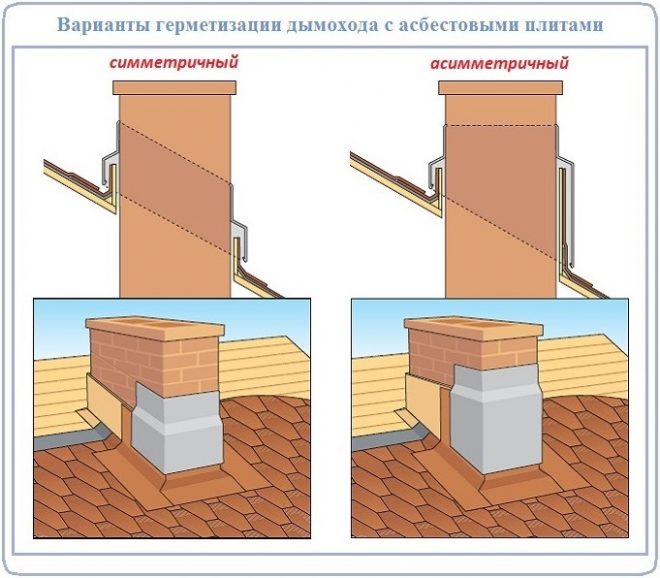
Wall adjoits are sealed with a similar method. Only in the installation of asbestos-cement protection there is no need, and the protected surfaces before arranging need to be placed and processed by primer.
Rules for laying cornisse
In order to create landmarks to stacking, the roof is better to post the coated construction cord. Horizontal lines are applied with a pitch equal to five rows of flexible tile. Verticals are fought off with a step in one shingle.
After the preparation and marking of the roofing surface, it is possible to start styling flexible tile, following the algorithm:
- the first is mounted by the carni row of tiles on Sve. You can take a special skate-carnice tile or handling the starting element itself by trimming the petals of ordinary quiet tile. From metal ribs farmery plank It is necessary to retreat 0.8-1 cm and glue an eternity shingle. To gluit from the adhesive layer, you need to remove the protective tape, and the remaining places to miss the mastic;
- the laid outdoor tile is fixed with roofing nails with a step equal to the lobe width. A wide hatch hat when climbing should be strictly parallel to the surface of the solid crate. Socials are not allowed. Close nails, retreating from the top edge of the shingle 2-3cm. Fixation sites should be overlapped by the next roof;
- the first row of flexible tiles is stacked. Start better from the center of the skate to make it easier to align horizontally. From the lower line of the starting series, 1-2 cm should be retreating and glued the already tested method. Nailed four nails at a distance of 2-3cm from the groove between the petals;
- the installation of the second row is also more convenient to start from the middle. But the shingle must be shifted so that the petal is over the groove of the first row of the tillarus and the attachment points were completely closed;
- the top corner of the tile, laid next to the fronton, is cut in the form of an equilateral triangle with the sides of 1.5-2 cm. Pruning is needed for the abundance of water.
We can continue the installation of shots according to the linear principle, i.e. Putting a completely whole row, one by one. It is possible on the pyramidal method with "buildup" from the middle of the rod to the edges or diagonally.
Two ways of the Endament device
For the formation of endanda, two ways have been developed:
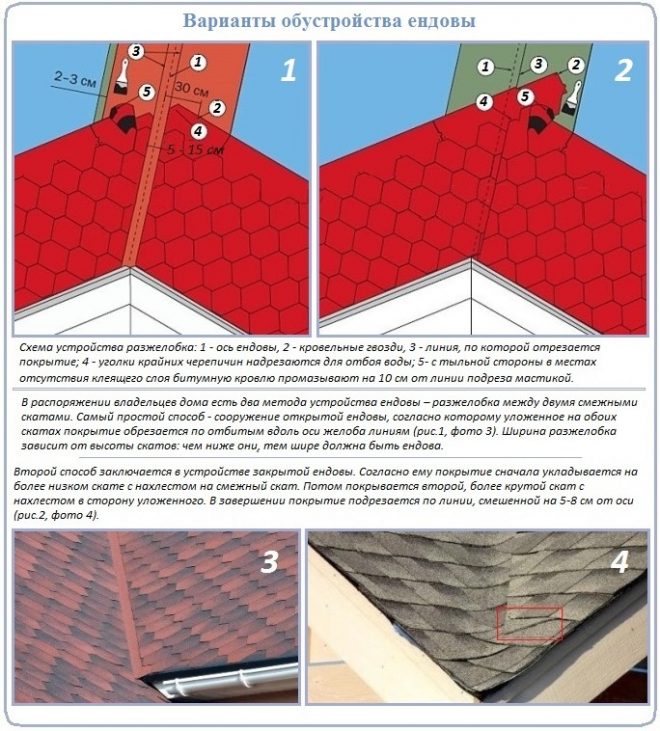
- Open discharge device. An ordinary tile is placed to the Endow's axis on both adjacent rods. Only nails stop clogging at a distance of 30cm from the axis. After laying a coated cord on the skates, endindes are fighting off, along which the coating is neatly cut. The width of the suspension from 5 to 15 cm. To the soft roof, do not cause damage during cutting under the tipper plates a plate. The roofing corners arranged near the ending the corners are trimmed to take off the water, then the back side of the coating elements is failed and glued.
- The device of a closed suspension. The tile is laid first on the skat with the smallest bias so that approximately 30cm material is located on the adjacent slope. At the top of the truncations are fixed with nails. After covering the second slope, then it is repeated on it, retreating from the axis 3-5 cm, along which cutting it. The corners of the tillarus are cut for the removal of water, after gluing the cropped loose elements on the mastic.
Tiles laying nuances on horseback
Upon completion of the installation of the tiles on the rods, proceed to the arrangement of the skate. The ventilation channels in the body of the crate should be left open, so there are 0.5-2CM gap between the vertices of the skates. To ensure ventilation, the cover is equipped with a plastic aerator. It is not too attractive, so in the glory of aesthetics it is decorated with universal skate-rice tiles or sliced \u200b\u200bfrom the shingles.
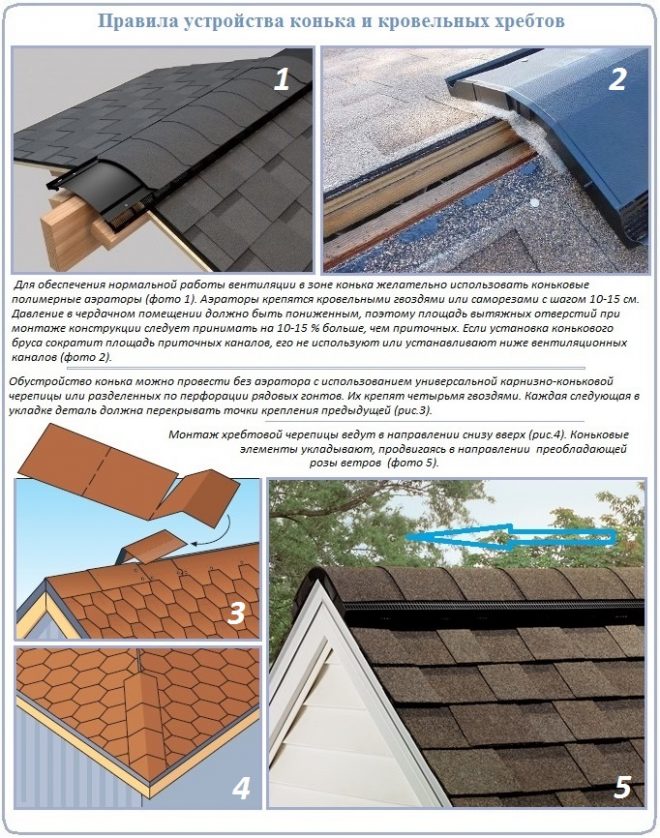
Tile 4 nails. Each subsequent element must close the previous fastener. Mounted tile on the ridges from the bottom up. The horse is shut-down in the direction of the movement of the winds so that open areas will unfold on the leeward side.
In details, the process of the device of a soft roof with explanations step-by-step technology Styling will demonstrate the video:
Of particular difficulties in the construction of a soft roof is not detected. There are technological features. If they are clearly observed, the laying can be performed independently with an excellent result.
Soft tile is usually used to arrange such roofs, the slope of which is not more than 12 °, which can be determined as a ratio of 1: 5 (height to length). The soft tile is used for both the equipment of new roofs and for the repair of old.
A similar roof on the roofs of private houses and cottages, as well as industrial, public and other buildings for purpose, and more so, when these buildings have a rather complicated geometric shape have great.
The main advantage of the soft tile is like the fact that it is possible to apply it to cover the roofs of almost any configuration, form and complexity, including the dome and roof of the bulbous form.
It allows you to ensure maximum tightness and perfectly fits into any landscape. If the tile is placed on top of the old coatings on a bitumen basis, they serve as a lower additional lining layer.
Layers
In order for the durability and reliability of the roof did not cause any doubts and complaints, for its further operation it is necessary to create a solid layer of vapor barrier and layer of insulation selected taking into account the characteristics of the temperature regime of this region. In addition, it is equally important to ensure proper ventilation of the underpowering space.
- The lining carpet serves as an additional waterproofing of less protected areas of the roof and is rolled material on a bitumen basis;
Fig. 1. Device of the roof of soft tiles
- The omene carpet is used to increase the waterproofing of the inner ohons of the roof (endands), which are most susceptible to rain and snow loads, as well as for sealing places of adjoints to vertical surfaces. In addition, it is a bitumen polymer material, and its installation is carried out with the help of sealant and roofing mastic.
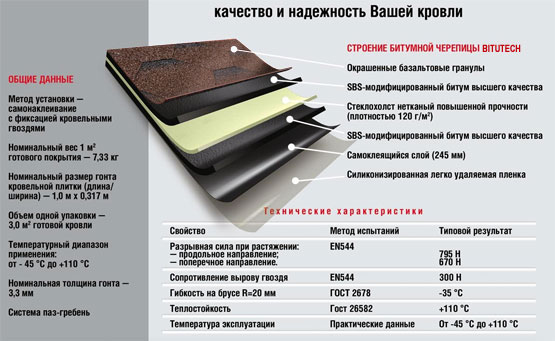
The design of the bituminous tile includes several layers at once:
- The foundation;
- Improved bitumen;
- Basalt sprinkle;
- Self-adhesive frost-resistant bitumen polymer base;
- Siliconized removable protective film.
Installation of a roof with a soft tile
Installation of soft tiles begins with preliminary preparation of the base. For soft tiles, it is mandatory for a smooth and clean solid base, called the crate. The lamp can be made of moisture-resistant plywood or oriented chipboard, however, if necessary, you can also use a conventional cutting board, preferably coniferous rocks.
This solid flooring is stacked on top of the rafted and attached with the help of self-samples.
Specialist Council: It is necessary to process rafters with an antiseptic, thereby increasing the further life of the entire design as a whole.
The step of rafters and the crate itself is largely dictated by the architectural features of the roof. In addition, constant and alleged temporary loads can also influence it, and therefore it can vary from 60 cm to 1.5 m. In turn, the step of the rafter affects the thickness of the wooden flooring used:
Council of the specialist: To compensate for linear extensions, inevitably occurring in the warm season, it is recommended to leave the gaps in 3 mm between the shell boards (in the case of using an osp or plywood), or 1-5 mm when the lamp is performed from the tank or edged board.
Installation of soft tile roofs preferably spend in the warm season. When the temperature is reduced below + 5 ° C, it is worth keeping in a warm room, and bring them from there as needed in small batches, 5-6 packs. With such weather conditions, for better fastening the soft tile, the self-adhesive side of the tiles is warm up with thermofen.
When performing installation work on the arrangement of the roof of soft tiles, all the necessary requirements of safety regulations should be observed, and while working with thermofen, use the gloves protecting hands. If the installation occurs during warm weather, you should not step on the laid soft tile, as it can lead to the fact that it will remain stains and traces. It is recommended to move around the roof skates with the help of special montertic climbs.
During the purchase of soft tiles, pay attention to the date of release and the color codes of the parties. This will allow you to sort roofing material immediately before laying and helps to achieve the same color and aesthetic external view Roofs in general. If there is such a need, various shades of soft tiles can be applied to arrange, which will allow you to create an attractive pattern designer. A rather important condition is to preserve the material for coating the roof from direct sunlight, which can prematurely destroy the adhesive layer with a protective film. Also, the pallets with the sheets of soft tiles are installed on each other.
Soft Tile Staying Order
In addition to the auxiliary materials mentioned above, for installation of soft tiles are used:
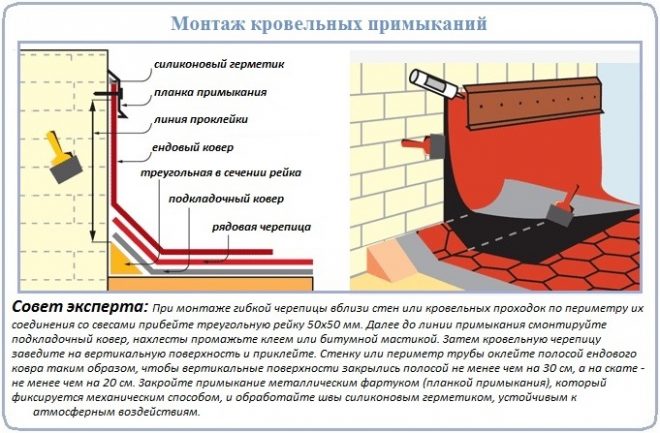
- Planks adjoiningwhich are designed to fix the omene carpet on vertical surfaces. Their installation is carried out with the help of roofing bitumen mastic, sealant and galvanized nails;
- Fronton planks. Serve to reduce wind loads on the tile of the end of the end and protect the edges of the base from moisture. Fastened with the help of sealant and galvanized roofing nails;
- Planks cornisic. Used to protect the base from moisture and enhance the cornese swells, are attached to sealant and nails;
- Roofing bitumen mastic. Serves as a sealant to sneak soft tiles, as well as a lining and fundamental carpet to the base;
- Roofing galvanized nails. A little shorter and thicker of familiar construction nails (length - 30 mm, thickness - at least 3 mm). Also have a slight-larger diameter hat (from 10 mm);
- Knife with hooks blade For cutting tiles;
- Construction hairdryer. It is used to warm up and burning sheets, so that they adjacent to the roof surface more tightly.
In order for the soft tiles to the vertical and horizontal laying, it is pre-conducted on the roof of the roofing markup, the vertical lines of which correspond to the width of the tile sheets used, and the horizontal lines are carried out in a step of approximately 80 cm (that is, about five rows of tiles).
Installation of lining carpet
On the entire surface of the roof, the lining carpet is laid parallel to the eaves from the bottom up and with the allen at least 10 cm. The fixation is carried out with roofing nails with an interval of 20 cm.
With a slope greater than 18 °, the lining carpet is fired on the cornese or end parts, endands, in places of passage through the roof mansard windows Both pipes, as well as in places of adjustment to vertical surfaces.
Installation of cornice planks
To protect the edges of the eaves from possible moistening, the lining layer is fixed with the help of cornice metal slats. They are fixed with the allen in a couple of centimeters with roofing nails. They must be clogged with zigzag, with an interval of 10 cm.
Installation of frontal planks
The edges of the crates in the end parts of the roof are protected with the help of frontal planks, the installation of which is made with an adhesive minimum in a pair of centimeters, and the fixation is zigzago-like roofing nails with an interval of 10 cm.

Fig. 2. Digital roofing of soft tiles
Laying of fundamental carpet
To ensure the waterproofing of the funds, the rope carpet is filling over the lining layer, fixing its edges with roofing nails and bitumen mastic. The choice of the color of the omene carpet is carried out in accordance with the color of the mild tile.
Fig. 3. Device of the roof of soft tiles
Sometimes it is equipped with an end with a substrate, and then the flooring begins to lay down from a smaller skate. Those tile tiles that go to endand from this slope are glued to the Endowa axis, taking into account the adhesion to the second slope at about 30 cm. The fixation is carried out by bitumen mastic or by the method of burning with the help of a construction dryer.
In turn, on the adjacent slope in parallel the axes of the Endament with an indentation of 10 cm, the tile, which goes to endand from the skate, is cut off. In this case, the upper corner of the edge cut on the tile should be cut off at an angle of 60 °.
Funny soft tiles
Flexible tile starts to mount just with the laying of the cornice tiles on the cornice skelet. The onset tiles itself is a bandwidth of 19.5 cm, obtained from ordinary tiles with cut-off petals. A self-adhesive layer is recommended to shoot directly before fixing the next sheet. Sticking the cornese tiles is carried out with an indent from the cornice plank up to a pair of see. It is glued by the method of the joint-b-joint and nailed closer to the methams of perforations. Fastening locations are further covered with ordinary flexible tiles.

Fig. 4. Roofing of soft tiles
Laying Private Soft Tile
In order to subsequently there were no obvious differences in the color of the tiles of the stacked soft tiles, the installation should be carried out after the tiles of several packages will be mixed. It is necessary to start from the center of the eaves, gradually moving towards the roof ends.
After the protective film is removed, the tile tiles do not need to be placed on other tiles!
The fixation of each of the tiles of ordinary soft tiles is carried out using 4 roofing nails clogged by 2-3 cm above the groove line. If the flexible tile is mounted on a roof with a bias above 45 °, the fixing is carried out using 6 nails on each tile.
The first row must be positioned in such a way that its lower edge retreats to about a centimeter in relation to laid to that cornice tile, and the joints of the sheets of the latter should completely overlap the tile petals.
The laying of each subsequent layer of soft tiles is carried out by observing the following condition: the ends of the petals of this layer must be located either at the level of cuts of tiles laid earlier than the row, or be located just above. At the end, the roof of the excess is cut into the clove with the edge, after which the end parts are sampled by flexible mastic on a width of at least 10 cm.
According to endowers, the trimming is carried out so that the open strip on the bottom of the end of the width is approximately 15 cm. To avoid damage to the roofing coating, the trimming must be performed on a substrate board or plywood.
Laying of ridge soft tiles
For the riding part of the roof, a soft tile is required with sizes 0.25x0.33m, for which the cornese tile along the perforation line is separated into three parts. After removing the protective film on the horse, after removing the protective film, it is necessary to perform in parallel to it with a short side of the tiles, fixing them on each side of the skate of the nail pair. Each subsequent sheet is stacked with an adhesive 5 cm on a sheet previous, thereby closing the nails hats.
Installation of adjustment planks
In those places where the roof will connect to chimney and other vertically recessed planes, the installation of soft tiles is carried out as follows.
- Initially, in all places of compounds, triangular rails 50x50 mm are nailed, on top of which the lining carpet is filling, fastening it with mastic.
- Following the tile of the ordinary tile, it is necessary to have the edges to enter the vertical surface at least 30 cm, after which they are fixed using mastic.
- This adjoining is then covered with a metal strip of an apron of an apron, and silicone sealant is used to secure, due to which great stability is achieved with respect to various natural phenomena.
Fig. 5. Digital roofing of soft tiles


