Soft roof is a long-acquired type of coating for most people. Not so long ago, one of the most widely used materials for coating roofs of various designs was the usual runner, which also refers to this category of roofing flooring. In fairness it is worth noting that the old runneroid did not differ in particular strength and high performance characteristics, so it was required periodic repairs.
Today, thanks to the new technologies that have appeared, soft roofing material Constracted significant upgrades. It is produced in various versions, including in the form of bituminous tiles. Such coatings already have long service life, combine high quality, excellent waterproofing characteristics and a very elegant appearance. Therefore, many people do not guess that the modern soft roof is all the same runner, only produced in advanced variations.
The technology of laying soft roofs from bituminous tiles is quite complex, and requires a lot of quantities. different materialsSince the design of such a coating consists of several layers, therefore, they deserved the name " roofing cake" Therefore, if it is decided to produce self installation Coatings from this material, it is necessary to carefully examine all the recommendations that should be adhere to when performing work.
Before making a decision on the choice of precisely the soft roof, it is necessary to have an idea of \u200b\u200bthis material, appreciate its advantages and disadvantages.
Advantages of soft roofs
There are various types of soft roofs, but they all have very high physico-technical and operational characteristics:
There are several moments that can be called the shortcomings of this roofing material, but they are honestly, very conditional. So, to such "minuses" can be attributed:
- Quite complex installation of "Roofing Cake", requiring accurate compliance with all technological recommendations.
- Any soft roof is placed only on a solid solid base. And this, in turn, will entail additional work and, accordingly, expenses.
However, as you can see, negative sides in the arrangement of a soft roof - much less, and therefore, more and more often the owners of mansions stop their choice on it.
Different types of soft roofs
Soft roofs include several varieties of materials, which can be easily found on the Russian market - this is a flexible bituminous tile, rolled soft roofing of various types, and erectifier (ondulin).
Rolled soft roofing
Rolled roofing materials are divided into several criteria. So, the following varieties of coatings are produced:
- Homeless and having the basis for coating.
- The basis for roofing roll Materials Can serve - fiberglass, asbestos fiber, cardboard, polymers, or several materials in the complex can be used for it.
- The roofing material can be equipped with various protective layers - small-scale or coarse-grained mineral crumb, dust-like or scaly powder.
In addition, rolled coatings can be separated by the form of base and installation method:
- Self-adhesive coatings. Such a material has a layer of adhesive composition, applied to the back side of the canvas and protected by a special membrane, which is removed immediately before installation of the coating.
- The glued canvas. These coatings are placed on mastic different wayswhich is called hot and cold. But in any case, the material during installation is heated to a certain temperature.
- Covered coatings. This type of coatings is fixed on the roof surface using gas burners. The flame of the burner melts the composition applied to the back of the material of the soft roof, after which the coating is rolled. Such a type of coating, which is properly laid on the prepared surface of the roof, makes it almost hermetic and resistant to leakage. In addition, this type of material is considered the most durable from all rolled options.
Membrane rolled roofing
The membrane coating is a high-tech material that can be manufactured on different bases: polyvinyl chloride (PVC), synthetic rubber (EPDM), thermoplastic polyolefin (TPO).
- PVC membrane, reinforced with essential fiber and has plasticizers in its composition, has high elasticity and resistance to temperature drops. In addition, the material does not fade in the sun, fires, produced in the range of colors, and also easily and quickly mounted on the surface. However, this coating has its drawbacks - it does not differ in resistance to organic solvents, to bitumen and oils. In addition, when heating the PVC coating is capable of toxic substances to the air, because it is not environmentally friendly.
- The EPDM membranes, made on the basis of rubber and reinforced with polyester grids, have high elasticity and resistance to various solvents.
The negative qualities of this material can be called that its installation is made with the help of glue, and joints over time, under the influence of external factors, can diverge, therefore the roof will begin to leak, as the coating will lose its tightness.
- The TPO membranes produced on the basis of thermoplastic polyolefin may have reinforcement or produced without it. Polyester or fiberglass is used to reinforce this material. The material of the material is welded with a hot air, and at the place of welding it is formed quite strong and reliable seam. Therefore, the coating has a long service life, high strength and resistance to negative temperatures, reaching up to - 60 degrees.
The disadvantages of such a coating include its low elasticity and sufficiently high cost, compared with other membrane materials.
Briefly - On the principles of flooring membrane roofing material
There are four main methods for mounting a membrane roof - it is a ballast fixation, mechanical mounting, sticking and welding with hot air.
- Ballast fixing Used in the event that the roof has a small bias that does not exceed 15˚.
In this case, the canvas stacked on concrete base flat roof or on a layer of laid thermal insulation. Then the material is stretched, fixed throughout the perimeter, the joints of the sheets are connected by welding or special glue.
Then, a ballast of pebbles, gravel or rubble is stacked on top of the membrane.
- Mechanical assignmentit is made if basic structure Not designed for the weight of ballast.
The basis for mounting the membrane this way can serve as wood, concrete, profiled sheets, as well as any other material.
The basis is laid and fixed by a layer of insulating material. Most often, the mineral basalt cotton wool is used for this, specially intended for such an application, from top to which the membrane is extinct. To fix materials to the base, disk or telescopic attachments are used, which are installed on the joints of the sheets laid by the penetration of 80 ÷ 100 mm.
- Sticking membraneit is performed on high-quality glue mixes that are characterized by good strength. The material is glued only around the perimeter of the canvas, at the joints and in problem places, for example, around chimneys, on ribs, endowes, etc.
- Hot air membrane welding- This method more often A total is used to fasten the sheets of membranes.
The work is made with the help of a special apparatus, which squeezes two canvases, laid by penetration, with a roller and hot air, the temperature of which comes to 600 ° C. The welded junction can be from 20 to 100 mm wide than the reliability of the connection and the guaranteed sealing is ensured.
EuroShorter or Ondulin
Another option of roofing material, which can also be attributed to the category of soft roof - it is Ondulin or Evrosurifer. This light and reliable wave-like material made from bitumen fiber mixture with the addition of mineral and polymer additives. Roofing sheets are easily mounted and typically differ in a very long service life. The material is made in various shades of calm tones, of which you can always choose suitable for a particular design of the facade.
Installation of this material can be made not only on a continuous basis, but also on the crate made from the boards of a width of 150 ÷ \u200b\u200b170 mm, fixed in increments of 200 ÷ 250 mm.
Ondulin is the only material from the soft roof category, which has a sufficiently rigid embossed structure, so and can be fixed on the crate.
Mounting ondulin, as well as any wave-like roofing material, is carried out from the cornice. The upper rows are stacked with the flax on the lower on the lower on 250 ÷ 300 mm, and the adjacent sheets located in one row are mounted on the vehicle, one wave. Atdulin fastening is made by special screws with waterproofing gaskets and special lids. They screw in every crest of the waves on the eaves and the skate, and in the middle of the skate - in a step of two ÷ three waves.
Flexible bituminous tile
Bituminous tile can be safely attributed to the most popular kinds of soft roofs, as it is distinguished by aesthetic appearance, a variety of shades and forms, strength and durability.
The tile is produced on a fiberglass basis, which is impregnated with high-quality bitumen, from top to which mineral crumbling of various colors is applied. The upper mineral spraying performs not only the decorative function, but also protective, as it prevents mechanical damage to the softer lower layers. Tile is used to cover houses with ache roofs of any size and configurations of any degree of complexity.
Since the most sought-after material from the soft roof category is a bitumen tile, its installation and will be considered in more detail.
Installation of a roof with bituminous tiles
To begin with, it is worth understanding the roofing "pie", which must be mounted under the floor soft tile. It is very important to accomplish this work correctly, otherwise the roof will be deprived of reliability and will not last long time, and in the premises it will be impossible to maintain a comfortable microclimate.
Approximate sequence of work
To comply with the sequence of installation of all elements, it is best to draw up a list of all works in order:
- The first step is to install rafter system.
- Further, on the part of the attic on the rafter, a vapor barrier membrane is fixed.
- On top of vaporizolation, also on the side of the attic, the lamp of the bar is fixed on the rafter. It is needed for the subsequent installation of the inner lining of the attic room, fixing the membrane and creating a tight base under the laying of the insulation.
- Next, laying between the rafter feet of insulating mats. Usually, mineral basalt wool is used for this.
- The insulation is closed by waterproofing roofing membrane. It is fixed on rafters.
- The membrane is pressed against the terminal legs of the contacts.
- Next, it is necessary to install a rarefied crate - the foundations for the flooring of a solid base.
- Moisture-resistant plywood or osp are fixed on the crate.
- A solid plywood liner is covered with a lining carpet.
- Next, laying soft bitumen tiles is carried out.
- The fixing of the drainage system, the covering of the cornese swelling of the anti-moskit grid, and then can be carried out by clapboint or sofita, can be carried out at various stages of installation work - as it will be more convenient to the masters.
Calculations of the crate system under the soft roof
Now knowing the approximate sequence of the installation of "roofing pie", there is a need to consider them in more detail, as there are nuances that are important to consider performing these sufficiently complex technological operations.
The first thing to determine is what parameters should have elements of a rafter system and clamps, and with what step they are installed.
Let's start with rafters. The cross section of the bar from which they are made, depends on the steepness of the skate, possible external loads on the roof and from the installation step of the rafter feet. Dependency is expressed in the following.
External loads include the weight of the structure itself, with insulation, crate and roofing material, a lot of possible snow applications in winter time and impact of winds. And snow, and wind loads are strongly dependent on the steepness of the skate, and with increasing angle of inclination, the significance of snow gradually decreases, but the wind farm increases.
The total load, expressed in kilograms per square meter, should evenly distribute on the rafting legs. And this, in turn, depends on the steps of their installation - the more often they are located, the smaller the load falls on each running meter of the rafter timber, and the less it may be its cross section. If you know the value of the distributed load, the table is easy to determine the parameters of the required material.
There is a sufficiently complex physico-mathematical algorithm for calculating the distributed load on the rafting legs. But I will not tire the reader abundance of formulas and tables, and we will offer to use a convenient calculator. The source data for the calculation will be:
- region of construction;
- the steepness of the roofing rod, degrees;
- roofing material;
- Features of the location of the house on the ground and its height.
In the last calculator item, it will be necessary to put the estimated step of the rafted installation. By changing this value in a large or smaller side, you can define the optimal load distribution. And then, on the table, knowing the length of the rafted, pick up the required section of the bar (logs).
Two map-schemes are attached to the calculator, which makes it possible to determine the zones of the construction region in the level of snow and wind load.
Calculator calculating distributed load on rafting legs
So, for starters, the schemes are determined by the zones:
Now we substitute the known values \u200b\u200bin the calculator - and we get the result
The technology of laying soft tiles is quite simple and does not cause special difficulties and, if you follow the instructions, as well as have some skills in construction, it is possible to install the bitumen tiles with your own hands. Properly produced laying of such a coating is not only excellent housing protection from adverse weather conditions, but also an excellent appearance of the roof itself.
Weather
According to the instructions, the flexible tile is recommended to lay in warm dry season, at a temperature not me + 5ºС, but it's better to still + 10ºС. It is necessary so that under the action of heat, the sheets of bituminous shingle are better glued together and with the base, forming a practically monolithic coating layer. At low temperatures, sheets become fragile, poorly bend, therefore winter is not the right time to work with such a type of coating, but if it is planned to lay the bituminous tiles in winter and the air temperature is less than + 5ºС, then you must necessarily withstand the material at room temperature and use the construction Hair dryer hair dryer and bitumen mastic for better sealing of layers. In winter, it is better to produce partial roof repair, and not a full installation on the entire surface of the roof, especially if the laying of the flexible tiles is made with their own hands.Blope roof
Installation of flexible tile, it is advisable to spend on the roofs with minimal bias 12º-18º. If the slope is less or the roof is flat, it is better to choose a different type of coating, since the inevitable stagnation of water will lead to a quick roof damage.Main stages of soft tiles
Base, ventilation
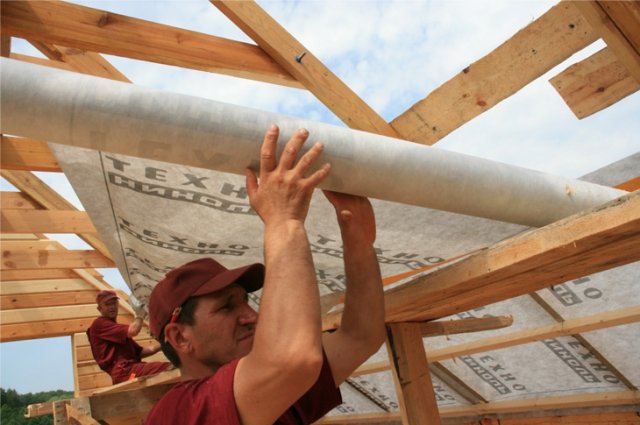
Any type of roof mounting begins with the preparation of the base. As a base for laying "bitum", a solid solid basis is used. It should be smooth and solid, since the slightest irregularities will inevitably affect the appearance of the roof. The ideal coating is considered OSB -3 plate.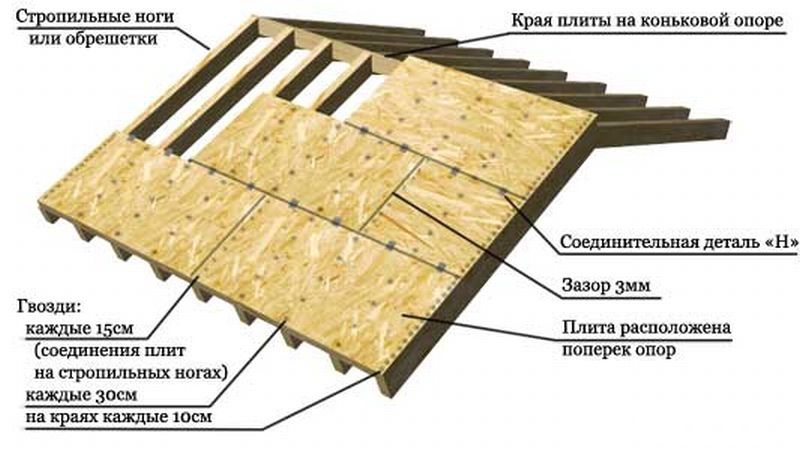 Mandatory condition for the long service of the soft roof is the right ventilation on the principle "bottom up". At the bottom of the skate, the ventilation holes are made through which the air flows, and it is pulled through, so-called, skate products or aerators.
 Features of laying lining layer
Installation of soft tiles is carried out on a special lining carpet, desirable to the same manufacturer as the tile. If the angle of inclination of the roof is minimum, i.e. 12º-18º, then the lining carpet needs to be laid on the entire surface of the roof. Mounting the lining layer starts from the bottom of the roof, parallel to the cornice line. The layers are superimposed on each other: the upper layer must be found on the lower 20 cm, the edges are melted with glue and nails nails with wide hats. You should pay attention to the good tension of the carpet! In the case of inclination of the roof, more than 20º can be laid, only on the cornese skes, skates, in the junction of the rods (endand), around the pipes, i.e., on "problem places", where the probability of leakage is large. In this case, the carpet can be mounted and vertically. Also vertical carpet mount can also be used for roofs with steep slopes. In any case, before installing the lining layer, the base is better to lift with bitumen mastic. Then, when heating the carpet with a hairdryer, the lining is perfectly connected with the base and a solid coating is obtained. The correct base and a qualitatively laid lining layer affect both the appearance of the roof and its protective functions. Use a hydrobrier as a lining material, the runneroid is not recommended.
The protection of the "edges" of the roof
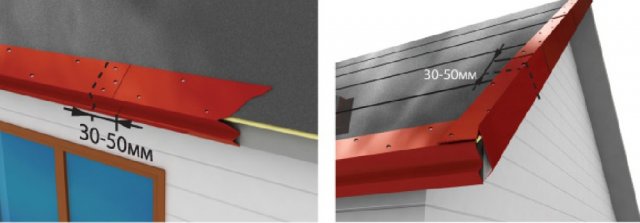
For the outflow of water and the protection of the wooden elements of the roof on the sink of the roof over the lining, the installation of metallic eaves. They should be attached to the nails in a chess order and connect the brass by 5 cm. The same strips are attached to the same way. These elements reinforce the sinks, protect wood coating From precipitation, wind resistance increases and give a complete appearance.
Marking under flexible tile
If the laying of soft tiles is performed for the first time, it is better to pre-mark up to avoid the curvature of the rows. A blanket is made on horizontal and vertical lines with increments of 0.8 and 1m, respectively. This markup will help to align the ranks horizontally and vertically, as well as fix curvature if some item is mounted in the roof: a pipe, a window. Bashed tile strictly for these lines. Only observe the direction! It is necessary to mix multiple packages with a tile so that the roof covering looks homogeneous, since in different parts there may be different shades that cannot be noticed immediately. At the beginning, at 1.5-2 cm from the edge of the cornice plank, the self-adhesive cornice tile of the joint in the joint is attached, additionally it is nailed with nails with wide hats. You can take a conventional ordinary tile, and cut the protruding parts, the so-called petals. The first row begin to be attached from the center of the skate towards the end of the roof in both directions. If the installation of flexible tiles is made with his own hands for the first time, then the sequence of actions should be followed:- Remove from the bottom of the sheet a film (after that you can not fold the tile on each other).
- To apply to the surface and secure the four nails on "recesses" at least 2 cm from the edge. If the bias of the roof is large, then you need to fix six nails - two to drive around the edges of the sheet for additional fixation.
- The following series apply to the previous one so that the "petals" of the upper sheets were found on the recesses of the previous series and formed a solid straight line with them.

Registration of "problem" places
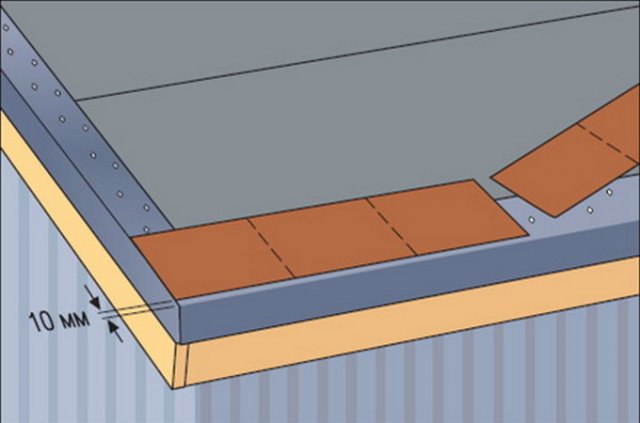
- Reached face plank, soft tiles need to be trimmed with a plank and smoke with bitumen sealant or glue on a width of about 10 cm.
- When laying in endows, the tile is laid in the neck of the adjacent scat and is cut under one line, hesitated additionally a hairdryer and is sampled with bitumen glue.
- Around the pipes, the outputs of the antennas and in the places of fitting soft tiles to the vertical surfaces should be used to use a metal apron and be sure to further miss the seams with bitumen sealant.
Konk
A corneal tile is fastened for the roof cover, divided into three parts. Each part bends under the desired angle. You can start laying from any side of the skate. The sheet is glued to the lip of the self-adhesive side and nails four nails. The next (top) tile must be putting the brass on the lower 5 cm to overlap nails. The extreme sheets are lined. Everything, the roof is ready!
 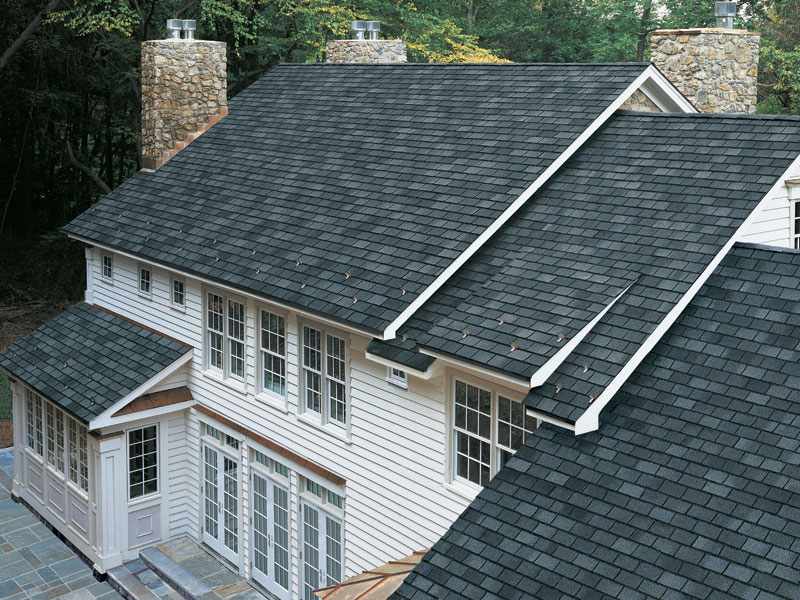 But most of the issues arise in the process of work, so it is worth familiar with the video of the installation of flexible tile.
Soft tile is usually used to arrange such roofs, the slope of which is not more than 12 °, which can be determined as a ratio of 1: 5 (height to length). The soft tile is used for both the equipment of new roofs and for the repair of old.
A similar roof on the roofs of private houses and cottages, as well as industrial, public and other buildings for purpose, and more so, when these buildings have a rather complicated geometric shape have great.
The main advantage of the soft tile is like the fact that it is possible to apply it to cover the roofs of almost any configuration, form and complexity, including the dome and roof of the bulbous form.
It allows you to ensure maximum tightness and perfectly fits into any landscape. If the tile is placed on top of the old coatings on a bitumen basis, they serve as a lower additional lining layer.
Layers
In order for the durability and reliability of the roof did not cause any doubts and complaints, for its further operation it is necessary to create a solid layer of vapor barrier and layer of insulation selected taking into account the characteristics of the temperature regime of this region. In addition, it is equally important to ensure proper ventilation of the underpowering space.
- The lining carpet serves as an additional waterproofing of less protected areas of the roof and is a rolled material on a bitumen basis;
Fig. 1. Device of the roof of soft tiles
- The omene carpet is used to increase the waterproofing of the inner ohons of the roof (endands), which are most susceptible to rain and snow loads, as well as for sealing places of adjoints to vertical surfaces. In addition, it is a bitumen polymer material, and its installation is carried out with the help of sealant and roofing mastic.
The design of the bituminous tile includes several layers at once:
- The foundation;
- Improved bitumen;
- Basalt sprinkle;
- Self-adhesive frost-resistant bitumen polymer base;
- Siliconized removable protective film.
Installation of a roof with a soft tile
Installation of soft tiles begins with preliminary preparation of the base. For soft tiles, it is mandatory for a smooth and clean solid base, called the crate. The lamp can be made of moisture-resistant plywood or oriented chipboard, however, if necessary, you can also use a conventional cutting board, preferably coniferous rocks.
This solid flooring is stacked on top of the rafted and attached with the help of self-samples.
Specialist Council: It is necessary to process rafters with an antiseptic, thereby increasing the further life of the entire design as a whole.
The step of rafters and the crate itself is largely dictated by the architectural features of the roof. In addition, constant and alleged temporary loads can also influence it, and therefore it can vary from 60 cm to 1.5 m. In turn, the step of the rafter affects the thickness of the wooden flooring used:
Council of the specialist: To compensate for linear extensions, inevitably occurring in the warm season, it is recommended to leave the gaps in 3 mm between the shell boards (in the case of using an osp or plywood), or 1-5 mm when the lamp is performed from the tank or edged board.
Installation of soft tile roofs preferably spend in the warm season. When the temperature is reduced below + 5 ° C, it is worth keeping in a warm room, and bring them from there as needed in small batches, 5-6 packs. With such weather conditions, for better fastening the soft tile, the self-adhesive side of the tiles is warm up with thermofen.
When performing installation work on the arrangement of the roof of soft tiles, all the necessary requirements of safety regulations should be observed, and while working with thermofen, use the gloves protecting hands. If the installation occurs during warm weather, you should not step on the laid soft tile, as it can lead to the fact that it will remain stains and traces. It is recommended to move around the roof skates with the help of special montertic climbs.
During the purchase of soft tiles, pay attention to the date of release and the color codes of the parties. This will restore the roofing material immediately before laying and will help achieve the same color and aesthetic. external view Roofs in general. If there is such a need, various shades of soft tiles can be applied to arrange, which will allow you to create an attractive pattern designer. A rather important condition is to preserve the material for coating the roof from direct sunlight, which can prematurely destroy the adhesive layer with a protective film. Also, the pallets with the sheets of soft tiles are installed on each other.
Soft Tile Staying Order
In addition to the auxiliary materials mentioned above, for installation of soft tiles are used:
- Planks adjoiningwhich are designed to fix the omene carpet on vertical surfaces. Their installation is carried out using roofing bituminous mastic, sealant and galvanized nails;
- Fronton planks. Serve to reduce wind loads on the tile of the end of the end and protect the edges of the base from moisture. Fastened with the help of sealant and galvanized roofing nails;
- Planks cornisic. Used to protect the base from moisture and enhance the cornese swells, are attached to sealant and nails;
- Roofing bitumen mastic. Serves as a sealant to sneak soft tiles, as well as a lining and fundamental carpet to the base;
- Roofing galvanized nails. A little shorter and thicker of familiar construction nails (length - 30 mm, thickness - at least 3 mm). Also have a slight-larger diameter hat (from 10 mm);
- Knife with hooks blade For cutting tiles;
- Construction hairdryer. It is used to warm up and burning sheets, so that they adjacent to the roof surface more tightly.
In order for the soft tiles to the vertical and horizontal laying, it is pre-conducted on the roof of the roofing markup, the vertical lines of which correspond to the width of the tile sheets used, and the horizontal lines are carried out in a step of approximately 80 cm (that is, about five rows of tiles).
Installation of lining carpet
On the entire surface of the roof, the lining carpet is laid parallel to the eaves from the bottom up and with the allen at least 10 cm. The fixation is carried out with roofing nails with an interval of 20 cm.
When inclined, exceeding 18 °, the lining carpet is laid on the cornese or end parts, endanders, in places of passage through the roof of mansard windows and pipes, as well as in places of adjoining to vertical surfaces.
Installation of cornice planks
To protect the edges of the eaves from possible moistening, the lining layer is fixed with the help of cornice metal slats. They are fixed with the allen in a couple of centimeters with roofing nails. They must be clogged with zigzag, with an interval of 10 cm.
Installation of frontal planks
The edges of the crates in the end parts of the roof are protected with the help of frontal planks, the installation of which is made with an adhesive minimum in a pair of centimeters, and the fixation is zigzago-like roofing nails with an interval of 10 cm.

Fig. 2. Digital roofing of soft tiles
Laying of fundamental carpet
To ensure the waterproofing of the funds, the rope carpet is filling over the lining layer, fixing its edges with roofing nails and bitumen mastic. The choice of the color of the omene carpet is carried out in accordance with the color of the mild tile.
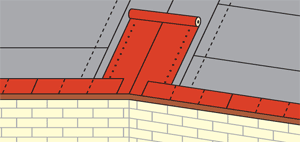
Fig. 3. Device of the roof of soft tiles
Sometimes it is equipped with an end with a substrate, and then the flooring begins to lay down from a smaller skate. Those tile tiles that go to endand from this slope are glued to the Endowa axis, taking into account the adhesion to the second slope at about 30 cm. The fixation is carried out by bitumen mastic or by the method of burning with the help of a construction dryer.
In turn, on the adjacent slope in parallel the axes of the Endament with an indentation of 10 cm, the tile, which goes to endand from the skate, is cut off. In this case, the upper corner of the edge cut on the tile should be cut off at an angle of 60 °.
Funny soft tiles
Flexible tile starts to mount just with the laying of the cornice tiles on the cornice skelet. The onset tiles itself is a bandwidth of 19.5 cm, obtained from ordinary tiles with cut-off petals. A self-adhesive layer is recommended to shoot directly before fixing the next sheet. Sticking the cornese tiles is carried out with an indent from the cornice plank up to a pair of see. It is glued by the method of the joint-b-joint and nailed closer to the methams of perforations. Fastening locations are further covered with ordinary flexible tiles.

Fig. 4. Roofing of soft tiles
Laying Private Soft Tile
In order to subsequently there were no obvious differences in the color of the tiles of the stacked soft tiles, the installation should be carried out after the tiles of several packages will be mixed. It is necessary to start from the center of the eaves, gradually moving towards the roof ends.
After the protective film is removed, the tile tiles do not need to be placed on other tiles!
The fixation of each of the tiles of ordinary soft tiles is carried out using 4 roofing nails clogged by 2-3 cm above the groove line. If the flexible tile is mounted on a roof with a bias above 45 °, the fixing is carried out using 6 nails on each tile.
The first row must be positioned in such a way that its lower edge retreats to about a centimeter in relation to laid to that cornice tile, and the joints of the sheets of the latter should completely overlap the tile petals.
The laying of each subsequent layer of soft tiles is carried out by observing the following condition: the ends of the petals of this layer must be located either at the level of cuts of tiles laid earlier than the row, or be located just above. At the end, the roof of the excess is cut into the clove with the edge, after which the end parts are sampled by flexible mastic on a width of at least 10 cm.
According to endowers, the trimming is carried out so that the open strip on the bottom of the end of the width is approximately 15 cm. To avoid damage to the roofing coating, the trimming must be performed on a substrate board or plywood.
Laying of ridge soft tiles
For the riding part of the roof, a soft tile is required with sizes 0.25x0.33m, for which the cornese tile along the perforation line is separated into three parts. After removing the protective film on the horse, after removing the protective film, it is necessary to perform in parallel to it with a short side of the tiles, fixing them on each side of the skate of the nail pair. Each subsequent sheet is stacked with an adhesive 5 cm on a sheet previous, thereby closing the nails hats.
Installation of adjustment planks
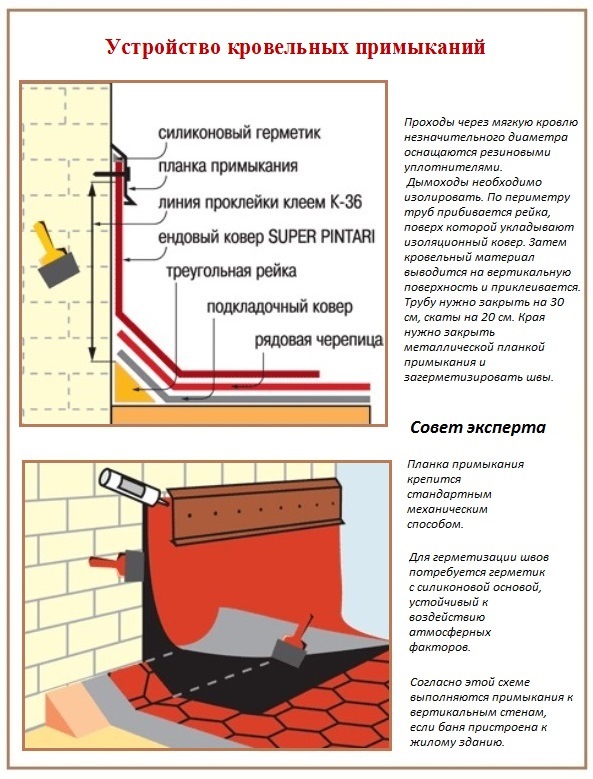
In those places where the roof will connect to chimney and other vertically recessed planes, the installation of soft tiles is carried out as follows.
- Initially, in all places of compounds, triangular rails 50x50 mm are nailed, on top of which the lining carpet is filling, fastening it with mastic.
- Following the tile of the ordinary tile, it is necessary to have the edges to enter the vertical surface at least 30 cm, after which they are fixed using mastic.
- This adjoining is then covered with a metal strip of an apron of an apron, and silicone sealant is used to secure, due to which great stability is achieved with respect to various natural phenomena.
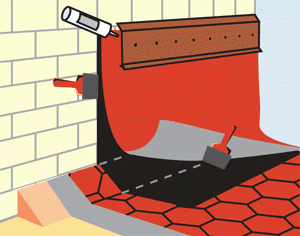
Fig. 5. Digital roofing of soft tiles
Soft options for roofing attract owners of baths low cost, lightweight and opportunity to perform styling of material on their own. The protective-decorative shell, created by the help of soft roofing materials, is reliable, protects against the penetration of atmospheric moisture from the penetration of atmospheric moisture. If the soft roof device was performed according to a strict technological dictate, it will serve no less galvanized iron or asbestos-cement plates.
General rules for structures
Be sure to decide the type of design over the bath before the construction of the roof. It can be one or twin, that is, consisting of one, two or more inclined planes. The angle of inclination of the planes determines the climatic specificity of the region. More precisely, the number of atmospheric precipitation capable of postpone on the roof and damage it with its weight. The larger the bias in roofing rods, the less likely the cluster of snow deposits on it.
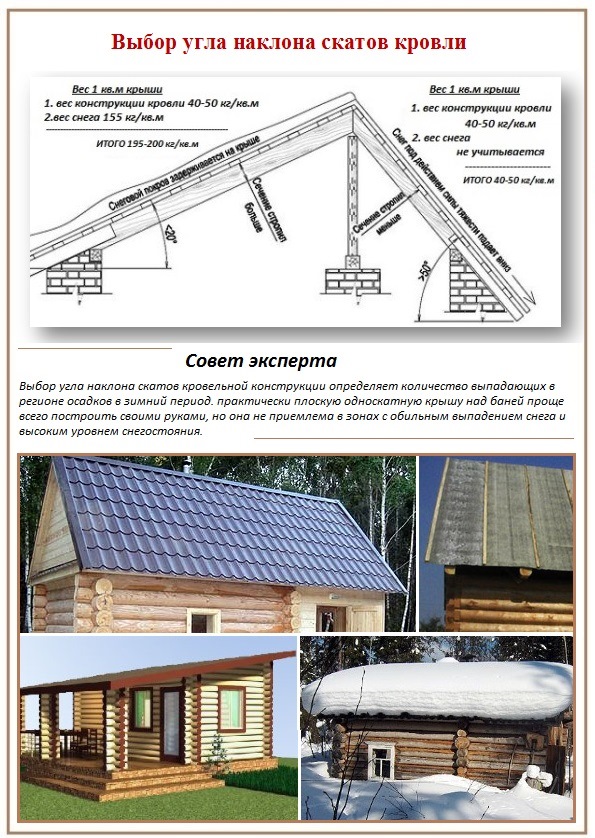
Depending on the corner, the material is chosen:
- ruberoid can be covered with a roof of any design with rods located at any angle;
- soft roofing can be arranged from a special roofing tile if the slope does not exceed 25º;
- rolled materials can be equipped with roof if the angle of inclination of the slope is from 5 to 25º;
- multiple layers of bitumen mastic pour almost flat roofs Up to 5º and less, some bunk roof should be necessarily, otherwise there will be a precipitate on it.
Listed types of soft roofs are constructed different waysBut there are general technological features in the methods of their construction. First, according to project calculations, preparation is carried out. For the arrangement of cans from foam concrete or bricks, Mauerlat is mounted, and in the upper wedges of buildings from a log or timber ceiling beams In increments from 0.5 to 1.0 m. The distance between Woods under the beams is calculated based on the type of construction of the system for the insulation of the ceiling and the species of roofing design.
- Construct individual elements of the rafter system. In order to exclude the risky situation and for convenience, most often the board or timber bar is connected by screws on Earth. After checking the identity of all components, carried out by folding into the stack of all rafting farms, they are raised to the top.
- Installation and fastening of all components of the rafter system with ceiling overlap, with bollards, bonds and with inner skateboards, after which this roofing frame becomes a single object.
- Constructs a doom. To properly implement the roof device under the soft roof, make the crate with minimal gaps or at all without them. The maximum allowable lumets between the boards should not exceed 1 cm. Often over the clamping creases of the crate, then the boarding of the flooring can be done with distances more than one cm. Plywood sheets are laid on the principle brick masonry. The jokes located on top of the roofing material are desirable not to combine with seams between plywood and with gaps between the board.

Council. In case of insufficient length of the shells of the chatter of the elements, it is necessary to place in different places to uniformly in all areas of distribution of weakened areas.
The listed steps are performed by analogy for the construction of any roof. Further installation of a soft roof is carried out with an orientation on the type of roofing material.
Technology laying various rolled materials
Rules of Regulation Ruberoid
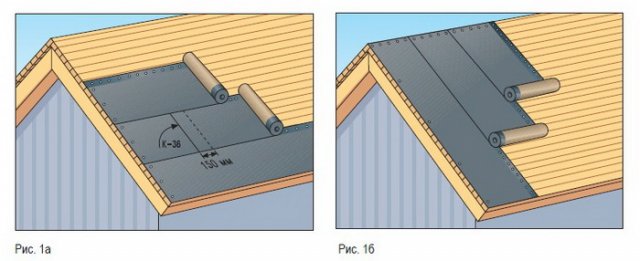
The budget flooring consists of three or five layers well all the known cheap material - rubberoid, the lack of which is in light flammability. Sometimes it is also placed as a temporary coating. Builders are recommended for rubberoid to make a crate of two layers. The direction of the boards of the top layer of the crate is located at an angle from 30º to 45º to the direction of the boards of the previous layer.
The number of coating layers is determined by an angle of inclination of the roof of the roof:
- for steep slopes with a 45-degree inclination of two;
- for skates with a bias from 20º to 40º, it will be necessary three;
- up to 15º four or even better five.
Note. Optionally, all layers are made of rubberoid. Parchment can lie below, then only and then fine-grained rubberoid. And the top layer can be performed from armored material or runner with coarse-grained sprinkle.
To lay a rubberoid, you need to choose a dry windy day with a positive temperature. These conditions are needed if any soft roof is satisfied: the installation technology and the specific quality of the materials do not allow work in the frost period.
Council. For convenience, the roofing material is folded into the rolls internally outside. On top of the crates, they are simply rolled over with the adoption through the horse at 25 cm. In the case of the "swelling of the hump", it is punctured and, releaseing air from under the headline smoothes to form a flat surface.
Ruberoid strips fastening with a BN-U or BN-1U-1U-dissolved bitumen in kerosene (6 liters of kerosene need 4 liters). The resulting solution will serve as a primer in the crate, and the layers should be glued together with a bitumen mastic.
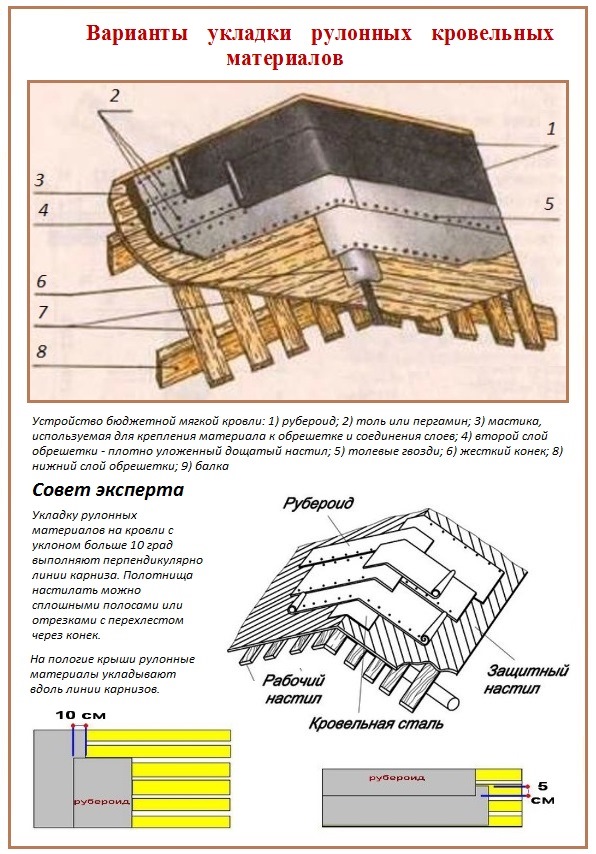
Note. Parchment, used as the bottom layer and rubberoids must be prepared in advance and cut. When counting the number of bands, it is necessary to consider that every extreme 10 cm will lie under the next strip stacked with the allen on the previous web. From both ends you need to leave 25 cm for throwing through the horse and for the bending under the carnisy board. Perramine, these allowances should be 15 cm.
The junctions of each of the subsequent upper layers of the roll material should not coincide with the previous one. After laying the runner nod to farmery board Through the strips of galvanized iron, which she also is cured. You can use instead of lanes of roofing racks.
Using new rolled materials
Technology of a soft roofing device from manufactured in last years Rolled materials with a glass of glass cholester or a reversible mixture is not much different from the roofing roof. Just for mounting strips are used specifically for this material Compositions. The cloth on the rods with a slight slope is laid along the direction of the eaves. On the coolest roofing structures of the panels, the steering is across, that is, along the flow, so that under the severity of precipitation, the multilayer coating is not slipped.
How is the soft roof of mastic?
The owners of the bath with a gentle roof can be dispensed without rolled materials by filling only mastic. The advantage of the method in the complete absence of seams, the lack of need to carefully monitor the uniformity of the fill. In order to carry out the installation of a soft roof with your own hands on this technology, a special sprayer will be required.
Pouring produce on the roofs with a slight slope slope. Most often poured on top concrete screed With the preliminary laying of reinforcing fiberglass layers and the installation of special sideboards around the vertical elements of the roof. Reinforcing layers are paved between the layers of the bitumen fill. The upper layer of fillings are strengthened by the gravel recessed in mastic. Endovists, Spearbags, eaves, skates, adjoining additionally reinforced with fox.
Soft Tile Styling Technology
A popular option that attracts not only traditional pluses of a light soft roof, but also aesthetic superiority. True, the device of the roof of soft tiles takes more time, money and labor effort.
- The first thing is laid down "in the disintegration" base from OSP plates with subsequent insulation throughout the area.
- Over the base along the eaves, starting from the bottom zone, the special lining carpet. The seams between the canvas, are imposed with the flax, are sampled and sealed. The edges of the lining carpet are nailed after 20 cm.
- For a stronger fixation of the lining carpet along the eaves and frontal joints, metal planks nourish. Roofing nails have a zigzag after 10 cm.
- After the construction of the basements, the roof of the soft tile is installed, strictly following the manufacturer's instructions. Typically, it is installed on each other. Start from the installation of the cornice tile. You do not need to retreat from the edge of the cornice more than 1 cm. Fasten the glued parts through the punching points with roofing nails.
- Along the endands are paving a special carpet.

Note. The most responsible part of the work is the fastening of the cornice tile and the first row of roofing elements. To comply with symmetry, it is recommended to start laying in the center of the sweep and go from it to the ends. It is necessary to thoroughly observe equivalent distances and clear directions throughout the entire glued row.
- After installing the cornis parts, ordinary are fixed. The lower edge of the roofing soft tile elements should retreat from the edge of the cornice analogue not more than one cm.
Fastening produced through the hole formed at the factory. In front of the front lines and in the region of the end, the surplus is cut, the edges are glued. Complete the device laying the skate elements.
To improve the roof of the hosts of the country baths can choose as budget, considered outdated, but still used and new, but not too cheap materials. The principle of laying is little different. True, in the configuration of soft tiles, in addition to the complete set of ordinary and fittings, detailed instructions will also be more detailed. The dominant rules of the roof device with soft coating - The construction of crates with minor gaps or at all without them. With accurate observance of technological canons, the roof covered with a soft material will be excellent for many years.
2014-06-11 13:56:06
You can lay soft tiles on any kind of roof, but it is especially suitable for use on the roofs of a complex configuration, having joints and transitions. Carry out the installation of soft tiles with their own hands the case is not difficult, but for quality work You need to know some features. We tried to tell in detail in this article in detail.
What is a soft tile?
This elastic material is made according to special technology from glass cholester or polyester impregnated with bitumen. Externally, a soft tile is a small plate of the most diverse shape (rectangular or five-, hexagonal), performed in the form of rhombuses or ovals, beesh cells, etc.The use of special additions from styrene-butadienestyrole and polypropylene can significantly increase the strength, strengthen the frost resistance and reduce the thermal conductivity of the tile. Colored stone crumb applied to her front side serves not only by decorative decoration, but also additional protection against mechanical damage and burnout.
Bituminous Roofing Device
Mounting soft tiles
1. This type of roof is mounted only on solid flooring (cable). Its thickness depends on the step of the rafted: the more distance between the rafter legs, the thicker should be the material from which the flooring is made. As it, you can use moisture-resistant faeer, tipped boards, chipboard, etc.2. To roofing It looked aesthetic, it is necessary that it was laid perfectly: with the slightest irregularity of the tile will look neakkurat.

Installation of wooden flooring under flexible tile
Important! Since when changing temperatures, wooden sheets or boards can vary in size, there should be a deformation gaps of 3-5 mm between boards or plates of the flooring.
3. To extend the service life of the roof, it should be provided for the presence of vapor and wind insulation and ventilation gaps.
4. The vapor barrier film is attached from the inside of the crate And fixed with the help of a nail or stapler, and then pressed with a wooden plank with a step of 60 cm. The places of adhesion of the film are sampled by bilateral tape.
Laying a vapor insulating layer
5. Residential attic should be pre-insulated. Plates insulation The driver is laid (in a checkerboard) over a layer of vapor barrier between wooden bars.
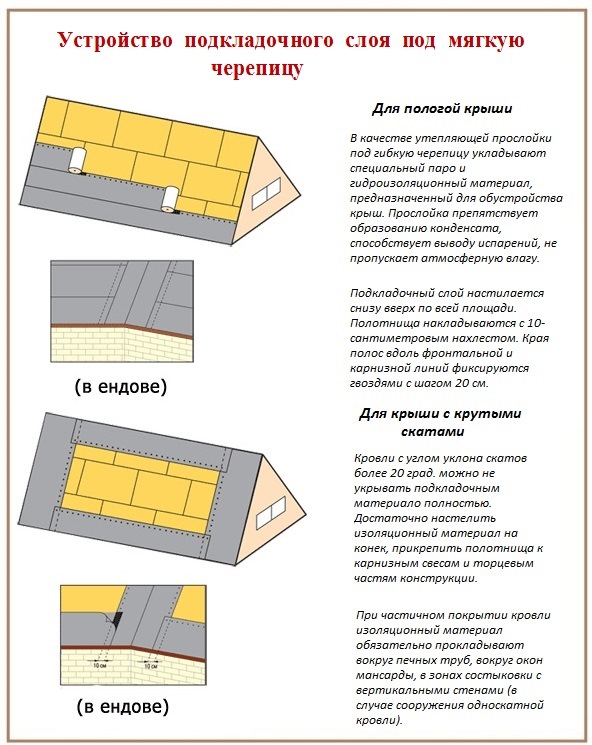
6. For additional waterproofing the most problematic places of roofing on the cornices, endand, the skate of the skate in the places of its break is unfolded lining carpet. With an insufficient bias of the roof (up to 12-18 °), it should be rolled throughout the roof surface. All joints are desirable to further treat bitumen mastic.
Installation of lining carpet
7. Lining carpet is mounted with overlap 10-15 cm and fastened with roofing nails in 15-20 cm increments. This material is bending undesirable. To create an overlap on the lined slopes, it can be cut by 10-15 cm.
Installation of the cornis plank
9. Installation of a soft roof starts from Karnizov. To do this, it is better to use a special farmery Tileon which a self-adhesive layer is applied to enhance the waterproofing. If it is absent, the tile, installed on the eaves, should be thoroughly wedged with mastic. Additionally, it is fastened with roofing nails with wide hats.
The order of laying the first row
Council. For laying, you should use tiles from one batch. Otherwise, essential deviations are possible in color. To obtain a flat pattern, it is better to use trunks (tiles) from different packages.
10. When installing the decorative tiles of the complex form "petals" should be laid out in accordance with the recommended manufacturer scheme of drawing.
11. Cutting material It is more convenient to carry out a special knife with a hook-shaped blade. To do this, you can use the usual wooden hacksaw. In order not to damage the soft tile, it is better to produce cutting on a special board.
12. In order for the roofing look neatly, it is better to put on the skates lighthouses from durable threadswhich when laying will serve as guidelines.

Installation of subsequent rows
13. Subsequent tile ranks are also attached to the base with the help of roofing nails. Their caps are completely hidden behind the petals of the subsequent row. The first row is stacked, starting from the center of Skata., gradually moving on the parties. At its edges, the tile is cut, if necessary.
14. When installing in the warm season, within a few days, the bitumen, which is part of the flexible tile, melt, and samovulakanization will occur. If the weather leaves much to be desired, it should be treated with a construction hairdryer for filling the tiles.
Important! Flexible roof It is not recommended to mount at low temperatures (not lower than + 5 ° C) - on the cold tile it becomes too fragile and in places of bends can break.
15. To provide ventilation at skating or in any other, the roofs are equipped with aerators. The places of their adjoining should be protected by a lining carpet and wrapped the layer of mastic.
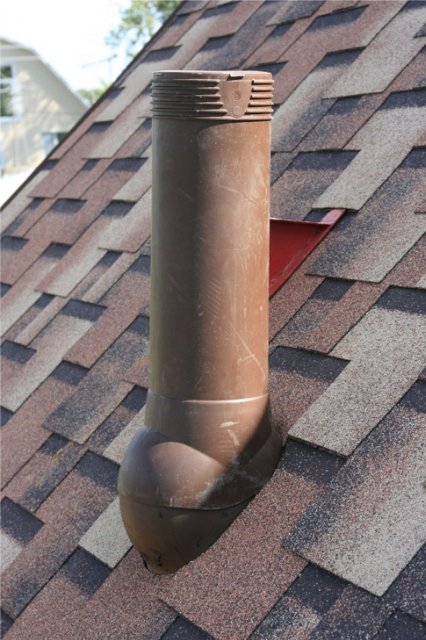
Roofing fans
16. To protect the most vulnerable places, the roof uses additional components: skates and endow (flexible strip or curved gears deployed at the interface of the roof planes). They fit simply: a fragment of the shingle is bend, and then fixed with roofing nails in 10 cm. With the help of the skunk tiles, it is possible to strengthen the air ducts, the output of communications and the attachment location of the antenna.
17. Since in places of rtandov, the most frequently formed undergoes, in such places it is desirable to lay two layers of the shingle.
Council. When operating under reduced temperatures, skate gears and endow to increase flexibility is better warm on a warm metal pipe.

Styling ndovism


