Any roof needs to protect the ends of the sills from rainwater from entering: from the wetting of the wooden parts of the design (rafters, a doomle) begin to rot.
For roofs flexible tile It is even more serious than for others, due to complete tightness and airproof coating.
To protect the outs, droplets are used for a soft roof.
Dropper for a soft roof - what is it?
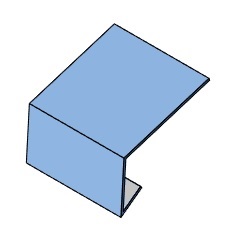
The drip is called a metal bar, bent in the form of an corner. Its shelf is installed on top of the crate and lining carpet, the other is directed vertically down. If under the cornice is installed with a drainage chute, the planka enters it. If there is no gutter - the edge just hangs, the water rolls to the ground from it.
The dripper is never installed over the coating, because In this case, his upper edge will prevent the flow of water from the roof. Water will start following the drip, the element will actually stop performing its function. Roofing material always lay on top of the cornice.
note
Drippers ( farmery planks) It is usually included in the soft roof material. You should not save on them. Moreover, the price of drippers for a soft roof is low, incomparable with the cost of the tile itself and the lining carpet for her.Droplets from the kit are painted with polymer paint in the color of the coating. If you bother the cornice bar separately, it will be more difficult to fit on the color.
The bending angles of parts are different, starting with 100 degrees. It depends on the roof slope: the cooler of the roof, the greater the angle. Less than 100 does not happen, on flat roofs a bitumen tile is not a stel.
Our work
Installing a dropper on a soft roof
Installation of a dropper under soft roof Neshes:
1. The bar is installed on top of the lining on the pannies sink so that one of the shelves hung in a chute or simply vertically down.
2. Fasten to the crate of roofing nails in increments of 10 centimeters, in a checkerboard.
3. The following bar is put on the previous flashes, and so until the end of the eaves.
4. On top of the drip, the pannies of the tiles are stacked. The tile is glued on the strap with an indent from the edge of three or five centimeters. Additionally fix it with nails two pieces in each. Shakes of slats are closed with petals.
As you can see, nothing is complicated. Only to do this should be in the process of mounting the tiles, and not after when the consequences of improper laying of the material will be noticeable.
Contact us in STM-Stroy: We quickly install a drip for a soft roof, the price is small.
And it is better to immediately carry a roof with full technology compliance. In the shortest possible time and inexpensive.
The cornice bar is designed to serve for the direction of rainwater in the gutter of the drainage system. Also, this element is called a dropper. The dropper is attached to the bottom edge of the roof on the crate before installing the roofing sheets. It is this fastening that excludes moisture from entering the roofing carpet with a lateral rain. This element is very important for preservation in the dry state of the frontal cornboard. Farmery Planck - is a finish element, directs water flowing from the roof to the drain. Also, this plank protects the roofing sheets from the separation with strong wind.
In homes, where this element for some reason neglected, rust may appear and / or leaks on the walls. If the water is not discharged into the drain, it is stirred, as a result of which the rotting of the wooden elements of the roof can begin.
Metal carnice strips are made of galvanized metal resistant to corrosion. Also, the metal can be with a paint coating, standard for metal is the RAL directory (you can find on the Internet or watch typical colors on our website). The cornice bar is an element that can be seen, so it is necessary to pay attention to it when choosing a color, size, form. In contrast to plastic cornese slats, an element made of metal does not give a wave effect on the building due to its hardness.
For additional stiffness, it is possible to use a metal with a thickness of 0.6 mm, 0.7 mm and even more if necessary. The most important metal thickness with a large width of the element sweep, the wider item, the greater it will be "worry", to avoid this effect it is useful for the manufacture of an element is a thicker metal.
The cornice bar is installed along the entire length of the cornese swell. According to the rules, the swap width of the roof (removal) should not be less than 500 mm, since the smaller removal will make the walls to spat the walls with the roof water, while if the water plank element can be less used to drive water, then the removal may be less.
Our company will make for you all kinds of slats: cornice, frontal, wind, strips of adjoining, etc. We invite you to production.
Catalog:
 Apron carnome 65x50. Protects from atmospheric precipitation. Outside of the soft roof. When using mounted drainage systems - the lower nose of the element is started in the chute. Attached to the crate before mounting soft tile. All sizes and angle between the shelves can be made under the order. The thickness used is 0.5mm-0.7mm. Color range - 20 standard colors via RAL-scale.
The dripper for a soft roof, with this challenge you will have to be confronted, performing the installation of the roof. The main purpose of this plank is the protection of the oops of the roof from moisture, as well as the direction of water into the waste chute. Where and how to put it, we will tell in our article, as well as describe the whole process of installing a soft roof.
What is a soft roof? This is the generalized name of roofing materials, the main component of which is bitumen.
But the installation of this coating is not possible without the use of additional details, which includes drippers - cornice strips.
This element protects the walls of the building and the base of the roof from the atmospheric moisture and flowing from the roof of the water, directing its streams into a waste chute, and also closes the roofing material from severe busting winds. That is, is a kind of protective apron.
Farmers not only prevent rotting wooden structures Roofs, and and perform aesthetic role. They betray the sink of the roof clear, smooth face and close roofing pie. Farmers of galvanized steel with an anti-corrosion layer and polyester coating are manufactured.
Their color is chosen by the main material. Droppers are installed along the entire length of the cornese swell.
Now we suggest to consider how the roof is arranged, and at what moment drippers are mounted, but for the beginning we will find out what the advantage of the soft roof in front of other roofing materials:
- High waterproofing. It is achieved due to the monolith of roofing carpet.
- The installation process will not take much time, there will be no special tools and techniques for this, several people will be able to perform work.
- The roofs made from the latest generation materials are perfectly coping with temperature differences and serve for quite a long time, at least 20-25 years.
- Due to its elasticity, the material is resistant to mechanical damage, smoothes irregularities and has high noise reducerning characteristics.
- The material has about low price, in comparison with other roofing coatings.
Soft roof - what better? Consider each material separately.
Flexible tile - a flat sheet, from one edge of which curly patterns (rhombus, trapezium, rectangle, etc.) are cut out. Based on this material It is a pressed, nonwoven glass chicketer impregnated with bitumen.
The upper part is protected by a layer of basalt sprinkle (Shinglas, shingle) or copper (copper bituminous tile). The lower is a layer of frost-resistant bitumen-polymer mass, which is protected by silicone film (it is removed before laying).
The main advantages include low lateness and the ability to use it on the roofs of any configuration and complexity.
Roll roof is manufactured on a synthetic or fiberglass basis, which is impregnated with bitumen-polymeric materials.
This type of coating is used both in private and in industrial construction. The main disadvantage is vapor permeability.
- Made from TPO, PVC and EPDM membrane. An important feature of the installation is considered to fasten the seams with hot air, which increases the strength of the coating. This material is considered durable, reliable and durable.
Installation of the roof includes several stages, consider them on the example of the roof of the flexible tile:
- Base for mounting. First, the lamp is installed under the soft roof. It must be solid, with the possibility of fastening other materials to it with nails. For these purposes, three types of wooden products are used:
- Plywood for a soft roof;
- OSB plates;
- Edged boards.
The edged boards are stuffed with a 5mm gap, it is necessary for their natural expansion, under the influence of temperatures. The thickness of the board depends on the step of the rafter and varies from 20 to 30 mm.
Plywood under a soft roof is taken by moisture-resistant or tipped. Its thickness also depends on the step of the rafter and ranges from 12 to 21 mm.
Speaking about OSB plates, it is worth noting that there is also a gap equal to 3 mm between them, but this is done in cases where the laying of the crates is performed at a temperature of less than 5 degrees. Fasten the crate to rafters, self-drawing or grown nails.
Tip! Wood moisture should not exceed 20%. All materials are treated with a special protective solution.
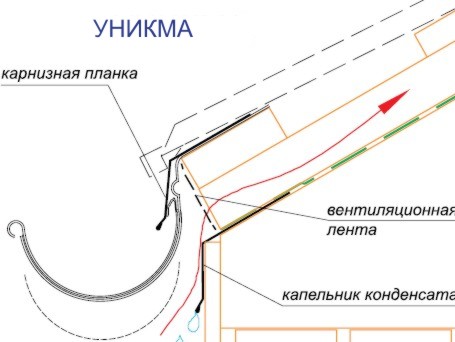
- Ventilation. For ventilation of the underpants, there are input and outlet holes for air circulation. The inlet holes are shut-off at the bottom of the roof, on the cornese swells. For this, the cornice box is closed with sofit placams or make special ventilation grilles. Exhaust holes are equipped at the top of the roof. For this purpose, ventilated lobby or point outputs of ventilation (aerators) are made. The width of the air gap should be from 50 to 80mm.
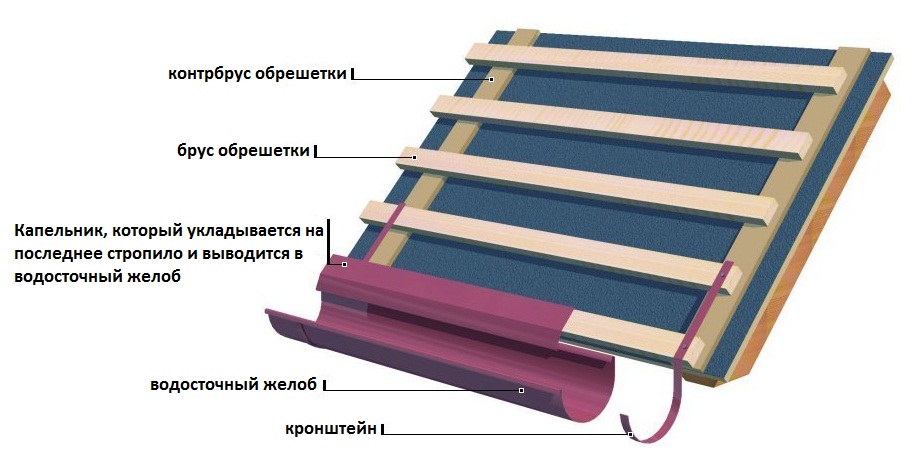
- Then the lining layer is laid, it can be both solid and partial (along the perimeter of the roof, in the places of pipe output and windows, on overlaps and adjoints). To do this, we use rolled bitumen materials that make the flashes (from 10 cm and above), then nailed with roofing nails (step 20 cm) to the crate.
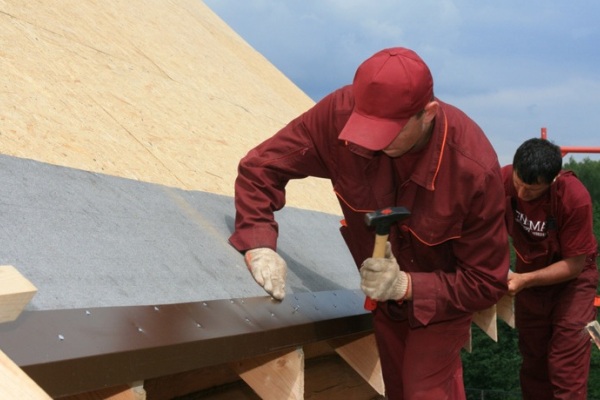
- Installation of drippers. With its base, the cornice bar is fastened on the top slope, on the lining layer. The bottom edge hangs from the cornese swell. Mufflies are fastened with flipper, with 2 cm overlapped, nails. In the locations of the slats on each other, 3 nails are nailed, along the edge of the nails are nailed in 10 cm increments, zigzag (shown in the figure).
The most common mistake when mounting drippers is their improper location.
For example, if you select the bar on top of waterproofing, there will be no air access, and accordingly ventilation as such. For proper montage The plank is attached to the crate, under roofing material.
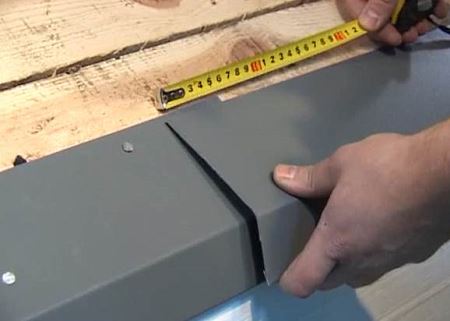
It must be a bit bent from the trim board. Also, the width of the player itself plays an unimportant role. It is necessarily taken into account, there will be a chute or not.
But first nourish the windshield on Svez. Sometimes there is a need to put two cornice strips (Figure 3), but it already depends on the used roofing material and roof structure.
- Installation of front planks. Front planks are nourished to protect the edge of the crate from the roof ends. The technology and the principle of their installation are similar to the installation of droplets.
- Installation of fundamental carpet. In color, it must correspond to the color of the flexible tile. On the edge of the omene carpet, nails are nailed, at a distance of 10 cm from each other. It is also recommended that the edges of the material wrestling with bitumen mastic, for a more reliable hitch.
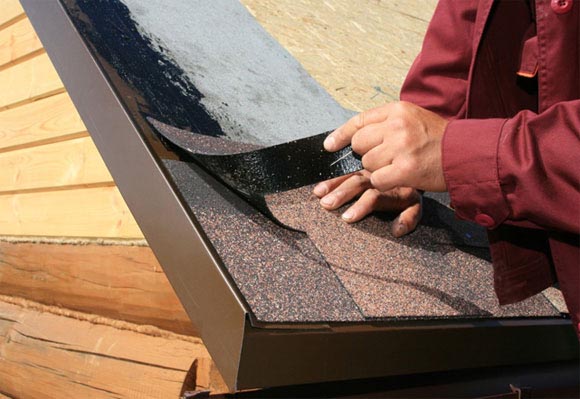
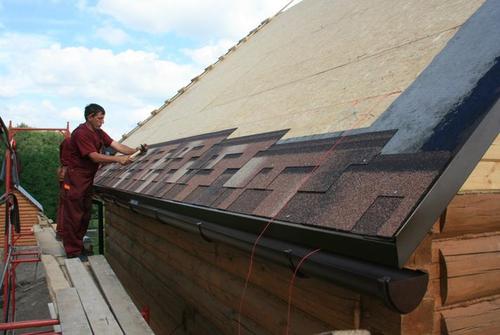
- Installation of cornice tiles. A cartoon tile sticks on the drip. The tile is glued to the jack, and then also fixed with nails at the top edge.
- Installation of the ordinary tile. From the reverse side of the material, a protective film is removed. The first row is stacked so that its petals close not only the joints of the cornese tile, and almost all of it, it should only look at 1 cm. The tile is fixed with 4 nails in the corners. Subsequent rows are stacked with a drawing shift, that is, in a checker order. Surplus are cut off with a knife with a curved blade. The edges of the tiles along the edges are labeled with bitumen mastic at a distance of 10 cm from the end. On UNDOWS, the tile is trimmed so that the open space is left to the width of 15 cm.
- Installation of the skunk tiles. The ski tile is obtained by cutting the cornese into three parts. It is stacked by the penetration of 5 cm and nailed, 2 on each side. At the same time, nails are arranged in such a way that the next tile is covered.
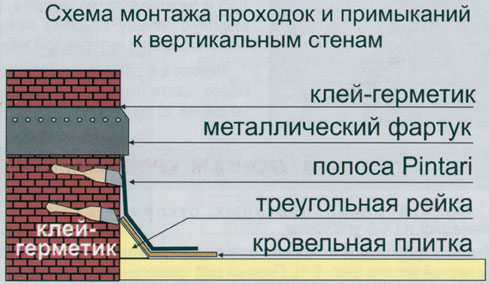
- Installation of roofing adjoins. These places are worth paying special attention. On the perimeter of the pipes, a wooden rail 50x50mm is stuffed. The lining material is stacked on top of it, which is attached with nails and bituminous mastic. Next, the layer of the ordinary tile is placed, with a rise in the vertical surface at 30cm. It is mounted using bitumen mastic. The top of the ordinary tile is covered with a metal plank, which is fastened with nails to the vertical surface, and then sealed with silicone sealant.
The instruction on the installation of a soft roof, as you already understood, includes a set of events, and not just laying the flexible tile. I would like to note that from how much each of these stages is performed, it depends on how much time your roof will serve you.


