Today we will talk about how to perform a log cabin into the bowl of your own hands. We will tell about what is this technology, which it has features, advantages and disadvantages. And so that the readers of the blog about the wooden house-building on the SEC Russian hut have learned more about the technology of cutting, the video will put it on the article. Let `s start?!
IN lately I increasingly hear about some new super technologies, all sorts of "smart" houses and other achievements of civilization, but ... Friends, agree, because all the same, we all pulls us to the natural, natural, familiar, proven year. Therefore, when it comes to the house and about what it is better to build it, I do not get tired of repeating: most best Material For the construction of housing - This is a tree, eco-friendly, breathable, natural.
If you decide to build wooden houseWe, first, I congratulate you on this step, and secondly, we recommend putting exactly our original Russian log house, when the so-called handage is performed.
The main secret of this simple, but, as the time has shown, a very brilliant idea is as follows: in each log, the deepening is cut down, that is, the "bowl", in which the next log is stacked, this garbage is also cut down - a bowl. The main task is to fit the size of the bowl so that the logs laid on each other in the result firmly fit to each other. 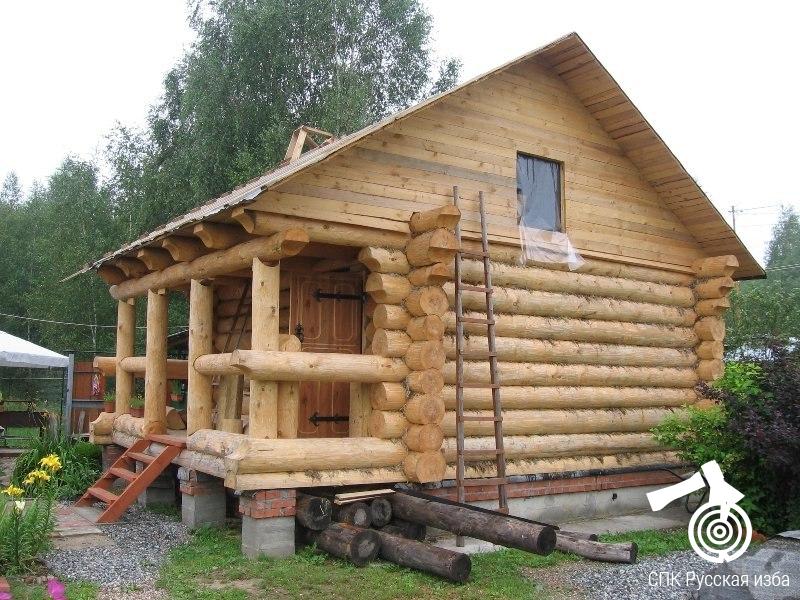
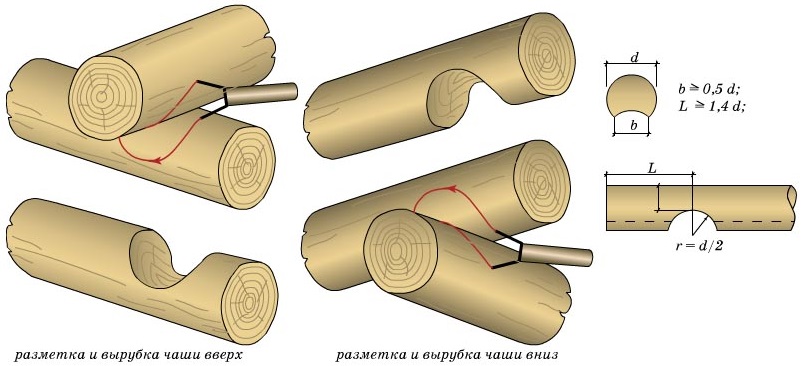
There are two ways to cut a log cabin into the bowl
- "IN OBLE" (Russian cutting) - the corner bunch of logs is carried out by laying up the top log in the bowl.
- "In Chief" (Siberian cutting) - the top log, at the bottom of which the bowl is cut down, stacked on the bottom log, etc.
It is believed that the second technique of cutting is more reliable, it better protects the log cabin from cold and moisture. But we know with you how to produce the heat engineering of the walls of the house, how to perform the waterproofing of the foundation, how and how to correctly treat the tree, in the end, which it is not terrible to buy a heater, therefore, no frost, nor the moisture from entering a moisture.

Types of wrist "in Oblop"
Couch cutting into the bowl - Advantages and Disadvantages
As you understand, the cutting into the bowl is a construction technique that our great-grandfather used from generation to generation to build a house without a single nail. Such houses, which is called, for century.
- If we speak in general about the cuts of the hand logging, the benefits and disadvantages of this technology, then I note the following: such houses do not need to somehow separately separate. If the material (tree) is chosen high-quality, he itself is very beautiful and noble looks, and sculpt something on top of it, in our opinion, is too much.
- The main advantage and, perhaps, the most significant argument in favor of a wooden house, fired on such an angular connection of logs in the bowl, is that it is warm, strong and reliable.
- The only thing, probably, minus cutting into the bowl is a greater consumption of material, if you compare this technology for building a cut, for example, with other existing. Since the log corners protrude up to half a meter, the useful living space of the house decreases.
- Another feature of such houses and bath is that it, like any wooden dwelling, must be treated with special compositions ( antiseptics and antipirenami) To protect the tree from the negative environmental impact.
So, friends, summarize on the issue of a log cabin in the bowl: Benefits and Disadvantages. " In fact, there is no significant disadvantages, but no, but the advantages are solid.
Marking and cutting of a log "in the bowl"
Houses from the log in the bowl - choose the material
In fact, the choice of forest from which your home will be built is the most important task you have to solve.
First of all, we say that our log house will be exclusively of coniferous rocks. These are the most resistant to rotting processes, because they contain a natural antiseptic - resin. If we proceed from the fact that you don't think anything at all in the wood, then you need to know everything yourself in advance: sniff, suck, iron, look at the rings in the cut, but learn to distinguish different wood species. Although if you can't distinguish the tree from birch, then it's better to cut into the bowl of your hands at all. Hide professionals for these purposesFor example, refer to
And remember: to cut a log cabin on such technology, you need to use logs of the same size (length and diameter). It is desirable that in the cutting tree it was at least 26-28 cm.
Cut in a bowl with your own hands - step-by-step instruction
The construction technology of such a house is extremely simple, but the cutting requires good physical training, skill, accuracy and accuracy. Because the quality of work directly affects ... In general, everything affects: how will your home (curve and obliquky or perfectly smooth), as you and your households will be comfortable to live in it, etc.
If the thesis of cutting a log cabin with their own hands, then it looks like this:

Hand logging Bath or house in the bowl - Nuances
All comes with experience! But the experience comes later, and the house must be built now, so the glory of the one who came up with the Internet, and those who share in it their precious experience just like me.
Whatever the Mastic Master, not always everything goes clearly according to plan and not always everything turns out correctly, especially if we are talking about hand logging into the bowl. Therefore, it is necessary before work to find out as many nuances as possible, in order to avoid any incidents. Here are some useful tips:
- When drinking a bowl very convenient, where the logs come into contact, smear coal: when you put a log in the bowl, it will be seen how much you need to cut wood.
- Cut out the bowls, after measuring everything. We put the logs and after fitting each tier - measure the level: if you saw the skew, you can try to fix the seal, we deposit them to the desired height.
- All logs are numbered: the thickness of the logs is different, then not to get confused.
- Suppose you chose the wood well, it is very high-quality, it's all the same for a lot of reliability every cutting bowl in some special bactericidal solution so that there was no mold in the future.
- When storing the logs, we put it down the bowl down so that the water does not register if it suddenly rain.
Grab cutting technology in the bowl - video
It seems that everyone told. As they say, they explained on the fingers. But to quite everything it was clear, you need to use another very useful resource with a description of the cutting technology cutting into the bowl - video! What else can be so clearly explained. Schemes, drawings, drawings are all good, stories from life, too, but when we see the process of sidelia, everything becomes in place.
Watch the video:
I want to advise you as a specialist who really understands something in the construction of log cabins, Valeria Samovich. By the way, he recently gave us, read it will be interesting!
I hope now you are certainly all extremely clear and understandable. And if not, ask questions in the comments to the article, explain more intelligibility.
Read us B.
Training Breed
Attention! To determine the quality of the logs (you can abandon a low-grade sawmaker at any time), you need to know about the ideal conditions of the workpiece that we consider below.
Forest-rounding must be harvested at a minus temperature, that is, in winter. It is at this time that the amount of moisture in the wood is minimized, therefore, during drying, the material will be less deformed and crack.
For the durability of a cut, during construction uses certain areas of logs (the so-called comute logs). These sites start from the rhizomes and end in the crown. Such comuted logs are more dense (than beneficially different from the tops) and there are practically no bitch. Also, the selection criteria include the round shape and the degree of curvature of the trunk. In both cases, marriage is an error that exceeds 1 cm on the trafficphone meter.
Attention! If the length, for example, 5 m, and the error exceeds 5 cm, then the log can be blinking.
The same applies to the diameter. For example, the diameter of the base of the log is 35 cm, while the tops are 25 cm or less. Such rounded is categorically not recommended for use in construction.
Finally, pay attention to the tree breed. Ideally, coniferous breeds of trees (spruce, larch, etc.) should be used for the bath. The larch is characterized by resistance to moisture, although in the extreme case can be resorted to a combination of "pine-fir" in which several first crowns are erected from pine. And if only spruce is used during construction, the material must be treated several times with an antiseptic agent.
Further actions follow in accordance with the previously compiled project. Such a project can be made to yourself, find on the Internet or order from specialists. It is with the help of this document that you can calculate the required amount of consumables, determine the area and the form of the base.
Stage 2. Treatment of Bruus
Step 1. After you have brought the consumable material (or you cut and delivered it yourself), it needs 25-30 days to be searched.
Step 3. Then proceed to processing. First, clean the logs from the bark (do it carefully so that they do not crack), leaving it a little on the sides - approximately the 15-centimeter strip on each side.
Step 4. After processing, put the logs for storage of approximately 25 cm from the surface of the Earth. You can lay as you like - stacks, packs, etc., the main thing is that the distance between the logs is 7-10 cm.
Video - Breed Preparation
Stage 3. Construction of the foundation
Immediately make a reservation that from massive monolithic foundations You can refuse a minor weight of the future design. In order to save, you can resort to one of the two possible light designs, namely:
- belt foundation;
- stated.
Consider each of the options.
For the construction of such a base over the entire perimeter, as well as under future walls, haul a trench of 40 cm wide and a depth of 50 cm, put on the bottom "pillow" from sand and gravel. Next, put the reinforcement, build a formwork with a 50 cm high and fill the concrete solution. As a result, the foundation height will be approximately 1 m.
Attention! A more specific height depends on the depth of the soil freezing in a specific region.
Video - Filling the foundation
Inside the perimeter, pour stripes from sand and rubble. In the future, the band can be pouring concrete or build a wooden floor on them. The choice of one or another depends on personal preferences and financial capabilities.
Foundation of a column type
In the case of a columnar, it will be necessary to build support. Here are two options:
- brick;
- from asbestos pipes.
Place the supports in the corners of the perimeter, as well as under all the walls with a pitch of 1.5 m. Under each support, pre-put a concrete "pillow". In each support, fix several reboot rods in such a way that the latter perform over the surface at least 30 cm.
Build a formwork with a height of 40 cm, put the reinforcement in it and tie it with the ponds protruding from the supports. Fill concrete solution. After four to five weeks, when the concrete is completely dry, you can proceed to further work.
Stage 4. Waterproofing base
Treat the surface of the foundation by molten bitumen and laid over the rubberoid layer. After complete bitumen drying, repeat the procedure. As a result, you will have reliable two-layer waterproofing.
Stage 5. Tool preparation
Such equipment will be required for work:

The last tool is "Damn" - we will pay special attention. For the manufacture you will need steel wire with acutely sharpened ends. Bend the wire in half so that it acquires the shape of the circulation, you can additionally secure the handle. This tool will be required when laying logs.
Stage 6. Construction of a Bani Srub
There are several assembly technologies:

The first option is the Russian cutting - is the easiest in execution, even an inexperienced carpenter can well cope with it. Therefore, we will consider that this technology.
Step 1. The construction of a church should be carried out in gradually and start with a bustling crown (in other words, from the first). The logs that will serve as a bustling crown, take it off to the Kant for the most dense adjacent to the foundation.
Step 2. On top of the waterproofing layer, put the first pair of logs. Squeeze the next pair at an angle of 90ᵒ relative to the first and connect everything into the "cup".
Attention! "Cup" is the easiest way to connect during the construction of the building log houses. It is simple enough: the boundaries of the future "cup" are measured at the bottom of the log, then with the help of "features" places a deepening. After re-checking the size, the recess is neatly cut into the ax.
You can use chainsaw - it will significantly save time. Although the final finish of "cups" will still have to make an ax.
Attention! In the starting crown of "cups" will not be deep, as a result of which the logs will not touch the base. Therefore, in the emerging clearance, lay a pad - a small piece of boards of the required thickness treated with an antiseptic and covered with insulation.
Step 3. Next, put the second crown, using the most thick logs. This is explained by the fact that in the future you are cutting into them in sex. For the purpose of dense adjustment, do a longitudinal groove in the upper log, which would be a third of the diameter of the previous log. To draw the borders of the groove, put the top log on the lower and mark the markup with the help of "features".
Walling
Step 4. Warm the joints of the logs, preferably using a linen fabric. One piece of the canvas to put on the lower crown, the second connate the longitudinal groove (especially if the latter has a triangular shape).
Step 5. Connect the crowns among themselves. Here you can use:
- square Squares;
- round brazed from wood.
The second method is preferable, since it is copied can be prepared ready and make holes with an electric drill.
Make holes in increments of 1-1.5 m, parallel to flashing a completely pair of upper crowns and not completely - the third (bottom). To avoid skewing at the end of the shrinkage, you brazen in the upper crown at least 6-7 cm.
Step 6. Raising the walls on the desired height, put on top of them ceiling beams and rafters. If wet wood was used, then instead of the rafter put slate sheets and wait for the design shrinkage. Usually, for this, it is enough to overweight once, but ideally the shrinkage should last a year and a half.
In the spring, when the shrinkage is finished, proceed to the pant.
Video - Osin Dranco Roof
Stage 7. Door, window openings
We specifically started talking about openings after the end of construction, since there are two options for their arrangement.
Tools of tools and methods of cavropka
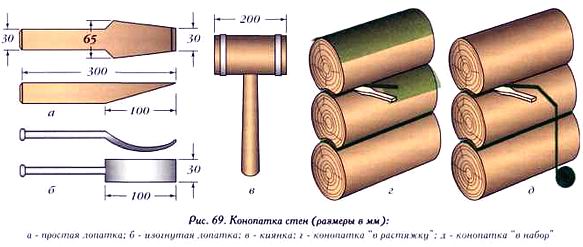
At the end of the shrinkage, the cutter is performed. To do this, prepare such equipment:
- a hammer;
- konopathic (from wood or metal).
Attention! If you seal the interventation space of packles or moss, then you can skip this stage, because the cacopate you will most likely not need. But if you have found at least the slightest slits, then the procedure is still better to perform.
Getting to work solely after complete drying of the insulation. First twist the material (pass or moss) in the harness, then score between the crowns through the hammer and cacopa.
After that, proceed to further scheduled works - fill concrete screed or the construction of a wooden floor (in the second case, the lags are crashed into the logs of the second crown and are fixed), install the insulation, perform the internal finish and the arrangement of the steam charges according to your project.
Bearing cornice
As a conclusion. Several delometrics
- Sometimes when assembling there is a need for docking logs. In this case, do not allow the joints to be located over each other. Moreover, in the lower vents of the docking is not allowed.
- When laying a cut on ready Fundam You can collect logs before drying, setting the seal between them.
- The windows are preferably equipped after shrinkage, since, otherwise they can shift.
Now you know how to buildshed Ban your hands.
The strength and heat engineering of the wooden structure in a large extent depend on the type of angular wrist. The builders of the old Slavic settlements did not hold the options for its manufacture in the secret. Thanks to their oral master classes, proven folk technologies were able to preserve. Carpentry traditions have been significantly enriched at the expense of foreign experience and the introduction of useful improvements. Knowledge baggage accumulated weighty. Now B. wooden construction A variety of ways are applied by varnish bar and logs, one of which is to be used to build their own baths.
Two "indigenous" families of louds
The fundamental criterion for dividing the methods of writing into two large classes - the presence of either the absence of bypass. So the folk masters called the remains of the log, and then the bars leaving on the ends beyond the limits of the circuit of the wooden structure. Relying on this indicatorIn the technologies of the construction of log cabins, I highlight two main fees:
- "In the bowl", according to which the angles are cut down with the residue. This is the most common way that has a mass of variations of domestic and foreign origin. Minus nodal bowls in a tangible consumption at all are not cheap material, plus in excellent thermal insulation of the angle. Yes, and looks on the bowl of the structure quite effectively.
- "In the paw" or in a simple "no residue". According to it, the contour of the structure is styled precisely according to plan. With an equivalent material consumption equivalent, the internal dimensions of the structure are larger. The corners chose in the paw in the paw require mandatory cladding, otherwise they will be bludging and mocking. Frams, built without reversal, can be seen by clapboard, block house, plastering, lining with brick or sandwich panels. Unlike options with the bowls, they are applicable here, and sometimes it is recommended all the directions of the finish.
One of the fundamental rules states that all angular compounds must be performed according to a single scheme. Since the wrist of a bar and log walls was carried out according to the scheme "in the bowl", then it will be necessary to cut down the partitions in the same way. Immediately pay attention to that for corner connections All existing ways are applicable in the log wedges. But the bath from a bar is cut primarily in the paw, but the occasion is also used and a number of cup-shaped types.

Both classes of corner wrist "covered" by an impressive number of subsidiary subspecies that differ in the complexity of manufacture and heat engineering qualities. Choice the best way Determine:
- performer's experience;
- climate specificity of the terrain;
- the period preferred to take bunny procedures.
For the assembly of the crowns of the countryside, operated only in the summer hours, the simplest ways of writhing are suitable. Especially if the owner is going to build a bath on cottage plot Alone. The customer of the brigade of masters in need of a warm structure for year-round use should not be denied in choosing a challenging technological scheme. Information about the differences and features of the wrist will help both the independent performer, and the excitement of builders, who wants to spend money not in vain, make a reasonable choice.

Options for cutting with the residue
The most accessible for a novice carpenter by making an angular node recognize the cut into the bowl, i.e. With the residue of the log on the end. In the "cup" class there are simple and ultra-empty technologies. In wooden construction, it is important to understand: what is easier to chop, will heal less and serve. However, without carpentry skills and knowledge in this art for the manufacture of complex structural recesses, it is better not to take.
Simple Bowl Making Algorithm
For the production of cutting into a simple cup in the log, two grooves in the shape of half-cylinders and a longitudinal interventored furrow, called a lunar groove, are selected in the log. All deepening in the log is made from above, which is very convenient for the wizard, but not good for the walls. In the hole deployed to the sky easily, moisture is easily selected and dust falls through the pairs of density due to drying. Therefore, simple bowls need constant renewal of cacopa.

The owner of the cylindered material does not need to suffer with preliminary preparation. Calibrated logs have a single size, the installation grooves are already selected in them. Even the manufacture of angular recesses. Cylindrid manufacturers can be done if an order and intelligible design documentation goes to them. The buyer of the sawn forest is to be processed: to make, dry, choose a longitudinal moon-shaped furrow for reliable bumps of the crowns, and then start to wheelhouse into the bowl.
Sequence of work on the manufacture of simple bowls:
- The squeezed log on the sister-in-making place for marking.
- If the longitudinal interventovaya groove has not yet been made, on the thin end of the lower log, in the upper part of which removing is to be made, draw a line equal to the width of the future groove.
- Slide the legs of the factory or homemade feature to the width of the placed mounting groove.
- Stinn the line with legs to the humps laid in the log cabin and trying to it the upper fellow, then we scratch the sharp legs on the lower log, the exact profile of the upper element, "ocked" the log from all sides.
- Having completed the marking of the groove, spread the legs of the line to the distance equal to half of the average radius of the log layered above.
- Strip again the legs of the drawing carpentry tool to the approximate and to the lower log lying across the side to describe the half-cylinders of future angular recesses.
- We will remove the approximate upper element of the cut, and on the lower log, we will make a pressure that do not reach the depth of the drawn recesses 7-10mm.
- We choose an ax that marked withdrawns and finalize the surface of the shinebel.
The method of manufacturing an angular connection based on a log cabin in a spike bowl is presented to the video:
There is no special difference in the sequence of actions. You can chop first a groove, then angular notches or in reverse order. The main thing is that all three constructive components are accurately extruded. You have to get caught by anyone: it will be necessary to try on and put the surplus if the top log is "sees" into the log cabin. Therefore, with the final sample to the protruding lines is not in a hurry. It is desirable to gradually bring it to mind to the mind, so that it is too big samples not to spoil the material. In the old time, the first time the crane mounting recesses smeared tar and put the top element on it. The lavety marks indicated where they still need to pose.
Subsidiaries Bowl
The cutting of a church in the bowl attracts inexperienced performers simplicity and relatively small labor costs. However, without additional castle elements, it is very hard for heat. For the construction of a summer bathhouse, this is quite acceptable. For the construction of a warmer building, the lock knot is better to supplement the selection. The way of cutting is to complicate, but heat engineering will improve.

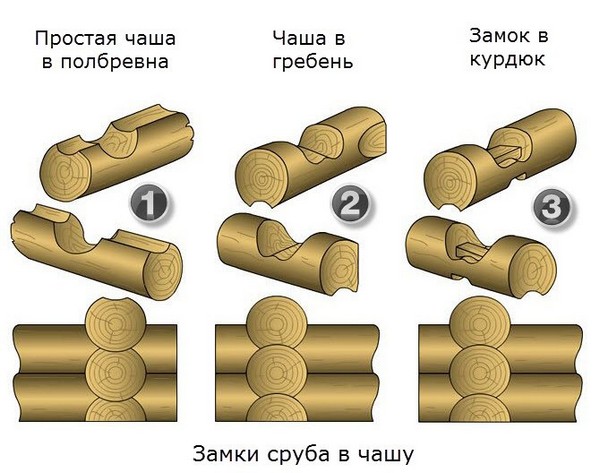
In the list of the nearest "relatives" technologies for shutters in the bowl:
- Cutting into the overojen (she is in the chop), which is a mirror reflection of the bowl. This method is also called Siberian cabbage. It is distinguished by the fact that the angular locks and the lunar groove are simply turned down. The lower orientation of the excavation eliminates the penetration of moisture and dust into the nodal conjugation, so that the insulation does not deteriorate and does not mock the log house.
- Bowl with a protrusion. It appeared as a result of the popular improvement of methods in the chille and in the region, according to which the deforestations are made either from above, or the bodies from the bottom. The cutting of the bowl with the protrusion allows you to arrange a longitudinal groove from below, and the angular notes at the top or proceed on the contrary. Because It will be necessary to lay a log with interventic furrows in the bowl, the excipher configuration cannot be still half a cylindrical. Therefore, a rounded protrusion appeared in the bowl, repeating the radius of the longitudinal mounting groove.
- Cutting in the hid. It is to form two equivalent rectangular cuttings on the upper and lower side. The option is simpler, but suitable only for the construction of economic buildings.
- Ublop with a gym. In order to optimize the strength and thermal insulation of the angle in the bowl, leavens are left - this is a unwanted quarter in a bowl from the inside of the angle. For dosilets, there will still be a response with a mating log.
- Cutting into Kurdyuk. It differs from the simple bowl of the presence in the extrusion of an additional spike that increases the strength of the angular node. Schip is called Kurdyuk or Potomok. It gave the name method and increased the heat engineering qualities of the log wall. Oriented the cutting into Kurdyuk in both traditional parties. The bowl is originally chopped by half of its height, then spikes are turned out. The sizes of the formed spike are transferred to the mating log without special tricks: rolling into a log house and marked the serfs where the response groove should be chopped.
Pretty demanding in relation to the skill and experience of the performer, two ways to cut a log cabin in the hook are considered. The first of them predetermines the cutting of half of the bowl, and the remaining, not disheveled half must be clearly docked with the semicircular cutting of the mating log. The second technology resembles a bowl with a gaze, but the logs are rejected by one Kant, and the opposite side turns inside the building. When cutting into the hook, the maximum log power is maintained, thanks to which the angles are warm and reliable.


This is how the cutting into a simple hook:
Overseas technologies of louds with the residue
The fundamentally Canadian and Swedish schemes of logging are similar to the Siberian technique "in OHLUP". Only the angular grooves and grooves to them have no rounded in the section, but a trapezoidal configuration. This is a good plus, because When shrinking, the Slavic bowls are expanding, because of what they need a periodic subaccination. Canadian and Swedish recess after shrinkage tightly "sit down" on the log died to her. There are no gaps at all, and over the years, dusting is also sprinkling spontaneously.
The technique of execution is different. External distinguish can be partially opposed in the castle area of \u200b\u200bthe "Canadian" log cabin and sharpened by six faces with a pretty "Swedish" crossing. W. canadian technology There is a good simplified follower - cutting into the saddle.

The extremely demanding point of all the shuttle schemes with the residue is precisely the length of the log part of the log, serving beyond the limits of the structure of the structure. It is impossible to do without a short crossing, otherwise it will fall. For a desire to save not led to the emergency state of a log, GOST for the number 30974-2002 clearly regulated the limit distances: from the end of the log to the center of the breakdown of the bowl should be at least 1.4 diameters of the log processed.

Video demonstration of Norwegian cuts:
Methods of cutting without a residue
Options for cutting cutters in the paw are significantly less than methods with a bowl. The reason for their appearance was not economic considerations, but the desire to remove the wooden Terem in the luxury palace by finishing. The angles in the paw are significantly colder. The capillaries on the ends are open, so the outer side of the angular connections in the paw strongly advise to sew at least boards.
For the construction of a church with the use of the technique "in the paw", a bar is suitable, the yokes - dried into two vertical Cant from the opposite sides of the log. Suitable otlindering and ordinary rounder with vertical left and right-wing trees - "DOOLS". Bolk length, i.e. The length of the side cut is equal to the largest diameter of the material used. Bolk width, i.e. The distance between the trees is 2/3 or 3/4 diameters of the vertex of the finest in the acquired batch of the log. Its and it is necessary to first identify and "fool" as a reference for other logs, so that in the process it is not found that part of the material does not fit under the size of the planned paw. By the way, the nerds can be outset immediately on all the logs, and then go to the manufacture of paws of the selected type.

General Lape Manufacturing Instructions
The straight paw is the simplest scheme in the "laptom" class, so you can try to make it my own. She has all the lines of the upcoming tester strictly vertical and horizontal. So that the angle is blocked less, the paw can be supplemented with a gaze, deposit this constructive addition from the inside of the angle. The most reliable connection in the class is oblique paw, because the inclined planes are not allowed to turn out the elements of the log cabin and carefully retain heat.
It turns out all the variations in the equivalent sequence:
- Prepared for processing the damn again we take away from above and below. The depth of the treasure should be equal to the width of the nerd. As a result, we get a parallelogram with one imaginary side and deployed to our square cross section;
- The end of the parallelogram is drawn into 8 equivalent horizontal parts.
- According to the selected paw type and table sizes on the preceded plane, we note and connect points;
- There are lines of future treasures with requiring planes and squads, if it is decided that they should be;
- Carefully remove the surplus on the markings and on the first finished paw we make a template for transferring the size of the following logs.
There is no need to independently calculate the sizes of oblique paws, they are in the tables. The masters of them are bothering slowly, scrupulously. The lunar groove is scratched along the logs laid into the log cabin, push the legs of the line to the value of the detected gap.

Corner Wildlings in Brous
Forming a rounded connection in a timber is difficult, and it is not necessary, because for the bruise of the crusted crowns, their techniques have been developed. On the basis of the paws were created identical options with very similar names: Okhenap, Polterev, Kurdyuk.
However, the bar has its own, specific methods and types of angular compounds using plug-in or chipped materials. The walls according to the tradition of wooden architecture are "penetrated" with bellows - vertical wooden nails of 25-30 cm in diameter and height equal to 0.8 from the height of the cut.

However, the bar has its own, specific methods and types of angular compounds using plug-in or chipped materials. The walls according to the tradition of wooden architecture are "penetrated" with bellows - vertical wooden nails of 25-30 cm in diameter and height equal to 0.8 from the height of the cut. It should be remembered that between the elements of any connection in the blocking and log cabin, it is necessary to leave a vertical clearance to compensate for the standard shrinkage, followed by construction. In the bowls and paws, the limit value of the gap 0.5 cm, in the mounting longitudinal grooves of 1.0 cm.

We described the common, but not all existing logistics schemes. The difference in the methods of their implementation and in the heat engineer will tell you that it is better to prefer good luck!
Engaged building a log house with your own handsFaced with the lack of good carpenters, masters in the field of wooden house-building. "Carpenters" many, real masters, unfortunately little.
The wooden house building market consists on a competitive basis. Each company for advertising and forming a package of orders declares the high quality of its products, about the best masters in its state.
Visiting the construction site of construction companies, make sure the quality leaves much to be desired.
Posting an order for the construction of a church in construction company, pay attention to the processing of the longitudinal groove.
The longitudinal groove should be semicircular and shallow. The groove is usually chosen by a rounded wrought-iron ax.
In the end, the longitudinal groove repeats the contour of the underlying log and causes a very dense fit of the log.
Selecting bowls.
A bowl is pumped up with a saw and rejuvenated by a rounded wrought-iron ax.

The bottom of the bowl is smooth and should fit tightly to the underlying log.
With the outside, the bowl should not be with the slots in the corners, the brica is tightly adjacent to each other.
With good skill of carpenters, there are no cracks in a litter. Engineer of technical supervision of the company "Northern Srub" obliges carpenters to lay interwidden insulation Thus, so that he would not be broken from the courtyard. This is done with the aim of showing the Customer and an employee carrying out the technical supervision of the construction of construction, the quality of the work performed. If the interwetant insulation sticks out in Srub, then this insulation can be masked any slot and hide poor quality.
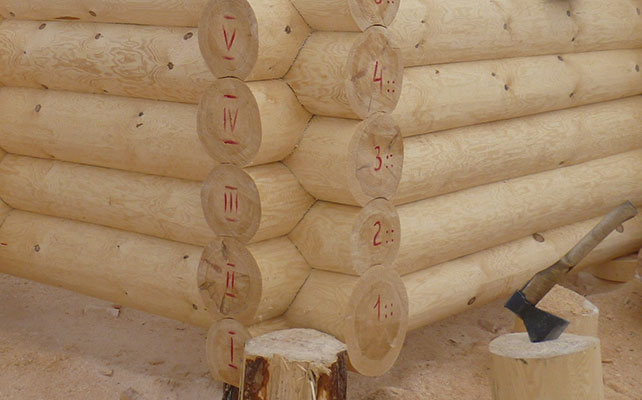
You can pay attention to how carpenters lead the marking of the log. In the end, on a split short, from the bottom logs to the top draws the pencil of the trait. If you hang a plumb from the top log to the bottom, then the trait and plumb must match. This suggests that the wall is made smoothly and not falling.
The construction of a church directly on the foundation at the customer avoids many unpleasant situations. If your foundation is flooded not exactly, carpenters, chopping the first crowns, quickly correct the lack of foundation.
If the carpenters in the construction company turned out to be non-professional, then you can stop the construction of the construction already in the first crowns, without waiting for you when you bring a ready log house, to see all the non-professionalism after the grazing assembly.
If you build a log house on your foundation, you are not a "hostage" of commercial activities of the construction company, because when the company lacks financial resources, it does not matter, whose money is to close current expenses. It happens that the customer in the middle of construction has no money for its continuation, they counted on something, but the deal broke or something else, the crisis for example. Such customers are not uncommon, in some cases sometimes have to install payment. Building a log house on the foundation, you can suspend construction at any time without prejudice to yourself and resume it with another company.
It is advisable to hire an engineer for technical supervision of quality control during the construction of a church.
The company "Northern Sreda" produces a log cabing directly on the site from the customer.
In this method there are a number of apparent benefits for the company and for the customer of advantages:
• Lack of prepayment. The customer pays for the services provided to him on the fact of work.
• The North Credo company makes work on the installation of the foundation and performs the full range of works related to interior decoration at home.
• Making work on the construction of a church directly on the foundation, the customer has the opportunity to regularly monitor the quality of construction, pay cash Only after the acceptance of the executed stage of the work. One only this factor is a sufficiently weighty argument. The log house is built about four months, and the service life is calculated for 400 years. Much more pleasant to live in a well-built home. Construction on the foundation excludes the possibility of poor quality work, as payment is made after the completed stage of the work of the Customer.
Circuit assembly on wooden impudent
Description of video material:
SK order-house Construction of houses from a bar, bruce baths, frame structures. Country houses And the baths from the profiled bar turnkey, and also work with a dry bar. Order houses and building baths. Quality products I. big choice carpentry products affordable prices. Excellent basic design equipment - high-quality windows and doors, carved balusters, warm corner, etc. Work of the Novgorod builders brigades. Building round year Without intermediaries - qualitatively, reliable. Shares and gifts!
Production of a boiler and a log house near the house

Description of video material:
Igor Pichugin shows how he two with her son makes a fruit on the machine of his own design, marks and rubs the Norwegian cups along the template invented by him - and all this is right near the house in P.Vacha Nizhny Novgorod region.
How to cut the log cabin with your own hands
Did you decide to cut the bathhouse, house or garage? The principle is one, the difference in the size of the logs and your desire. What about a church with corners, cut down "in paw"? The advantage of this method is obvious. This is the savings of the building material, and the reliability of the junction of logs in the foot.
How to cut a log house with your own hands? Where to begin? Of course, the beginning of the work should be the choice of the workplace, where we will be shredded by our construction Materials. The masters advise to harvest the forest in the winter, because the snow is easier to move, and the purity of the material is also ensured. First of all the logs need to be sick, i.e. Remove the bark with them. It is worth it as soon as possible, because with drying the bark sticks to the log everything is all stronger, and it is not clear it, and this is a serious minus of the appearance of the construction.
How to cut down the log house with your own hand for the tools. For the manufacture of a log, you will need a carpentry ax, a hatch, a chisel, hacksaw, a two-handed saw, a bracket, a level, a bayonet shovel, a short-graging cord and sewing (for marking), roulette. If possible, get a chainsaw - this tool will greatly facilitate your work, and will also save time and strength.
Choose the size of the board at which you will mark logs. And proceed. In the middle of the logs it is necessary to mark the width of the board. According to these two vertical lines, we make a pressure and comparting too much. Gently note the length and width of the log, which will take place in the angle, on the measurement board. The line for washed must be strictly vertical throughout the corner. And do not forget about oblique cuts on inner corner Siruba. Otherwise, the logs do not be hurt.
The layer laid on each other log is called a crown. Between themselves, the crowns must be fastened with wooden spikes by 1.5 meters from each other in a checkerboard order. If the project is conceived by the window, then experts advise to lay five crowns down, and three crowns over the window opening.
For the strength of the structure, the thick logs are stacked in the lower crown on the foundation. Then the rest of the crowns are collected. After readiness of the top layer of logs, it is possible to mount the ceiling beams and the woven wovers.
It is recommended to get acquainted with the appropriate literature or consult with a qualified carpenter to learn how to cut the log house with your own hands. After all, you want your construction to be reliable for for long years? Then follow the technology of construction and warming of a church.
Catching corners of a church. In a bowl or in paw?
Choosing between two classic types of cutting of the corners of wooden log cabins "in the paw" and "into the bowl" should be paid attention to their properties. The masters of our company own both techniques perfectly, but the customer still should be understood which of the types of cutting corners of the log cabins meets its requirements. This article will carry out a comparative analysis of the two classic types of connection - "in the bowl" and "in the paw" so that you can decide which one should choose.
Locking "in the paw" during the construction of a church
The first thing that can attract the Customer in choosing the cutting "in the paw" is an economic component. When cutting the corners "in the paw" there is a real opportunity to save. This type of logging of the corners of the cut does not imply a material overpowering. And the walls of the church correspond to the length of the log. As a result, the cheapening of the total cost of a chopped or brusade house, or a bath to ten percent. However, the cutting "in the paw" has a number of shortcomings.
One of the main disadvantages of cutting "in the paw" is a significant consumption of heat. Due to the fact that the propagation of the cold along the wood fibers is not much faster than across, and the log ends or a bar with such a connection is at sufficiently close distance from the indoor room, the heat is easier to leak outward. Heat exchange between cold air outside and warm air inside wooden house, cut down "in the paw", is much more intense than when cabing "in the bowl".
The actual cutting "in the paw" requires greater qualifications from the master and by itself more laborious. The fact is that inappropriate quality of work can lead to the fact that over time the logs "float." And it will steadily lead to disturbance all the construction. At the same time, the size of the chub roles does not play, whether it big house, sauna or summer veranda.
Building, firing "in the paw" is short-lived. To ensure that the structure of the tree is violated with this type of log cabin. It inevitably leads to a decrease in the sustainability of the house or bath to the natural impact of external factors and weather conditions. For example, water that fell into a log house with a similar type of connection, during freezing it can seriously damage the construction. But to produce work on exterior decoration Such a cut is much easier. If the owner of the house is generally interested in the misstitution of the construction, to make it on the house, cut down "in the paw" is much more convenient than on a house, fired "in the bowl".
Cutting "In the Bowl" during the construction of a church
Chopping a wooden house or a bath "in the bowl" more expensive than "in the paw". However, the price difference is not so great. It is about 5 - 10 percent. However, for this money you buy not only a more classic type of chopped bath or a log house, but also a number of pleasant bonuses, which will be discussed below.
First, heat loss in a wooden house or bath, cut down "in the bowl", significantly less. The size of the construction in this case does not play roles. Starting from the cutters of small, and ending with the most common among customers by cutters of houses 8x10 - all of them have less heat transfer if they are not cut into the "paw", but "in the bowl".
The stability of the house, the log house is made in "in the bowl", became among the masters on the cutting of the log cabins of the patrol in the towns. And this is repeatedly confirmed in practice. In addition, the log house "in the bowl" looks more authentic and classically compared to the log cabin "in the paw." Immediately seen is a real traditional log house.
When cutting a cut "in the bowl", the structure of the wood log is subjected to minimal disorders. This most directly affects the durability of a church. Its stability with respect to the natural effects of external factors and weather conditions increases repeatedly.
We hope that this material will help you do. right choice. Now you are able to independently understand what type of log cabin - "in the bowl" or "in the paw" is preferable
Repair cut do it yourself
Change lower vents Fraps from logs (log cabbage) or log cabins from a bar (brushed log cabins) by the builders or their own hands, is usually accompanied by the rise of the house for a certain height. Moreover, such a rise is necessary if you need to change two or three lower crowns from logs or timber, as they are usually fastened between them with wooden, or even with metal brazers.
A lever was used in ancient to lift the lips - a good long strong logo and wedges. Then, of course, there were no jacks and other mechanical lifts. Now, perhaps, it is easier to find a jack than a good log, and the use of a jack simplifies this task significantly. Great, if there are 2 ... 3 jacks. But if there is only one jack - it does not matter, you can quite do and alone.
Usually, when damaged by the lower crowns of any structure, under the influence of wood pests - fungi or insects, it comes to disrepair and the ground overlap of the church itself, in particular the beams of the basement wooden sruba. In this case, most likely, when replacing the crowns, do not do without disassembling floors and the basement. With this, in order not to disturb the integrity of the building, the carrier beams of the overlapping is first appropriate, not to disassemble, but to replace them at the final stage of the work, after that we will change the shift of the crowns. By the way, the disassembly of the basement will open us the possibility of accessing the crowns of the building from the inside and will allow prophylactic work on the device's internal harness.
It is necessary to envisage that when climbing a log building with their own hands, do not damage the furnace, which, of course, will happen if the furnace is arranged in a litter at the basement. In this case, the furnace should be shifted by installing it on a separate foundation. It would be nice to still remove the chimney,
After fulfilling all these preliminary measures, you can proceed to the main task. And here it is already necessary to act according to ancient wisdom "death seven times, - once again."
As a rule, the work on changing the crowns of the logs or timber is starting with their own or with the help of specialists with a shorter-moving wall of a wooden log cabin. It is usually the length of its 4 ... 6 m.
When performing marking of the openings, which will have to cut into the wall, it is necessary to take into account the presence of partitions, openings, butts of cutting in a litter.
Marking logs start with some kind of corner of the building: retreating at a distance of 0.5 cm from the angle, on both sides of the angle, starting with the last top log or timber, which must be removed, is cut to the foundation for two grooves at a distance of 50 cm. Then, retreating to the distance of 2.0 ... 2.5 m, are made exactly the same two vertical grooves.
In order not to disturb the strength of the structure, we do not need to immediately lead work on the entire perimeter of the structure.
After performing feeds, these half-meter plots will be released from the bar, having received the windows. Thus, three windows are obtained in the wall.
The rise of the facility on their own or with the help of professional builders of specialists - we start from the corner of a church. To do this, before the resulting opening, it is necessary to arrange a support - install a stone, log, etc. Further, with the help of a kind and log arm (or hydraulic jack), carefully for 10 ... 12 cm We will raise the building. Lifting should be performed smoothly and gradually, while simultaneously defining the divergent bars (Fig. 8).
The height of fastening brazings is usually 5 ... 6 cm and lifting a 10 cm building for 10 cm for the first case. After making sure that we are not interfered with us, we disassemble the angle. At the same time, the construction relies on the wedges. Now is the time to pay attention to the status of the quality of the foundation, strengthen it or, if necessary, "pour out" a new one. When the foundation device should not forget about the ventilation holes in it. Making sure that the foundation meets all the requirements, we can "knit" angle of new material. Then we will rise a second angle and only after that, to change the average. If there is a large span and sagging for the suspension, it is necessary to apply supports (wooden "chairs" from logs or timber).
I would like to remind you about the need to protect wood from contact with stone or concrete foundation, which is achieved by the laying between the runneroid strip, roofing or other insulating material.
After the change of timber and cachatka is made, you can proceed to the device of the banding, that is, the inner warming of the building, the flooring of the floors, etc.
See Also:
Illustration:
http: //vobrog-srub.rf
Nowadays everything more people Interested in wooden buildings. Environmentally friendly, with good and very original external speciesThey allow owners to feel themselves in the atmosphere of the distant past, carrying them into the era of ancestors. Today, have a chopped wooden hut or a bath on the plot - it means to have a good taste and take care of your health. Our ancestors knew how to chop out a bowl into the bowl and this method was greatest. The technique of this method is quite simple, however, in order to master it, you need to know some techniques of carpenter skill.
 This method of erection of wooden buildings is characteristic of the countryside of Russia, including those places where the climate is very severe - Siberia and the Russian North. The method received its name thanks to a semicircular excavation, which the master did in the lower log - the so-called "bowl". This seizure served to perpendicular to the top log in it. Such a connection method made it possible to avoid significant gaps and ensured a very dense fit of the logs to each other. Speaking about what a log house is in the bowl, it is impossible not to mention its varieties. If the bowl is done in the lower log, then this is a faithful sign of the so-called "Russian cutting" (or so-called "in the region"). In the case when the wizard cuts into a bowl in the log, which will be top, has a "Siberian cutting" (another name - "in the chop"). It is believed that in the second case, the building is more protected from unfavorable weather factors.
So, the advantages of a church in the bowl can be called:
- fairly strong design;
- non-blowing corners of the building;
- aesthetic appearance.
But the log house in the bowl has some drawbacks:
- challenge problems;
- due to the projections of the corners, a reduced useful area of \u200b\u200bthe room;
- high wood consumption.
What will take a carpenter
So, you are going to make a log house in the bowl with your own hands. This will require the following:
- saw (electrical or gasoline);
- ax;
- carpentry line (circula);
- chisels.
Also need material for sealing slots (pack, jute, etc.)
What tree to chop?
Specialists in a carpentry case prefer such a tree like pine. Despite the fact that it is not the best material in processing (Pine wood is characterized by hardness and tendency in the process of working with it to form chips), it is pine logs that have better characteristics on the resistance to fungal diseases of wood and attacks of cores. In addition, the trunks of the tree are smooth and practically deprived of such a defect as the swirls. Buildings from pine have durability. For construction, you need to choose a log thickness from 20 to 25 cm. It is necessary to harvest the material in the winter, since during the process of drying wood trunks will be less prone strain and cracking.
Work technique
This process, like a log cabin in the bowl, should precede the preparation of the foundation with work on its waterproofing. The key to success here will be undoubtedly a strict horizontal surface.
We proceed to the creation of the lower layer (bustling crown). To do this, we take two barrels that will go to the device of the long walls of the cut, put them in parallel, then two trunk is put on their ends perpendicularly. Next, with the help of a carpenter circulation, the marking of the outbreaks under the logs is made. By doing this, it is necessary to observe special care and accuracy, since only correctly fitted logs will ensure proper quality of work. Placing a bowl, it is necessary to achieve the immersion of the upper barrel to the lower exactly half.
Next, using the tools, we cut the cutting down of our bowls. After that, we pre-install the upper logs in them. In order for the logs well to fit the vertically to each other in the lower log, in the place where its upper edge is, it is necessary to cut into the groove. It is performed along the entire length and its thickness can be from 12 to 20 cm, depending on the sizes of the trunk. Before installing a log in the grooves lay insulation.
To ensure the levels of the whole design in the bowls, the holes in which the holes are drilled in which the brazers are inserted - special spikes. The grub assembly process is accompanied by tracing logs with a chumbana.
And further…
Collecting log house, you need thin annual rings to arrange outside, and thick - inside. Building can be assembled by parts, carrying out a bundle on Earth, and then installing each other. Pile Fundam - The optimal version for a log in the bowl. With a lack of experience, it is better to start building small designs - arbors or baths.
Rubym corners in the top bowl


