The foundation on the screw piles is a universal design that is erected on any soils. Works can be held at the most low temperatures, during precipitation, in all climatic latitudes. For a low-rise structure, screw piles can be done with the help of a welding machine, steel pipe and sheet steel. This type of foundation is popular, as it is most reliable on complex soils, on blocks, aqueous, swampy sites. His advantages include easy mount and low cost.
Screw welded device
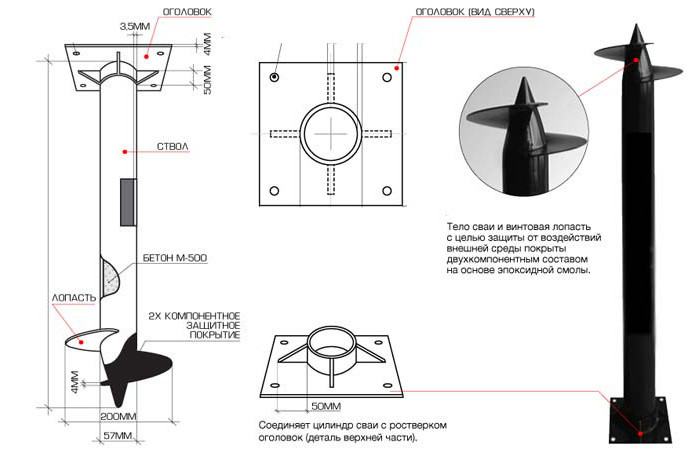 Screw the pile is made of high strength steel. From external factors, it is protected by an epoxy resin coating or anti-corrosion primer. In general, the product is a construction of 3-parts:
- hollow tube;
- tip;
- spiral blade.
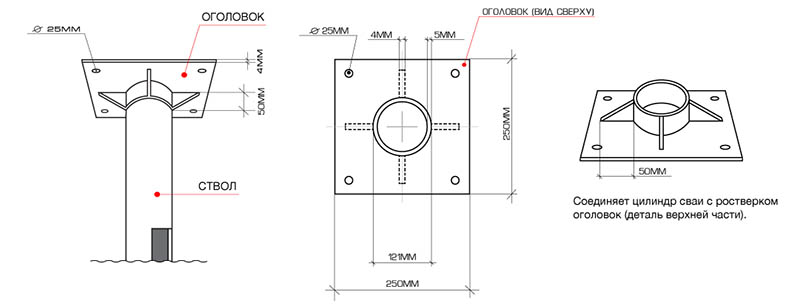
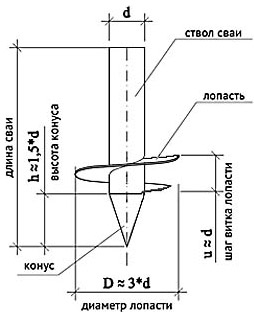
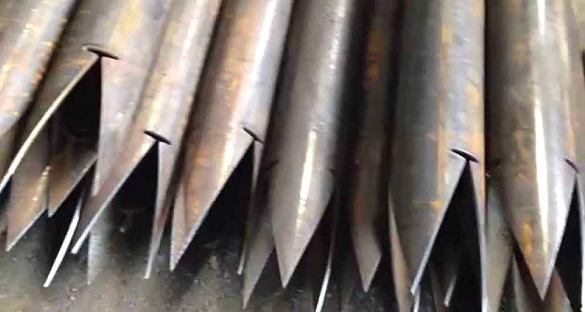
The lower end of the pipe has a pointed (conical) form. The upper end is a headband that is welded after screwing the pipe into the ground and fill in it concrete solution. The parameters of all parts of the structure depend on the weight of the structure, the size of the foundation, the type of soil. It is better not to select them approximately, but order a calculation in the project organization. So you are sure that the manufacture of piles occurs in compliance with the standards of construction and taking into account the peculiarities of the soil.
Materials for manufacture
For the manufacture of screw piles, you need to know the following data:
- pipe length;
- pipe diameter;
- length of the tip;
- pitch blade;
- the diameter of the blade;
- the angle of inclination of the blade to the plane;
- screw screwing line to pipe;
- steel thickness (for private house-building is 4 mm).
For example, give the values \u200b\u200bof the diameter of the pipe and the conditions for the application of these piles in construction:
- 57 mm - for light fences (blade diameter 200 mm);
- 102-108 mm - for frame-type houses (50 mm screw step, 300 mm screw diameter);
- 133 mm - for houses from stone, brick, wood, various blocks;
- 159-325 mm - for heavy buildings, including multi-storey and industrial.
Manufacturing process
So, you decided to build a small house, a garage, a hospostroy on the foundation of this type. The length of each pile should not be less than 200 mm. Their manufacture will require the presence of the following materials:
- tube suitable diameter;
- the blade of the suitable diameter and step;
- cone-shaped tip (for example, 150 mm long).
For work, electric welding machine and 3 mm electrodes are required. The blades and cones are cut from sheet steel, while the particular configuration of the screws should be taken into account. The cone is placed in the form of an inaccessible triangle with a base equal to the length of the circle. The length of the parties is equal to the length of the cone (download the drawing).
Important: Independent manufacture and welding parts should be carried out with a clear observance of parameters. The slightest changes can lead to violation of technology. For example, a slight angle shift on the screw leads to a marriage in the product and the impossibility of using it.
Installation with your own hands
 Piles can be screwed into the ground with hand tools. The simplest one is metal pipewhich is inserted into the loop, pre-welded to the top of the base. They are made from the reinforcement d \u003d 10 mm. This pipe is pushing like a lever, it rotates pile, it is screwed into the ground. In detail the installation of screw piles is based on a certain sequence of actions. Observe this instruction:
- Swipe stamps on the site according to the calculations of the foundation. The maximum distance between them should not exceed 3 m, the most reliable is the distance of 2 m.
- Each pipe install strictly vertically sharp ending with the blade down.
- With the help of a pipe or scrap, inserted into the loops and used, like a lever, screw the pile into the ground. The minimum blowout is 1.5 m. If the soil consists of a loam and clay, the screw continues through them to the solid layer of the Earth.
Final work
Height over the soil must comply with the design calculations. It can be different if the site has slopes, elevations. That is why the foundation of this type does not require a preliminary alignment of the site. The main thing is that the upper edge of all pipes is at the same level (controlling the laser construction level).
After installing piles in their cavity, concrete M300 is poured. For the manufacture of 1 m3 take:
- 400 kg of cement;
- 1300 kg rubble;
- 650 kg of sand;
- 180 liters of water.
After the solution is frozen to the top of each pile, the headband is welded. It has a cylindrical basis with a square "lid". The strapping is attached to the scribe. It is made of any material depending on the structure of the structure: 2All, channel, bar, reinforced concrete plate.
Installed screw piles with their own hands make it possible to significantly save money on the base device compared to the construction of foundations from other materials.
Hilly terrain, wooded plot, weak soils (swampy, peat) - all this does not become an obstacle to the construction of a pile-screw base.
For the construction of fences and light buildings, it is quite possible to make screw piles yourself.
The pile row support is collected from several parts:
- trunk (supporting pipe);
- tip;
- blades.
Trunk
The support portion of the pile is made of metal pipe. The production of piles implies the use of pipes of various sizes. The magnitude of the pipe diameter is the main factor affecting the supporting ability of the support. The pile diameter for the foundation determines the area of \u200b\u200bits use, carrying the load and the composition of the soil.
| № | Diameter of trunk | Priming | Application area | |
|---|---|---|---|---|
| 1 | 57 mm | Up to 800 kg | Outlined soil | Fences, Light Constructions |
| 2 | 89 mm | Up to 1.4 tons | Wetlands and peat soils | Fences, garages, pises, country houses |
| 3 | 108 mm | Up to 3.5 tons | In addition to stony soils | Heavy fences, log houses |
| 4 | 133 mm | Up to 6 tons | In addition to stony soils | Brick and monolithic houses |
This table contains the most common diameters of the supports of the supports used in construction. In individual cases, can use for the manufacture of piles of the pipe of other sizes.
Tip
 Weld the piles qualitatively, otherwise, when screwing, the blades will disperse
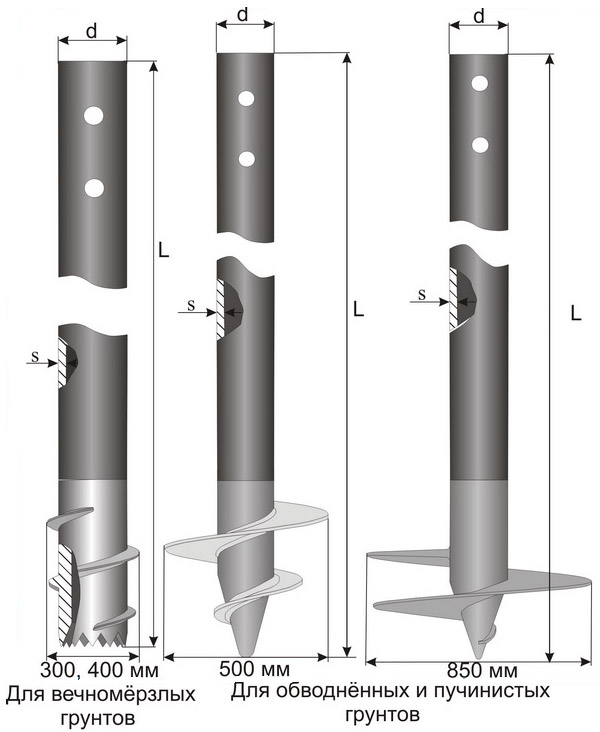
 In the manufacture of screw piles with their own hands it is very important to make it properly and welcome to the pile-screw support tip. In industrial production, tips are made mainly by cast. Equipment for the production of screw piles allows you to make cast tips in the form of a cone.
Welded tips are used to erect the support base in weak loose soils. Welded cones have less strength than cast tips.
A poorly welded tip cone when entering the ground may disperse, as a result, the support will be collapsed.
For the construction of fences and light buildings, the lower end of the barrel is performed in the form of a pipe cutting at an angle of 45 degrees. The hole is brewed with a metal sheet in the form of an ellipse.
Screw piles with beveled lower ends are very popular. This design significantly reduces the manufacture of piles. The bevelous ends of the stems of a small diameter are not inferior to cone tips.
Under conditions of having a large load and dense soil, screw poles are installed only with tapered tips.
Blades
 Make a small blade
 From the size and sharpness of the edges of the blades, the ease of screwing into the soil of support depends. This affects the deadlines for the construction of screw foundations.
Typically, the trunk is welded 2nd blades. If necessary, in addition to two blades set the third additional blade. It should be borne in mind that an additional half of the screw will increase the resistance of the ground base, which will require great effort to screw the support into the soil.
However, an additional screw for pile will provide a support with an increased bearing capacity and facilitates the entry of the barrel of the rack into the dense layers of the soil.
Homemade screw piles are made with a small diameter blades. And it is necessary to make a thickness of no more than 2 - 3 mm from the sheet metal. Thicker metal will require the use of industrial equipment, such as guillotine scissors.
Carefully completed pile drawing is the key to the proper manufacturer of the screw support.
Conditions for the manufacture of screw piles with their own hands
How to do screw pile For the foundation with your own hands? For this you need a number of conditions:
- employee qualification;
- availability of workshop;
- equipment.
Employee qualification
 The employee must own building instruments, including such as grinding and electric drill.
We need experience with electric welding. Knowledge and performance of safety regulations when conducting welding work - compulsory requirement.
The qualifications of the welder must be confirmed by the relevant documents.
Availability of workshop
All work on the manufacture of screw piles should be carried out in a well-ventilated room. The workshop must have a shield for connecting to electrical network Welding equipment.
Equipment
 To ensure the safety of welding, the equipment must be grounded.
In construction, welding machines operating from the 3-phase network are used. In the absence of such conditions, it is quite possible to use a welding device operating from the household network with a voltage of 220 V.
In order to make support, you will need a workbench or mounting table. The table should be in length so that you can put a pipe on it up to 3 meters long.
Welding work is carried out on a metal workbench. In extreme cases, the worktop of the workbench is covered with a metal sheet. This will protect the wooden parts of the table from fire due to sparks of welding. About how to make screw piles, look at this video:
It is necessary to have in a workshop device to fix parts of pile. As a rule, it is vice and clamps.
A plug-in tool kit must be arranged in the available zone of the mounting table.
Screw pile manufacturing technology
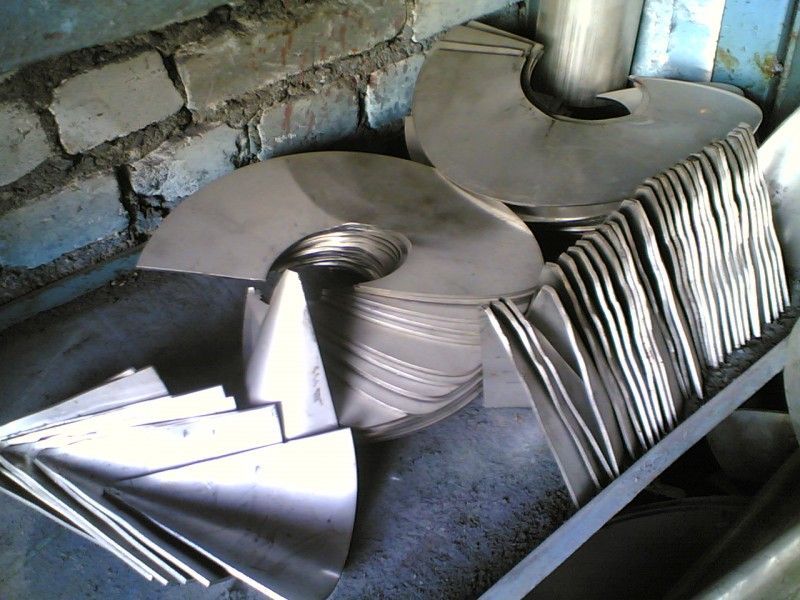
![]() Tipper blades cut by pattern
Tipper blades cut by pattern
Consider the independent manufacture of screw piles stages:
- At the top of the trunk, the supports are drilled by mounting holes. In these holes, the levers are inserted to screw the support in the ground.
- For the cutting of the metal sheet under the billets of cone tips, cut out of a dense material (cardboard) pattern.
- The drawings of the pile-screw supports give an accurate idea of \u200b\u200bthe sizes of the tip and the technology of its manufacture. Cone tips bend from a metal sheet with a thickness of 6 mm. The sheet is bent in the form of a conductor. As a conductor, you can use a driving cone smaller or make it yourself. Welded seam must be performed qualitatively. A poorly welded tip cone when entering the ground may disappear, as a result of which the support collapses.
- The pattern is cut off the plane of the blades.
- Billet blades bent, forming a screw surface.
- The edges of the blades are treated with an abrasive circle, forming the cutting edge of the screw.
- Pipe rigidly fixed with a tapered tip. The cone is welded along the length of the circle of the pipe. It is important to lay the support housing and tip cone on one axis. Disruption of the coaxiality of the cone with the trunk barrel can lead to the destruction of the tip, and then the whole support.
- In the formation of the bevelled end of the rod, the support is cut into the abrasive circle at an angle. The hole is tightly brewed with a metal blank.
- Then weld the blades to the support case. The big pitch of the blades is convenient when screw foundation Earl in sandy soil. The smaller pitch of the blades is made to set the foundation base in dense soils.
- The entire support is covered with an anti-corrosion composition. Compact anti-corrosion protection prolongs the service life of up to 50 years.
At the end of the welding work, control the quality of welded seams. Slag shells and uncompaired places can lead to the destruction of welding under load. Therefore, all identified flaws are necessarily eliminated.
Some nuances in the manufacture
 The inner surface of the pipe does not need to be processed. After installing the supports in the design position and leveling of the upper ends, a concrete solution is poured inside the trunks.
Concreting supports must be implemented. This significantly increases the supporting ability of the supports and increases the stability of the foundation base.
In addition to the above, it should be added that the screw support is a responsible high-tech design. For details of the manufacture of screw piles, see this video:
Any non-professional attitude towards independent support will subsequently lead to trouble. Therefore, if there is at least some doubts in your own forces and abilities, it is better to buy piles of factory manufacture.
The production technology of screw piles in the factory conditions guarantees the quality and reliability of this product.
Modern technologies quickly enter our life and become an integral part of it. Over 60 years ago, only military and geologists and geologists were used by the screw piles - lovers of hard-to-reach places.
To date, screw piles allow you to erect any designs in places with complex, swampy and even watery soil and territory relief does not matter.
Manufacturers plants are a huge amount around the world, but the progress does not stand still and of course, a person wants to master the manufacture of screw piles.
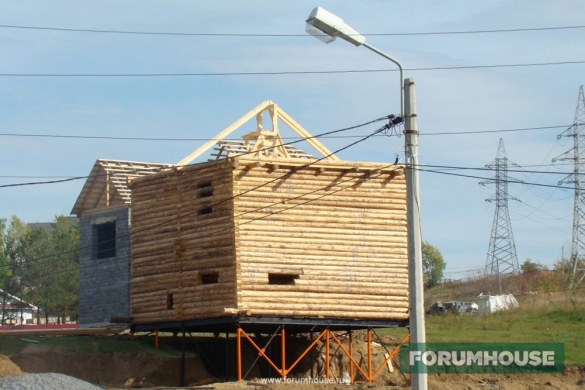
Photo 1 - Pier on screw piles
Want to build such a pier with your own hands? Especially since there is nothing complicated. You will need: a little patience, knowledge and money.
By the way about money. The most important advantage of the manufacture of screw piles with their own hands is precisely saving money. The foundation will cost approximately 40% cheaper than bought at the factory. Or maybe you like more than Pier, as the next photo?
Photo 2 - Original Pier with your own hands
What is a spiral pile?
This is a hollow metal pipe treated with an anti-corrosion composition with a welded or cast sharp tip and welded or cast blades. Each unit is mounted very simple. It must be tied to the ground like a large screw.
Stages of manufacture
- garage;
- alcove;
- veranda;
- bridge;
- pier;
- pier;
- bathhouse;
- fence;
- wooden frame house.
To make piles you will need:
- the drawing that can be found on the Internet;
- tool (welding machine, Bulgarian, scissors for metal);
- new pipes of the required diameter;
- metal for blades and conical tips;
- high quality anti-corrosion coating;
- waterproof paint.
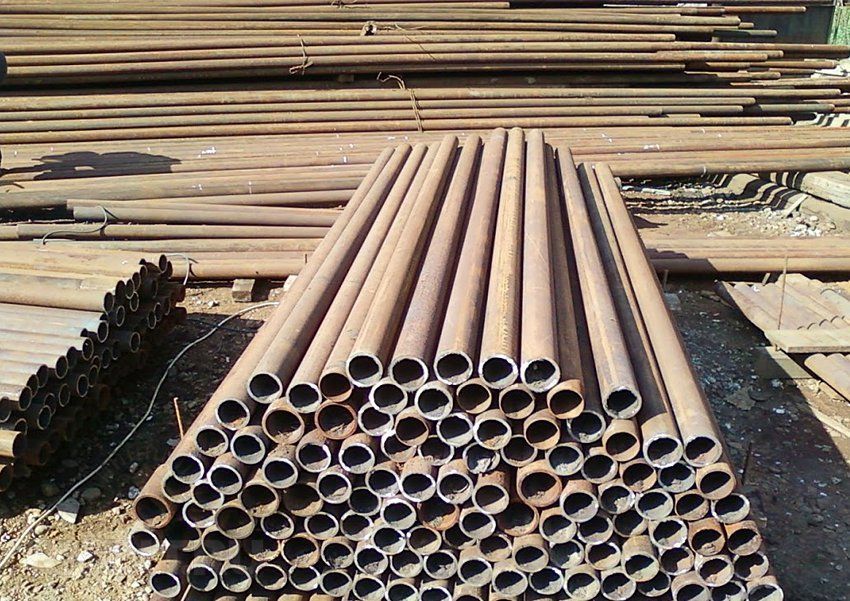
Photo 3 - Preparation of parts for the manufacture of piles
Tubes weld tips and blades. All seams process sandpaper to shine and cover waterproof chemistry in several layers. The more conscientious of the seams and the better the anti-corrosion coating, the longer your pile will last. At the top of the trunk, we make a hole for scrap, which will perform the role of the lever and make it easier to screw. At the end of the installation, the pipe with the hole is cut by the grinder.
All sizes must coincide, because by how much the strength and durability of your structure depends on how much the foundation.
Photo 4 - Ready Fundam from screw piles for baths do it yourself
But you can go and easily by contacting any production, where you will be helped by calculating the pile-screw foundation and order there with one pile, which professionals recommend, and the others do their likeness.
Making screw piles with her hands. Video
In the manufacture of screw piles, with their own hands there is nothing complicated, which will clearly show the following video:
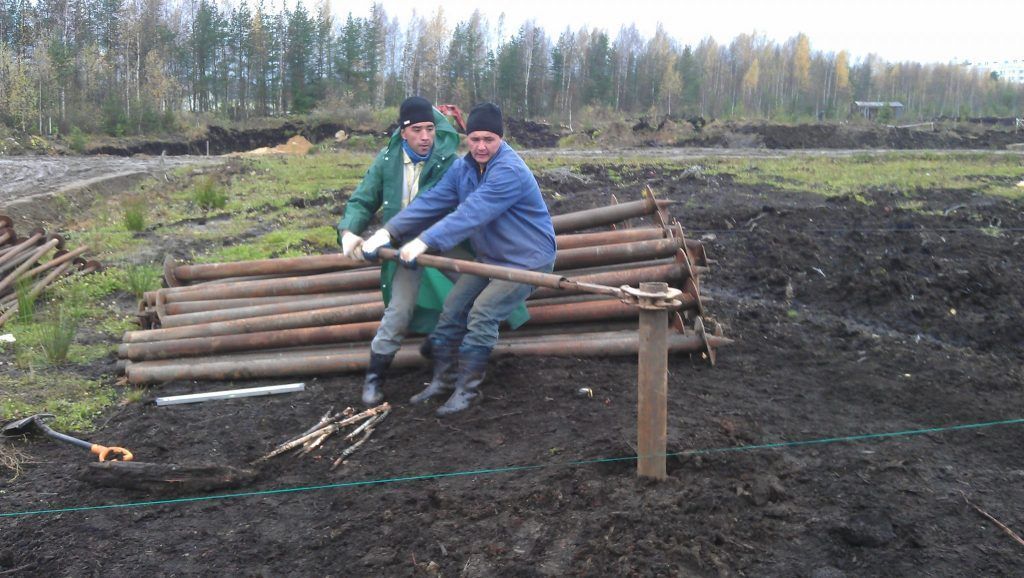
Screwing screw piles
The technology itself is absolutely simple. Call a couple of friends and you will handle in one day.
It is necessary to start with the fact that with the help of pegs to place places where the piles will stand. Then check the drawing evenness of the angles and the coincidence of all distances.
Photo 5 - Marking
Insert the prepared hole in the pre-cooked hole and, applying small efforts, screw the screw piles. Each average leaves from 10 to 20 minutes. Level Check how exactly the pile is enters the ground. The maximum allowable deviation is two degrees.
All piles must be the same length above the ground. To do this, measure each and disconse the excess with a grinder. In order for the foundation to be more durable in piles, you can pour a solution of concrete and over each of each to spend the headband with a thickness of 8-10 mm, and more than several centimeters width more than the pile.
Tool to twist screw piles
If you build a small design, and the diameter of your piles does not exceed 108 mm, then the following tool will be needed for manual installation:
- level to control deviations;
- scrap or metal pipe that will serve as a lever;
- bulgarian for alignment of the foundation in height;
- welding machine for welding offens and strapping (if it is scheduled).
Screw-in screwdriver technology. Video
We bring to your attention a video with detailed technology Screwing screw piles.
Installing the pilewood foundation. Video
When choosing a place to build any object on screw piles, first of all, it is necessary to make sure that there are no underground communications on the site, because the depth of twisting the smallest screw pile with a diameter of 57 mm is 1.5 meters. The more piles, the deeper they are installed.
The following video clearly demonstrates all pluses of installation. pile-screw foundation.
Special equipment for installing pile foundation
Installation of screw piles can be made not only manually. There are various techniques that will accelerate and facilitate the process.
For the manufacture of the foundation for small structures, the manual machine you will cope in two hours. If a more massive design is erected, then you can use the motobur, yamobur or excavator. At the same time, I don't have to buy equipment, it can be rented.
Each machine has a special mechanism that consists of a fixed part, a rotating frame and a special gearbox, which converts torque. The device screwing the piles into the ground can be controlled manually, hydraulically or mechanically. The special equipment is still convenient because:
- it can be reached by the construction site of off-road, swampy and clay terrain with a complex relief;
- provide fast and high-quality installation of piles even a very large diameter due to special adapters and mechanisms;
- spentlessly operates at low temperatures.
$ Cost screw piles
If you buy piles from well-known manufacturers, the price for one piece of the smallest diameter of 57 mm will be at least 15 hryvnia, and if you make it yourself on the cottage from the girlfriend, it will cost 3 to 5 hryvnia.
In the presence of materials, power tools can be constructed screw piles do it yourself, slightly reducing the budget of construction. Savings is 15 - 20%, but the home master can be sure that the CRS will have a maximum resource. Many unscrupulous manufacturers to reduce the cost of products use a suture tube, allow marriage when centered tip, which reduces the foundation characteristics repeatedly.
The construction of industrial production is extremely simple. A seamless thick-walled pipe has holes or clamps at the top for fastening the levers, a pointed tip-peak with a blade at the bottom. For weak soils, the second blade can be used at a distance of 0.4 - 0.6 m from the lower screw. Special anti-corrosion coating protects metal elements from destruction.
Production of screw pile step by step
At the initial stage, it is enough to buy seamless pipe With a wall of 4 - 5 mm, no matter what kind of design will rely on the pile field. For the remaining elements of SVS (pile screw welded) will need sheet metal 4 - 6 mm thickness. All items are joined by welding, for cutting it will be necessary for the Metal Disk EYM or more modern equipment (for example, Plasmorez), which is often present in the Arsenal of the Home Masters.
Pile body
Depending on the depth of the reservoir with a sufficient bearing capacity, the SVS length is 2 - 3 m. Larger products are uncomplicated manually, therefore, if necessary, a three-meter product is immersed, increasing in the ground with a piece of exactly the same pipe several times. The pipe must correspond to several criteria when choosing:
The specified parameters optimally corresponds to the sorting from Steel 09G2C (corresponds to GOST 19281) or ST20 (corresponds to GOST 8732).
Options of tips
The easiest way in the manufacture of piles with a pipe tip. Then there is a cross-shaped peak, a petal technology. The most complex tip is a welding option.
Cross-shaped peak
For the manufacture of this tip, four sheet steel blanks will be required. Technology has the form:
- curra sheet - 1 round plug; 1 triangle (the base is equal to the pipe diameter, the height is 2 - 2.5 diameters); 2 screeners serving rigidity ribs for a triangle
- tap - the triangle is installed at a right angle on the base-plug, brazers lean on the sides.
- welding - double seam for all joints
The blade in this option is impossible to welcome to the peak, so it begins above. In combination with a cruciform form, this significantly increases the twisting force.
The peak is made of several triangular billets. For diameters 76 - 89 mm, 4 petals are usually used, for diameters 108 - 159, up to 5 petals increase, 7-11 petals are used for pipes 219 - 325. The template has dimensions:
A peak is welded from the blanks to be welded to the pipe, observing the coaxiality of the cone, pile bodies. At home it is not easy. The offset of the tip for a couple of centimeters to the side will ensure the beating, the soil jams instead of sealing the walls of the well.
The technology is similar to the previous way with small additions:
In view of the similarity of the technologies, there is no lack of a lathe for a lathe center, the centering is also made on the eye. The quality of pile in this case depends entirely on the qualification of the cutter, the disintegrating teeth for welding.
Many manufacturers of screw piles implement modifications without conical tips of two types:
In the last embodiment, concrete when filling in the inner cavity is fed under pressure, it turns out in the depths of the layer, after the frozen increases the area of \u200b\u200bsupport, carrying the ability, respectively. These piles are the simplest in the manufacture, however, the blade begins on the body of the pipe, which increases screwing force. A mechanized immersion method is recommended (drill + multiplier).
Blades
In factory piles with cast, welded cone-shaped lugs, the blade begins in the lower third of the peak, then goes to the body of the pipe. This significantly reduces screwing force at a manual immersion method. The lower blade is mounted on all modifications of SBS, the upper is used in soils with insufficient bearing capacity. With independent manufacture, two-blade CSSs are rarely manufactured.
For the workpiece of this element, the SBS will need a sheet steel minimum of 5 mm thick. The technology of manufacturing the uniform blade is as follows:
In homemade CSS with a cross-shaped tip or without a tip, the blade begins from the lower edge of the pile body. All joints boil with double suture, the scale is knocked down before anti-corrosion processing.
The second screw is manufactured similar to the lower blade, is mounted above it by 40 - 60 cm, depending on the characteristics of the reservoir located above the carrier layer. For an additional screw, 4 mM steel can be used, since the load when immersing the SBS is significantly less. 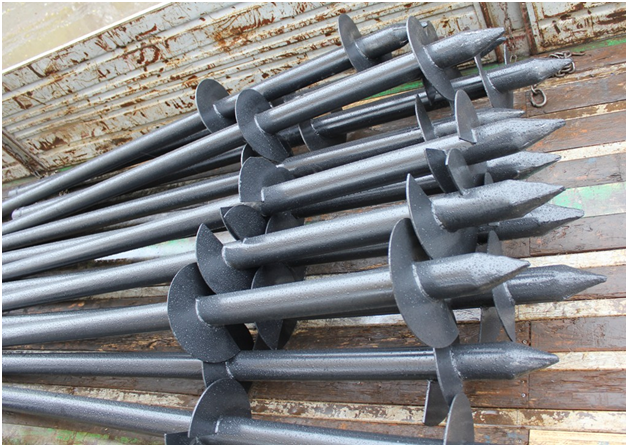
Two-blade piles are more stable in the vertical direction after 70 cm reel. They withstand the prefabricated loads from the cottage 1.5 times large than one-grade modifications. More resistant to side loads, often used for fences from a high sailboat, banner stretch marks.
Knot fastening levers
To rotate the CCS, levers are used, the ends of which somehow must be fixed in the upper part of the CSS. To do this, it is usually made by holes in which you can insert two scrap or adapter for the torque amplifier (multiplier) when screwing the CSA drill. In order to keep the pipe in some cases, two clamps (reinforcement 12 - 16 mm) are welded on it, which after immersion is cut off by the Bulgarian. 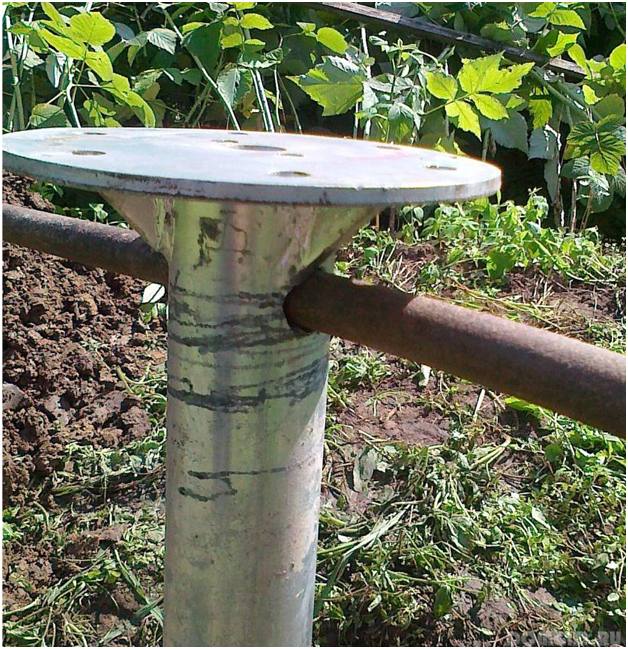
Due to the large diameter of the levers (scrap or pipe 1 inches), drilling holes inefficient. Therefore, they are burning with welding or gas cutter, then align the ESM with a metal disk. Holes should be located below the edge of the pipe into two diameters, be opposite each other.
As a clamp, 12-16 mm fittings (smooth or periodic sections) are usually used, curved by the diameter of the levers. The disadvantage of this method is to increase labor costs (welding, cutting of clamps after mounting piles), dignity - preservation of the pile body (extra 15 to 20 cm), which is relevant for the construction budget. 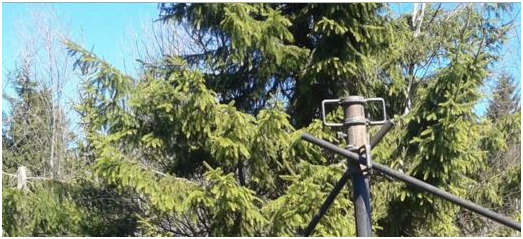
Metal structures operating underground rust even in the absence of oxygen in the lower layers of the soil. Therefore, at the end of the welding work, Kalina is knocked down from all seams, the pile is completely covered with anti-corrosion compositions. The most efficient first layer of protection is hot galvanizing. However, this method is not available at home. Therefore, compounds are used as soil:
- zinc-containing paints
- soil Vl05
- soil IR02.
The second layer are the following:
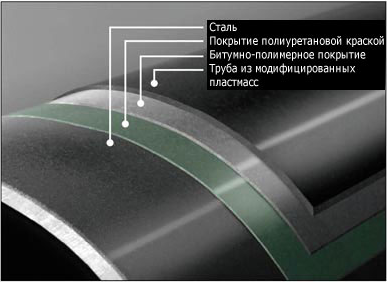
These paints and varnishes in the complex with primer provide 30 - 90 sideways of the pile field. From electrochemical corrosion (wandering currents in the ground) protects exclusively fiberglass, which is impossible to apply high quality at home.
Following the above technologies, you can make a pile of SBS yourself, providing a high resource of the foundation. Changes in the design of the blades, arbitrary sizes of peaks will lead to an increase in torque, reducing the carrying capacity of the product.
It is difficult to produce screw piles with their own hands, however, you can. Therefore, we take on the courage to describe this process. And they will help us in this tips forumhouse users.
The calculation of the pile-screw foundation is a difficult job that requires the participation of specialists. Only the designer will be able to calculate the total number of screw piles, the density of their location on the site, as well as the thickness. In the present article, the process of manufacturing screw piles with their own hands is given and standard recommendations for the definition of their size are given.
Construction of pile
To begin with, consider the general view of homemade piles and we define its main features.
The pile, manufactured by the user of our portal, has a four-moisture tip and equipped with a spiral metal blade. Such piles should be made according to the drawing presented in the photo.
Consider the process of manufacturing the main elements indicated in the drawing.
Barrel pile
The base (trunk) of piles is the hollow metal tube.
In all cases, pile trunks are recommended to be made of steel with durability of at least Article 20 according to GOST 8732-74 (for ordinary structural steels). If more durable alloyed steel is used, GOST 19281 will fit (but at home can be limited to the first option).
The first thing you need to make the creator of pile is to determine the length of its trunk. At the same time, he will have to find out various "tricks" to find out at what depth of the construction site is a solid soil. The most correct (but expensive) decision will appeal to the geological and intelligence service. But, perhaps, there is a person among society neighbors who has a reasonable idea of \u200b\u200bthe state of underground formation.
The length of the pipe should exceed the depth of the carrier layer about 300 ... 500 mm (if the pile will perform from the Earth above, this distance may be greater). People, magic practical experience, are recommended to do the length of piles with a margin, so that they did not have to build up.

Burgeim User forumhouse.
Twisted 17 pieces (house 9 on 8). Playground on Sobor. Part of the piles cut, part of the rushing and filled with concrete.
In order to determine the diameter of the pipe, you can refer to SNIP 2.02.03-85 (with its tables and formulas). But those who are not familiar with the design building structures, guided by less sophisticated calculations:
- The pipe with a diameter of 47 to 76 mm is used in the construction of light fences and all sorts of fortifications
- Piles with a diameter of 89 mm are used in the construction of courtyard buildings (arows, baths, etc.), as well as during the construction of brick fences
- For construction frame houses and chopped buildings are used piles with a diameter of 108 mm.
Piles with a diameter greater than 108 mm (which are capable of withstanding high loads), at home is not recommended. It will take a reinforced blade for them, and to ensure such a product with high quality during self-making will be very difficult.
Alexey Oreshkov User forumhouse.
The larger the diameter, the harder it is to do the screw, that is, the blade itself for the bend.
The minimum thickness of the stem walls should be 4 mm. Its calculation is simple - the thicker, the better. But, picking up the wall thickness, it should be remembered that the pile cone will have to bend with the help of a hammer.
Alexey Oreshkov
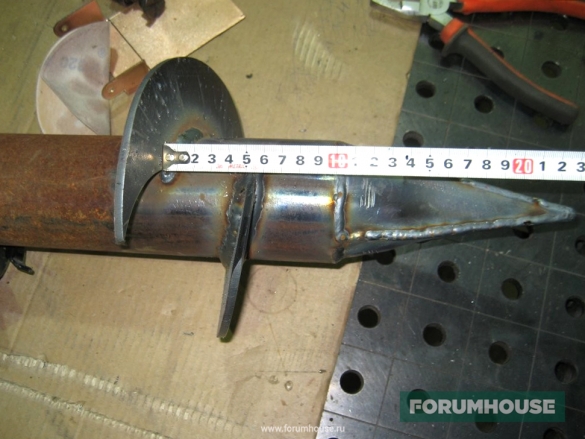
I made my piles myself. Pipe - 68x4 mm, screw - diameter 168 mm, screw thickness - 5 mm, step on the screw - 50 mm, length of a tetrahedral tip - 150 mm. Everything is very well failed semi-automatic.
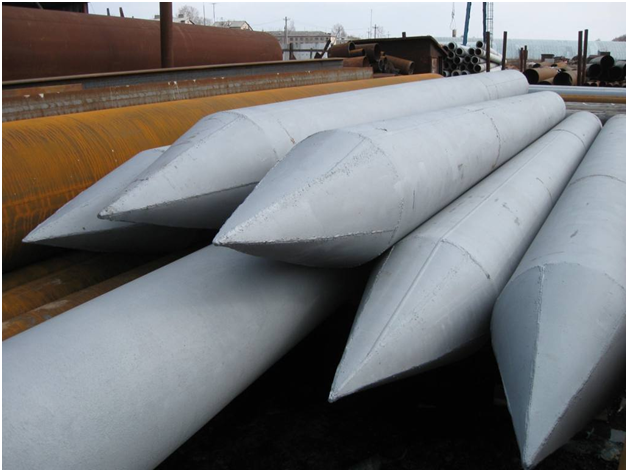
Cone
As can be seen in the drawing, the cone is the tip of piles. Its length is from 1.5 to 2 diameters of the pipe. This is the standard, but some make the length slightly more so that the cone is sharper, and the piercing lighter went into the ground.
At home, the cone is made by fourfold or hexagon. To do this, special sectors are cut on the edge of the trunk, which are beaten by the hammer in the cone and are welded with welding.
Bone Use the user forumhouse
Made a pattern of tight paper, pre-exchanging the circle of the pipe to equal parts. Then I placed the pipe with a marker and made a spike with a grinder. It turned out the so-called crown. The thickness of the pipe makes it easy to bend it with a hammer. At first, it was very clouded, but all the defects were removed by welding, and the point was completely sealed, which allowed you to fill the pipe with concrete after the twist.
This is how it looks in the photo:
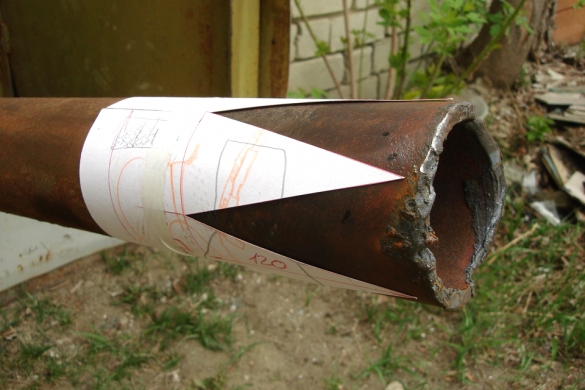
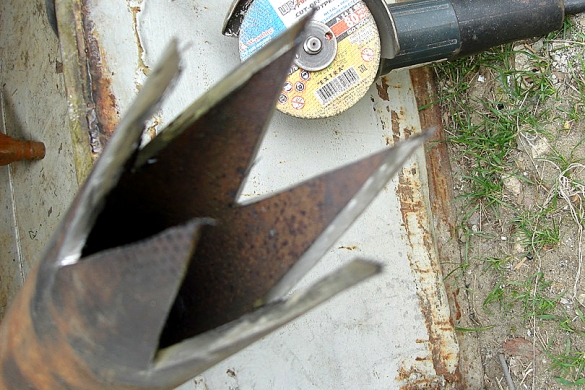
As we see, the markup of the stem was carried out on paper gelatin. It's quite simple to make it. For this, the diameter of the circumference of the pipe must be divided into the number of sectors. The value found is the distance between the upper points of the neighboring sectors. The data is easy to transfer to a paper drawing and get a ready-made template. Further actions consist in cutting "crown", in the bending of petals and in welding the articulations obtained.
Before you bend the petals of the cone, at the bottom of the crown you should make small slits. Then form the tip will be easier.
Blade
The blade is the main working part of the pile. It follows from sheet steel with a thickness of 5 mm. So prefer to do many. Someone manages to make a blade with a thickness of 6 mm, but correctly bend such item is much more complicated. The material of the blade is carbon steel of ordinary quality (GOST 380-71). Optimally use the brand Article 3 (it is used even in the industrial production of piles).
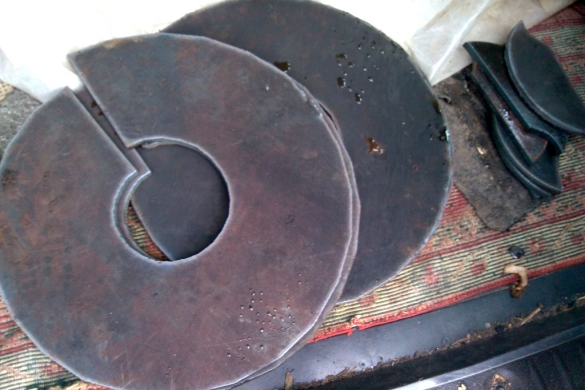
Now it's time to talk about the shape of the blade. The creation of its geometry is considered the most responsible stage of work. And if you make a mistake, then the silent simplicity will not be screwed into the ground.
To begin with, we define with the inner and external diameter of the workpiece for the blade. The outer diameter of the blade (width of the pile) has a direct dependence on the diameter of the pile barrel. Take a look at the table.
Now a little about how to determine the step of the screw. Usually the screw step is 0.2 ... 0.4 from the outer diameter of the blade. If the screw step is less, then small solid inclusions that are in the ground will be stuck between the blades, preventing the promotion of piles. If this figure is larger, it will have to make more efforts to screw the pile into the ground.
What specifically to use a step is depends on what kind of soil is to screw the piles. It is easier to navigate on the characteristics of the soil: the harder the soil on your site, the less you should make the step of the screw on the pile. On the sandy soil, we make a maximum step.
After all sizes are defined, you can start the steel sheet markup and to cut the workpiece. To cut the contour of the workpiece, we will need a plasma cutting of sufficient power, and that it is in stock, you should take care in advance.
At the next stage, the cut outbreak is bent according to the selected screw step. At home, this can be done using ordinary vice and girlfriend.
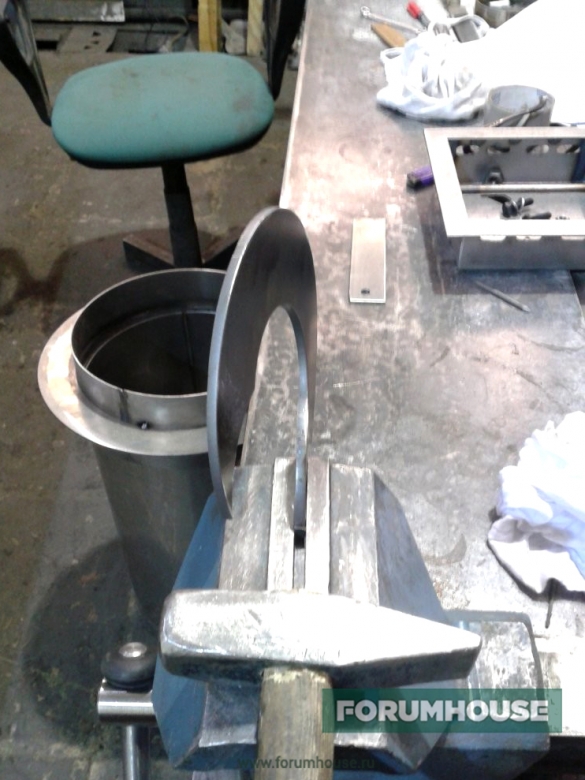
User forumhouse. Burgeimoffers its own variant tool for the spawn.
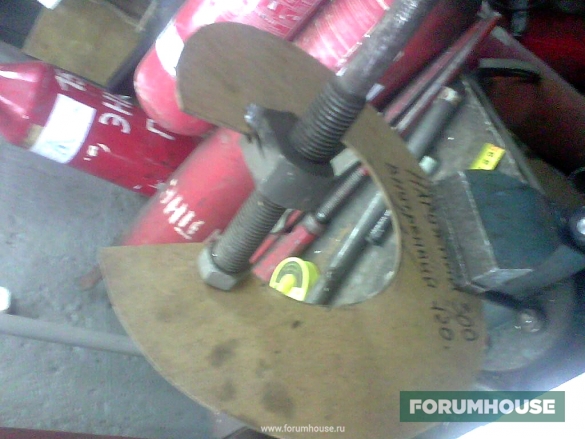
Please note that the bend on the cutting edge of the blade is completely small. So it is always done. Such a bend enough to pile, like a self-tapping screw, went into the ground.
On the part of the blade that will be the first to enter the ground, it is necessary to make a cut under 45 °. This will help the pile easily bypass solid mechanical inclusions that are in the soil.
At the next stage, the finished item is welded to the pile trunk. Seam is paved on top and bottom of the blade. The blade must be welded perpendicularly. Otherwise, the pile will be during the screwdrition to explode soil, destroying and relaxing its structure. And on a weakened soil, the pile will not be able to cope with the loads assigned to it.
After performing all the above operations for working on the creation of the lower part of the pile, it can be finished.
Top of pile
In the upper part of the pile, two holes should be made, which will help independently screw the finished product in the ground. They can simply cut through welding.
When the pile will be screwed, and the legna will not be installed yet, the inner cavity of the product can be filled with concrete. This will give the strength of all pile foundation.
Corrosion protection
The problem of protecting self-made piles from corrosion at home, unfortunately, has no definite solution. But the pair of options still exists:
- Application of ship paint.
- Application of primer for metal.
If these materials are two layers to apply to the pile surface, the protective layer is preserved even after screwing the product into the ground. Only before applying paint materials, pile should be carefully cleaned from rust and degrease.
But what non-standard exit from the situation offers the user of our portal.
"This is an article for those who have not yet decided on the type of future foundation. Also on our portal you will find a small video telling about