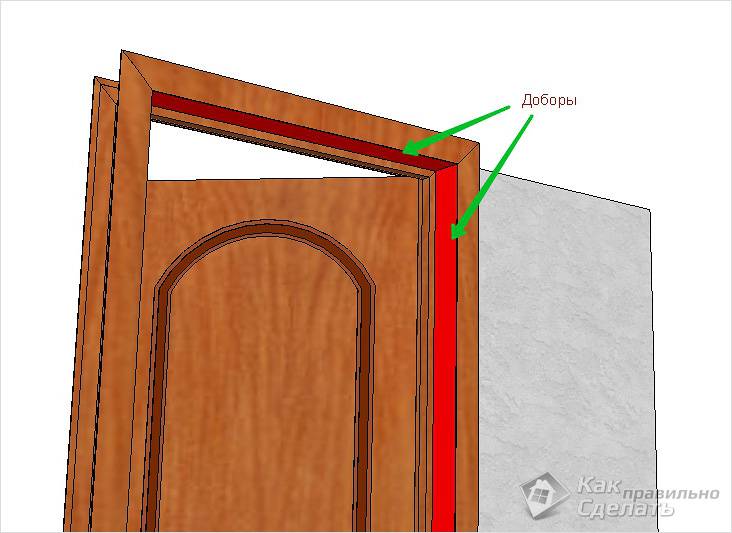
When installing door boxes, there is often a need to close the remaining part of the slope. Most often, "DOWERS" used for these purposes, which can be purchased with door canvases and platbands. However, in most cases, such good elements require fitting, as it should be fixed to the box as much as possible, and always - strictly in the size of the visible part of the slope.
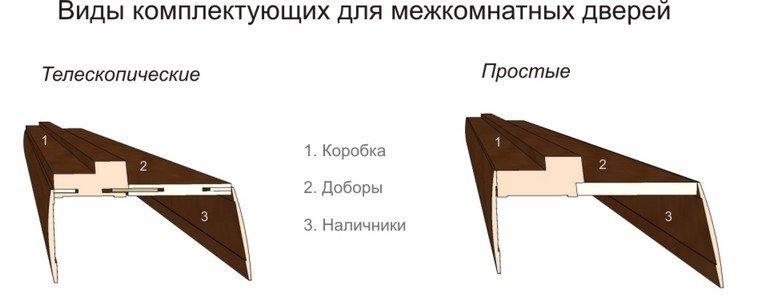
Door boxes
There are two versions of the door boxes, which are usually attached to good:
- with a groove for him
- without a groove.
In the first case, the diverse element is inserted into the groove of the boxes one (long) side, while the second side turns out to be untouched.
With the second version, the good will need to be attached to the slope, without fixing to the door frame.
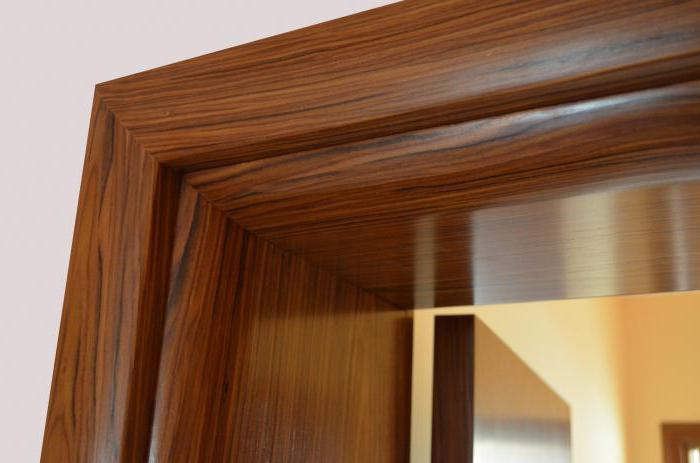
Select good
![]()
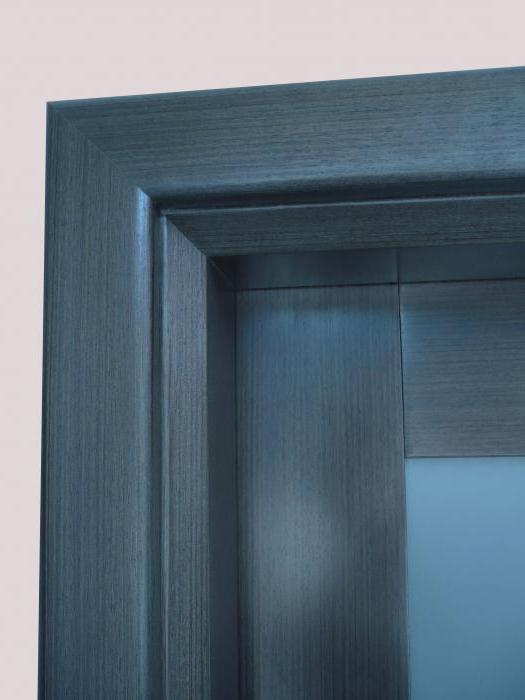
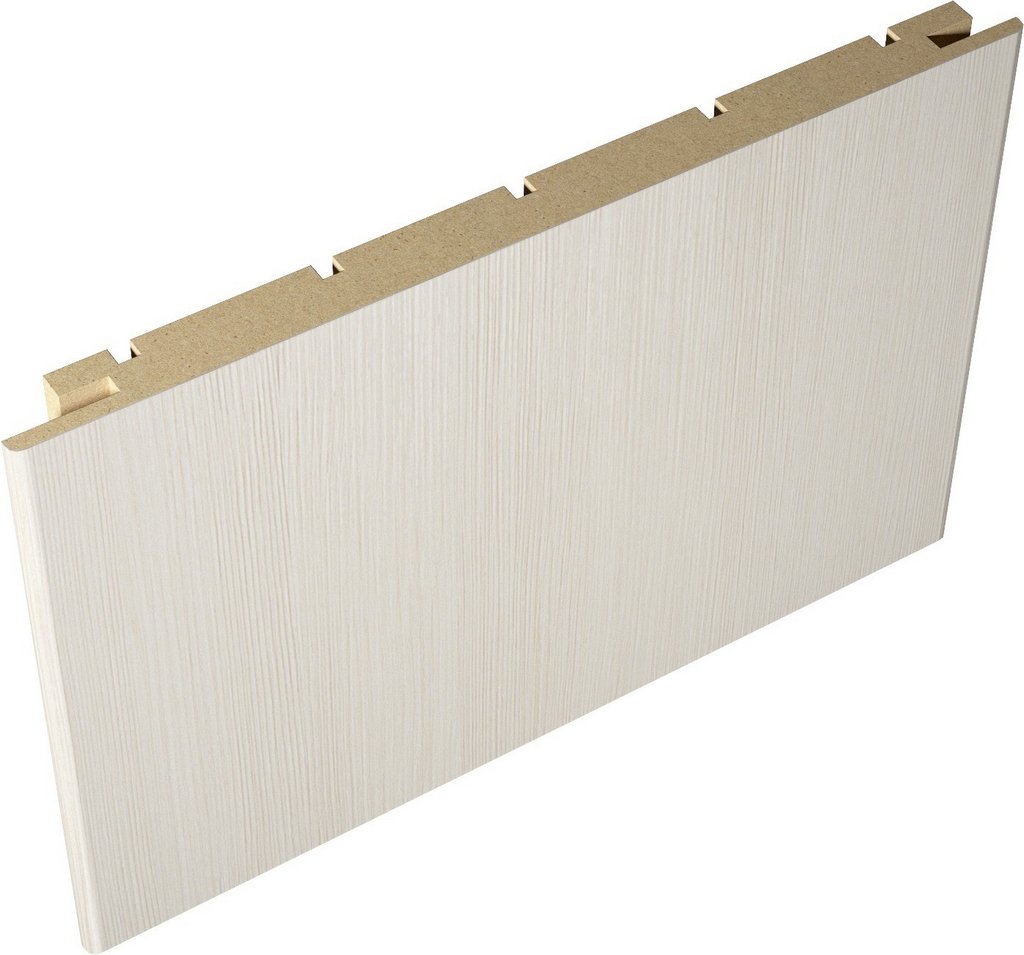
DOPPORTS are planks made of laminated MDF. The color of these elements usually coincides with the color box color and platbands. But if you wish, you can always buy dobor the other colors, if this option is more suitable for the design of your room.
Do not forget that the dough closes the slopes from three sides - from above and from two sides. At the same time, it is desirable that the upper favor is longer than the width of the door, and the vertical goodholds rested at him at right angles.
A diverse width of goodworkers allows you to find them for slopes almost any width. The main thing is that the diverse is not already needed. If you can not choose a good exactly in size, it can be cut. To do this, it is recommended to apply to furniture workshops, as you should additionally be ordered there and the sticker of the edge ribbon to one or two end ends.
Installing Sobor
First, consider how to fix dogs on the door, if the door frame has a special groove:
- Install and secure the door frame in the opening. You can even hang the door - it will not affect the installation of good.
- Cut the dough in length to the size of the size.
- Measure the distance from the outer edge of the wall (from the slope) to the door frame at least in three places. If these distances do not coincide, then the kind will have to be cut in the furniture workshop. At the end of the good, to which the platband will be mounted, it is necessary to stick the edge ribbon.
- Insert the dobors in the door frame grooves: first the top horizontal, then the side vertical. Dobra must be located strictly at an angle of 90 degrees to the plane of the door frame.
- Check their horizontal and verticality.
- Stick the greasy tape in 4-5 places along the length of the problem in such a way as to secure it in the desired position with it.
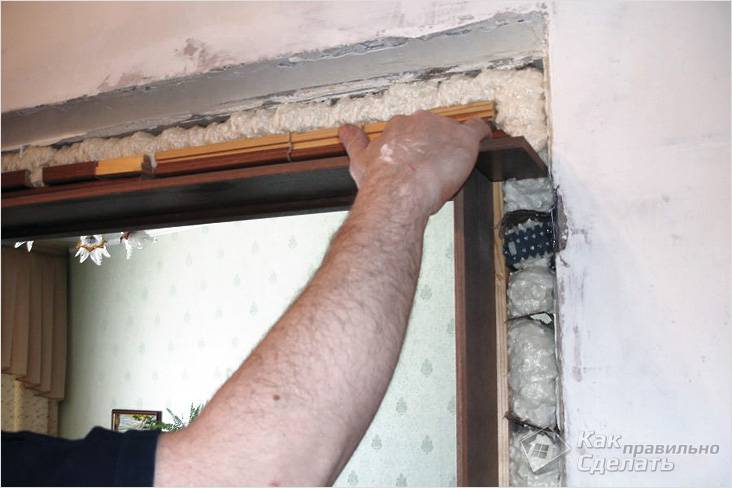
- Fill the mounting foam space between the wall and the goodness.
- Wait for the foam to freeze, cut the speaking surplus.
- Attach the platbands.
Installing good faults
After installing the door in the doorway, it is necessary to measure the remaining unclosed part of the wall (slopes). If dobors have to trim along the long side, then do it better also in the furniture workshop. In the same place, order the sticker of the edge ribbon from two ends of the kind (and from the side adjacent to the door frame, and on the side of the platbands).
If the slopes are not plastered, it follows it as follows: Take a wooden bar or a small bar and attach it to the slopes in such a way that it was possible to fasten it from top to this bar, and at the same time its vertical (horizontal - for top-free) and straight angle between him and door box.
With even plastered slopes, you can do without an additional wooden plank, provided that there is no need to leave any space between the good and wall.
- Attach a good bar.
- Fill the remaining space between the wall and the goodness by assembly foam. To foam faster frozen, sprinkle it with water.
- Cut the excess of frozen foam.
- Secure the platbands.
The advantages of using goodbye
As you can see, the technology consolidation of nonsense avoids such a tedious procedure as plastering of slopes. The correctly chosen dotty element makes the slope even and beautiful, no matter how badly the slope looks before it. However, if the space between the good and the wall exceeds 3-4 centimeters, the good is better to additionally fasten with small wooden bars screwed to the wall.
In cases where you do not have the opportunity to use factory dobors, you can make their man-made "analogue" from laminate or MDF panels. Such a solution will allow you to perform "divergent" slopes (located at an angle of 90 degrees relative to the door box).
Video
Useful instructions for installing goodness:
Below you can see how good it is:
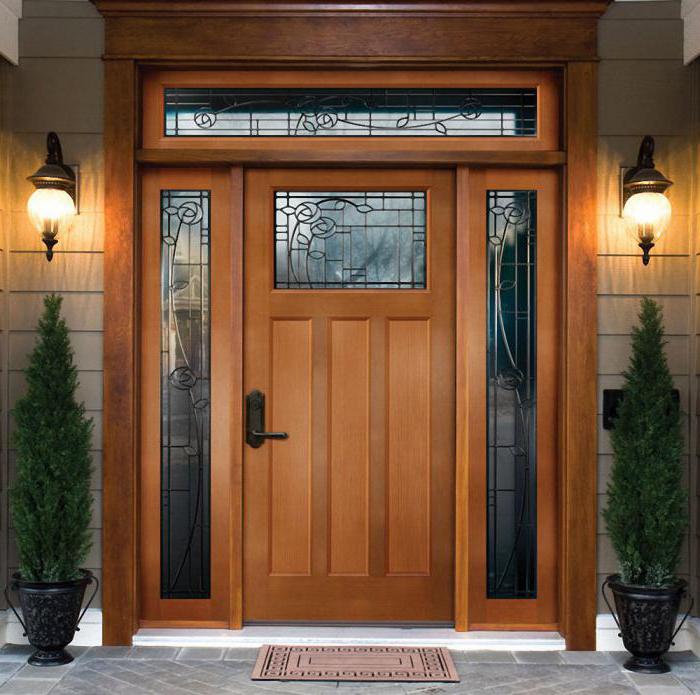
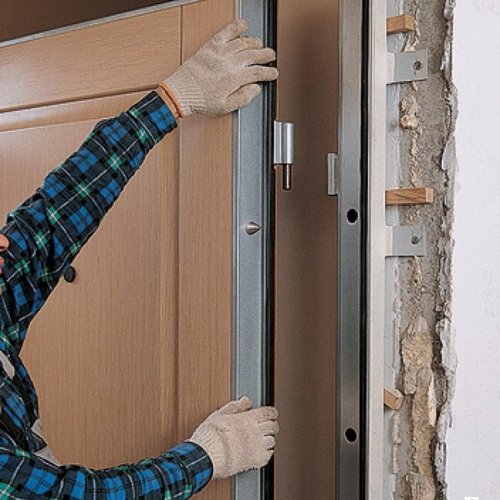
Quite often, when installing the entrance door, there is a need for installation of nonsense. This device brings the opening to perfection, and if used in a complex with other components, the design will look complete.
Varieties of door dormants
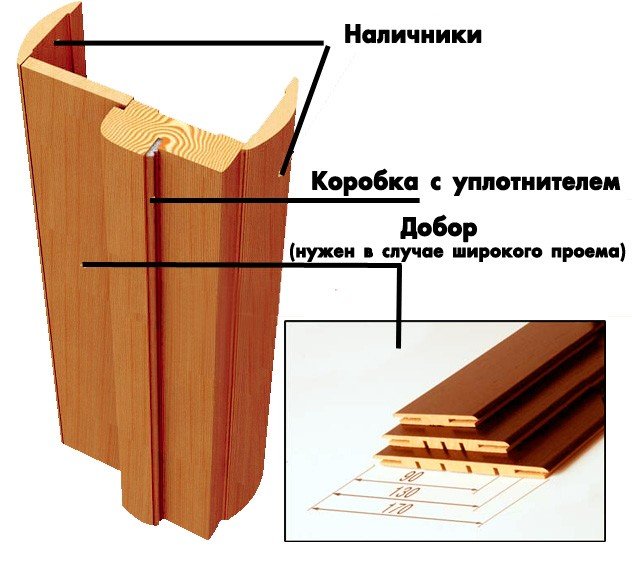
Before you will be implemented on entrance doorIt is necessary to familiarize yourself with technology and deal with the main varieties and design of these items. Dobors are some part that connects this element with platbands. The need to close the wall in the opening may occur when the wall thickness is larger than the size of the box itself. To do this, you can apply the planks attached to the box.
If you are installed in the input door, the types of these items must be considered. Among them should be given those manufactured from:
- wood;
- metal.
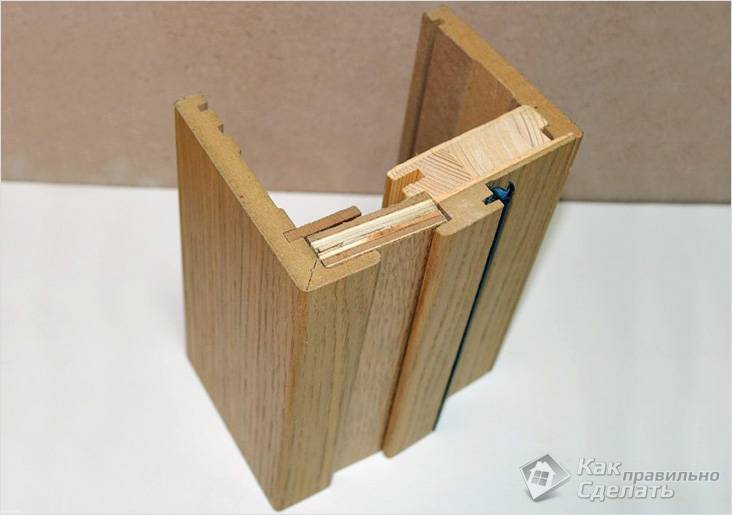
Dobors may have the edge or be deprived of it. Another kind of problem are telescopic elements. The first option is the simplest and presented in the form of a plank without treated edges. Slices at the final stage are closed by platbands, but it can negatively affect their durability, if the level of humidity is too high.
Simple good with the edge has processed protective coating The edges, which prevents water from entering the inner structure of the material. Telescopic good is the most convenient option. It has treated edges and spike-groove type connections that allow you to install on door boxes and platbands.
The need to use good
Installing the input metal door It is carried out when it is necessary to increase the box in the coverage area. These elements are capable of expanding the door box. Planks you can buy together with or separately. They do not differ complex design, so you can make and install them yourself.
Methods of installation of goodbye
Installation of door sketches at the entrance door can be conducted at one of several technologies. You can do this to the door box, on the mounting bar and the wall in the opening area. The second method involves the need for the location of the mounting bar between the dogs and vertical planes of the opening.
When the installation of sobers, platbands at the front door are being carried out, you may encounter a problem when the box is not capable of covering the width of the opening. This part can be covered with wallpaper, cover with plaster or separated by plastic. But the use of goodholders makes it possible to achieve a better result, because elements look more attractive, and they are cheaper and do not imply repair.
Barbox can have a chosen quarter for mounting. If there is no such, then goodholds may have any thick. If this mounting excavation is present, then the installation of the problems can be carried out on the input of which are 1 cm in thickness.
For the reason that mechanical load will not be affected for good, only liquid nails are used for fastening. However, you can most often find galvanized screws as fasteners. If the mount is carried out outside, then the hats should be closed with plugs or mastic.
Conducting kindups
You can purchase a door frame with a basic quarter or without this device. In the first case, the installation will be quite simple. To do this, use wood-chip or wooden planks. Their width must be measured after the box will be in its place. After the whole design is assembled, the extreme line of the good has to be flush with the linte of the opening.
If you notice the surplus, you can remove them with a branch, and subsequently reapperate ones. Expansion of the door design by goodness is sometimes carried out with the help of galvanized 25-centimeter nails. This case applies to the door with a groove. For fasteners, you can use glue that is applied to the excavation of the box.
Installing good in the opening with expansion
Sometimes it is required to install good-door to the entrance door when the opening has an extension. For finishing, you can use one of two ways. The first implies gluing around the perimeter of the bar, the length of which can vary in the range from 30 to 40 cm. Next, the box is installed in the box, and the formed space is filled with construction foam.
The second method provides for the need to screw timber to the wall by several self-draws. With their help, you can adjust the position of the carcass received, and then install a good in the groove and fill the mounting gap.
Installing Dogs in a Boxing Bar without a notch

It will be possible to select a quarter using a milling machine, but for this you need to pre-mount the line and use the straight mill. As soon as the box becomes part of the door item, you can proceed to the installation of the good. Its fastening is carried out through the holes done by self-tales, which will be located from the end. The diameter of these holes will not be the same along the entire length.
To begin with, the wizard should use the drill, the diameter of which is equal to the diameter of the screw of the self-press. At the next step, you need to use a drill with a diameter equal to the size of the trunk. The installation of good-to-inlet door is accompanied by mounting a vertical bar, which must be removed from the floor surface by 20 cm. Next elements are strengthened after 55 cm. Dogs can be placed along with the box inside the base from plywood or drywall. Boxing timber can be connected without a quarter, using the staks of good and racks. These elements are not strengthened by a solid strip, they need to be installed with separate segments.
Installing voltors to the entrance door must be accompanied by the fastening of the elements among themselves. To do this, use galvanized screws. If we are talking about the elements from the MDF, then the holes for fasteners must be made in advance so that the material is not damaged when spinning.
Holes must be led by a drill, the diameter of which will be 3/4 of the diameter of the self-press. If we are talking about chipboard, then the screws must have cutting throughout the barrel.
Classic problem installation scheme
Installing voltages at the entrance door is carried out on a specific algorithm. First you need to perform measurements, turning attention to the fact that for the right and left voltage, the vertical measurement should be carried out separately. The inner line of the vertical bar must be measured on the box.
To the installed door frame you need to secure three-chalk parts. Between the dignities and the wall, it is necessary to place the position of which can be changed to align the design. Before filling out the gap of the mounting foam, the spacer wedges must be installed between the swore and the boxed timber.
Conclusion
Switching should be performed portion. It is best to do it in two receptions. The hardening process in this case will be monitored. If necessary, you can make adjustments, while the composition does not completely clarify. Work should be completed by the sealing of the gap between outdoor coating and wooden details. At the final stage, platbands are installed.
Sometimes Falshosnov is manufactured not only from plasterboard, but also from magnesite plates, moisture-resistant plywood or OSB. Falsecases of the boxing timber can be fixed in increments from 25 to 30 cm. The top panel that will be placed horizontally must be laid on vertical elements.
Many people, engaged in the repair of their housing, install a new door (input or interroom) or ennoble an old structure. Purchasing the door, do not forget about the nuances decorative decoration Door opening, slopes.
The space where the door and the box is installed, it can not always be closed with a box. The thickness of the doorway is wider. Therefore, manufacturers are offered complete to any model from an array, MDF, veneer of goodness from the same material as a canvas. Installation of door voltages can be carried out both during the installation of doors and after some time.
DOWERS, PREVIODS PUBLIC TO THE FINED TIME
Consider several options right mounting Good. We give recommendations to those who want to make them install their own hands.
DOWERS FOR DOOR - what to choose
DOOR is a decorative element that allows you to close the opening wall, not affected by the box. Not all openings are the same. Their thickness depends on the material used. If the wall is made of brick, then its thickness can be both in one and more bricks.
The drywall is mainly created internal partitions. The entrance door is characterized by the largest wall thickness if the house is not from the tree. Therefore, the openings, the slopes cannot be the same even in one house or apartment.
And create unity of space is required anyway for the completeness of the interior. DOPERS COLLECT COLLECT TO THIS FUNCTION.
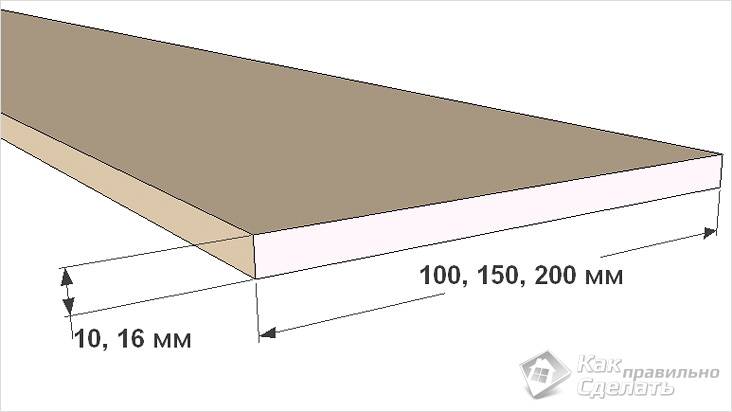
- Dobly elements are represented by a board or panel of certain sizes from different materials. The assortment shows a ruler from 80 mm to 500 mm. The thickness of each panel is 10-15 mm.
- Installing door diet can be in the grooves of the box or back to it.
Choosing the door, take care of buying goodness at the same time, in order to continue to try to find a suitable shade. Elements will come into contact with each other and the slightest varnotone will become visible to any person. Therefore, when measuring inlet or interior opening, specify the dimensions of horizontal and vertical surfaces.
 DOPPORT, PINE, BOX, WITH MUST MUST BE A SALE
 Dobor is not always selling the desired size. Buy one option that is as close as possible to the desired one. Large can always be reduced. The missing size will create difficulties with the installation.
Different installation options for door voltage
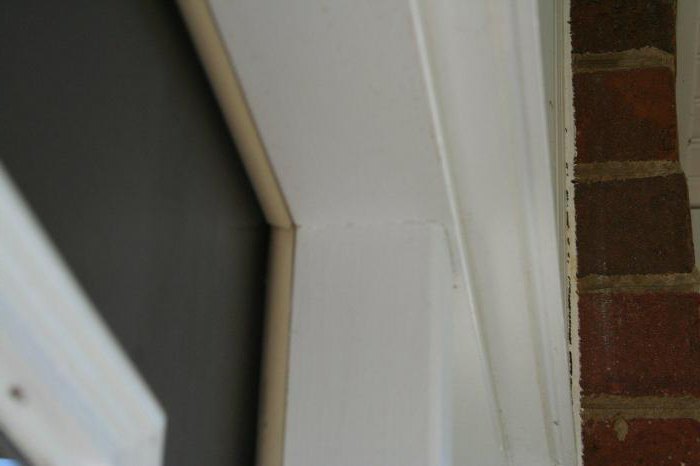
Operactions may have difference not only in the thickness of the wall, but also in the proportions of the space itself. Sucks are not always perfectly smooth and have a strictly vertical or horizontal direction.
There are slopes (with an extension to the outside wall), with an uneven surface, when the walls are poorly plastered. It is necessary to take into account all the nuances so that the installation of decorative elements was correct.
Standard installation door
It is understood that there is a special groove in the door frame where the good is inserted.
 Often, good is installed in the factory groove box
 Installation is made with the box at the stage of securing it in the opening. We will need the following elements:
- vertical good - 2 pcs.;
- horizontal good - 1 pc.;
- construction corner or roulette;
- rule;
- a hammer;
- hacksaw or circular saw;
- drill;
- pistol mounting;
- foam;
- nails without hats or glue "Liquid nails";
- self-tapping screw;
- furniture plugs;
- malyary Scotch;
- wedges, bars.
This is a standard set for any way to install decorative sobers. Go to the description of the standard method.
Sequencing:
On this, all the steps are completed. Using such a guide, the installation of door voltages with your own hands will be available to any homemade master without extra costs.
Non-standard method of installing good
Not always the box of the input or interior door has a special groove for spikes of decorative slope.
 In the absence of a groove, the good is installed close to the box with different options
 It refers to metal designs Or the use of the box is not from the door set. Then the groove may not be provided. But it is necessary to install good. There is another method of installing panels:
- adjoining the end of the finishing board to the box if the door is installed earlier than the decorative planks are purchased;
- if the door is not installed, the panels are fixed directly to the box at the assembly stage.
Consider both options.
If the door is not yet installed
- Having collected the vertical and horizontal parts of the box, fasten to the ends of the dough racks, after removing the measurement and painting to the desired dimension.
- Thin drill drill holes for small nails at a distance of 200-300 mm apart.
- Gently nail the panel to the boxes of the box.
- We set the design in the doorway, performing successively all actions.
If the door is installed
It is possible to establish a good one in such a situation with two methods:
- fixing long self-drawing to the boxes of the box;
- fixing to the wall.
In the first case, it is necessary to choose thin screws of such a length in order to flush the width of the dough and timber. This method is possible if the thickness of the non-refined wall is not more than 200 mm. With a larger size, the strength of the structure may be doubtful.
- In pre-prepared holes, twist the screws, driving them inside the panel. Perform actions around the perimeter of the doorway.
- In the second case, the decorative board is fixed to the wall, which must be closed. If the wall is smooth, there is no large gap between the wall and the door frame, you can fix the good right to the wall with the help of self-tapping and liquid nails.
- When using self-tapping screws, we drill small holes with a deepening with a hat.
- We twist the self-tapping screws around the perimeter, close with furniture plugs using silicone glue.
- When choosing an embodiment with glue, we apply liquid nails to the inner surface of the good. Apply to the wall and tightly press. For a good clutch of surfaces, you can fasten the panels to the wall and the box with a painted scotch.
- If the walls are uneven or the clearance is very large, you can use lining bars to fasten the sore walls.
- Cut the bars the necessary thickness on the details of the desired size.
- Fix them to the wall by controlling the process level. We form a frame for decorative panels.
- We establish dogs to the resulting frame, using self-tapping screws or liquid nails.
- Take the mounting gun and we blow up the space between the wall and decorative element Without fanaticism, not to disturb the proportion.
- After drying the foam, we remove excess with a knife, go to the installation of the platbands.
The unity of space is created. Any kind of door skill installation with your own hands is available to those who can keep tools and solve simple tasks.
Door opening with deviations
Not always interior opening has smooth vertical or horizontal lines.
Mostly door dobors are installed on the inside where there is no loop. There are situations that require decorative coating from the loop. It is necessary to observe the gaps that allow the doors to calmly open. If you do not consider the angle for opening the fittings, friction will arise between the surfaces, which will lead to the rapid abrasion of the decor.
You can close the wall and other finishing materials: wallpaper, painting, wall panels, decorative plaster. The world of building stores will offer you a variety of goods. Door Dobor Reduces the time of finishing the premises, the cost of purchasing additional funds, prevents complexity with the choice of shade.
 The door is a single interior composition. Everything should be flawless.
 The price of goodholds and their installation depends on several parameters:
- material used for manufacture; Door Box Installation: Box Assembly Tips different ways and installation in the doorway do it yourself
Very often, when replacing interroom doors, a problem arises: the thickness of the wall in which the doorway is located, more than the width of the door box. The remaining unclosed sections of the wall look unattractive and spoil all the impression from new door. Conduct this problem and give the door to the necessary strength and the finished look will help door dobors.
DOORS ON THE DOORS AND THEIR VALUES
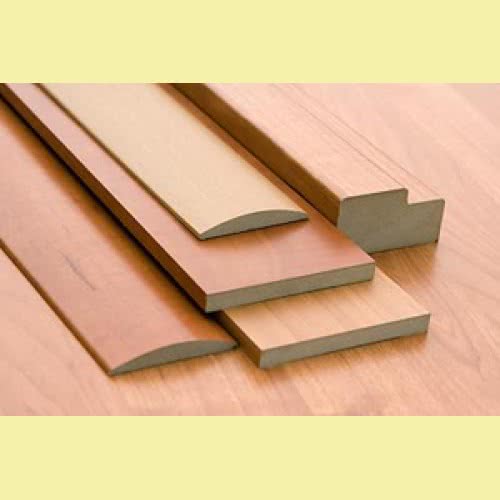
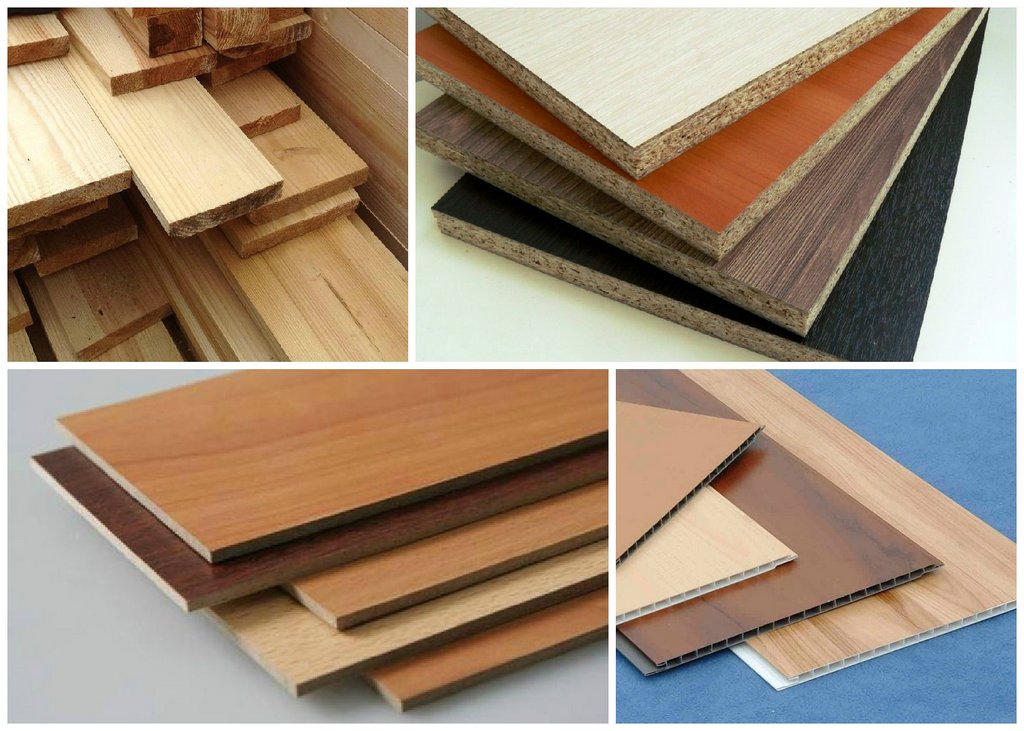
Dobor or Dobly Board (Planck) is a flat rectangular board. For its manufacture, an array of wood and laminated or veneer-coated MDF-plates are most often used.
A variety of species is not different. All the challenges can be divided into two groups:
- ordinary;
- telescopic.
The usual challenges look like an ordinary board, and differ from each other with the material from which the color and width are made. The market presents a lot of 100, 120, 150 and 200 mm wide.
Telescopic dobors on the principle of their installation are similar to the lining. The plank of this kind on the one hand is equipped with a groove, and on the other - the ridge. This allows you to sneak the doorways of any width. You can find telescopic dobors width 90, 120 and 150 mm.
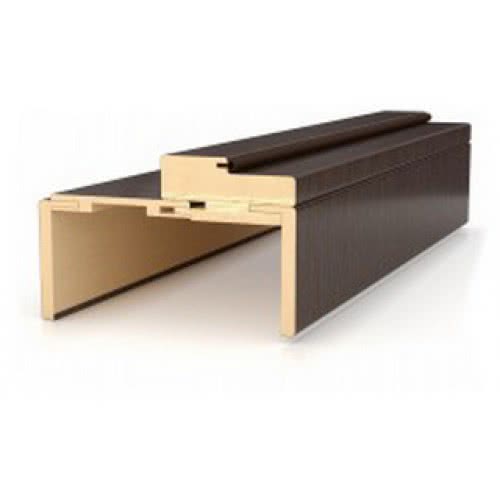
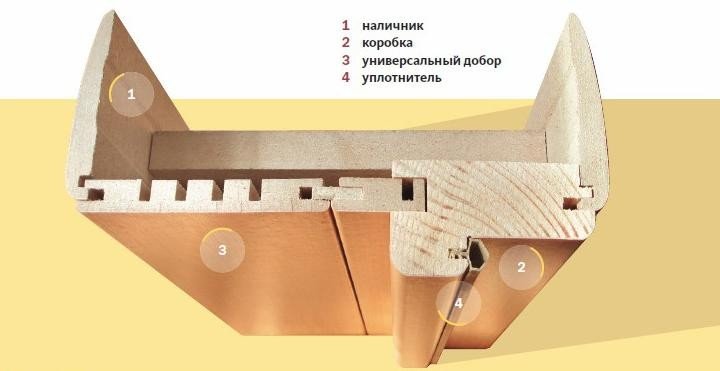
Also worth mentioning decorative corner, combining the functions of a good boards and a platband. This product is used only with a special design door box. In its ends there are deep grooves, in which dotory-platbands are mounted. It is convenient to use good items of this kind when the width of the door box is not enough for quite a bit, up to 50 mm. For wider openings, they will not fit.
How to choose the right items?
Today, almost in all the outlets offering interior doors, Windows doors are presented. Therefore, with the choice of color and the textures of these components, there should be no problems.
Choosing the size of the good slats, it is necessary to produce simple calculations. This will require you to know the width of the wall (SST) and the width of the door frame (SC). Knowing these quantities, it is easy to calculate the width of the dog (shd): SD \u003d SCC.
Attention! For more more accurate calculations Measure the width of the wall follows at several points, at least four. In the formula you need to insert a measure with the highest indicator.
Also, when choosing a problem, you should pay attention to the design of the door frame. If it has a special groove to install a good boards, then its thickness must match the thickness of the groove.
Software installation technology for interroom door
Installation of door voltages No special skills requires, so this case can be coped with your own hands. Installing enough boards follows after the interior door box is mounted in the opening and the mounting foam is completely dried. In the case of a special groove in a box, it needs to be carefully cleaned. If it is not, it is necessary to clean the space from the foam per box. The width of the resulting gap should be 1.5-2 cm, the depth is 1-2 cm.
Further installation technology may have minor differences depending on the type of goodness.
Installation of ordinaryobors
The whole process of installing ordinary volunteers can be divided into several consecutive stages:
- Fit upper fast boards. First, the bar is measured and cut down in length. The width is further seen. For this, the board must be inserted into the work side prepared by the groove and put the wall width labels at both of its ends. Connect the resulting points of the straight line and cut it on it.
- Fit the side challenges. It is carried out similarly.
- Assembling good. At this stage, it is necessary to adjust the lateral challenges in length so that the top plank lay on them exactly in the horizontal position.
- Fastening of good slats. In order to avoid the formation of gaps and gaps, it is necessary to separate the challenge between the opening and the box. As a wedges, you can use wood, folded in several layers of cardboard or dried assembly foam. After inspecting the place of connecting the upper bar with the side space between the good and the opening point is dug away. When the foam dries, the remaining cavities are filled.
- Installing spacers in the opening between the challenges. This action will prevent their displacement in the process of drying the mounting foam.
- Installing platbands.
Installation of telescopic volunteers
The process of installing telescopic elements as a whole repeats the stages of the installation of common problems. The feature of this type of voltage is that each subsequent row of planks is installed only when the previous one is securely fixed in the opening.
Thus, telescopic door dobors can be installed with their own hands.
Installing platforms
This kind of quantine elements is set easier than everyone else. Combined Dobor Tubes do not require capital fastening. The entire installation process is adjusting them in length and installation in a special groove on the door frame.
First, it is measured, the upper good-platband is cut off and installed, then the side corners are then mounted. The side elements should be cut only from below, because in the upper part there is a notch that provides a dense connection of lateral parts from the top. For the installation of volunteers on interior doors, these varieties are suitable just perfect.
Installing the problems at the entrance door is not much different from the installation of these elements on interior doors. Their installation can also be carried out with their own hands without the help of professionals.
There are three ways to install voluntary elements on a metal door:
- lining (a good board is refilled under the box);
- power (the product is applied directly to the box);
- using a mounting timber.
For the entrance door, there are ideal for good planks made of MDF or natural treated tree. These materials are resistant to mechanical effects, high humidity and have sufficient heat and sound insulation.
The steps of installing the problems at the front door can be designated as follows:
- Conduct measurements from the wall to the box and from the top of the opening to the threshold.
- Preparation of planks in accordance with the size obtained. In total, there should be three details: two vertical and one horizontal.
- Fastening of challenges. In the case of the formation of a gap between the gooders and the wall, it must be filled with the mounting foam, fix and wait for complete drying. If there are no gaps and a good fit into the wall, it can be attached with glue, galvanized nails or self-tapping screws. The heads of nails and self-tapping screws are disguised with a special mastic or plugs in the tone of a short web.
- Installing platbands.
Installation of door sneaks does not take a long time. After the end of the work, the doorway will acquire a beautiful and completed view.
(Votes: 1 , average rating: 5,00 out of 5)
Facing the doorway when installing the box often puts in an impasse of unprepared people. Previously, the difference between the box and the unclosed section of the opening was decorated with wallpaper, plaster or paint. Now there are special products made predominantly from MDF and serving one goal - close the slot in the opening. With their installation there are many questions about the choice of material, forms and in general the process of this action. In this article we will describehow to establish good to interior doors, the features of their choice and give general recommendations.
Types of doors for doors
What is a good door? This is an ordinary rail, which is mounted to the door frame to increase its width in homes, where the walls are rather thick. In other words, if your box does not close the opening completely, it is used such a facing. At the same time there are several varieties that we now consider.
Normal
Rake, various models of which differ only on decorative coating - veneer (or its absence) - and width that can be from a hundred to two hundred millimeters. If necessary and desire, they can even be performed by themselves.
Image from the site remontami.ru
Telescopic
The difference from the above view is a special design, similar to the clapboard. Each individual element has a groove on one side, and on the other - spike, with the help of which they connect, which allows you to favoray the doorways almost any width. As in the previous case, such products differ in decoration and width (from 90 to 150 millimeters).
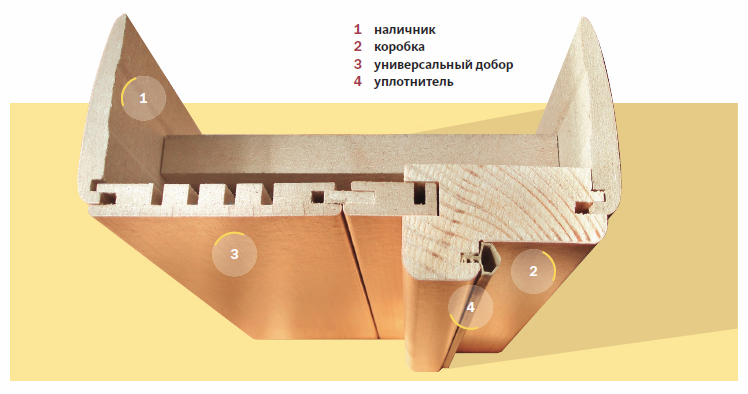
Image from DvervDome.ru
Combined
This type, in addition to its main purpose, additionally performs the function of the platband. It is quite convenient when it is necessary to increase the width of the opening, but significantly limits the installation of such a product into broad simpleness. In fact, it is a decorative corner in a bundle with a door-box of a special design with grooves on the ends in which it is attached. But more on that later.
How to install dothor on the interroom door
All three types have differences in their installation, which is due to various constructive features and behavior of the material when it is fixed by mounting foam, which we will talk about now.
When installing good, it may turn out that the walls are not completely vertical. What to do? With a slight discrepancy in the height (no more than 5 millimeters), it is enough to add thickness wall with plaster and close this place with a platband. With a more serious bias, you will have to make a correction to the wedge during the trimming of the rail.
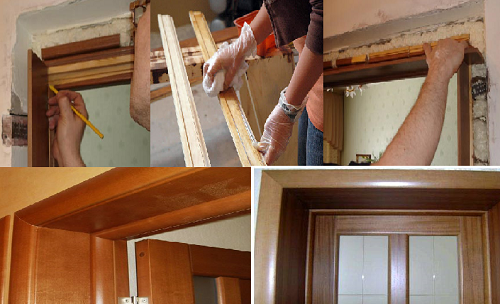
Installing ordinary doors on interior doodles with your own hands
Installation of facing begins with fitting the size of the upper element. First, adjust its length (it should act a little outside the box), and after and width, using a wall for a landmark and putting a pencil label. As a tool, it is best to use the electrolovka. The length and width of the side parts are selected in the same way. It is worth noting that there should be no cracks between the elements, and the compound should occur strictly at an angle of 90 degrees. Be sure to check the building level accuracy of their location to avoid difficulties when opening the door in the future.
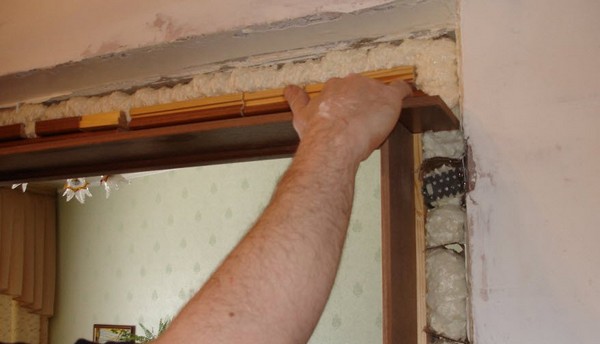
Image from the site dVeridoma.net
The fastening to the box is made as follows: the upper bar is attached using wedges (any material can be used - from cardboard to dried trimming of the mounting foam). After that, the side parts are substituted to it and the quality of their connection is monitored, as well as the lower part of the rails - if necessary, you can separate them as well as the top item. After that, an assembly foam with a low expansion coefficient, which is pointing to the doorway point to the doorway point. After drying the foam and checking the result, the rest of the space is filled.
Such a situation may happen that the door junction has a break. With a significant discrepancy with the norm (more than 5% in relation to the deviation from the horizontal / length of the plank), we do not recommend installing goodness. Curvature indicates engineering miscalculations when installing a box; In this case, you should completely remake the design in order to avoid damage to the freshly installed rails.
How to put telescopic dobors on the interroom door?
The installation of telescopicobors is not fundamentally different from the installation of ordinary. The difference is only in the method of connecting individual plates among themselves. For example, it will not be possible to collect immediately the shield of the desired width and install it on the opening - it is necessary to produce in several occurrences to avoid the deformation of the surface during the polymerization of the foam. To begin with, the main rail is attached around the perimeter of the box, to which extension will be made. Installation should be made in exactly the same way as in the case of conventional elements. After soaring the foam, the next tier is attached and so on.
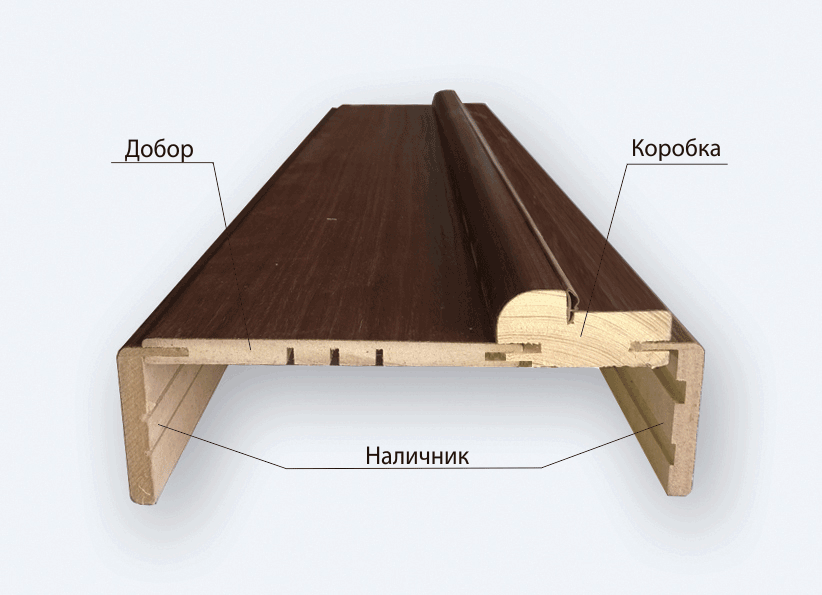
Image from Matadoor.ru
How are the combined dobors put on interior doors?
The combined type is attached quite simply due to the lack of need to use the mounting foam. They should only be adjusted to the already available grooves of the boxes. Pay attention to the connection density and the adjustment of the corners, which is made from the upper element and the subsequent correction of the side parts (this should be performed in the lower part of them).
If you have any questions, you can watch the video about the installation of a kind on interior doors.
The presences should be attached after the mounting foam is free.
Installation of nonsense on the doorway is not a challenging or long operation and does not impose special requirements for skills. It is much more practical than the plaster of slopes, and the process does not depend on the initial state of the opening. With due accuracy and sequence of work, you will get a beautifully looking and very functional coating that will be perfectly completed appearance Doors.


