To fix the door leaf in the opening, a door frame is made. It is a frame consisting of two vertical posts (jambs) and one or two horizontal crossbars. The material is bars 40-100 mm thick and 60-100 mm wide. For the entrance door frame, thicker blanks are taken, and the frames for sliding doors or accordions can be made of a thinner material.

- Plunge blocking: the lock is inserted into the door leaf.
- Additional blocking: the blocking box is attached to the door leaf.
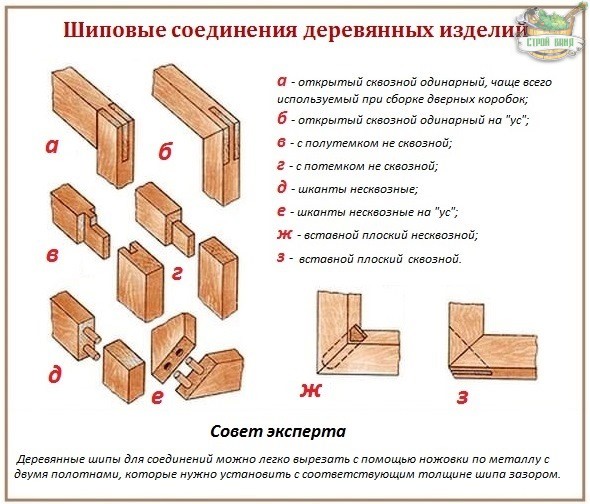
The boxes into which doors are inserted, despite their constructive variety, can be divided into two main types - closed and open. The first (Fig. 36, a) assembled from four bars connected on thorns: upper (lintel), lower (door threshold) and two side (jambs). Such boxes are made, for example, for entrance doors. Open boxes are made up of three bars (fig. 36.6) - top and two side ones and are used for interior doors. Before making the frame, it is necessary to select a quarter for the door leaf in bars (Fig. 36, c).
Bolt length is measured in the locked position from the face of the lock to the outer edge of the bolt. In some systems, one latch operates, in other cases, multiple contacts per latch point. The bars are available in various shapes. 
It is possible to fix the bolt with at least two manganese steel drilling pins, against sawing or drilling.
To increase the resistance of the door, it can be combined with an additional lock, which is preferably installed at knee height. However, providing an additional lock requires even more discipline on the part of the residents. You must also use this lock. In addition, such locks often cannot be closed from the outside when leaving the house.
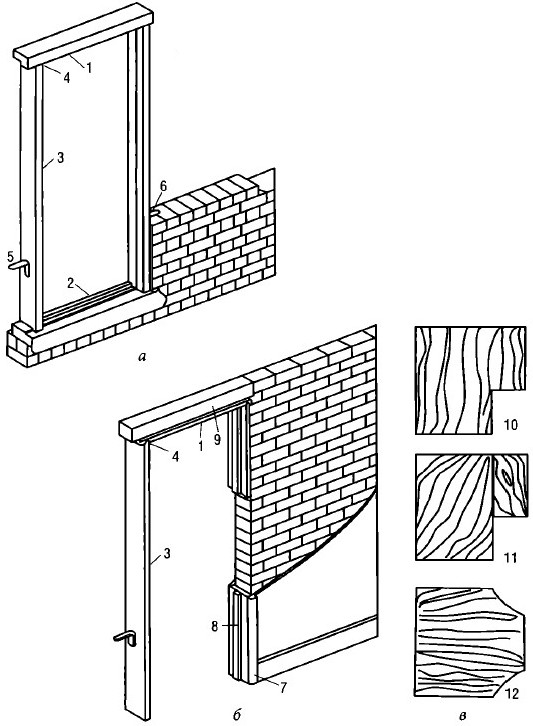
Figure: 36. Wooden door frames: a - closed frame of the outer door;
6 - open box of the inner door; c - profiles of blanks for door frames:
1 - lintel; 2 - threshold; 3 - jamb; 4 - connection on thorns; 5 - fastening bracket
boxes to the wall; 6 - fixing the staple into the wall; 7 - platband; 8 - overhead rail,
forming the porch of the door leaf; 9 - bearing jumper; 10 - bar with selected
a quarter; 11 - assembly of two beams; 12 - timber with oval bevels
for swing doors
There are different types of locks. Cylinder locks allow for a large number of key options. 
- The corresponding keys are freely available in hardware trade.
- Therefore, it is recommended to replace such locks.
- It is a safe alternative if the key has at least six notches or notches.
This can be done with a circular saw, a falzgebel plane or an electric plane. If for some reason it is impossible to cut out the quarters, you can collect blanks from two bars of different widths, fastening them together with dowels or screws. Door frames for sliding doors are made without a quarter cut. Vertical and horizontal elements are connected to each other in a spike. On one of the vertical racks, slots are made for the hinges.
How does a cylinder work
This way, potential burglars cannot push, break, or cut the trap. How do you best protect your front door from being shattered with a shoulder or foot pedal? 
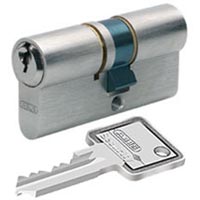
Cylinders usually consist of the following parts. Stator or cylindrical housing: The fixed outer part of the cylinder that forms the rotor housing. Rotor or cylinder core: the rotating inner part of the cylinder into which the key is inserted. The stator and rotor can be equipped with drilling pins made of steel for drilling protection.
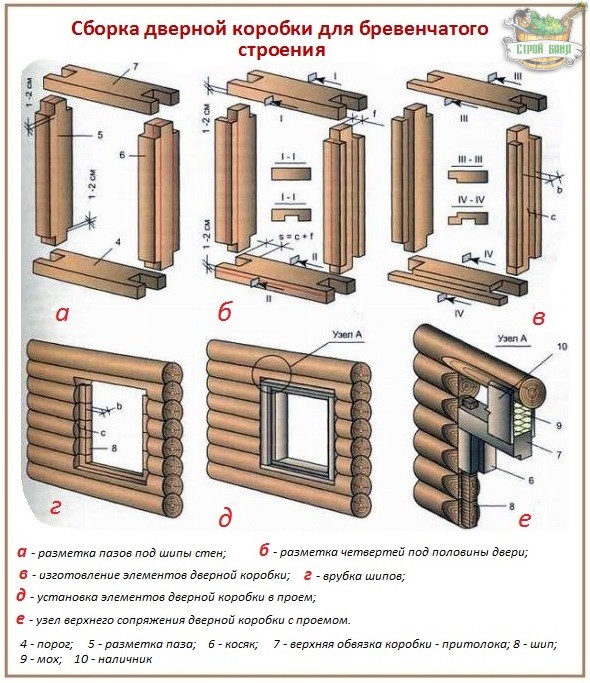
Door frames for brick and chopped walls are different from each other. So, for openings in the walls of chopped buildings, they are made from thick rectangular bars or simply hewn out of logs of a suitable diameter. In the bars from the inside along the perimeter, quarters of the thickness of the door (from 20 to 40 mm) are chosen, and from the outside along the sides - grooves with which the bars are put on the ridges made in the opening on the logs of the log house. The bars are knitted into a box on single or double spikes. At the bottom, a straight spike is made, with which the side stand is attached to the lower log (threshold). Usually, a thicker log is laid down, in which the top is horizontally cut off before laying, a quarter is chosen and the nests are hammered into which side bars are inserted with spikes. At the traditional wooden doorstep top part beveled by 10 °, and the threshold itself protrudes beyond the border of the wall sheathing. Eyes are made at the upper ends of the vertical bars, and spikes are made in the upper bar. When installing the details of the door frame, the upper bar is temporarily fixed with wedges, and the cracks are clogged with tow. The box assembled in place is checked with a plumb line or level, in addition, the diagonals are measured - it must be rectangular.
How does a cylinder work? When the key with the correct profile is inserted into the H rotor, the stator and rotor spring pins are in the correct position or combination under spring pressure. As a result, the cylinder is unlocked and the rotor can rotate freely in the stator. The rotor drives the closing bevel, which in turn moves the latches.
In addition to the conventional cylinder locks, there are also safety cylinders. 

- A safety cylinder with an electronic opener is also possible.
- What are the advantages of such a system?
In a brick (stone) wall the upper beam (lintel) is made wider than the doorway so that its protruding ends (50-60 mm each) rest on the masonry and fix the box in the desired position. Besides, in brickwork lay two wooden bars, to which the side bars of the door frame are attached with nails. Sometimes metal brackets are used for this (item 5 in Fig. 36).
A wide-angle door spike is a small hole in a door that lets you see who is in front of the door. The door post usually covers a viewing angle of 180 to 200 °; it does not allow you to see the person completely. Digital spies have been available recently. The screen is attached to the inside of your door. The spy itself is equipped with a small camera. When you press the button next to the screen, the small camera is activated in doorwayand you can see on the screen who is standing in front of the door.
They give you the advantage of time to react to an attack. Therefore, you should always use clips! The table shows the costs for four typical cases. The wooden frame for the inner door fits into the load-bearing inner wall. Installation of a steel frame in a load-bearing inner wall for an inner door. The steel frame for the front door fits into the outer wall. The load-bearing wall is mounted with wooden frame for the front door. As part of recovery measures such as disability-friendly expansion, doors often need to be folded back or widened.
IN frame houses the elements of the box with the attached door are assembled dry on a flat horizontal surface. This is necessary to check the absence of curvature of the elements of the frame and door leaf. It is easier to fix flaws before installation than trying to fix an already fixed box and door ... In an open structure, instead of the lower bar, a temporary jumper is nailed - a bar with a cross section of 50 x 25 mm - at a certain distance from the lower edge of the box to fix the position of the jambs. If the box is supposed to be painted or varnished, you can cover it with one layer of drying oil or varnish before installation.
Sometimes installing doors is also necessary because a new wall divides a large room. Doors consist of a movable blade with a push-pull fitting and lock, as well as a fixed door frame, also called a frame. The connecting part between the frame and the sheet is called a hinge and also a hinge. A string, strictly speaking, consists only of a component that covers the edge of the door opening perpendicular to the wall opening, that is, the opening. Shields are usually also included that decoratively cover the edge of the opening in the direction of space.
Door frame installation
![]()

Frame setup costs in detail
The cost depends on the size of the door opening and the material of the frames. They are made of metal or wood. The width of the frames depends on the thickness of the wall, which in turn depends on the type of wall. Therefore, the cost of installing frames in interior walls significantly different from the cost of external walls.
Human resources and construction costs
Load-bearing walls are often found indoors. They are usually 11.5 cm wide and the frame size is 10 centimeters. The price comparison is about 20.5 cm frames.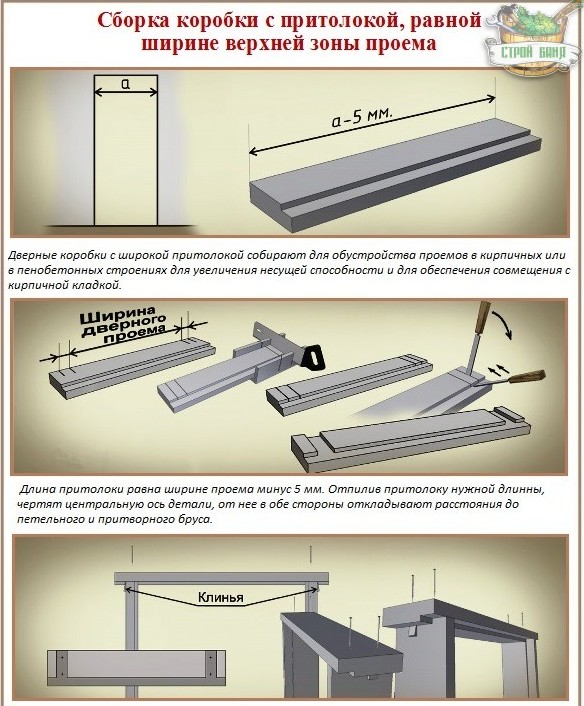

The door should be installed after the plastered wall has dried or dry plaster has been installed, but before laying the floor covering and installing the plinth.
Before starting work, you need to decide in which direction the door should open, and in accordance with this, install the door frame. It is better if the door opens towards the exit from the apartment or house
, and the exit to the balcony or loggia is considered as such.
The weight of the door leaf and the forces applied to the door are transmitted through the hinges to the frame, therefore, the frames must be fixed in the doorway firmly and reliably. Wherein doors are never hung close to the floor.
There must be a gap of at least 10mm between the door and the floor so that paths or carpet can be put near the door and this does not interfere with the opening and closing of the door.
Exterior walls can be up to 49 centimeters thick. For further consideration, this is about 28.5 cm frames. For building space and small material, an additional € 30-50 can be expected. Installing an entrance door is much more difficult than installing an interior door. They must be firmly secured. For a professional installation, you can expect between 200 and 350 euros. Assembling frames in interior doors costs between 50 and 150 euros. As a rule, companies offer discounts when installing multiple frames.
Noteworthy when installing door frames
What to do with door frames
The frame serves as a door stop, tape attachment and impact plate retention. She also disguises the wall attic. There are several things to consider when choosing and assembling. Differences between frames. They differ not only in material, but also in performance. Prices quoted always refer to complete wardrobes.The preparation of the doorway consists in checking the fastening of the wooden blocks to which the box is attached,
laid in the masonry with a step of 600 mm. If the embedded blocks are loose, it is necessary to fix them with spacers on the glue. It is best to fix the box elements to the wall with screws 100-120 mm long. The vertical racks of the entrance door frames are fixed with 4-5 screws. Horizontal elements are usually fastened with two screws. To fix screws in a brick or concrete wall, instead of wooden mortgages, you can use plastic dowels, but such fastening requires special accuracy when marking.
The easiest way to mark the holes is as follows. A box with drilled holes for screws is installed in the appropriate place in the opening, set in level and plumb line and fixed with clamps, spacers and wedges. With a thin drill through the frame on the doorway, mark the centers of the holes for the dowels. After removing the elements of the box, holes are drilled in the opening and dowels are installed in them with glue.
In the case of metal frames, corner frames that cover the wall opening and open on one side. Wooden frames are frames. They include a hole on three sides. The measure is very broad in the case of external doors and is carried out in order to create a disabled person. Carpenters can also make doors and frames in other sizes. This is, however, impractical, since only doors that are individually manufactured can be inserted into a frame other than conventional ones.
Aesthetic aspects when choosing a door frame
The sides made from the same wood as the door look beautiful. But they have a big drawback: if the door no longer fits, the frame no longer fits. More versatile are neutral frames, which can be adapted to walls or doors if required. For example, homeowners can opt for glass doors without any problem.
In frame houses, the doorway must be reinforced with additional struts and struts
, oblique or transverse, for greater rigidity. There are no particular difficulties in installing a wooden door frame to wooden walls.
The dry-assembled box is disassembled, the thorns are coated with PVA glue, assembled and installed in the doorway. The hinge part of the box is set vertically along a plumb line, fixed with clamps and fastened with screws. The loose part of the box is fixed with wooden wedges and a door is hung on the box. Pulling out and knocking out the wedges, they achieve the horizontal position of the upper bar and the vertical position (each in two mutually perpendicular planes) of the side bars of the box. Check the adherence of the door to the frame: the gaps between the vertical planes of the door leaf and the corresponding planes of the box should not exceed 2, and between the horizontal planes - 3 mm. Check the correctness of the installation by opening the door - it must remain stationary in any position; the gap between the bottom edge and the floor must be the same.
If necessary, wooden gaskets are installed between the elements of the box and the doorway. Only after that the box is finally fixed with screws. Countersinks are made under the screw heads, then these places are putty.
Always leave the door open by a specialist
Incorrect door installation prevents the door from closing or opening. However, a less obvious mistake is also possible, for example, that the frame is not correctly fixed in the masonry. Changing the wooden frame of a damaged door - difficult task.
Repair the door frames
The first thing you need to do is remove the door by lifting it up and very carefully remove it from its hinges. Try to put the door in safe placewell secured so that it does not fall or defend itself, so that it does not get hit or scratched during the task.After installation door block in the opening, the gap between the box and the wall is caulked or filled with plaster. IN modern construction instead, polyurethane foam is used.
To do this, one side of the gap is closed with a strip of fiberboard or plywood, the door is removed, and so that the foam does not fall on the outer surface of the box, the latter is pasted over with masking tape. 4-5 temporary spacers are installed between the vertical posts of the box. This is necessary to avoid deformation of the box during foam polymerization. The foam is blown from the bottom up into the vertical, and then into the horizontal slots. After foam polymerization, its excess is cut off with a knife.
After removing the hardened polyurethane foam that protrudes beyond the dimensions of the door frame, you can hang the door, nail platbands, install locks and handles.
Assembling the door frame
Removed the door, we must remove the old one wooden frame... Help yourself with a chisel and hammer to make the planks jump and separate them from your nails. Once you have completely removed the frame, remove the hinges to use in the new frame. Apply angles and imperfections that may prevent the new frame from leveling.
If you are going to build your own frame by purchasing wood, it's time to measure the area where the new frame will be, as well as the old frame, so that you have a corresponding reference. Also measure the door to make sure it will fit into the new frame. When measuring in hand, go for a craft or carpentry to cut or cut at home if you have the right tools like a saw, miter and level to cut straight pieces.
How to properly assemble and install a door frame with your own hands - video
Buying doors in a store, we knowingly acquire a door block that is not completely prepared for installation, but a scaled-up likeness of a children's designer set for “skillful handles”. It is quite understandable why the hinges are not hung and the locks are not cut in, because it is not known which side the door will open in. Manufacturers do not assemble boxes, since they do not know exactly the dimensions and features of the opening being equipped. Therefore, the owners have to hire craftsmen or independently build this important part of the door block. And for this, you need to clearly know how you can and should make saws of a bar, how to assemble a door frame for a long-term service of an interior or entrance structure.
Now is the time to sand the cut pieces or frame, give a coat of primer and then varnish or paint if the door is different from wood. When all hands are dry, it's time to reassemble the pieces to reassemble the frame. You can do this before installation and mount the entire frame or install it piece by piece, fixing them one by one to the door structure.
Door frame assembly diagram
To install the frame, use nails and screws suitable for the wood for assembly specifically. You can also use wood blocks. It's easier if you install the frame beforehand. You can use wood glue if you feel like it. If the frame is mounted, there is some crack or gap between the wood and the wall, you can seal them and cover them with plaster or, by smoothing and then directly sand the defects or seal. The last step is to reinstall the doors and the door in place.
What is the root "snag"?
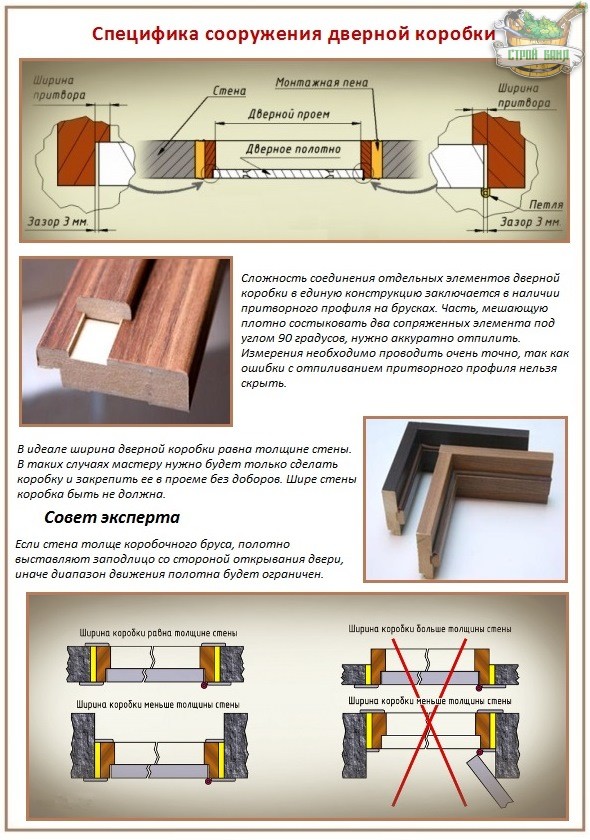
The complexity of a number of operations for assembling the base frame for hanging the door lies in the specifics of the production of cuts and in the connection of the components. The work, which is simple in the eyes of an inexperienced man in the street, is complicated by the presence of a feigned recess on the profiled jambs and crossbars of the future box.
Two box construction schemes
You can dock them by running the cuts:
- at an angle of 45 °, for which you need a good miter box with a reward, but it is much better if you can beautifully cut off the excess with a miter saw;
- at an angle of 90º, which will require not only a fine-toothed saw and accuracy of the performer, but also knowledge of the technological intricacies of essentially not too complicated work.
Self-tapping screws with galvanized coating or “nailless” spike joints are used to perform a solid connection of components. Thorns can be formed at both of the above angles. However, they are milled mainly perpendicular to the full thickness of the box beam, which must be taken into account when calculating and marking the length and width of the door frame-frame.
It makes no difference, the spikes of the transverse strips of the box will fit into the grooves of the horizontal ones or vice versa. If only the joints were strong and unshakable, for which they are sometimes reinforced by additional driving of zinc-coated nails.
The shape and dimensions of the structure
The geometric parameters of the base box being constructed are determined by two conditions:
- the width and length of the door leaf itself, for which this frame is intended to cover and support;
- purpose and category of the room being equipped.
Therefore, even before the starting stage of work, it is necessary to clearly determine where and how to install the door frame the owner of the door and opening in his personal property wants.
Depending on the purpose of the premises, the requirements for ventilation or for the insulation that the door must provide change. Entrance door in the bathhouse and the door to the steam room should not let the cold inside and release the beneficial warm air outside. The washing department, on the other hand, needs additional ventilation so that excess vaporization is spontaneously unloaded and the building materials do not rot. Necessarily need additional ventilation in the boiler room, especially if there is installed gas equipment... What can be done:
- If it is necessary to provide a barrier against heat leaks, four bars will be required for the construction of the door frame, which, after being connected, will turn into a closed rectangular frame. The door frame will consist of a false and hinged vertical bar, lintel - an upper crossbar and a threshold connecting two vertical elements in the area of \u200b\u200btheir conjugation with the floor surface. A 3 mm technological gap must be maintained between the box beam and the canvas along the entire perimeter for free movement of the door.
- If it is required to ensure the natural outflow of steam and polluted air, the box is assembled from only three parts, since instead of a threshold that prevents aerodynamic processes, a gap of 15.0 - 20.0 mm must be made. The door frame reminds in such cases the letter P. The gap of 3 mm laid by the technology runs only along the vertical posts and lintels.
Between the threshold and the newly laid floor covering leave a gap of 2-3 mm in case of thermal movement.
A closed box, of course, is higher than an open counterpart, as it is increased due to the thickness of the nut. This nuance must be taken into account in the calculations so that you do not have to "shorten" the door leaf, which is especially undesirable if it is covered with veneer.
Important. If you still have to cut on a veneer, start on the trimmed side and work your way up to the uncoated side. So the veneer will suffer least of all, the chips will be insignificant.
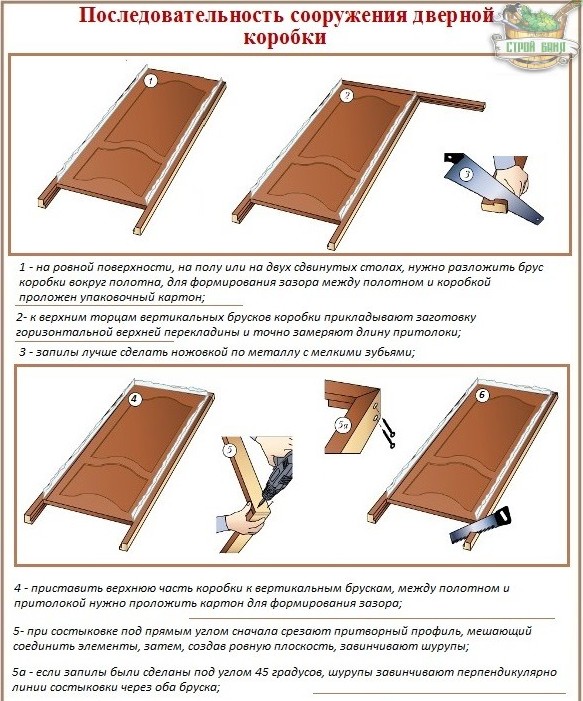
The sequence of the simplest assembly scheme
There are not too many people willing to mill or painstakingly choose spikes with grooves with a chisel without experience, and not everyone stocked up on equipment for perfect diagonal sawing. Therefore, most home craftsmen stop at the simplest scheme with joining elements at right angles.
Now let's find out how to properly assemble the door frame. It is more convenient to work by laying out all the components at a single level horizontally. Most often this happens on a covered with cardboard or other soft material on the floor, less often on two tables pushed together, four stools can be fitted.
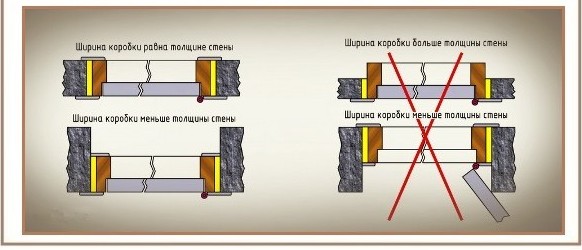
When buying a timber separately from the canvas, please note that the base for fastening the door in the opening should not be narrower than the canvas and wider than the wall.
Work order:
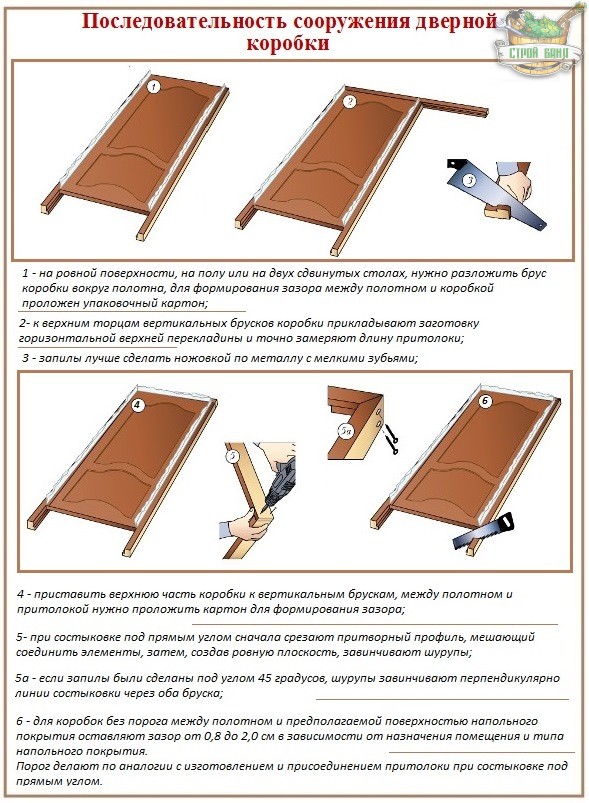
- On a platform equipped for work, lay out the box beam face up, that is, outward with the porches. If the beam is wider than the canvas, we bring the plane of the door to a single level with the future box, placing softback books under the canvas. According to any of the selected schemes, three standard elements are first involved in the work: a false and looped jamb and an upper crossbar.
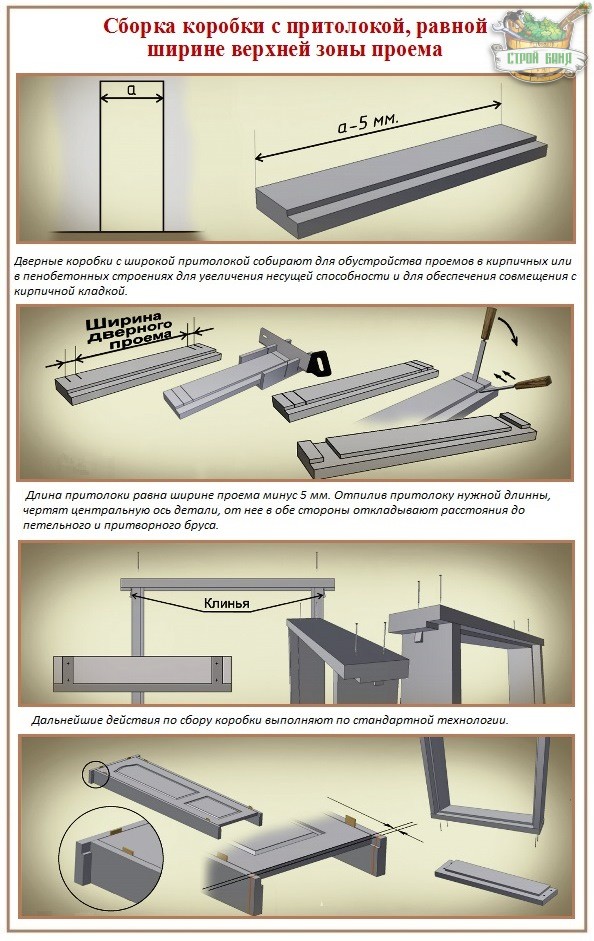
- The upper crossbar of the door frame, installed in a brick or foam concrete opening, is recommended to be made wider than the box to increase the bearing capacity. Usually it is 0.5 cm narrower than the opening. To search for the attachment points of the vertical bars to it, first find the center of the lintel, then lay equal distances in both directions.
- To form a gap equal to the entire perimeter between the canvas and the box beam, cardboard or old linoleum cut into pieces is laid.
- Having marked the gaps, we mark the cutting points without scratching the surface. It is better to apply light pressure with your fingernail. A pencil, especially a poorly sharpened one, is not recommended by experienced craftsmen for marking. It will not provide accuracy.
- Saw off the crossbar according to the selected scheme.
- Let us mark, preferably with an awl or a sharp scalpel, a part of the false profile, which must be removed so that a plane forms at the junction. Then "cut off" the marked area with a chisel or saw off. This is one of the most significant steps in the assembly of the box, which does not tolerate inattention and mistakes. A slight shortage in the length of the box bars will still be covered by the platband, and poorly cut with a chisel or sawn off ledges of the vestibule will be visible. Decided to cut? Take a hacksaw for metal and cut so as not to accidentally rip off the veneer from the underlying plane. For insurance it is better to cover it with cardboard. After we have done the wash down to the depth of the ledge, we clean off the excess with a chisel.
- We lay out the sawn-off bars back around the canvas with cardboard in the gap. Mark the location of the loops with maximum accuracy. The standard is considered to be the indentation for the installation of weights of 20 cm from the top and bottom of the canvas. Not forgetting about the upper gap, we put a point on the hinge bar at a distance of 20.03 cm from the intersection of the lintel and the jamb.
- We attach the loop card to the hinge bar on two screws and mark with a scalpel or awl the shape of the socket and the points of the holes for the screws. Slowly, scrupulously remove the veneer or solid wood to a depth equal to the thickness of the card.
- We put the hinge flags in the nests and fix them there with self-tapping screws. The lock striker on the box is installed only after the box is fastened in the opening and the canvas is hung, as there may be discrepancies.
- We return the looped bar to its place. We thoroughly check the perpendicularity of the elements to each other. We fasten the crossbar and the posts, distributing two screws per connection.
The gates are made in the same way as the lintel.
Features of assembling boxes for wooden baths
Wood is an excellent building material, which differs from others by the ability to settle after construction, which is not very pleasing to the owners. Openings in baths and houses made of logs or beams should not be equipped at all in the next couple of years after the construction of the crowns. Moreover, it is imperative to find out how to properly install the door frame in a log or log opening.

There are 2 options here:
- If the width of the opening formed during the construction process corresponds to the design solution, a groove is cut out in the end right in the middle and then a bar is hammered into it. It is to this beam that you can nail a box, you cannot directly to the walls, because even after shrinkage, they continue to "settle" a little.
- If the opening is not formed, you need to cut a hole for the passage with a width less than the design one by two thicknesses of a kind of ridge. In such cases, a box beam is made with a groove.
In both versions, the box elements at the same time serve as a crown connector. A gap is always left above the opening to protect against deformation during the shrinkage period.