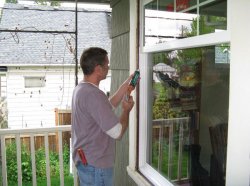
What do we know about wooden windows. Only that these windows were installed in everyone in the house. There were, because not long ago (in comparison with wooden ones), we all began to install PVC windows en masse. Refusal from wooden windows in favor of plastic is the right decision or not, only time will judge. Here are some of the benefits of a wooden window.
The first, and perhaps most important, is that wooden windows "breathe". If you leave the room for a long time without ventilation, for example, you went on a business trip, then there will be no musty air in the room, and there will be no puddles of water (condensation during the heating season) near the slopes on the windowsill. That's why wooden windows “breathe”, there is an exchange of air masses between the street and the room itself.
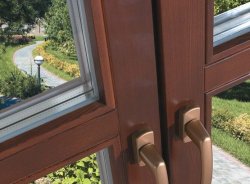
This air movement occurs through the tree of the window itself, and not through the junction of the sashes to the box. But, of course, subject to the technical standards for the care of such windows, namely treatment with water-soluble dyes and primers. The second, quite important factor is durability. Thanks to modern technologies wooden euro-windows are able to maintain durability and attractiveness, long years... Thus, it is not a weak competition for PVC windows. For example, you have seen PVC windows that are 50 years old! No, but wooden windows still serve faithfully. The only drawback is the price for a wooden euro window, which is an order of magnitude higher than PVC.
Now let's consider how to insert wooden window in a brick and wooden house. Windows installed in brick buildings and installed in wooden houses, have some differences.
A window inserted into a brick (block) opening has an additional frame frame around its perimeter. Which is fastened with nails into a special beam, which was previously installed in the masonry of the building. Such a frame frame is pre-treated with a water-repellent material, such as roofing material, parchment, etc. since the frame will be in direct contact with the base of the window opening. We fixed the frame, install the window frame, it should come close to the frame, now you can hang the sashes in which the double-glazed windows are inserted, this is if the euro windows are made of wood.
How to mount a window into a wooden opening. The procedure is the same, but with minor deviations. The window frame is rigidly fixed along the entire perimeter of the window opening, it can be fixed with nails or self-tapping screws on wood. For wooden log cabins, we make a groove on the frame and a spike on the frame opening, the spike and the groove can be swapped for convenience.
Now let's compare how a wooden window is inserted and a plastic one. First of all, you need to take into account the humidity of the room for wooden windows (as it can cause deformation of the entire window frame), PVC will not hurt. For pvc fasteners, modern fasteners, various anchor bolts, self-tapping screws for concrete are used ... which cannot be said about wooden windows. Well, in conclusion, it is worth noting that it is better to pay more attention to sealing when installing wooden windows.
How? Haven't you read it yet? Well, it's in vain ...
In construction, wood has been used for a long time, but now it remains in demand and does not lose its relevance
The process of installing a plastic window is not difficult and not laborious, but it will require care and accuracy.
Finishing of external and internal slopes with various materials.
Overview of the characteristics of modern windows made of PVC, aluminum, timber and their combinations.
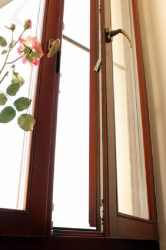
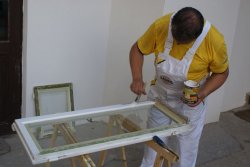
Wooden windows are distinguished not only by their beauty, but also by their environmental friendliness. And how long the window will serve you directly depends on how well the installation is made. Of course, it is better to involve a qualified specialist to carry out these works, but you can perform the installation yourself, having studied the technology well. Also, the owners of country houses often resort to self-installation of windows, since the installation of windows in wooden house do it yourself significantly saves the total cost of building and repairing a house.
Described in another article. To clearly understand how the installation of a wooden window is carried out with your own hands, watch the video.
Do-it-yourself installation of wooden windows in a wooden house: video
Technology for installing wooden windows in a wooden house:
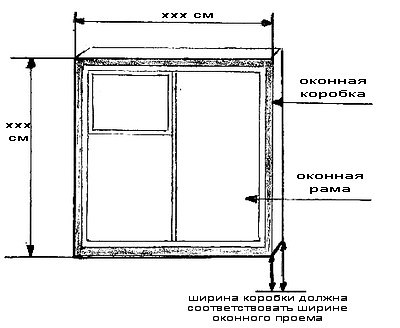
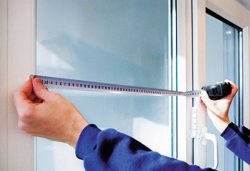
- Measurement of the window opening. The width of the opening is measured from the left to the right slope and from the upper slope to the window sill inside the room.
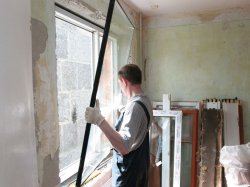
- ... Before proceeding with dismantling, the glass from the window frames is removed and the old slopes and casings are removed. After that, you need to knock out the nails from the window frame and take it out of the box. Further, if necessary, the old window sill is dismantled. Then it is necessary to remove it from the window opening.
- Opening preparation. When the old window is completely dismantled, you need to clean the window opening from the remnants of the seal and other debris. Further, the entire wooden surface is treated with a special antiseptic.

Installation of waterproofing and sealing tape
Window installation
- Laying a sealing and waterproofing tape on the bottom of the window.
- Installation of a window box.
- Securing the box with special wooden pads and wedges.
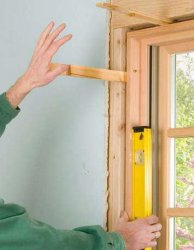
- Vertical and horizontal adjustment. When installing a window, it is worth considering that you need to focus on the real horizontal and vertical, and not on the sides of the window block. To do this, you should use the building level.
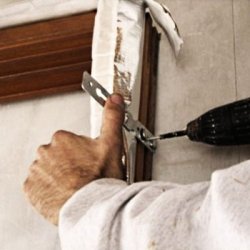
- Drilling holes in window opening every half a meter on all four sides.
- Fixing the box using self-tapping screws.
- Installation of insulation along the border of the window box. For this purpose, polyurethane foam is used, which must be applied evenly and without interruption. To avoid the formation of excess foam, you can install a restrictive wooden bar.
- Installation of the frame. The frame is installed in the grooves of the window frame and fixed in it with screws.
- Opening / closing design setting.
- Final finishing. When the main work is done, the window sill, platbands, ebbs and all wooden elements or are installed.
When installing wooden windows with your own hands, you must take into account the following nuances:
- The size of the opening should be about 30 mm larger than the size of the window. Likewise, the necessary reserve is provided for the arrangement of insulating materials. And in the lower part of the opening, it is worth leaving 50 - 60 mm, taking into account the presence of a window sill.
- For greater heat preservation, it is advisable to mount wooden windows closer to the outside of the window opening.
- The corners must be 90 ° and the diagonals must differ by a maximum of 10 mm.
- Mounting foam tends to collapse due to exposure to the sun and other factors, so it should be protected with a layer of sealant and any waterproofing material.
- During installation, do not tighten the screws too tight in order to prevent the profile deflection at the attachment points.
Thus, you are convinced that the technology of installing wooden windows is not so simple, but at the same time, it is quite accessible to anyone who wants to install it on their own. is also not simple, but with the right technology will not be difficult. But for this it is necessary not only to have all necessary tool, but also take into account all the nuances of installing wooden windows.

Self-assembly of wooden windows is no different from installing plastic windows. You also need to prepare the opening, install the window, fix, foam, adjust the fittings and finish decorative trim... But still, we will tell you how to properly install wooden windows with your own hands.
End-to-end technology for installing a wooden window
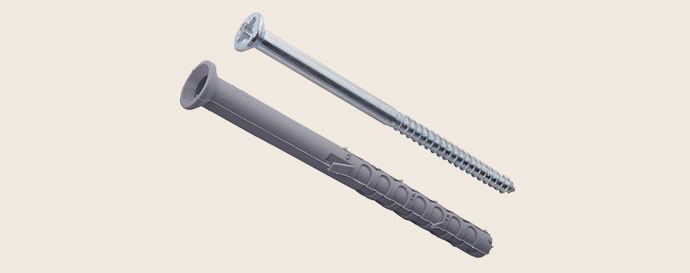
Through is the technology by which a wooden window is installed and fixed on self-tapping screws in dowels. This is a fairly simple, but at the same time, reliable installation method. Judge for yourself: a dowel in the wall is an excellent stopper for a self-tapping screw that is screwed into it. When the screw is completely screwed into the dowel, such a structure cannot be loosened.
In order to install a wooden window through the through method, you need to separate the glazing beads from the frame and stick out the glass units (you also need to remove the sashes so that they do not interfere and lighten the weight of the window). Next, you need to mark from the inside the places for drilling holes inside the frame (on the sides and top).
When the holes are drilled, you need to screw in the screws so that the window can be moved a little. This is necessary in order to adjust it vertically and horizontally. The horizontal adjustment is made by lining the blocks under the bottom of the frame, the vertical is adjusted by moving the same bottom of the frame closer inward or outward.
Important! The wooden window should not be installed close to the walls, otherwise it may deform over time from wall loads. There should be an indent of 1.5-2 cm from each side, and 5 centimeters from the bottom, so that you can adjust the horizontal and leave space for the windowsill.
If your window opening is thicker, then it is better to install a wooden window closer to the outside, so that most of the opening is inside and, therefore, warmer. We recommend that you plot the thickness of the opening into 4 equal parts and install the window in the second quarter, counting from the outside.
The technology of installing wooden windows using mounting blocks
The installation of a wooden window on the blocks assumes a very even openingso this option is not for everyone. First, you need to fix the pads on the waterproofing to the sides of the opening so that they are parallel to the frame on each side. Before installing the window directly, it is better to remove the sash from it. After inserting the frame, the vertical and horizontal are checked. And finally, the window is fixed with wedges.
The technology of installing a wooden window on mounting plates
Before installation, mounting plates are attached to the window from the sides and top with an indent of 25 cm from the edge of the frame (the plate should face into the room, as it will be attached to the inside of the opening). If the dimensions of the window exceed 1.5 meters, then it is necessary to fix another 1-2 plates to the window from the sides and top.

The plate is attached to the frame and to the opening with self-tapping screws, only to the frame on one side of the plate, and to the opening on the other side. After inserting the window into the opening, you need to fix it with wedges, align and then fix it to the end (screw in the screws and remove the wedges).
After the final fixing of the window, all cracks must be covered with polyurethane foam.
Do-it-yourself ebb installation
It is known that wooden windows in houses built from timber are rightfully considered the safest and most practical solution, which favorably affects the microclimate in the dwelling.
Fundamental in the presented case is that when it shrinks, the window system and walls behave monotonously. The decisive role here is played by their installation according to technology.
Features of installing windows in a wooden house
The assembly of windows in a timber structure has certain features. As you know, wood shrinks. In houses made of chopped logs or during the first 5 years, shrinkage is about 10-13% of the height of the building, while shrinkage is no more than 2%.
If there is a warping of window structures, the formation of inter-crown gaps in the walls or cracking of a glass unit, this indicates a violation of technology during the installation process.
- In houses of chopped wood, round logs, planed or profiled timber, it is advisable to install a window support after shrinkage of the house (not earlier than 1.5 years after construction).
- The installation of windows after the construction of a log house is not rational due to the lack of the possibility of calculating the shrinkage of the walls. This indicator depends on the moisture content of the timber.
- In houses made of laminated veneer lumber, installation of windows is allowed immediately after erection of walls and installation of the roof of the house.
- The installation of windows must be carried out exclusively by means of sliding joints - support bars and casings. It is strictly forbidden to strap window blocks and the structure of the window to logs or beams. Tight fastening during shrinkage leads to a violation of the integrity of the window modules and walls of the building. In fact, the window system must be balanced separately against the wall.
- In the upper part above the window frames, it is necessary to provide for a shrinkage margin - gaps of 6-7 cm. Miscalculations of spare gaps can lead to poor closing of windows or gaps in the walls.
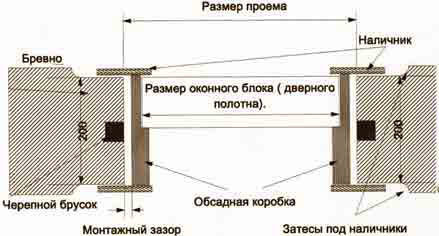
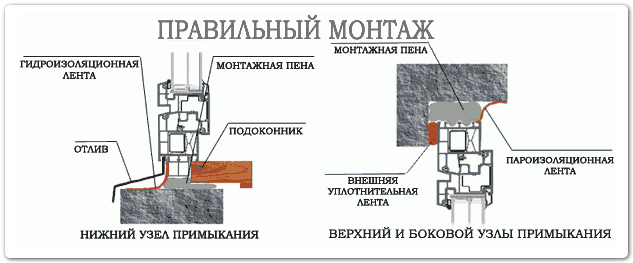
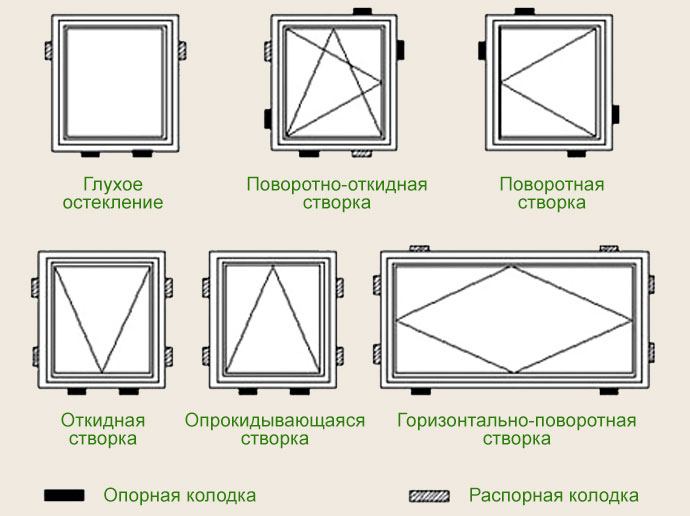
Installation diagram of wooden windows
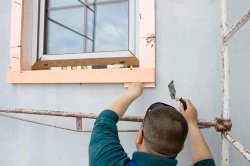
Preparation of a window opening
Before mounting the box, prepare a window opening. The opening should be rectangular without cracks, depressions, distortions and other flaws. It is necessary to remove construction debris, dirt, dust and layers from all its surfaces.
In order to avoid distortions in the future, it is required to make accurate measurements of the external, internal and lateral sides of the opening.
In the case when the skew of the opening is significant and it is not possible to correct it, it is recommended to expand the parameters of the window in such a way that the highest level of the outer opening exceeded the width by 2.5-4 cm, and the height by 1-2 cm.
The extension makes it possible to install an additional profile on the window. This will prevent the appearance of gaps between the box and the hole in the areas of maximum skew.
In addition to the option of expanding the size of the opening to correct the skew, there is such an option as increasing the parameters of the window frame.
Siege
A special design, which is a wooden box without a bottom crossbar, the purpose of which is to securely fasten the window and maintain the shape of the window frame, regardless of the degree of shrinkage of the house, is called a casing or jamb.
There are several types of this design:
- Solid. It is made from specially processed solid material.
- Sticky. The individual components are made of type-setting boards that are connected by means of micro-grooves and glue. All burrs and small knots are removed.
- Mixed. Part of the casing is made in one piece, while the other part is made using glue. Upon completion of the installation, the window is coated with varnish. This type is suitable for using large window sills.
The window is made according to the size of each window. Moreover, if an internal lining is planned, then a sample can be made for it. When facing on both sides, the sample is not taken.
Casing assembly can be started after the window opening has been prepared.
Its manufacture is carried out as follows:
- In the base, which is adjacent to the window hole, grooves are grinded. A bar of the same size is inserted into them, which serves as the side of the casing.
- First, a bar is placed at the bottom of the opening, which will prevent the displacement of the side elements.
- A sealant is placed under the timber from linseed tow.
- A sealing material is placed in the grooves and mount the side boards.
- The final stage is fastening the top board of the structure.
- Above the window, a space is left for wood shrinkage and it is filled with a sealant. So in the process of shrinking the logs, the load will not affect the window opening.
Installation of windows
The window is installed in the following sequence:
- On the lower part of the opening, a waterproofing and a sealing material.
- Install the window frame and fix it with wood pads or wedges.
- Using a building level or plumb line, they adjust the horizontals and verticals. Thus it is necessary to pay attention to the actual horizontal and vertical, and not to the sides of the window opening.
- On each side of the opening, with a step of 50 cm, holes are drilled.
- With self-tapping screws fix the box.
- Insulate the space between the box and the wall sealing material.
- Next, the frame is mounted. It is installed in the grooves of the box and fixed to it with screws.
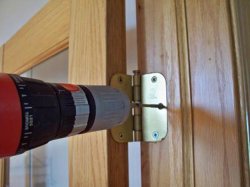
- Window blocks are installed on the frame with hinges (separable and non-separable). The difference between them is the possibility of recessing the hinge. Detachable ones are convenient in areas where there is no possibility of raising the window sash. Smooth fastening of the hinges contributes to the even hanging of the window transoms. They are fastened with screws.
- The sash is locked by means of a locking element or a latch. After checking the opening and closing of the transom, fasten the frame using nails.
- Next, proceed to the installation of window sills. They are mounted from the inside so that the side edges go into the walls by 4.5-5 cm on both sides.
- Immediately before installation, using a lime-gypsum mixture, align the bottom of the window opening.
- The window sill is fixed with wedges. After laying the thermal insulation material, it is finally fixed.
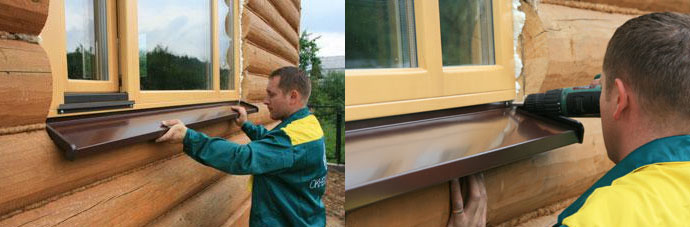
- Installation of ebbs is carried out from the outside of the opening - over the entire width of the frame penetration into the base.
- The gaps between the casing of the base and the box, as well as the upper and lateral sides of the window, are closed with a casing. It is advisable to use the same type of wood from which the house was built as platbands.
- All parts of the casing are connected to each other. To do this, use thorns, nails or glue solution.
- Placement markup is performed beforehand fasteners (step is 10-12 cm).
- So that in the process of attaching the platbands they do not move, the structure can be glued.
- The final step is fixing the platbands with nails or self-tapping screws., and closing the gaps between the base and the platbands with a sealing material.
- For the manufacture of casing, wood is used with a moisture content of at least 10%, otherwise, cracks form inside the structure over time.
- It is strictly forbidden when making a window. use metal fasteners.
- Do not use building foam as a sealing material for casing assembly. In this case, the wood is bonded, which prevents its natural shrinkage.
- In the process of installing windows, it is important to make the holes for them correctly. The optimal distance from the window sill to the floor is 85-90 cm.
- Experts do not recommend installing windows without installing a window, even if the house was built many years ago, and the frame is completely dry. This is due to the fact that throughout the entire service life the tree tends to shrink.
- For greater efficiency and heat retention, wooden windows should be installed closer to the outside of the window opening.
- It is necessary to choose hard wood as the material for the window sill. A window sill made of glued wood has the longest service life, a window sill made of solid wood has the shortest service life (as a rule, the product is warped).
- The corners of the window opening must be 90 degrees, and the diagonals must not differ by more than 10 mm. If the hole in the base is larger than the allowable value, more sealing material will be required. If you do not ensure that the corners are even, the box may warp.
- It is important to correctly calculate the planting depth of the window in the opening so that the dew point contour equal to 10 degrees passes through its inner part. Then condensation will not form on the inside of the window.
Process installation of wooden windows practically from installation plastic windows is no different. Before installation, all options are thought out in advance, as well as possible problems that may appear during the installation process.
Installation of wooden windows - simple, but requires the accuracy of calculations and accuracy. Therefore, it is better to entrust it to professionals. Nevertheless, knowledge of the rules for installing windows will make it possible to do this work efficiently.
First rule
The measuring technician must have personal experience with the installation and be familiar with the construction of the window to be installed. If an incorrect calculation is carried out, then all costs will be lost, and additional work will require much more time and material investments. Therefore, it is important to monitor the accuracy of this stage of work.
Second rule
The measurement of the window that will be installed is carried out both from the inside and from the outside - from the street. These measurements are necessary in order to determine the depths of a quarter of the initial window opening.
Of course, the window should not be less than the outer dimensions of the opening. This will prevent the structure from falling out. How much it should be depends on many different factors.
When installing windows made of wooden material, certain rules must be followed. This article continues their descriptions.
Third rule
It is imperative to take into account the factor that the opening that exists can be quite skewed. This is typical for panel houses. In this case, this factor leads to the need to increase the size of the window by the size of the skew.
Or, otherwise, so that there are no through slots between the edge of the window frame or the edge of the opening, the size of the window must necessarily be greater than the size of the outer window opening by at least 30-40 mm in width, and in height by 15-20 mm.
This is achieved in two ways. You can increase the size of the window frame. Alternatively, you can expand the window with special additional profiles that snap onto the box.
Fourth rule
From the side of the street, there should be a clear idea of \u200b\u200bthe appearance of the window, since some people like that the entire box of the inserted window is walled up into the wall and is not visible from the outside. Others prefer to show the window in all its glory.
In the event that the first option is chosen, one should not forget about possible distortions, so as not to hide the edge of the glass unit inside the wall, and not just the box itself. The second option is preferable. In this case, the likelihood of errors is less, as well as the severity of their consequences.
Fifth rule
It should never be forgotten that from the outside of the window, sometimes from above, but mainly from below, there should be an outflow specially installed to drain rainwater. Therefore, regardless of how the ebb is installed, the lower edge of the window should not be below the outer edge of the opening.

This is necessary in order to ensure that there are no special openings for water drainage of the window frame from the outside. In addition, the joint between the frame and the ebb, as well as between the frame and the window sill, must be sealed, for example, with silicone.
Of course, it is best to install the ebb under the window. This will eliminate the possibility of water seepage in the place where the connection is. Also, do not forget about the windowsill. It is installed not in the joint to the window, but under the window.
It also needs to be sealed with silicone. This will prevent moisture from seeping under the windowsill through the joint. On the other hand, it will increase the strength of the connection. During installation, the window sill has a slight downward slope, according to SNIP - 3 degrees. This is to prevent condensation from draining under the window.
Sixth rule
After accurately determining the dimensions of the future window, they must be compared with the control internal dimensions of the opening. Such a comparison will make it possible to detect a mechanical error in a timely manner in previous calculations. This will also allow you to estimate how much plaster layer should be deposited on the internal slopes.
Seventh rule
It is necessary to strive to ensure that the joint width between the window frame and the wall does not exceed 3 cm. This is especially important when the size of the window is large. This is not difficult at all, since the manufacturers of window profiles, in addition to the basic set, necessarily make additional profiles that make it possible to increase the width of the window frame without changing the dimensions of the glazing. Such profiles are specially designed and designed for just such cases.
Eighth rule
There are generally accepted methods for fix the window frame... This is a fastening through the box, which is made directly or fastening using a metal anchor plate clinging to a plastic lock on the outside of the box. Each of these methods has both advantages and disadvantages.
In the first case, all double-glazed windows and sashes must be removed from the frames during installation. But at the same time, the window is fixed in almost any opening, which guarantees the load not on the plastic, but on the metal internal reinforcement of the window. The second method simplifies the leveling process by plumb line and level.
It does not leave marks on the end surface of the plastic. Both methods prove themselves in practice. Which one to choose determines rather personal taste. Next comes the installation process. The window is freed from hinged sashes and double-glazed windows.
The empty frame is inserted with wedges using a horizontal level and a vertical plumb bob very carefully into place. Holes are drilled in the frame and wall for future fasteners around the perimeter of the window. The frame is secured with collet bolts.
After that, the sash and double-glazed windows are inserted into place. Then the joints between the wall and the window are sealed. This is done with polyurethane foam. Then the protective film is removed from the profiles, only after that the hardware is finally adjusted. In the process of performing these actions, you need to take into account rule 9, which will be described in the next part of the article.
The previous parts of this article talked about the rules for installing windows. The rules that will be described in this article are additions to the eighth rule of the third part of the article.
Ninth rule
Taking off glass unit, it is necessary to mark the glazing beads. This is necessary in order to put them in the future exactly in the same place. In the process of window production, the dimensions of the glazing beads are determined very clearly in place using a special measuring ruler. And although the glazing beads themselves are at first glance the same, their length is different. The difference can be no more than 2 mm, but in the place where the joint of the vertical and horizontal glazing beads occurs, even such a trifle is perfectly visible.
Tenth rule
It must be remembered that it is better to install the window on the lower bearing blocks. They are not removed after installation. In no case should the window remain hanging on the dowels. The weight of a metal-plastic window with a double-glazed unit reaches 150 kg.
Therefore, neither dowels nor polyurethane foam will certainly hold it. The pads must of course be placed next to the vertical elements. Under the vertical partitions-imposts and at the corners of the frames to be installed.
The next part will look at the rules covering fixings and plumb lines.
Eleventh rule
When positioned vertically, a plumb line with a sharp tip and perfect axial symmetry must be used. The level bar is by no means suitable. She does not give accurate readings. When leveling the horizontal, experts recommend using a water level. It is he who gives an accurate reading.
The twelfth rule
Do not tighten the fastening screws while tightening them. Otherwise, you may not notice, but the window will take on some barrel-shaped appearance. After tightening the screws, in any case, it is advisable to once again check the absence of profile deflections in those places where the fasteners were made, as well as the general leveling of the window.
When sealing windows, the joints between the wall and the window frame with a variety building materials usually filled with polyurethane foam. It is relatively cheap, easy to use, capable of receiving and evenly distributing wind loads and mechanical stresses.
For her, the unevenness of the sealing surfaces does not matter. But you need to use foam skillfully and thoughtfully. It must be protected with sealant, plaster or paint. And, of course, rigid fastening in the window opening should be provided not with foam, but with special profiles.
How to install wooden windows - video:


