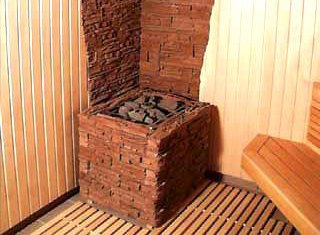
It has long been in Russia, with their own hands, good-quality baths. The most important factor was where to build it, and almost everyone wanted to make this design. And this is not surprising, because anyone knows that the bath restores health and gives strength. It is these words that can be found in a variety of ancient scrolls.
Build a bath and today. Before the main project is made, you need to decide what will be the oven - Electric, metal or brick with water tank. We will not disturb the ancient customs and consider how to make a brick design with water tank.
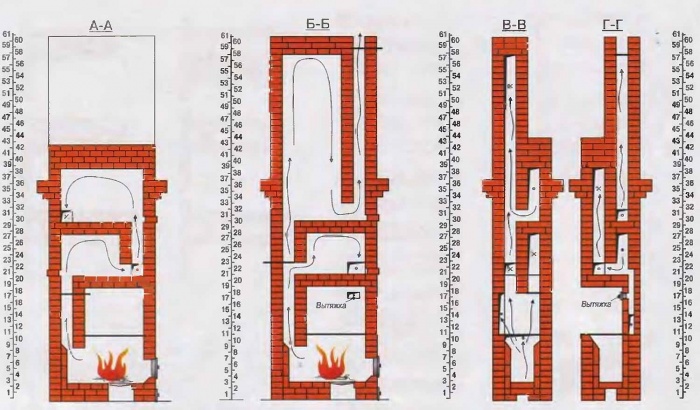
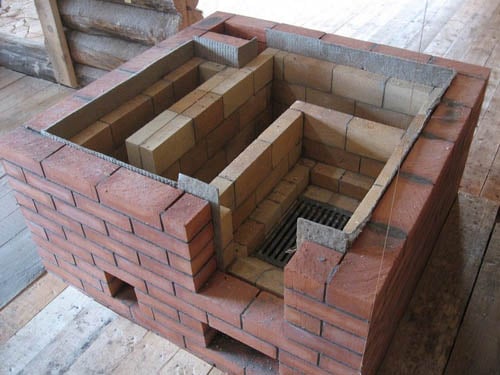
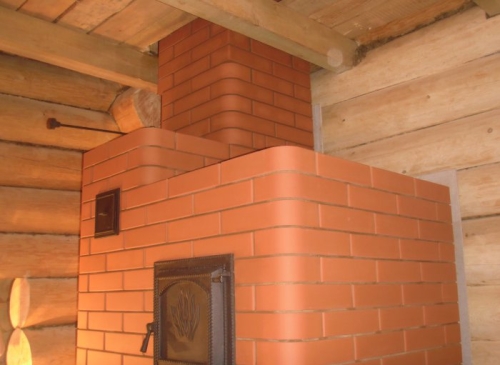
What does a brick furnace look like for a bath
It has the following main parts:
- furnace;
- solnik;
- kamenka;
- chimney;
The pipe chimneys is made in several ways:
- It can be made on an atmosphere. In this case, it will fix right to the oven.
- It can be make root. The pipe is put separately and adjoins the oven itself.
For the rule, you need to take that the pipe must be put 0.5 meters Above the ridge of the roof. In the chimney pipe, the cross section should be equal to a full brick. In extreme cases, his half. When, it becomes necessary to make her broadening.
In most cases, bathing stoves are made with their own hands, without any trimmed structures. Therefore, mostly there is enough ordinary water tank. When you make such brick structures, then as a pipe for the chimney is perfectly suitable metal pipes . Unfortunately, when they are cooled, they begin to proceed by an unpleasant smell. To avoid this, it is necessary to put the heat insulating case on the pipes.
For the bath is important properly fold brick oven with a tank. This is especially true of those cases when you do not hire specialists, but do it with your own hands. Steam can be obtained if you water preheated stones with cold water.
Views
For the bath, brick stoves are built in several variations:
- In black. Such are sometimes encountered in half-visured villages. They do not have chimney, hence the name. There are water tanks, but not always.
- In gray. Brick furnaces of this type are built with chimney. Firewood should fire so that soot delias.
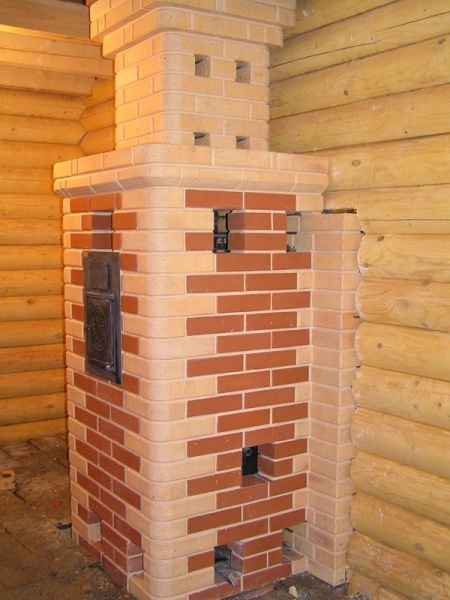
- In white. Such a brick oven warms a bath for 12 hours.
- With tiles. Brick furnaces are found in such variations. In this case, stones and tank are located on the pair of pig-iron plates.
Build a brick oven with your own hands
First of all, we will need the following tool:
- building level;
- grater;
- shovel;
- sieve;
- plumb;
- trowel;
- bucket.
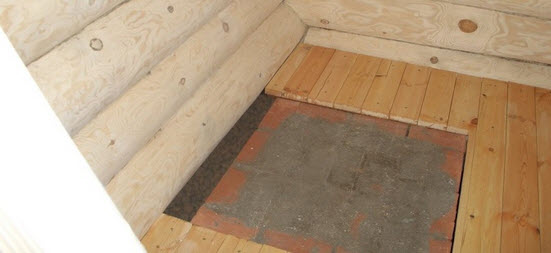
First you need to understand where the brick oven will be located. After that, it will be necessary to note where the chimney pipe will be located. Secure the plumb in the marked circle. It is from him that the construction of a brick furnace for a bath will begin.
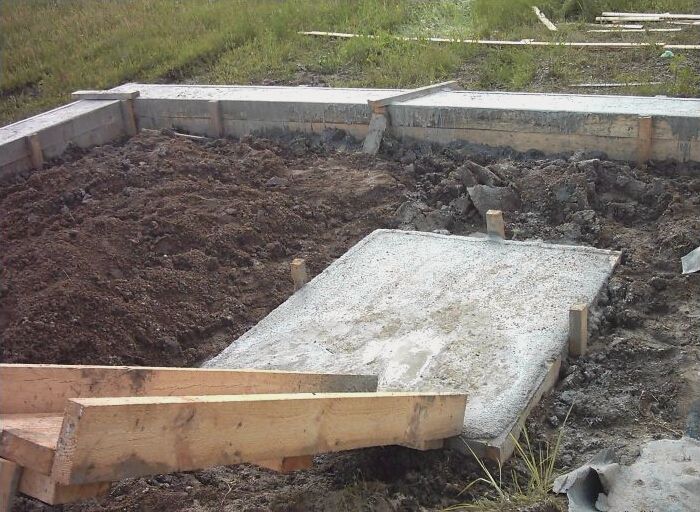
It is necessary in the area it will be much more than the future design. The work algorithm will be like this.:
- the shovel bursts the pit and the bottom of the sand layer on the bottom;
- sand shed water and thoroughly tamper;
- next occurs the installation of a formwork consisting of boards;
- after that, put the gravel layer with your own hands, scatter it and sink;
- put the rod of reinforcement on gravel and fill everything with a solution of cement;
- leave the resulting mass until the moment of complete drying. To speed up the process, it is recommended to pour wet sawdust.
Before laying bricks, they will need to moisten in water. Thanks to such a simple reception from the solution, they will not take moisture. After that, the formwork is removed, all possible gaps fall ashamed by sand. So, you building foundationon which there will be a bath brick oven. Now it will be necessary to lay a layer of pergamine for waterproofing. Brick oven is done on. He is prepared with her own hands. This is required for heat resistance.
Laying oven. Order
 On the waterproofing layer there is a masonry of the first row of bricks. Do it need dry. Be sure to leave the hole for cleaning, it will later be possible to hang the door.
Further order is happening so:
- on the lower mount in the third row of bricks, you need to put the door. From above it will be fixed on the sixth row.
- To bricks better fit together, you will need some of them to cut your own hands. It is important to remember that they can be installed exclusively over the door.
- Understand whether the brickwork is properly laid, you can use a plumb.
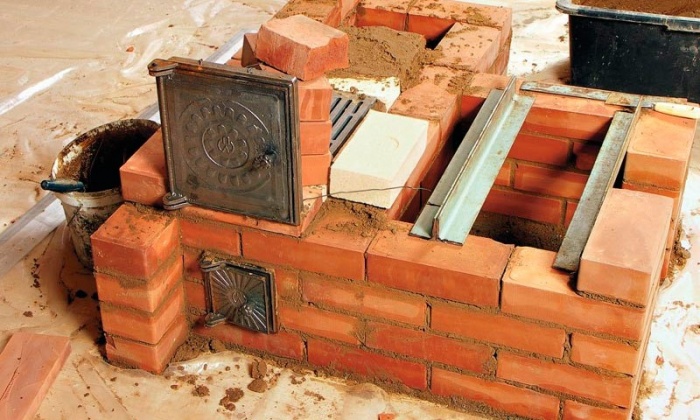
- The door of the firebox, the ash well and grate must also be installed in the third row.
- On the next order you need to put a special partition. It will divert the flue gases.
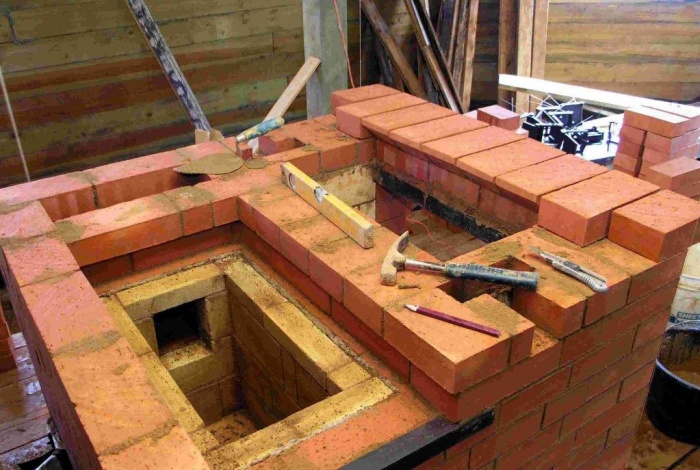
- When order will be performed up to 14 rows, it will be necessary to make the opening and consolidate the schuler on the side walls. It is necessary to further install the water tank with your own hands.
- Further one row of bricks need to lay down to each other at an angle. This will be the basis of the separation wall.
- Next lays out 3 more rows Bricks for closing joints.
- Asbestos cord from a brick furnace winds are wrapped with metal parts so that the fire does not happen.
- After that, you need to build a chimney and damper for him with your own hands.
Plastelling brick stoves
 When the brick is driving, it will need to be launched. To do this, you can use a solution, sand and clay. Sand is sieved and fiberglass is added to the solution. Before carrying out further work, the furnace surface will be required thoroughly prepare:
- residual solutions and dust are cleaned;
- the walls of the furnace are wetted with water.
So, a brick oven with water tank can be built on its own. It does not matter if you are not a professional in this case. If you enjoy the instruction, then the magnificent brick oven for the bath will be folded in a short time ( 2 Votes rating: 4,50 out of 5)
Despite the growing popularity of ready-made metal structuresThe traditional Russian bath is invariably associated with a brick model of the furnace. Craftsmen who prefer to independently engage in property landscaping, useful to familiarize themselves with the Procedure bath Furnace From brick. Information on the required materials, the nuances of the process and the detailed description of the sequence of work will help to equip a comfortable place for relaxation.
Materials and tools
The acquisition of high-quality material is the first step towards the construction of durable brick design For a bath. Brick deserves primary attention: to arrange a Kamenka and chimney furnace red fireproof speciesHolding up to 850 o C, the laying of the furnace is carried out by chamoten brick, which preserves its properties at temperatures above 1500 o C. To bookmark the foundation, cooler sand and clay will be required, referentially used between the base and the bath furnace.
Additional materials for the construction of a bath furnace:
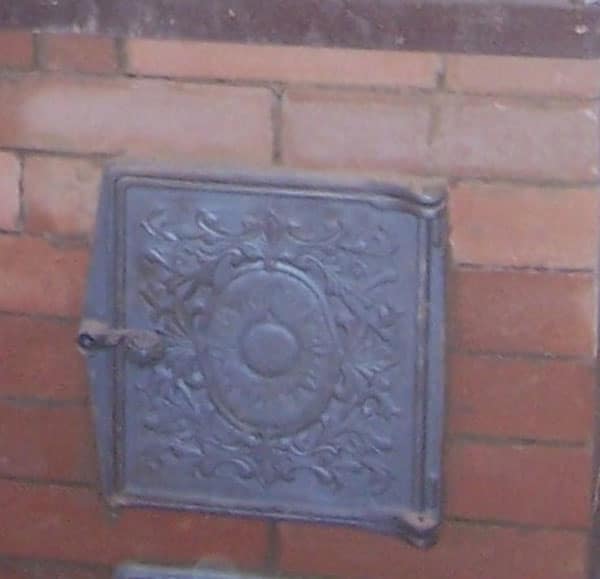
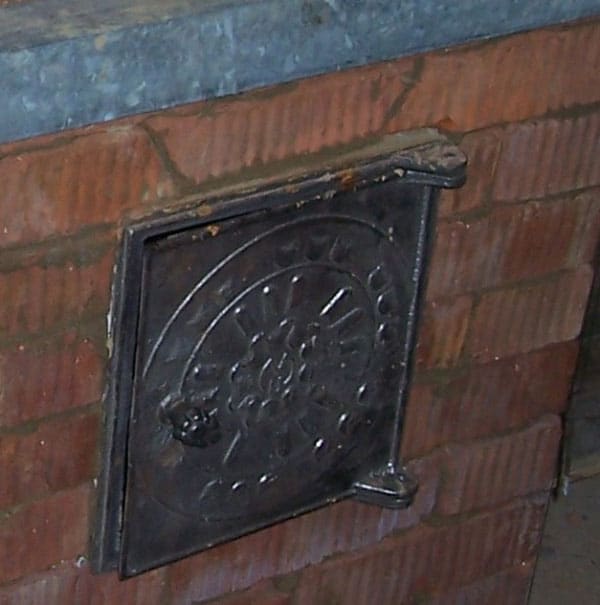
- stove casting;
- steel corner and tape;
- capacity for heating fluid;
- asbestos cord;
- galvanized wire.
The listed materials will help build the simplest model of a brick bunny furnace, more complex designs will require additional details. In order not to interrupt the process to search for the required tools, take care of their presence in advance. In addition to the electric crust and the grinder, the container is required for the solution, level, roulette, plumbing and wooden cizyanka.
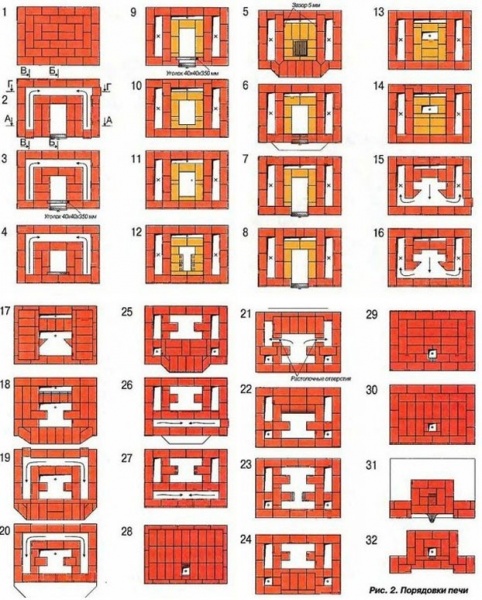
Project options
There are many laying schemes if you do not consider yourself to professionals, choose to build a better simple option for erection. The effectiveness of the bath furnace will not suffer, and the chance of a successful result will be much higher.
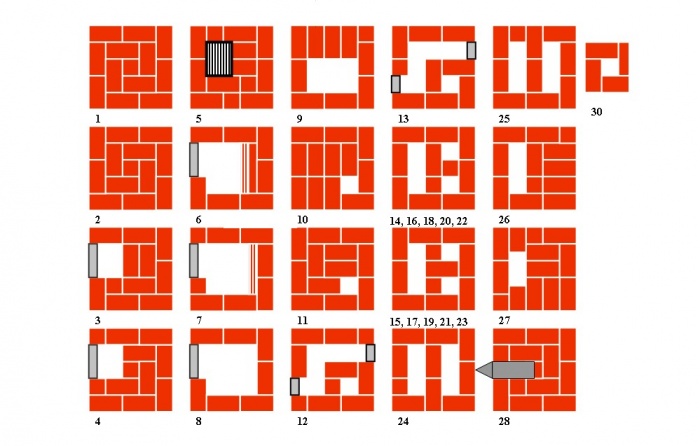
In addition to traditional ways Masonry, we bring to your attention the order of the Coupacing bunny stoves of Kuznetsov, which occupy a significantly less space in contrast to standard structures.
Each novice liver is useful to familiarize themselves with the subtleties of the process of equipment of the brick furnace equipment, otherwise the errors made during the masonry can become fatal during the operation of the bath construction. So, what should be paid attention to:
- Clay, seized in the process of digging the foundation, is useful for the mortar mixture when masoning the furnace.
- Clay and sand for laying a bath furnace mixed in a 2: 1 or 3: 1 ratio. Determine the correct lug in the solution for the brick connection will help the following method: dropping a wooden stick into it, measure the remaining layer of clay. The optimal is considered the thickness of 2 mm, if the indicator is greater - you need to add sand, a thinner layer indicates the need to make clay.
- The mounting of the furnace casting into brick rows provides for the formation between them the floor of the centimeter clearance. This prevents the destruction of the masonry of a brick coat as a result of the expansion of the metal from incandescent.
- Non-standard brick sizes lead to its protrusions or shortage at the end of the masonry of the row. Fix the situation will help the dumping of the protruding parts of the brick of the grinder or the formation in the event of a shortage of thickened intermediate seams.
- If the size of the grate does not match the hole in the furnace prepared in the bath furnace, turn to the grinder equipped with a circle of metal.
- Be sure to pride the cleaning wells on the turns of the internal channels of the chimney, these sections are most susceptible to the accumulation of soot.
- Eliminate the contact of the chimney with bricks. These bath furnace places need additional protection, which is organized by winding the asbestos cord on metal parts.
- Located next to the bath furnace, wooden elements requires antiseptic solutions, which protect the material from self-burning as a result of heating from bricks and prevent rotting processes.
Important ! The masonry of the brick furnace is carried out with the mandatory use of the construction level strictly on the plumb.
Sequence of work
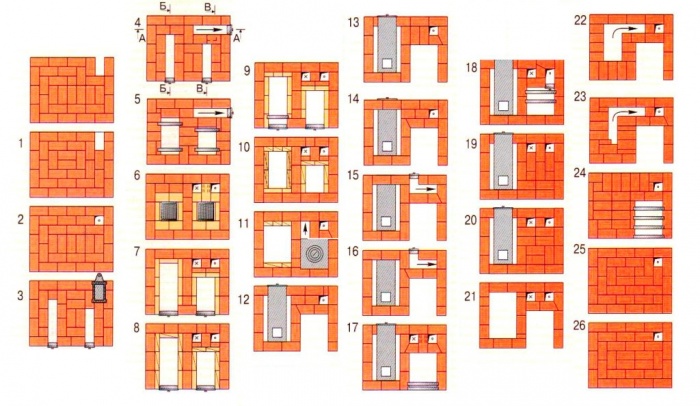
Bath furnace made of bricks, due to its massiveness, needs preliminary equipment of the foundation. By laying the foundation, go directly to the masonry, the process of smoke arrangement is completed.
Foundation
Drive for a foundation for a bathing stove from bricks rushes to a depth above excess of the level of primerization of the soil. Depending on the region, this indicator is 0.7-1.2 m. The width of the pit at the bottom itself slightly exceeds the main recess. This does not allow impaired integrity. common design When the soil moves. The construction procedure for the foundation for a bath furnace includes the following steps:
- The bottom of the pit is equipped with a sandy pillow with a height of 15 cm, which is subsequently poured with water.
- After a complete impregnation, a stone or broken brick is stacked, a layer is formed with a thickness of 20 cm.
- Upon completion of the shrinkage of the sandy pillow, a layer of rubble is formed.
- The formwork is installed on top and the reinforced frame is mounted.
- The solution of concrete is poured to a level that does not reach 15 cm from the floor surface.
- The next step is to dismantle the formwork. The vacant place is filled with small gravel or large sand.
Completes the process of laying on the concrete of two layers of the rubberoid, which performs the function of the waterproofing material between the foundation and the stove of the brick. Preventing moisture from entering the brick prevents the premature destruction of the material. After complete drying, the foundation is moving to the main construction of a brick design.
Masonry furnace
After checking the horizontal level of the foundation, you can proceed to the construction of the walls of the bath furnace. First on the floor forms a kind protective screen. From brick, creating a barrier from fire. This will require a sand-concrete solution and rifle bricks. For the main masonry, a sand-clay mixture is used.
Tip! Easy the use of dry clay will help its pre-soaking for several days in a special capacity. Sand for the solution is purified from garbage and sieved.
A small volume of the solution in the exemplary ratio of sand and clay 2: 1 is recommended. When forming a first row of a bath furnace, a brick, placed on a waterproofing material, is pre-wetted with water. Finish the first number of mandatory angles and compliance with the selected order. It is taken into account with any chosen brick bath project. The seams between the rows are formed with a thickness of 3-5 mm. The next layer of bricks is placed on the joint of the two lower, this rule is observed throughout the masonry.
Usually, when forming the third row of the bath in the coil, the installation of the door occurs. To strengthen it uses steel sheets or galvanized wire. Experts prefer steel strips due to the lightweight fastening process, in the absence of strips, the selected wire must comply with the regulatory thickness. To fix it in bricks, it is necessary to prepare small recesses.
Before starting the formation of the fourth row, the level of the walls horizontally and vertical, as well as the set 90 o for the corners of the bath furnace, are tested. This row is equipped with a well for ash and grate. For the installation of the lattice in bricks, the deepening is dispened so that the formed gaps make it possible to expand the cooler as a result of thermal exposure. These gaps are approximately 1 cm in each direction. The rear wall under the grate is rounded with a broken brick to reduce the resistance when the air flow moves into the flue compartment.
After the 6th row, the installation of the door is carried out for pondering, the 7th row ends with the fixation of the grate grid and machine door. It is installed similarly to the door pondered. As a rule, cast iron doors, characterized by durability and high, are used for bath furnaces. refractory properties. On the 8th row, a partition is formed, which serves as the beginning of the chimney. Such a laying of bricks continues to a fourteenth row, on which the channels are equipped. The next row of the bath furnace is laid out by half bricks underlying at an angle relative to each other. This serves as the basis for the formation of the separation plane. The laying of subsequent three rows is carried out similarly to the first three levels: each brick falls at the joint of the previous layer.
The door for the release of steam is equipped on a 19th row of a bath furnace, after which metal thin strips are mounted, which serve to bond on the 20th and 21st rows. On the 21st row, the frame of the steam door is closed and the water container is installed, if such is provided by the project.
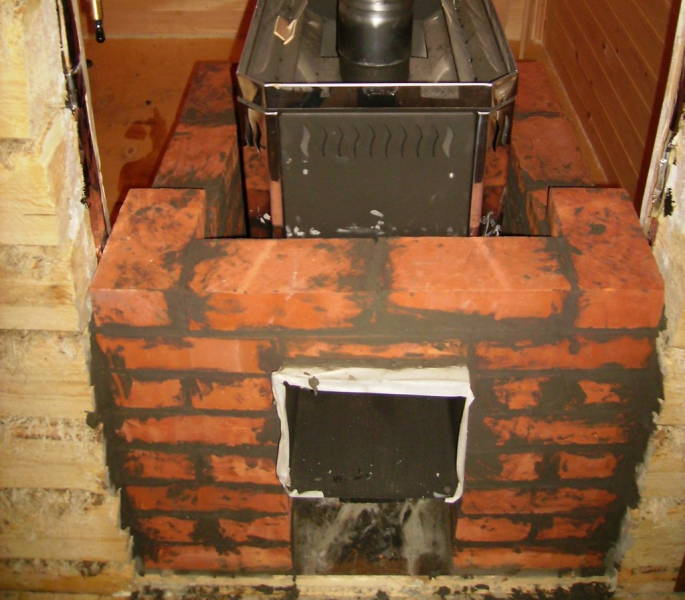
Chimney
Twenty-third row serves to equip the bath furnace, the length of which varies depending on the overall height of the room. The pipe is selected in proportion to the size of the bath furnace itself: the more powerful the main design, the greater the chimney, and vice versa.
Important ! The minimum thickness of the chimney walls and the bath furnace is Polkirpich, the same size of the secting of flue passages.
Elevation chimney Above the roof is at least half a meter. For its masonry, a limestone or cement solution is used, since the sand-clay mixture will be repeated as a result of precipitation or effects of condensate.
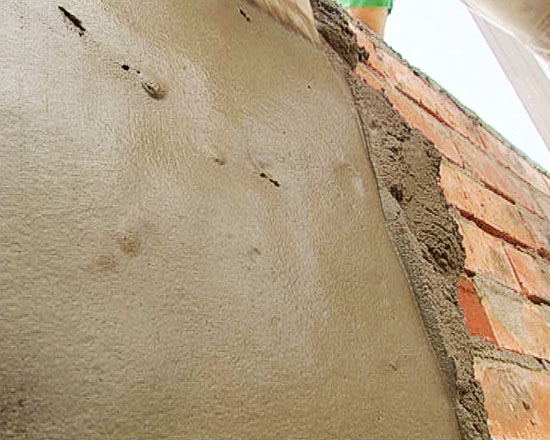
Improve appearance The finished bath furnace will help her plastering. It is desirable to add asbestos or gypsum into the solution. Before the outlined procedure, the furnace made of bricks is cleaned of excess solutions, slightly deepen the seams and spit.
Holding set sizes furnaces, hectares and chimney cross sections, you will provide safe operation Bath furnace, and a construction of brick will create comfortable conditions for a long time when visiting the steam.
Becoming the owner of the site for the construction of the house, many begin with the construction of a bath. Often the bath is built in the country, even if country cottage area small. We'll figure it out how to fold the furnace with your own hands for the bath in the country or on the household site at home.
Materials for the furnace
In order to understand how to fold the stove for the bath, you need to learn the properties of the furnace materials. To the bath on the site of the house or at the cottage joined tenants, you need to take into account the many nuances.
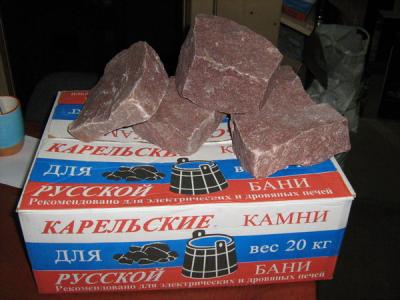
Stones
In the heater lay down from 1 to 5 kilograms of stones. Stones should have a high proportion, high heat capacity, high melting point, mechanical strength.
- Magmatic refractory rocks can be used: granite, basalt, diabase, quartzite.
- There are a legend about Mineral Jadeit, supposedly perfectly suitable for the heater. It is likely that it is true.
When the Kamenka device in the bath at the cottage or on the household site of the house is forbidden to use:
- Sedimentary rocks: Limestone, shelling and dolomite with a high content of calcium and magnesium carbonates.
- For the same reason, it is impossible to use marble - Metamorphic breed with carbonates.
- When heated, these breeds turn into lime.
- If the heated marble or limestone is poured with water, then a limestone dough with significant gas formation is obtained. In this case, you can choose and get a chemical burn.
- Stones high silicon Also dangerous, since silicon cracks while heating and can fly into small sharp pieces. These pieces can cause injury.
- Also not suitable stones with high content asbestos, sulfur, sodium.
Often, along with stones use castuncan. Cast iron practically fully satisfies the formulated requirements for the stones for the bath.
Brick
Before folding the oven, you need to purchase a brick. Moreover, that brick that was used to build the walls of the house is not suitable. After all, there is no heat-resistant and refractory brick for the walls of the house.
- Under stovety concrete foundation Furnaces must be arranged waterproofing. Rolled or coherent way, as you are more comfortable and more familiar.
- The base of the furnace is lower than the clean floor of the bathhouse lead on cement-sandy solutionwith ratio one to three.
- In the process of masonry with their own hands, the base of the bath furnace, opposite the future door, it is necessary to install a metal sheet at the level of clean floor of the bath or pre-banner (depending on where the furnace leaves).
- Every row of bricks must first lay out without a solution on dry. This is necessary in order to choose the same bricks in size to minimize the thickness of the masonry seam.
- Laying of each row begins from angular brick.
- Before masonry, do it yourself, each brick is immersed in a bucket or trough with water about 20 seconds. This is done to fill the pore of the brick water.
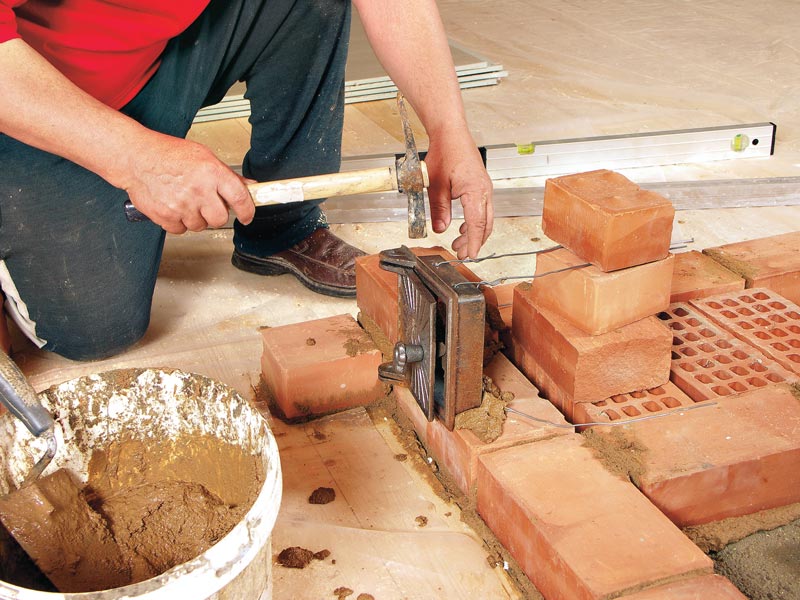
Masonry Rules
There are many orders of coaches. It depends on your wishes to the size, design and thermal power of the future furnace. General principles of reference chimney masonry do it yourself:
- Required amount of masonry solution Take a celma and gently decompose in the place of masonry. After that, thoroughly dissolve the solution. Try to monitor the same amount of solution every time.
- Already an exemplary brick plunge into a trough with water and put on a rooted solution.
- Carefully tapping the knob of the Kelma, aspiration brick. In this case, follow the thickness of the seam, not more than 5 millimeters.
- The solution squeezed from two sides to pick up the cell.
- Make the same portion of the solution to the place of the new brick.
- Rolemn the solution and spread it on the edge of the previous brick. This vertical line is called - pump.
- The next expectant and moistened with water bricks also exhaust the stump of a thin layer of the solution. Not thicker 3 mm.
- Mix the new brick so that the stumps are lacked with a solution adjoined each other.
- Tapping a knob of the Kelma, make the thickness of the seam no more than 5 mm (better less). Sealing solution pick up.
The following rows of masonry are also carried out as the first, more often we are checked with a friend.
Note! Setting three or four rows, we wipe the wet rag, especially gently wash the chimney walls.
Performing the masonry with your own hands, do not forget to dress.
- The coincidence of vertical seams of masonry is not allowed.
- Vertical seam Must be blocked by the brick body of the next and previous row.
- Ideally, the seam should pass the center above the brick.
- But in practice it turns out not always. Sometimes the seam overlap does not happen in the center of the brick.
- But in any case, the seam should be overlapped at least than the quarter of the length of the standard brick.
You can not put the crash or cut side of the brick inside the smoke channel.
- In these places, the buried brick surface is broken and can be collapped under the influence of hot flue gases and sour condensate.
- Halves and quantity of bricks need to be trimmed very carefully so that thick seams are not formed on the site of their landing.
- The trimmed brick edge is laid inside the masonry, that is, not inside the furnace and not towards the bathroom.
Fake camera
- Bandage of masonry chamotte and conventional brick is not allowed due to different coefficients of temperature expansion.
- Therefore, from the chamotas arrange a lining of the cooler camera.
- In this case, the chamotte brick is laid on the edge.
- There should be at least 5 millimeters between chammatory bricks and usual.
- For chamotte masonry Use special chamotte clay.
Oven
We must not forget that cast iron and brick have different coefficients of temperature expansion. Cast iron expands when heated is greater than the brick, so if cast-iron oven fit into brickwork, then cast iron will expand and breaks brick. Therefore, all the instruments: grate grids, coarse doors and water tanks must be installed with gaps.
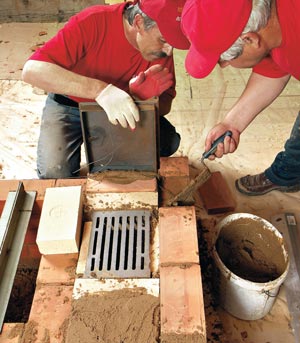
Grate
The cooler is placed freely without a solution with gaps from all sides at least 5 millimeters. The lattice should be able to be freely replaced in the case of exercise.
Inflowable, cleaner and coarse doors
Important! Doors still in the store are checked on the subject that the door is tightly adjacent to the box. It is necessary to identify possible distortions, as the door is closed and the door on the loops opens, how the valve works, is there fasteners.
In the fastening holes on the door frame insert a soft knitted wire, twist the wire in the harness. On the brick at the installation site, the door is placed. We put the door, check the vertical and horizontal levels and temporarily fix it with the help of bricks, laid as dissolving. Then we lay the ends of the wire in the laying seams.
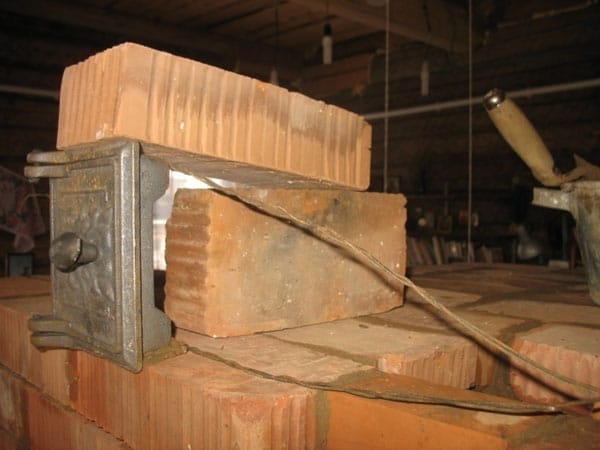
Temporarily fix the door with bricks. Knitting wire twist in the harness. Then continue the masonry around the door. We overlap the door from above or two whole bricks at half the brick length on each side. Or a whole brick in the "Castle". The door of the fuel chamber must be additionally wrap asbestos web. It is not bad to fix it from above with a metal strip with a cross section of 25 × 2 millimeters, the ends of this strip should be embedded in the masonry.
Chimney
We all love very much to take a bath oven.
- Therefore, the temperature of the exhaust flue gases at the outlet of the furnace reaches 750 degrees. And this can last a few hours.
- And the normal working temperature of the factory metal chimney from the stainless steel is only 450 degrees. True, metal chimneys admit a short-term increase of up to 900 degrees, but 15-30 minutes, and not for several hours.
- In addition, the binder of most basalt insulation inside the sandwich tube begins to collapse at temperatures above 400 degrees.
Our advice! The output of this contradiction is: the first element of the chimney after a furnace is made of a thick-walled steel or cast-iron pipe. This segment will take on the main temperature "blow."
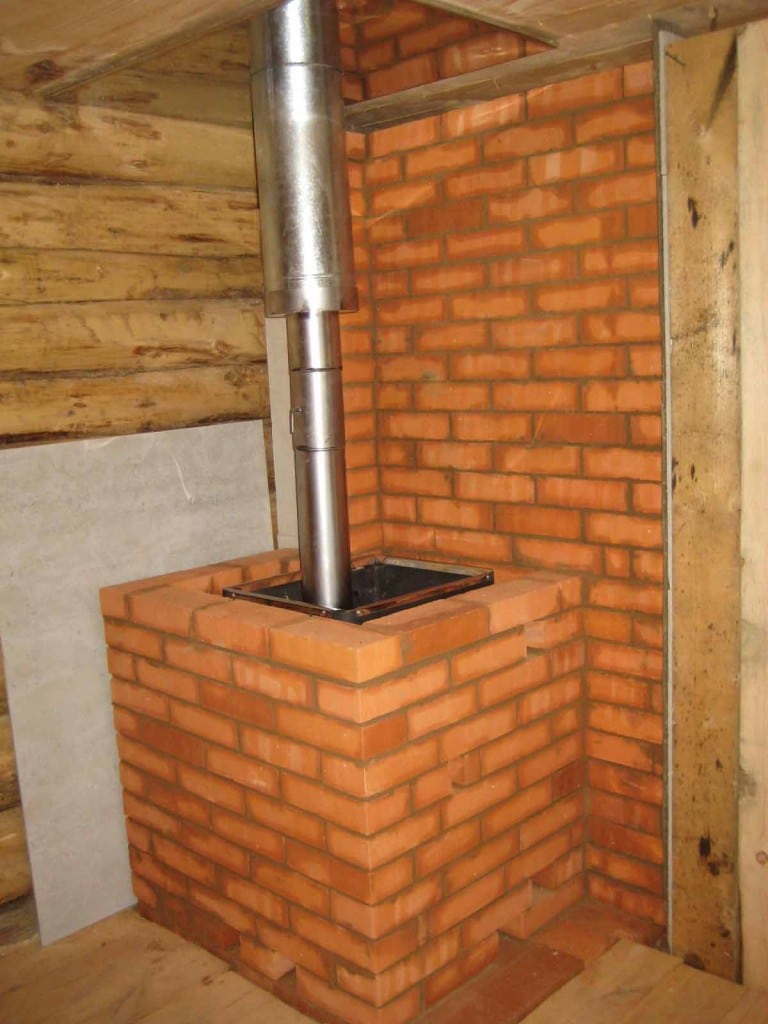
The first element of the chimney is one-way. And after it there is a two-stranded warmed basal plate sandwich tube.
Drying the furnace
A new furnace cannot be intensively stirred immediately. She can crack and spoil.
- After completing masonry and pipe work the stove must dry.
- Several days it is kept with open doors and dampers.
- And the windows and doors open in the bath room so that there was an intense draft.
- Three to four days, a new furnace can be slightly drove with small sins for 12-15 minutes.
- Such short floors can be held two or three throughout the day.
- Usually it happens three to four days As long as abundant condensate is maintained on the flap. Condensate shows that there is still a lot of moisture inside the oven.
When the abundant moisture condensate stops on the surface of the flap, it means that the drying of the furnace was successful. We considered the question of how to fold the furnace for a bath built in the country or at the household site of the house. There is no good supernatural or shaman. If you carefully follow professional recommendations, then the problem is how to fold the oven itself will be solved.
Target audience - newcomers, unfamiliar with the Aza chimney and need to explore the basics.
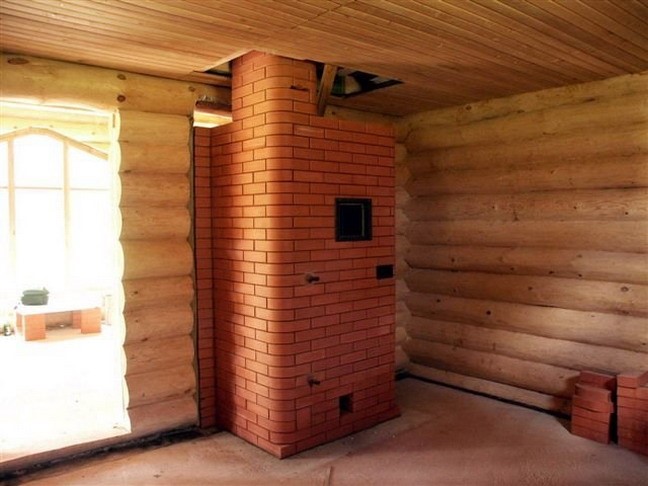
Brick oven in the bath - tribute to tradition.
Go shopping
What from building materials will need for the construction of a bath furnace?
- Concrete for the foundation.
- Cast iron elements - furnaces of firebox and ashtar, grate and valve for adjusting the thrust.
- Solution.
- Brick.
Create:, but also stone.
However, pick up and squeeze the desired number of stones is much more difficult than buying several hundred bricks, so the stone laying will remain outside of our consideration.
We will pay attention to choosing what will have to be purchased.
Brick
Red, full. For lining of the furnace - chamoten, made of refractory clay. Silicate disappears due to bad resistance to temperature: with overheating it crumbs. Any void or passioned is also not suitable: cavities provide effective thermal insulation, and we, by contrast, need maximum thermal conductivity.
Cast iron
When choosing doors and valves should pay attention to the absence of distortion. Open and closed all moving elements should be without significant resistance.
Other materials
In addition to the above, for the construction of the foundation will have to be purchased:
- Cement. The usual portland cement grade 400.
- Small river sand. Grain size should not be more than one and a half years. Before mixing the solution, he is sifted.
- Ruberoid. It will be needed for the foundation waterproofing: the masonry should not pull the water from the soil on the capillars.
Getting to work
Preparation of solution
For the preparation of the solution, we will have to go to the nearest reservoir and dial there ... clays. Cement mortar is not suitable for furnace masonry: when heated it will quickly get out.
So clay, sand and water at our disposal.
- The clay on the day is soaked, then wipes through a fine sieve. At the output there should be a viscous pasta sticking to the hands.
- Add sand into the splashing clay. Its quantity depends on how fattle it is at our disposal: than it is greater, the more sand is required.
- We stir the solution to a homogeneous state, when necessary, adding water.
How to determine the degree of fat clay solution? It will help a simple test.
From one portion of clay, a ball with a diameter of about five centimeters is rolled; The second portion is rolled into the cake. After two or three days of drying in the shade, neither the ball nor the pellet should crack: the presence of crack indicates too fatty.
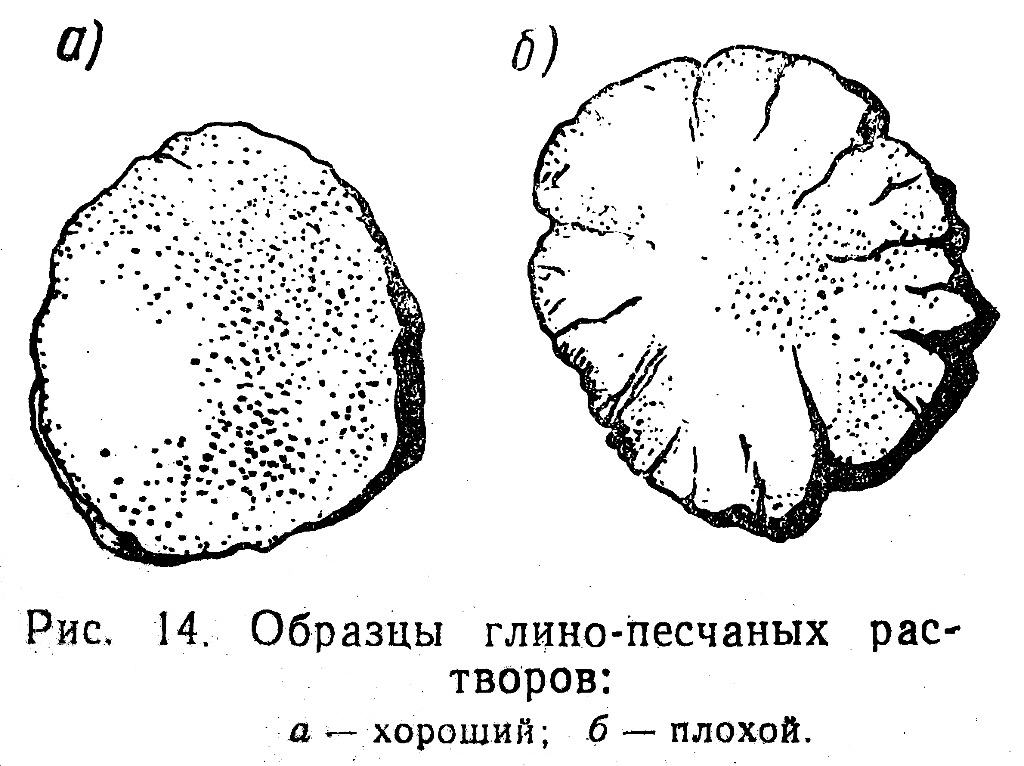
In addition, the ball, falling from the meter height of the tree, should not split (this will occur at a skinny solution).
If there is no clay near your home - you should not despair. Dry chamotte (refractory) clay is sold in many building stores. The price of a 20-kilogram bag is about 200 rubles.
Foundation
How to fold the stove in the bath without a reliable foundation? It is from him that the construction itself begins. In the ground rotates a depth of about half a meter; Above the level of soil is collected formwork. The surface of the foundation must be about 7 centimeters below the level of the future floor.
Concrete for the foundation is prepared quite traditionally: 1 part of the cement is mixed with three parts of dry sand, then water fills up to the desired consistency with continuous stirring. As a filling, you can use stones, brick battle and crushed stone. For reinforcement, a rod, a grid or simply trimming of unnecessary pipes, a corner, etc.
Important moment: Foundation. The instruction is related to the fact that they differ in temperature and degree of shrinkage.
The surface of the foundation is aligned cement mortar and is hydroizing two layers of rubberoid. Then, the solid layer of bricks is then laid out, on which the wall of the furnace will be erected.
Masonry
How to fold the stove for the bath? The sequence of actions itself is the same as any other brick masonry; However, there are a number of features associated with the temperature regime.
Let's formulate the highlights.
- The new series is pre-decomposed without a solution. This will allow you to choose bricks in size: there is always a small scatter of the dimensions between them. It is usually leveled by a dissolved seam, but not in our case, because ...
- ... The seam thickness is only five millimeters against 12 in a regular wall laying. The thin layer of the solution will provide the oven maximum strength. What is thicker, the more the difference in the thermal expansion coefficients of clay and brick will affect the condition of the masonry.
- Each row begins with an angle styling.
- Before laying brick on a mortar pillow, soak it in water for 20 seconds. Filled pores will make seams more durable: clay will come into contact with a larger surface.
- The solution is applied to both adjacent pumps - the end of the bricks. Surplus are squeezed when rushing.
- Vertical seams shift from a row to a row. The perfect laying - when the vertical seam accounts for strictly on the middle of the brick in the next row.
- The dried side should not be addressed inside the smoke channel. The smaller, the less soot there will be gathering.
- How to fold the stove for a bath with a lining shame? Chamotte brick laid on the edge without dressing with the main masonry. Moreover: there is a five million meter gap between chammatory and red bricks to compensate for the difference in the temperature expansion of materials.

Installation of cast iron parts
The way they are installed again rests on a significant difference in the temperature expansion: heating to 800-900s, the cast iron increases the linear dimensions much more than the brick. For fixing the cast iron, knats from annealed wire are used, which are laid between the rows; Doors are wrapped with asbestos cord.
The grinding is placed with the gap between it and the walls of at least 5 millimeters; When burning, it should change without violation of masonry.
Chimney
Here is the same rule: the first meter from the furnace. Ideally, from the heat-resistant stainless steel. Next - sandwich pipes, ceramics and so on.
Drying
Intensive raw oven extracts guaranteed to crack.
Drying is a matter of several days.
- Three to five days of clay dries with open doors and valves.
- Then follows several 15-minute extracts with chips. A sign that the furnace is dry - the lack of condensate on the flap.
![]()
Conclusion
If you after reading the article experienced a self-esteem crisis - what, you can always turn to professionals. How much it costs to fold the furnace to the bath - it depends first of all, on the qualification of the master. As a rule, work costs more than three things.
If you are confident in your abilities - the video in this article will allow you to get acquainted with some aspects of the furnace masonry more clearly. Successes!
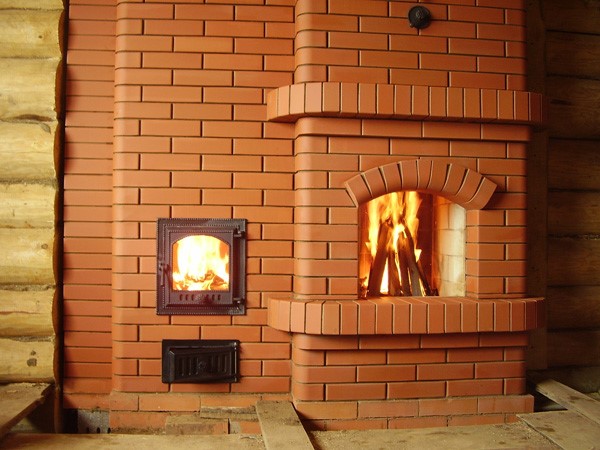
The stove is a stove of a brick - the heart of the bath, it gently and evenly warms the room and long supports the level of heat is pleasant for bath procedures. Shake in a bath with such a stove - "re-born", this is a whole range of health procedures, both for the body and for the common tone of the body. "FROM light steam! " "It's not just a wish, this is a whole philosophy that has enlightened the entire experience and tradition of the masters of a bunny business.
That's why brick Bath Oven Must meet the highest requirements, the furnace laying must be performed with special care, possess the necessary knowledge, skills and skills. Secrets on how to build a furnace are carefully transmitted from generation to generation, each time the design of the furnace is improved, but there are several rules that remain unshakable for centuries.
For no circumstances, the foundation cannot be tied to the main foundation of the bath, since when heated the furnace, the difference in temperature extensions is formed. It must be isolated and posted according to a specific scheme, the violation of this rule will inevitably lead to damage to the masonry.
Device:
- The basis should make more dimensions of the furnace on the Polkirpich on each side.
- It is recommended to plunge 700 mm and more.
- The distance from the main foundation to the foundation of the furnace should be at least half a meter.
- Sandy sand and harated lime 2: 1.
- Sand and Cement 3: 1.
- Haired lime, cement, sand 2: 1: 6. The sand can be up to 16 parts, it directly depends on the grade of cement and fatness of lime.
The first row of the foundation is laid out of the boob stone, rubble and washed brick, everything is thoroughly tram and poured with a solution, then the layer should be repeated. The height of the structure should not reach the floor level of the bathhouse for 2 bricks, the surface of the layers must be aligned. Then, using the same solution, lay 2 rows of bricks. The gaps between the foundation of the furnace and the floor of the bath should be filled with sand and tamper. Completes the structure of the foundation 2 layers of waterproofing bituminous mastic or rubberoid.
Bath oven do it yourself
It is impossible to use a hole and silicate brick, they are destroyed at high temperatures.
Before laying, each brick need to soak a couple of minutes in water, it will increase the adhesion of the layers and will prevent dehydration of the solution.
The solution is prepared from clay and sand 1: 1 or 1: 2. The clay must be soaked in water for a day (see the mixture for masonry bricks for the furnace). For masonry refractory and fireproof bricks Use a solution of clay and chamot, or clay and mountain sand, in a ratio of 1: 1 (2). The finished solution should be homogeneous, with a rough surface, it is easy to fill from the shovel. There should be no lumps in the solution, the consistency should be brought to the density of oily sour cream, and strain through a sieve with a metal grid.
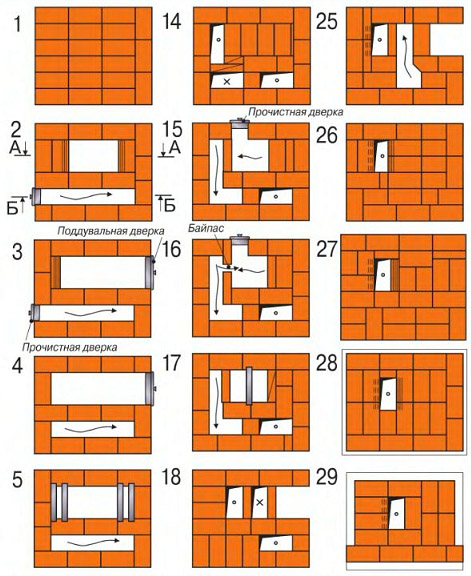
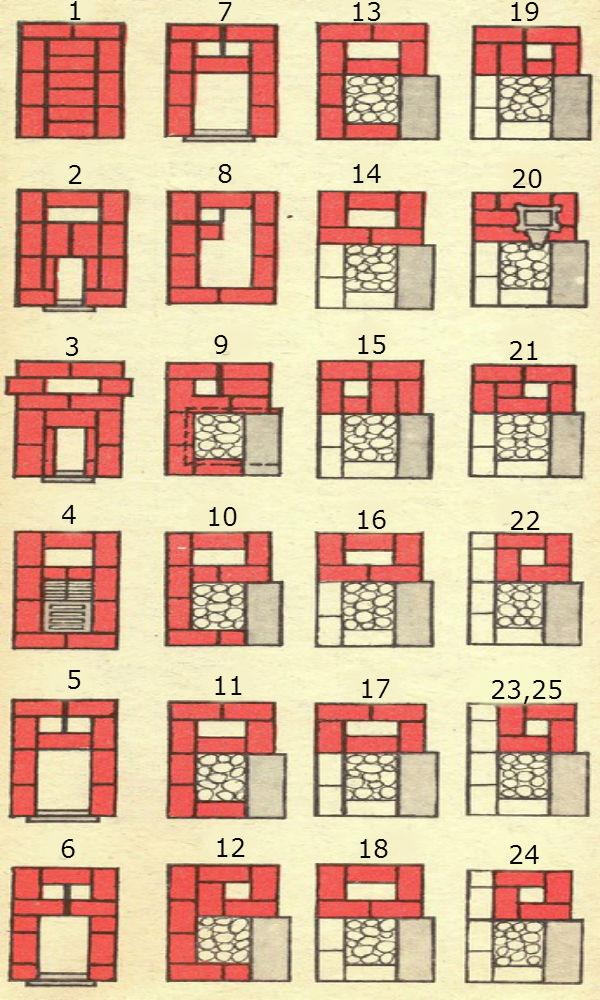
The masonry to the chimney is made strictly according to the scheme, the brick can be put immediately to the solution, when laying a fuel and chimney, each brick should be adjusted.
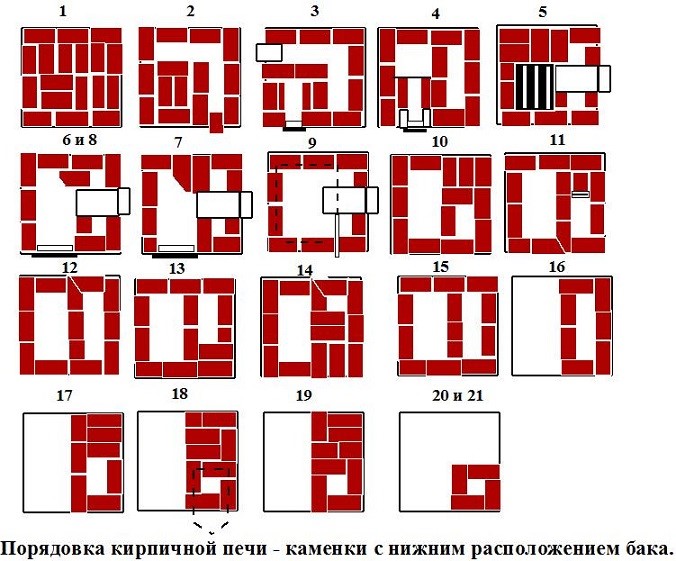
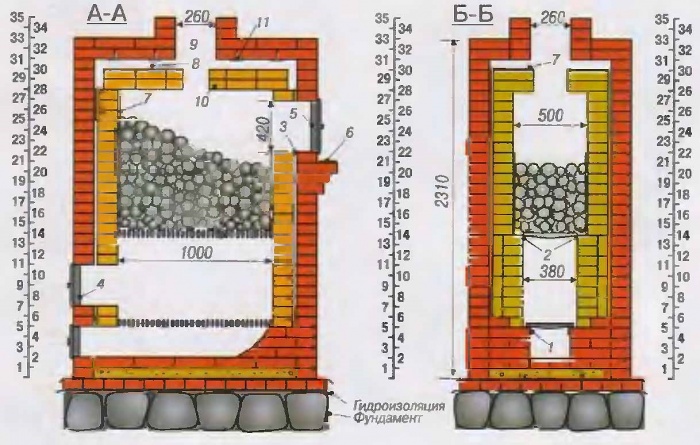
Below is a brickwork diagram wood stove With stones and water tank:
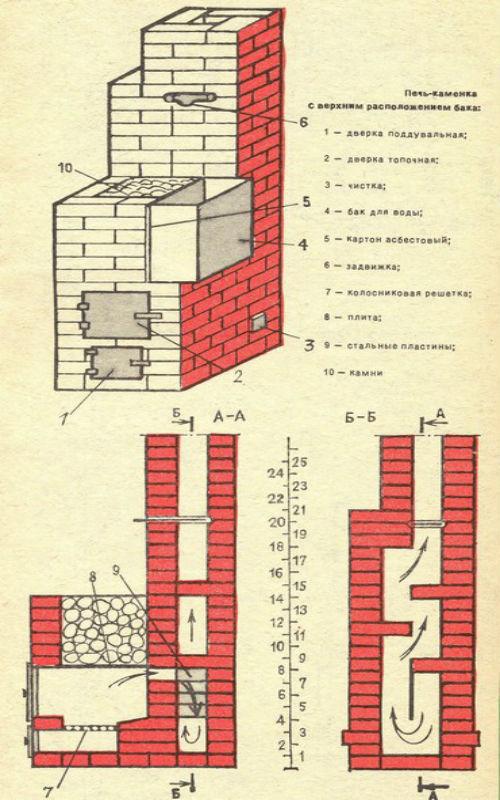
In the image above, you can see the vertical scale from the bottom up from one to 25 are the stages of laying, which are described in more detail in the diagram below:
To preserve the horizontal of masonry, the first brick in the row must be put on the recommended layer of the solution, and the second on the layer is thicker and squeeze the solution, which refers to the level. The seams should be as thin as possible, filled with clay to the entire depth. The layer for masonry of the usual brick is 5 mm, for refractory and refractory 3 mm.
Dressing rules:
- Due to the difference in expansion, during heating, it is impossible to tie ordinary brick with refractory and refractory.
- Vertical seams need to overlap brick on top.
- The seams should be thoroughly embedded so that the carbon monoxide does not overster the arrival in the bath.
The inner surface of the furnace for a bath should be very smooth, all irregularities should be output. The inner part is recommended to wipe with a rag, painted in clay, to strengthen the smallest cracks and irregularities.
Video instruction
During masonry, the furnace should seek the design geometry as much as possible using the horizontal level and vertical plumbs.
Constantly check with the drawing for proper Installation Colonents, valves, water tanks, doors.
If the furnace is planned to be drowned, the grate and the door should be placed on the same level, if coal is used, then the grate should be placed on 20-30 cm below the heat door.
Fuel Installation Rules:
- When installing a grate grid, which is expanding when heated, leaving the gap between it and bricks in 5 mm. The gap can be filled with asbestos or sand.
- The stove above the fuel is also installed with a gap of 5 mm and is paved asbestos.
- Doors are attached with the help of special "paws" that are made of wire or soft steel tape. For thermal insulation, the doors use asbestos cord.
- For furnaces on firewood, the door width should be at least 250 mm, 1 brick, and the height is 350 mm and more.
The top wall of the furnace (overlap) is made up of 3 rows platering laid bricks with careful dressing of seams.
Chimney
Observe fire safety! Remember that the pipe should rise above the roof at least 80 cm, then you do not have to escape from the burning bath.
The walls of the chimney should be made thicker, the specialists insist on the thickness of the brick. Of course, they will slowly warm up, but it is much longer to maintain warmly, it is possible to avoid the formation of condensate on the inner walls of the chimney.
Number of materials
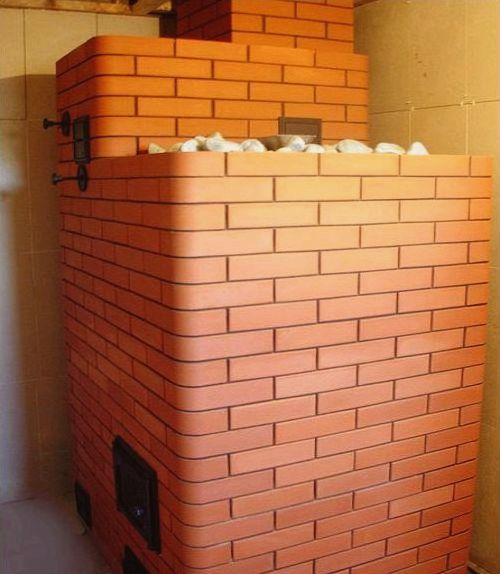
For masonry typical furnaces For the bath presented in the photo, you will need:
- selected brick - 230 pcs;
- clay - 0.1 m 3;
- sand - 0.2 m 3;
- buck for water heating - 1 pc;
- grass grille - 1 pc;
- standing door - 1 pc;
- fire door - 1 pc;
- pig-iron stove - 1 piece;
- ruberoid - 2 square meters. m;
- smoke valve - 1 pc;
- the catch - 1 pc;
- asbestos and imperative protective sheet.
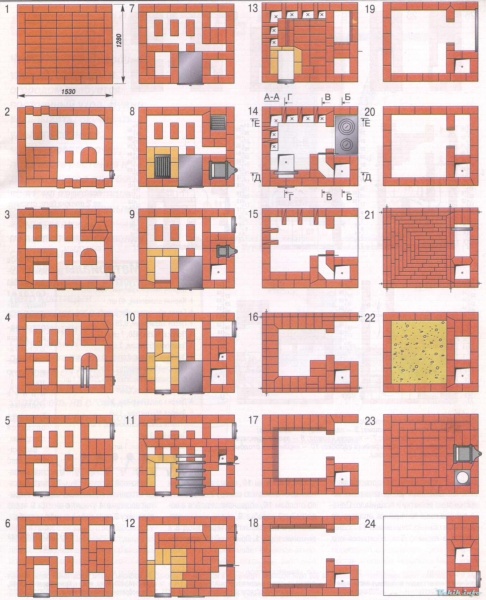
The project of the furnace on the base to the pipe provides for 21 row of brick masonryEach row should be performed in strict accordance with the drawings, and is repeatedly checked by a horizontal and vertical level.
The oven is dried for a brick bath at least 2 weeks. After completing the masonry, be sure to check the craving by opening all the doors and plugs. Test furnace is recommended to carry out chip, not a warm oven.