Updated:
 2016-08-14
In fact, pipes for a bath and chimneys for stoves are essential elements of the system, the performance of your bath directly depends on the correct choice and installation of which. Today we will talk about chimneys installed for a bath, and also tell you how to choose and install devices with your own hands.
For traditional Russian banks, stoves are used, the work of which is based on solid fuel. Therefore, it is extremely important to ensure the disposal of their combustion products. Your task, as a bathhouse builder, is to make a chimney that will remove smoke and dangerous carbon monoxide.
For chimneys of sauna stoves, the same materials are used from which chimneys are made in ordinary houses:
- Brick;
- Ceramics;
- Black steel;
- Galvanized steel;
- Stainless steel;
- Combined designs.
Nowadays, the use of combined chimneys is widespread, where a steel pipe can be inside a brickwork, or a ceramic pipe, enclosed in a steel sheathing.
 A feature of the presented materials is that they:
- Fire resistant;
- They can have different diameters;
- They are characterized by excellent thermal conductivity;
- Do not emit harmful substances when heated;
- Suitable for high temperature environments.
But from such materials as aluminum or asbestos cement must be categorically abandoned, since these pipes are prohibited for saunas and baths.
At the moment, brick versions of the stove are extremely rare. This is due to the higher efficiency and availability of metal furnaces. If desired, they can be finished with bricks. In any case, the pipes of your chimney must fully correspond to the parameters of the stove. Not surprisingly, the most common kind is this. It is made of stainless steel.
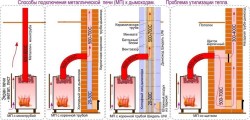
Installation methods
When choosing a chimney system for your own stove in a bath, you should know about two ways to install them yourself.
- Nasadnaya. In this case, the chimney is located above the stove on the pipe, it is placed on the outlet pipe, placed inside the bathhouse and out through the ceiling, and then through roof covering out. Usually such pipes have the simplest shape, which is considered a very, very effective option. The chimney produces excellent draft and the soot does not build up on the inner walls.
- Attached. Such a chimney is mounted to the sidewall of a boiler installed for a bath. The outlet is carried out through the wall to the outside, and then the structure rises vertically along the wall to a height exceeding the level of the roof. These chimneys are safer. But they are characterized by less efficiency, which is associated with the presence of gentle segments and bends. As a result, the cravings get worse. Plus, the heat emanating from the pipe heats the air outside, and does not additionally affect the heating of the bath.
Product requirements
 If you want to choose and make a chimney with your own hands, you should definitely rely on a few key points.
- Internal surfaces. Necessarily smooth to prevent soot build-up.
- It is advisable to choose a circular section, since this shape contributes to the creation of more efficient traction.
- The diameter of the pipe is determined directly depending on the power of the stove used in the bath. You need to take into account the inner diameter, that is, the inner section. If the furnace power is up to 3.5 kW, then the section will be 140 by 140 millimeters. With a power of up to 5.2 or up to 7.2 kW, choose the cross section 140 by 200 and 140 by 270 millimeters, respectively.
- Do-it-yourself installation should be done so as to observe maximum length horizontal and gentle segments no more than one meter. Otherwise, the traction will become ineffective.
- When laying pipes through the roof and ceiling, it is imperative to provide for the installation of fire cuttings.
Do it yourself
 Having picked up the chimney for sauna stove appropriate material, you should develop a project yourself. It consists in calculating the length of other and other structural elements.
- To find the optimal length of the chimney pipes, working only with your own hands, you need to determine the distance available between the outlet pipe on the stove and the top point on your roof, plus add 50 centimeters. It is at this distance that the chimney should be higher than the roofs;
- The connection between the upper and lower tubes should be at the center of the height of the sauna attic. If you find this point, you can easily calculate the required pipe length;
- The part of the lower pipe from the stove pipe and up to almost the very ceiling of the bath is better done single. And the rest of the elements, including part of the lower and the entire upper pipe, are made only of a two-layer type and are additionally insulated.
 After that, you can proceed to the next steps with your own hands. You should have a great sauna stove chimney.
- Cut the purchased pipe into two pieces in accordance with the calculations performed earlier.
- The top pipe should be wrapped with an effective insulation material. Now measure what diameter the element will have. This way you can determine the width required to create the casing ( outer pipe) galvanized sheet.
- To calculate, you need to multiply the diameter by 3.14 and add 30 millimeters to the resulting number. 30mm is extra width for roller contact.
- Two elements should be cut out of the galvanized sheet - rectangular. Outer pipes are rolled from them. The edges are connected by rolling.
- A strip is made from the same galvanized sheet. Its width will be 20 cm, and the length is identical to the circumference of the pipe plus another 30 millimeters. This will give you a clamp to connect the upper and lower chimney pipes.
- Taking another zinc plating, make four rings of the same size. Please note only that both diameters, that is, internal and external, must exactly match the diameters of your chimney pipes. With the help of rings, heaters will be closed from the end sides of the pipes.
- A special strip of metal is welded in a circle to the lower end part of the inner tube of the chimney, the thickness of which is 2 mm and the width is 4 cm. A branch pipe is created there, where the upper end should then be inserted from the lower inner tube.
Installation
The diameter is determined, the structure is assembled. Now all that remains is to install the chimney.
- Pre-make the necessary holes in the ceiling and roof. Their size is 45 by 45 centimeters. They will serve for the passage of the chimney;
- The holes obtained should be located strictly above the outlet pipe. The chimney will be in its center, the efficiency will be maximum;
- Two square-shaped elements with sides of 50 centimeters are cut from a sheet of metal. They will serve to fix the chimney to the ceiling and roof. Make holes for fasteners in the corners;
- Exactly in the middle of one workpiece, a hole is made with a power tool. Its diameter must match the diameter of the outer pipe of the smoke exhaust system;
- An oval hole is made in the center of the second blank, since it will have to be hemmed to the roof slope;
- The casing, which was made of zinc plated, should be fitted to the inner tubes sauna chimney... You had to insulate them beforehand. The ends are closed with rings made earlier and the edges of the outer pipes are bent. This is how the fixation happens;
- The lower pipe is pushed into the hole in the metal sheet with the insulated end;
- Make sure that the gap between the cut of the ceiling of your bathhouse and the chimney is the same on all sides. Now you can fix the metal sheet to the floor;
- Similarly, the upper pipe is pushed onto the lower pipe using a previously welded pipe;
- Connect the elements of the clamps to each other;
- The space obtained between the ceiling and the chimney must be filled. To do this, you can use clay, expanded clay or asbestos. Any material that does not burn will do.
If you rely on the photo instructions, on the useful recommendations presented above, it is quite possible to make and install a full-fledged, effective chimney with your own hands. But if in doubt, it is better to immediately entrust the question to specialists of the appropriate profile.
The chimney for a sauna stove is a very important element in the design of the entire sauna. After all, it performs the function of removing carbon monoxide outside and does not allow soot to settle on the walls of the room. And in order to choose the right design, you need to familiarize yourself with what types of chimneys are, what material is better to use and how to properly install such a design.
The task of the chimney is to prevent carbon monoxide from entering the bath. To do this, you must adhere to the requirements of building codes and fire safety rules.
What designs are better for a bath
First of all, a chimney for a sauna stove must withstand high thermal loads and have good draft. Today, the following types of chimneys for a bath are used:
- Brick;
- Chimney sandwich;
- Chimney out steel pipes.
Materials of such structures have high heat resistance and thermal conductivity, and also do not emit harmful substances. For a brick chimney device, a special refractory brickthat can withstand high temperature loads. But the process of erecting a brick structure is a very difficult job.
It is necessary to correctly observe the entire installation technology, therefore this type is not installed so often.

It will be much easier to install a sandwich chimney, which consists of two stainless pipes, and a layer of mineral wool insulation is laid between them. Parts of a sandwich pipe are connected using such elements as:
- Knee;
- Tee;
- Brackets;
- Pass-through pipe;
- Roof cutting.
For firm fixation, all elements are fixed with clamps and special sealed gaskets.
The sandwich pipe must be selected based on the parameters of the furnace.
The chimney made of steel pipes is assembled by welding, which connects the elements together. In this case, the welds must be made to the highest level in order to prevent leakage.
The role of a heat exchanger for sauna stoves
A heat exchanger for a bath stove performs a very important function, without which no bath can do. This is water heating. According to the method of placement, heat exchangers are:
- Hinged;
- Built-in.

The advantage of hinged structures is that the heat exchanger, which is located on the flue pipe, uses the heat of the emitted hot gases. By contacting the hot surface of the chimney pipe, the heat exchanger heats the water, and then it goes through the pipes into the hinged tank. Due to the large volume of the chimney, the heat exchanger quickly heats up the water and maintains a high temperature for a long time.
The heat exchanger, which is located inside the sauna stove, differs in that it consumes heat from the heating of the stove.
Whichever installation method is used, a prerequisite for the correct operation of the system is filling it with cold water before firing up the furnace.
The heat exchanger is connected using two fittings, which are attached to the battery from above and below, or hinged tank... Further, the heat exchanger works thanks to the circulation of the liquid, which is heated or using an electric pump.
Today the heat exchanger is installed together with the following structures:
- With a brick sauna stove;
- With a metal oven.
The advantages of a metal oven are:
- Fast heating of the bath;
- Easy to install;
- Compactness;
- Aesthetics.

Thanks to all of the above qualities, as well as having many varieties and modifications, metal furnaces every year more and more brick installations are squeezed out of the market building materials.
Installation of a chimney for a bath
The installation of a chimney for a bath should be performed strictly in accordance with the requirements of building codes. The chimney for a sauna stove performs a very important function - it removes flue gases outside, which are formed during the combustion of fuel. Therefore, it is extremely important to observe fire safety rules when installing the structure.
By far the most popular is the chimney sandwich. But the sauna stove has very high combustion temperatures, therefore, to install the structure, it is necessary to select especially heat-resistant pipes. By the method of installation, chimneys for the stove are divided into types such as:
- Internal;
- Outdoor.
The internal method is the classic installation option for the structure. Its advantage is that the room is additionally heated. But such a design is more laborious to install.
For outdoor installation chimney is displayed through the wall to the street. When the chimney passes through the wall, a high-quality insulation of the pipe is a prerequisite. The disadvantage of such an installation is that the pipe will not be able to give off heat to the room and, accordingly, the fuel consumption will increase.

Indoor and outdoor chimney
The device of a bath chimney is a very difficult matter. You will be required to be extremely careful, attentive, and comply with all safety requirements and rules. Chimneys are divided into 2 types - nozzle, which are put on the furnace nozzle, and root, which are located separately, adjacent to the furnace. When deciding which chimney to choose, you must first of all study the device of your bath. The easiest way to buy it, however, often after the construction of a bathhouse, there is simply no money left to buy a chimney. However, this does not mean that your bathhouse will remain without a chimney, because you can assemble and install it yourself.

The chimney for a bath is of two types: nozzle and root.
Installation chimney is a responsible job, so you should study some tips regarding the design of the chimney in the bath. The basis of any construction works is a well-designed diagram. Please note that the pipe must be smooth on the inside. This will help prevent soot from accumulating in it. The absence of cracks in the pipe is also an important point. The section of the pipe must be within the normal range, the width of the masonry must be at least 12 cm for the inner walls and 38 cm for the outer ones.
Remember that the chimney you build requires regular maintenance. It should be inspected and cleaned at least once a year. Initial cleaning is carried out by burning aspen logs. Mechanical cleaning pipes are carried out using a brush, a weight and a cable.
So, in order to carry out the installation of the chimney with your own hands, you must have experience in this area or seek help from professionals. The chimney is an important part of the sauna stove, and mistakes in its construction can lead to dangerous consequences for life and health.
Add to bookmarks
Chimney design and installation
The most important item in any bath or steam room is undoubtedly the stove.
But how can you protect yourself from the fact that your stay in the bathroom is not overshadowed by the accumulation of smoke and carbon monoxide that is released during the burning of wood in the stove?
A properly installed chimney is the key to your good rest.
To prevent this from happening, you need to think in advance about how the smoke will be removed from the bath room. A pipe for your bath complex you can assemble yourself without any difficulties. All you need to know is how to use the tool correctly.
How the chimney works
Before you start your work, you should learn as much as possible about how different chimney designs differ, what requirements are imposed on their dimensions, what will be the features of installing a pipe for a stove in a bathhouse and how it should be operated correctly. After you familiarize yourself with all the nuances, the next step should be to draw up a drawing according to which construction or installation will be carried out.
Chimney design

Due to what material will be used for your chimney, the design feature of the pipe and its constituent elements will change. If your stove in the bath is brick, then the pipe can be metal, ceramic or brick. You can also combine all these materials, but before that you need to find out which combination option will be optimal. In the event that your stove is completely metal, only metal or ceramics can be used to make the pipe.
In our time, brick chimneys are practically not used. The reason for this was the large labor costs during the construction of the stove and minor difficulties during further operation. Modern furnace construction is based on structures that are easy to maintain and do not require special training from the person who will create the furnace.
Typically, such chimneys include two or three pipes, a pair of "elbows", a tee, a deflector, rain protection, several adapters and a gate. Such a structure is fixed with support brackets and clamps. One of the most important points during installation it is. We install such insulation according to the following scheme: first, an interfloor adapter is installed, then a pipe is installed, the diameter of which exceeds the diameter of the main chimney. The resulting voids are filled with expanded clay or filled with basalt wool, which will provide maximum thermal insulation.
What kind of pipes are there for the stove in the bath
To remove smoke from the bath, you can use both external and internal type of chimney. Each of these two types has its own positive and negative properties. The advantage of an external chimney is its lower fire hazard, ease of assembly and installation. The disadvantage is a large heat transfer, due to the fact that it is located on the outside of the bath, that is, on the street. The advantages of an internal chimney include excellent heat retention, as it is released into the bath rooms. But the installation of such a chimney is an order of magnitude more difficult than that of an external one. And its main drawback is its high fire hazard. In general, all these disadvantages can be avoided if you use high-quality insulation, since with this type of chimney there is minimal heat loss, therefore, you can save on fuel resources.
Almost any material can be used for the manufacture of a chimney: it can be metal, ceramics, and brick. All of them are environmentally friendly and can withstand large temperature changes. There are also aluminum and, but they are categorically not suitable for these purposes.

The main design features of the pipe for the stove in the bath
As we wrote above, for the manufacture of a pipe, black or galvanized metal, ceramics or brick should be used, but in no case asbestos cement or aluminum. When installing a pipe in a bath, follow some rules that depend on what material you are using. The reason for this is the high temperatures and different sanitary and environmental standards, as well as the fact that basically the building itself is made of wood. So, here are some conditions to adhere to:
- When choosing thermal insulation, make sure that it is non-combustible and environmentally friendly. Expanded clay stone and basalt wool are most suitable for these purposes.
- When installing the chimney, make sure that it does not come into contact with surfaces that are made of wood (ceiling walls, etc.). This will ensure fire safety. For this is used sheet metal, with which you go around the wall and part of the ceiling in the bath around the pipe.
- In the place where the pipe will go out of the bath to the roof, insulate it from roofing materialusing a galvanized metal casing for this.
Installing the pipe

The location of the chimney holes must be taken into account during the construction phase of the bath.
The very first step that you must take before you start installing in the bath is to acquire all the necessary parts of the chimney structure. The manufacture of such elements is possible only with special equipment and various skills. Based on this, the easiest way to put together the whole structure is to buy it in the store.
After everything you need is purchased, you can start directly to work. First, we prepare the holes for our chimney. If the construction of the bath has just begun, then all the necessary holes can be prepared in advance. The internal chimney implies holes in the ceiling and roof, and for the external one, one will be enough, which will be located directly next to the stove.
Remember! Before leading the pipe from the bath to the roof or through the wall, prepare in advance protective metal sheets that will protect the walls and ceiling from high temperatures.
The chimney opening should be square with dimensions of 450x450 mm. This is due to the fact that you will need to install a special adapter that you can make with your own hands. Cut out two squares of 500x500 mm from a steel sheet and make a hole in them for a pipe, make slots for fasteners in the corners. In the same way, we make four more sheets, only this time without holes in the center. In height, the box should exceed the thickness of the ceiling by 50-100 mm. Then we fasten all the sheets and make the cladding using basalt wool, in which both sides are foil. To protect the roof, it is required to install a metal apron, which is called "Master Flash", it is also purchased in advance in the store. When all these operations are completed, you can start installing the pipe.
Before installation, we prepare places for fasteners, for which on the walls, exactly opposite the outlet, every 200 mm we mark places for fasteners and drill holes for them. After all the preparations, we proceed to the installation.
After the pipe and adapter are installed, we fill it with expanded clay stone or stone wool. The next thing we will be installing is a sandwich pipe. After installing it, you can put the last element of the pipe, which will go out of the bath into the street. We attach protection from precipitation in the form of a fungus to the outer part of the bath pipe.
The design and installation of a chimney requires a lot of attention, even to the smallest moments. A slight inaccuracy or oversight during the work performed can lead to the fact that smoke will enter the bath room, and this can lead to the worst consequences. To avoid this, follow the rules that the experts remind you of with maximum accuracy.


