- Types of foundations
- Erection of a strip foundation
- ABOUT earthworksoh
- Protection of the foundation from moisture
Types of foundations
To build a reliable, durable house, we build the foundation with our own hands. First you need to make the right choice.
Depending on the fundamental design, foundations are divided into: strip, columnar, floating.
Monolithic slab - versatile reliable base
One of the main reasons an add-on can cost twice as much as a square foot is since remodeling an existing space is the foundation. Unless you're building up or jumping out, each addition requires some kind of masonry foundation to be dug below the freezing line to keep it from being pushed around by freezing temperatures. But there are some ways to reduce these costs. Full basement. This is the most expensive option because it requires the most digging and the most specific, plus the crew may have to break through old foundationto connect new and old basements together.
Choose the type of foundation depending on the task at hand. The choice is mainly influenced by two factors: the purpose of the building and the intended construction site. Depending on the basic design, foundations are divided into:
- tape;
- columnar (pile);
- floating (slab).
Soils are divided into two main types:
However, you get basement space that can be easily converted into living space, both now and in the future, for a nominal added value, McCmiller says. In addition, you can insulate under the floor and you can use solid floors, which are not an option with all types of foundations.
And all you really give up is a simple space that will allow you to turn your basement into a living space in the future. This is why this is the standard approach to supplements in most parts of the country. Built in the same way as a concrete patio, it combines the foundation and floor in a single layer of concrete.
- heaving;
- non-porous.
The concrete is poured in layers, with a vertical layer size of no more than 40 cm and with alignment along the entire length of the foundation strip. Getting rid of air bubbles in concrete is done with a vibrator. In addition to the vibrator, it is advisable to "stick" the solution with a piece of reinforcement and tap the surface of the formwork with a small sledgehammer. After the end of the pouring, the foundation is covered with burlap. In hot weather, the set concrete must be periodically watered for three days. The foundation will be ready in six days.
The crew can put insulation under the slab, but the concrete will tend to make the floor quite cold, Schultz says, and hard wood floors are not recommended due to the moisture in the concrete. When the addition is above the level, because your first floor is high above the ground, or because you are building a second floor, by adding, say, a shielded porch below it. The cheapest option is to ditch the foundation or slab and use pole poles instead. This is what is commonly used for decks: holes are dug below the freeze line, cardboard tubes are inserted into them, and then concrete is poured into the tubes.
Competent calculation of the foundation structure, taking into account the characteristics of the soils on the site, the selected wall material, the structural design of the building, as well as strict adherence building technologies and project requirements is a guarantee of creating a reliable, strong and durable basis for a country house
The foundation of any home is the foundation.
After he is cured, the tubes are chopped off and the concrete supports the pillars that hold the addition. This allows a wooden floor to be used for insulation, although it is usually not as warm as with a foundation underneath. An engineer may be required under certain conditions; Town Hall, your general contractor, or you may feel like there is something about a house or lot that requires an engineer's approval.
When building on a slope, you may need an engineer to determine what it takes to keep your home in place. For example, foundation walls may need additional steel, or you may need to use more durable concrete. Using the Engineer may seem a little costly at times, but it will keep everything in proper condition and you might just end up in one of the happy houses next door. Any basement that has foundation walls higher than 7-8 needs to be worked out. When the installer or surveyor has marked where the house will be located on the site, an excavator enters and digs a hole for the foundation.
A well-designed and well-built foundation in the total construction budget accounts for 15 to 25%. Agree, this is a lot. And when the budget is limited, you have to look for the most economical options. Let's talk about them
Any competent specialist, having heard the question about which foundation is better to choose for a particular house, will answer that it is impossible to simply choose a foundation, like a product in a supermarket. The choice of the foundation is influenced by a number of factors: the weight of the walls, the design features of the building, the types of pounds on the site, the level of occurrence of groundwater (GWL), the depth of soil freezing, etc. This is at least. Only specialists can accurately determine the type of soil and groundwater level when conducting engineering and geological surveys. Based on these studies, in each specific case, one or another type of foundation will be selected.
While it may cost a little more, in a difficult situation you may want a surveyor to mark the corners of the house. Most districts require that the survey be conducted after the foundation is located. If you ask them to come before you start with the basics, it only costs a little, but it can save you a lot of money and frustration. Many of the foundations had to be moved or completely redone because it was in the wrong place.
A shed base is an integral part of building a shed, the base must be properly made to give your shed a solid foundation. At first glance, setting up the base of a shed or any other building for that matter, like a house entrance or simple storage in a garden, may seem like a daunting task, but follow these simple steps and you will have a smooth and solid foundation for your new shed in no time. terms.
However, today we would like to consider the influence on the choice of the foundation of the first of the above factors and offer the readers the most economical options for each type of house - wooden, frame, stone. The final cost of the foundation largely depends on the weight of the walls: the heavier they are, the more area and strength it should have. If the weight of the walls is relatively small, then there are much more options for budget foundations.
Plan where your barn will be
- Make sure you have access.
- Surrounding areas.
- Natural light.
- View of your garden from the planned area.
- Consider whether you plan to use the building's electrical supply.
5 most economical types of foundations for a country house
- Columnar
- Shallow tape
- Bored
- The foundation created using the TISE technology
- Pile-screw
The simplest and most economical foundation
The most economical of all types of foundations is columnar. It is a system of unconnected pillars that are installed in all corners, intersections of walls and other points with increased load. The pillars can be industrial (concrete) or construction (brick, rubble, from foundation blocks).
How to build a concrete foundation
So what's the choice? There are three main popular types of barn. Whichever method works for you, we recommend that you have a 2-inch lip around the base of your barn. To calculate the size of the base needed for the specific building you want to build, add 4 inches to the total base dimensions to provide a sufficient base size for your barn. This is the easiest and fastest option, make sure the ground you place your base on is flat and level. Pegs and string Construction sand Standard cement Timber for formwork Tape Sweeping handle. Decide where to place your garden shed, with enough distance from hedges or fences to allow easy access to all sides.
The column foundation is recommended for houses without a basement with light walls. Its advantages include efficiency (in terms of material consumption and labor costs, it is 1.5-2 times more economical than tape), speed of manufacture (moreover, without the use of heavy equipment on the construction site), durability: a foundation erected in compliance with all requirements can withstand more than 50 years. Columnar foundations are less susceptible to the negative effects of frost heaving forces. The simplest option for a columnar foundation is a foundation using solid concrete blocks measuring 20 x 20 x 40 cm, from which low
Using pins and cord, mark the base 2 inches more than the building area on each side. Finally, measure diagonally on both sides so that the area is square. Concrete requires 3 inches of compacted hardcore underneath 3 inches of concrete. The base can be level with the ground or raised above it. If you want it flat, dig out top ground up to 6 "to provide hardcore and 3" concrete. Level the area with a batten and shovel and remove the pins.
Formwork and concrete pouring
This includes measuring, cutting, and fitting the wood to the shape of the base to contain the concrete. Check the diagonal measurements to ensure that the formwork is square and level, as this will determine if your shed base is 100% solid. Then spread a layer of well-compacted hardcore and cover with loose sand. This needs to be well compacted and flattened, preferably with a compaction tool or roller.
(60 cm) columns. After marking the base of the future building, recesses are made in the ground for the supports (150-200 mm), a sand cushion is poured into them, spilled with water and tamped. The blocks are arranged in a column so that there are two blocks in each row, and each row is laid with a dressing. The blocks are fastened together using masonry mortar. The thickness of the pillars should be equal to the thickness of the walls plus 10-12 cm. The distance between the pillars (1.5-2.5 m) depends on the value of the load on them. From above, the pillars are covered with waterproofing material, on which the lower harness of the building will be located. The depth of such a foundation is at least 0.5-0.7 m, that is, it is located above the freezing depth, and a light structure (wooden or frame house) in winter will rise and fall with the foundation.
Mix concrete using one part cement with five parts in one ballast or use dry concrete bags and just add water. Remember to add small amounts of water at the same time and mix in the concrete. Be careful as too much can cause the cement to be too sloppy and must remain dry enough. Spread the concrete evenly and lightly over the formwork. It can then be leveled with the long, straight edge of the timber, resting on the formwork, moving slowly over the entire surface of the fresh concrete.
However, since each column "walks" up and down individually, some of them stop "working" in the spring. This is the main disadvantage of the columnar foundation. Another drawback is the lack of a base. To keep heat in the underground space and protect it from moisture, dust, rodents, they make a pick-up.
If wet weather forecasts, cover the concrete with polyethylene for 24 hours. In warm weather, cover the substrate with wet bags and spray them with water over a 24-hour period to ensure the dry concrete will not shrink or crack. The result is a smooth, sound level base. An ideal foundation for building a garden shed.
Items and planing plates with flat surface Plates for construction sites Construction sand Standard cement Shovel tape Rubber hammer Sweeping brush. Decide where you will place your garden shed, leaving enough space around hedges, fences, and railings for easy access to all sides. Using pins and stitching, mark the base 2 inches more than the building area on each side. Finally, check the size by measuring two diagonals so that the area is square.
A pick-up is a wall that connects the posts.
In fact, this is the simplest type of base. For its construction, you can use brick, concrete, rubble stone (masonry with a thickness of 10-20 cm), cement-bonded concrete sheets. If the soil is heaving, then a sand pillow of 15-20 cm is arranged under the pick-up. The pick-up itself is deepened into the ground by 10-20 cm. For ventilation of the underground space, ventilation holes are provided in it. If the pick-up is made of stone or brick, then it is not associated with the pillars, since the uneven settlement is fraught with the appearance of cracks. However, bricking (especially reinforced concrete) may be more expensive than the foundation itself. Therefore, from the point of view of reasonable economy, it is better to use a DSP.
2: dig, align and disassemble the area
Drain the topsoil and dig to a depth of approx. 5 inches for base placement. Level the area with a rake and remove the pins. Mix one part of cement with 8 parts of dry sand and mortar. Spread it evenly, ensuring that the mixture will sit for approx. 4 cm deep.
5: Double check the base - even and flat
Starting at one corner and working outward, lay the slabs by tapping the center of each slab with a rubber mallet. Using a spirit level, make sure all boards are square, level, and tight against a solid base. The completed base should now be flat and square. Make a final check with a long, straight edge piece of wood to check if the base is level from each corner and also measure the diagonals to finally check that the base is square. The result is a smooth, firm and even base.
As mentioned above, columnar foundations are only suitable for timber and frame houses no basements. There are restrictions on their use and depending on the characteristics of the soil at the site. So, it is not recommended to put columnar foundations on weakly bearing soils (peat, subsiding rocks, water-saturated clayey), in areas with a sharp difference in height (2.0 m and more). Can't be erected columnar foundation and at a high level of groundwater, since its base will rest on soil saturated with moisture and having a low bearing capacity, due to which the pillars will sag unevenly under the weight of the house.
Do I need help building my base? Building the foundation for your garden garden is a hassle-free task for the individual. When it comes to the actual assembly of the shed, we recommend an extra person on hand for lifting and placing the roof and wall panels in place.
Do I need planning permission for my barn? A design permit is usually not required to construct a garden building unless you live in a conservation area or the building cannot invade a neighbors garden. You can check with your neighbors or local council before starting construction.
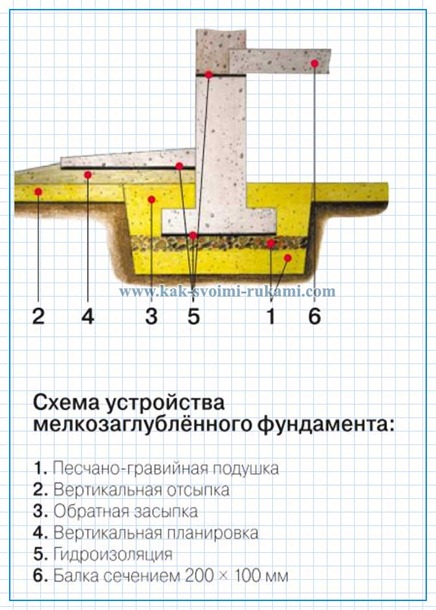
Diagram of a shallow foundation device:
1. Sand and gravel pad
2. Vertical filling
3. Backfilling
4. Vertical layout 5- Waterproofing
6. Beam with a section of 200 * 100 mm
From an expensive foundation to a budget one
Traditional recessed strip foundation - one of the most expensive today. An excellent alternative to it is a shallow strip foundation. It is much easier to manufacture and not less than 35-40% cheaper than a buried one. And this is understandable: when deepened by 0.3-0.5 m, and not 1.5-1.8 m
Cleaning the gutters is one of the most important projects on the to-do list, but it's too often overlooked. Unfortunately, many of us wait until the late fall season for the last leaf to fall before we decide to make it. This delay exposes our homes to potential damage. It also makes the job much more difficult.
If you do this a couple of times a year, in the fall and spring, cleaning gutters is easy. Just once, or not at all, and it can be a disruption and cost you thousands of dollars along the way. The problem with clogged gutters is more than just annoying waterfalls that pour down the roof on rainy days or pretty icicles that hibernate. This excess water damages the structural integrity of your home. A home gutter system is designed to move water down from the roof and away from the home, and this is the basis for proper drainage.
labor costs and the cost of building materials are significantly reduced. In terms of reliability, such a foundation is not inferior to the traditional one. The main feature of the construction of a shallow foundation is the replacement of part of the soil under the sole with a sand cushion of such a height that would guarantee the permissible deformation of the foundation, but no more. A shallow foundation allows you to arrange a basement or a small cellar. It is used on almost all types of soil. The exception is excessively heaving.
The construction of this type of foundation is as follows: according to the project, trenches are dug to the calculated depth (usually 0.7 m). The thickness of the cushion is 0.3 m. The lower part (0.2 m) is made of coarse sand, the upper (0.1 m) is made of a mixture of sand with gravel.
Each layer is carefully rammed. Then a polymer film is placed on the base so that the cement milk from the concrete does not go into the sand cushion. When installing formwork panels, roofing material is attached to them. Their purpose is to prevent the flow of cement milk from the freshly poured concrete mix through the gaps between the boards, to facilitate the disassembly of the formwork, and also save the lumber for future use. Then knit reinforcement cage and feed concrete into the trenches. After two weeks, you can start erecting the walls of the building. This type of foundation is suitable for the construction of wooden, frame houses, aerated concrete cottages, gas silicate blocks. It should be borne in mind that it is not recommended to leave the shallow foundation unloaded in the winter.
Bored foundation
Another type of economical and reliable foundation is a pile foundation. In parts of housing construction, two of its variants are most widely used - bored and pile-screw.
Printed ( bored piles) are made in the ground under the foundation of the future structure. Wells are drilled in the places determined by the project, a metal reinforcement cage is installed in them, and then poured with concrete. In loose soils, to maintain the stability of the borehole walls, a roofing felt lining or a casing pipe is used (after pouring it is removed or left to increase the strength of the pile).
It is possible to drill wells for piles either manually or using special equipment. In the first case, the well-known (Technology of individual construction and ecology), developed by a team of designers under the leadership of R.N. Yakovlev, is used.
Its main feature is that the pillars at the base have an expansion, which increases the support area, and also contributes to the resistance of the pillar to buckling by the forces of the soil. Wells for pillars are made using a special hand drill equipped with a sliding bar, a soil accumulator and a folding plow controlled by a cord. The plow lowers under its own weight, is securely held in intermediate positions by a two-link locking mechanism, and rises vertically by the cord. When folded, the length of the drill is 125 cm, when extended, it is 225 cm. The width of the handle is 55 cm. The length of the rod is fixed with a screw stopper.
The process of drilling a well using the TISE technology is as follows. The plow is removed, after which the drill begins to rotate clockwise. As it deepens, it is lifted and cleaned of the captured soil. The expansion of the lower part of the well is carried out with a plow, while the drill is rotated counterclockwise. Then reinforcement is inserted into the well body and the expanded part is filled with concrete. Then a roofing jacket is placed in the cylindrical part, which protects the column from destruction by axial forces caused by the heaving soil. Then the concreting process is completed.
If the foundation is not created on our own, but with the involvement of construction company, she, as a rule, uses special equipment for drilling wells. For example, such as a multifunctional compact tractor. It is mobile, exerts little pressure on the ground and increases the speed of foundation construction several times. After drilling, a layer of sand and crushed stone is poured onto the bottom of the well so that the bottom of the concrete column dampens ground movements. Then a reinforcing cage is placed in the well and the concrete mixture is poured.
The last stage of work (both in the first and in the second case) is the creation of a grillage ( top part pile foundation, which is a reinforced concrete or metal beam or tape). The task of the grillage is to tie together the underground part of the foundation, thus ensuring an even distribution of the weight of the house along the piles and their equal vertical movement.
The grillage can be high (it is much higher than the ground level) and low (underground). It should be noted that when using a columnar-grillage foundation, a terrace, veranda, porch attached to the house cannot be connected into a single constructive whole. Under them, it is necessary to build your own foundations and separate the buildings with an expansion joint, since the load from the porch (terrace) is not comparable to the load from the walls of the house, and therefore the draft will be different for them.
A bored foundation is able to withstand the load of not only light wooden or frame houses, but also heavy stone ones, without giving a draft. In this case, you can ignore the level of groundwater and build it on almost all types of soil, without fear of negative consequences. Laying the foundation pillars below the level of freezing of the soil will provide the finished structure with strength and protection from the forces of frost heaving.
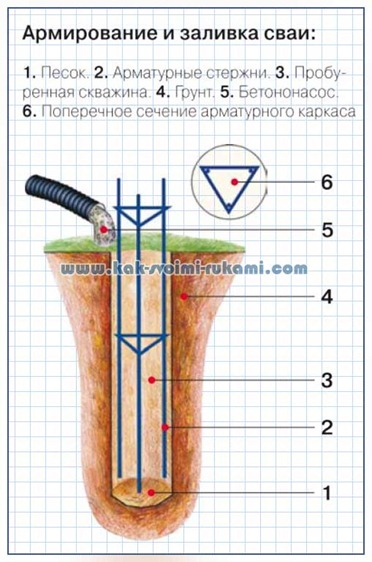
Reinforcement and pouring of piles:
1. Sand. 2. Reinforcing bars. 3. Drilled well. 4. Ground. 5. Concrete pump. 6. Cross-section of the reinforcement cage
Foundation on screw piles
And finally, another type of foundation that can be classified as economical is the foundation on screw piles. Cost reduction in this case occurs due to the lack of a large volume of earthworks, which saves time and labor. At the same time, there is no need to use heavy equipment. This type of foundation costs 30-40% less than a traditional strip or slab foundation.
Screw piles are made from steel pipes... The lower part of the pile is equipped with a cutting blade of a certain shape, due to which it is screwed into the ground to almost any depth. A head is welded to the opposite end of the pile, on which the grillage is fixed. The small area of \u200b\u200bcontact of the screw pile with the pound in combination with the cutting blades does not allow the foundation to move even when the pound is deeply frozen. When screwing, the turn-to-turn gaps of the soil are not loosened, but, on the contrary, are compacted by the blade of the pile. Screw piles provide high support strength. For example, with a length of 2.5 m, a barrel diameter of 108 mm, a barrel wall thickness of 4 mm, a blade diameter of 300 mm and a blade thickness of 5 mm, the screw pile will withstand a vertical load of at least 5 tons (for wooden structures, 2-3 tons are sufficient).
When installing, the piles are screwed in to the calculated depth, the central cavity of the pile is concreted (M300 concrete is enough). To create a single and coherent structure screw piles fastened together with a channel, a bar, a reinforced concrete grillage or monolithic reinforced concrete slab depending on the type of building. Immediately after screwing in, the piles are ready to receive the design load.
The pile-screw foundation perfectly copes with the tasks assigned to it, not only on soft soils, but also in difficult conditions: on a slope, in a coastal strip, in a forest area (while the natural landscape is preserved as much as possible). In cases where the soil has a heterogeneous structure, screw piles are installed at different depths, and then the above-ground parts are leveled. The pile-screw foundation is suitable not only for wooden and frame houses, but also for stone and cellular blocks, however, in the latter two cases there will be a slightly different structure - in addition to the reinforced concrete grillage, they are cast monolithic slab on piles. Thus, a subfloor is immediately obtained. Work to create pile-screw foundation can be carried out all year round.
Concluding the conversation about economical types of foundations, I would like to invite our readers to familiarize themselves with the estimates for their construction prepared by Russian construction companies.


