Wind or end planka is a wooden board of a particular shape and sizes.
Sometimes it happens from metal profile. It serves to effectively close the front open holes, which most often remain between the roofing shell boards.
The absence of an end plank can lead to sad consequences and entail a series of unpleasant moments. If the bar is installed incorrectly, then the strong gusts of the wind can bend the sheets of metal tiles.
In the absence of a wind strap through the roof slots blows the wind and the water falls. The room can no longer be dry, clean and warm. In order for the roof coating served as long as possible and did not cause problems, it is necessary to purchase an end bar.
This device refers to roofing components. When purchasing building material It often does not happen in the kit and therefore, it must be purchased separately.
 The end bar is installed on the roof of the roof only after the installation of the metal tile is fully completed.
It must be remembered that the end bar must be installed at the very last moment before installing the plank.
This device is mounted using conventional wood screws that have a special sealing gum. Self-tapping screws go every 45-55 cm. The wind strap is attached towards the roof cornice to the skate. It fits tightly to the roof roof and avoids rattling with strong wind.
The backstage between the planks is 100 mm, and if necessary, the planks are cut. The planka must definitely close the top crest of the wave so that water does not enter the room. Sometimes, to achieve this goal it is necessary to bend up the edge of the sheet metal tile. It is possible to put it correctly. It will be possible only if the fence was performed correctly.
Advantages in use
Wind bar performs many useful protective features. In addition to protective functions, wind Planck gives the aesthetics and beauty of any roof. Thanks to her, the roof of the roof becomes more attractive and a pleasant view is created.
Since it protects against precipitation and strong winds, it closes the slit, which means it is attached to the end of the metal roof. Thanks to its lavetling over the roof, it protects and increases the life of wooden end boards.
IN lately Windscrew is used with siding and sofit, which allows you to give an unusual and exclusive view of the sink of the roof.
Unusual types of planks
 During the installation of the wind strip in elite country houses Or cottages use an unusual view of this element.
For emphasising individuality, an end plank is purchased with a wood thread. When there is no possibility to embody this idea, then several planks are put on the usual board, which are located one above the other.
From the side it looks like the roof of the roof is made in the traditions of Russian wooden architecture. So like a clipping on a tree of complex ornaments is a heavy and painstaking work, the price of such an unusual end bar will be an order of magnitude more than the rest.
Due to the fact that high-quality wood remains less and less, recently the complex ornament is applied to moisture-resistant fane, which is not exposed to external environmental impacts.
Recently, the end planks are manufactured not only from wood or plywood, but also from and matte acrylic, from MDF, CSP and OSB plates. In some cases, the bar is made from artificial stone and glued array of wood.
- Description, Advantages and Disadvantages
- Purpose of end elements
- Preparatory work before installation
- Facility installation work
One of the important details in the roof is the face plank for metal tile. Currently, metal tile is an undisputed market leader roofing materials. However, for normal operation of the roof, the installation of a large number of small parts is necessary. The mechanical bar for metal tile allows the roof from the stains of the wind and falling down from below and gives the finished type of roof.
It is important to establish such strips throughout the perimeter of the roof according to the rules of their installation.
After all, protecting the roof from placing stuffing, they significantly extend the life of the roof, because the presence of moisture in the underfloor space significantly accelerates the processes of rotting the rafter system and rusting metal tiles. Despite the importance of the plank, its installation is quite simple and quite feasible with their own hands. A description of how end planks and their design and manufacturing material will be shown in this material.
Description, Advantages and Disadvantages
Since the end planks are important elements Roofs, it is worth stopping in more detail on its description. It is worth starting with the fact that such an element takes an insignificant area and is installed from the ends of the rod metal tapes (as it is clear from the title), while they perform important protective function of the roof, not allowing damage to the roofing coating and the heat-insulating "cake".
Such elements are often manufactured in the same way as the metal tile itself, according to the same technology.
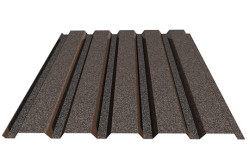
Metal photographs from rolled steel has a galvanized coating with a thickness of at least 0.5 mm.
As the basis, metal rolls from rolled steel are used. It has a protective galvanized coating, the thickness of the sheet used should be at least 0.5 mm. The polymer protective coating should be applied over the sheet, as well as on the main sheets of metal tile. The most commonly produced end planks (they are also called wind) with protective coating from polyester or from plastisol. If the main sheets of metal tiles are manufactured using a composite material technology, then for such a metal tile, the use of the end plank with basalt coating is recommended (spraying in the form of crumbs).
The profile of the plank has the form of the letter "g", which is attached to the small end to the ends of the skates. At the ends of the planks usually dressed plugs. This form allows you to protect the underfloor space.
There are advantages and disadvantages of end elements. The pluses include the following:
- reduction of pressure (wind load) on the roof, which will not allow to cut the coating;
- does not allow moisture to enter the undercase;
- the strength of the material and the planks in general;
- the design provides protection not only coating, but also a rafter system.
The disadvantages include:
- the need for complex preparatory work;
- the installation process is though simple, but quite laborious, which significantly increases the operating time;
- it is necessary to strictly follow the safety instructions, since it is inconvenient to work with ends of the skates and is dangerous.
After describing the design and material of end slats, it is worth going to consider their assignment (to obtain a complete view of this element).
Back to the category
Purpose of end elements
The end slats, as mentioned above, are longitudinal elements of roofing (metal tiles), the main function of which is to protect the bars of the rafter system and the shunting boards from the wet under atmospheric precipitation and wind.
As a result, water and moisture does not get into the undercase and the attic room.
Fastening the plank is carried out to the side ends of the roofing rods in the same way farmery Plank. (These planks are very similar both in shape and for the purpose, the difference lies only at the fastening site). In this case, the ears of the ends of the skates occurs. After overlapping the end, such a bar makes it inaccessible to getting water and moisture to the crate, slinge systemThermal layers, significantly reduces the wind load on metal tile. It is the protection of the roof from breaking with strong wind and allowed the "people" to name the end plank of the wind.
Back to the category
Preparatory work before installation
Before starting the installation of end slats, it is worth producing some preparatory work. To mount the bar, it is necessary that the rafter system is assembled and secured.
Next, heat-insulating and moisture insulating layers should be installed on the rafter system (the so-called insulating cake). It is assembled as follows: the ceaseplate is fixed with a vapor barrier film, the insulation sheets are stacked in the cells, then the insulation closes the membrane.
After the insulating cake is ready, feed the crate. At the same time, it is important to fill the front boards on the ends of the skates. It is the end planks that are attached. It is worth noting that all wooden parts must be previously processed by protective fluids: anti-grapple (antiseptic), "aquastop", primer, after processing they must dry. An important point is that the front boards must be even. Mounting front boards can be either using nails (from galvanized or stainless steel), or with the help of self-samples. The latter option is more preferable because it provides greater strength. At the same time, the length of the self-samples should be at least 1/3 more than the total thickness of the frontal board, rafters and crates.
Some wizards for fastening front boards provide special grooves in rafters. This is not a mistake, moreover, significantly increases the strength of the attachment. Sometimes to enhance the design, in addition to already mounted frontal boards, additional ending boards are mounted, which are fixed on top of the crate.
After mounting, the front boards produce a trunk. To do this, any material can be used, such as boards, timber, plastic panels, bricks, etc. It is recommended to strengthen the entire design of the installation of supporting bars.
It should also be noted that the front boards should not be for the ends of the skates. Next produce styling metal tile on the roof.
The end planka for the roof is performed in two versions. For flexible tile And for metal tile. It is very important to know that the face plank for a soft roof is installed during the installation of the roof and for metal tile, after.
Wind (end) bar performs 2 tasks:
It does not allow moisture and drops of rain to fall into the space under the roof, the result is fully tightness of the coating.
It reliably fastens the edges of the roof, not allowing wind gusts to raise the edges of the roofing coating
Master Listogib Manages end planks of any complexity and configuration. Production time of the product from 10 minutes.
To calculate the price of the factories of the end. Plans, contact our manager, use or
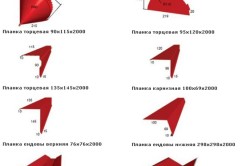
Characteristics of the end plank
Facing plank for metal tile: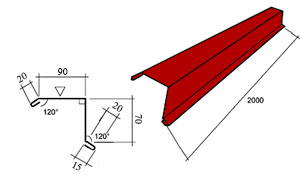
The end plan for metal tile is installed on the sides of the soles, after installing the roof. Standard dimensions:
Long - 2m
Working length - 1.9m
Upper shelf (standard) - 90mm (must correspond to the wavelength of the roof)
Svet (standard) - 70mm (must close the front board)
Films - 20mm (on both sides)
Rube ribs - 15mm (on both sides)
Face plank for a soft roof:
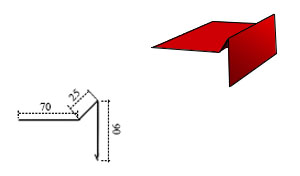
The face plank for a soft roof is installed on the sides of the soles, during the installation of the roof. Standard dimensions:
Long - 2m
Working length - 1.9m
Top Shelf (Standard) - 70mm (must enter under roofing not less than 50mm)
Barrier Height: 25mm
Svet (standard) - 90mm (must close the windshield)
Ribbiness on the rigging - 15mm
Installation of the end plank
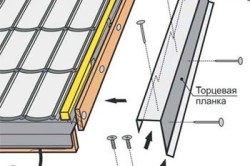
Installation Facial Plank for Metal Tile:
To install you need:
Roofing screws in color
Screwdriver with a nozzle at 8mm
The installation of the end plank is starting to bottom of the roof, moving to the skate. First of all, attach one side of the end slap tightly to the roof, and the second press to the frontal board. The convincing is that the shelf of the plank, completely overlaps the first upper wave, and the castler enters the bottom. Also check that the ot of the end slap completely closes the frontal board. If all the parameters are observed, fasten the rods to the frontal board, and the shelf to the metal tile (important: when installing the plank, the shelf should be fixed in such a way that the screws are included in the top wave of metal tile). High interrupted by self-tapping should be no more than 30 cm. Planks use scissors for metal. In no case do not use the grinder or metal cutting machines for these purposes, they strongly heat the product thereby damaging the coating. Each subsequent end plank is attached to the previous one in the back of at least 10 cm. Svet the end plank is closed with a plug, and the top is driving under the horse. The places of contact with the end plank with the roof is isolated by the extensive ribbon itself. It prevents dust and insects in the roofing space.
Installation Facing Plank for Soft Roof:
Installation of the end plank is very simple, the main thing is to comply with the rules of installation of the roof and challenges on water.
To install you need:
Roofing nails or self-tapping screws.
Hammer or screwdriver with a pH2 nozzle
Bridge roofing resinobitum
Installation of the end plank for a soft roof is made during the installation of the roofing coating. Installing the end plank starts the roof from the bottom, moving to the skate. Facial planka for flexible roof It is fixed on top of a lining carpet with self-draws or roofing nails in two rows with a step of no more than 120-150mm. Use scissors for metal to cut the bar. In no case do not use the grinder or metal cutting machines for these purposes, they strongly heat the product thereby damaging the coating. Each subsequent end plank is attached to the previous one in the back of at least 10 cm. After installing the end plank, the bituminous bridge is applied to the entire length of the shelf, which is stacked soft roof.


